1、模型下载魔搭社区
2、运行环境:
1、硬件
RTX 3090*1 云主机[普通性能]
8核15G 200G
免费 32 Mbps+付费68Mbps
ubuntu22.04
cuda12.4
2、软件:
flash_attn(好像不用装 忘记了)
numpy
Pillow==10.3.0
Requests==2.31.0
transformers==4.43.0
accelerate==0.30.0
torch==2.5.0(自己去下载另一个库)modelscope==1.25.0
(base) root@ubuntu22:/opt# nvcc -V
nvcc: NVIDIA (R) Cuda compiler driver
Copyright (c) 2005-2024 NVIDIA Corporation
Built on Tue_Feb_27_16:19:38_PST_2024
Cuda compilation tools, release 12.4, V12.4.99
Build cuda_12.4.r12.4/compiler.33961263_0
3、运行代码如下
import math
import numpy as np
import torch
import torchvision.transforms as T
from decord import VideoReader, cpu
from PIL import Image
from torchvision.transforms.functional import InterpolationMode
from modelscope import AutoModel, AutoTokenizer
from transformers import AutoConfig
import os
import time
IMAGENET_MEAN = (0.485, 0.456, 0.406)
IMAGENET_STD = (0.229, 0.224, 0.225)
def build_transform(input_size):
MEAN, STD = IMAGENET_MEAN, IMAGENET_STD
transform = T.Compose([
T.Lambda(lambda img: img.convert('RGB') if img.mode != 'RGB' else img),
T.Resize((input_size, input_size), interpolation=InterpolationMode.BICUBIC),
T.ToTensor(),
T.Normalize(mean=MEAN, std=STD)
])
return transform
def find_closest_aspect_ratio(aspect_ratio, target_ratios, width, height, image_size):
best_ratio_diff = float('inf')
best_ratio = (1, 1)
area = width * height
for ratio in target_ratios:
target_aspect_ratio = ratio[0] / ratio[1]
ratio_diff = abs(aspect_ratio - target_aspect_ratio)
if ratio_diff < best_ratio_diff:
best_ratio_diff = ratio_diff
best_ratio = ratio
elif ratio_diff == best_ratio_diff:
if area > 0.5 * image_size * image_size * ratio[0] * ratio[1]:
best_ratio = ratio
return best_ratio
def dynamic_preprocess(image, min_num=1, max_num=12, image_size=448, use_thumbnail=False):
orig_width, orig_height = image.size
aspect_ratio = orig_width / orig_height
# calculate the existing image aspect ratio
target_ratios = set(
(i, j) for n in range(min_num, max_num + 1) for i in range(1, n + 1) for j in range(1, n + 1) if
i * j <= max_num and i * j >= min_num)
target_ratios = sorted(target_ratios, key=lambda x: x[0] * x[1])
# find the closest aspect ratio to the target
target_aspect_ratio = find_closest_aspect_ratio(
aspect_ratio, target_ratios, orig_width, orig_height, image_size)
# calculate the target width and height
target_width = image_size * target_aspect_ratio[0]
target_height = image_size * target_aspect_ratio[1]
blocks = target_aspect_ratio[0] * target_aspect_ratio[1]
# resize the image
resized_img = image.resize((target_width, target_height))
processed_images = []
for i in range(blocks):
box = (
(i % (target_width // image_size)) * image_size,
(i // (target_width // image_size)) * image_size,
((i % (target_width // image_size)) + 1) * image_size,
((i // (target_width // image_size)) + 1) * image_size
)
# split the image
split_img = resized_img.crop(box)
processed_images.append(split_img)
assert len(processed_images) == blocks
if use_thumbnail and len(processed_images) != 1:
thumbnail_img = image.resize((image_size, image_size))
processed_images.append(thumbnail_img)
return processed_images
def load_image(image_file, input_size=448, max_num=12):
image = Image.open(image_file).convert('RGB')
transform = build_transform(input_size=input_size)
images = dynamic_preprocess(image, image_size=input_size, use_thumbnail=True, max_num=max_num)
pixel_values = [transform(image) for image in images]
pixel_values = torch.stack(pixel_values)
return pixel_values
def split_model(model_name):
device_map = {}
world_size = torch.cuda.device_count()
config = AutoConfig.from_pretrained('OpenGVLab/InternVL3-8B', trust_remote_code=True)
num_layers = config.llm_config.num_hidden_layers
# Since the first GPU will be used for ViT, treat it as half a GPU.
num_layers_per_gpu = math.ceil(num_layers / (world_size - 0.5))
num_layers_per_gpu = [num_layers_per_gpu] * world_size
num_layers_per_gpu[0] = math.ceil(num_layers_per_gpu[0] * 0.5)
layer_cnt = 0
for i, num_layer in enumerate(num_layers_per_gpu):
for j in range(num_layer):
device_map[f'language_model.model.layers.{layer_cnt}'] = i
layer_cnt += 1
device_map['vision_model'] = 0
device_map['mlp1'] = 0
device_map['language_model.model.tok_embeddings'] = 0
device_map['language_model.model.embed_tokens'] = 0
device_map['language_model.output'] = 0
device_map['language_model.model.norm'] = 0
device_map['language_model.model.rotary_emb'] = 0
device_map['language_model.lm_head'] = 0
device_map[f'language_model.model.layers.{num_layers - 1}'] = 0
return device_map
# If you set `load_in_8bit=True`, you will need two 80GB GPUs.
# If you set `load_in_8bit=False`, you will need at least three 80GB GPUs.
path = 'OpenGVLab/InternVL3-8B'
device_map = split_model('InternVL3-8B')
model = AutoModel.from_pretrained(
path,
torch_dtype=torch.bfloat16,
load_in_8bit=False,
low_cpu_mem_usage=True,
use_flash_attn=True,
trust_remote_code=True,
device_map=device_map).eval()
tokenizer = AutoTokenizer.from_pretrained(path, trust_remote_code=True, use_fast=False)
while True:
image_path = input("请输入图片路径(输入 'q' 退出):")
if image_path.lower() == 'q':
break
if not os.path.exists(image_path):
print("图片不存在,跳过本次问答。")
continue
question = input("请输入问题:")
start_time = time.time()
# set the max number of tiles in `max_num`
pixel_values = load_image(image_path, max_num=12).to(torch.bfloat16).cuda()
generation_config = dict(max_new_tokens=1024, do_sample=True)
# single-image single-round conversation (单图单轮对话)
question = f'<image>\n{question}'
response = model.chat(tokenizer, pixel_values, question, generation_config)
end_time = time.time()
execution_time = end_time - start_time
print(f'User: {question}\nAssistant: {response}')
print(f'本次代码执行时间: {execution_time:.2f} 秒')
# 释放单次资源缓存
del pixel_values
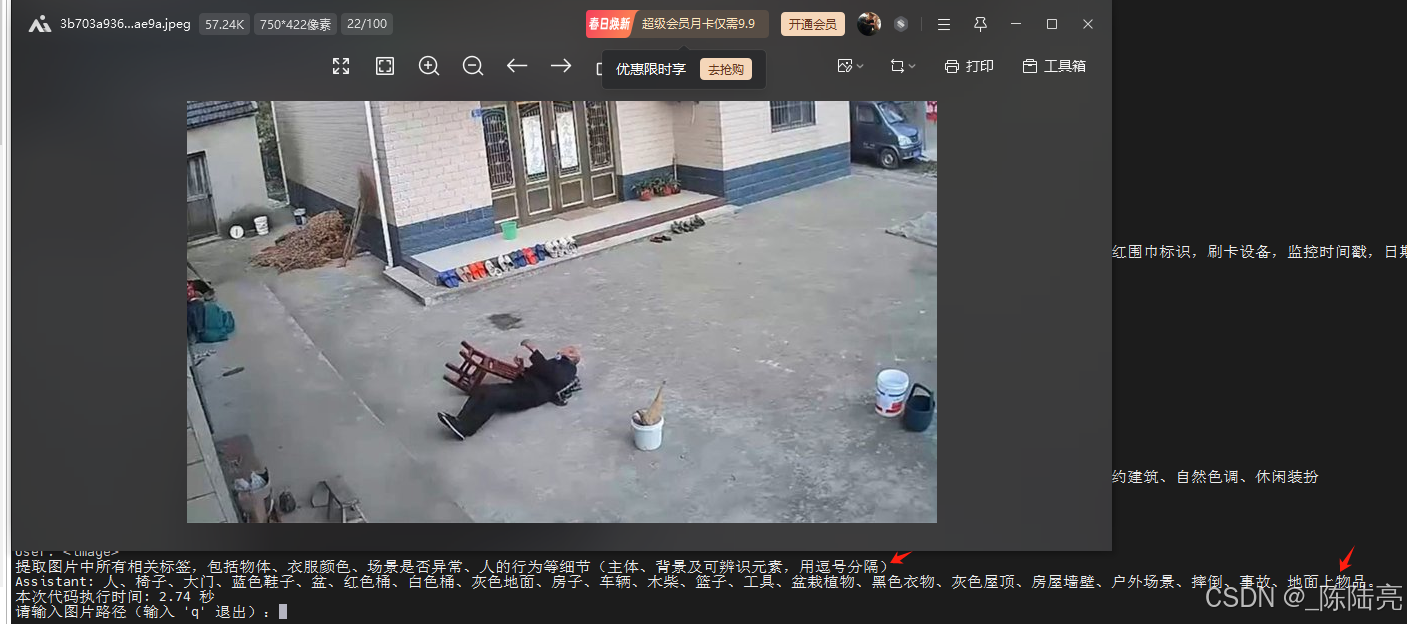
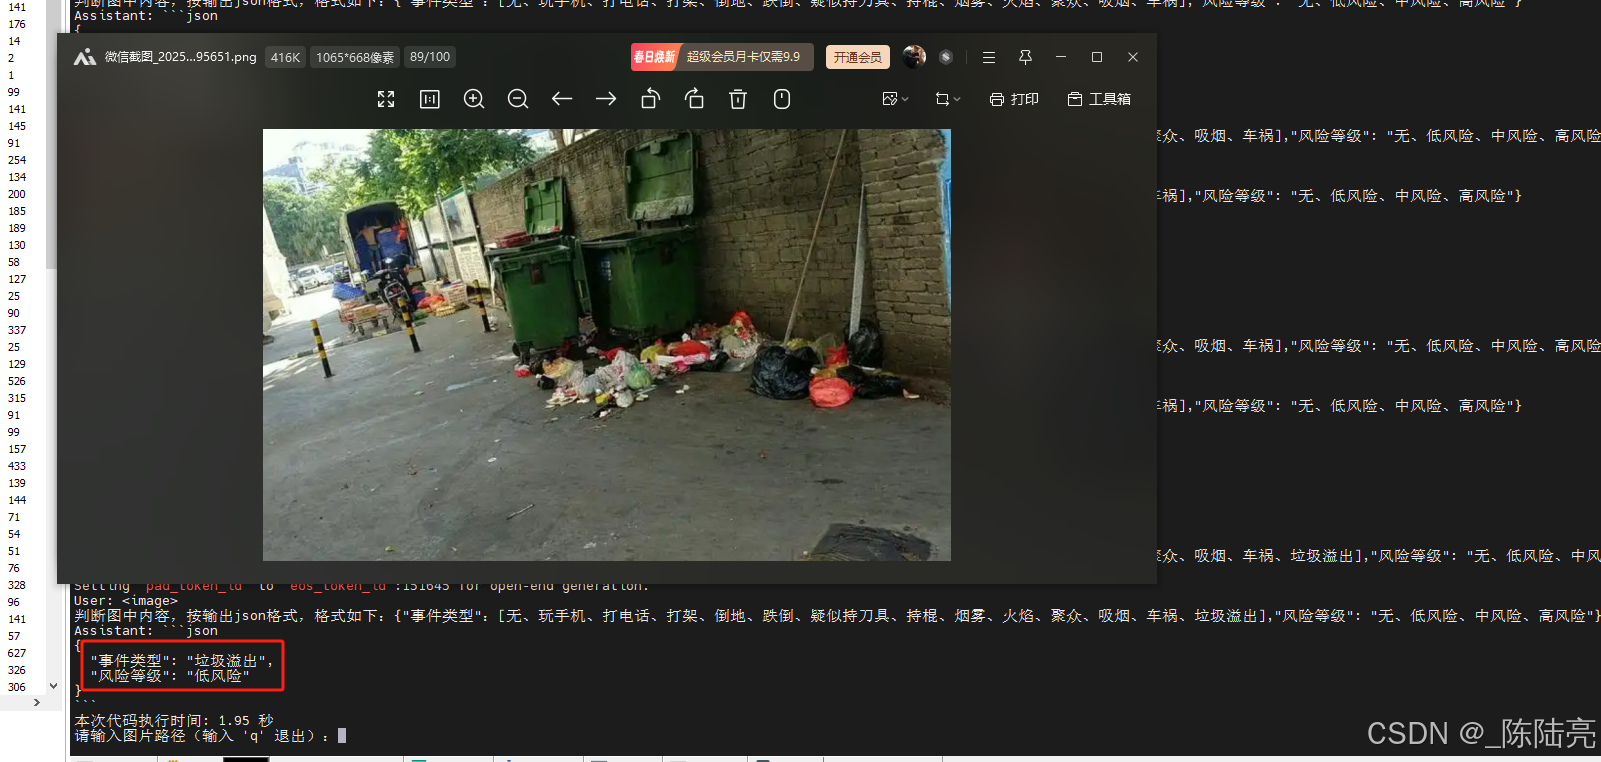
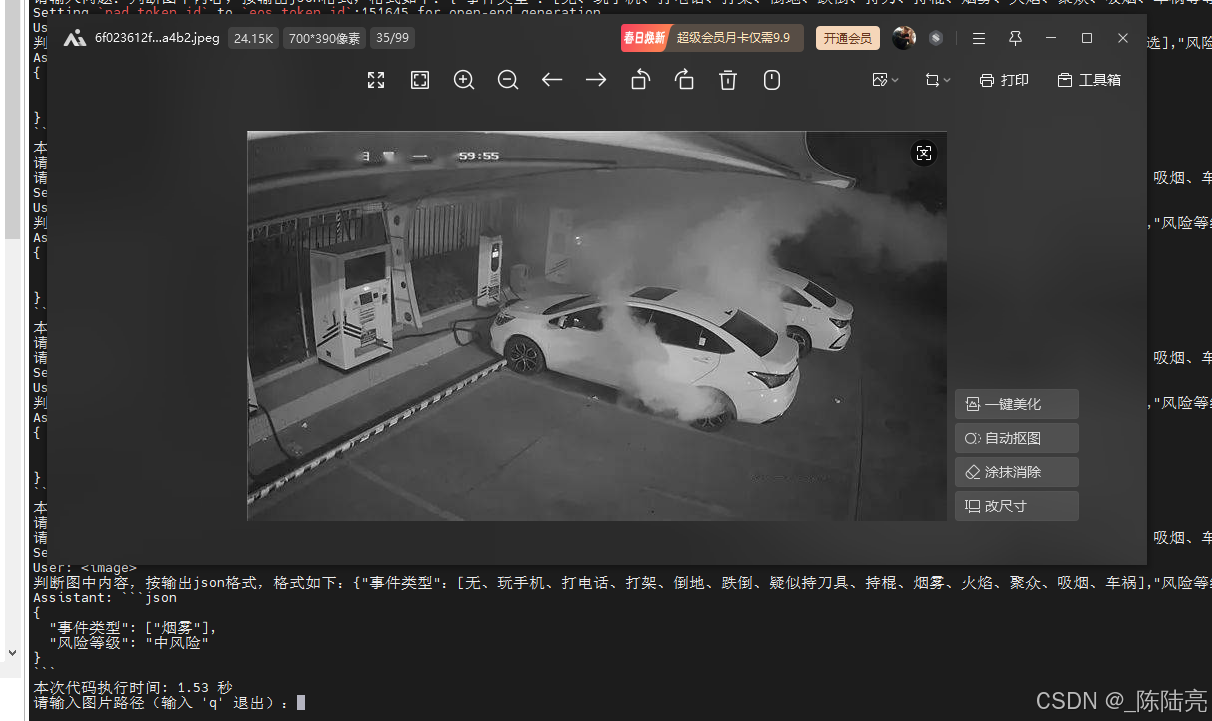
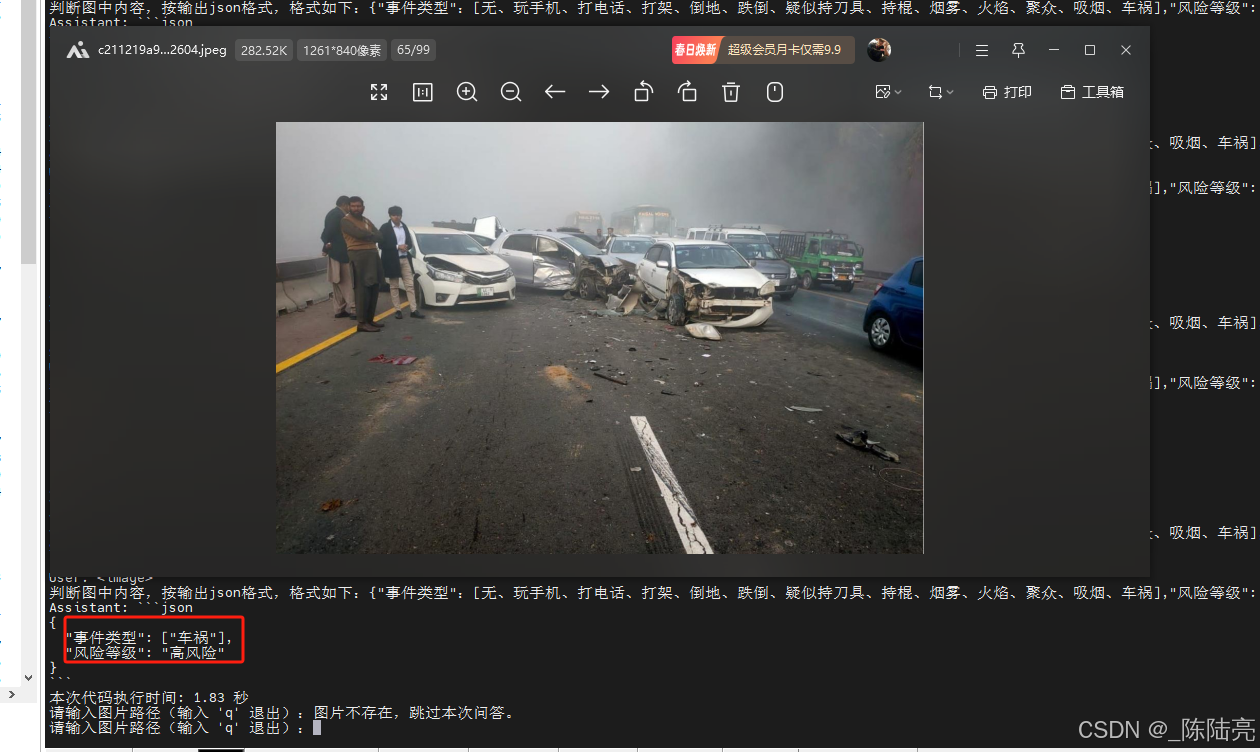
torch.cuda.empty_cache() 4、测试效果:
问题和耗时如图
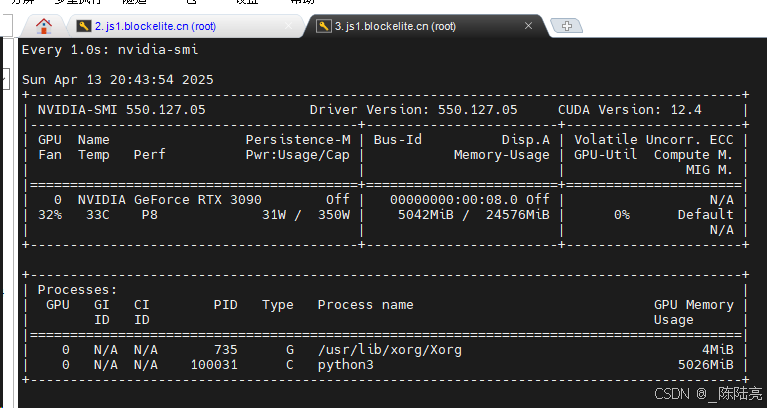
5、资源占用
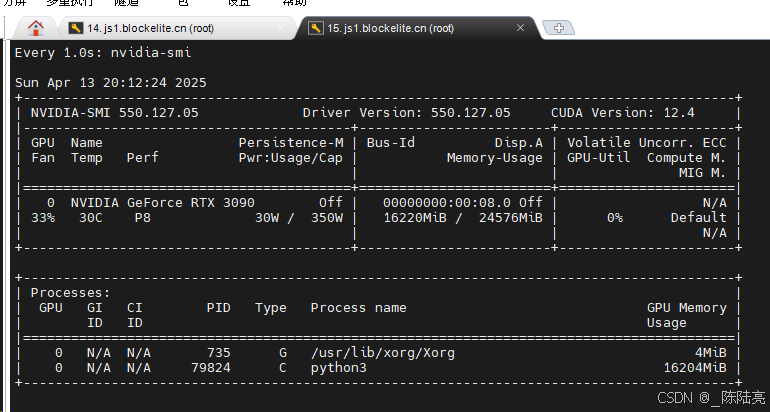
不释放资源会一直涨显存。总体还算满意,我试了好多个图理解大模型,就属它牛一点
附图一张

补充,测试InternVL3-2B的结果