在整个图像处理的学习过程中可以看到,在很多应用中图像强度的变化情况是非常重要的信息。强度的变化可以用灰度图像I(对于彩色图像,通常对每个颜色通道分别计算导数)的x和y的方向导数和进行描述。
图像的梯度向量为:
梯度有两个重要的属性,一个是梯度的大小:

它描述了图像变化的强弱,一是梯度的角度:

它描述了图像中在每个点(像素)上强度变化最大的方向。NumPy中的arctan2()函数返回弧度表示的有符号角度,角度的变化区间为。
我们可以用离散近似的方式来计算图像的导数。图像的导数大多可以通过卷积简单地实现:

通常选择Prewitt滤波器:
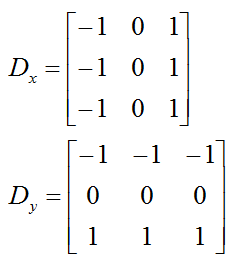
Prewitt边缘算子是一种边缘样板算子,利用像素点上下,左右邻点灰度差,在边缘处达到极值检测边缘,对噪声具有平滑作用
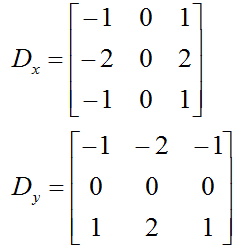
使用Sobel滤波器,Sobel算法是一种较成熟的微分边缘检测算法,它计算简单,且能产生较好的检测效果,对噪声具有平滑作用,可以提供较为精确的边缘方向信息。
import cv2
from matplotlib import pyplot as plt
img = cv2.imread('img2.png', 0) # 后面参数为0表示取灰度图
img1 = cv2.cvtColor(img, cv2.COLOR_BGR2RGB)
sobelx = cv2.Sobel(img,cv2.CV_64F,1,0,ksize=3)#默认ksize=3
sobely = cv2.Sobel(img,cv2.CV_64F,0,1)
gm = cv2.sqrt(sobelx ** 2 + sobely ** 2)
plt.subplot(121),plt.imshow(img)
plt.subplot(122),plt.imshow(gm)
plt.show()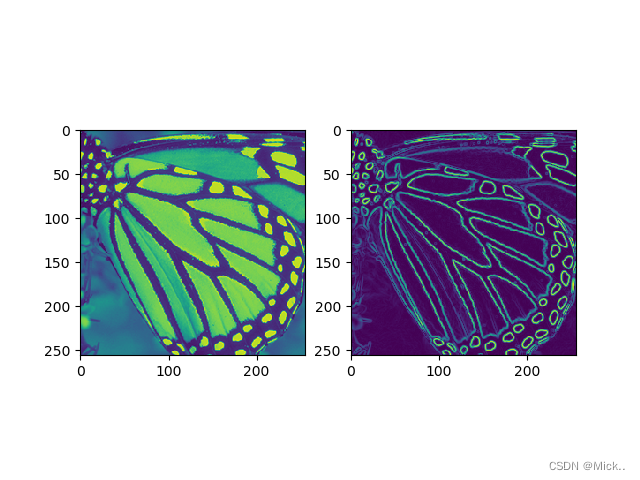
梯度图像
from skimage import data,color,filters
import  matplotlib.pyplot as plt
import numpy as np
original_img=data.chelsea()
gray_img=color.rgb2gray(original_img)

'''
#using system function
edge_img=filters.sobel(gray_img)
figure=plt.figure()
plt.subplot(131).set_title('original_img')
plt.imshow(original_img)
plt.subplot(132).set_title('gray_img')
plt.imshow(gray_img)
plt.subplot(133).set_title('sobel_img')
plt.imshow(edge_img)
plt.show()
'''

#self code
x_sobel=np.array([[-1,0,1],
                    [-2,0,2],
                    [-1,0,1]])
y_sobel=np.array([[-1,-2,-1],
                    [0,0,0],
                    [1,2,1]])
h,w=gray_img.shape
img=np.zeros([h+2,w+2])
img[2:h+2,2:w+2]=gray_img[0:h,0:w]
def sobel_cal(img,filter):
    h,w=img.shape
    img_filter=np.zeros([h,w])
    for i in range(h-2):
        for j in range(w-2):
            img_filter[i][j]=img[i][j]*filter[0][0]+img[i][j+1]*filter[0][1]+img[i][j+2]*filter[0][2]+\
                    img[i+1][j]*filter[1][0]+img[i+1][j+1]*filter[1][1]+img[i+1][j+2]*filter[1][2]+\
                    img[i+2][j]*filter[2][0]+img[i+2][j+1]*filter[2][1]+img[i+2][j+2]*filter[2][2]
    return img_filter

x_edge_img=sobel_cal(img,x_sobel)
y_edge_img=sobel_cal(img,y_sobel)
edge_img=np.zeros([h,w])
for i in range(h):
    for j in range(w):
      edge_img[i][j]=np.sqrt(x_edge_img[i][j]**2+y_edge_img[i][j]**2)/(np.sqrt(2))
plt.figure('imgs')
plt.subplot(321).set_title('original_img')
plt.imshow(original_img)
plt.subplot(322).set_title('gray_img')
plt.imshow(gray_img)
plt.subplot(323).set_title('x_edge_img')
plt.imshow(x_edge_img)
plt.subplot(324).set_title('y_edge_img')
plt.imshow(y_edge_img)
plt.subplot(325).set_title('edge_img')
plt.imshow(edge_img)

plt.show()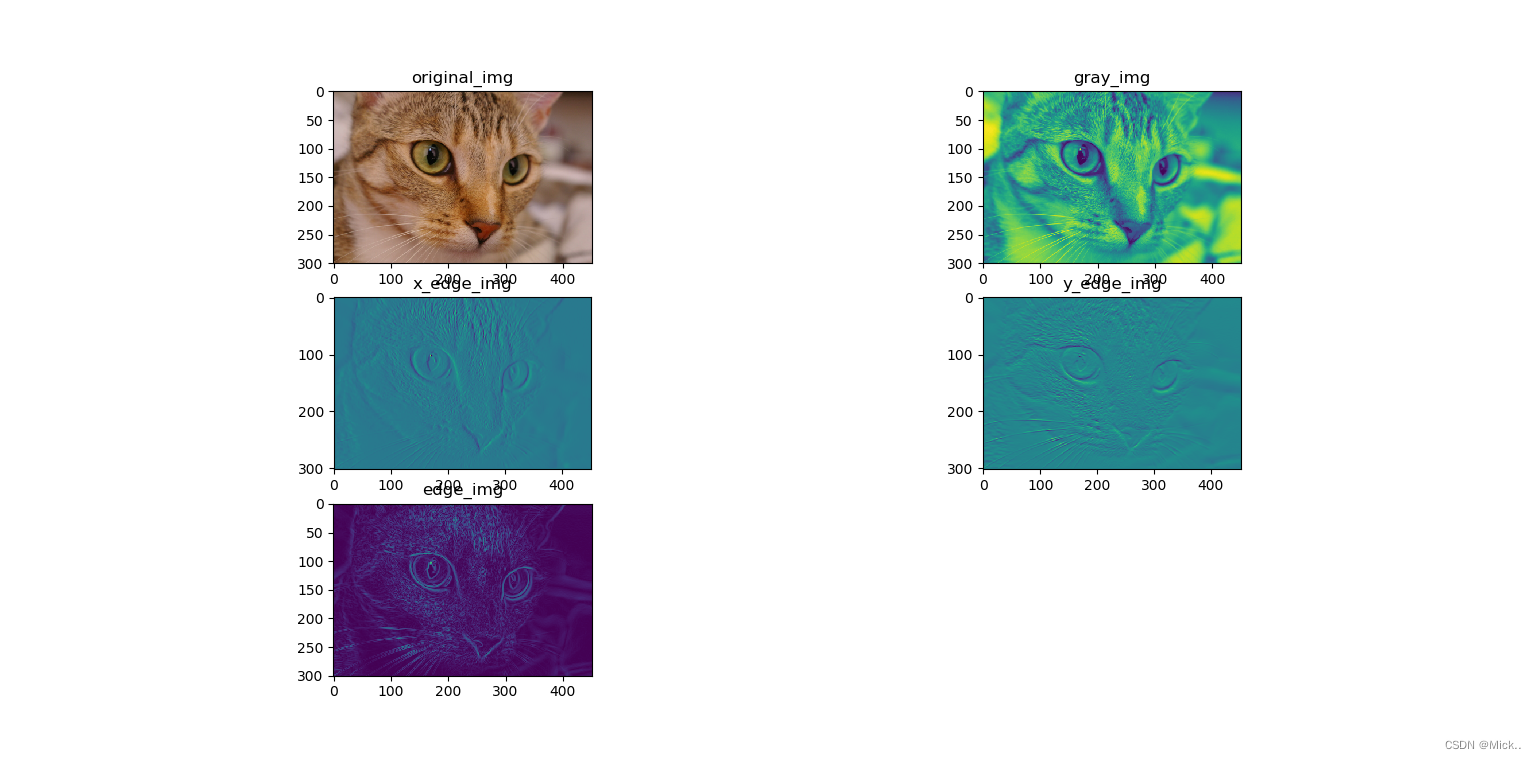
角度图像
from skimage import data,color,filters
import  matplotlib.pyplot as plt
import numpy as np
original_img=data.chelsea()
gray_img=color.rgb2gray(original_img)

'''
#using system function
edge_img=filters.sobel(gray_img)
figure=plt.figure()
plt.subplot(131).set_title('original_img')
plt.imshow(original_img)
plt.subplot(132).set_title('gray_img')
plt.imshow(gray_img)
plt.subplot(133).set_title('sobel_img')
plt.imshow(edge_img)
plt.show()
'''

#self code
x_sobel=np.array([[-1,0,1],
                    [-2,0,2],
                    [-1,0,1]])
y_sobel=np.array([[-1,-2,-1],
                    [0,0,0],
                    [1,2,1]])
h,w=gray_img.shape
img=np.zeros([h+2,w+2])
img[2:h+2,2:w+2]=gray_img[0:h,0:w]
def sobel_cal(img,filter):
    h,w=img.shape
    img_filter=np.zeros([h,w])
    for i in range(h-2):
        for j in range(w-2):
            img_filter[i][j]=img[i][j]*filter[0][0]+img[i][j+1]*filter[0][1]+img[i][j+2]*filter[0][2]+\
                    img[i+1][j]*filter[1][0]+img[i+1][j+1]*filter[1][1]+img[i+1][j+2]*filter[1][2]+\
                    img[i+2][j]*filter[2][0]+img[i+2][j+1]*filter[2][1]+img[i+2][j+2]*filter[2][2]
    return img_filter

x_edge_img=sobel_cal(img,x_sobel)
y_edge_img=sobel_cal(img,y_sobel)
edge_img=np.zeros([h,w])
for i in range(h):
    for j in range(w):
      # edge_img[i][j]=np.sqrt(x_edge_img[i][j]**2+y_edge_img[i][j]**2)/(np.sqrt(2))
        edge_img[i][j]=np.arctan2(x_edge_img[i][j],y_edge_img[i][j])
plt.figure('imgs')
plt.subplot(321).set_title('original_img')
plt.imshow(original_img)
plt.subplot(322).set_title('gray_img')
plt.imshow(gray_img)
plt.subplot(323).set_title('x_edge_img')
plt.imshow(x_edge_img)
plt.subplot(324).set_title('y_edge_img')
plt.imshow(y_edge_img)
plt.subplot(325).set_title('edge_img')
plt.imshow(edge_img)

plt.show() 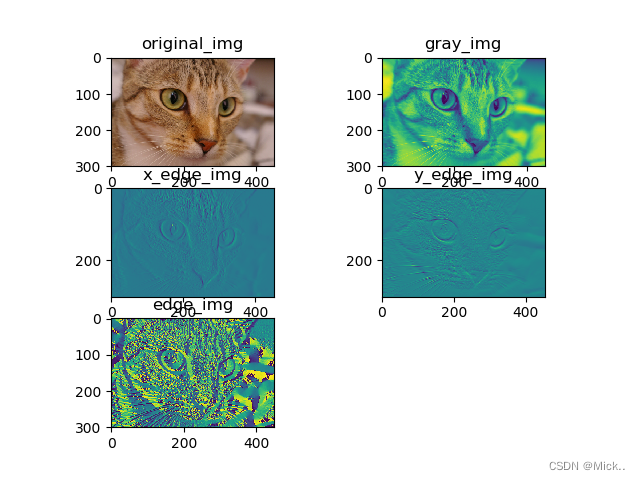
import matplotlib.pyplot as plt

from skimage.io import imread

import numpy as np

import cv2

"""
1.清晰图像和模糊图像之间的梯度分布不同,清晰图像的梯度有明显的重尾分布,而模糊图像不存在这种梯度分布;
2.对清晰图像进行高斯模糊;
3.使用opencv进行计算梯度,包括幅度梯度和角度梯度;
4.绘制图像的梯度直方图;
5.并计算两张图像之间的梯度差,并绘制差值的直方图
"""
img = imread('img1.png')

# img = np.float32(img)/255.

img_blur = cv2.GaussianBlur(img, (15, 15), 0)

# img_blur = np.float32(img_blur)/255.

# 清晰图像的x,y方向的一阶导(梯度)

gx_ord = cv2.Sobel(img, cv2.CV_32F, 1, 0, ksize=1)

gy_ord = cv2.Sobel(img, cv2.CV_32F, 0, 1, ksize=1)

# 模糊图像的x,y方向的一阶导

gx_blur = cv2.Sobel(img_blur, cv2.CV_32F, 1, 0, ksize=1)

gy_blur = cv2.Sobel(img_blur, cv2.CV_32F, 0, 1, ksize=1)

# Calculate gradient magnitude and direction ( in degrees )

# cv2.cartToPolar这个函数计算二维向量(x,y)的幅度梯度和角度梯度

mag_ord, angle_ord = cv2.cartToPolar(gx_ord, gy_ord, angleInDegrees=True)

mag_blur, angle_blur = cv2.cartToPolar(gx_blur, gy_blur, angleInDegrees=True)

# bins_ord = angle_ord.max - angle_ord.min

# bins_blur = angle_blur.max - angle_blur.min

bins = np.arange(256) # np.histogram的默认bins值为10

hist_ord_mag, bins = np.histogram(mag_ord, bins)

hist_blur_mag, bins = np.histogram(mag_blur, bins)

hist_ord_angle, bins = np.histogram(angle_ord, bins)

hist_blur_angle, bins = np.histogram(angle_blur, bins)

# 计算清晰图像和模糊图像之间的幅度和角度的梯度差

mag_diff = mag_ord - mag_blur

angle_diff = angle_ord - angle_blur

hist_mag_diff, bins = np.histogram(mag_diff, bins)

hist_angle_diff, bins = np.histogram(angle_diff, bins)

width = 0.7 * (bins[1] - bins[0])

center = (bins[:-1] + bins[1:]) / 2

plt.subplot(331), plt.imshow(img), plt.title('ordinary')

plt.subplot(332), plt.imshow(img_blur), plt.title('blur')

plt.subplot(337), plt.title('ord_angle'), plt.bar(center, hist_ord_angle, align='center', width=width)

plt.subplot(338), plt.title('blur_angle'), plt.bar(center, hist_blur_angle, align='center', width=width)

plt.subplot(334), plt.title('ord_mag'), plt.bar(center, hist_ord_mag, align='center', width=width)

plt.subplot(335), plt.title('blur_mag'), plt.bar(center, hist_blur_mag, align='center', width=width)

plt.subplot(336), plt.title('mag_diff'), plt.bar(center, hist_mag_diff, align='center', width=width)

plt.subplot(339), plt.title('angel_diff'), plt.bar(center, hist_angle_diff, align='center', width=width)

plt.show()
参考文献
边缘检测算法总结及其python实现--一阶检测算子_RF-or的博客-CSDN博客_边缘算法python
【视觉入门】——空域图像增强(邻域运算部分):图像卷积、多种滤波器;二值图像分析及形态学图像处理_Vulcan_Q的博客-CSDN博客
![[datawhale202211]跨模态神经搜索实践:前端简介 Streamlit](https://img-blog.csdnimg.cn/616b18f61a3149b2bd541f5b00c48bfb.png)
![[python]basemap后安装后hello world代码](https://img-blog.csdnimg.cn/c5f2b969eb034153b300e1044a2ca431.png)






![[Apollo Cyber RT] Timer实现](https://img-blog.csdnimg.cn/e38e5bbff45d4bc3b313c029f0569d5b.png)

