目录
一、Harbor 介绍
二、Harbor 的优势
三、Harbor 部署安装
3.1 部署环境
3.2 为 Harbor 自签发证书
3.3 安装 Harbor
3.4 设置开机自启
四、Harbor 图像化界面使用说明
4.1 修改本地 hosts 文件
4.2 访问 harbor
4.3 创建项目
五、测试使用 harbor 私有镜像仓库
5.1 修改 docker 配置
5.2 登录 harbor
5.3 上传镜像到 harbor
5.4 从 harbor 仓库下载镜像
一、Harbor 介绍
Docker容器应用的开发和运行离不开可靠的镜像管理,虽然Docker官方也提供了公共的镜像仓库,但是从安全和效率等方面考虑,部署我们私有环境内的Registry也是非常必要的。Harbor是由VMware公司开源的企业级的Docker Registry管理项目,它包括权限管理(RBAC)、LDAP、日志审核、管理界面、自我注册、镜像复制和中文支持等功能。
Harbor 官网:Harbor
二、Harbor 的优势
- 基于角色的访问控制:用户与 Docker 镜像仓库通过“项目”进行项目管理,可以对不同的账户设置不同的权限,以实现权限的精细管控。
- 镜像复制:镜像可以在多个 Registry 实例中复制(同步),可以实现高性能、高可用的镜像服务。
- 图形化用户界面:用户可以通过浏览器来浏览,管理当前 Docker 镜像仓库,管理项目和镜像等。
- AD/LDAP 支:Harbor 可以集成企业内部已有的 AD/LDAP,用于鉴权认证管理。
- 审计管理:所有针对镜像仓库的操作都可以被记录追溯,用于审计管理。
- 国际化:已拥有英文、中文、德文、日文和俄文等多语言支持版本。
- RESTful API:提供给管理员对于 Harbor 更多的操控, 使得与其它管理软件集成变得更容易。
- 部署简单:提供在线和离线两种安装工具, 也可以安装到 vSphere 平台(OVA 方式)虚拟设备。
三、Harbor 部署安装
Harbor 官方安装文档:Harbor docs | Harbor Installation and Configuration
3.1 部署环境
Harbor 安装之前需要先安装 Docker engine,Docker Compose,Openssl;Harbor 启动默认是占用80端口(如果是 HTTP Schema,在生产环境还是最好使用 HTTPS),当然这个可以在后面的配置文件中更改。
Docker Compose 安装步骤查看这篇文章:【云原生 | Docker 高级篇】07、Docker compose 容器编排_Stars.Sky的博客-CSDN博客
系统环境初始化:CentOS 7 初始化系统_centos7初始化_Stars.Sky的博客-CSDN博客
3.2 为 Harbor 自签发证书
[root@harbor ~]# mkdir /harbor/ssl -p
[root@harbor ~]# cd /harbor/ssl/

# 生成 ca 证书
# 生成一个 3072 位的 key,也就是私钥
[root@harbor ssl]# openssl genrsa -out ca.key 3072

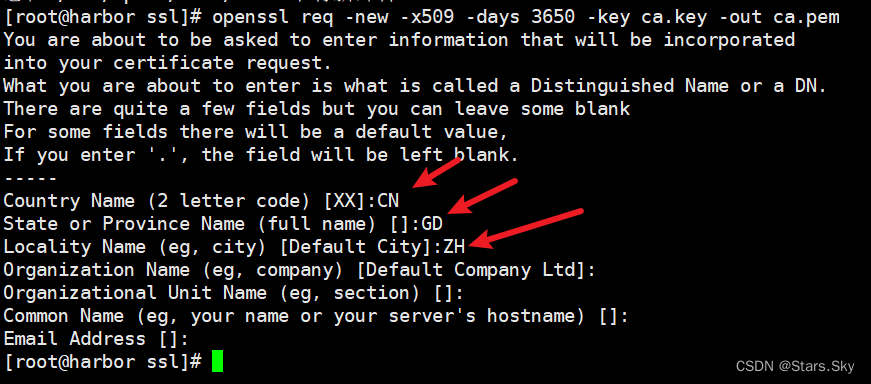
[root@harbor ssl]# openssl req -new -x509 -days 3650 -key ca.key -out ca.pem
生成一个数字证书 ca.pem,3650 表示证书的有效时间是 3 年,按箭头提示填写即可,没有箭头标注的为空:
# 生成域名的证书
[root@harbor ssl]# openssl genrsa -out harbor.key  3072
[root@harbor ssl]# openssl req -new -key harbor.key -out harbor.csr
生成一个证书请求,一会签发证书时需要的,标箭头的按提示填写,没有箭头标注的为空:

# 签发证书
[root@harbor ssl]# openssl x509 -req -in harbor.csr -CA ca.pem -CAkey ca.key -CAcreateserial -out harbor.pem -days 3650

[root@harbor ssl]# ls
ca.key  ca.pem  ca.srl  harbor.csr  harbor.key  harbor.pem
3.3 安装 Harbor
Harbor 安装包下载地址:Releases · goharbor/harbor · GitHub

# 把下载好的包放在此目录
[root@harbor ssl]# cd /usr/local/
[root@harbor local]# ls
bin  etc  games  go  harbor-offline-installer-v2.5.5.tgz  include  lib  lib64  libexec  sbin  share  src

[root@harbor local]# tar -zxvf harbor-offline-installer-v2.5.5.tgz
[root@harbor local]# cd harbor/
[root@harbor harbor]# cp harbor.yml.tmpl harbor.yml

# 修改配置文件
[root@harbor harbor]# vim harbor.yml
······
hostname: harbor        # 修改 hostname,跟上面签发的证书域名保持一致
······
https:                  # 协议用 https
  # https port for harbor, default is 443
  port: 443
  # The path of cert and key files for nginx
  certificate: /harbor/ssl/harbor.pem    # 修改为前面创建证书的路径
  private_key: /harbor/ssl/harbor.key
······

# 邮件和 ldap 不需要配置,在 harbor 的 web 界面可以配置,其他配置采用默认即可,修改之后保存退出。
# 注:harbor 默认的账号密码:admin/Harbor12345

# 运行安装脚本
[root@harbor harbor]# ./install.sh
看到下面内容,说明安装成功:

3.4 设置开机自启
[root@harbor harbor]# vim uprestart.sh
#!/bin/bash
cd /usr/local/harbor
docker-compose stop
docker-compose up -d

[root@harbor harbor]# chmod +x uprestart.sh

# 最后一行添加下面内容
[root@harbor harbor]# vim /etc/rc.d/rc.local
/bin/bash /usr/loacl/harbor/uprestart.sh

[root@harbor harbor]# chmod +x /etc/rc.d/rc.local
扩展:
# 停止 harbor
# 进入 Harbor 文件夹
[root@harbor harbor]# pwd
/usr/local/harbor
[root@harbor harbor]# docker-compose stop


# 重启 harbor
# 进入 Harbor 文件夹
[root@harbor harbor]# pwd
/usr/local/harbor
[root@harbor harbor]# docker-compose start
或
[root@harbor harbor]# docker-compose up -d
四、Harbor 图像化界面使用说明
4.1 修改本地 hosts 文件

在 hosts 文件下面添加如下一行,然后保存即可(注意:填写自己的 harbor 主机 ip)
192.168.78.138 harbor
# harbor 服务器也要修改
[root@harbor harbor]# cat /etc/hosts
127.0.0.1   localhost localhost.localdomain localhost4 localhost4.localdomain4
::1         localhost localhost.localdomain localhost6 localhost6.localdomain6
192.168.78.138 harbor
4.2 访问 harbor
在浏览器输入 https://harbor

账号:admin
密码:Harbor12345
输入账号密码出现如下:

所有基础镜像都会放在 library 里面,这是一个公开的镜像仓库。
4.3 创建项目
点击新建项目 -> 自定义项目名字为 test(把访问级别公开那个选中,让项目才可以被公开使用)


五、测试使用 harbor 私有镜像仓库
5.1 修改 docker 配置
# 增加一行内容 "insecure-registries": ["192.168.78.138","harbor"],表示走 http 协议,即内网访问
[root@harbor harbor]# vim /etc/docker/daemon.json
{  "registry-mirrors": ["https://hlfcd01t.mirror.aliyuncs.com","https://registry.docker-cn.com","https://docker.mirrors.ustc.edu.cn","https://dockerhub.azk8s.cn","http://hub-mirror.c.163.com"],
  "insecure-registries": ["192.168.78.138","harbor"]
}

# 使配置生效
[root@harbor harbor]# systemctl daemon-reload
[root@harbor harbor]# systemctl restart docker.service
5.2 登录 harbor
[root@harbor harbor]# docker login 192.168.78.138
Username: admin
Password:
WARNING! Your password will be stored unencrypted in /root/.docker/config.json.
Configure a credential helper to remove this warning. See
https://docs.docker.com/engine/reference/commandline/login/#credentials-store

Login Succeeded
5.3 上传镜像到 harbor
[root@harbor harbor]# docker images
REPOSITORY                      TAG       IMAGE ID       CREATED         SIZE
······
centos                          latest    5d0da3dc9764   16 months ago   231MB

# 给 centos 镜像打标签,指定 test 项目
[root@harbor harbor]# docker tag centos:latest 192.168.78.138/test/centos:v1

[root@harbor harbor]# docker images
REPOSITORY                      TAG       IMAGE ID       CREATED         SIZE
······
centos                          latest    5d0da3dc9764   16 months ago   231MB
192.168.78.138/test/centos      v1        5d0da3dc9764   16 months ago   231MB

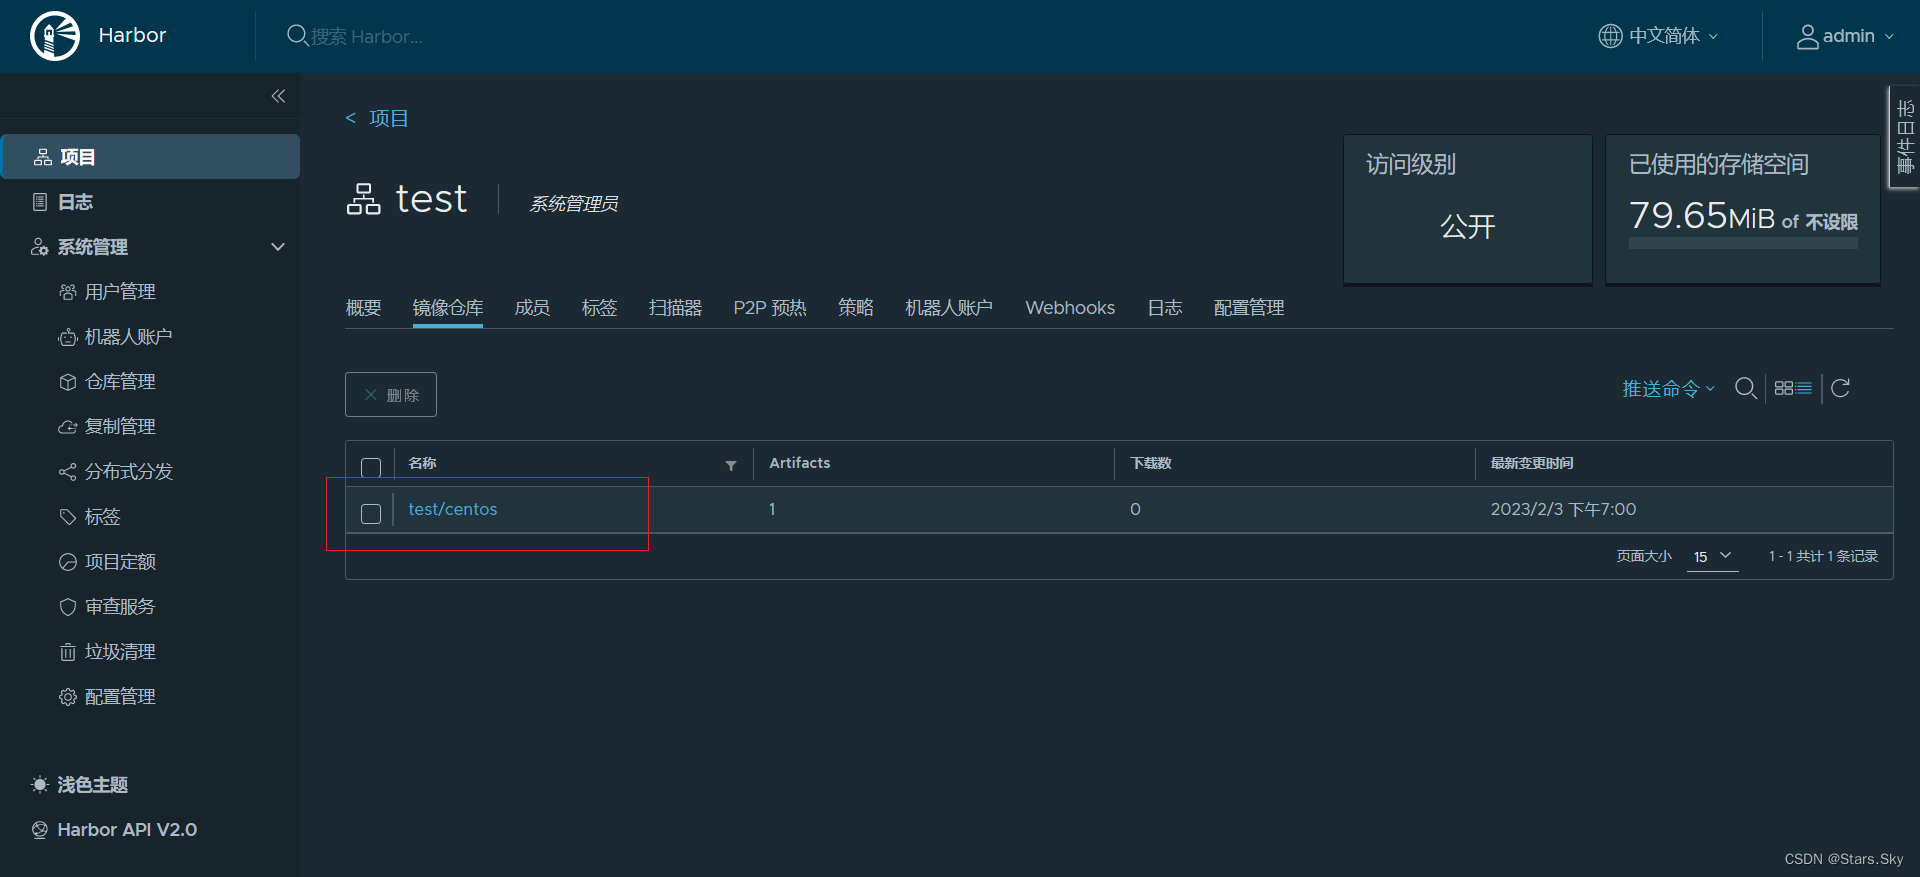
# 上传镜像到 harbor 里的 test 项目下
[root@harbor harbor]# docker push 192.168.78.138/test/centos:v1
5.4 从 harbor 仓库下载镜像
# 先本地删除镜像
[root@harbor harbor]# docker rmi -f 192.168.78.138/test/centos:v1
[root@harbor harbor]# docker images
REPOSITORY                      TAG       IMAGE ID       CREATED         SIZE
······
centos                          latest    5d0da3dc9764   16 months ago   231MB

# 下载镜像
[root@harbor harbor]# docker pull 192.168.78.138/test/centos:v1
[root@harbor harbor]# docker images
REPOSITORY                      TAG       IMAGE ID       CREATED         SIZE
·····
192.168.78.138/test/centos      v1        5d0da3dc9764   16 months ago   231MB
centos                          latest    5d0da3dc9764   16 months ago   231MB
上一篇文章:【云原生 | Docker 高级篇】10、Docker 资源配额_Stars.Sky的博客-CSDN博客_docker容器默认分配多少内存

