为什么要分析DefaultAttributeMap和AttributeKey呢?我自己对Netty也是一个不断的学习过程,从前面几篇Netty分析的博客中,可以看出,Netty是比较博大精深的,很像java.util.concurrent.*包中的源码,如果只是看主体流程,就会觉得Netty不就是一个接收数据,并将数据封装到业务端代码,业务端处理完代码后,再将数据封装返回给客户端不? 主体代码固然不错,但这些细节代码也值得我们学习,正是因为这些细节处理得足够好,我觉得Netty的高性能,离不开这些细节代码的支持。因此今天要分析一下DefaultAttributeMap及AttributeKey的实现原理。
在分析Netty 服务端源码中遇到一个代码块,请看下图。
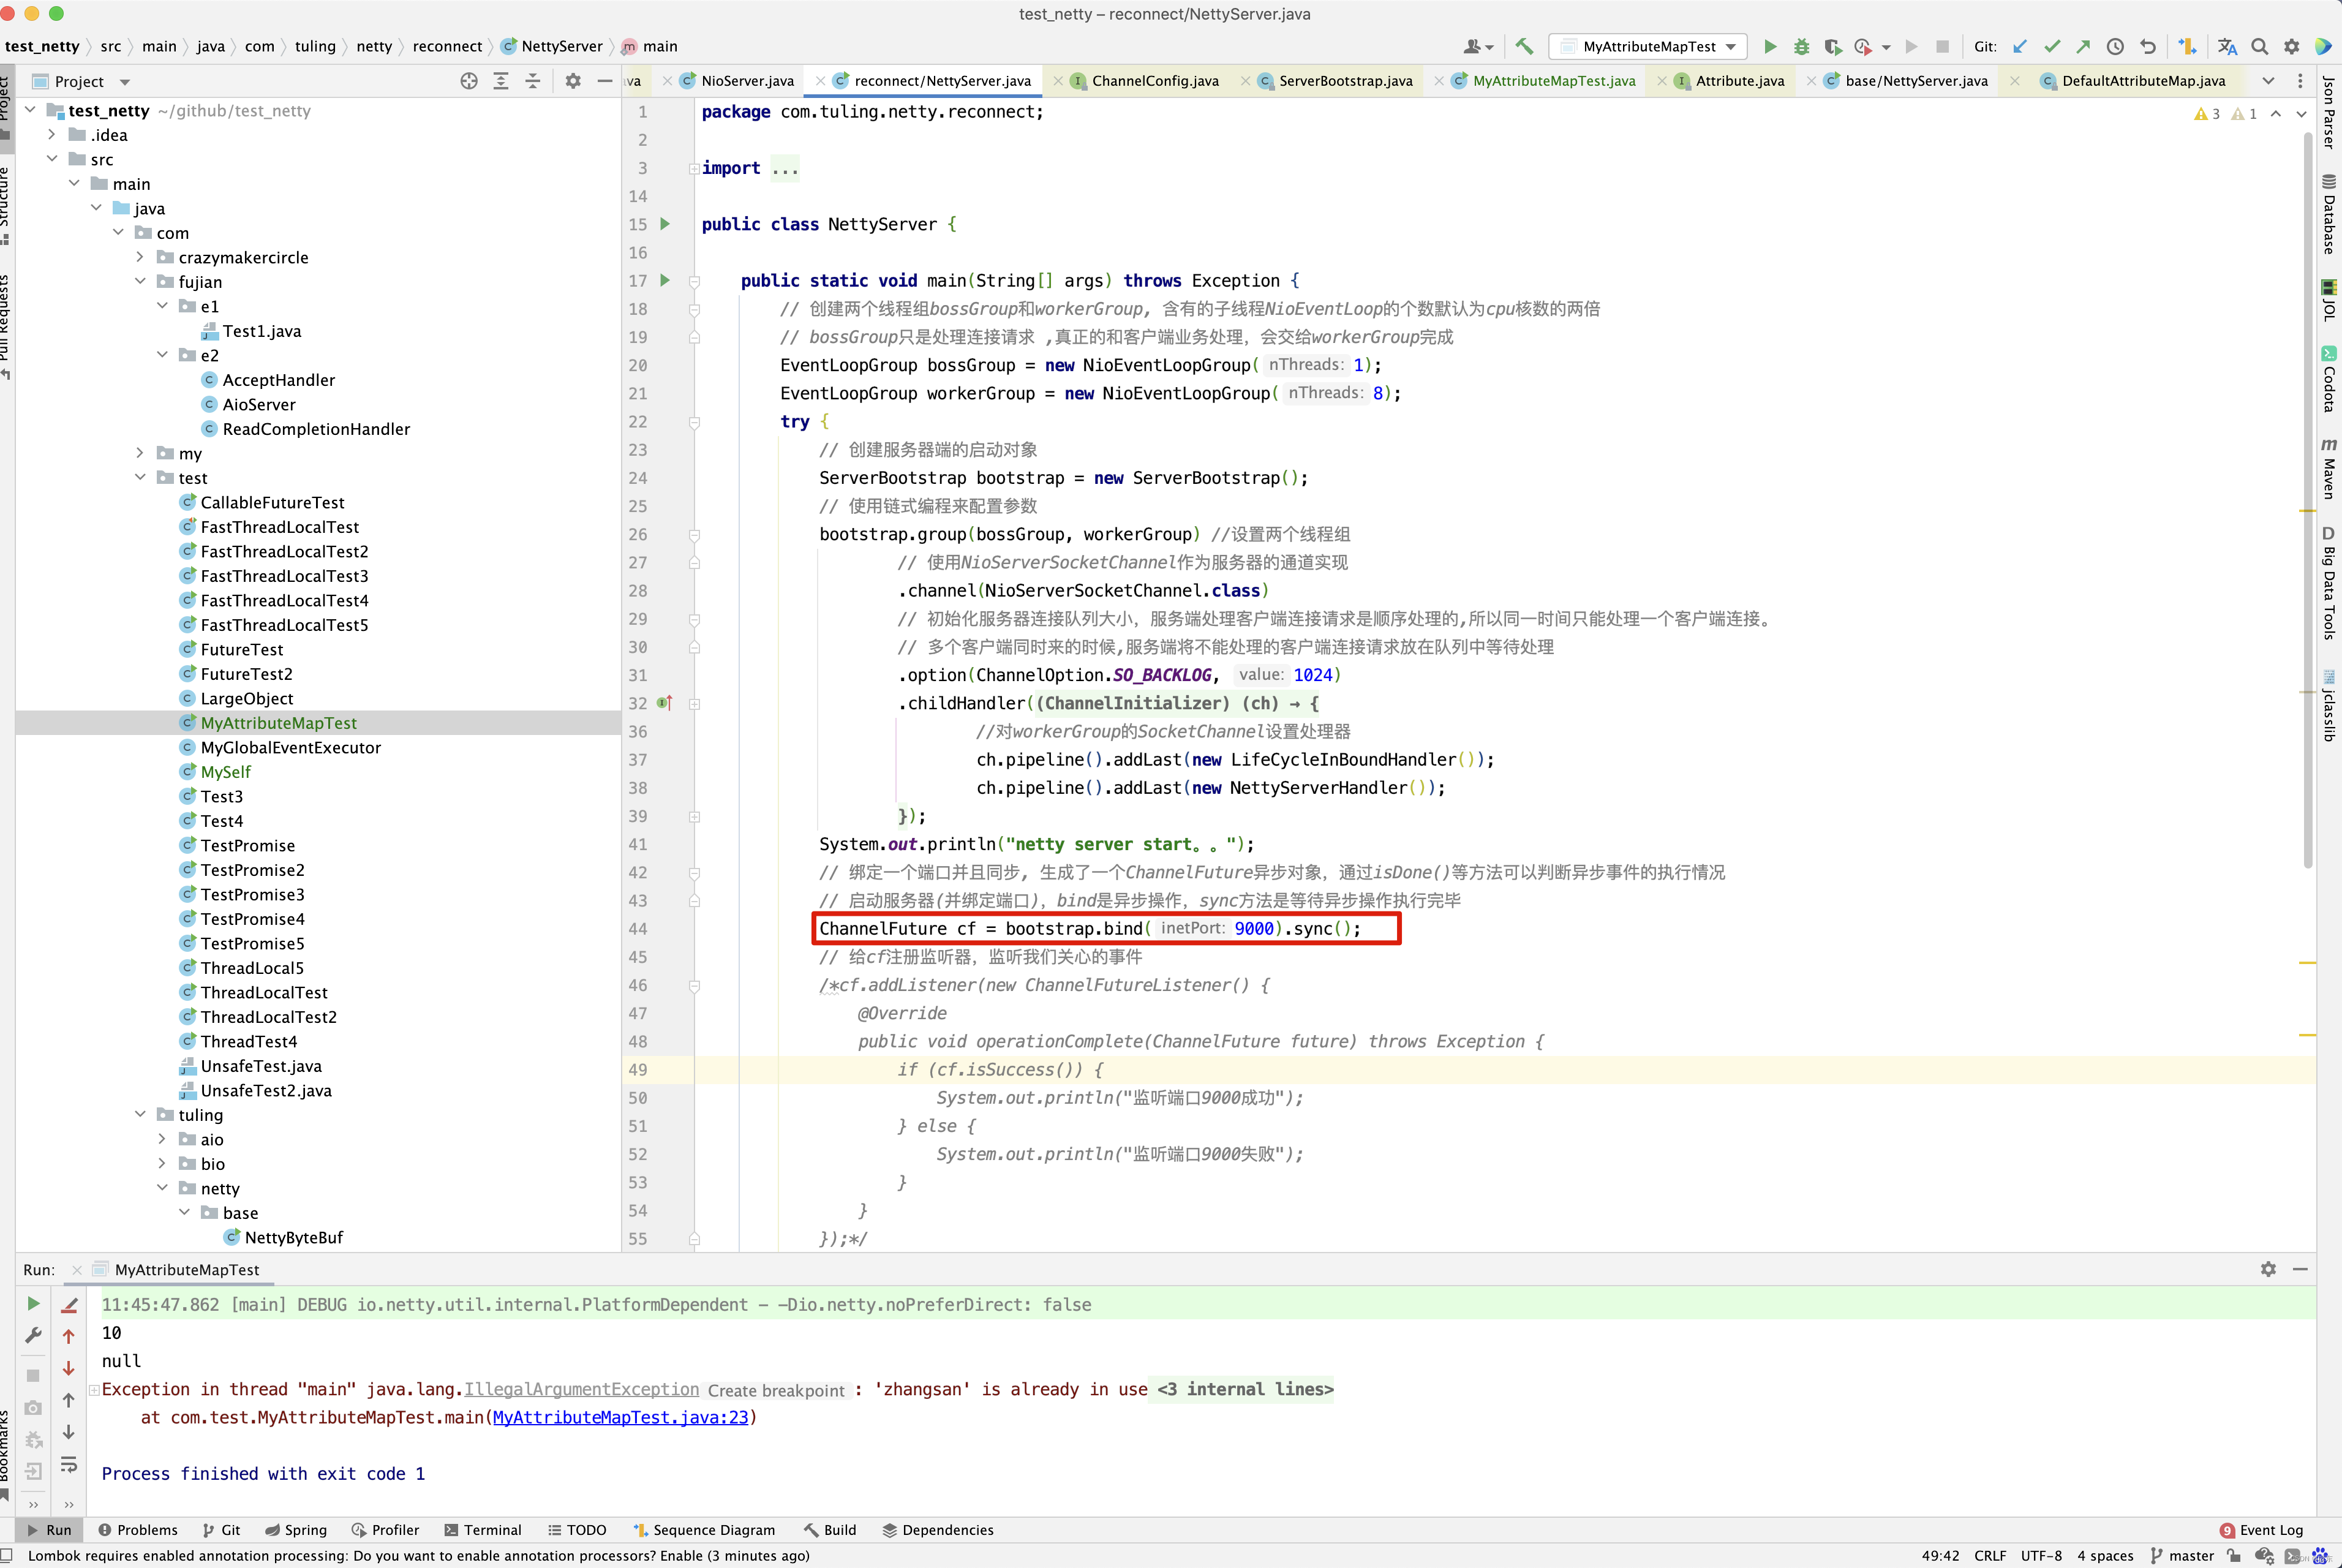
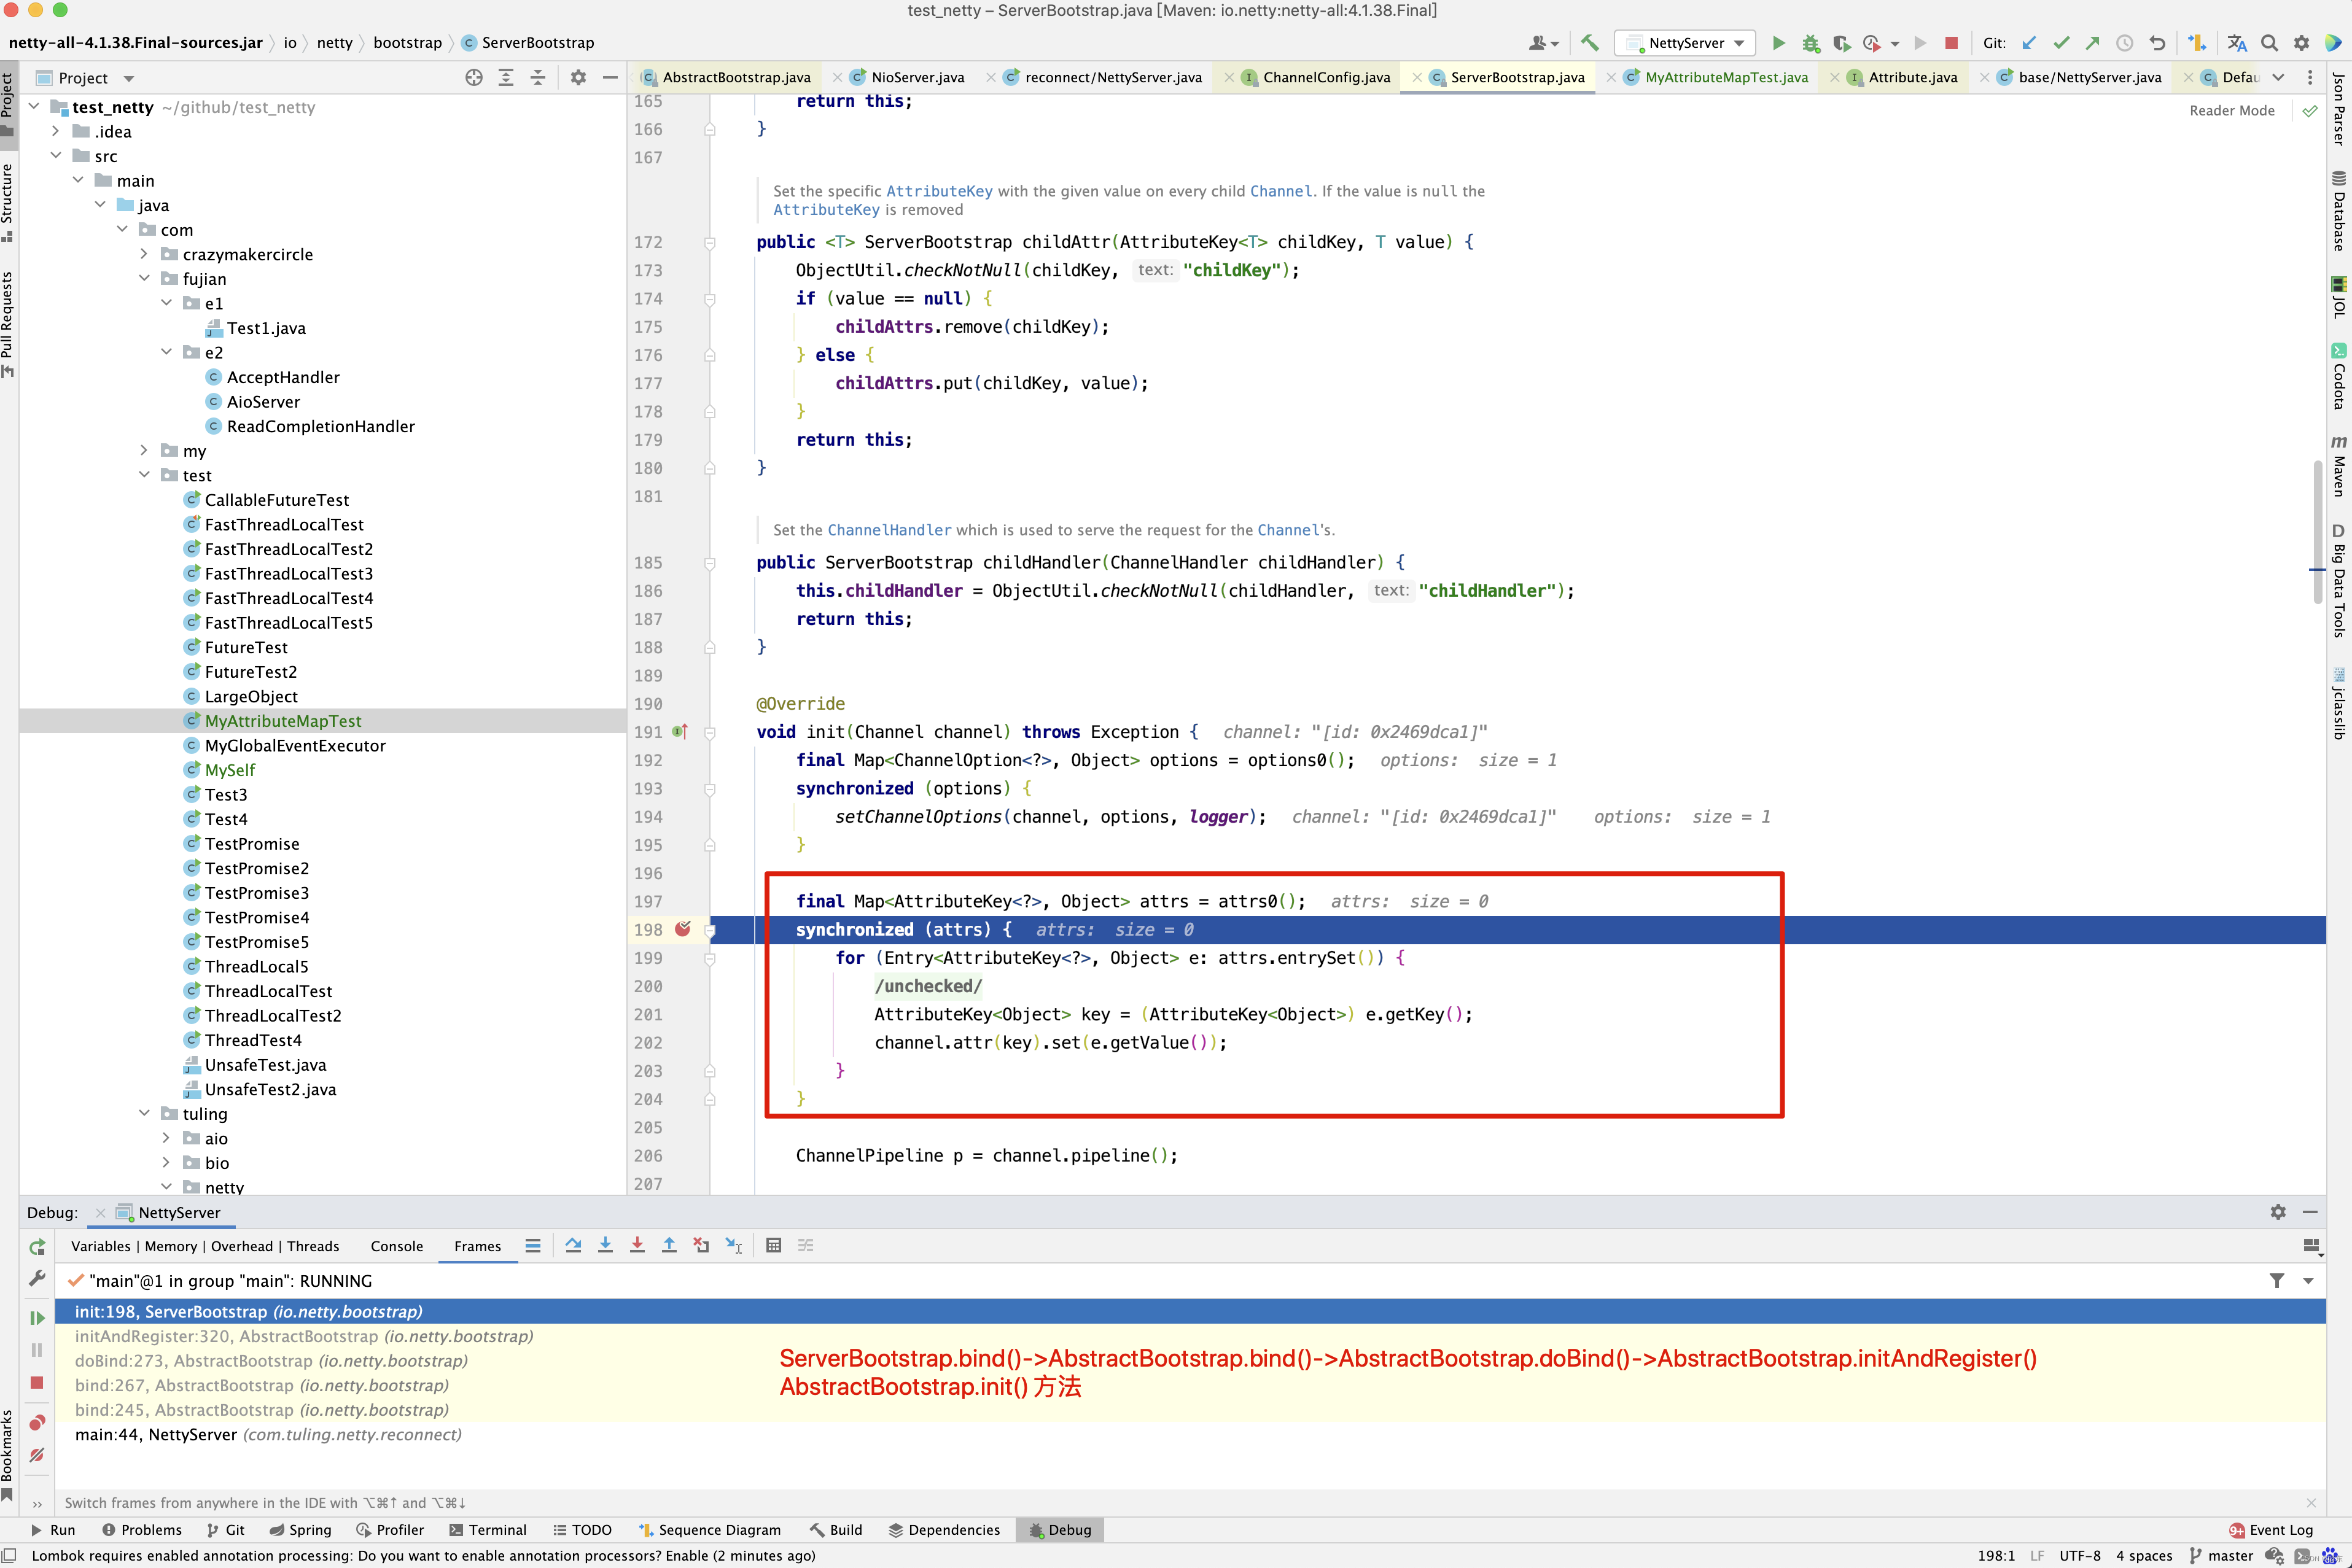
在ServerBootstrap的bind()方法调用过程中,调用了init()方法 。上图中的Channel就是NioServerSocketChannel,那NioServerSocketChannel和DefaultAttributeMap有什么关系呢?请看下图
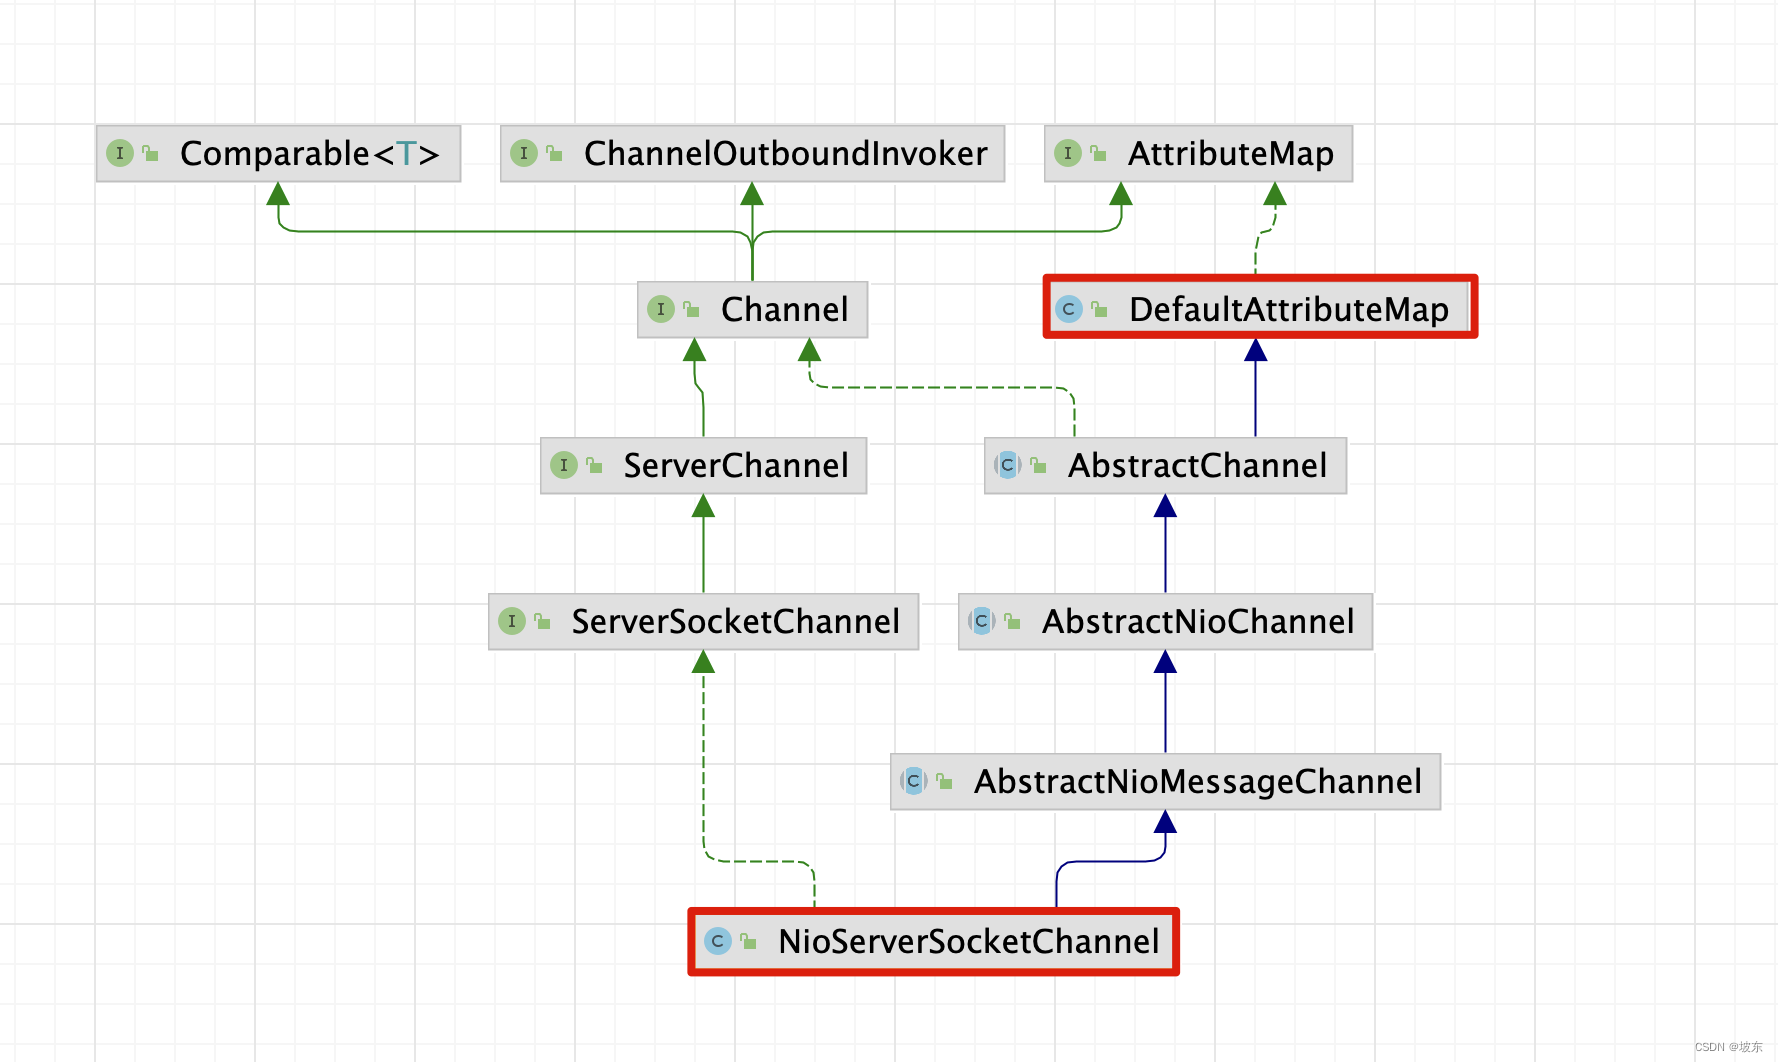
弄明白它们之间的关系,接下来进入DefaultAttributeMap和AttributeKey的原理分析 。
既然要分析源码,那肯定还是从例子学起。 请看下面例子。
public static void main(String[] args) {
    AttributeKey<String> key = AttributeKey.newInstance("zhangsan");
    DefaultAttributeMap defaultAttributeMap = new DefaultAttributeMap();
    Attribute attr= defaultAttributeMap.attr(key);
    attr.set(10);

    System.out.println(attr.getAndRemove());
    System.out.println(attr.get());
    AttributeKey<String> key1 = AttributeKey.newInstance("zhangsan");
}
创建一个AttributeKey对象,并为其设置值为10 , 调用getAndRemove()方法获取值为10,再调用get()方法返回空, 显然,10在getAndRemove()方法中被移除再,再次实例化name为zhangsan的AttributeKey,抛出异常。

我们就围绕着上述例子来分析源码 。
AttributeKey
首先看AttributeKey的类结构
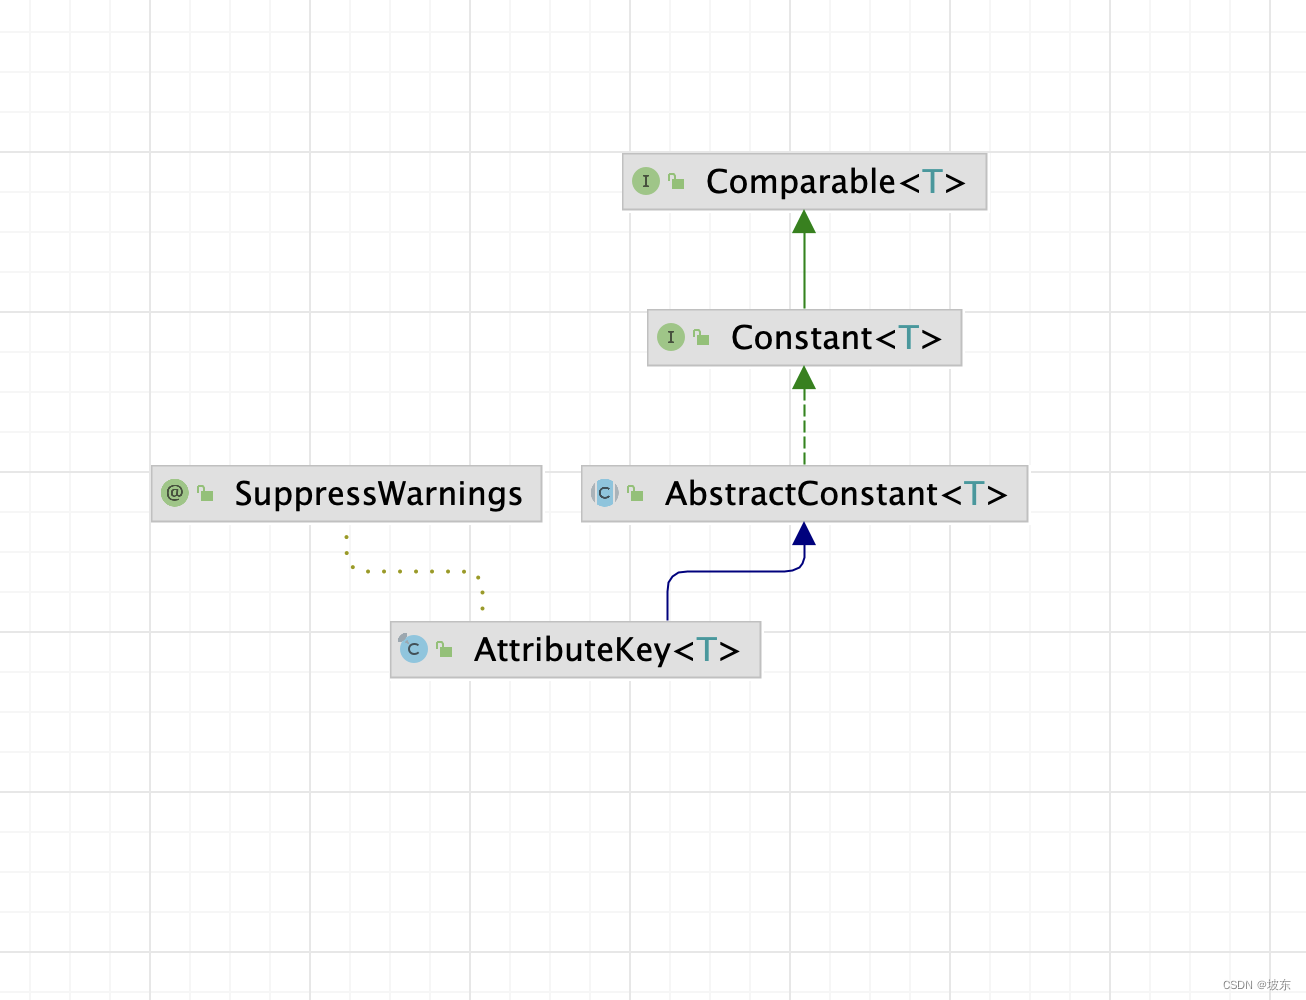
public final class AttributeKey<T> extends AbstractConstant<AttributeKey<T>> {

    private static final ConstantPool<AttributeKey<Object>> pool = new ConstantPool<AttributeKey<Object>>() {
        @Override
        protected AttributeKey<Object> newConstant(int id, String name) {
            return new AttributeKey<Object>(id, name);
        }
    };

    public static <T> AttributeKey<T> valueOf(String name) {
        return (AttributeKey<T>) pool.valueOf(name);
    }


    public static boolean exists(String name) {
        return pool.exists(name);
    }

    public static <T> AttributeKey<T> newInstance(String name) {
        return (AttributeKey<T>) pool.newInstance(name);
    }

    public static <T> AttributeKey<T> valueOf(Class<?> firstNameComponent, String secondNameComponent) {
        return (AttributeKey<T>) pool.valueOf(firstNameComponent, secondNameComponent);
    }

    private AttributeKey(int id, String name) {
        super(id, name);
    }
}
当 newInstance( name) 方法时,实际上调用的是pool.newInstance(name)方法 ,进入pool的newInstance()方法 。
private final ConcurrentMap<String, T> constants = PlatformDependent.newConcurrentHashMap();

private final AtomicInteger nextId = new AtomicInteger(1);

public T newInstance(String name) {
    checkNotNullAndNotEmpty(name);
    return createOrThrow(name);
}

private T createOrThrow(String name) {
    T constant = constants.get(name);
    if (constant == null) {
        final T tempConstant = newConstant(nextId(), name);
        // 如果name已经存在于constants中,则不会执行插入操作
        constant = constants.putIfAbsent(name, tempConstant);
        if (constant == null) {
            return tempConstant;
        }
    }

    throw new IllegalArgumentException(String.format("'%s' is already in use", name));
}

public final int nextId() {
    return nextId.getAndIncrement();
}
从上面代码中得知,最终调用的是AttributeKey中的newConstant()方法,创建了AttributeKey()对象,当然id为自增id , name 为我们传入的名字,在例子中两次调用AttributeKey.newInstance(“zhangsan”)方法, 第二次抛出IllegalArgumentException异常。

原因就在于createOrThrow()方法 , 如果constants中有name相同的key时, 则无法进行插入操作。引发后面的IllegalArgumentException异常。
接下来看DefaultAttributeMap的实现。
DefaultAttributeMap
public class DefaultAttributeMap implements AttributeMap {

	// 以原子方式更新attributes变量的引用
    private static final AtomicReferenceFieldUpdater<DefaultAttributeMap, AtomicReferenceArray> updater =
            AtomicReferenceFieldUpdater.newUpdater(DefaultAttributeMap.class, AtomicReferenceArray.class, "attributes");
	// 默认桶的大小4
    private static final int BUCKET_SIZE = 4;
    // 掩码为3
    private static final int MASK = BUCKET_SIZE  - 1;

    // Initialize lazily to reduce memory consumption; updated by AtomicReferenceFieldUpdater above.
    // 延迟初始化,节约内存
    private volatile AtomicReferenceArray<DefaultAttribute<?>> attributes;


    @Override
    public <T> Attribute<T> attr(AttributeKey<T> key) {
        if (key == null) {
            throw new NullPointerException("key");
        }
        AtomicReferenceArray<DefaultAttribute<?>> attributes = this.attributes;
        // 当attributes为空时则创建它,默认数组长度4
        if (attributes == null) {
            // Not using ConcurrentHashMap due to high memory consumption.
            // 没有使用ConcurrentHashMap为了节约内存
            attributes = new AtomicReferenceArray<DefaultAttribute<?>>(BUCKET_SIZE);

			// 原子方式更新attributes,如果attributes为null则把新创建的对象赋值,原子方式更新解决了并发赋值问题
            if (!updater.compareAndSet(this, null, attributes)) {
                attributes = this.attributes;
            }
        }

		// 计算key所在数组下标 ,相当于 key.id % 3
        int i = index(key);
        DefaultAttribute<?> head = attributes.get(i);

        // 头部为空说明第一次添加,这个方法可能多个线程同时调用,因为判断head全部为null
        if (head == null) {
            // No head exists yet which means we may be able to add the attribute without synchronization and just
            // use compare and set. At worst we need to fallback to synchronization and waste two allocations.
            // 创建一个空对象为链表结构的起点
            head = new DefaultAttribute();
            // 创建一个attr对象,把head传进去
            DefaultAttribute<T> attr = new DefaultAttribute<T>(head, key);
            // 链表头head的next = attr
            head.next = attr;
            // attr的prev = head
            attr.prev = head;
            // 给数组i位置赋值,这里用compareAndSet原子更新方法解决并发问题,只有i位置为null能够设置成功,且只有一个线程能设置成功
            if (attributes.compareAndSet(i, null, head)) {
                // we were able to add it so return the attr right away
                return attr;
            } else {
            	//设置失败的,说明数组i位置已经被其它线程赋值
            	//所以要把head重新赋值,不能用上面new出来的head,需要拿到之前线程设置进去的head
                head = attributes.get(i);
            }
        }

        // 对head同步加锁
        synchronized (head) {
        	//curr 赋值为head    head为链表结构的第一个变量
            DefaultAttribute<?> curr = head;
            for (;;) {
            	// 依次获取next
                DefaultAttribute<?> next = curr.next;
                // next==null,说明curr为最后一个元素 ,
                // 将新创建的节点插入到尾节点
                if (next == null) {
                	// 创建一个新对象传入head和key
                    DefaultAttribute<T> attr = new DefaultAttribute<T>(head, key);
                    // curr后面指向attr
                    curr.next = attr;
                    // attr的前面指向curr
                    attr.prev = curr;
                    // 返回新对象
                    return attr;
                }

				// 如果next的key等于传入的key,并且没有被移除
				// 则返回链表中的节点即可
                if (next.key == key && !next.removed) {
                	// 这直接返回next
                    return (Attribute<T>) next;
                }
                // 否则把curr变量指向下一个元素
                curr = next;
            }
        }
    }
    private static int index(AttributeKey<?> key) {
    	// 与掩码&运算,数值肯定<=mask 正好是数组下标
        return key.id() & MASK;
    }
首先要理清DefaultAttributeMap的结构,其实是一个数组长度为4的数组链表结构 。
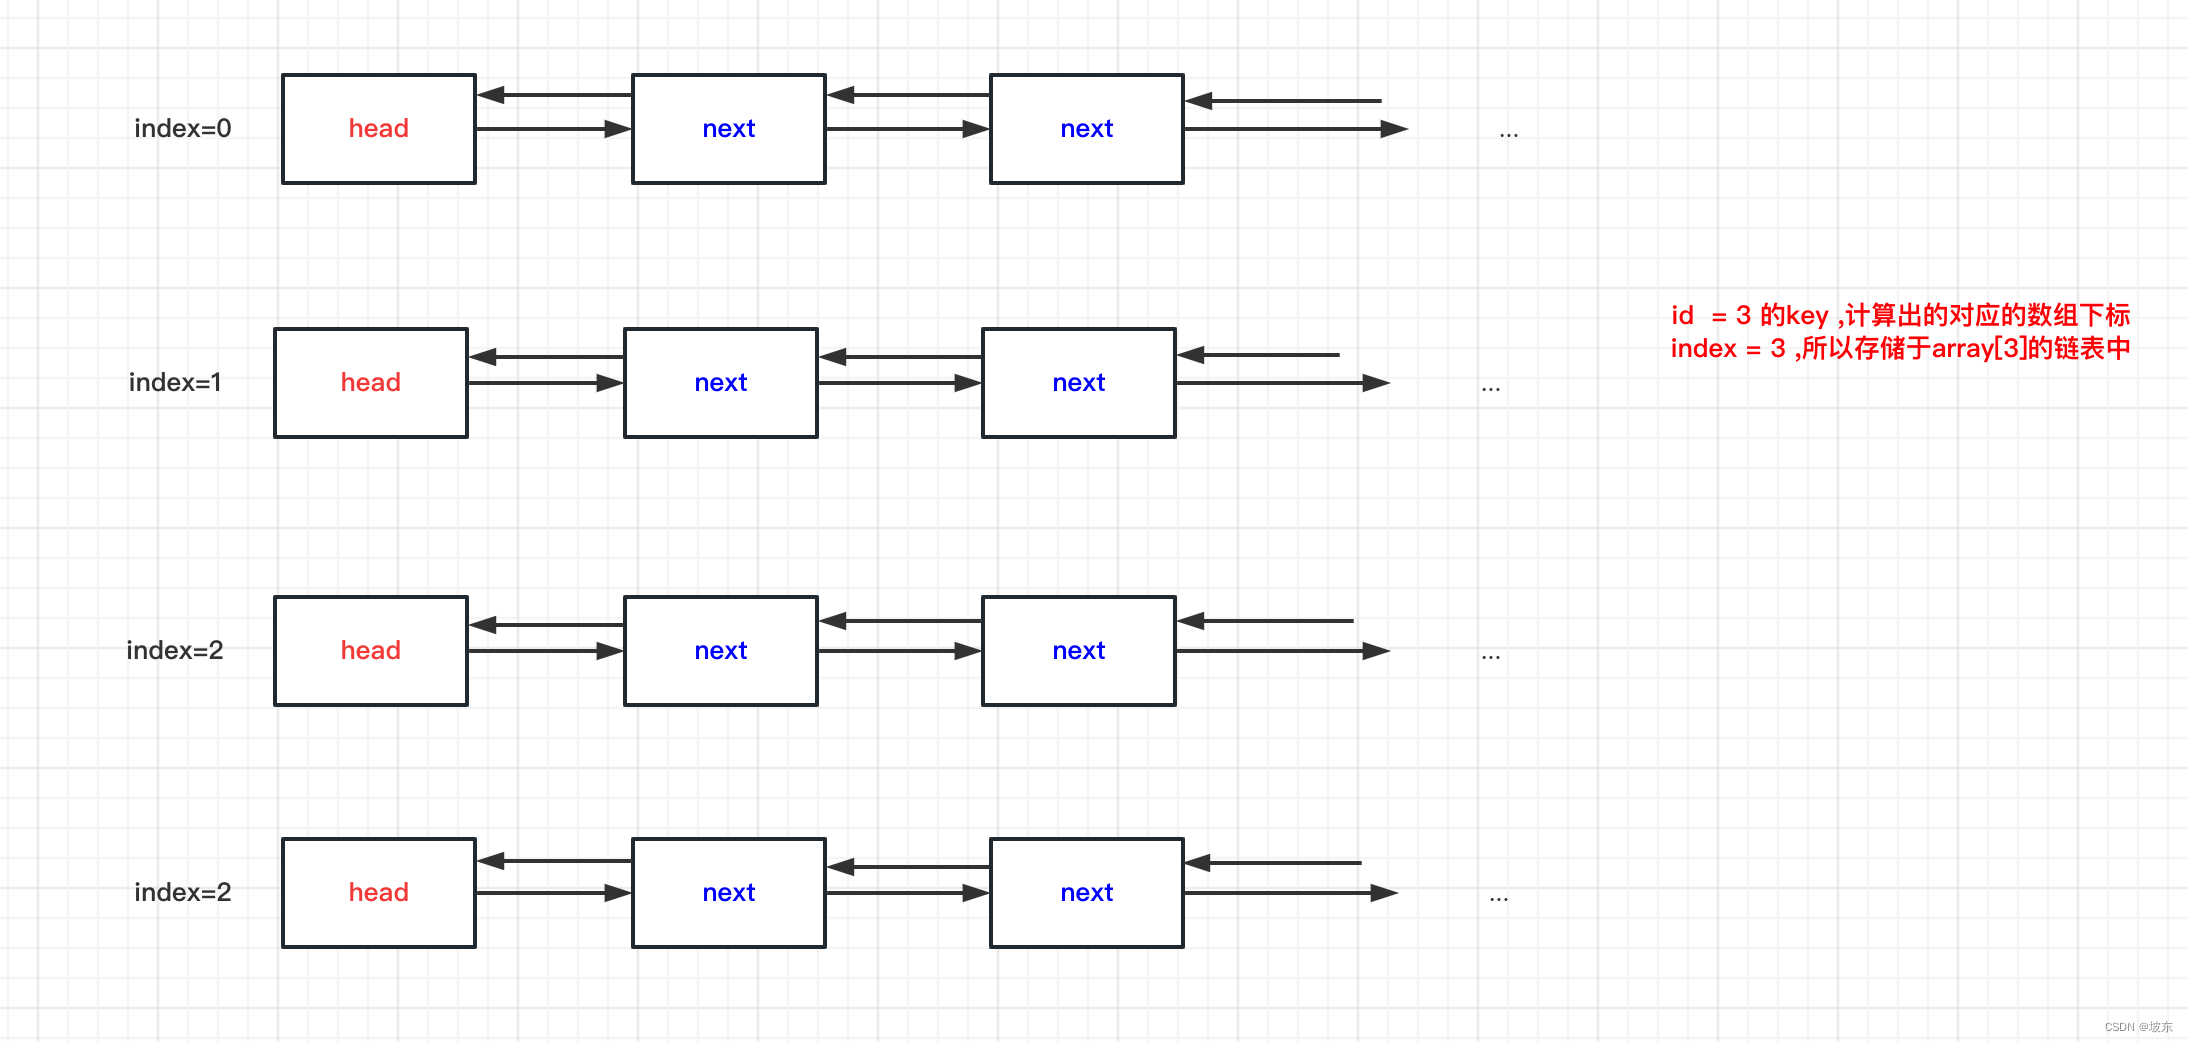
上面代码分3种情况 。 我们用图来展示 。
-
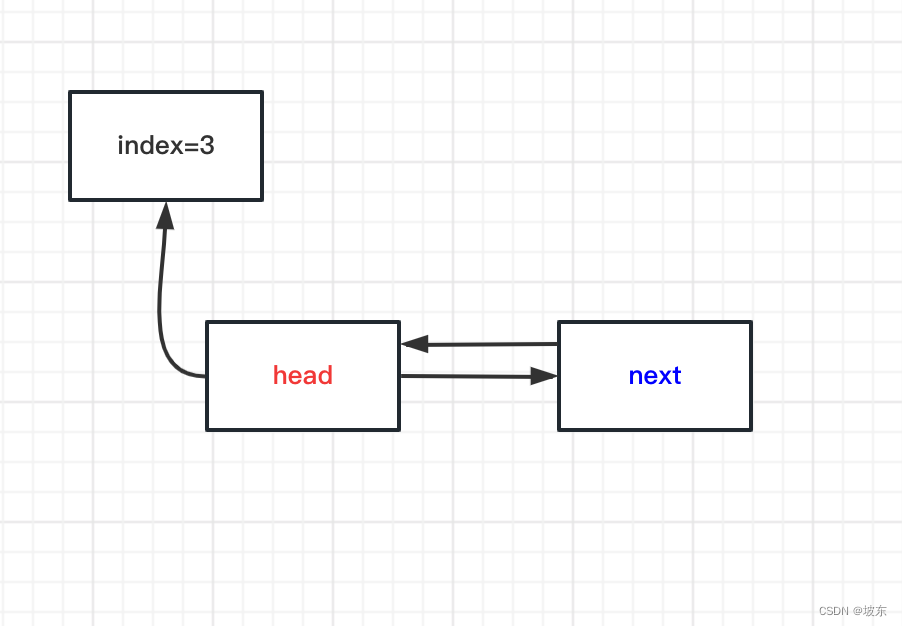
第一种情况, key 对应的数组下标处没有头节点。创建头节点,并将创建next节点,再将头节点CAS操作插入到数组对应下标处。
-
多线程并发将头节点插入到数组索引为3处,此时必然一个线程成功,一个线程失败,失败的线程继续将新创建的next节点插入到index为3的链表结尾 。

-
如果next1的key和传入的key相等,并且next1 并没有被移除掉,则返回next1即可。
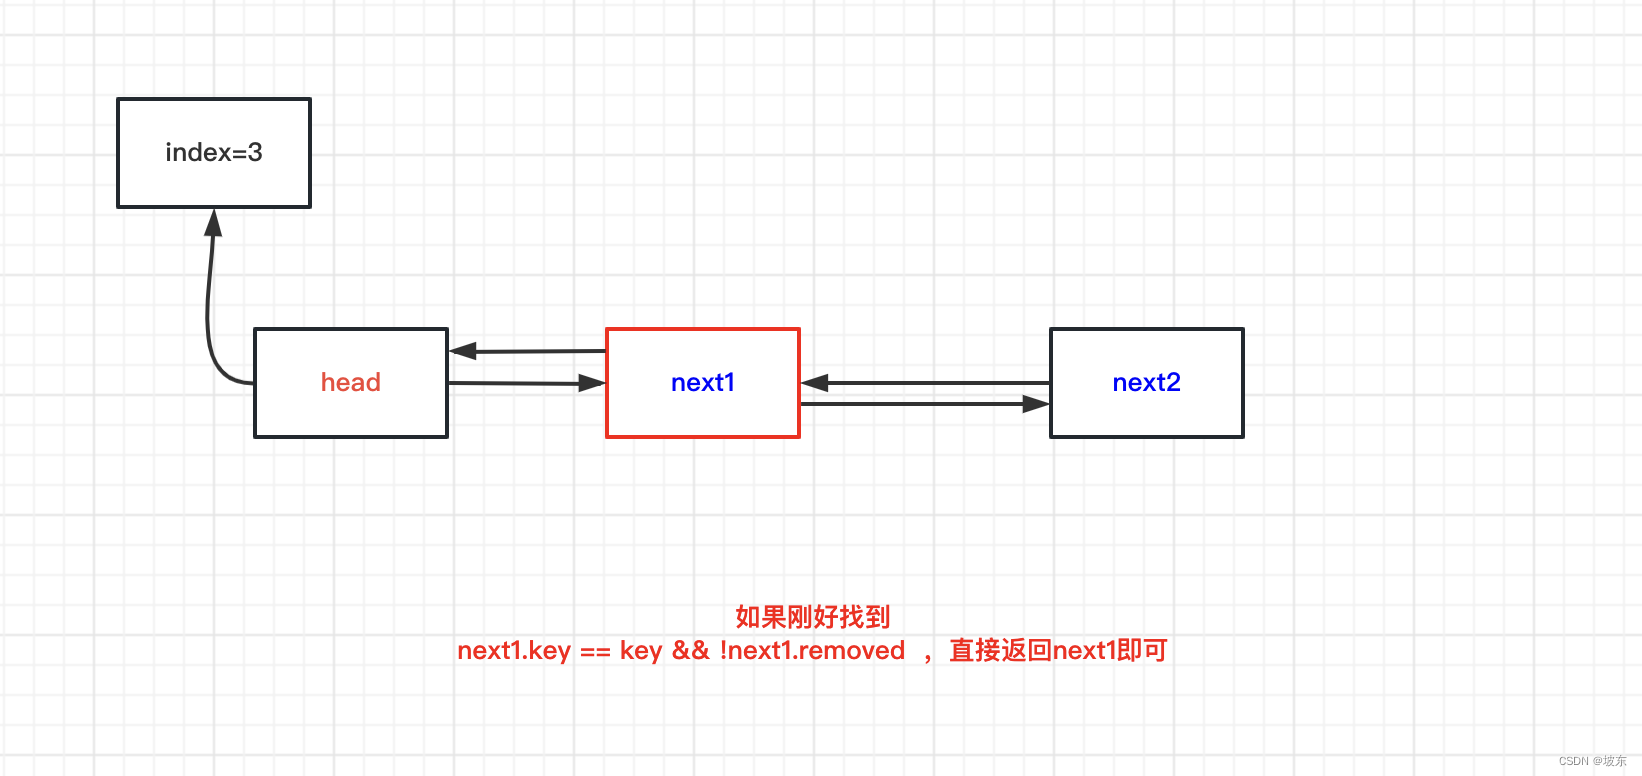
hasAttr()方法的实现原理和attr()方法的实现原理类似,这里不做过多分析 。
    @Override
    public <T> boolean hasAttr(AttributeKey<T> key) {
        if (key == null) {
            throw new NullPointerException("key");
        }
        // attributes为null直接返回false
        AtomicReferenceArray<DefaultAttribute<?>> attributes = this.attributes;
        if (attributes == null) {
            // no attribute exists
            return false;
        }
		// 计算数组下标
        int i = index(key);
        // 获取头 为空直接返回false
        DefaultAttribute<?> head = attributes.get(i);
        if (head == null) {
            // No attribute exists which point to the bucket in which the head should be located
            return false;
        }

        // We need to synchronize on the head.
       // 对head同步加锁
        synchronized (head) {
            // Start with head.next as the head itself does not store an attribute.
            // 从head的下一个开始,因为head不存储元素
            DefaultAttribute<?> curr = head.next;
            // 为null说明没有节点了
            while (curr != null) {
            	// key一致并且没有被移除则返回true
                if (curr.key == key && !curr.removed) {
                    return true;
                }
                // curr指向下一个
                curr = curr.next;
            }
            return false;
        }
    }
从DefaultAttribute的结构得知,其实在之前的图表中,每个节点还有一条线没有画, 如果画上去太多了,不方便突出重点 。 这里补充上,实际DefaultAttribute节点之间的关系图如下 。
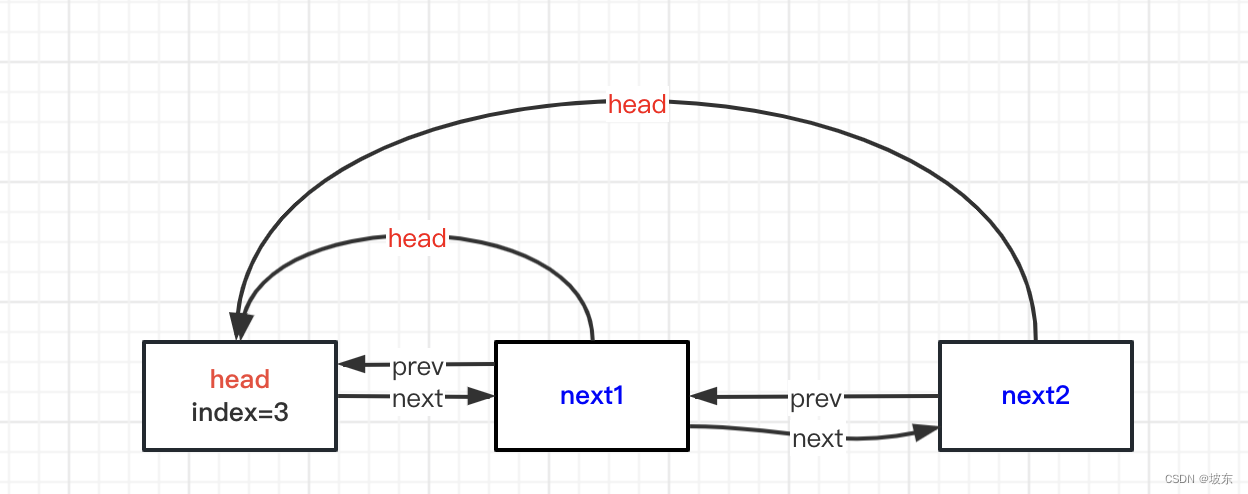
    @SuppressWarnings("serial")
    private static final class DefaultAttribute<T> extends AtomicReference<T> implements Attribute<T> {

        private static final long serialVersionUID = -2661411462200283011L;

        // The head of the linked-list this attribute belongs to
        private final DefaultAttribute<?> head;
        private final AttributeKey<T> key;

        // Double-linked list to prev and next node to allow fast removal
        private DefaultAttribute<?> prev;
        private DefaultAttribute<?> next;

        // Will be set to true one the attribute is removed via getAndRemove() or remove()
        private volatile boolean removed;

        DefaultAttribute(DefaultAttribute<?> head, AttributeKey<T> key) {
            this.head = head;
            this.key = key;
        }

        // Special constructor for the head of the linked-list.
        DefaultAttribute() {
            head = this;
            key = null;
        }

        @Override
        public AttributeKey<T> key() {
            return key;
        }

        @Override
        public T setIfAbsent(T value) {
            while (!compareAndSet(null, value)) {
                T old = get();
                if (old != null) {
                    return old;
                }
            }
            return null;
        }

        @Override
        public T getAndRemove() {
            removed = true;
            T oldValue = getAndSet(null);
            remove0();
            return oldValue;
        }
从DefaultAttribute的代码中得知, 每一个节点DefaultAttribute的removed属性是volatile修饰的。 接着看remove()方法的实现。
        @Override
        public void remove() {
            removed = true;
            set(null);
            remove0();
        }

        private void remove0() {
            synchronized (head) {
                if (prev == null) {
                    // Removed before.
                    return;
                }

                prev.next = next;

                if (next != null) {
                    next.prev = prev;
                }

                // Null out prev and next - this will guard against multiple remove0() calls which may corrupt
                // the linked list for the bucket.
                prev = null;
                next = null;
            }
        }
    }
}
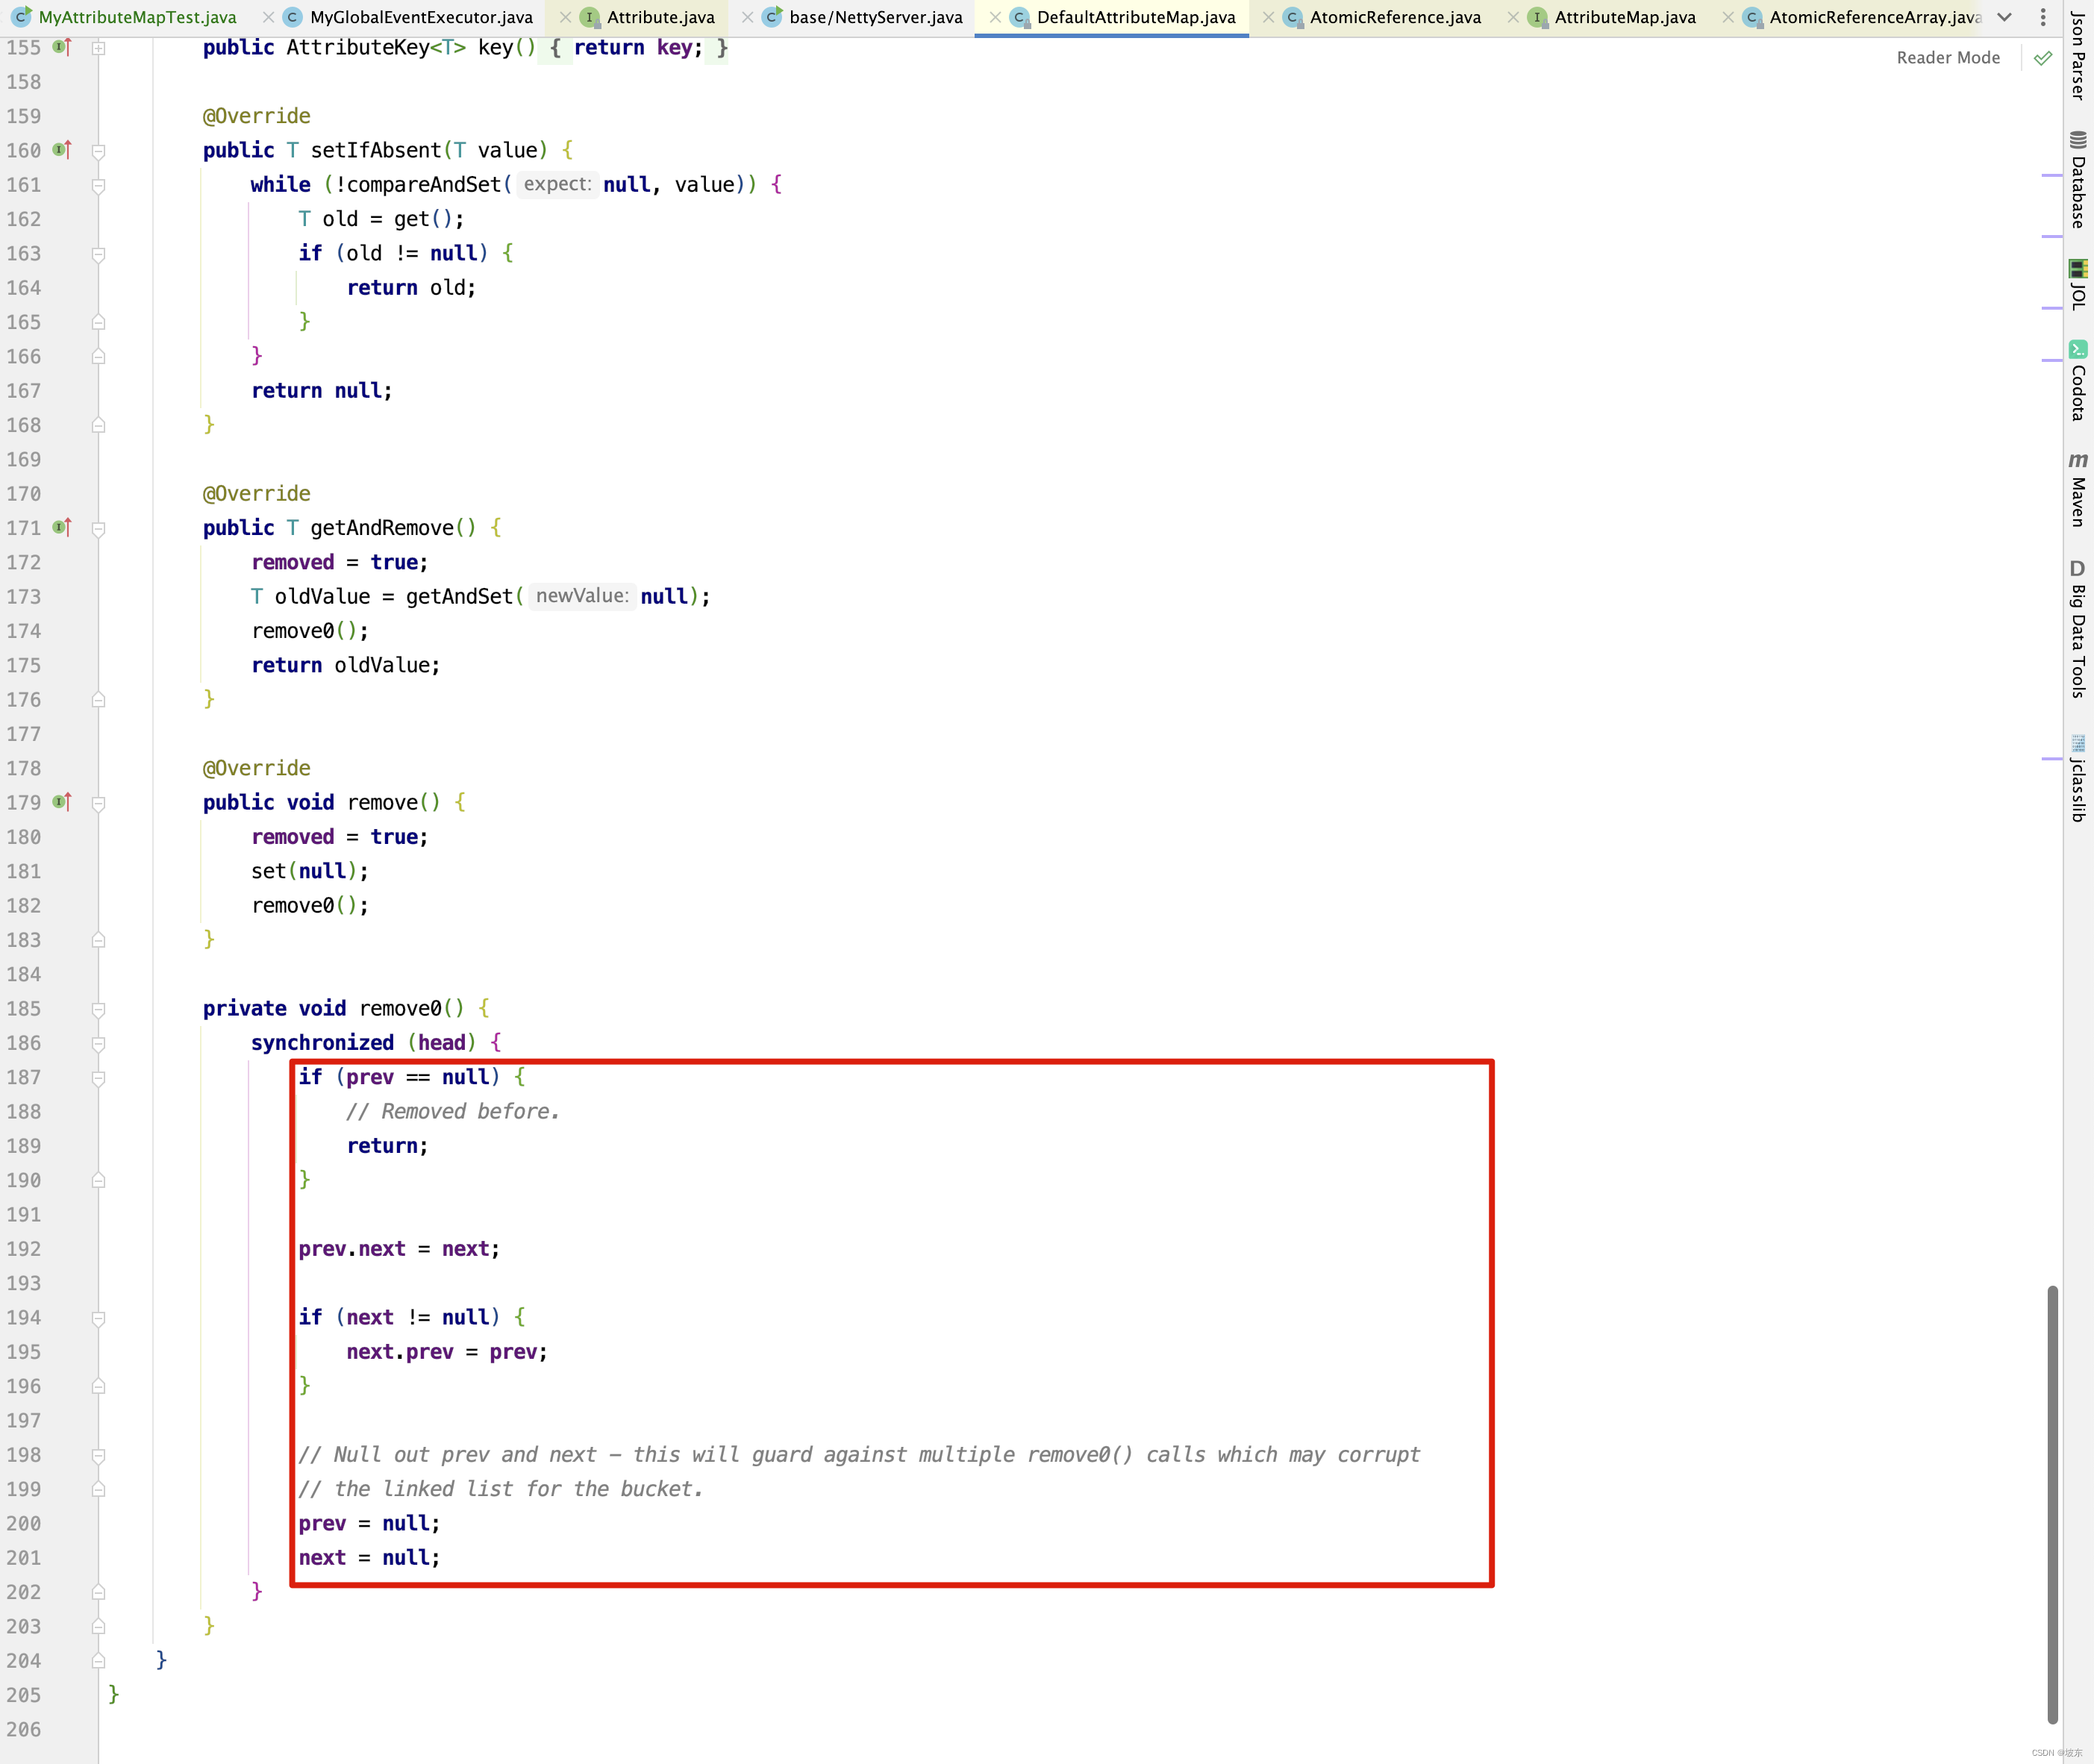
remove()方法的第一步就是将removed设置为true,其他线程立即可见,如果此时正存在插入查询操作,则此时会将key插入到队列尾部。 我们来模拟key=zhangsan 的节点并发执行移除再添加的操作。
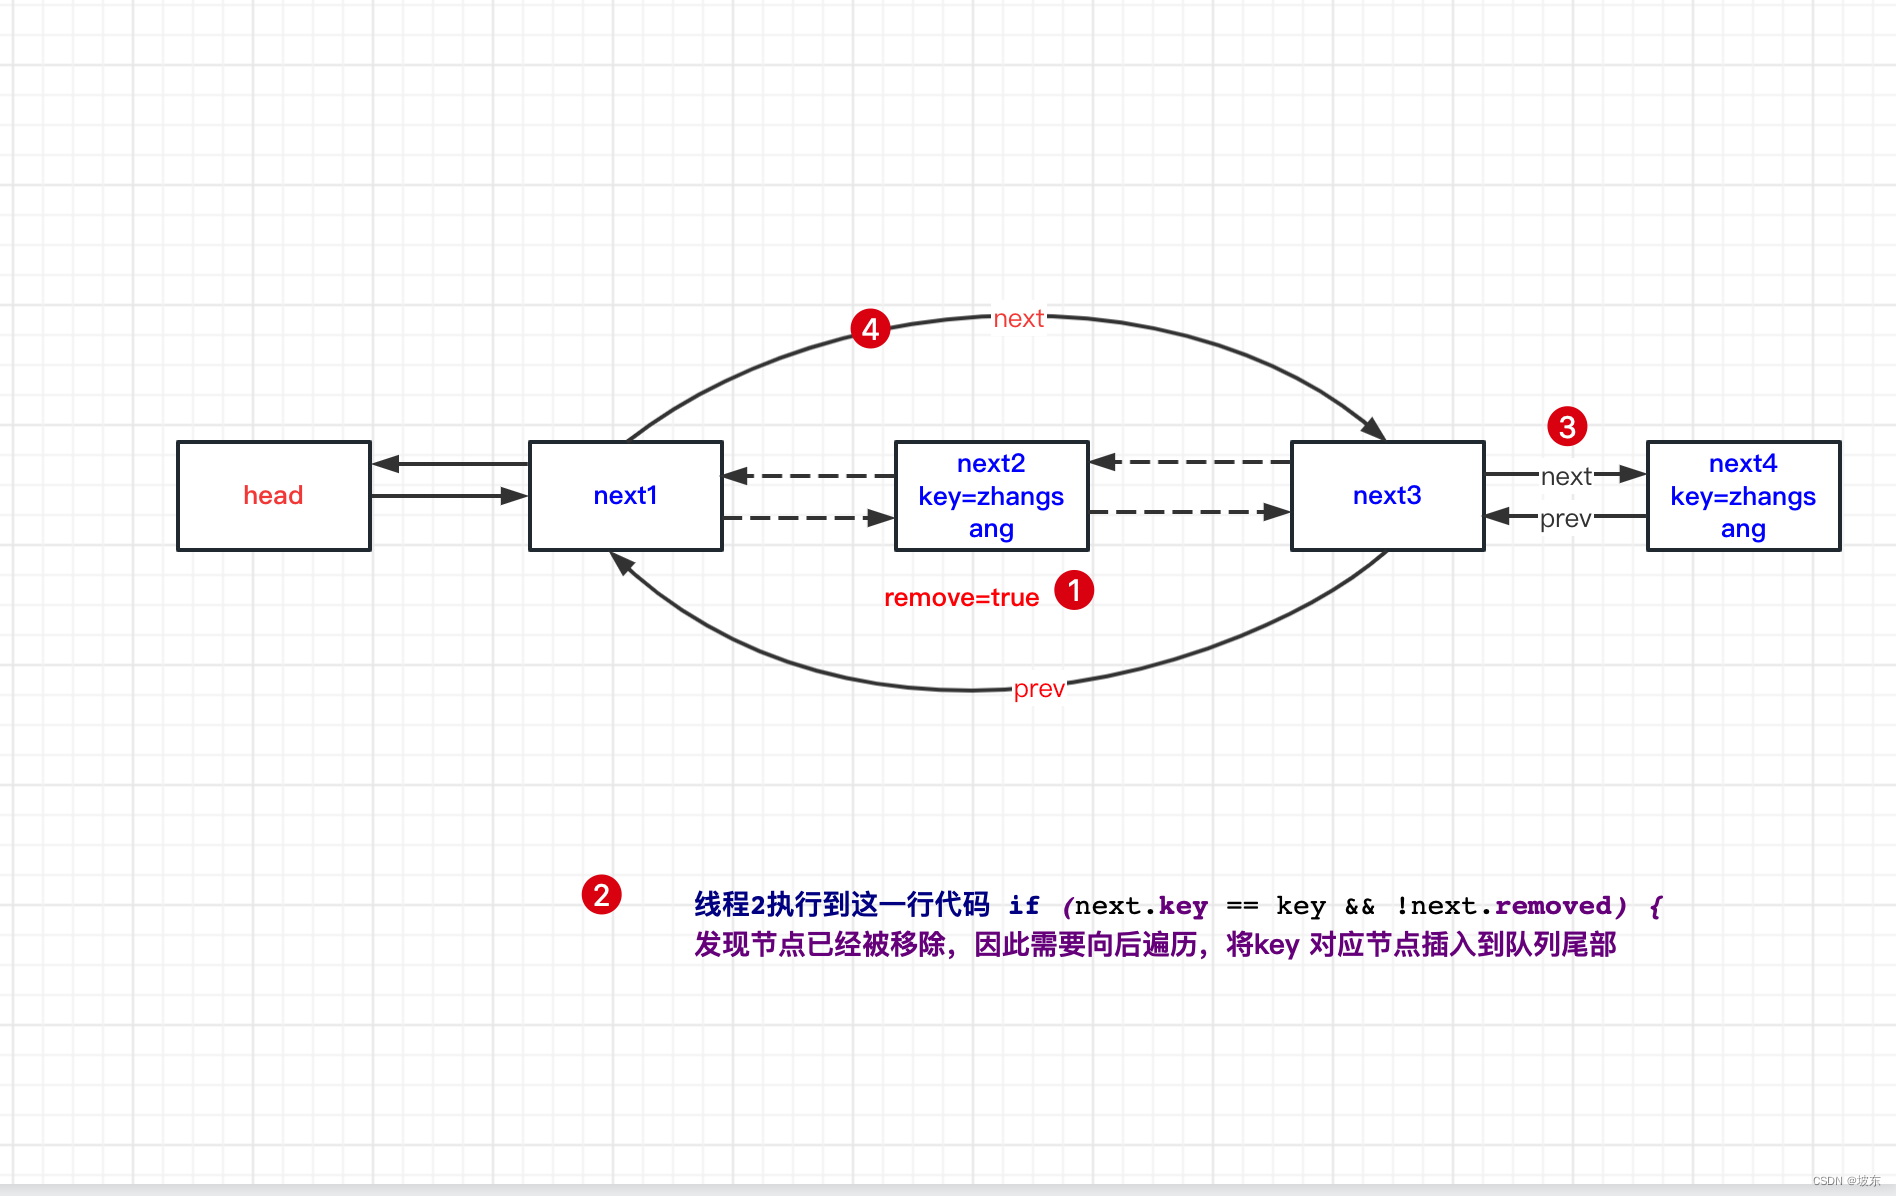
- 线程1执行下面加粗代码。
public void remove() {
        removed = true;
        set(null);
        remove0();
    }

    private void remove0() {
        synchronized (head) {
            if (prev == null) {
                return;
            }

            prev.next = next;

            if (next != null) {
                next.prev = prev;
            }

            prev = null;
            next = null;
        }
    }
}
-
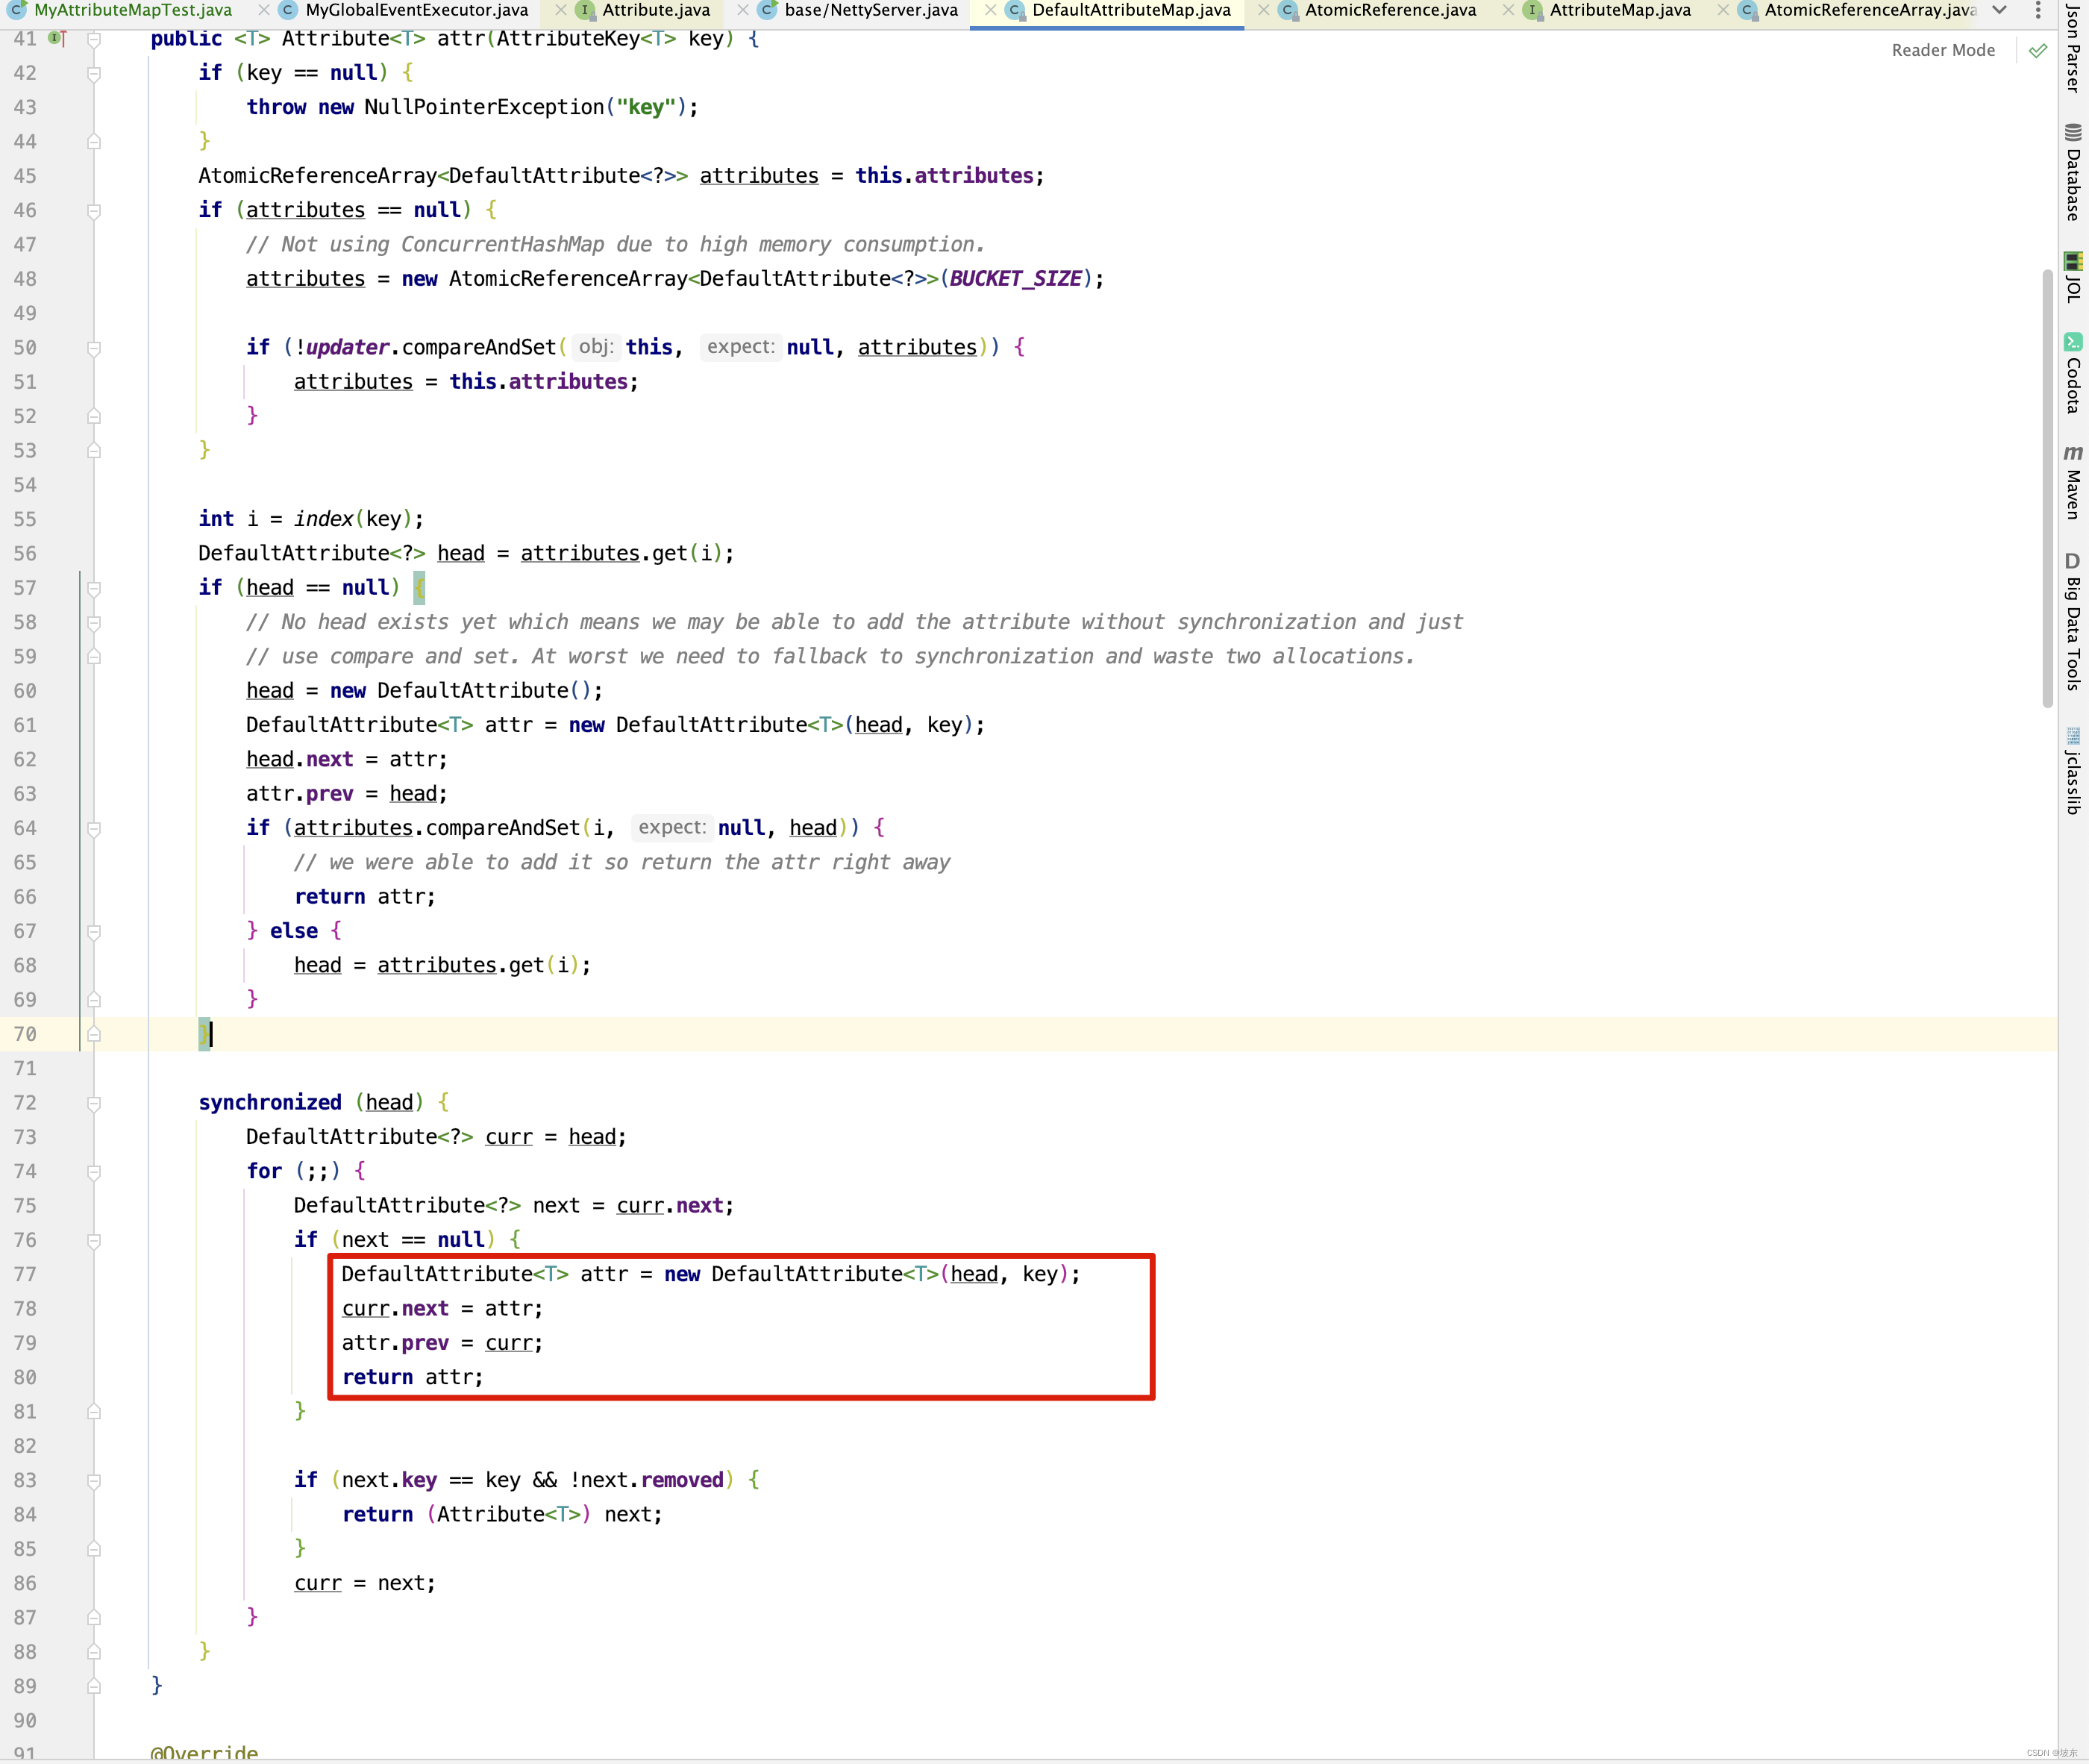
线程 2 抢到同步锁,并执行下面红框代码
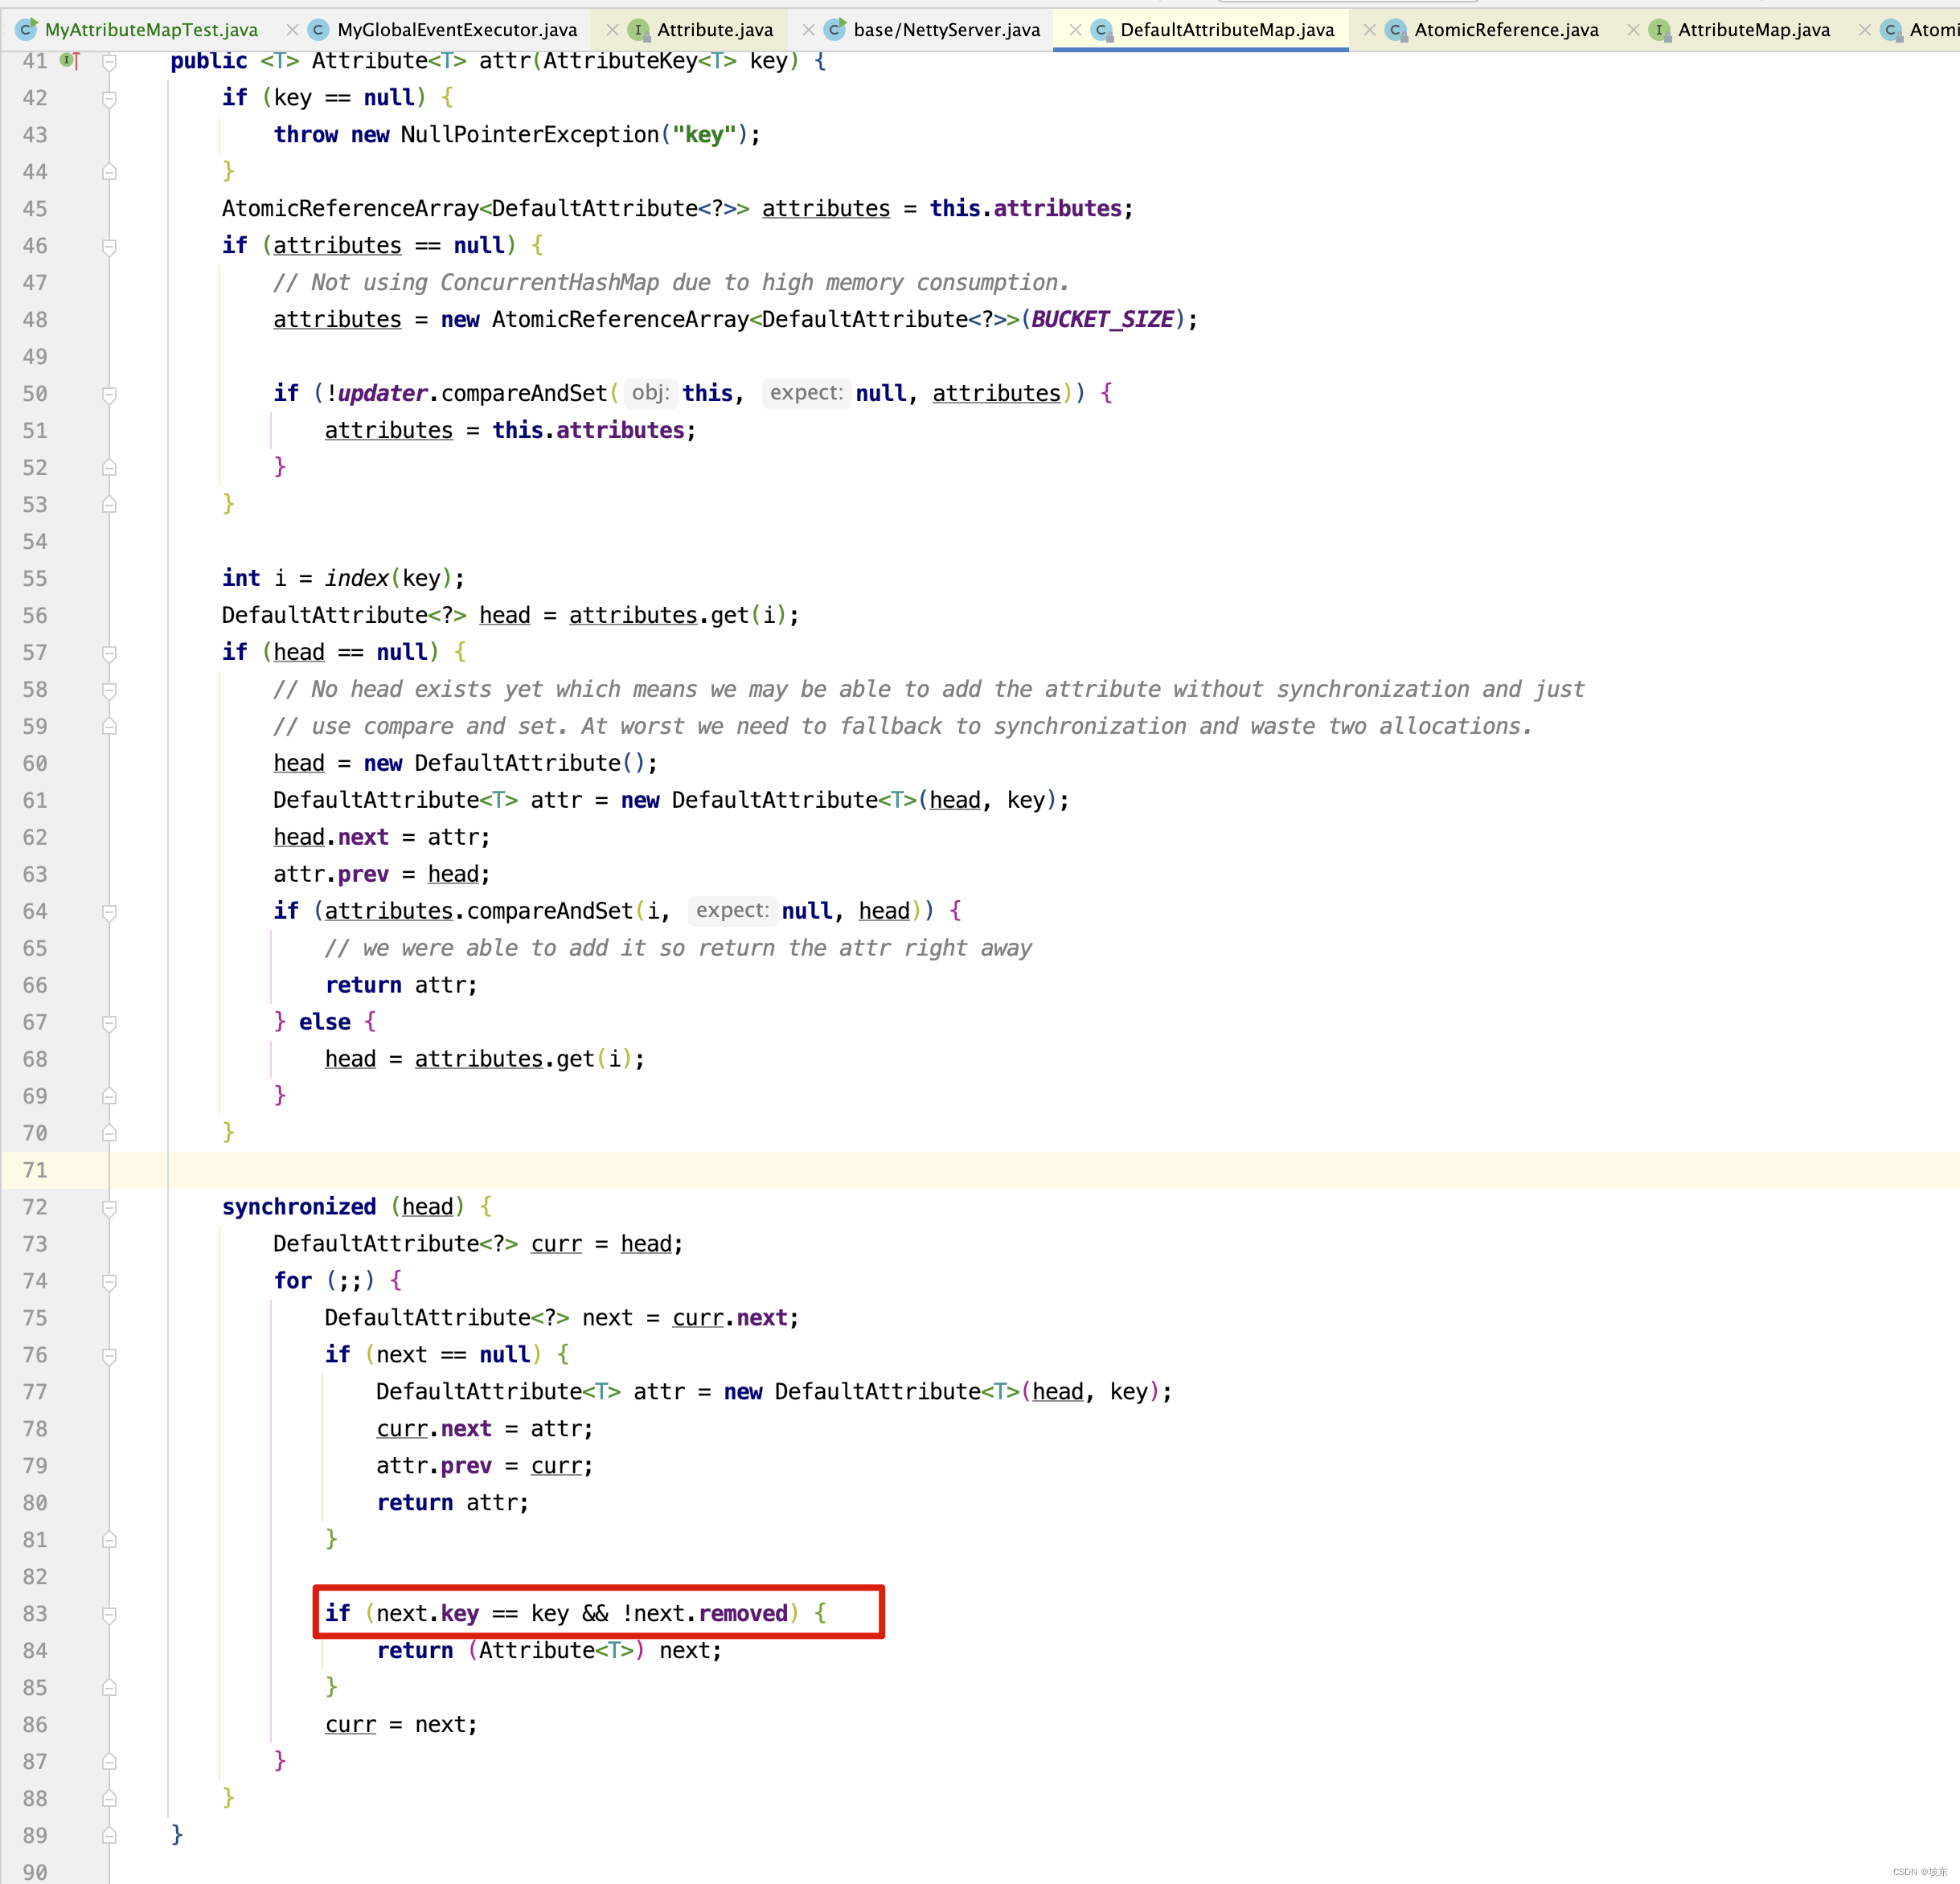
-
因为线程2 抢到锁, 因此继续执行,将key=zhangsan构建出DefaultAttribute节点,插入到队列尾部。 继续执行下面红框中的代码 。
-
线程 1 等待线程 2 释放锁后,抢到同步锁。 执行后续的节点移除操作
