目录
一、简介
二、创建SpringApplication对象
1)、推导出当前启动的项目的类型
2)、设置Initializer初始化器
3)、初始化Listener监听器
4)、反推出main方法所在的Class对象
三、运行SpringApplication#run(java.lang.String...)方法
1)、获取运行监听器
2)、发布启动过程中各阶段事件
3)、准备环境Environment
4)、创建ApplicationContext IOC容器
5)、准备ApplicationContext IOC容器的基本信息
6)、刷新IOC容器
7)、调用所有runners
本篇源码基于spring-boot-2.1.0.RELEASE版本进行分析,各个版本可能存在一些差别。
一、简介
SpringBoot的启动从main()方法开始:
public static void main(String[] args) {
    SpringApplication.run(SampleTomcatApplication.class, args);
}
调用SpringApplication的静态方法run():
// SpringBoot项目的启动方法
public static ConfigurableApplicationContext run(Class<?> primarySource, String... args) {
    return run(new Class<?>[] { primarySource }, args);
}

// 继续调用重载的run()方法
// run方法是一个静态方法,用于启动SpringBoot
public static ConfigurableApplicationContext run(Class<?>[] primarySources,
        String[] args) {
    // 构建一个SpringApplication对象,并调用其run方法来启动
    return new SpringApplication(primarySources).run(args);
}
主要分为两步:
- a、创建SpringApplication对象;
- b、运行SpringApplication#run(java.lang.String...)方法;
下面对这两部分做详细的分析。
二、创建SpringApplication对象
执行SpringApplication的构造方法,创建出一个SpringApplication对象,并初始化了一些属性,代码如下:
// 创建一个新的SpringApplication实例。应用程序上下文将从指定的主要来源加载bean
public SpringApplication(Class<?>... primarySources) {
    this(null, primarySources);
}

@SuppressWarnings({ "unchecked", "rawtypes" })
public SpringApplication(ResourceLoader resourceLoader, Class<?>... primarySources) {
    // 传递的resourceLoader为null
    this.resourceLoader = resourceLoader;
    Assert.notNull(primarySources, "PrimarySources must not be null");
    // 记录主方法的配置类名称
    this.primarySources = new LinkedHashSet<>(Arrays.asList(primarySources));
    // 推导出当前启动的项目的类型
    this.webApplicationType = WebApplicationType.deduceFromClasspath();
    // 加载配置在spring.factories文件中的ApplicationContextInitializer对应的类型并实例化. 并将加载的数据存储在了 initializers 成员变量中。
    setInitializers((Collection) getSpringFactoriesInstances(ApplicationContextInitializer.class));
    // 初始化监听器,并将加载的监听器实例对象存储在了listeners成员变量中
    setListeners((Collection) getSpringFactoriesInstances(ApplicationListener.class));
    // 反推出main方法所在的Class对象
    this.mainApplicationClass = deduceMainApplicationClass();
}
SpringApplication构造方法主要做了以下几件事情:
1)、推导出当前启动的项目的类型
this.webApplicationType = WebApplicationType.deduceFromClasspath();调用WebApplicationType的静态方法deduceFromClasspath():
/**
 * 根据classpath推导出web项目的类型。Servlet项目或者Reactive项目
 *
 * @return
 */
static WebApplicationType deduceFromClasspath() {
    // 一些绑定的Java类的全类路径
    // ClassUtils.isPresent(): 通过反射的方式获取对应的类型的Class对象,如果存在返回true,否则返回false
    if (ClassUtils.isPresent(WEBFLUX_INDICATOR_CLASS, null)
            && !ClassUtils.isPresent(WEBMVC_INDICATOR_CLASS, null)
            && !ClassUtils.isPresent(JERSEY_INDICATOR_CLASS, null)) {
        return WebApplicationType.REACTIVE;
    }
    for (String className : SERVLET_INDICATOR_CLASSES) {
        if (!ClassUtils.isPresent(className, null)) {
            return WebApplicationType.NONE;
        }
    }
    return WebApplicationType.SERVLET;
}
可以看到,springboot通过判断当前项目有没有引入特定的依赖或者判断当前项目是否存在某个特殊类来推断当前项目是Servlet项目还是Reactive项目。
在本例中,我们是SERVLET项目类型。

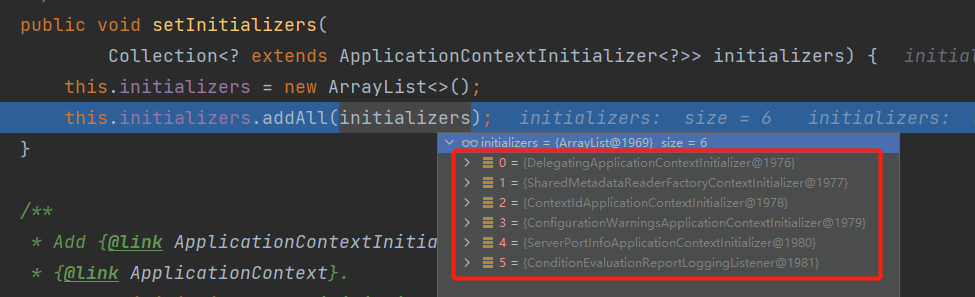
2)、设置Initializer初始化器
setInitializers((Collection) getSpringFactoriesInstances(ApplicationContextInitializer.class))springboot通过加载配置在spring.factories文件中的ApplicationContextInitializer对应的类型并实例化,并将加载的数据存储在了 initializers 成员变量中。
3)、初始化Listener监听器
setListeners((Collection) getSpringFactoriesInstances(ApplicationListener.class));springboot通过加载配置在spring.factories文件中的ApplicationListener对应的类型并实例化,并将加载的数据存储在了 listeners 成员变量中。

4)、反推出main方法所在的Class对象
this.mainApplicationClass = deduceMainApplicationClass();private Class<?> deduceMainApplicationClass() {
try {
// StackTrace记录了run()方法执行的堆栈信息
StackTraceElement[] stackTrace = new RuntimeException().getStackTrace();
for (StackTraceElement stackTraceElement : stackTrace) {
// 找到调用main方法的类
if ("main".equals(stackTraceElement.getMethodName())) {
return Class.forName(stackTraceElement.getClassName());
}
}
}
catch (ClassNotFoundException ex) {
// Swallow and continue
}
return null;
}可以看到,springboot从记录了run()方法执行的堆栈信息中,找到main方法所在的类,这个类就是主启动类。
在本例中,就是sample.tomcat.SampleTomcatApplication:
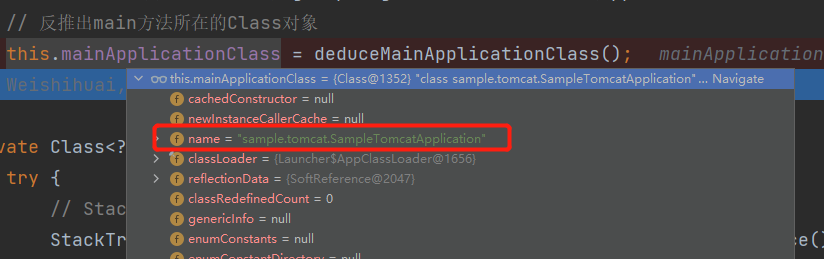
通过上述的一些工作,就构建了一个SpringApplication对象,接下来就调用它的run()方法启动应用。
三、运行SpringApplication#run(java.lang.String...)方法
// 运行 Spring 应用程序,创建并刷新一个新的ApplicationContext
public ConfigurableApplicationContext run(String... args) {
    // 创建一个任务执行观察器,用于统计run启动过程花了多少时间
    StopWatch stopWatch = new StopWatch();
    // 记录开始时间
    stopWatch.start();
    ConfigurableApplicationContext context = null;
    // exceptionReporters集合用来存储异常报告器,用来报告SpringBoot启动过程的异常
    Collection<SpringBootExceptionReporter> exceptionReporters = new ArrayList<>();
    // 设置了一个名为java.awt.headless的系统属性, 其实是想设置该应用程序,即使没有检测到显示器,也允许其启动. 对于服务器来说,是不需要显示器的,所以要这样设置.
    configureHeadlessProperty();
    // 从spring.factories配置文件中加载到EventPublishingRunListener对象并赋值给SpringApplicationRunListeners
    // EventPublishingRunListener对象主要用来发布SpringBoot启动过程中内置的一些生命周期事件,标志每个不同启动阶段
    SpringApplicationRunListeners listeners = getRunListeners(args);
    // 发布启动事件
    listeners.starting();
    try {
        // 创建ApplicationArguments对象,封装了args参数
        ApplicationArguments applicationArguments = new DefaultApplicationArguments(args);
        // 准备环境,包括系统变量、环境变量、命令行参数、默认变量等
        ConfigurableEnvironment environment = prepareEnvironment(listeners, applicationArguments);
        // 配置需要忽略的BeanInfo信息
        configureIgnoreBeanInfo(environment);
        // 启动时控制台打印Banner
        Banner printedBanner = printBanner(environment);
        // 根据不同类型创建不同类型的spring容器ApplicationContext应用程序上下文
        context = createApplicationContext();
        // 加载spring.factories配置文件配置的异常报告器
        exceptionReporters = getSpringFactoriesInstances(
                SpringBootExceptionReporter.class,
                new Class[] { ConfigurableApplicationContext.class }, context);
        // 准备上下文,刷新容器前的一些操作
        prepareContext(context, environment, listeners, applicationArguments, printedBanner);
        // 刷新应用上下文。完成Spring IOC容器的初始化
        refreshContext(context);
        // 在刷新上下文后调用的钩子,这个方法是一个模板方法
        afterRefresh(context, applicationArguments);
        // 停止记录执行时间
        stopWatch.stop();
        if (this.logStartupInfo) {
            new StartupInfoLogger(this.mainApplicationClass)
                    .logStarted(getApplicationLog(), stopWatch);
        }
        // 事件广播,启动完成了
        listeners.started(context);
        // 执行ApplicationRunner、CommandLineRunner的run方法,实现spring容器启动成功后需要执行的一些逻辑
        callRunners(context, applicationArguments);
    } catch (Throwable ex) {
        handleRunFailure(context, ex, exceptionReporters, listeners);
        throw new IllegalStateException(ex);
    }

    try {
        listeners.running(context);
    } catch (Throwable ex) {
        handleRunFailure(context, ex, exceptionReporters, null);
        throw new IllegalStateException(ex);
    }
    return context;
}
这个方法是springboot的核心启动方法,其中包括了准备环境、配置文件的解析、创建IOC容器、内嵌servlet web容器的启动、事件广播等核心逻辑,下面我们挨个进行分析。
1)、获取运行监听器
SpringApplicationRunListeners listeners = getRunListeners(args);

private SpringApplicationRunListeners getRunListeners(String[] args) {
    Class<?>[] types = new Class<?>[] { SpringApplication.class, String[].class };
    // 获取spring.factories配置文件中配置的SpringApplicationRunListener,并通过反射实例化
    return new SpringApplicationRunListeners(logger, getSpringFactoriesInstances(
            SpringApplicationRunListener.class, types, this, args));
}从spring.factories配置文件中找到SpringApplicationRunListener对应的值。其实在springboot中,getSpringFactoriesInstances()方法都是根据传入的Class类型,去"META-INF/spring.factories"文件中,找到执行Class类型对应的值,然后通过反射获取到构造方法,实例化后返回。
在本例中,获取到一个运行监听器EventPublishingRunListener,它主要用来发布SpringBoot启动过程中内置的一些生命周期事件,标志每个不同启动阶段。

2)、发布启动过程中各阶段事件
listeners.starting();

// 上一步获取的listeners就只有EventPublishingRunListener一个。
public void starting() {
    // EventPublishingRunListener
    for (SpringApplicationRunListener listener : this.listeners) {
        listener.starting();
    }
}
循环获取到的所有的运行监听器,依次执行starting()回调方法:
以org.springframework.boot.context.event.EventPublishingRunListener#starting为例:
public void starting() {
    // 通过事件发布器发布容器启动事件ApplicationStartingEvent
    this.initialMulticaster.multicastEvent(
            new ApplicationStartingEvent(this.application, this.args));
}
实际上EventPublishingRunListener的starting()就是通过事件发布器发布了一个ApplicationStartingEvent事件,这就涉及到发布-订阅模式了,这样订阅了这个ApplicationStartingEvent事件的其它地方就可以感知到,做一些其他处理。
后续启动过程,还会依次发布不同的事件,处理流程类似,只是发布的事件类型不一样,这里就不过多分析。
3)、准备环境Environment
ConfigurableEnvironment environment = prepareEnvironment(listeners, applicationArguments);

private ConfigurableEnvironment prepareEnvironment(
        SpringApplicationRunListeners listeners,
        ApplicationArguments applicationArguments) {
    // Create and configure the environment
    ConfigurableEnvironment environment = getOrCreateEnvironment();
    configureEnvironment(environment, applicationArguments.getSourceArgs());
    // 在配置环境信息之前发布事件
    listeners.environmentPrepared(environment);
    bindToSpringApplication(environment);
    if (!this.isCustomEnvironment) {
        environment = new EnvironmentConverter(getClassLoader())
                .convertEnvironmentIfNecessary(environment, deduceEnvironmentClass());
    }
    ConfigurationPropertySources.attach(environment);
    return environment;
}
准备环境,包括系统变量、环境变量、命令行参数、默认变量等。首先返回或者创建基础环境信息对象StandardServletEnvironment,然后配置环境信息对象并绑定到当前Spring应用,监听器调用 listener.environmentPrepared()通知所有的监听器当前环境准备完成。
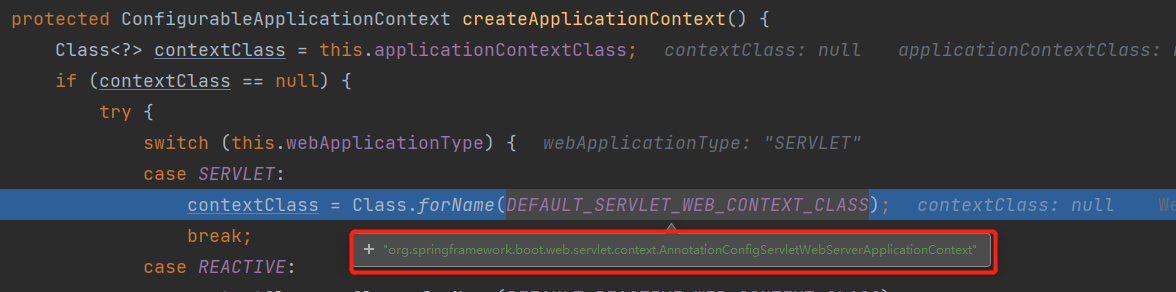
4)、创建ApplicationContext IOC容器
context = createApplicationContext();

protected ConfigurableApplicationContext createApplicationContext() {
    Class<?> contextClass = this.applicationContextClass;
    if (contextClass == null) {
        try {
            switch (this.webApplicationType) {
            case SERVLET:
                contextClass = Class.forName(DEFAULT_SERVLET_WEB_CONTEXT_CLASS);
                break;
            case REACTIVE:
                contextClass = Class.forName(DEFAULT_REACTIVE_WEB_CONTEXT_CLASS);
                break;
            default:
                contextClass = Class.forName(DEFAULT_CONTEXT_CLASS);
            }
        }
        catch (ClassNotFoundException ex) {
            throw new IllegalStateException(
                    "Unable create a default ApplicationContext, "
                            + "please specify an ApplicationContextClass",
                    ex);
        }
    }
    return (ConfigurableApplicationContext) BeanUtils.instantiateClass(contextClass);
}
根据不同类型创建不同类型的spring容器ApplicationContext应用程序上下文。
在本例中,由于是SERVLET项目类型,所以创建的是AnnotationConfigServletWebServerApplicationContext上下文。
5)、准备ApplicationContext IOC容器的基本信息
prepareContext(context, environment, listeners, applicationArguments, printedBanner);

private void prepareContext(ConfigurableApplicationContext context,
        ConfigurableEnvironment environment, SpringApplicationRunListeners listeners,
        ApplicationArguments applicationArguments, Banner printedBanner) {
    // 将环境信息保存到IOC中
    context.setEnvironment(environment);
    postProcessApplicationContext(context);
    // 获取到所有的Initializer,回调initialize()方法
    applyInitializers(context);
    listeners.contextPrepared(context);
    if (this.logStartupInfo) {
        logStartupInfo(context.getParent() == null);
        logStartupProfileInfo(context);
    }
    // Add boot specific singleton beans
    ConfigurableListableBeanFactory beanFactory = context.getBeanFactory();
    beanFactory.registerSingleton("springApplicationArguments", applicationArguments);
    if (printedBanner != null) {
        beanFactory.registerSingleton("springBootBanner", printedBanner);
    }
    if (beanFactory instanceof DefaultListableBeanFactory) {
        ((DefaultListableBeanFactory) beanFactory)
                .setAllowBeanDefinitionOverriding(this.allowBeanDefinitionOverriding);
    }
    // Load the sources
    Set<Object> sources = getAllSources();
    Assert.notEmpty(sources, "Sources must not be empty");
    load(context, sources.toArray(new Object[0]));
    listeners.contextLoaded(context);
}
准备上下文,就是在刷新IOC容器之前做一些初始化工作,主要包括:
- a、将环境信息保存到IOC容器中;
- b、对前面创建的ApplicationContext 做后置处理,设置资源加载器、类加载器等;
- c、应用初始化器,获取到构建SpringApplication时所有的Initializer初始化器ApplicationContextInitializer ,挨个回调initialize()方法,来对ioc容器进行初始化扩展功能;
- d、发布ApplicationContextInitializedEvent事件;
- e、注册单例bean,如springApplicationArguments、springBootBanner等;
- f、设置bean工厂允许覆盖bean定义信息;
6)、刷新IOC容器
refreshContext(context)

private void refreshContext(ConfigurableApplicationContext context) {
    refresh(context);
    if (this.registerShutdownHook) {
        try {
            context.registerShutdownHook();
        }
        catch (AccessControlException ex) {
            // Not allowed in some environments.
        }
    }
}

protected void refresh(ApplicationContext applicationContext) {
    Assert.isInstanceOf(AbstractApplicationContext.class, applicationContext);
    ((AbstractApplicationContext) applicationContext).refresh();
}
创建容器中的所有组件,这里真正开始创建Spring的IOC容器,即执行AbstractApplicationContext类的refresh()中核心的12个步骤:
- a、prepareRefresh():容器刷新前的一些预处理工作;
- b、obtainFreshBeanFactory():创建DefaultListableBeanFactory工厂,给bean工厂设置一些属性,加载配置文件信息,封装成bean定义信息;
- c、prepareBeanFactory(beanFactory):设置bean工厂的一些属性,如添加一些BeanPostProcessor增强器等
- d、postProcessBeanFactory(beanFactory):模板方法,留给子类扩展实现;
- e、invokeBeanFactoryPostProcessors(beanFactory):执行BeanFactoryPostProcessor的postProcessBeanFactory()增强方法;
- f、registerBeanPostProcessors(beanFactory):注册BeanPostProcessor增强器,注意这里只是注册,真正是在初始化阶段的前后执行;
- g、initMessageSource():初始化MessageSource,国际化处理;
- h、initApplicationEventMulticaster():初始化事件多播器;
- i、onRefresh():模板方法,留给子类扩展实现;
- j、registerListeners():注册一些监听器;
- k、finishBeanFactoryInitialization(beanFactory):完成非懒加载的单例bean对象的实例化,包括反射创建bean对象、属性填充、循环依赖的处理、bean的初始化等等;
- l、finishRefresh():容器刷新完成之后的一些处理工作;
7)、调用所有runners
callRunners(context, applicationArguments)

private void callRunners(ApplicationContext context, ApplicationArguments args) {
    List<Object> runners = new ArrayList<>();
    // 将ApplicationRunner添加到runners中
    runners.addAll(context.getBeansOfType(ApplicationRunner.class).values());
    // 将CommandLineRunner添加到runners中
    runners.addAll(context.getBeansOfType(CommandLineRunner.class).values());
    // 排序
    AnnotationAwareOrderComparator.sort(runners);
    // 循环所有的runners,执行run()方法
    for (Object runner : new LinkedHashSet<>(runners)) {
        if (runner instanceof ApplicationRunner) {
            callRunner((ApplicationRunner) runner, args);
        }
        if (runner instanceof CommandLineRunner) {
            callRunner((CommandLineRunner) runner, args);
        }
    }
}
获取容器中的 ApplicationRunner 、CommandLineRunner,然后合并所有runner并且按照@Order进行排序,遍历所有的runner,调用 run 方法,实现spring容器启动成功后需要执行的一些逻辑。
以上就是springboot应用启动的核心流程分析。