前言
上个月写了一个《基于halcon的眼在手上(Eye-in-Hand)标定》的文章,通过官方的示例代码进行了简单的叙述,想学习的小伙伴可以点击链接进行学习。之前博主认为眼在手上(Eye-in-Hand)的案例更多,或者说是使用场景更多的。但是,最近在学习机械臂的运动规划方向的内容后,发现对于机械臂避障这一块,眼在手上的实施方式是不太可能实现避障的。主要问题在于,眼在手上这种方式,只能看到机械臂前端的物体,而忽略机械臂周围的物体,没有周围物体的位置,那么机械臂在运动过程中,就难以保证机械臂不会碰撞。而眼在手外则可以看到机械臂和机械臂周围的物体,减小机械臂与周围物体碰撞的概率。
(emmm。。这里得提一下,对机械臂的运动规划这一部分内容通常是在Moveit!中进行的,当然肯定会有在该平台下的手眼标定方案,需要的小伙伴请自行学习。由于我感觉halcon的手眼标定精度是不错的,所以还是记录一下啦~)
halcon示例代码
halcon示例代码
*
* This example explains how to use the hand eye calibration for the case where
* the camera is stationary with respect to the robot and the calibration
* object is attached to the robot arm.
* In this case, the goal of the hand eye calibration
* is to determine two unknown poses:
* - the pose of the robot base in the coordinate system
*   of the camera (BaseInCamPose).
* - the pose of the calibration object in the coordinate system of the
*   tool (CalObjInToolPose)
* Theoretically, as input the method needs at least 3 poses of the
* calibration object in the camera coordinate system and the corresponding
* poses of the robot tool in the coordinate system of the
* robot base. However it is recommended
* to use at least 10 Poses.
* The poses of the calibration object are obtained from images of the
* calibration object recorded with the stationary camera.
* The calibration object is moved by the robot with respect to the camera.
* To obtain good calibration results, it its essential to position
* the calibration object with respect to the camera so that the object appears
* tilted in the image.
* After the hand eye calibration, the computed transformations are
* extracted and used to compute the pose of the calibration object in the
* camera coordinate system.
dev_update_off ()
* Directories with calibration images and data files
ImageNameStart := '3d_machine_vision/hand_eye/stationarycam_calib3cm_'
DataNameStart := 'hand_eye/stationarycam_'
NumImages := 17
* Read image
read_image (Image, ImageNameStart + '00')
get_image_size (Image, Width, Height)
* Open window
dev_close_window ()
dev_open_window (0, 0, Width, Height, 'black', WindowHandle)
dev_set_line_width (2)
dev_set_draw ('margin')
dev_display (Image)
* Set font
set_display_font (WindowHandle, 14, 'mono', 'true', 'false')
* Load the calibration plate description file.
* Make sure that the file is in the current directory,
* the HALCONROOT/calib directory, or use an absolut path
CalTabFile := 'caltab_30mm.descr'
* Read the initial values for the internal camera parameters
read_cam_par (DataNameStart + 'start_campar.dat', StartCamParam)
* Create the calibration model for the hand eye calibration
create_calib_data ('hand_eye_stationary_cam', 1, 1, CalibDataID)
set_calib_data_cam_param (CalibDataID, 0, [], StartCamParam)
set_calib_data_calib_object (CalibDataID, 0, CalTabFile)
set_calib_data (CalibDataID, 'model', 'general', 'optimization_method', 'nonlinear')
disp_message (WindowHandle, 'The calibration data model was created', 'window', 12, 12, 'black', 'true')
disp_continue_message (WindowHandle, 'black', 'true')
stop ()
* Start the loop over the calibration images
for I := 0 to NumImages - 1 by 1
    read_image (Image, ImageNameStart + I$'02d')
    * Search for the calibration plate, extract the marks and the
    * pose of it, and store the results in the calibration data model of the
    * hand-eye calibration
    find_calib_object (Image, CalibDataID, 0, 0, I, [], [])
    get_calib_data_observ_contours (Caltab, CalibDataID, 'caltab', 0, 0, I)
    get_calib_data_observ_points (CalibDataID, 0, 0, I, RCoord, CCoord, Index, CalObjInCamPose)
    * Visualize the extracted calibration marks and the estimated pose (coordinate system)
    dev_set_color ('green')
    dev_display (Image)
    dev_display (Caltab)
    dev_set_color ('yellow')
    disp_cross (WindowHandle, RCoord, CCoord, 6, 0)
    dev_set_colored (3)
    disp_3d_coord_system (WindowHandle, StartCamParam, CalObjInCamPose, 0.01)
    * Read pose of tool in robot base coordinates (ToolInBasePose)
    read_pose (DataNameStart + 'robot_pose_' + I$'02d' + '.dat', ToolInBasePose)
    * Set the pose tool in robot base coordinates in the calibration data model
    set_calib_data (CalibDataID, 'tool', I, 'tool_in_base_pose', ToolInBasePose)
    * Uncomment to inspect visualization
*     disp_message (WindowHandle, 'Extracting data from calibration image ' + (I + 1) + ' of ' + NumImages, 'window', 12, 12, 'black', 'true')
*     disp_continue_message (WindowHandle, 'black', 'true')
*     stop ()
endfor
disp_message (WindowHandle, 'All relevant data has been set in the calibration data model', 'window', 12, 12, 'black', 'true')
disp_continue_message (WindowHandle, 'black', 'true')
stop ()
* Check the input poses for consistency
check_hand_eye_calibration_input_poses (CalibDataID, 0.05, 0.005, Warnings)
if (|Warnings| != 0)
    * There were problem detected in the input poses. Inspect Warnings and
    * remove erroneous poses with remove_calib_data and remove_calib_data_observ.
    dev_inspect_ctrl (Warnings)
    stop ()
endif
* Perform hand-eye calibration
* Internally before performing the hand-eye calibration the cameras are calibrated
* and the calibrated poses of the calibration object in the camera are used.
dev_display (Image)
disp_message (WindowHandle, 'Performing the hand-eye calibration', 'window', 12, 12, 'black', 'true')
calibrate_hand_eye (CalibDataID, Errors)
* Query the error of the camera calibration
get_calib_data (CalibDataID, 'model', 'general', 'camera_calib_error', CamCalibError)
* Query the camera parameters and the poses
get_calib_data (CalibDataID, 'camera', 0, 'params', CamParam)
* Get poses computed by the hand eye calibration
get_calib_data (CalibDataID, 'camera', 0, 'base_in_cam_pose', BaseInCamPose)
get_calib_data (CalibDataID, 'calib_obj', 0, 'obj_in_tool_pose', ObjInToolPose)
try
    * Store the camera parameters to file
    write_cam_par (CamParam, DataNameStart + 'final_campar.dat')
    * Save the hand eye calibration results to file
    write_pose (BaseInCamPose, DataNameStart + 'final_pose_cam_base.dat')
    write_pose (ObjInToolPose, DataNameStart + 'final_pose_tool_calplate.dat')
catch (Exception)
    * Do nothing
endtry
* Display calibration errors of the hand-eye calibration
disp_results (WindowHandle, CamCalibError, Errors)
disp_continue_message (WindowHandle, 'black', 'true')
stop ()
* For the given camera, get the corresponding pose indices and calibration object indices
query_calib_data_observ_indices (CalibDataID, 'camera', 0, CalibObjIdx, PoseIds)
* Compute the pose of the calibration object in the camera coordinate
* system via calibrated poses and the ToolInBasePose and visualize it.
for I := 0 to NumImages - 1 by 1
    read_image (Image, ImageNameStart + I$'02d')
    * Obtain the pose of the tool in robot base coordinates used in the calibration.
    * The index corresponds to the index of the pose of the observation object.
    get_calib_data (CalibDataID, 'tool', PoseIds[I], 'tool_in_base_pose', ToolInBasePose)
    dev_display (Image)
    * Compute the pose of the calibration plate with respect to the camera
    * and visualize it
    calc_calplate_pose_stationarycam (ObjInToolPose, BaseInCamPose, ToolInBasePose, CalObjInCamPose)
    dev_set_colored (3)
    disp_3d_coord_system (WindowHandle, CamParam, CalObjInCamPose, 0.01)
    Message := 'Using the calibration results to display the'
    Message[1] := 'coordinate system in image ' + (I + 1) + ' of ' + NumImages
    disp_message (WindowHandle, Message, 'window', 12, 12, 'black', 'true')
    if (I < NumImages - 1)
        disp_continue_message (WindowHandle, 'black', 'true')
        stop ()
    endif
endfor
* Clear the data model
clear_calib_data (CalibDataID)
*
* After the hand-eye calibration, the computed pose
* BaseInCamPose can be used in robotic grasping applications.
* To grasp an object with the robot, typically, its pose
* with respect to the camera is determined (which
* is simulated here by setting the object's pose to the
* pose of the calibration object)
ObjInCamPose := CalObjInCamPose
* If the tool coordinate system is placed at the gripper
* and an object detected at ObjInCamPose shall be grasped,
* the pose of the detected object relative
* to the robot base coordinate system has to be computed.
pose_invert (BaseInCamPose, CamInBasePose)
pose_compose (CamInBasePose, ObjInCamPose, ObjInBasePose)
解析
和眼在手上一致,眼在手外的标定代码前面部分也是一些参数配置。比如:ImageNameStart和DataNameStart是文件地址起始部分路径(文件名相同部分)、NumImages为图像数量。
创建、设置标定模型
下面代码主要是用于创建标定模型:
* Read the initial values for the internal camera parameters
read_cam_par (DataNameStart + 'start_campar.dat', StartCamParam)
* Create the calibration model for the hand eye calibration
create_calib_data ('hand_eye_stationary_cam', 1, 1, CalibDataID)
set_calib_data_cam_param (CalibDataID, 0, [], StartCamParam)
set_calib_data_calib_object (CalibDataID, 0, CalTabFile)
set_calib_data (CalibDataID, 'model', 'general', 'optimization_method', 'nonlinear')
read_cam_par 读取相机内参;
create_calib_data 创建标定模型;
set_calib_data_cam_param 将相机内参设置到标定模型中;
set_calib_data_calib_object 获取标定板的描述文件;
set_calib_data 设置标定的一些参数;
读取标定图像
下面是for循环中的内容,主要功能为读取标定图像:
read_image (Image, ImageNameStart + I$'02d')
* Search for the calibration plate, extract the marks and the
* pose of it, and store the results in the calibration data model of the
* hand-eye calibration
find_calib_object (Image, CalibDataID, 0, 0, I, [], [])
get_calib_data_observ_contours (Caltab, CalibDataID, 'caltab', 0, 0, I)
get_calib_data_observ_points (CalibDataID, 0, 0, I, RCoord, CCoord, Index, CalObjInCamPose)
read_image 读取图像;
find_calib_object 寻找标定板;
get_calib_data_observ_contours 找到标定板,然后画轮廓;
get_calib_data_observ_points 找到标定板,然后画标定点;
读取工具坐标系位姿
每一张图像对应着一个机械臂末端夹具(工具坐标系)在机械臂基坐标系下的位姿
* Read pose of tool in robot base coordinates (ToolInBasePose)
read_pose (DataNameStart + 'robot_pose_' + I$'02d' + '.dat', ToolInBasePose)
* Set the pose tool in robot base coordinates in the calibration data model
set_calib_data (CalibDataID, 'tool', I, 'tool_in_base_pose', ToolInBasePose)
read_pose 读取工具坐标系在机械臂基坐标系下的位姿;
set_calib_data 将读取的结果设置到标定模型中;
手眼标定
参数读取和设置都完成之后,结下来就是手眼标定啦~
calibrate_hand_eye (CalibDataID, Errors)
* Query the error of the camera calibration
get_calib_data (CalibDataID, 'model', 'general', 'camera_calib_error', CamCalibError)
* Query the camera parameters and the poses
get_calib_data (CalibDataID, 'camera', 0, 'params', CamParam)
* Get poses computed by the hand eye calibration
get_calib_data (CalibDataID, 'camera', 0, 'base_in_cam_pose', BaseInCamPose)
get_calib_data (CalibDataID, 'calib_obj', 0, 'obj_in_tool_pose', ObjInToolPose)
calibrate_hand_eye 手眼标定;
get_calib_data 获取一些标定数据,这个算子有点特别,里面包含很多参数选择,这里就不进行叙述了。想要了解的小伙伴可以去halcon算子里面进行学习;
到这里标定就结束了。下面是保存参数。
write_cam_par (CamParam, DataNameStart + 'final_campar.dat')
write_pose (ToolInCamPose, DataNameStart + 'final_pose_cam_tool.dat')
write_pose (CalObjInBasePose, DataNameStart + 'final_pose_base_calplate.dat')
write_pose (PlaneInBasePose, DataNameStart + 'final_pose_base_plane.dat')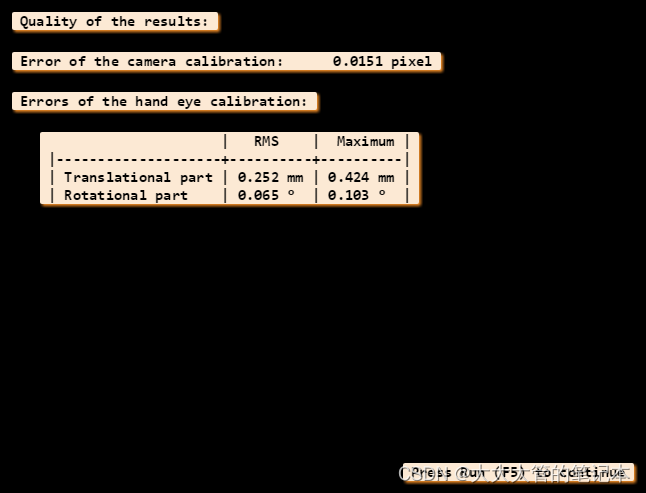
验证
在这里就不对验证进行解释了,简单来说就是根据以下三个坐标系进行转换:标定板坐标系相对于基座标系的转换关系、工具坐标系相对于相机坐标系的转换关系、工具坐标系相对于机械臂基座标的转换关系。这里进行一些数学计算,就能获得标定板坐标系在相机坐标系下的位置和姿态。注意这里不是识别标定板的结果,而是根据结果进行验证。
下面是一个比较好的结果(halcon示例结果):
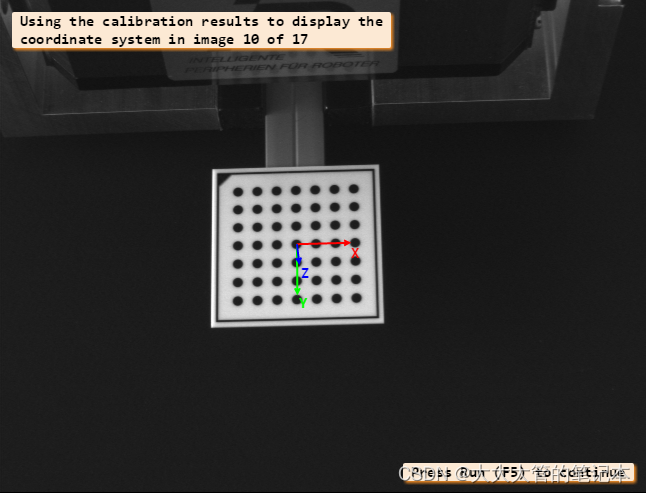
可以看到坐标系和标定板的中心和姿态基本上是吻合的。这就是一个好的结果。
-------------------------2024.06.27 留个坑,等我有空实验一下--------------