前言
人脸皱纹主要区分有额纹、川字纹、眼下纹、法令纹、嘴角纹,眼角纹等,在美颜相机,智能医美等于应用领域里,需要对人脸皱纹进行检测、定位、分割,测量等。
传统图像算法的皱纹检测
1.传统算法的皱纹检测可参考《人脸图像的皱纹检测与定量评价研究》这篇论文,下面是论文复现的代码。
from PIL import Image
import cv2
import time
import numpy as np
from skimage.filters import frangi, gabor
from skimage import measure, morphology
from Partition import practice14 as pa
#
# class UnionFindSet(object):
#
#     def __init__(self, m):
#         # m, n = len(grid), len(grid[0])
#         self.roots = [i for i in range(m)]
#         self.rank = [0 for i in range(m)]
#         self.count = m
#
#         for i in range(m):
#             self.roots[i] = i
#
#     def find(self, member):
#         tmp = []
#         while member != self.roots[member]:
#             tmp.append(member)
#             member = self.roots[member]
#         for root in tmp:
#             self.roots[root] = member
#         return member
#
#     def union(self, p, q):
#         parentP = self.find(p)
#         parentQ = self.find(q)
#         if parentP != parentQ:
#             if self.rank[parentP] > self.rank[parentQ]:
#                 self.roots[parentQ] = parentP
#             elif self.rank[parentP] < self.rank[parentQ]:
#                 self.roots[parentP] = parentQ
#             else:
#                 self.roots[parentQ] = parentP
#                 self.rank[parentP] -= 1
#             self.count -= 1
#
#
# class Solution(object):
#     def countComponents(self, n, edges):
#         """
#         :type n: int
#         :type edges: List[List[int]]
#         :rtype: int
#         """
#         ufs = UnionFindSet(n)
#         # print ufs.roots
#         for edge in edges:
#             start, end = edge[0], edge[1]
#             ufs.union(start, end)
#
#         return ufs.count
#
#
# # def connected_component(thresh_A):
# #     thresh_A_copy = thresh_A.copy()  # 复制thresh_A到thresh_A_copy
# #     thresh_B = np.zeros(thresh_A.shape).astype(int)  # thresh_B大小与A相同,像素值为0
# #
# #     kernel = cv2.getStructuringElement(cv2.MORPH_CROSS, (3, 3))  # 3×3结构元
# #
# #     count = []  # 为了记录连通分量中的像素个数
# #     xy_count = []
# #     # 循环,直到thresh_A_copy中的像素值全部为0
# #     while thresh_A_copy.any():
# #         Xa_copy, Ya_copy = np.where(thresh_A_copy > 0)  # thresh_A_copy中值为255的像素的坐标
# #         thresh_B[Xa_copy[0]][Ya_copy[0]] = 1  # 选取第一个点,并将thresh_B中对应像素值改为255
# #
# #         # 连通分量算法,先对thresh_B进行膨胀,再和thresh_A执行and操作(取交集)
# #         for i in range(thresh_A.shape[0]):
# #             dilation_B = cv2.dilate(thresh_B, kernel, iterations=1)
# #             print(type(thresh_A), type(dilation_B.astype(int)))
# #             thresh_B = cv2.bitwise_and(np.uint8(thresh_A), dilation_B.astype(int))
# #
# #         # 取thresh_B值为255的像素坐标,并将thresh_A_copy中对应坐标像素值变为0
# #         Xb, Yb = np.where(thresh_B > 0)
# #         thresh_A_copy[Xb, Yb] = 0
# #         xy_count.append(np.c_[Xb, Yb])
# #         # 显示连通分量及其包含像素数量
# #         count.append(len(Xb))
# #         if len(count) == 0:
# #             print("无连通分量")
# #         if len(count) == 1:
# #             print("第1个连通分量为{}".format(count[0]))
# #             print(xy_count[0], "2")
# #             ecc = measure.regionprops(xy_count[0])
# #             print(ecc[0].eccentricity)
# #         if len(count) >= 2:
# #             if (count[-1] - count[-2]) < 2:
# #                 continue
# #             print("第{}个连通分量为{}".format(len(count), count[-1] - count[-2]))
# #             print(xy_count[len(count) - 1][len(xy_count[-2]):len(xy_count[-1])], "2")
# #             ecc = measure.regionprops(xy_count[len(count) - 1][len(xy_count[-2]):len(xy_count[-1])])
# #             print(ecc[0].eccentricity)
# def connected_component(path):
#     img_A = cv2.imread(path)
#     gray_A = cv2.cvtColor(img_A, cv2.COLOR_BGR2GRAY)  # 转换成灰度图
#     ret, thresh_A = cv2.threshold(gray_A, 20, 255, cv2.THRESH_BINARY_INV)  # 灰度图转换成二值图像
#     print(thresh_A, "thresh_A")
#     thresh_A_copy = thresh_A.copy()  # 复制thresh_A到thresh_A_copy
#     thresh_B = np.zeros(thresh_A.shape, np.uint8)  # thresh_B大小与A相同,像素值为0
#
#     kernel = cv2.getStructuringElement(cv2.MORPH_ELLIPSE, (3, 3))  # 3×3结构元
#
#     count = []  # 为了记录连通分量中的像素个数
#     xy_count = []
#     # 循环,直到thresh_A_copy中的像素值全部为0
#     while thresh_A_copy.any():
#         Xa_copy, Ya_copy = np.where(thresh_A_copy > 0)  # thresh_A_copy中值为255的像素的坐标
#         thresh_B[Xa_copy[0]][Ya_copy[0]] = 255  # 选取第一个点,并将thresh_B中对应像素值改为255
#
#         # 连通分量算法,先对thresh_B进行膨胀,再和thresh_A执行and操作(取交集)
#         for i in range(200):
#             dilation_B = cv2.dilate(thresh_B, kernel, iterations=1)
#             thresh_B = cv2.bitwise_and(thresh_A, dilation_B)
#
#         # 取thresh_B值为255的像素坐标,并将thresh_A_copy中对应坐标像素值变为0
#         Xb, Yb = np.where(thresh_B > 0)
#         thresh_A_copy[Xb, Yb] = 0
#         xy_count.append(np.c_[Xb, Yb])
#         # 显示连通分量及其包含像素数量
#         count.append(len(Xb))
#         if len(count) == 0:
#             print("无连通分量")
#         if len(count) == 1:
#             print("第1个连通分量为{}".format(count[0]))
#             # print(np.c_[Xb, Yb], "1")
#             print(xy_count[0], "2")
#
#             ecc = measure.regionprops(xy_count[0])
#             print(ecc[0].eccentricity)
#         if len(count) >= 2:
#             if (count[-1] - count[-2]) < 2:
#                 continue
#             print("第{}个连通分量为{}".format(len(count), count[-1] - count[-2]))
#             # print(np.c_[Xb, Yb], "1")
#             print(xy_count[len(count) - 1][len(xy_count[-2]):len(xy_count[-1])], "2")
#             ecc = measure.regionprops(xy_count[len(count) - 1][len(xy_count[-2]):len(xy_count[-1])])
#             print(ecc[0].eccentricity)


def master_control(image):
    # image = cv2.resize(image, (int(image.shape[1]*0.3), int(image.shape[0]*0.3)), interpolation=cv2.INTER_CUBIC)  # 图片分辨率很大是要变小
    b, g, r = cv2.split(image)  # image

    sk_frangi_img = frangi(g, scale_range=(0, 1), scale_step=0.01, beta1=1.5, beta2=0.01)  # 线宽范围,步长,连接程度(越大连接越多),减少程度(越大减得越多)0.015
    sk_frangi_img = morphology.closing(sk_frangi_img, morphology.disk(1))
    sk_gabor_img_1, sk_gabor_1 = gabor(g, frequency=0.35, theta=0)
    sk_gabor_img_2, sk_gabor_2 = gabor(g, frequency=0.35, theta=45)  # 越小越明显
    sk_gabor_img_3, sk_gabor_3 = gabor(g, frequency=0.35, theta=90)
    sk_gabor_img_4, sk_gabor_4 = gabor(g, frequency=0.35, theta=360)  # 横向皱纹
    sk_gabor_img_1 = morphology.opening(sk_gabor_img_1, morphology.disk(2))
    sk_gabor_img_2 = morphology.opening(sk_gabor_img_2, morphology.disk(1))
    sk_gabor_img_3 = morphology.opening(sk_gabor_img_3, morphology.disk(2))
    sk_gabor_img_4 = morphology.opening(sk_gabor_img_4, morphology.disk(2))
    all_img = cv2.add(0.1 * sk_gabor_img_2, 0.9 * sk_frangi_img)  # + 0.02 * sk_gabor_img_1 + 0.02 * sk_gabor_img_2 + 0.02 * sk_gabor_img_3
    all_img = morphology.closing(all_img, morphology.disk(1))
    _, all_img = cv2.threshold(all_img, 0.3, 1, 0)
    img1 = all_img
    # print(all_img, all_img.shape, type(all_img))
    # contours, image_cont = cv2.findContours(all_img, cv2.RETR_EXTERNAL, cv2.CHAIN_APPROX_SIMPLE)
    # all_img = all_img + image_cont
    bool_img = all_img.astype(bool)
    label_image = measure.label(bool_img)
    count = 0

    for region in measure.regionprops(label_image):
        if region.area < 10: #   or region.area > 700
            x = region.coords
            for i in range(len(x)):
                all_img[x[i][0]][x[i][1]] = 0
            continue
        if region.eccentricity > 0.98:
            count += 1
        else:
            x = region.coords
            for i in range(len(x)):
                all_img[x[i][0]][x[i][1]] = 0

    skel, distance = morphology.medial_axis(all_img.astype(int), return_distance=True)
    skels = morphology.closing(skel, morphology.disk(1))
    trans1 = skels  # 细化
    return skels, count  # np.uint16(skels.astype(int))


def face_wrinkle(path):
    # result = pa.curve(path, backage)
    result = cv2.imread(path)
    img, count = master_control(result)
    print(img.astype(float))
    result[img > 0.1] = 255
    cv2.imshow("result", img.astype(float))
    cv2.waitKey(0)


if __name__ == '__main__':
    path = "2885.png"
    # backage = r'shape_predictor_81_face_landmarks.dat'

    face_wrinkle(path)
检测结果:

2.基于传统的图像算法的皱纹检测,对于一些复杂的使用场景,要做的预处理相对麻烦很多。
基于ENet算法的皱纹检测
1.ENet 网络
1.ENet 是的论文《ENet: A Deep Neural Network Architecture for Real-Time Semantic Segmentation》在2017年发布,ENet算法的目标是语义分割的快速实现,在考虑分割精确度的同时,还要考虑分割的实时性能。语义分割的基本网络结构为编码-解码结构,即通过下采样实现像素级的分类、上采样实现图像目标的定位。要想提高算法的实时性,必须在上采样阶段减少计算量,提高采样速度。
ENet算法选择在初始化模块中设计一个池化操作与一个步长为2的卷积操作并行,并合并结果特征图,在网络早期使用了更小尺寸和更少数量的特征图,大大减少了网络参数,提高了网络的运行速度,ENet算法在下采样过程使用了扩张卷积,可以很好的平衡图像分辨率和图像感受野,实现在不降低特征图分辨率的同时扩大图像目标的感受野。不同于SegNet算法是一个非常对称的结构,编码器和解码器结构大小相同,ENet算法包含了一个大的编码器和一个小的解码器,有助于降低ENet网络的参数量。
2.ENet网络源码可以在git上获取,但最初的使用的学习框架是caffe,为了之后模型的扩展,这里要框架改成pytorch.
2. 数据集标注
1.数据是从网上收集的,大概有100多张图像,有各种人脸皱纹。
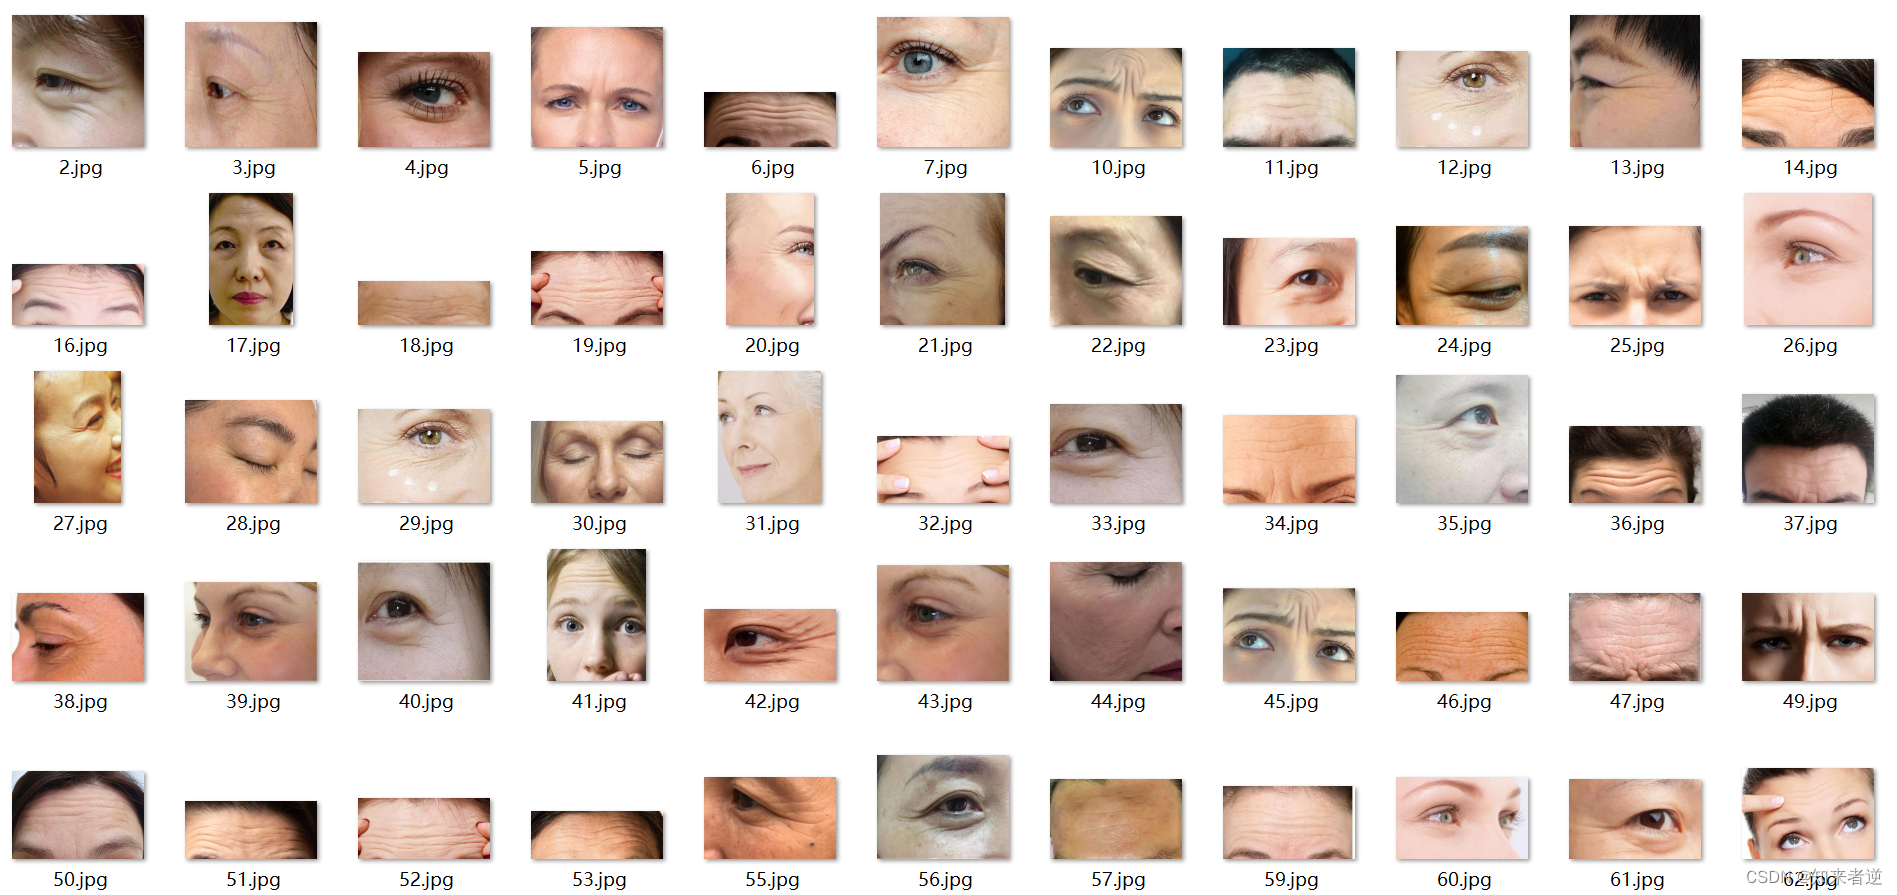
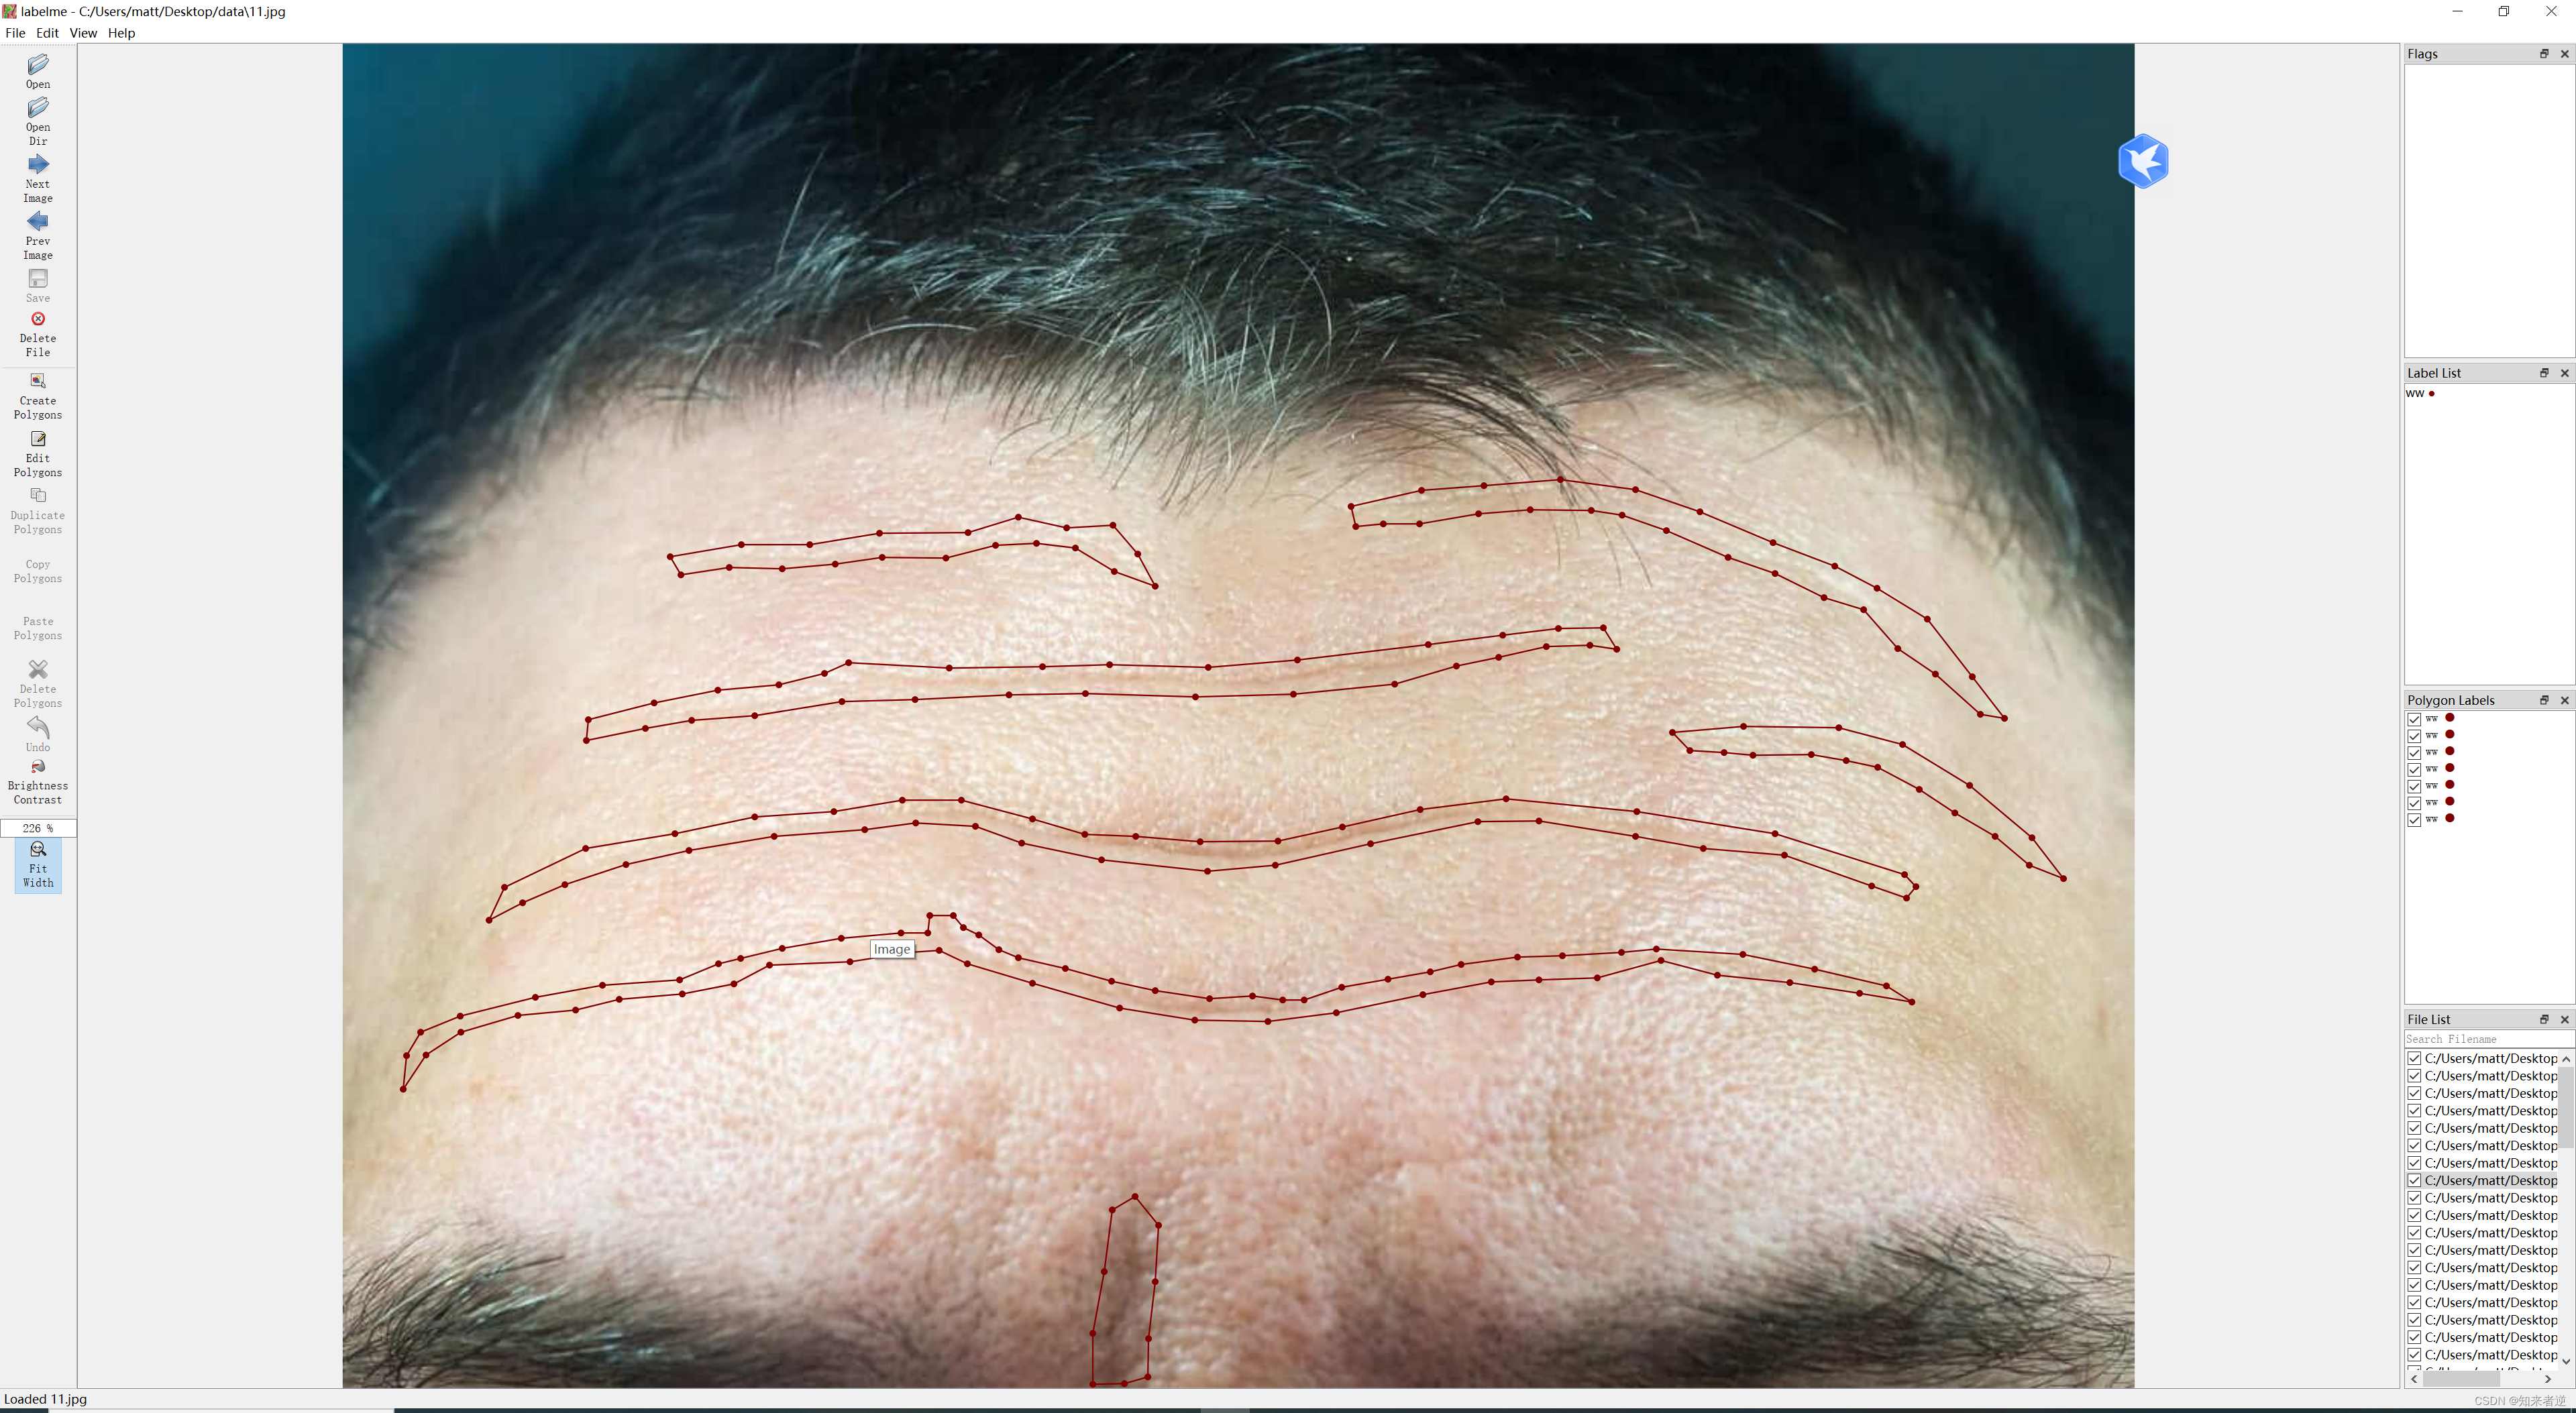
2.因为没有找到标注单独线条的工具,这里使用labelme对数据进行标注。标注结果如下:

3.数据集处理
1.生成数据集,运行下面脚本,能生成样本标签和训练集与测试集。
import os
import sys
import glob
import json
import math
import uuid
import random

import numpy as np
import PIL.Image
import PIL.ImageDraw
from tqdm import tqdm
import  cv2 as cv

def shape_to_mask(img_shape, points, shape_type=None,
                  line_width=10, point_size=5):
    mask = np.zeros(img_shape[:2], dtype=np.uint8)
    mask = PIL.Image.fromarray(mask)
    draw = PIL.ImageDraw.Draw(mask)
    xy = [tuple(point) for point in points]
    if shape_type == 'circle':
        assert len(xy) == 2, 'Shape of shape_type=circle must have 2 points'
        (cx, cy), (px, py) = xy
        d = math.sqrt((cx - px) ** 2 + (cy - py) ** 2)
        draw.ellipse([cx - d, cy - d, cx + d, cy + d], outline=1, fill=1)
    elif shape_type == 'rectangle':
        assert len(xy) == 2, 'Shape of shape_type=rectangle must have 2 points'
        draw.rectangle(xy, outline=1, fill=1)
    elif shape_type == 'line':
        assert len(xy) == 2, 'Shape of shape_type=line must have 2 points'
        draw.line(xy=xy, fill=1, width=line_width)
    elif shape_type == 'linestrip':
        draw.line(xy=xy, fill=1, width=line_width)
    elif shape_type == 'point':
        assert len(xy) == 1, 'Shape of shape_type=point must have 1 points'
        cx, cy = xy[0]
        r = point_size
        draw.ellipse([cx - r, cy - r, cx + r, cy + r], outline=1, fill=1)
    else:
        assert len(xy) > 2, 'Polygon must have points more than 2'
        draw.polygon(xy=xy, outline=1, fill=1)
    mask = np.array(mask, dtype=bool)
    return mask

def shapes_to_label(img_shape, shapes, label_name_to_value):
    cls = np.zeros(img_shape[:2], dtype=np.int32)
    ins = np.zeros_like(cls)
    instances = []
    for shape in shapes:
        points = shape['points']
        label = shape['label']
        group_id = shape.get('group_id')
        if group_id is None:
            group_id = uuid.uuid1()
        shape_type = shape.get('shape_type', None)

        cls_name = label
        instance = (cls_name, group_id)

        if instance not in instances:
            instances.append(instance)
        ins_id = instances.index(instance) + 1
        cls_id = 1
        # cls_id = label_name_to_value[cls_name]

        mask = shape_to_mask(img_shape[:2], points, shape_type)
        cls[mask] = cls_id
        ins[mask] = ins_id

    return cls, ins

def lblsave(filename, lbl):
    if os.path.splitext(filename)[1] != '.png':
        filename += '.png'
    # Assume label ranses [-1, 254] for int32,
    # and [0, 255] for uint8 as VOC.
    if lbl.min() >= 0 and lbl.max() <= 255:
        lbl_pil = PIL.Image.fromarray(lbl.astype(np.uint8), mode='L')
        lbl_pil.save(filename)
    else:
        raise ValueError(
            '[%s] Cannot save the pixel-wise class label as PNG. '
            'Please consider using the .npy format.' % filename
        )

if __name__ == '__main__':
    data_path = 'D:/DL/ENet/wrinkle/'
    out_path = 'D:/DL/ENet/datasets'
    if not os.path.exists(out_path):
        os.makedirs(out_path)
    label_name_to_value = {
        '_background_': 0,
        'ww': 1,
    }
    json_fns = glob.glob(os.path.join(data_path, '**/*.json'), recursive=True)
    out_lst = []
    for json_fn in tqdm(json_fns):
        with open(json_fn, 'r') as f:
            data = json.load(f)
        img_shape = (data['imageHeight'], data['imageWidth'])
        lbl, _ = shapes_to_label(img_shape, data['shapes'], label_name_to_value)
        image_fn = json_fn.replace('.json', '.jpg')
        label_fn = json_fn.replace('.json', '_label.png')
        lblsave(label_fn, lbl)
        if not os.path.exists(image_fn):
            print(image_fn + ' not exists')
            continue
        else:
            #img = PIL.Image.open(image_fn)
            #mask = PIL.Image.open(label_fn)
            img = cv.imread(image_fn)
            mask = cv.imread(label_fn)
            if img.size != mask.size:
                print(image_fn, img.size, mask.size)
                continue

        out_lst.append(image_fn + ',' + label_fn)
    random.shuffle(out_lst)
    trn_num = int(len(out_lst) * 0.9)
    with open(os.path.join(out_path, 'train.txt'), 'w') as f:
        f.write('\n'.join(out_lst[:trn_num]))
    with open(os.path.join(out_path, 'val.txt'), 'w') as f:
        f.write('\n'.join(out_lst[trn_num:]))
2.如果使用不做处理,直接用这个使用这个标签来训练模型,最终得到的结果会是整个皱纹包括边际,这种结果并不理想,如果要精细化,则要佬轮廓骨架提取。
3.对轮廓进行骨架提取
骨架提取代码:
void skeleton_extraction(cv::Mat& cv_src, cv::Mat &cv_dst)
{
	cv_dst = cv_src.clone();
	std::vector<cv::Point> deletelist1;
	int index[9];
	int nl = cv_dst.rows;
	int nc = cv_dst.cols;
	while (true)
	{
		for (int j = 1; j < (nl - 1); j++)
		{
			uchar* data_last = cv_dst.ptr<uchar>(j - 1);
			uchar* data = cv_dst.ptr<uchar>(j);
			uchar* data_next = cv_dst.ptr<uchar>(j + 1);
			for (int i = 1; i < (nc - 1); i++)
			{
				if (data[i] == 255)
				{
					index[0] = 1;
					if (data_last[i] == 255) index[1] = 1;
					else  index[1] = 0;
					if (data_last[i + 1] == 255) index[2] = 1;
					else  index[2] = 0;
					if (data[i + 1] == 255) index[3] = 1;
					else  index[3] = 0;
					if (data_next[i + 1] == 255) index[4] = 1;
					else  index[4] = 0;
					if (data_next[i] == 255) index[5] = 1;
					else  index[5] = 0;
					if (data_next[i - 1] == 255) index[6] = 1;
					else  index[6] = 0;
					if (data[i - 1] == 255) index[7] = 1;
					else  index[7] = 0;
					if (data_last[i - 1] == 255) index[8] = 1;
					else  index[8] = 0;
					int whitepointtotal = 0;
					for (int k = 1; k < 9; k++)
					{
						whitepointtotal = whitepointtotal + index[k];
					}
					if ((whitepointtotal >= 2) && (whitepointtotal <= 6))
					{
						int ap = 0;
						if ((index[1] == 0) && (index[2] == 1)) ap++;
						if ((index[2] == 0) && (index[3] == 1)) ap++;
						if ((index[3] == 0) && (index[4] == 1)) ap++;
						if ((index[4] == 0) && (index[5] == 1)) ap++;
						if ((index[5] == 0) && (index[6] == 1)) ap++;
						if ((index[6] == 0) && (index[7] == 1)) ap++;
						if ((index[7] == 0) && (index[8] == 1)) ap++;
						if ((index[8] == 0) && (index[1] == 1)) ap++;
						if (ap == 1)
						{
							if ((index[1] * index[7] * index[5] == 0) && (index[3] * index[5] * index[7] == 0))
							{
								deletelist1.push_back(cv::Point(i, j));
							}
						}
					}
				}
			}
		}
		if (deletelist1.size() == 0) break;
		for (size_t i = 0; i < deletelist1.size(); i++)
		{
			cv::Point tem;
			tem = deletelist1[i];
			uchar* data = cv_dst.ptr<uchar>(tem.y);
			data[tem.x] = 0;
		}
		deletelist1.clear();

		for (int j = 1; j < (nl - 1); j++)
		{
			uchar* data_last = cv_dst.ptr<uchar>(j - 1);
			uchar* data = cv_dst.ptr<uchar>(j);
			uchar* data_next = cv_dst.ptr<uchar>(j + 1);
			for (int i = 1; i < (nc - 1); i++)
			{
				if (data[i] == 255)
				{
					index[0] = 1;
					if (data_last[i] == 255) index[1] = 1;
					else  index[1] = 0;
					if (data_last[i + 1] == 255) index[2] = 1;
					else  index[2] = 0;
					if (data[i + 1] == 255) index[3] = 1;
					else  index[3] = 0;
					if (data_next[i + 1] == 255) index[4] = 1;
					else  index[4] = 0;
					if (data_next[i] == 255) index[5] = 1;
					else  index[5] = 0;
					if (data_next[i - 1] == 255) index[6] = 1;
					else  index[6] = 0;
					if (data[i - 1] == 255) index[7] = 1;
					else  index[7] = 0;
					if (data_last[i - 1] == 255) index[8] = 1;
					else  index[8] = 0;
					int whitepointtotal = 0;
					for (int k = 1; k < 9; k++)
					{
						whitepointtotal = whitepointtotal + index[k];
					}
					if ((whitepointtotal >= 2) && (whitepointtotal <= 6))
					{
						int ap = 0;
						if ((index[1] == 0) && (index[2] == 1)) ap++;
						if ((index[2] == 0) && (index[3] == 1)) ap++;
						if ((index[3] == 0) && (index[4] == 1)) ap++;
						if ((index[4] == 0) && (index[5] == 1)) ap++;
						if ((index[5] == 0) && (index[6] == 1)) ap++;
						if ((index[6] == 0) && (index[7] == 1)) ap++;
						if ((index[7] == 0) && (index[8] == 1)) ap++;
						if ((index[8] == 0) && (index[1] == 1)) ap++;
						if (ap == 1)
						{
							if ((index[1] * index[3] * index[5] == 0) && (index[3] * index[1] * index[7] == 0))
							{
								deletelist1.push_back(cv::Point(i, j));
							}
						}
					}
				}
			}
		}
		if (deletelist1.size() == 0) break;
		for (size_t i = 0; i < deletelist1.size(); i++)
		{
			cv::Point tem;
			tem = deletelist1[i];
			uchar* data = cv_dst.ptr<uchar>(tem.y);
			data[tem.x] = 0;
		}
		deletelist1.clear();
	}
}
4.如果只需要皱纹的线条,可以直接在样本标注生成之后,对数据标签进行骨架提取后再训练,效果要比训练后再做骨架提取要好。
4.训练模型
1.使用的是conda的搭建环境
conda create --name enet python=3.8
source activate enet
conda install pytorch torchvision torchaudio pytorch-cuda=11.7 -c pytorch -c nvidia
pip install cython matplotlib tqdm opencv-python scipy pillow
2.训练模型
运行以下命令:
python main.py -m train --save-dir save/ENet_Card --name ENet --dataset card --dataset-dir datasets --epochs 300 --height 512 --width 512 --print-step
参数说明:
– save-dir:训练模型保存路径
–dataset:训练数据类型
–dataset-dir:train.txt和val.txt所在路径
–epochs:训练总epoch数
–height:输入高度
–width:输入宽度
–print-step:是否打印每个step的loss
3.转onnx模型
import os
import argparse
from addict import Dict
import yaml
import torch
import torch.optim as optim
from models.enet import ENet
import utils

def get_args():
    parser = argparse.ArgumentParser(description='convert pytorch weights to onnx')
    parser.add_argument('--input', type=str, required=True, help="input pytorch model")
    parser.add_argument('--output', type=str, required=True, help="output onnx model")
    args = parser.parse_args()
    return args

if __name__ == '__main__':
    args = get_args()
    model = ENet(2, encoder_relu=True).to('cpu')
    save_dir = os.path.dirname(args.input)
    name = os.path.basename(args.input)
    optimizer = optim.Adam(model.parameters())
    model = utils.load_checkpoint(model, optimizer, save_dir, name)[0]
    inputs = torch.FloatTensor(1, 3, 512, 512)
    torch.onnx.export(model, inputs, args.output, opset_version=9)
5.模型推理
1.转成onnx模型后,可以使用opencv的dnn进行推理
int demo()
{
std::string path = "demo";
std::vector<std::string> filenames;
cv::glob(path, filenames, false);
for (auto img_name : filenames)
{
cv::Mat cv_src = cv::imread(img_name,1);
cv::Mat cv_or = cv_src.clone();
cv::Size reso(512, 512);
cv::Mat blob = cv::dnn::blobFromImage(cv_src, 1.0 / 255, reso,
cv::Scalar(0, 0, 0), false, false);
cv::dnn::Net net = cv::dnn::readNet("model/ENetv2.onnx");
net.setInput(blob);
cv::Mat out = net.forward();
cv::Mat cv_segm = cv::Mat::zeros(out.size[2], out.size[3], CV_8UC1);
for (int i = 0; i < out.size[2] * out.size[3]; ++i)
{
if (out.ptr<float>(0, 0)[i] < out.ptr<float>(0, 1)[i])
{
cv_segm.data[i] = 255;
}
}
//cv::Mat cv_seg;
//skeleton_extraction(cv_segm, cv_seg);
//show_img("segm", cv_seg);
cv::Mat cv_dst;
cv::Mat cv_edge;
cv::resize(cv_segm, cv_edge, cv_src.size());
for (int i = 0; i < cv_src.rows; i++)
{
for (int j = 0; j < cv_src.cols; j++)
{
int pix = int(cv_edge.at<uchar>(i, j));
if (pix >0)
{
cv_src.at<cv::Vec3b>(i, j)[0] = 0;
cv_src.at<cv::Vec3b>(i, j)[1] = 255;
cv_src.at<cv::Vec3b>(i, j)[2] = 255;
}
}
}
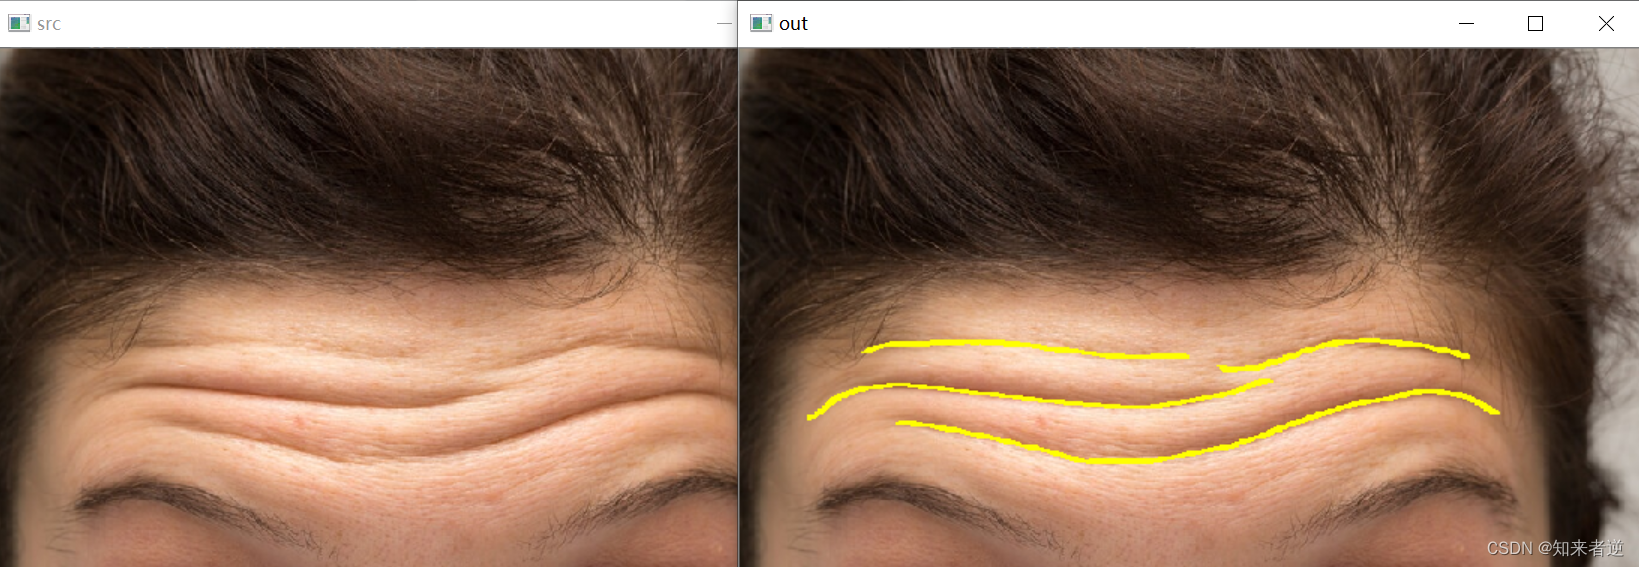
show_img("src", cv_or);
show_img("out", cv_src);
cv::waitKey();
}
return 0;
}
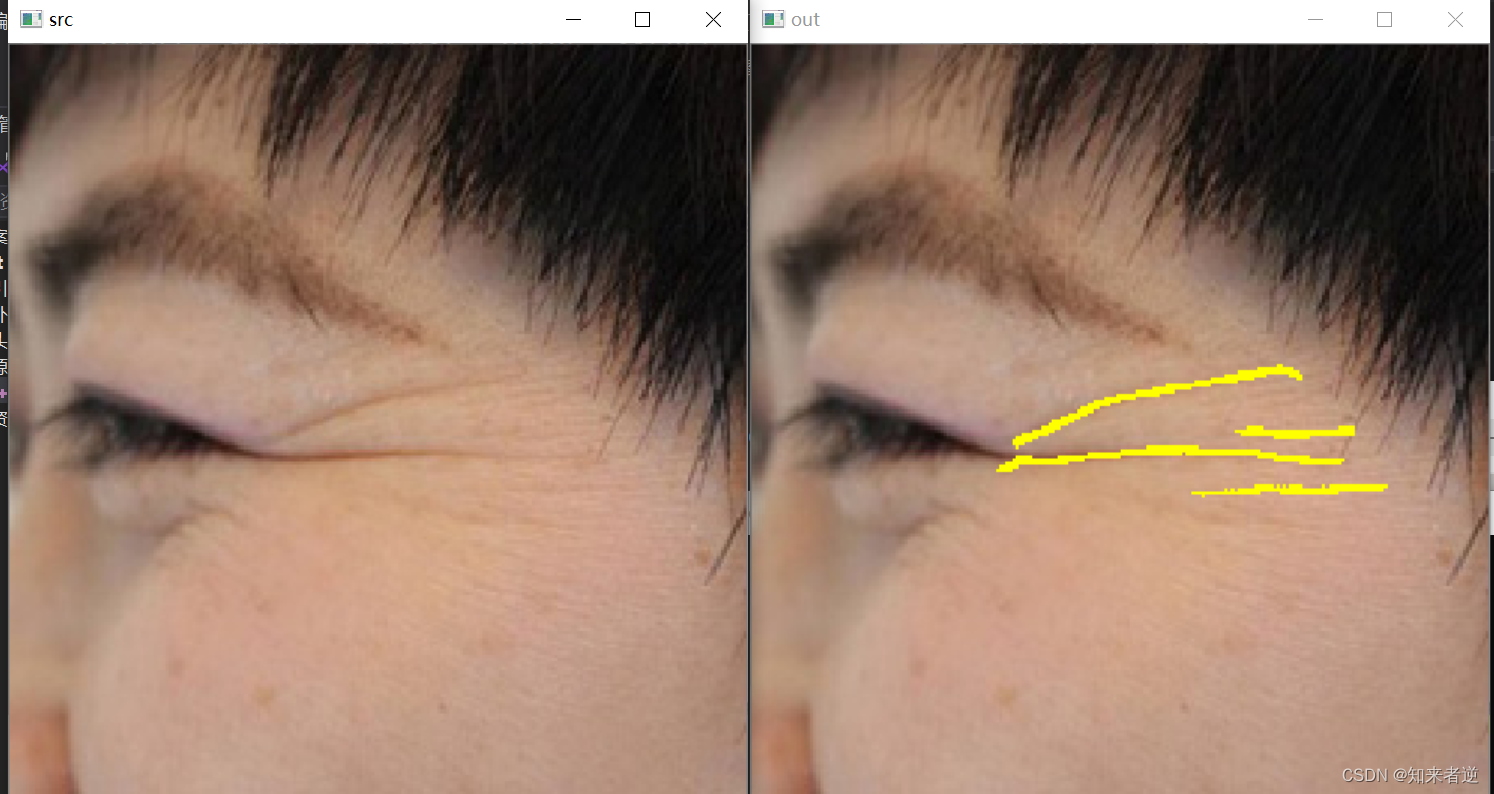
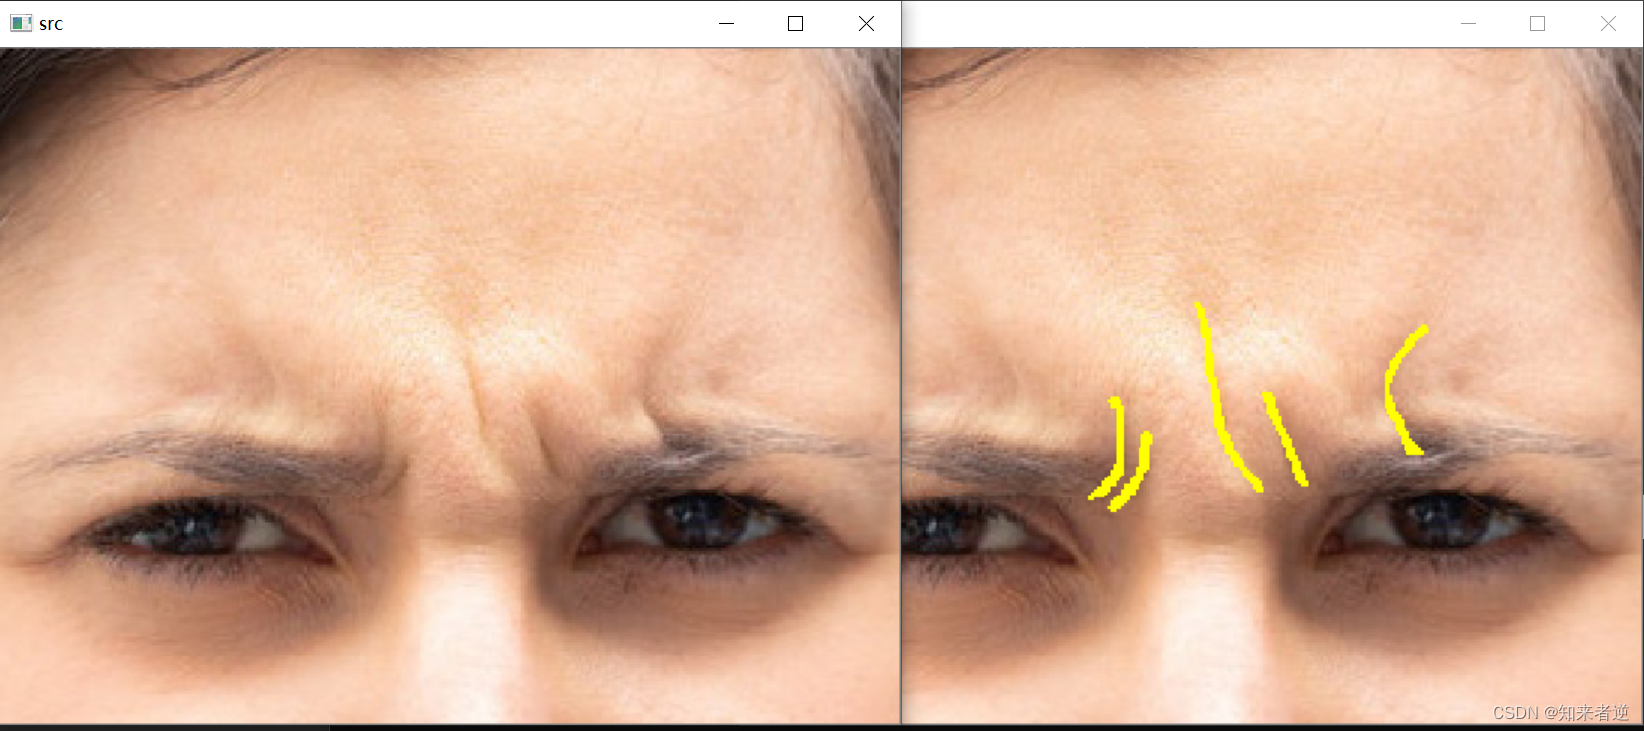
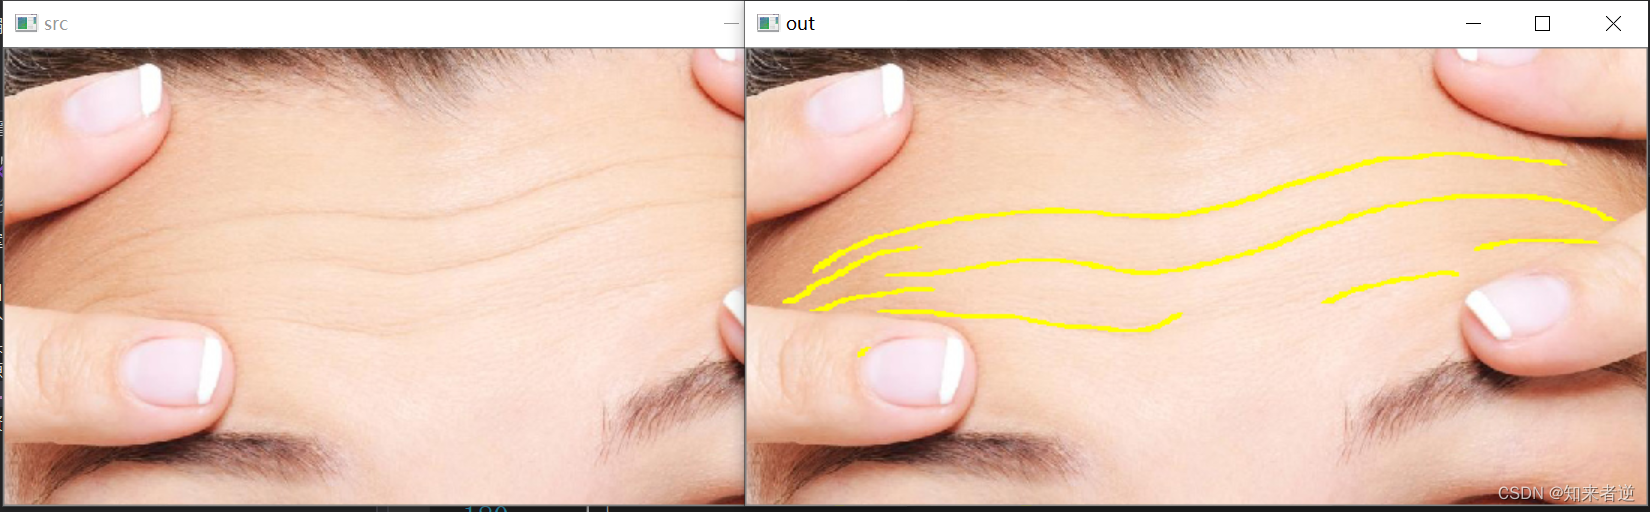
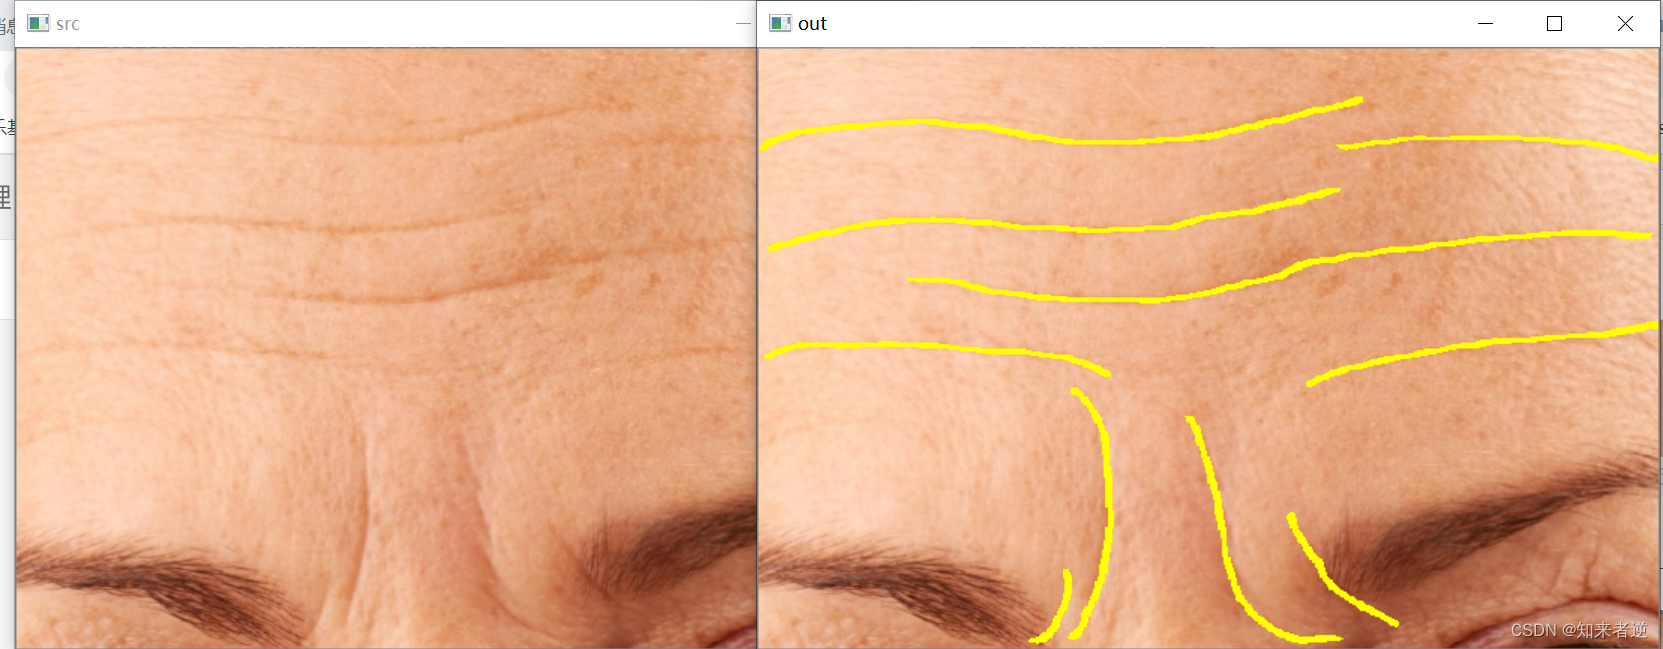
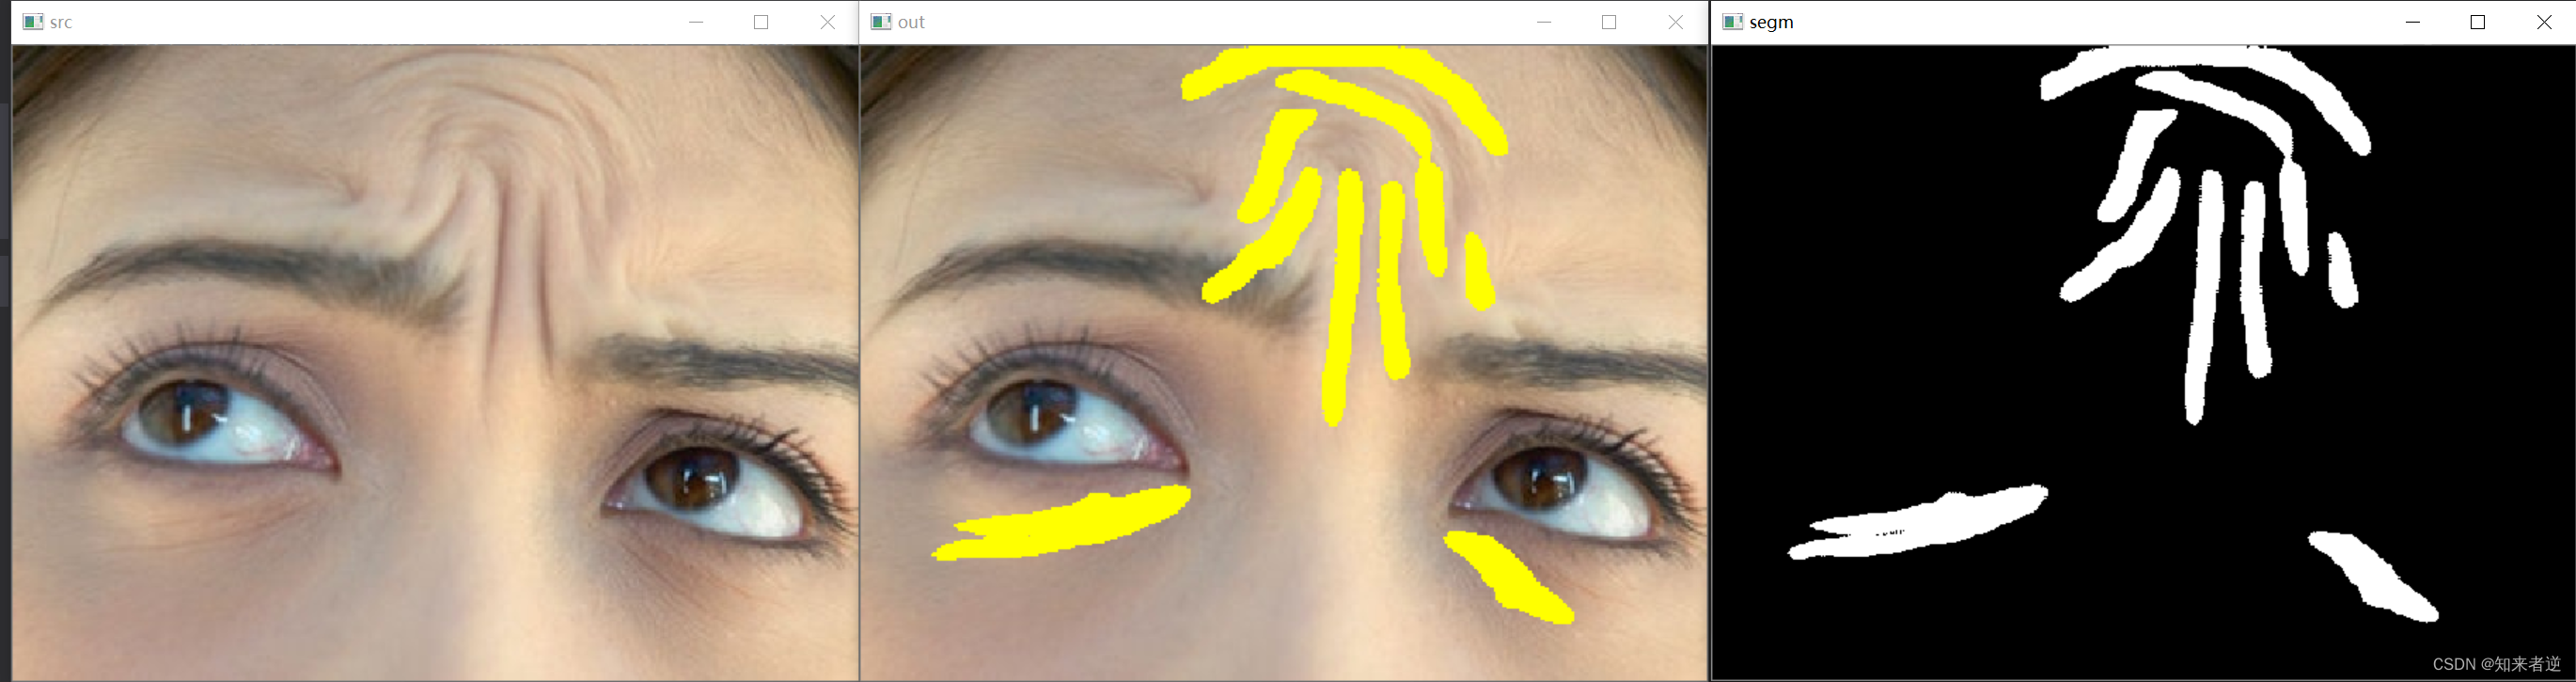
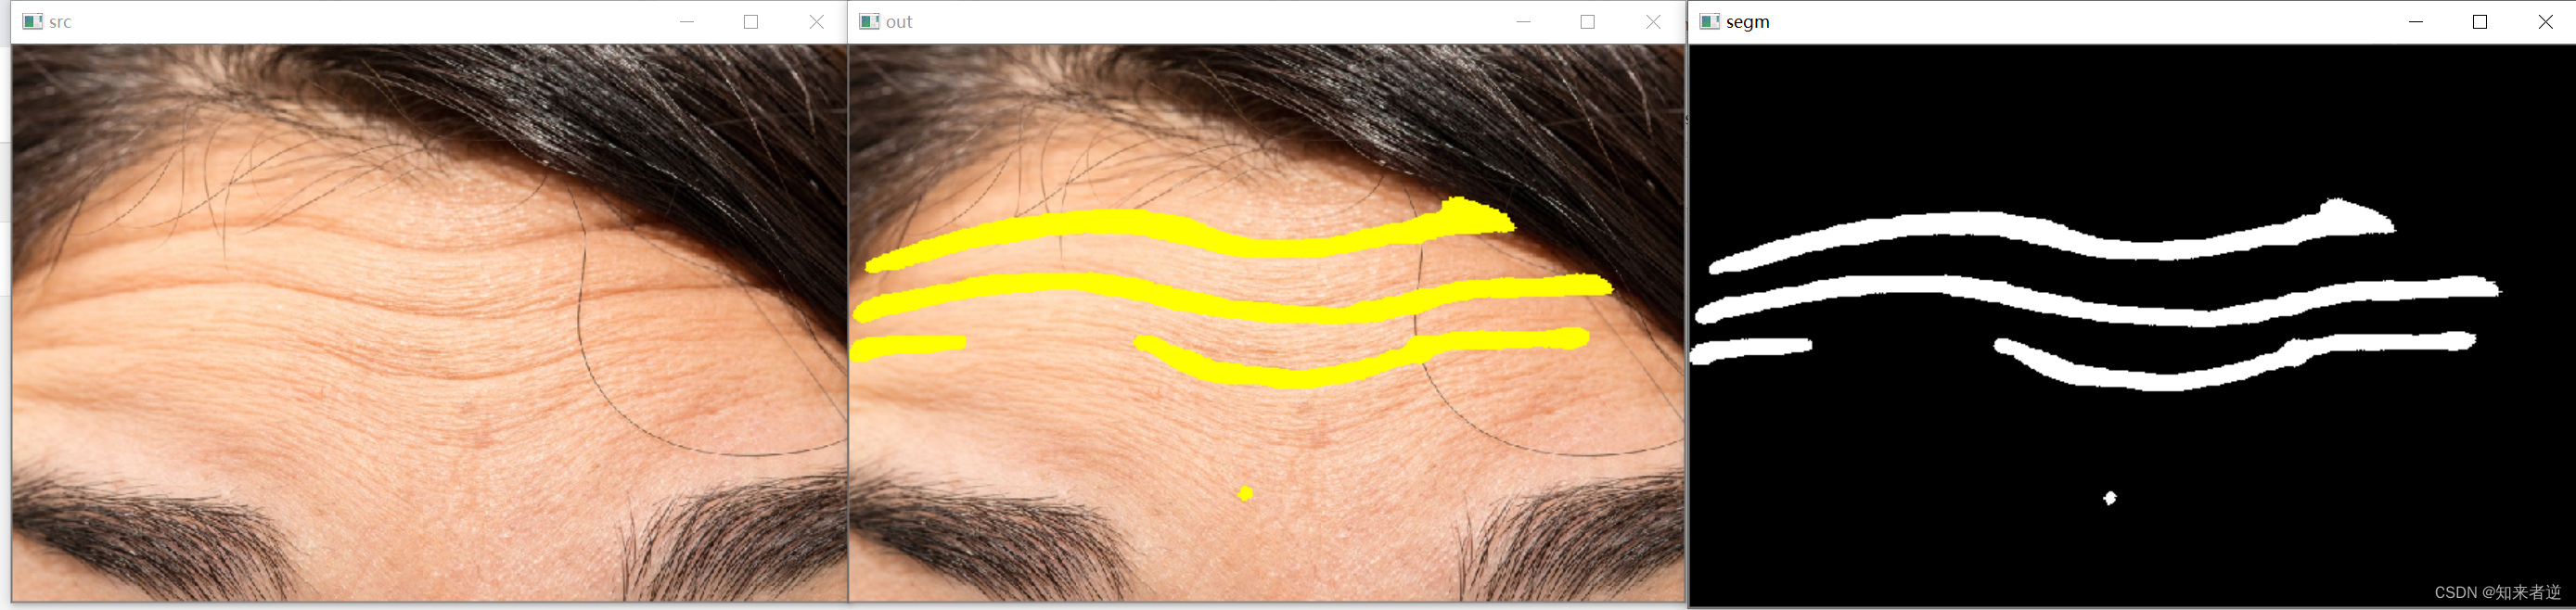
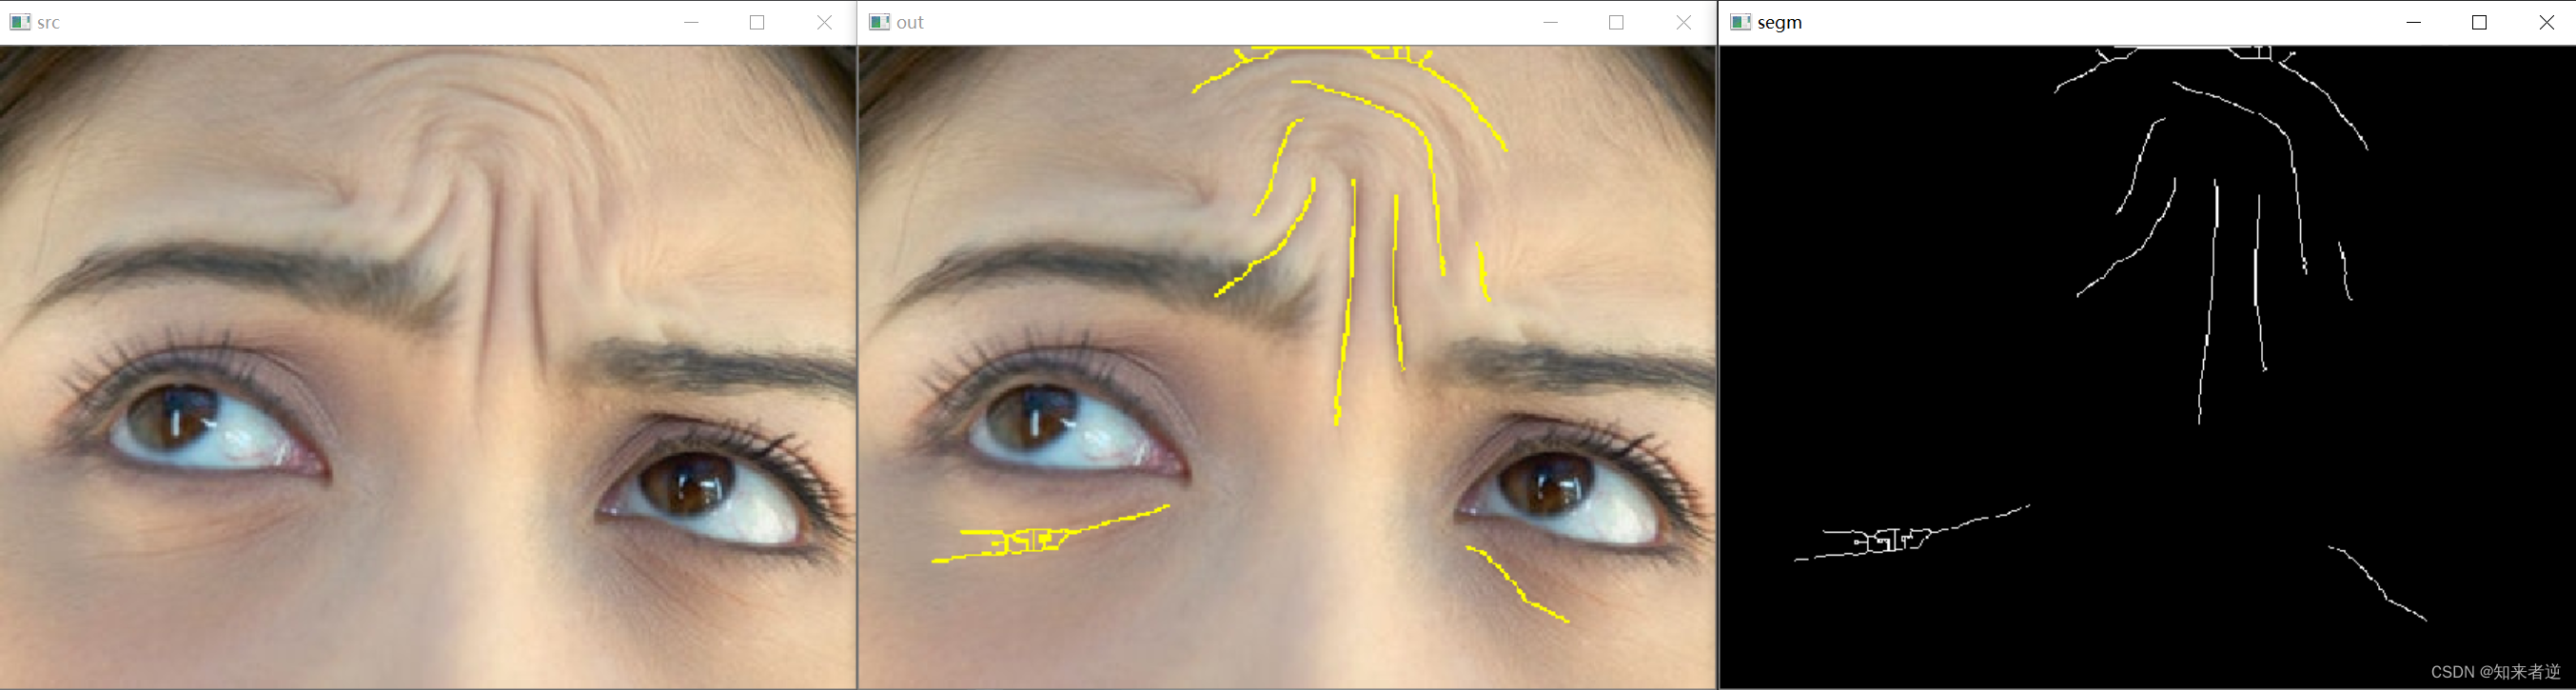
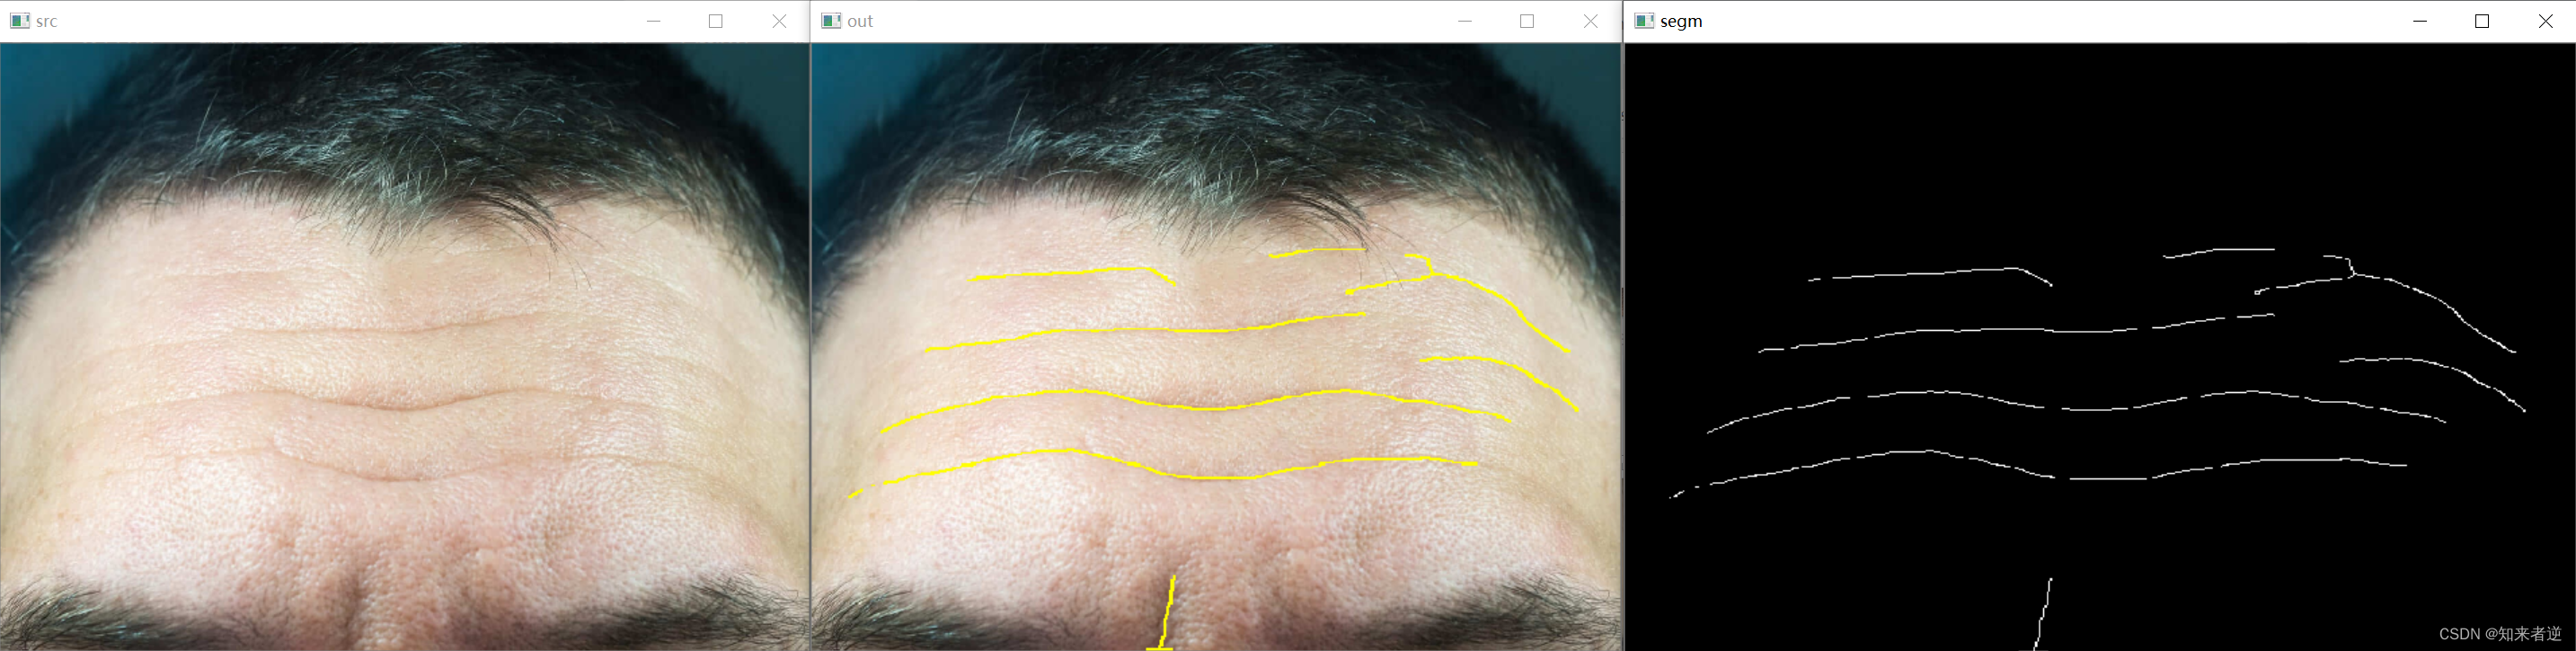
2.推理结果