Kivy tutorial 003: Building a full GUI – Kivy Blog
Central themes: Adding Widgets to one another
中心主题: 添加组件到另一个组件中
The tutorals so far have covered the very basics of a Kivy application; getting everything running, adding a Widget (the Label), and doing some customisation.
到目前为止,导师课已经涵盖了Kivy应用程序非常基本的元素;让所有的一切跑起来, 增加一个组件(label 标签),和做了一些个性化。
Let’s now combine some widgets to make a larger GUI. This tutorial will solely cover joining the widgets together, not making them do anything; this is covered in later tutorials.
现在让我们结合一些组件来制作一个更大GUI。 这节导师将单独地覆盖连接组件们到一起,不让它们干任何事, 以后的导师课会有涉及干其他的事。
Note
This tutorial will construct the GUI using entirely Python code. You can always do this with Python as described here, but normally we recommend using the easier, clearer and more concise kv language to construct widget trees. This will be covered fully in later tutorials.
这节导师课将构建GUI 通过整个使用Python代码。 你总是可以像python描述的这样干,但是常见的是我们使用更简单、清晰和更简洁的KV语言来重新命令构建组件树。这在以后的导师课中会被覆盖。
Our new task will be to build a simple calculator app; we’ll need Buttons for each of the numbers and mathematical operations, and a Label to display the result.
我们新的任务是构建一个简单地计算机app;我们将需要Buttons按钮给每个数字,并且自动地业务操作,和一个标签来展示结果。
Let’s start with a new basic app structure:让我们开始一个简单的app结构:
from kivy.app import App

class YourApp(App):

    def build(self):
        return None

YourApp().run()
Right now, you can run the code but the window will be empty because we didn’t add any widgets. Let’s do that now, but we no longer want just a Label; our app will be made of multiple Widgets next to one another. For this, we use Layout classes; let’s start with the following:
现在,你可以运行代码,但是窗口将是空的因为我们没有添加任何的组件。让我们现在添加些, 但是我们不再只想要一个Label标签;我们的App将有许多复杂的组件一个挨着一个的组成。为了这点,我们使用Layout 布局类,让我们像下面这样开始:
from kivy.app import App
from kivy.uix.button import Button
from kivy.uix.boxlayout import BoxLayout


class YourApp(App):
    def build(self):
        layout = BoxLayout(orientation='vertical')
        b1 = Button(text='button 1')
        b2 = Button(text='button 2')

        layout.add_widget(b1)
        layout.add_widget(b2)

        return layout


YourApp().run()
We’re now instantiating three Widget classes; the BoxLayout and two Buttons. Just like with the Label, each one can be customised by passing properties. The only new one here is the orientation of the BoxLayout; passing 'vertical' means it will place its children below one another. The Buttons are internally a Label with a background image and touch behaviour (you can see this in the Button documentation, check the ‘Bases:’), so we can use the Label’s text property just like before.
现在我们实例化了3个组件类; Boxlayout 布局 和2个 Buttons按钮。 就像Label一样,每个组件类都可以通过传递属性实现自定义。 在这唯一新的是Boxlayout布局的 orientation方向;传递 'vertical' 意味着它将从上到下的放置它的子类。 按钮是在一个Label标签内部同一个背景图篇和touch behaviour 触摸行为(你可以在Button文档中看到这块儿,检查'Bases'),因此我们可以使用Label的text属性就像之前一样。
After instantiating the widgets, we can add them to one another. You can almost always add any widget instance to any other in exactly this way. When you do so, the newly added widgets will appear on the screen, and you’ll be able to interact with them. The widget you add to is called the parent widget, and the added widget (in this case the Buttons) is the child widget.
在组件的实例化之后,我们可以添加它们到另一个中。你几乎总是可以添加任何组件实例给另一个通过这种方式。当你这么干的时候,新添加的组件将在屏幕上出现,并且你将能够和它们互动。添加到其中的部件称为父部件,被添加的部件(在本例中为Buttons)是子部件。
This code should give you something like the following image. You can also now click the buttons to see their colour change; this behaviour is automatic, they don’t do anything else yet.
这代码应该给你像下面图片这样。 现在你也可以点击按钮来看看它们该百年的颜色, 这行为是自动地,它们不做其它的事情。
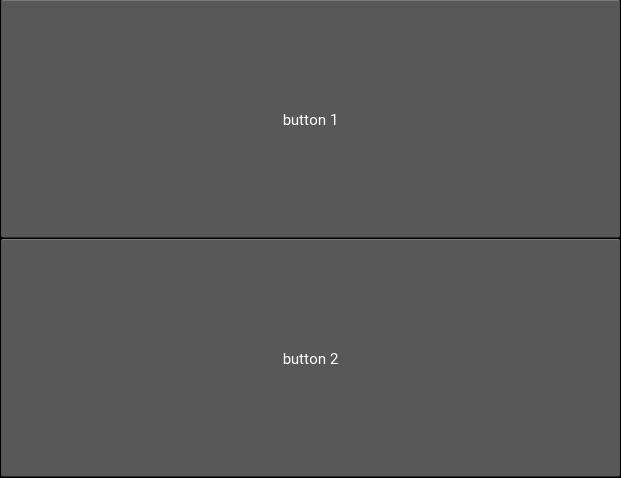
Try setting the BoxLayout orientation to 'horizontal' to see how it affects the result.
试着设定Boxlayout布局方向到'horizontal'水平的来看看它如何形象结果。
Resize the window, and note that the sizes and positions of the buttons update automatically. This happens because the BoxLayout repositions and resizes its children when its own size changes, and because it is the root widget its own size tracks that of the window. This is very important! If you replace the BoxLayout with a plain Widget (from kivy.uix.widget import Widget) this will not happen, the Buttons will both have their default position and size in the bottom left of the window. For this reason, you’ll want to use Layouts like BoxLayout all the time to automatically position things, though you can also create your own automatic bindings (see later tutorials on Kivy Properties).
重新设置窗口的大小,并且注意自动添加的按钮的位置和大小。因为Boxlayout布局重新设置位置和重新设置大小给它的子类,当它自己的大小改变 ,也因为根组件它自己的大小跟随着窗口。这是非常重要的!如果你将plain组件替换Boxlayout布局(从kivy.uix.widget导入Widget)者将不会发生,按钮都将有它们默认的位置和大小在窗口的左边的底部。 因为这个原因,你将想使用Boxlayout布局一样总是自动地定位食物,尽管你也可以创建你自己的自动绑定(看之后的关于kivy属性的导师课)
With these basic ideas in hand, let’s proceed to add Widgets representing our entire calculator interface:
伴随着进行中的这些基础想法,让我们开展组件代表我们整个计算器界面:
from kivy.app import App
from kivy.uix.button import Button
from kivy.uix.boxlayout import BoxLayout
from kivy.uix.gridlayout import GridLayout
from kivy.uix.label import Label


class YourApp(App):
    def build(self):
        root_widget = BoxLayout(orientation='vertical')

        output_label = Label(size_hint_y=1)

        button_symbols = ('1', '2', '3', '+',
                          '4', '5', '6', '-',
                          '7', '8', '9', '.',
                          '0', '*', '/', '=')

        button_grid = GridLayout(cols=4, size_hint_y=2)
        for symbol in button_symbols:
            button_grid.add_widget(Button(text=symbol))

        clear_button = Button(text='clear', size_hint_y=None,
                              height=100)

        root_widget.add_widget(output_label)
        root_widget.add_widget(button_grid)
        root_widget.add_widget(clear_button)

        return root_widget


YourApp().run()
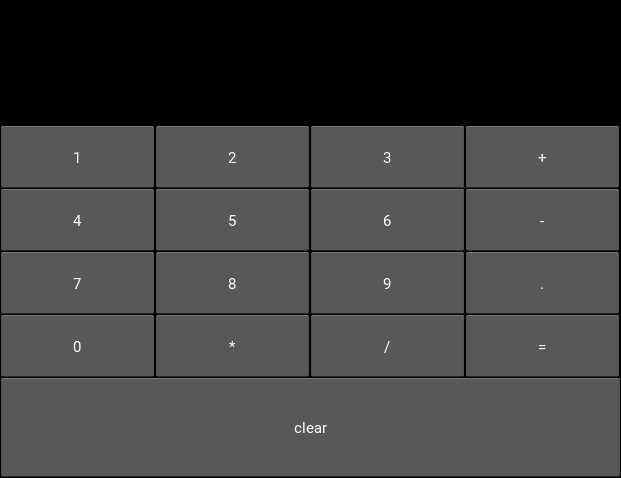
This introduces a couple of new ideas; the GridLayout is a new layout class that arranges its child widgets in (you guessed it) a grid. We’ve set its cols` property to ``4`, which means that every 4 widgets we add it will start a new row. Since we add 16 buttons altogether, that’s 4 rows of 4.
这介绍了一些新的想法; GridLayout布局 是一个新的布局类,这类排列它的子类组件在一个(你猜的)网格中。 我们已经设置它的 ‘cols’列 属性是‘4’,这意味着我们添加的每4个组件它将重新起一行。自从我们一起添加了16个按钮,那是4行,每行4个按钮。
The other new idea here is the size_hint_y setting for the output_label and button_grid. All widgets have a size_hint_x (horizontal) and size_hint_y (vertical) that you can set. They are used by Layout classes to set relative sizes; in this case, the the one with size_hint_y=2 takes up twice as much vertical space as the one with size_hint_y=1.
这儿另一种新的想法是 size_hint_y 设置给output_label 和 button_grid。所有的组件都有一个你可以设置的size_hint_x(水平的) 和size_hint_y(竖直的)。它们被Layout布局类用来设置相对的size大小;在这案例中,size_hint_y=2的组件比size_hint_y=1的组件在竖直方向上多占用2倍的空间。
You can also override the size hint to set a manual width and/or height for your Widget, but you must do this explicitly, as shown here with the ‘clear’ button. By setting size_hint_y=None, we ensure that its height=100 is never overridden, this Button will have a height of 100 pixels no matter what.
你可以通过重写大小提示(size hint)来为你的控件设置手动的 宽度 和/或 高度,但你必须明确地这样做,就像这里的“清除”按钮所示。通过设置size_hint_y=None,我们确保它的height=100设置不会被覆盖,因此这个按钮将始终具有100像素的高度,无论其他条件如何。
这段翻译解释了在一个图形用户界面(GUI)框架(如Kivy)中,如何为一个控件(如按钮)设置固定的尺寸。size_hint属性通常用于按比例分配控件的尺寸,而设置size_hint_y=None则告诉框架不要按比例调整这个控件的高度,而是使用直接指定的height值。这样,无论其他因素如何变化,该控件都将保持指定的固定高度。
Your final code should look something like the image below. You can resize the window to see all the components move around and resize automatically, thanks to the use of Layouts for positioning.
你最终的代码应该看起来和下面图片一样。你可以重新定义窗口的大小来看看所有的部件在周围移动并且重新自动地定义大小,感谢Layout布局的positioning的定位。
You are strongly encouraged to experiment with modifying this code to see what happens. All the concepts used here are standard when working with Kivy widget positioning.
非常鼓励你来体验修改这代码来看看将发生啥。在所有这里使用的概念里都是Kivy组件的positioning定位使用时的标准。
The calculator GUI clearly doesn’t do anything yet (although you can click on the buttons due to their default behaviour). Adding some functionality is covered in the next tutorial.
计算机的GUI非常清晰但是啥也干不了, 你可以点击折现按钮因为它们本身的默认behaviour行为。在下一节的导师课中涵盖了一些添加的一些功能。
Full code
your_filename.py:
from kivy.app import App
from kivy.uix.button import Button
from kivy.uix.boxlayout import BoxLayout
from kivy.uix.gridlayout import GridLayout
from kivy.uix.label import Label


class YourApp(App):
    def build(self):
        root_widget = BoxLayout(orientation='vertical')

        output_label = Label(size_hint_y=1)

        button_symbols = ('1', '2', '3', '+',
                          '4', '5', '6', '-',
                          '7', '8', '9', '.',
                          '0', '*', '/', '=')

        button_grid = GridLayout(cols=4, size_hint_y=2)
        for symbol in button_symbols:
            button_grid.add_widget(Button(text=symbol))

        clear_button = Button(text='clear', size_hint_y=None,
                              height=100)

        root_widget.add_widget(output_label)
        root_widget.add_widget(button_grid)
        root_widget.add_widget(clear_button)

        return root_widget


YourApp().run()


