Linux系统安装python3.10.9
- Linux系统安装python3.10.9
- 查看系统自带python信息
- python官网下载安装包
- 解压安装包
- 上传安装包到服务器
- 解压安装包
- 进入解压后的目录
- 安装python使用的依赖
- 安装python使用的依赖完成
- 编译安装python
- 设置软连接
- 设置python软连接
- 设置pip软连接
- 配置环境变量
- 使用安装完成的python
Linux系统安装python3.10.9
查看系统自带python信息
[root@module ~]# which python
/usr/bin/python
[root@module ~]# python --version
Python 2.7.5
[root@module Python-3.10.9]# ll /usr/bin/python*
lrwxrwxrwx. 1 root root    7 9月  10 06:39 /usr/bin/python -> python2
lrwxrwxrwx. 1 root root    9 9月  10 06:39 /usr/bin/python2 -> python2.7
-rwxr-xr-x. 1 root root 7216 4月  11 2018 /usr/bin/python2.7
python官网下载安装包
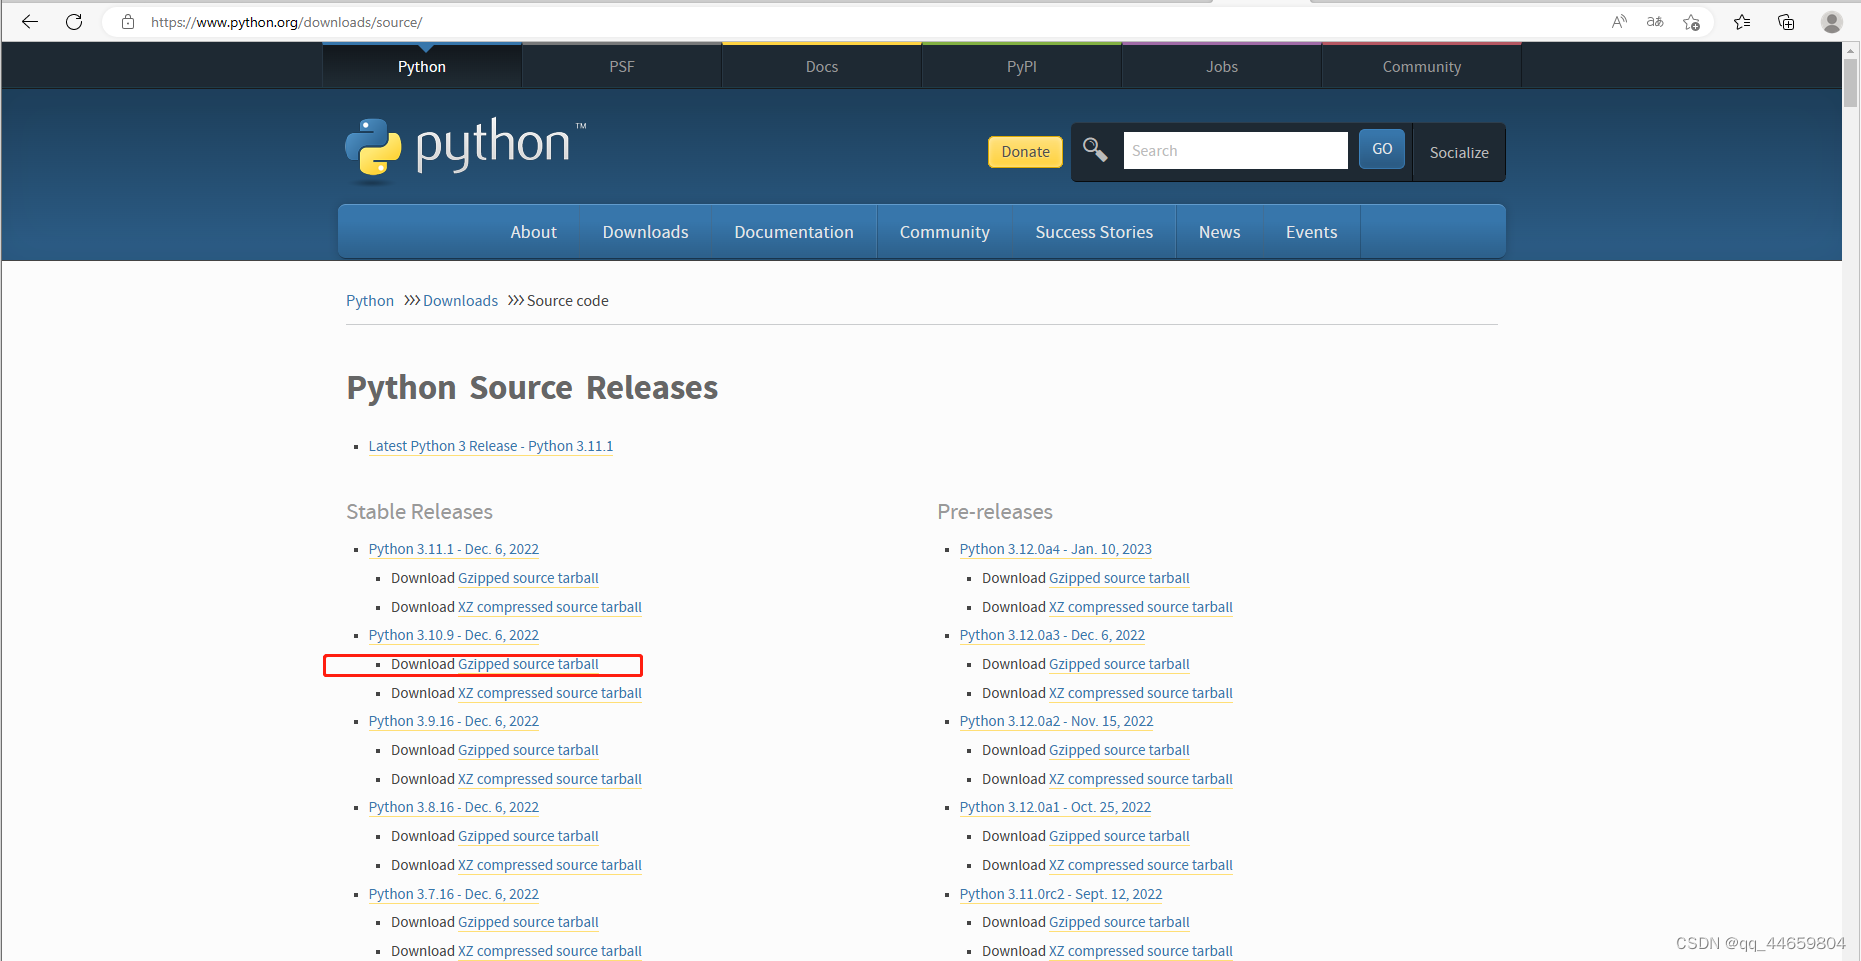
官网下载地址:
https://www.python.org/downloads/source/
下载相应稳定版本的安装包
Download Gzipped source tarball
此处下载的为
Python 3.10.9 - Dec. 6, 2022
Download Gzipped source tarball
Python Source Releases		Python源代码版本
Stable Releases				稳定版本
Pre-releases				预发布
解压安装包
上传安装包到服务器
[root@module ~]# ll
-rw-r--r--  1 root root 26044345 1月  29 16:30 Python-3.10.9.tgz
解压安装包
[root@module ~]# tar xf Python-3.10.9.tgz
[root@module ~]# ll
drwxr-xr-x  16 1000 1000     4096 12月  7 02:44 Python-3.10.9
-rw-r--r--   1 root root 26044345 1月  29 16:30 Python-3.10.9.tgz
进入解压后的目录
[root@module ~]# cd Python-3.10.9
[root@module Python-3.10.9]# ll
总用量 1148
-rw-r--r--  1 1000 1000  22792 12月  7 02:31 aclocal.m4
-rw-r--r--  1 1000 1000    630 12月  7 02:31 CODE_OF_CONDUCT.md
-rwxr-xr-x  1 1000 1000  49348 12月  7 02:31 config.guess
-rwxr-xr-x  1 1000 1000  35276 12月  7 02:31 config.sub
-rwxr-xr-x  1 1000 1000 525012 12月  7 02:31 configure
-rw-r--r--  1 1000 1000 179099 12月  7 02:31 configure.ac
drwxr-xr-x 18 1000 1000   4096 12月  7 02:44 Doc
drwxr-xr-x  2 1000 1000     39 12月  7 02:31 Grammar
drwxr-xr-x  4 1000 1000   4096 12月  7 02:31 Include
-rwxr-xr-x  1 1000 1000  15368 12月  7 02:31 install-sh
drwxr-xr-x 34 1000 1000   8192 12月  7 02:31 Lib
-rw-r--r--  1 1000 1000  13930 12月  7 02:31 LICENSE
drwxr-xr-x  8 1000 1000    164 12月  7 02:31 Mac
-rw-r--r--  1 1000 1000  73343 12月  7 02:31 Makefile.pre.in
drwxr-xr-x  2 1000 1000   4096 12月  7 02:44 Misc
drwxr-xr-x 14 1000 1000   4096 12月  7 02:31 Modules
-rw-r--r--  1 1000 1000     82 12月  7 02:31 netlify.toml
drwxr-xr-x  4 1000 1000   4096 12月  7 02:31 Objects
drwxr-xr-x  2 1000 1000    239 12月  7 02:44 Parser
drwxr-xr-x  5 1000 1000   4096 12月  7 02:31 PC
drwxr-xr-x  2 1000 1000   8192 12月  7 02:31 PCbuild
drwxr-xr-x  2 1000 1000     83 12月  7 02:31 Programs
-rw-r--r--  1 1000 1000  46565 12月  7 02:31 pyconfig.h.in
drwxr-xr-x  3 1000 1000   4096 12月  7 02:31 Python
-rw-r--r--  1 1000 1000  10138 12月  7 02:31 README.rst
-rw-r--r--  1 1000 1000 116971 12月  7 02:31 setup.py
drwxr-xr-x 23 1000 1000    330 12月  7 02:31 Tools
安装python使用的依赖
[root@module ~]# yum -y install zlib-devel bzip2-devel openssl-devel ncurses-devel sqlite-devel readline-devel tk-devel libffi-devel gcc make
也可以使用yum -y group install "Development tools"命令把所有开发环境的依赖包安装好。
安装python使用的依赖完成
已安装:
  bzip2-devel.x86_64 0:1.0.6-13.el7                  gcc.x86_64 0:4.8.5-28.el7
  libffi-devel.x86_64 0:3.0.13-18.el7                ncurses-devel.x86_64 0:5.9-14.20130511.el7_4
  openssl-devel.x86_64 1:1.0.2k-12.el7               readline-devel.x86_64 0:6.2-10.el7
  sqlite-devel.x86_64 0:3.7.17-8.el7                 tk-devel.x86_64 1:8.5.13-6.el7
  zlib-devel.x86_64 0:1.2.7-17.el7

作为依赖被安装:
  cpp.x86_64 0:4.8.5-28.el7                                expat-devel.x86_64 0:2.1.0-10.el7_3
  fontconfig.x86_64 0:2.10.95-11.el7                       fontconfig-devel.x86_64 0:2.10.95-11.el7
  fontpackages-filesystem.noarch 0:1.44-8.el7              freetype-devel.x86_64 0:2.4.11-15.el7
  glibc-devel.x86_64 0:2.17-222.el7                        glibc-headers.x86_64 0:2.17-222.el7
  kernel-headers.x86_64 0:3.10.0-862.el7                   keyutils-libs-devel.x86_64 0:1.5.8-3.el7
  krb5-devel.x86_64 0:1.15.1-18.el7                        libX11.x86_64 0:1.6.5-1.el7
  libX11-common.noarch 0:1.6.5-1.el7                       libX11-devel.x86_64 0:1.6.5-1.el7
  libXau.x86_64 0:1.0.8-2.1.el7                            libXau-devel.x86_64 0:1.0.8-2.1.el7
  libXft.x86_64 0:2.3.2-2.el7                              libXft-devel.x86_64 0:2.3.2-2.el7
  libXrender.x86_64 0:0.9.10-1.el7                         libXrender-devel.x86_64 0:0.9.10-1.el7
  libcom_err-devel.x86_64 0:1.42.9-11.el7                  libkadm5.x86_64 0:1.15.1-18.el7
  libmpc.x86_64 0:1.0.1-3.el7                              libselinux-devel.x86_64 0:2.5-12.el7
  libsepol-devel.x86_64 0:2.5-8.1.el7                      libverto-devel.x86_64 0:0.2.5-4.el7
  libxcb.x86_64 0:1.12-1.el7                               libxcb-devel.x86_64 0:1.12-1.el7
  mpfr.x86_64 0:3.1.1-4.el7                                pcre-devel.x86_64 0:8.32-17.el7
  stix-fonts.noarch 0:1.1.0-5.el7                          tcl.x86_64 1:8.5.13-8.el7
  tcl-devel.x86_64 1:8.5.13-8.el7                          tk.x86_64 1:8.5.13-6.el7
  xorg-x11-proto-devel.noarch 0:7.7-20.el7

完毕!
编译安装python
./configure --prefix=/usr/local/tools/Python-3.10.9
make
make install
说明:–prefix是Python的安装目录。
没有提示错误,即安装成功。
设置软连接
建立软连接(Python与pip都建立软连接,分别为python3、pip3与系统自带的Python2区分)
设置python软连接
[root@module Python-3.10.9]# ln -s /usr/local/tools/Python-3.10.9/bin/python3.10 /usr/bin/python3
[root@module Python-3.10.9]#
[root@module Python-3.10.9]# ll /usr/bin/python3
lrwxrwxrwx 1 root root 45 1月  29 16:47 /usr/bin/python3 -> /usr/local/tools/Python-3.10.9/bin/python3.10
[root@module Python-3.10.9]# which python3
/usr/bin/python3
设置pip软连接
[root@module Python-3.10.9]# ln -s /usr/local/tools/Python-3.10.9/bin/pip3.10 /usr/bin/pip3
[root@module Python-3.10.9]#
[root@module Python-3.10.9]# ll /usr/bin/pip3
lrwxrwxrwx 1 root root 42 1月  29 16:48 /usr/bin/pip3 -> /usr/local/tools/Python-3.10.9/bin/pip3.10
[root@module Python-3.10.9]#
[root@module Python-3.10.9]# which /usr/bin/pip3
/usr/bin/pip3
配置环境变量
配置环境变量主要是能快速使用pip3安装命令。
# 追加内容
vi ~/.bash_profile

# 配置python
export PYTHON_HOME=/usr/local/tools/Python-3.10.9
export PATH=$PYTHON_HOME/bin:$PATH
保存退出(:wq),执行source ~/.bash_profile命令使配置生效。执行echo命令,查看是否配置成功
[root@module Python-3.10.9]# source ~/.bash_profile
[root@module Python-3.10.9]#
[root@module Python-3.10.9]# echo $PYTHON_HOME
/usr/local/tools/Python-3.10.9
使用安装完成的python
[root@module Python-3.10.9]# python3
Python 3.10.9 (main, Jan 29 2023, 16:36:16) [GCC 4.8.5 20150623 (Red Hat 4.8.5-28)] on linux
Type "help", "copyright", "credits" or "license" for more information.
>>>
>>>
>>>
>>>
>>>
>>>
>>> exit()
[root@module Python-3.10.9]#
