环境准备
下载 HBuilderX
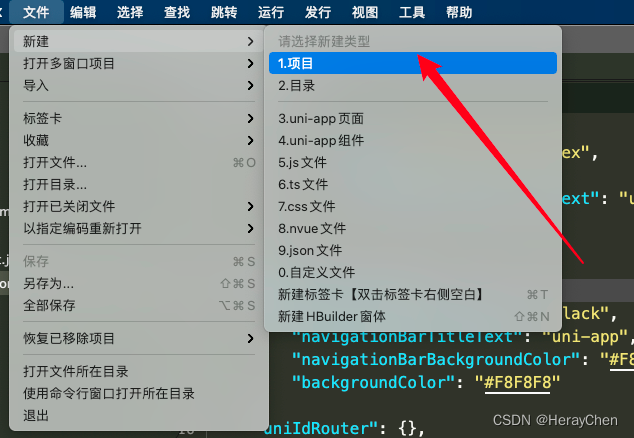
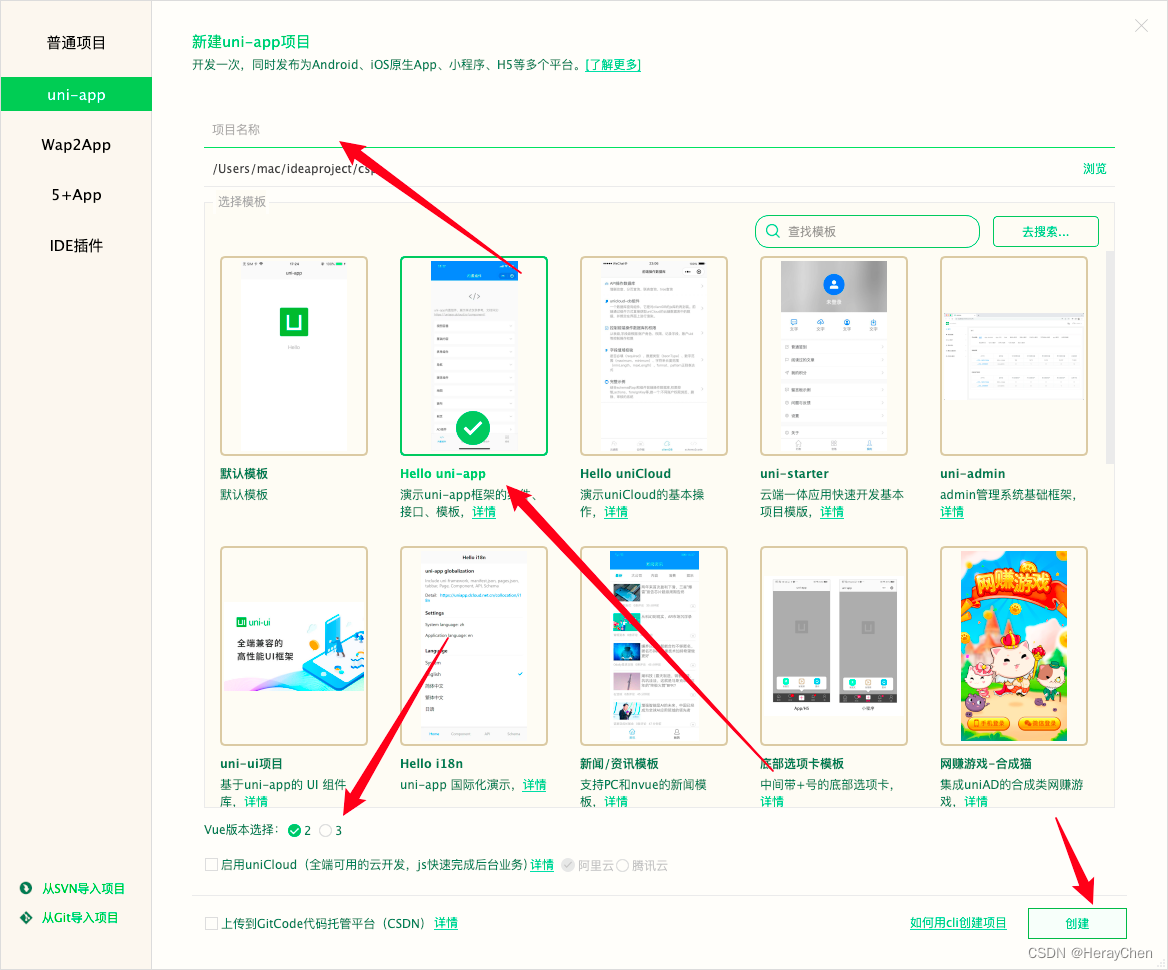
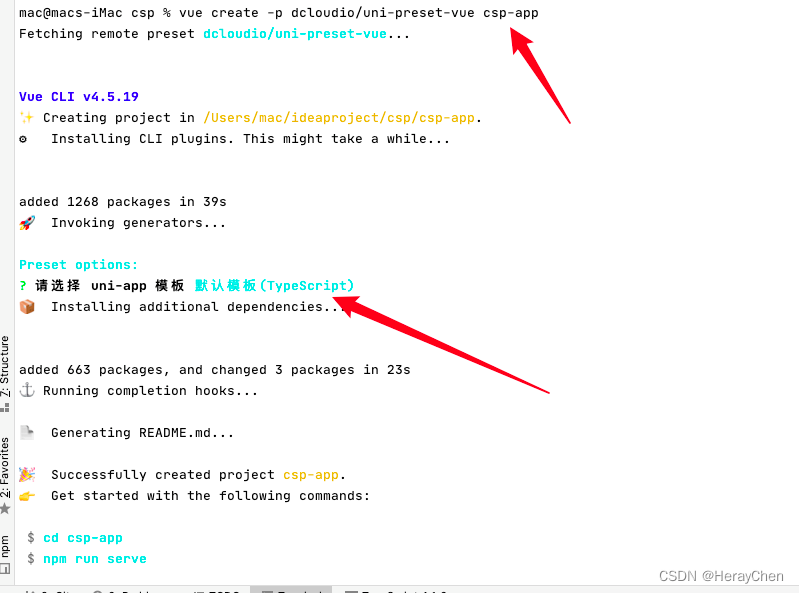
使用命令行创建项目:

一些常识准备
响应式单位rpx
当设计稿宽度为750px的时,1rpx=1px。
uniapp中vue文件style不用添加scoped
打包成h5端的时候自动添加上去,打包成 微信小程序端 不需要添加 scoped。
图片的使用
background: url(‘~@/static/bg.png’)
src=“~@/static/api.png”
小程序背景图片会默认转为base64格式的
使用动态文件的时候要用相对路径
不以/开头的都是相对路径
以/开头的都是绝对路径

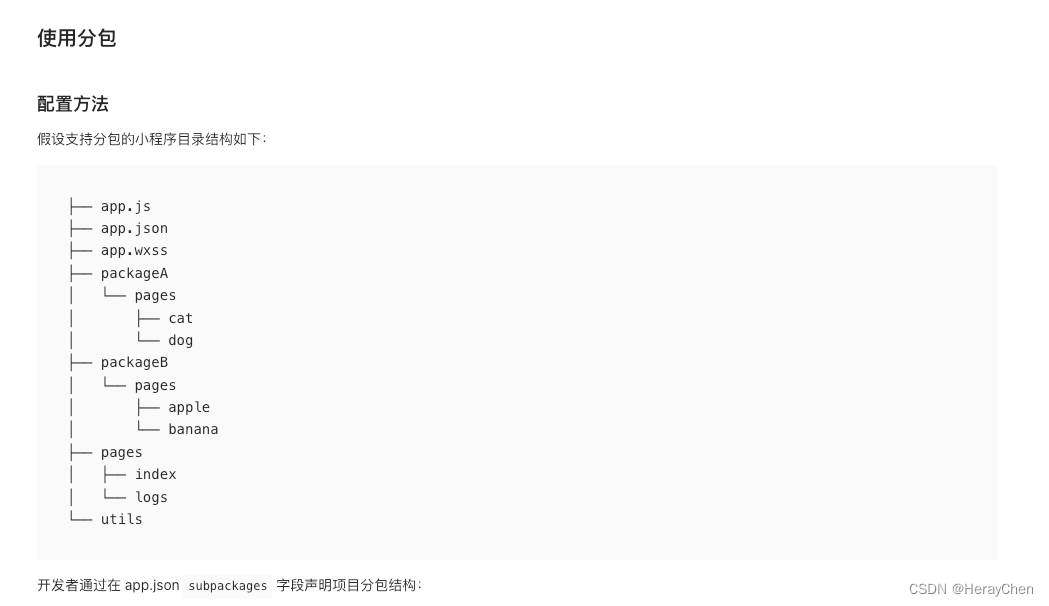
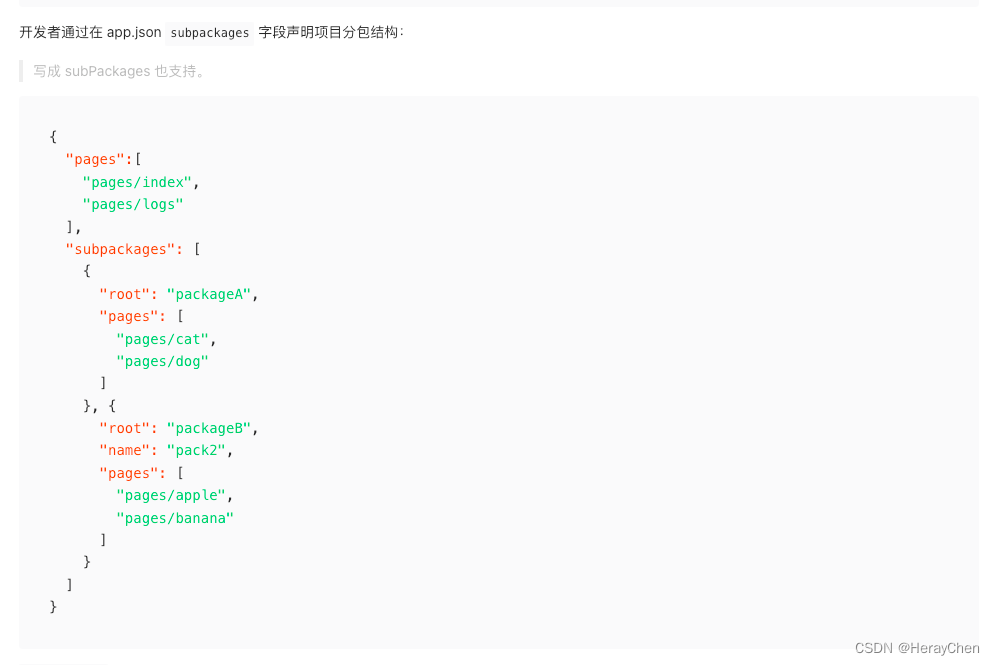
项目文件树分析
碰到的问题及处理方法
sitemap 索引情况提示] 根据 sitemap 的规则[0],当前页面 [pages/tabBar/component/component] 将不被索引
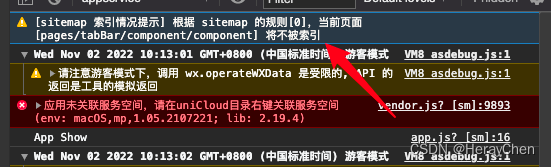
解决方法:
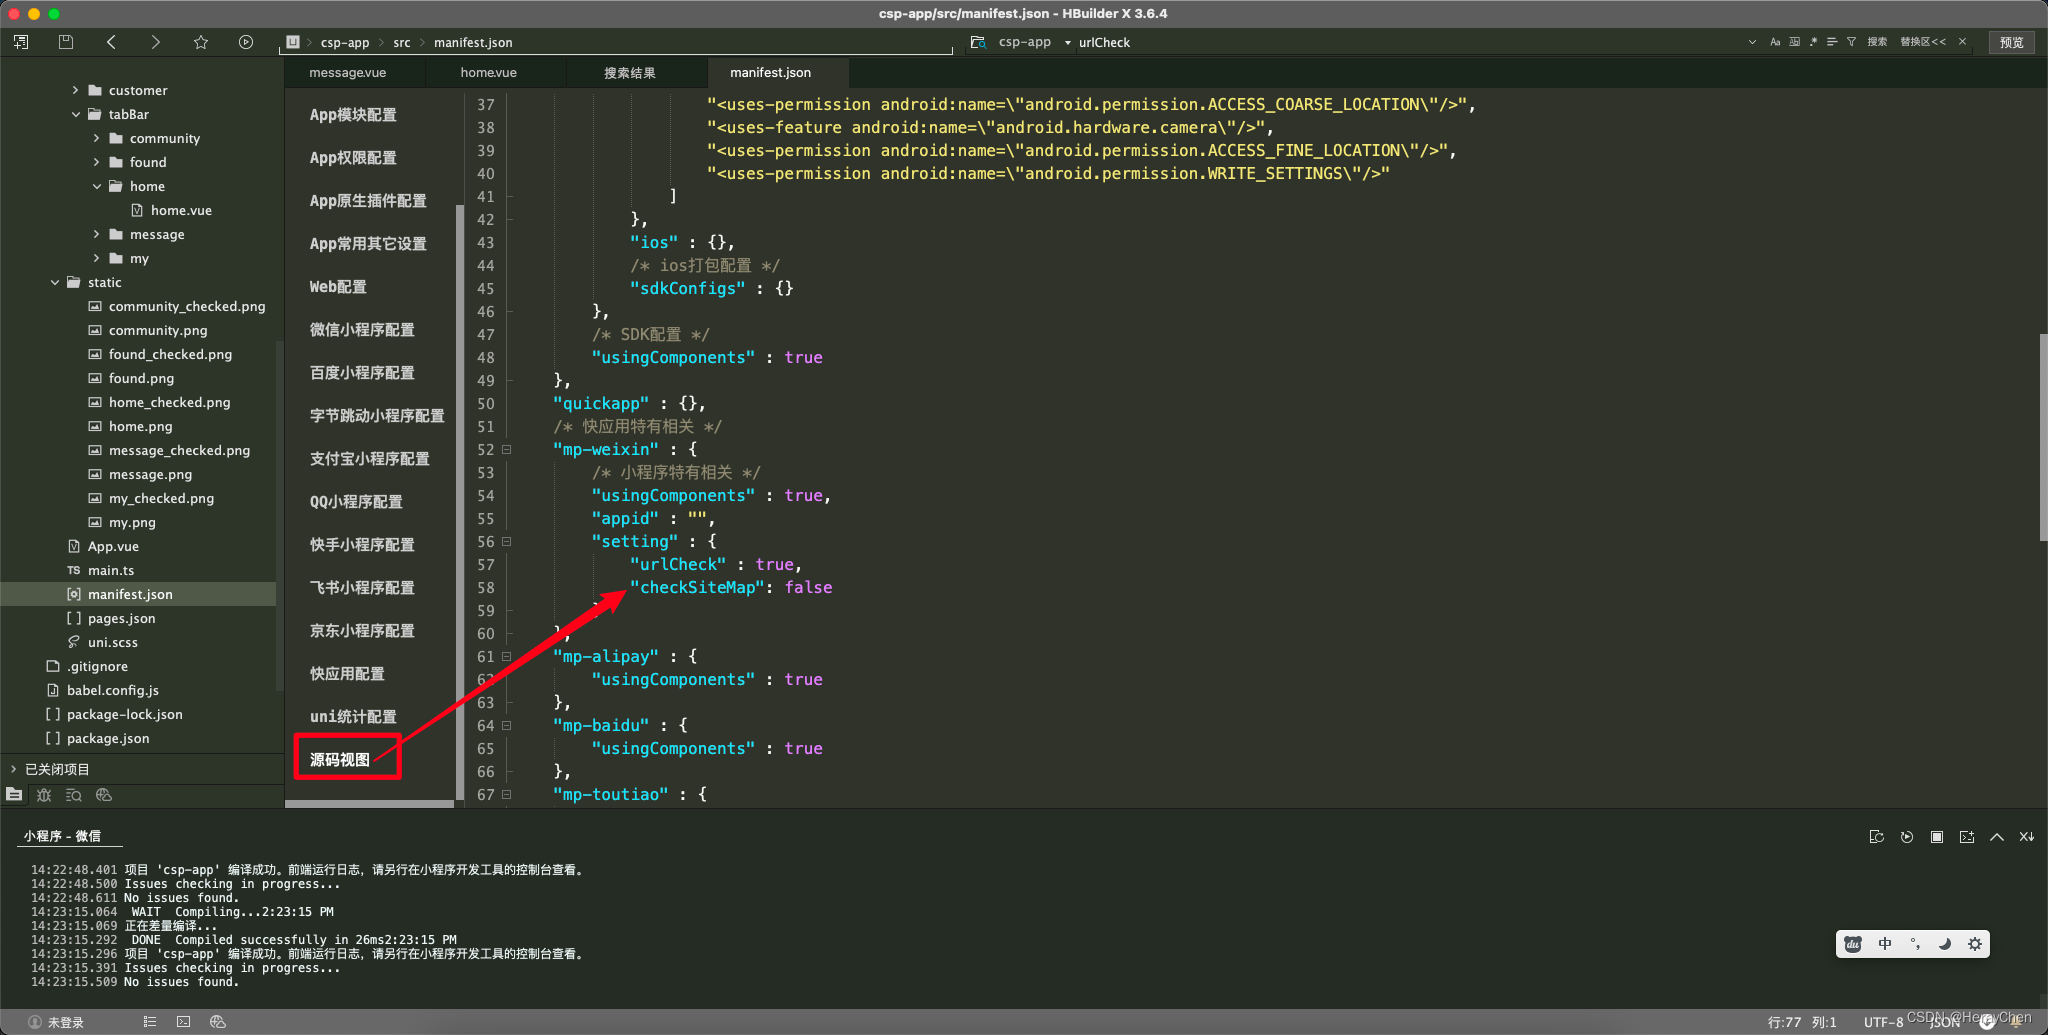
在manifest.json的setting中添加"checkSiteMap": false
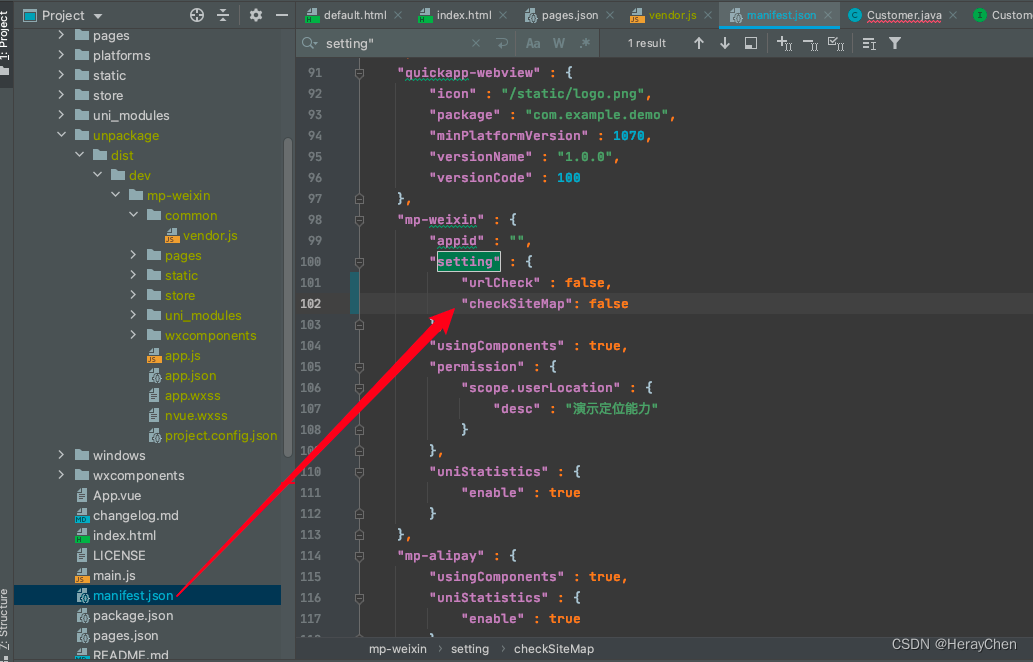
注意:这里要切换到源码视图修改才会生效
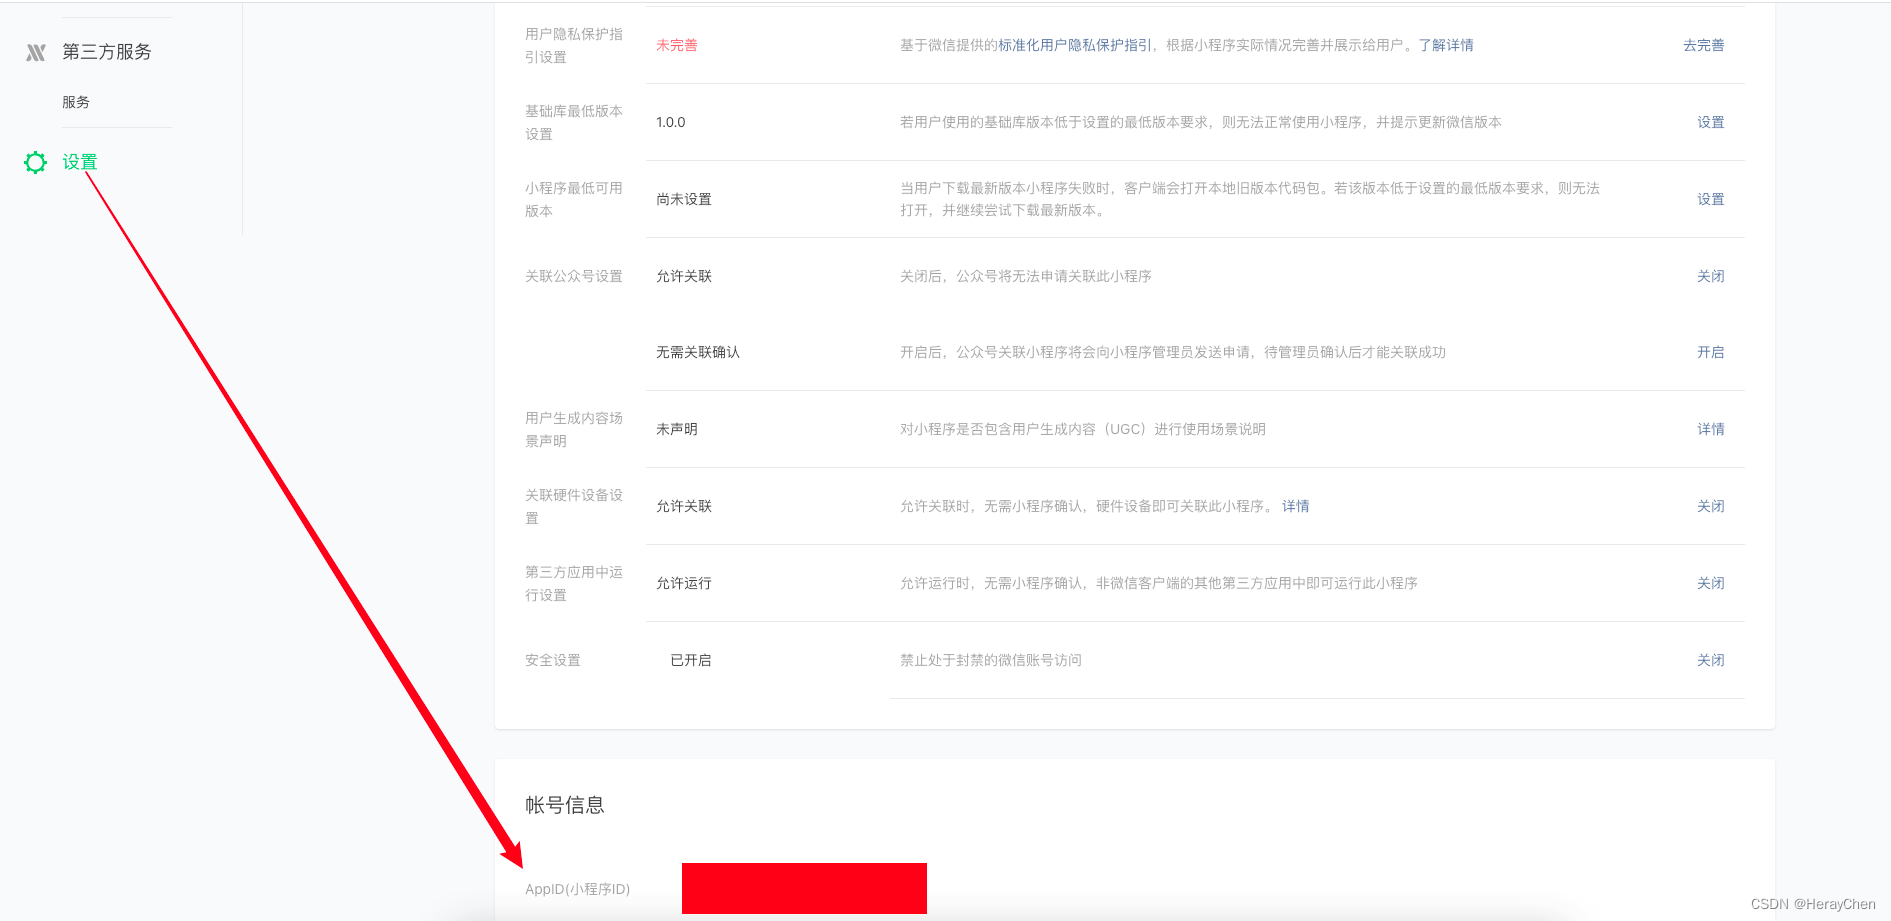
TypeError: Cannot read property ‘forceUpdate’ of undefined
这个报错的原因是appid失效了。
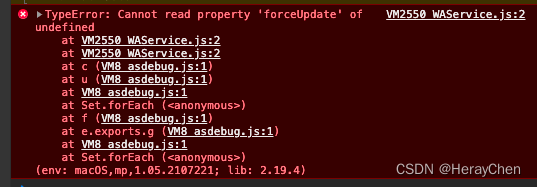
解决方法:
- 百度搜索 微信公众平台
- 微信公众平台 - 设置(左侧菜单) - 往下滑
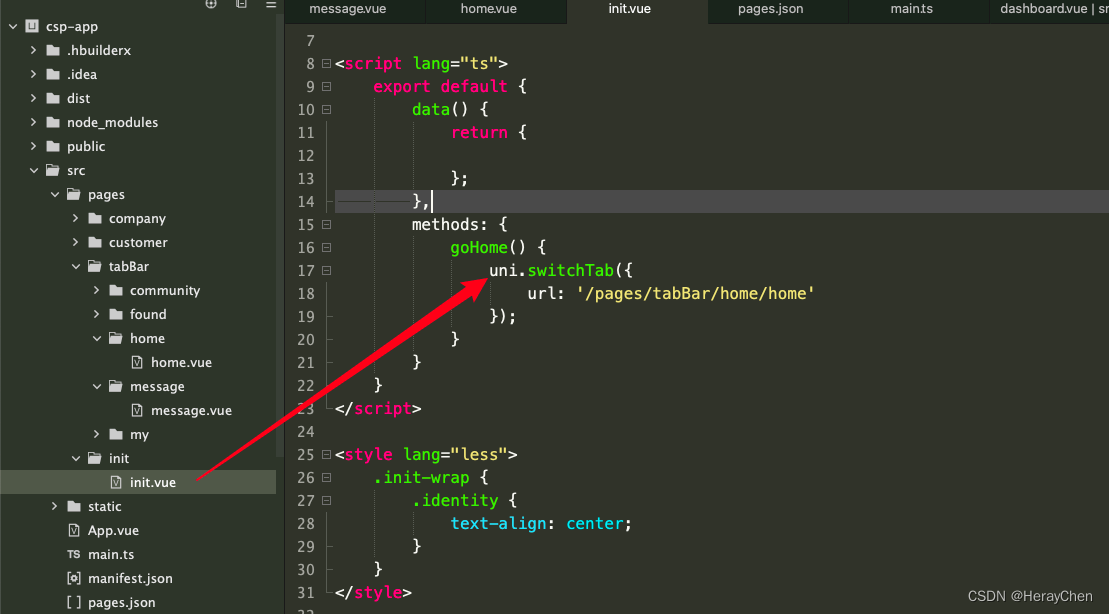
创建页面(初始页面)
引导页:
- 创建引导页
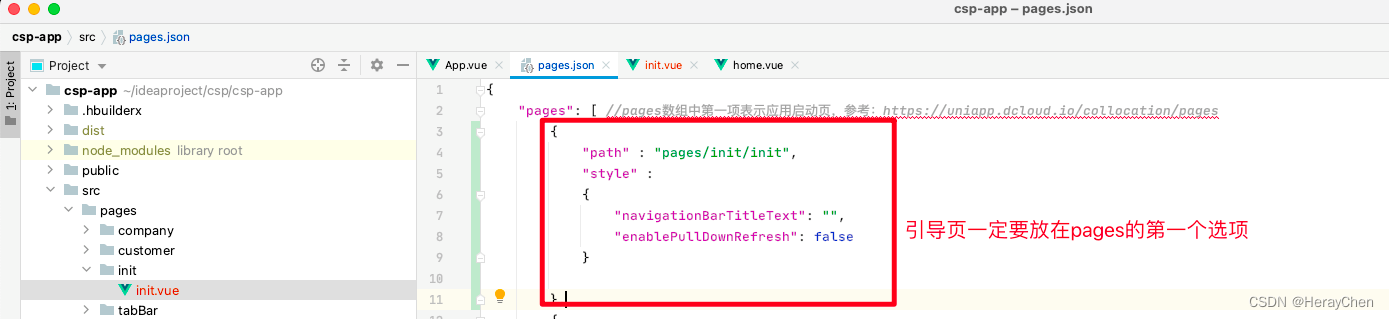
- 配置引导页跳转到tabBar页面
添加全局样式(Sass)
方法一
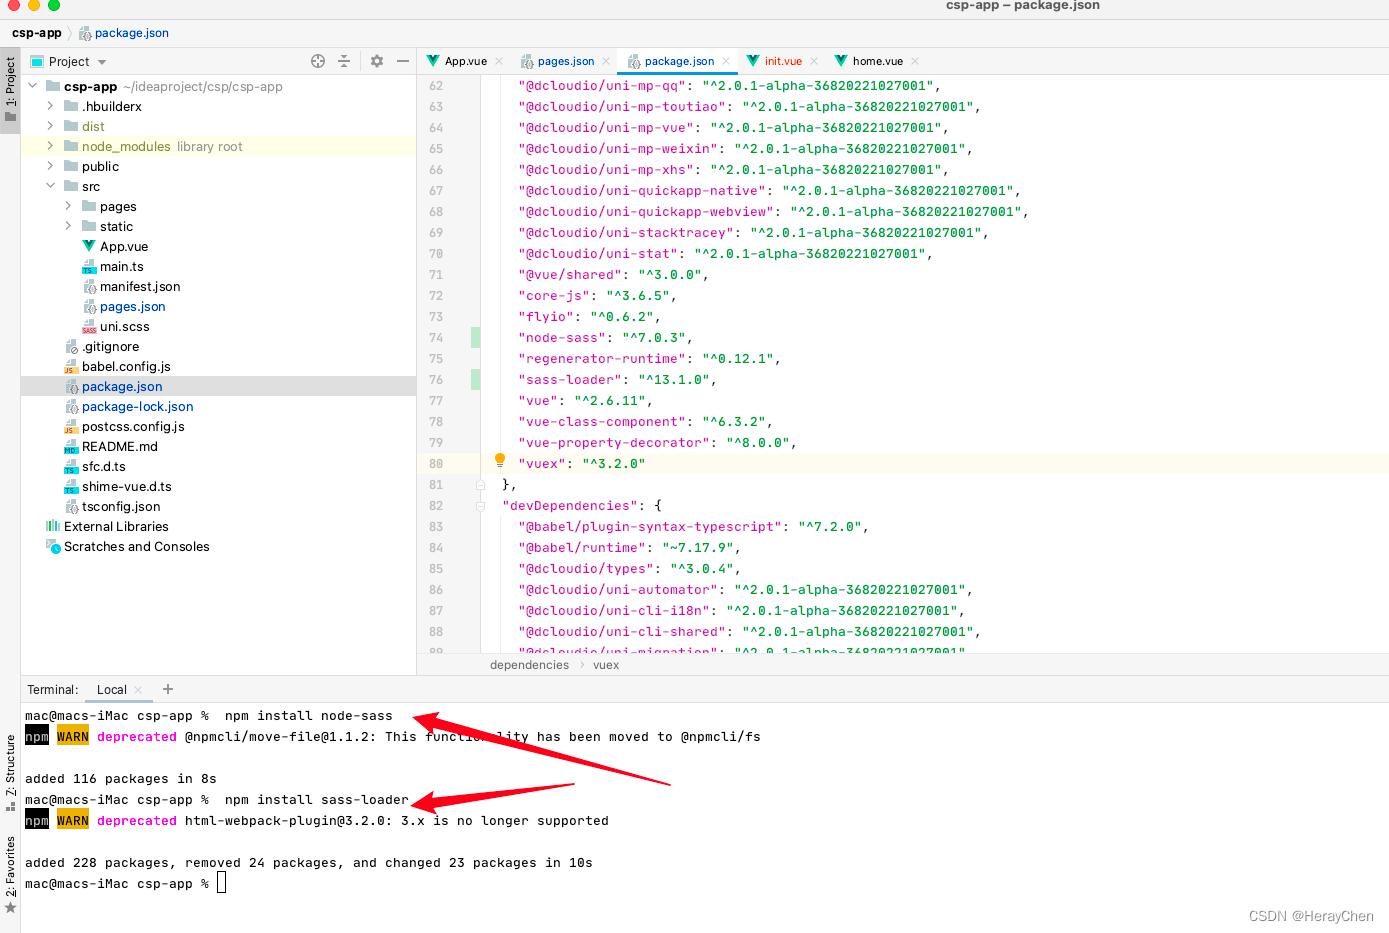
注意:重新运行项目的时候可能会报错
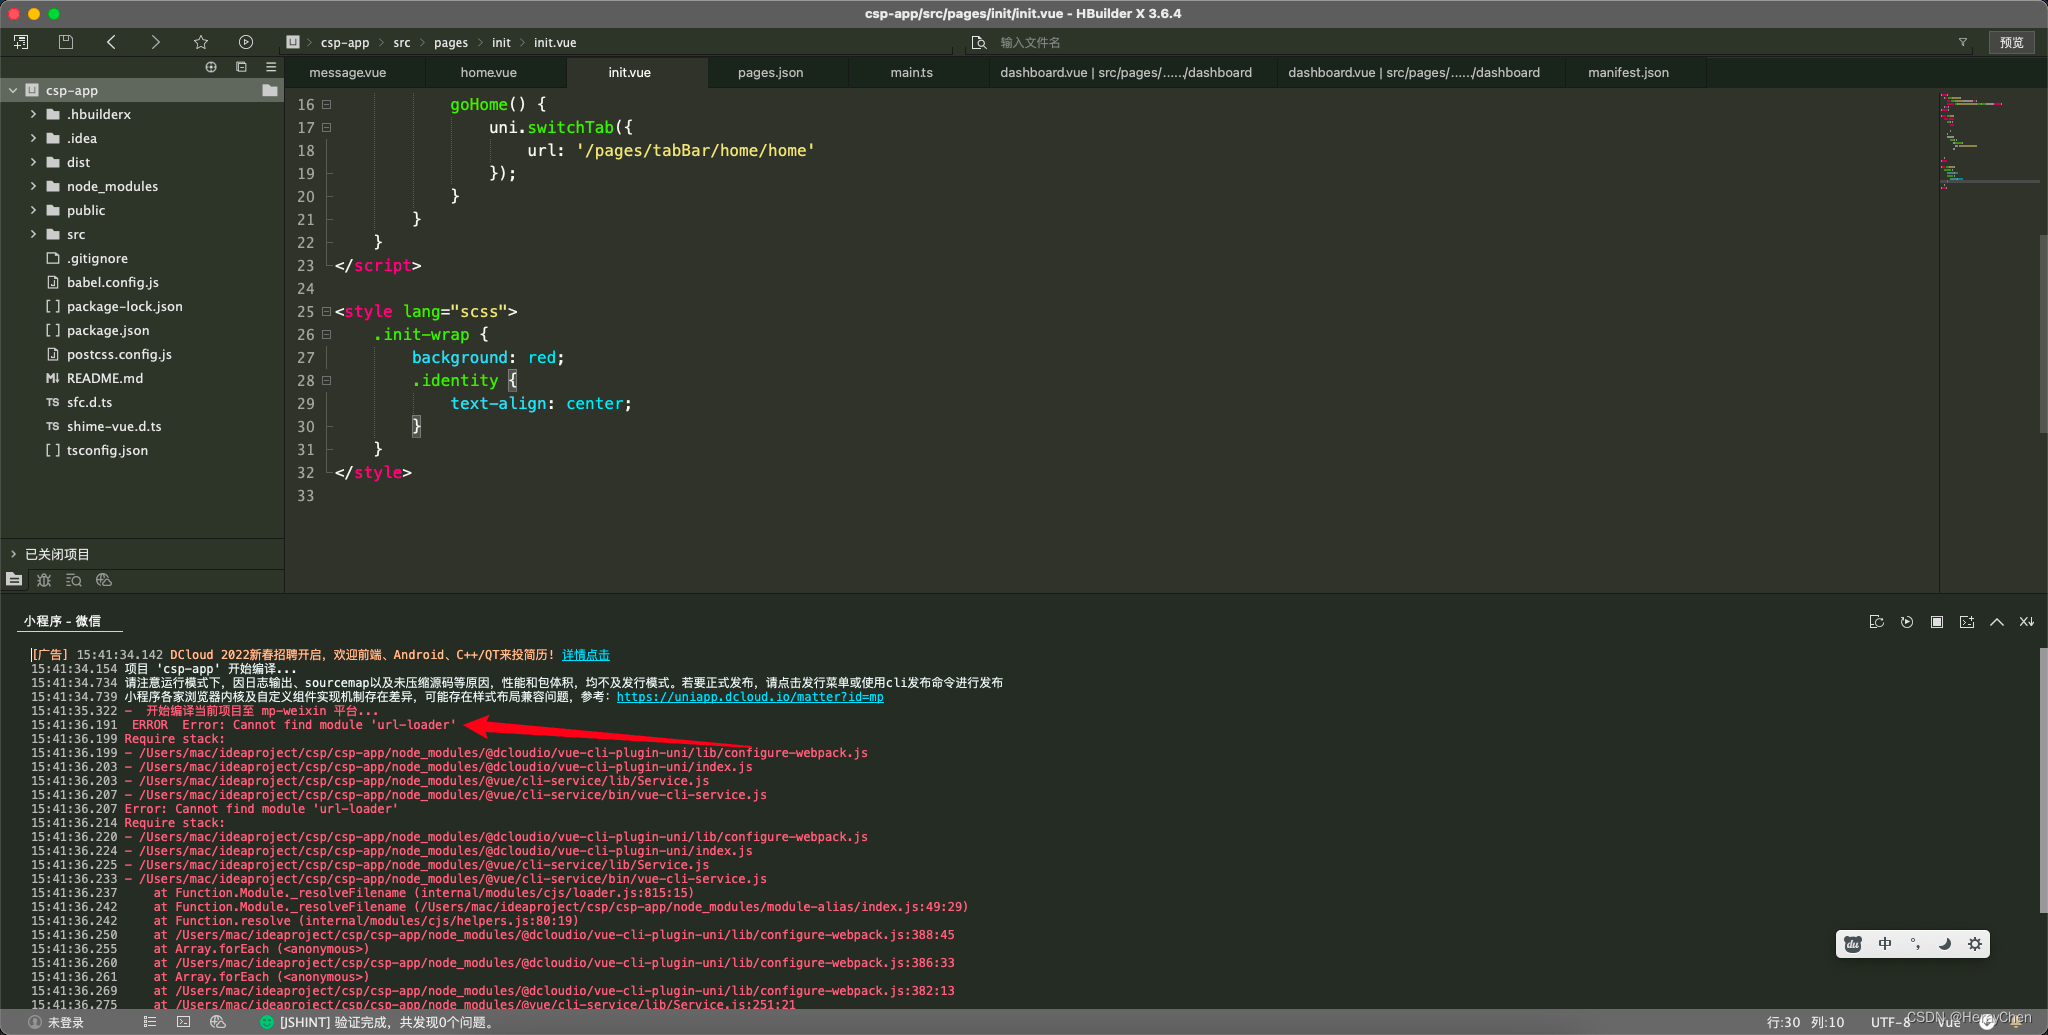
重新安装一下缺少的那个包就好了

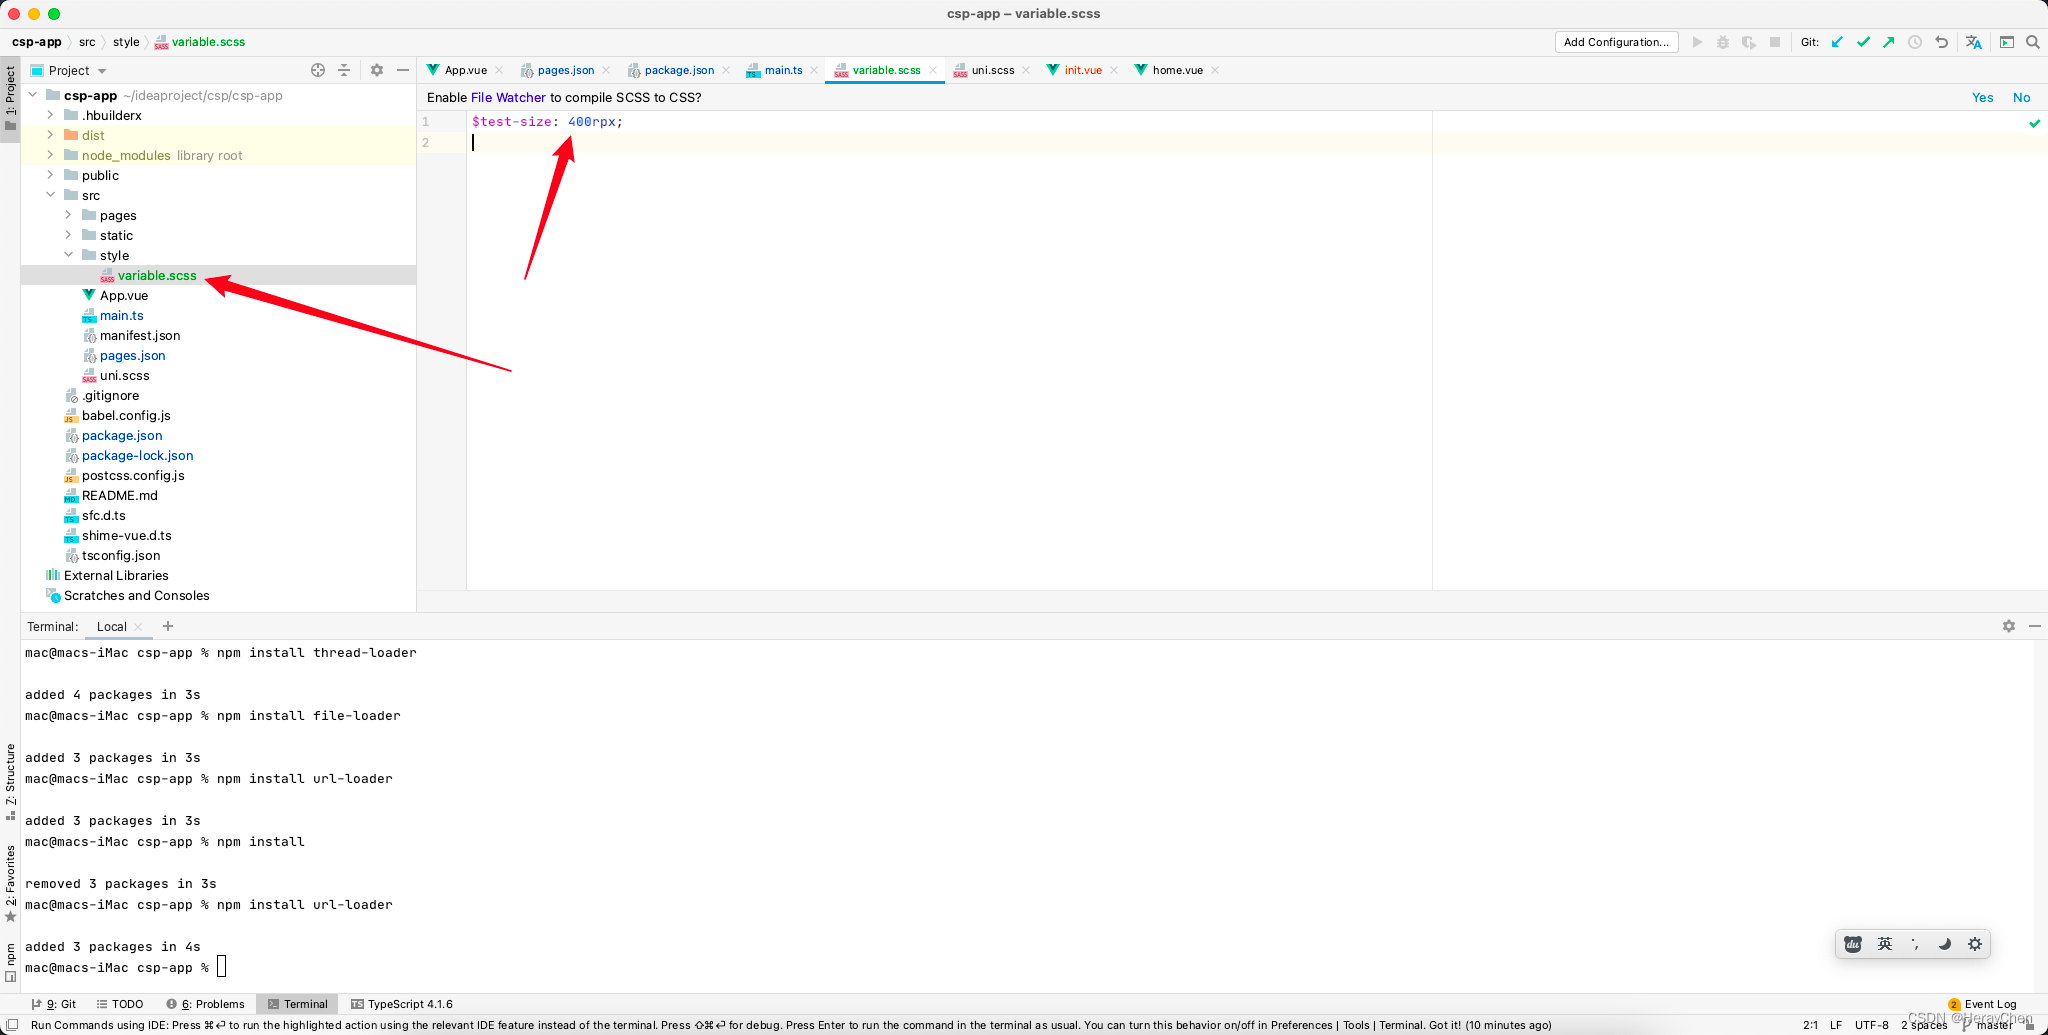
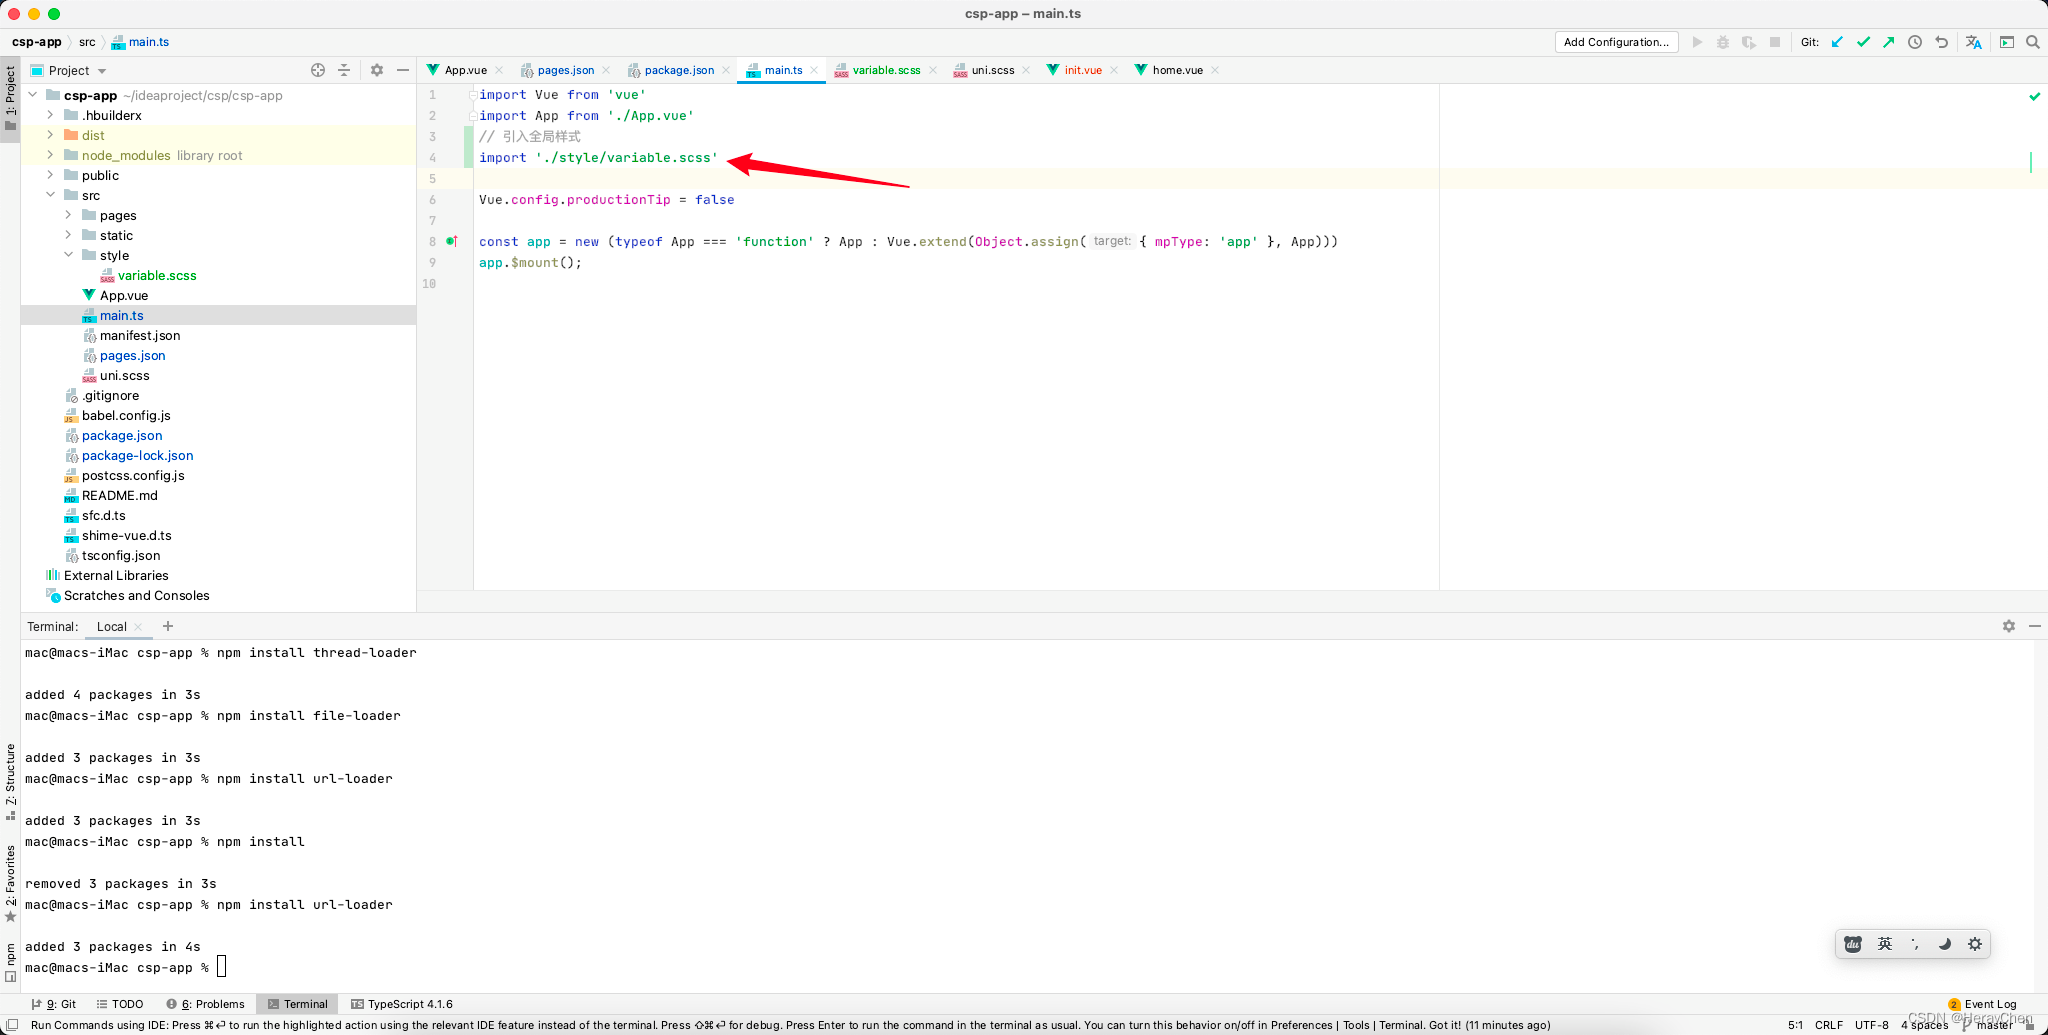
创建全局样式表:
全局引入全局样式表:
使用: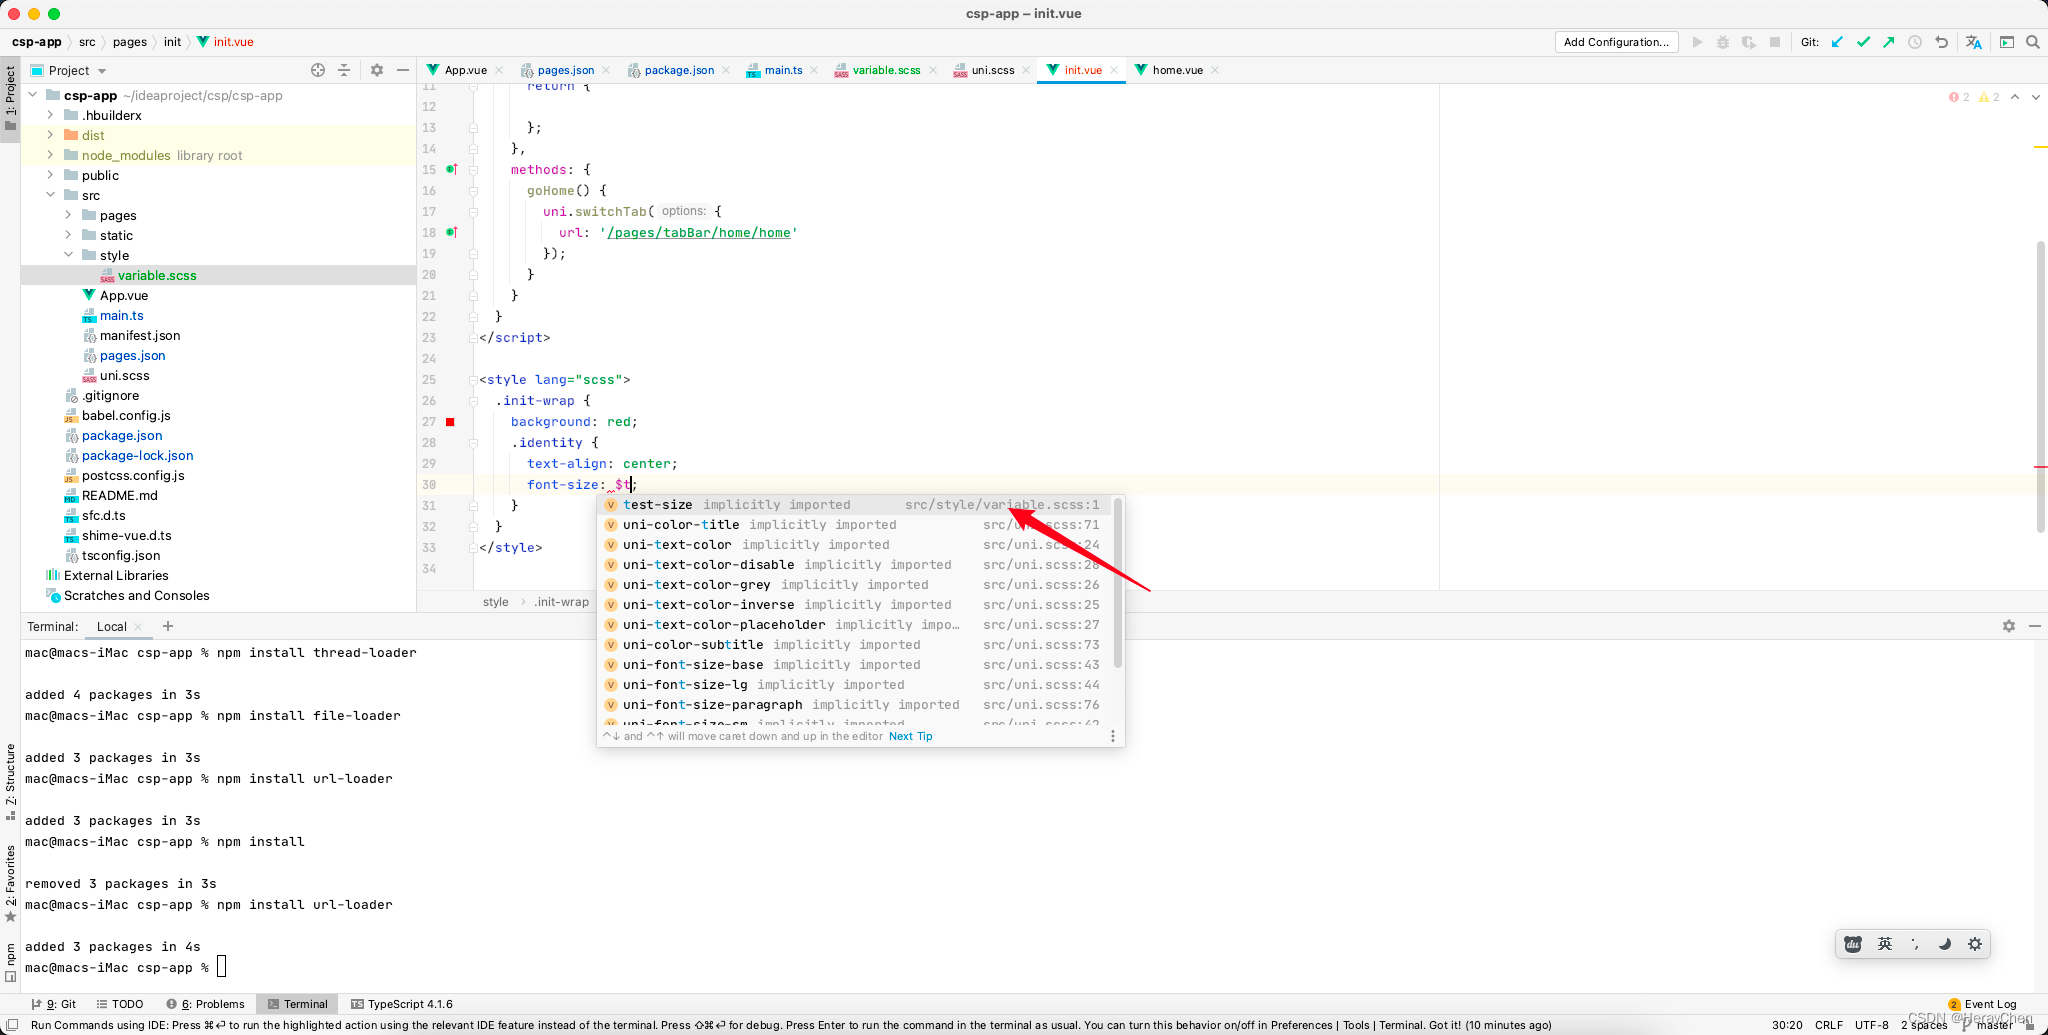
碰到的错误:SassError: Undefined variable.
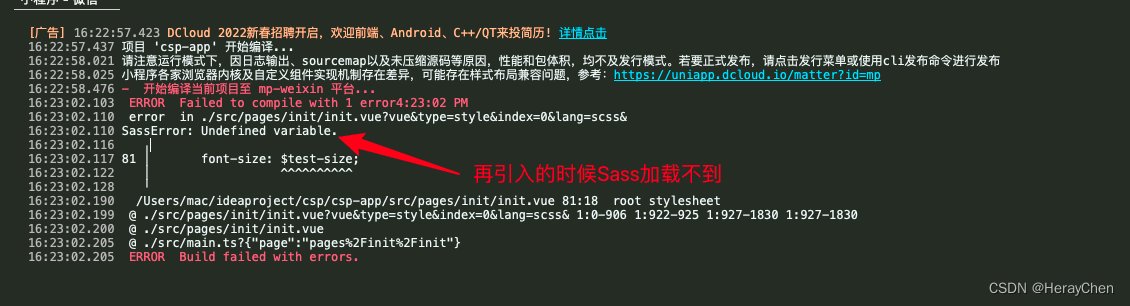
不知道怎么解决~~~~
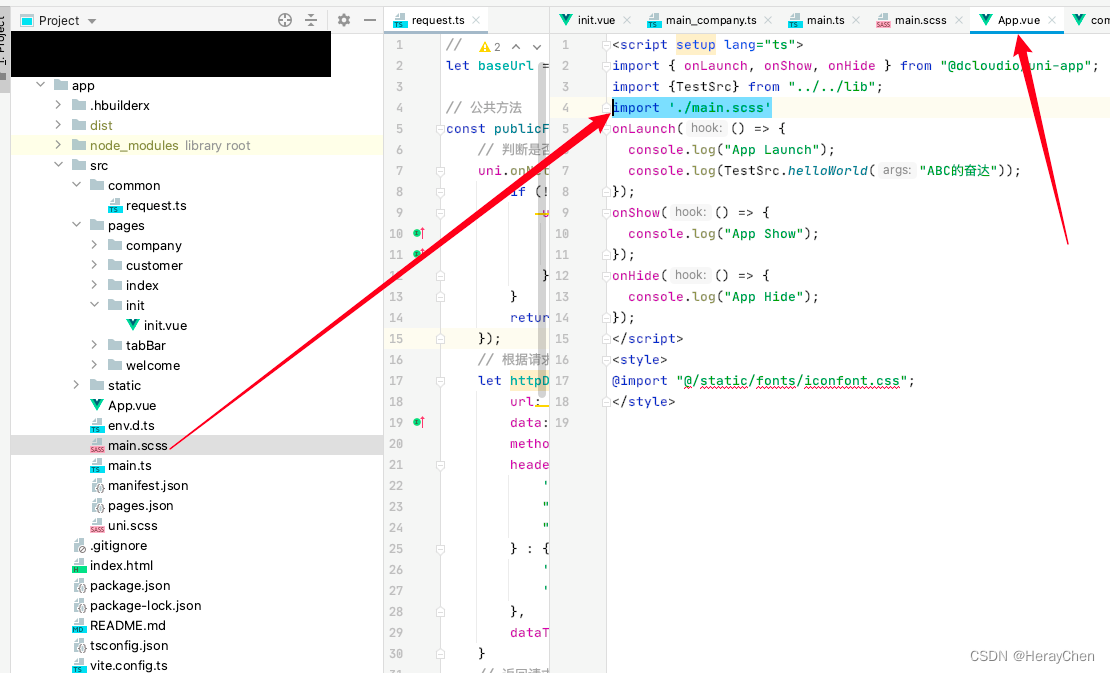
方法二(创建全局样式文件)
创建全局样式文件main.scss文件,然后在App.vue中引入全局样式文件文件。
封装公共请求方法
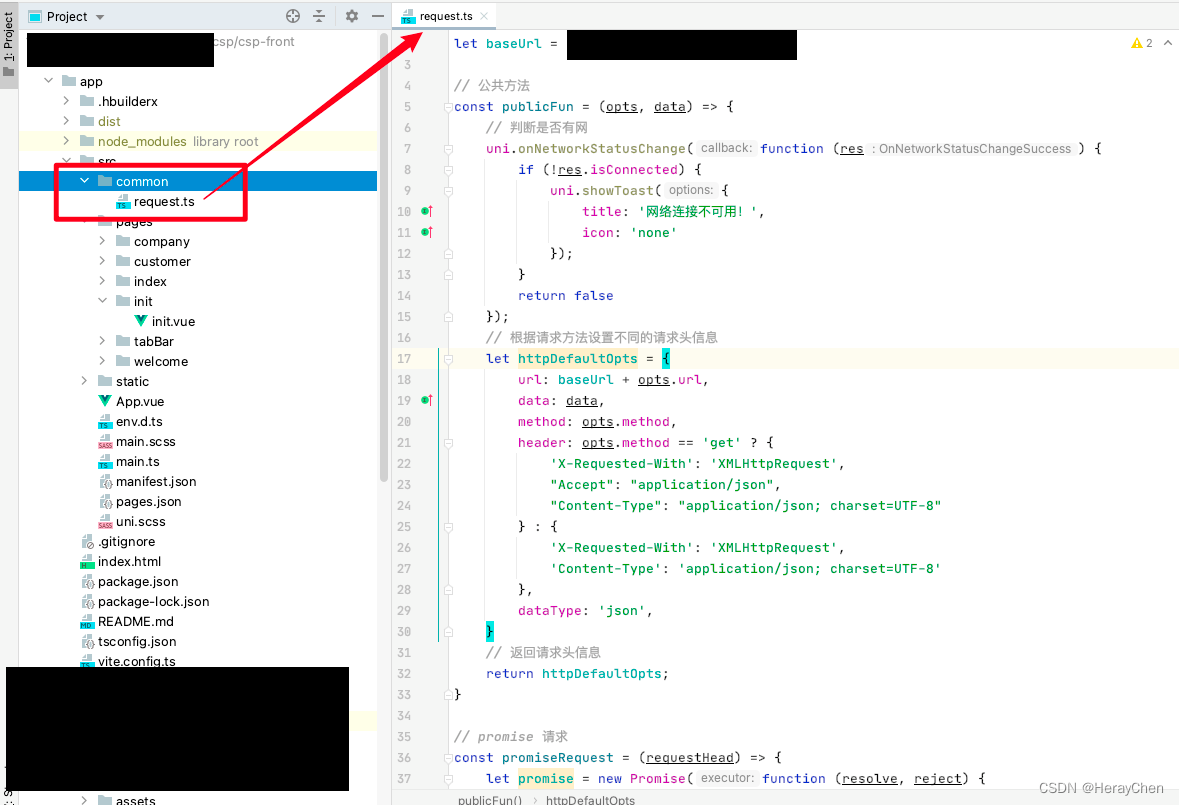
在src下创建common文件夹,将公共求方法request.ts文件放在common文件夹中。
不带token的公共请求方法
// 根地址
let baseUrl = 'https://XXX.com';

// 公共方法
const publicFun = (opts, data) => {
    // 判断是否有网
    uni.onNetworkStatusChange(function (res) {
        if (!res.isConnected) {
            uni.showToast({
                title: '网络连接不可用!',
                icon: 'none'
            });
        }
        return false
    });
    // 根据请求方法设置不同的请求头信息
    let httpDefaultOpts = {
        url: baseUrl + opts.url,
        data: data,
        method: opts.method,
        header: opts.method == 'get' ? {
            'X-Requested-With': 'XMLHttpRequest',
            "Accept": "application/json",
            "Content-Type": "application/json; charset=UTF-8"
        } : {
            'X-Requested-With': 'XMLHttpRequest',
            'Content-Type': 'application/json; charset=UTF-8'
        },
        dataType: 'json',
    }
    // 返回请求头信息
    return httpDefaultOpts;
}

// promise 请求
const promiseRequest = (requestHead) => {
    let promise = new Promise(function (resolve, reject) {
        uni.request(requestHead).then(
            (res) => {
                resolve(res.data)
            }
        ).catch(
            (response) => {
                reject(response)
            }
        )
    })
    return promise
}


// 请求方法
const get = (url) => {
    const requestBody = {url, method: 'get'}
    const params = publicFun(requestBody);
    return promiseRequest(params);
}

const post = (url) => {
    const requestBody = {url, method: 'post'}
    const params = publicFun(requestBody);
    return promiseRequest(params);
}

export default {
    baseUrl,
    get,
    post
}
使用:
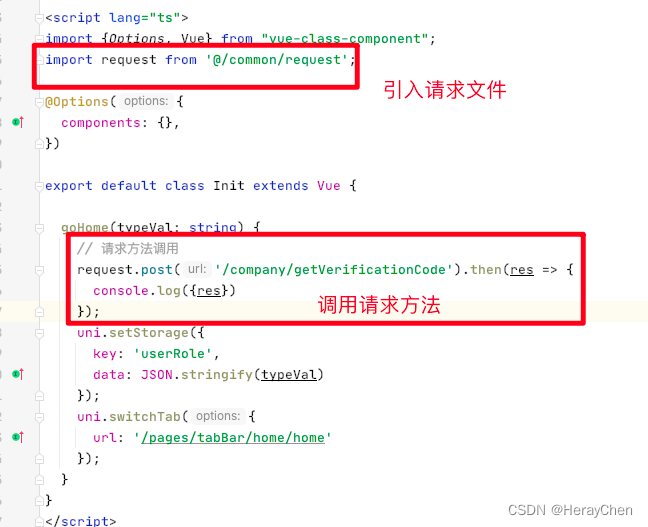
import request from '@/common/request';

// 请求方法调用
request.post('/company/getVerificationCode').then(res => {
  console.log({res})
});
带token的公共请求方法
// 根地址
let baseUrl = 'https://XXX.com';

// 公共方法
const publicFun = (opts, data) => {
    // 判断是否有网
    uni.onNetworkStatusChange(function (res) {
        if (!res.isConnected) {
            uni.showToast({
                title: '网络连接不可用!',
                icon: 'none'
            });
        }
        return false
    });
    // 获取token
    let token = uni.getStorageSync('token');
    // 处理token
    if (token == '' || token == undefined || token == null) {
        uni.showToast({
            title: '账号已过期,请重新登录',
            icon: 'none',
            complete: function() {
                uni.reLaunch({
                    url: '/pages/init/init'
                });
            }
        });
    } else {
        // 根据请求方法设置不同的请求头信息
        let httpDefaultOpts = {
            url: baseUrl + opts.url,
            data: data,
            method: opts.method,
            header: opts.method == 'get' ? {
                'X-Access-Token': token,
                'X-Requested-With': 'XMLHttpRequest',
                "Accept": "application/json",
                "Content-Type": "application/json; charset=UTF-8"
            } : {
                'X-Access-Token': token,
                'X-Requested-With': 'XMLHttpRequest',
                'Content-Type': 'application/json; charset=UTF-8'
            },
            dataType: 'json',
        }
        // 返回请求头信息
        return httpDefaultOpts;
    }
}

// promise 请求
const promiseRequest = (requestHead) => {
    let promise = new Promise(function (resolve, reject) {
        uni.request(requestHead).then(
            (res) => {
                resolve(res.data)
            }
        ).catch(
            (response) => {
                reject(response)
            }
        )
    })
    return promise
}


// 请求方法
const get = (url) => {
    const requestBody = {url, method: 'get'}
    const params = publicFun(requestBody);
    return promiseRequest(params);
}

const post = (url) => {
    const requestBody = {url, method: 'post'}
    const params = publicFun(requestBody);
    return promiseRequest(params);
}

export default {
    baseUrl,
    get,
    post
}
支持ts写法版本
// 根地址
let baseUrl = import.meta.env.VITE_APP_API_BASE_URL;

// 公共方法
const publicFun = (opts: any, data: any) => {
    // 判断是否有网
    uni.onNetworkStatusChange(function (res) {
        if (!res.isConnected) {
            uni.showToast({
                title: '网络连接不可用!',
                icon: 'none'
            });
        }
        return false
    });
    // 获取token
    let token = uni.getStorageSync('token');
    // 处理token
    if (token == '' || token == undefined || token == null) {
        uni.showToast({
            title: '账号已过期,请重新登录',
            icon: 'none',
            complete: function () {
                uni.reLaunch({
                    url: '/pages/init/init'
                });
            }
        });
    } else {
        // 根据请求方法设置不同的请求头信息
        let httpDefaultOpts = {
            url: baseUrl + opts.url,
            data: data,
            method: opts.method,
            header: opts.method == 'get' ? {
                'Authorization': 'Bearer ' + token,
                'X-Requested-With': 'XMLHttpRequest',
                "Accept": "application/json",
                "Content-Type": "application/json; charset=UTF-8"
            } : {
                'Authorization': 'Bearer ' + token,
                'X-Requested-With': 'XMLHttpRequest',
                'Content-Type': 'application/json; charset=UTF-8'
            },
            dataType: 'json',
        }
        // 返回请求头信息
        return httpDefaultOpts;
    }
}

// promise 请求
const promiseRequest = (requestHead: any) => {
    let promise = new Promise(function (resolve, reject) {
        uni.request({
            ...requestHead,
            success: (res) => {
                resolve(res);
            },
            fail: (err: any) => {
                reject(err)
            }
        });
    })
    return promise
}


// 请求方法
const get = (url: string) => {
    const requestBody = {url, method: 'get'}
    const params = publicFun(requestBody, '');
    return promiseRequest(params);
}

const post = (url: string, data: any) => {
    const requestBody = {url, method: 'post'};
    const params = publicFun(requestBody, data);
    return promiseRequest(params);
}

export default {
    baseUrl,
    get,
    post
}
将封装的方法挂载在原型上
挂载:

调用:

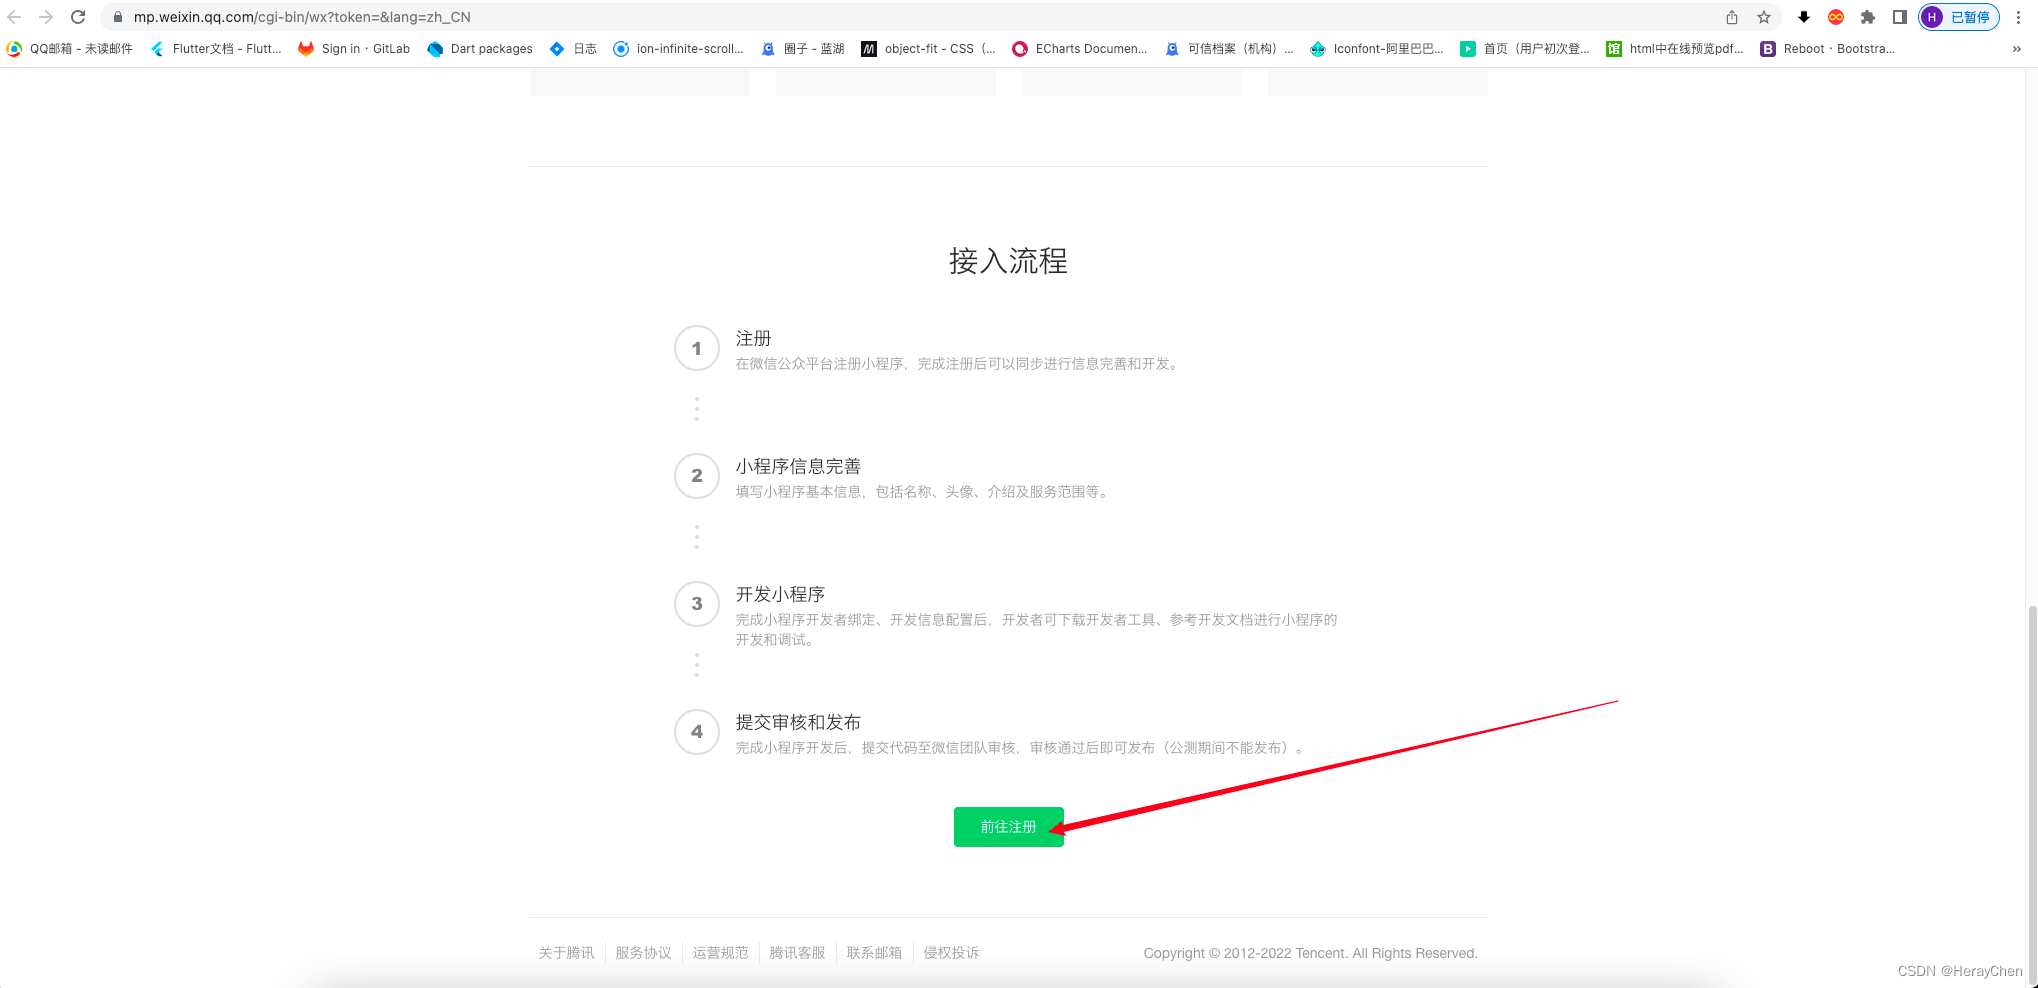
小程序登录
在微信公众平台注册测试号
将测试号的地址放在后台配置上就可以实现登录了。

前台登录的时候要获取小程序的信息:

<!-- getPhoneNumber 获取用户手机号 -->
<!-- https://developers.weixin.qq.com/miniprogram/dev/component/button.html -->
<button class="primary-btn" open-type="getPhoneNumber" @getphonenumber="getPhoneNumber">点击微信登录</button>
export default class Login extends Vue {
  // 用户类型
  authorType: string | undefined = '';

 //
  sessionData: any | undefined = null;

  created(): void {
    uni.login({
      // 使用微信登录
      provider: 'weixin',
      success: (res) => {
        if (res.errMsg == 'login:ok' && res.code) {
          // 请求接口 获取用户登录信息
          // 注意: onlyAuthorize:true 才会返回
          this.sessionData = res.data;
        }
      }
    })
  }

   getPhoneNumber(e) {
		// 获取用户登录的身份
	    const authorType = uni.getStorageSync('authorType');
	    if (e.detail.errMsg != 'getPhoneNumber:ok') {
	      uni.showToast({
	        title: '获取手机号失败',
	        icon: 'none'
	      })
	      return;
	    }

	    // 判断手机号是否获取成功
	    WechatLoginController.decodePhone(this.$axios, {encryptedData: e.detail.encryptedData, iv: e.detail.iv, sessionkey: this.sessionData.session_key}).then(result => {
	      if (result.errMsg == 'request:ok') {
	      	// 通过拿到的信息 调用接口登录
	      	// 通过用户类型和手机号登录
	        WechatLoginController.authorLogin(this.$axios, authorType, result.data.phoneNumber).then(result => {
	          if (result.errMsg == 'request:ok') {
	            uni.setStorage({key: "token", data: result.data});
	            // 登录跳转到首页
	            uni.switchTab({
	              url: '/pages/tabBar/home/home'
	            });
	          }
	        })
	      } else {
	      	// 获取失败
	        uni.showToast({
	          title: '获取手机号失败',
	          icon: 'none'
	        })
	        return;
	      }
	    })
	}
}
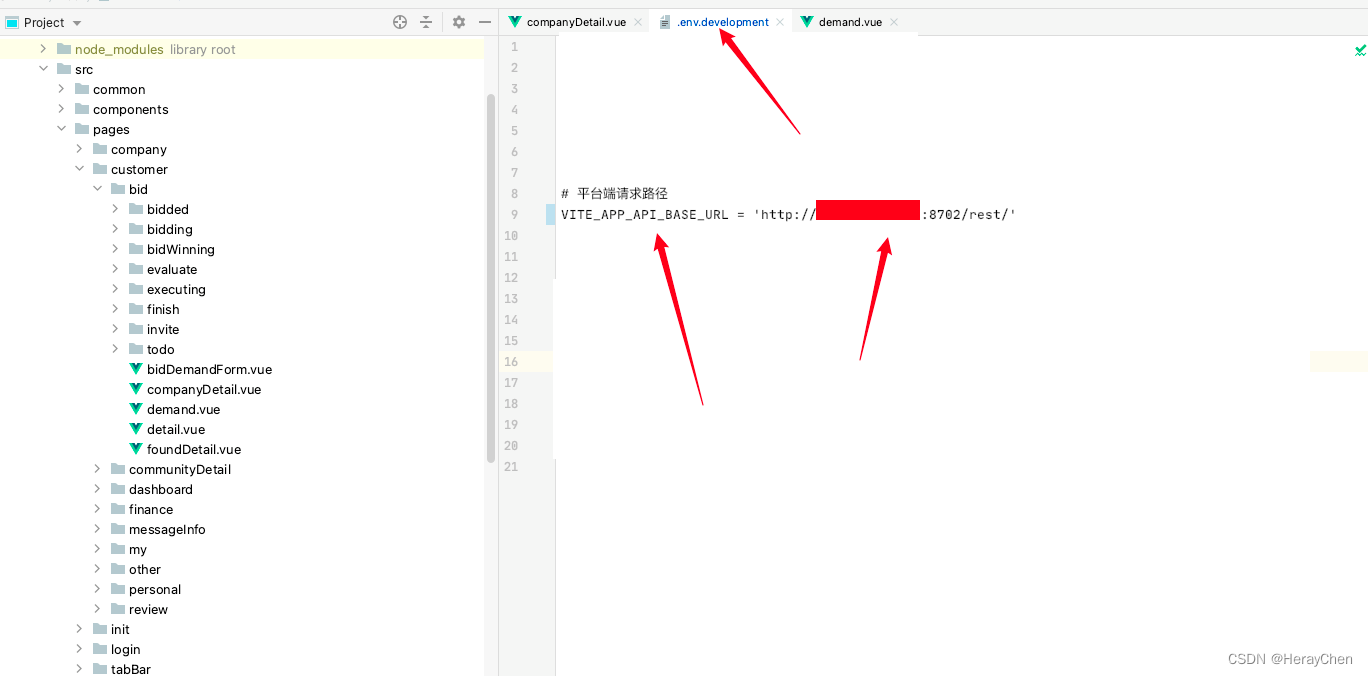
配置地址映射
创建.env.development和 .env.production文件配置根路由地址。
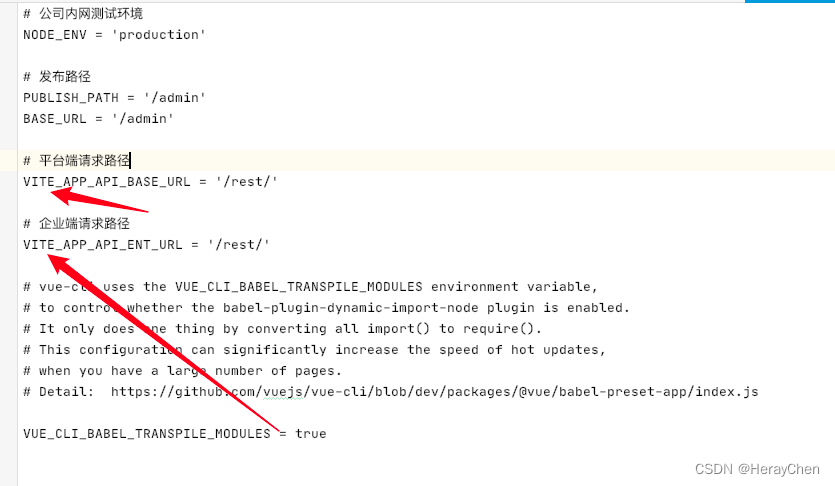
使用:通过import.meta.env来使用。

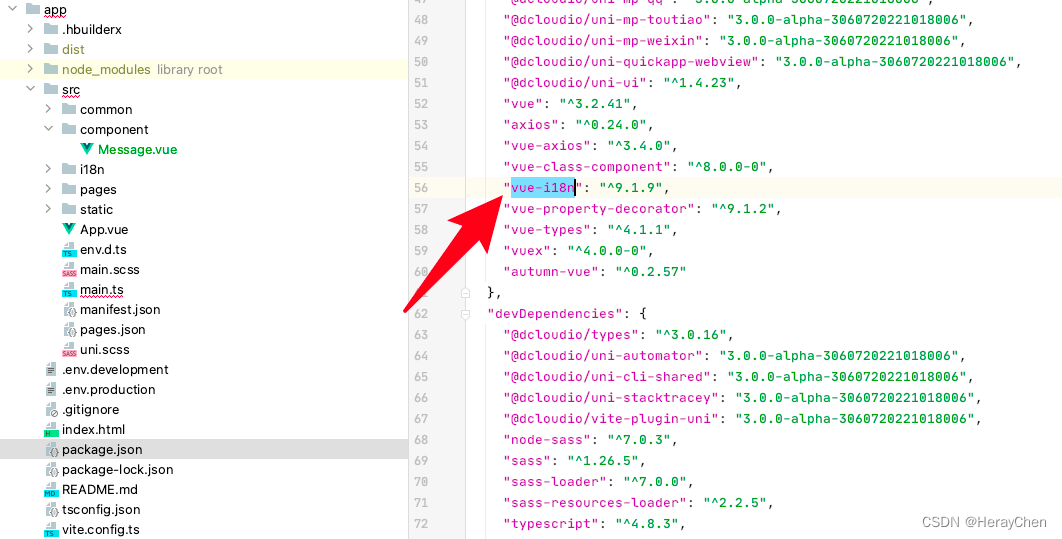
多语言
- 安装vue-i18n,
npm install vue-i18n
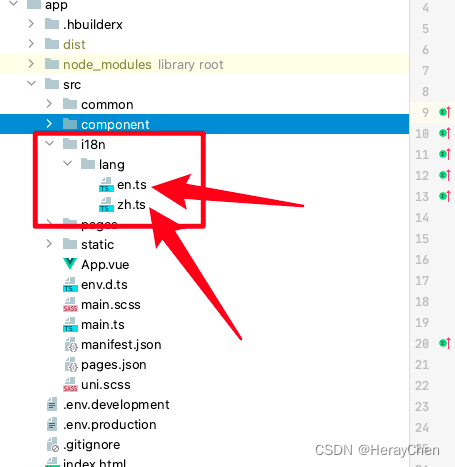
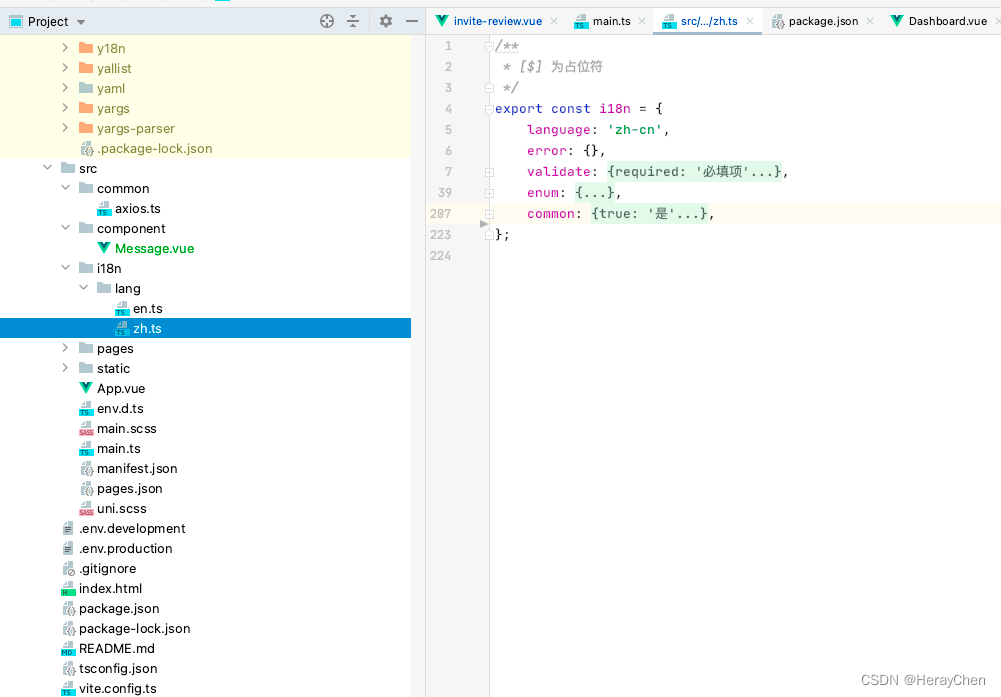
- 创建i18n文件存放多语言翻译文件
- 配置vue-i18n
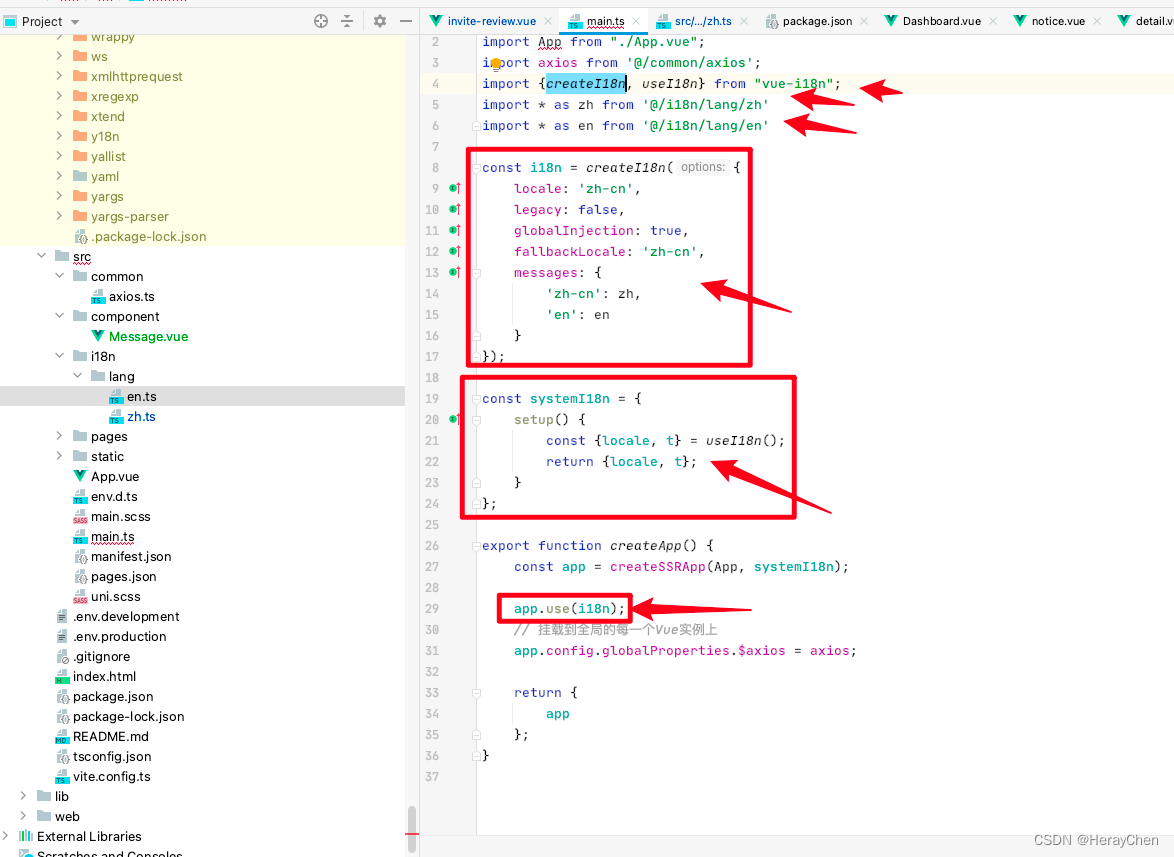
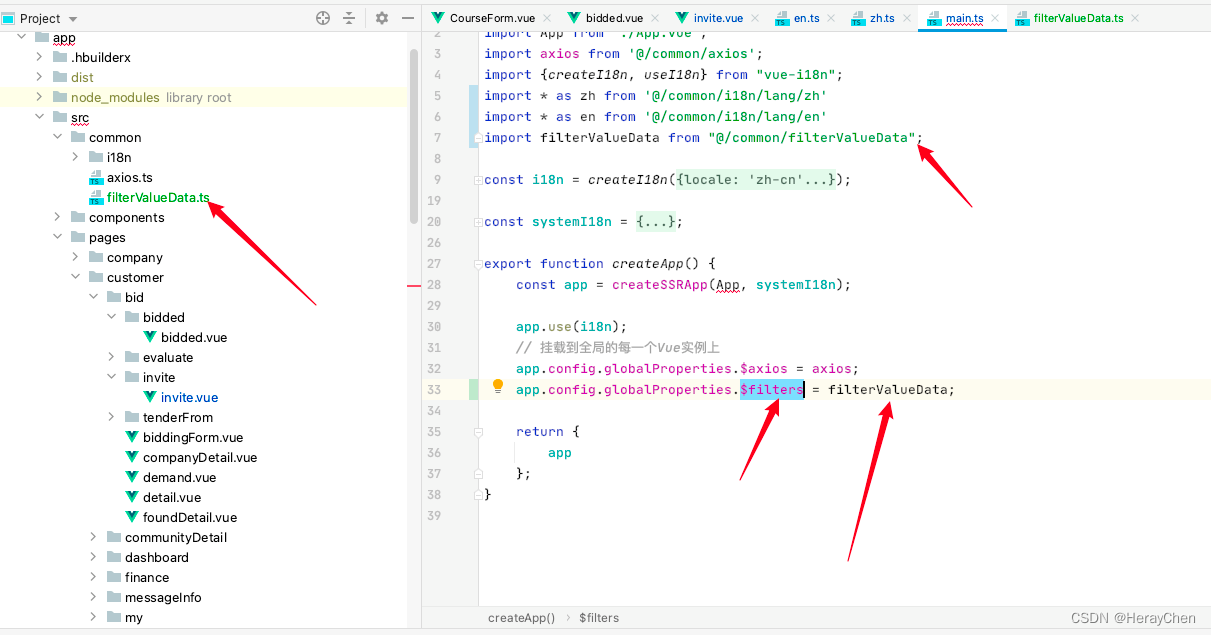
import {createSSRApp} from "vue";
import App from "./App.vue";
import axios from '@/common/axios';
import {createI18n, useI18n} from "vue-i18n";
import * as zh from '@/i18n/lang/zh'
import * as en from '@/i18n/lang/en'

const i18n = createI18n({
    locale: 'zh-cn',
    legacy: false,
    globalInjection: true,
    fallbackLocale: 'zh-cn',
    messages: {
        'zh-cn': zh,
        'en': en
    }
});

const systemI18n = {
    setup() {
        const {locale, t} = useI18n();
        return {locale, t};
    }
};

export function createApp() {
    const app = createSSRApp(App, systemI18n);

    app.use(i18n);
    // 挂载到全局的每一个Vue实例上
    app.config.globalProperties.$axios = axios;

    return {
        app
    };
}
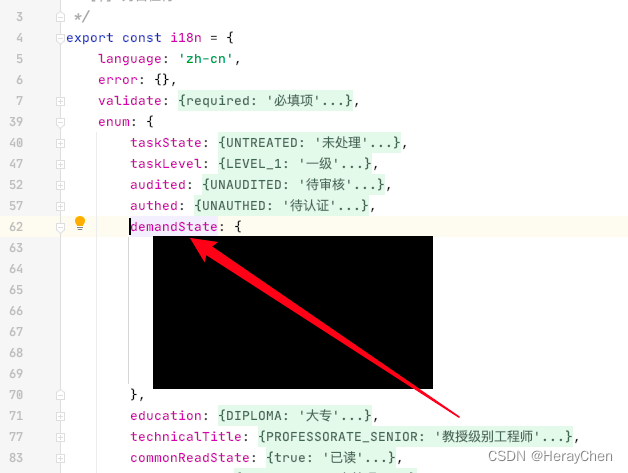
- 使用

这里用的就是demandState里面的值
自定义组件
在src下创建components文件夹,把创建的组件存放在components中,然后就可以全局使用了,不用导入,也不用注册,直接通过自定义组件文件名称来使用,vit会自动识别components中的文件为组件。
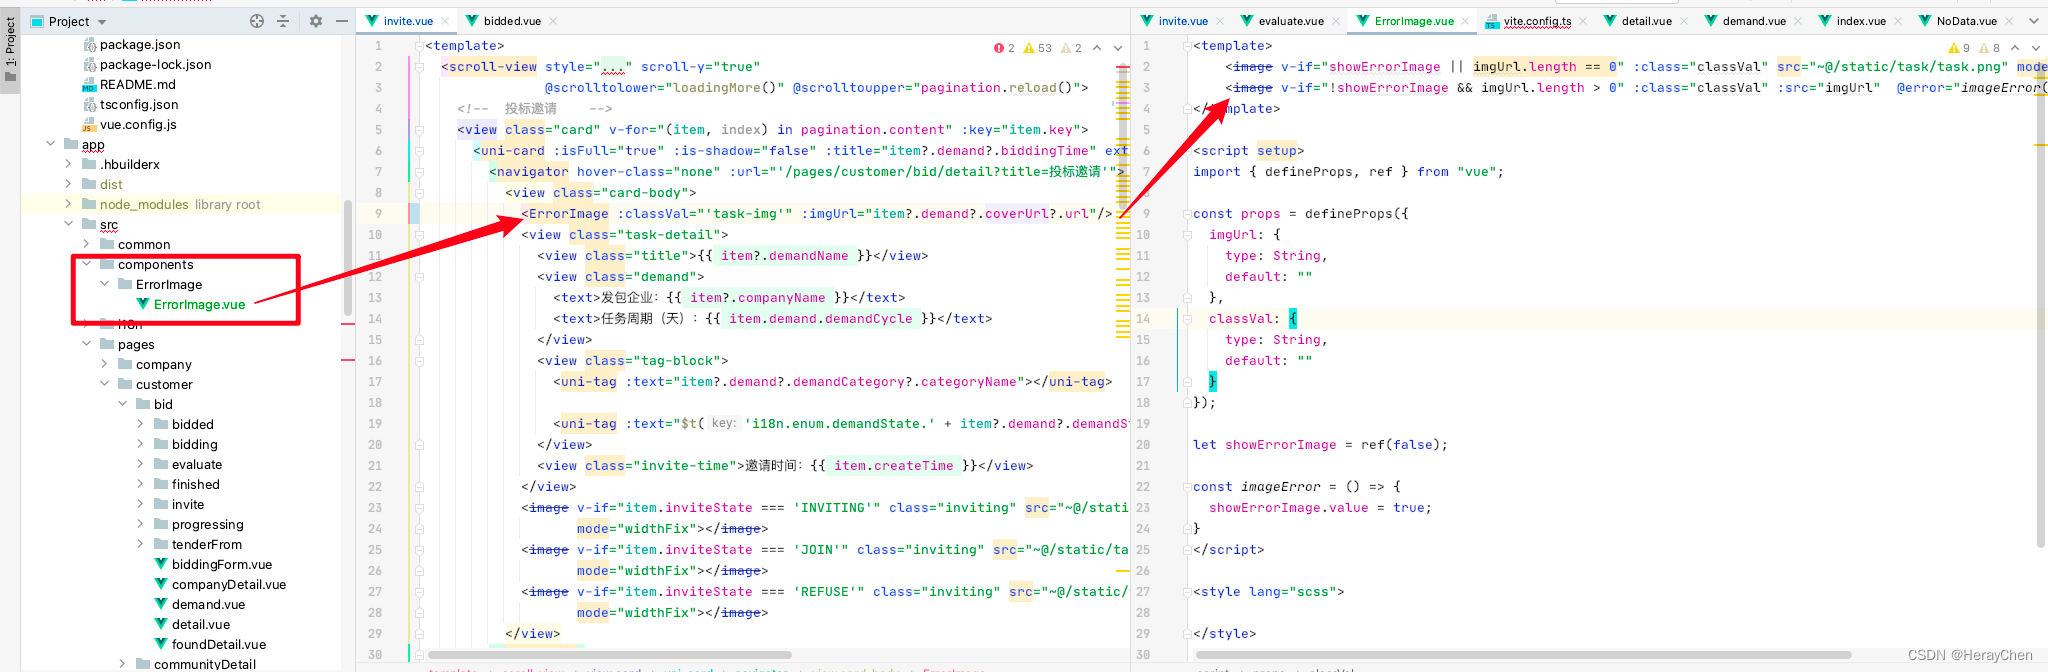
由于vue3中不支持require,所以我就用自定义组件的方式, 通过利用image的error方法来实现了图片加载失败的占位效果。
<template>
    <image v-if="showErrorImage || imgUrl.length == 0" :class="classVal" src="~@/static/task/task.png" mode="widthFix"></image>
    <image v-if="!showErrorImage && imgUrl.length > 0" :class="classVal" :src="imgUrl"  @error="imageError()" mode="widthFix" ></image>
</template>

<script setup>
import { defineProps, ref } from "vue";

const props = defineProps({
  imgUrl: {
    type: String,
    default: ""
  },
  classVal: {
    type: String,
    default: ""
  }
});

let showErrorImage = ref(false);

const imageError = () => {
  showErrorImage.value = true;
}
</script>

<style lang="scss">

</style>
也可以通过下面这种方式写,我是用自定义组件是因为调用接口的方法不支持内容的修改。

通过VueX自定义提示
uniapp的uni-popup-message和wx.showToast等的局限性太多了,就自己弄了一个$toast实现自定义提示,但是每次使用的时候都要在页面上写一下CustomToast这个标签,麻了。

代码:
main.ts
import {createSSRApp} from "vue";
import App from "./App.vue";
import store from "@/store";

// 提示加载方法
function toast(params: any){
    store.commit("toast", params)
}

export function createApp() {
    const app = createSSRApp(App);
    // 挂载到全局的每一个Vue实例上
    app.config.globalProperties.$store = store;
    app.config.globalProperties.$toast = toast;

    return {
        app
    };
}
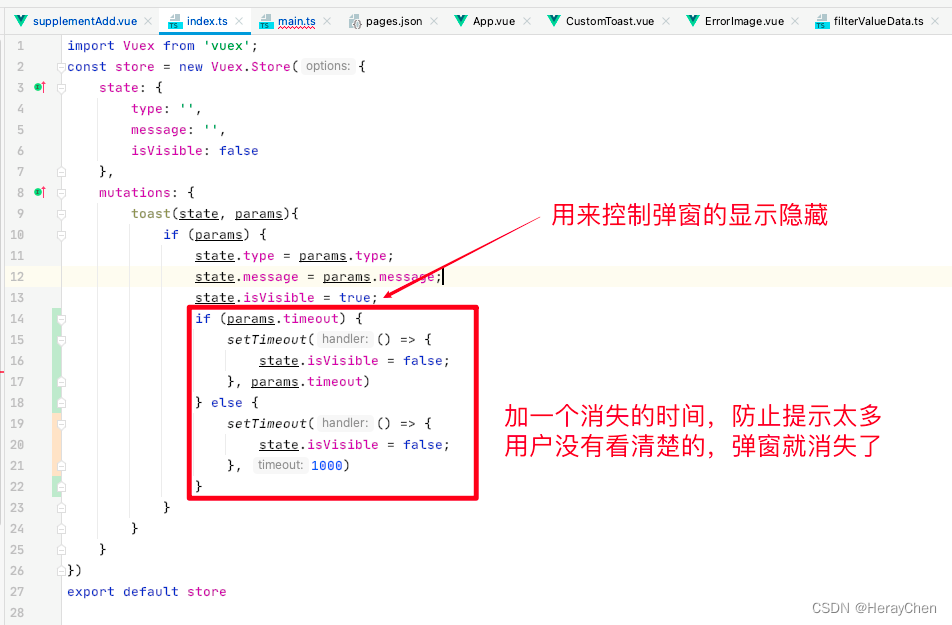
src/store/index.ts 内容:
import Vuex from 'vuex';
const store = new Vuex.Store({
    state: {
        type: '',
        message: '',
        isVisible: false
    },
    mutations: {
        toast(state, params){
            if (params) {
                state.type = params.type;
                state.message = params.message;
                state.isVisible = true;
                if (params.timeout) {
                    setTimeout(() => {
                        state.isVisible = false;
                    }, params.timeout)
                } else {
                    setTimeout(() => {
                        state.isVisible = false;
                    }, 1000)
                }
            }
        }
    }
})
export default store
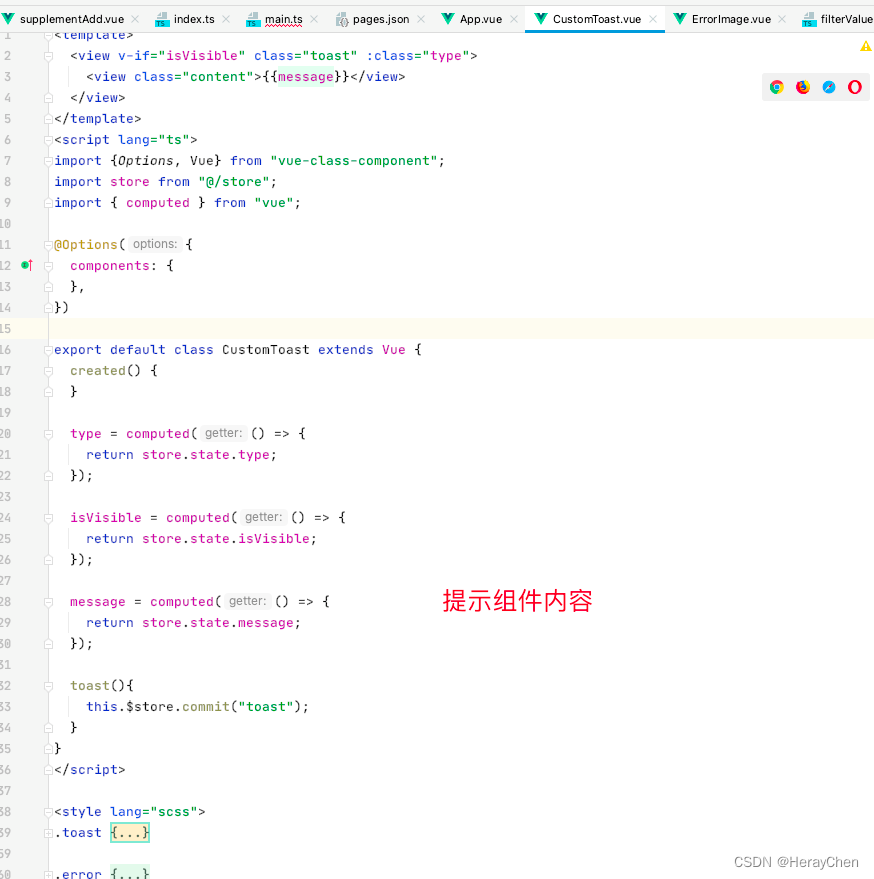
CustomToast组件内容:
注意uniapp中把项目组件放在components文件夹中,可以在全局中使用。
<template>
  <view v-if="isVisible" class="toast" :class="type">
    <view class="content">{{message}}</view>
  </view>
</template>
<script lang="ts">
import {Options, Vue} from "vue-class-component";
import store from "@/store";
import { computed } from "vue";

@Options({
  components: {
  },
})

export default class CustomToast extends Vue {
  created() {
  }

  type = computed(() => {
    return store.state.type;
  });

  isVisible = computed(() => {
    return store.state.isVisible;
  });

  message = computed(() => {
    return store.state.message;
  });

  toast(){
    this.$store.commit("toast");
  }
}
</script>

<style lang="scss">
.toast {
  position: fixed;
  top: 4vh;
  left: 50%;
  transform: translateX(-50%);
  width: 90vw;
  border-radius: 8rpx;
  background: red;
  .content {
    display: -webkit-box;
    -webkit-box-orient: vertical;
    -webkit-line-clamp: 5;
    margin: 18rpx;
    line-height: 40rpx;
    overflow: hidden;
    text-overflow: ellipsis;
    text-align: center;
    font-size: 24rpx;
  }
}

.error {
  color: #f56c6c;
  background: #fde2e2;
}
.success {
  color: #09bb07;
  background: #e1f3d8;
}
.warn {
  color: #e6a23c;
  background: #faecd8;
}
</style>
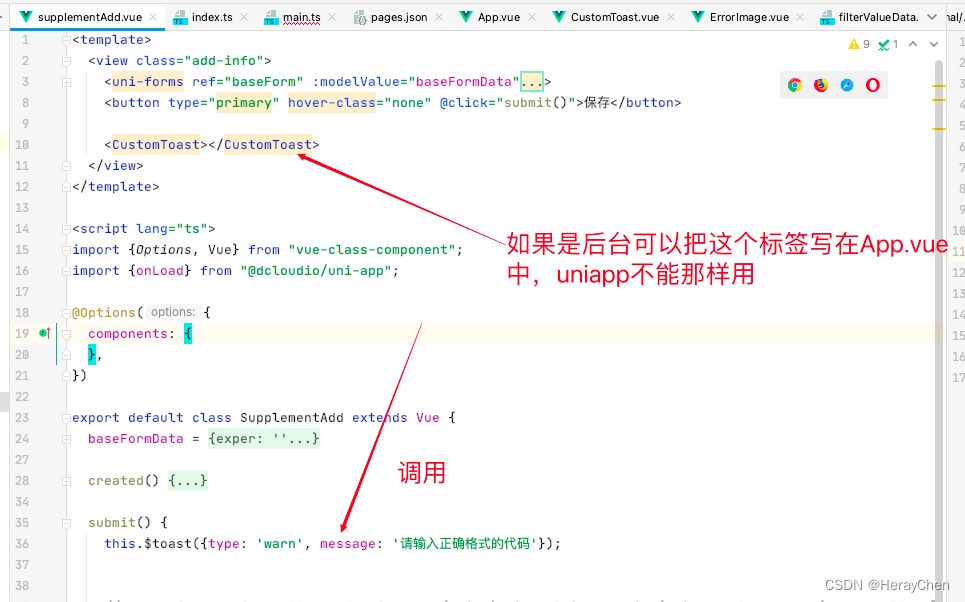
使用:
<template>
  <view class="add-info">
    <button type="primary" hover-class="none" @click="submit()">保存</button>
    <!-- 引入组件 -->
    <CustomToast></CustomToast>
  </view>
</template><script lang="ts">
import {Options, Vue} from "vue-class-component";
import {onLoad} from "@dcloudio/uni-app";

@Options({
  components: {
  },
})

export default class SupplementAdd extends Vue {
  submit() {
  	// 显示组件
    this.$toast({type: 'warn', message: '请输入正确格式的代码'})
  }
}
</script>
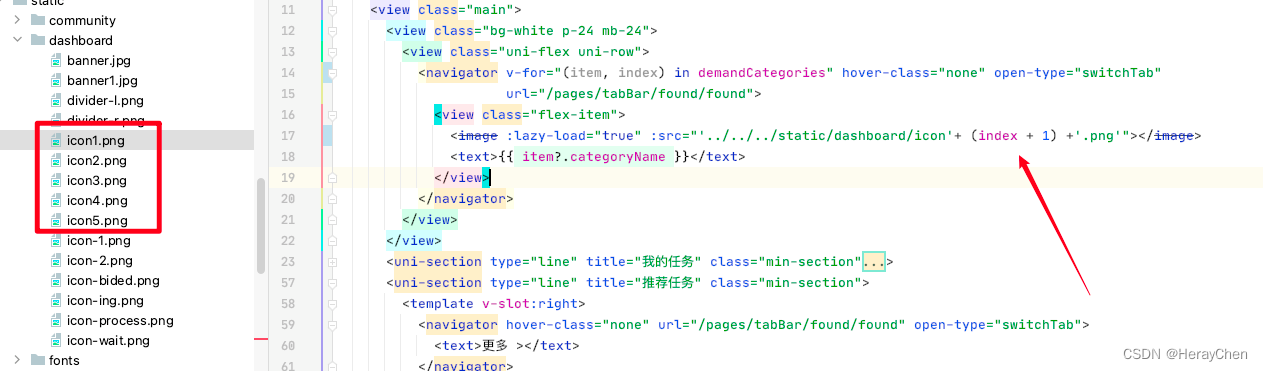
动态渲染图片
只能使用绝对路径。
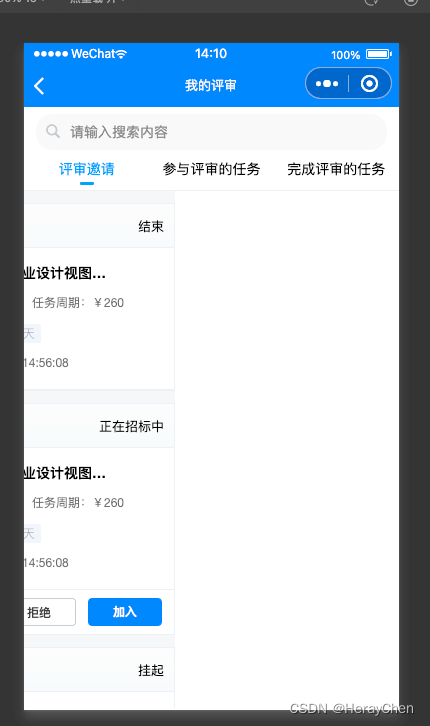
uni-segmented-control 和 swiper实现左右滑动点击切换
  <view class="segmented">
    <uni-segmented-control :current="current" :values="items" styleType="button" activeColor="#4699FA"
                           @clickItem="onClickItem"></uni-segmented-control>
  </view>
  <view class="equipment-content">
    <swiper class="swiper" style="height: calc(100vh - 172rpx);" duration="500" @change="swiperChange"
            :current="current">
      <swiper-item>
        <scroll-view v-if="current === 0" style="height: 100%;" scroll-y="true"
                     @scrolltolower="loadingMore('1')" @scrolltoupper="refresh()">
          1
          </scroll-view>
      </swiper-item>
      <swiper-item>
        <scroll-view v-if="current === 1" style="height: 100%;" scroll-y="true"
                     @scrolltolower="loadingMore('2')" @scrolltoupper="refresh()">
          2
          </scroll-view>
      </swiper-item>
      <swiper-item>
        <scroll-view v-if="current === 2" style="height: 100%;" scroll-y="true"
                     @scrolltolower="loadingMore('3')" @scrolltoupper="refresh()">
          3
          </scroll-view>
      </swiper-item>
    </swiper>
  </view>
items = ['评审邀请', '参与评审的任务', '完成评审的任务'];
current = 0;

// uni-segmented-control 点击切换
onClickItem(e) {
 if (this.current !== e.currentIndex) {
   this.current = e.currentIndex
 }
}

// swiper 左右滑动切换
swiperChange(e) {
 this.current = e.detail.current;
}

将右边改造成左边的样子。
::v-deep(.segmented-control) {
  height: 88rpx;
}

::v-deep(.segmented-control__text) {
  color: #000 !important;
}

::v-deep(.segmented-control__item--button--first),
::v-deep(.segmented-control__item--button) {
  background-color: #fff !important;
  border-color: #fff !important;
}

::v-deep(.segmented-control__item--button--active .segmented-control__text) {
  padding-bottom: 14rpx;
  color: #4699FA !important;
}

::v-deep(.segmented-control__item--button--active .segmented-control__text::after) {
  position: absolute;
  bottom: 0;
  left: 50%;
  transform: translateX(-50%);
  content: "";
  display: block;
  width: 28rpx;
  height: 6rpx;
  background: #4699FA;
  border-radius: 3rpx;
}

.segmented {
  padding-bottom: 10rpx;
  box-shadow: inset 0px -1px 0px 0px rgba(0, 0, 0, 0.08);
}
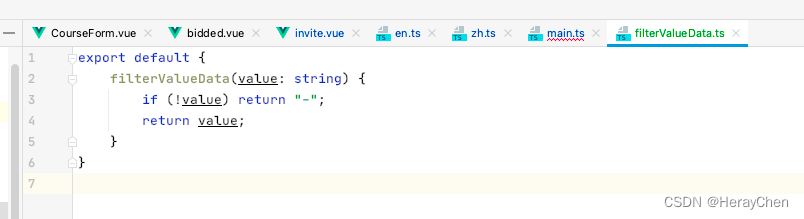
全局过滤器
在common文件夹中创建filters.ts文件,将文件的内容挂载到原型上,然后通过$filters.filterValueData()的方式来使用。

switchTab 跳转不能传参
可以通过全局变量的方式来使用。
存储:

 viewCategores(categoryName) {
 	// 将要传递的参数存储为全局变量
    getApp().globalData.categoryName = categoryName;
    uni.switchTab({
      url: '/pages/tabBar/found/found'
    })
  }
接收/使用:

// 接收传递的参数
getApp().globalData.categoryName
注意:这样使用数据只会更新一次。
解决方法:将switchTab更换为reLaunch。

navigateTo 跳转传递多个参数

注意:navigateTo 传递的参数是string类型的,传递的时候要通过JSON.stringify转换为字符串之后使用。
<uni-list-item v-for="item in pagination.content" link="navigateTo" :to="'/pages/customer/other/questionnaire/detail/detail?itemStr='+ JSON.stringify(item)">
// 接收传递的参数
created() {
	// 这里 onLoad 只加载一次,
	// 页面每次加载都加载数据接口 用 onShow
    onLoad((option) => {
      let options = JSON.parse(option.itemStr);
    })
}
通过点击事件跳转
<uni-list-item v-for="item in pagination.content" @click="viewQuestionnaireDetail(item)" link>
</uni-list-item>
viewQuestionnaireDetail(item: any) {
    CustomerQuestionnireController.getQuestionnaireLogByQuestIdAndAccountId(this.$axios, item.questId).then(res => {
      if (res.data) {
        wx.showToast({
          title: '当前调查项已经填写过了!',
          icon: 'none',
          duration: 500
        })
      } else {
        uni.navigateTo({
          url: '/pages/customer/other/questionnaire/detail/detail?itemStr='+ JSON.stringify(item)
        })
      }
    })
  }

navigateTo 跳转次数超过10次栈溢出
解决方法:
通过 getCurrentPages().length 判断次数,超过之后用reluanch实现跳转。
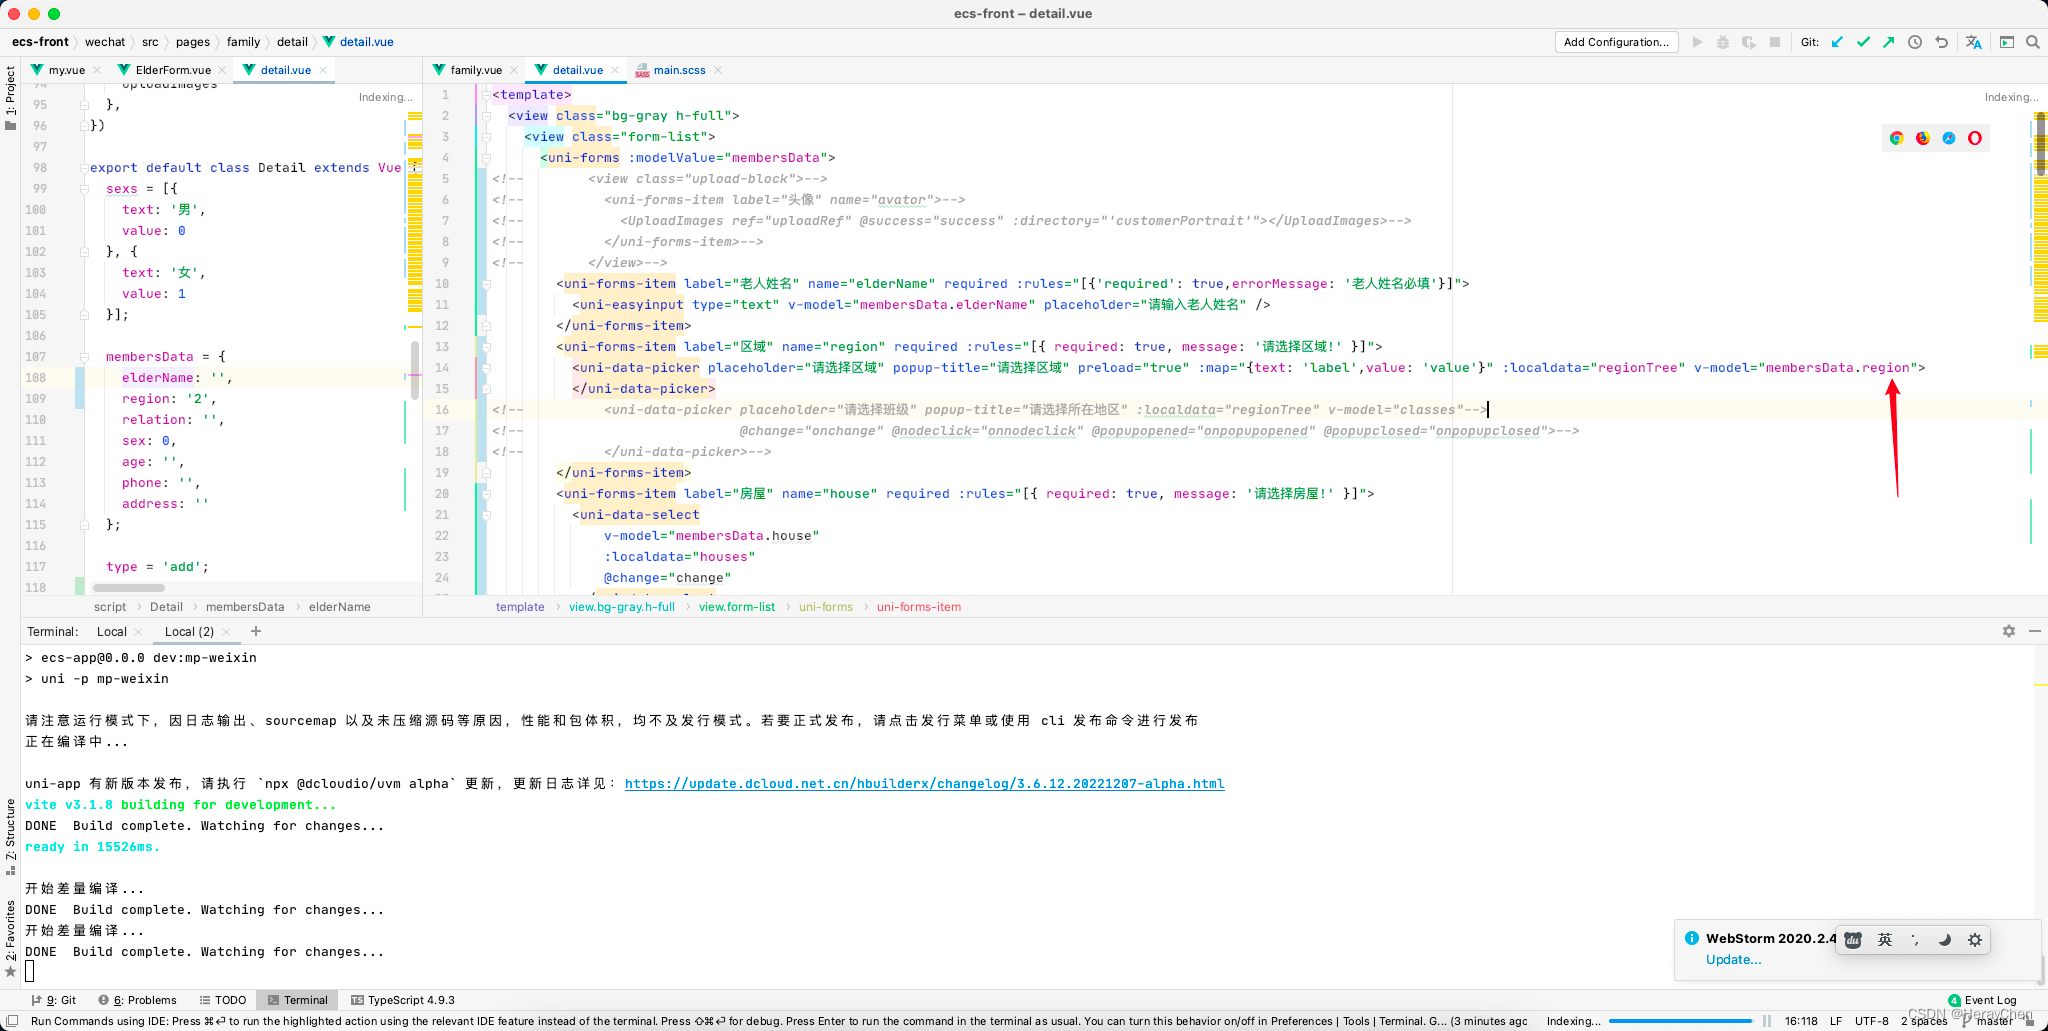
uni-data-picker 数据显示不出来
v-model绑定的数据必须要有值才行。
机型判断
uniapp种通过uni.getSystemInfoSync().platform来判断运行环境的机型。
百度小程序开发工具、微信小程序开发工具、支付宝(Alipay )小程序开发工具中uni.getSystemInfoSync ().platform的返回值都是devtools。
表单
简单表单的校验
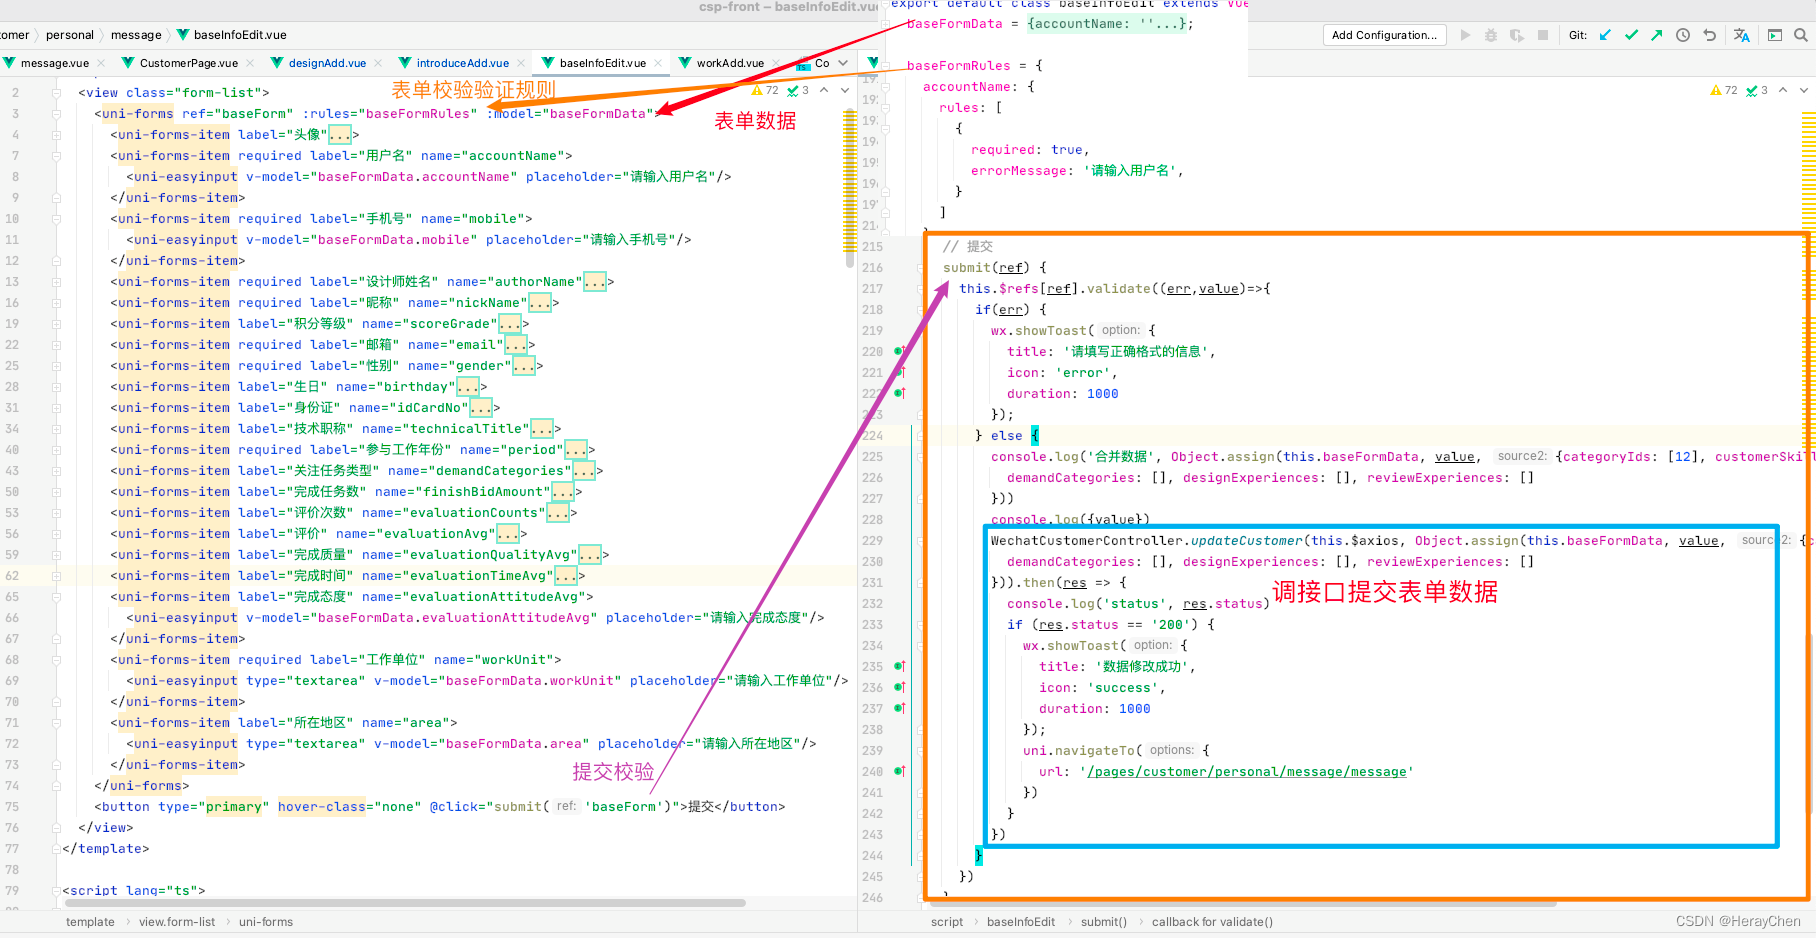
  <uni-forms ref="baseForm" :rules="baseFormRules" :model="baseFormData">
  	  <!--注意:这里必须要写name校验才会生效 -->
      <uni-forms-item required label="用户名" name="accountName">
        <uni-easyinput v-model="baseFormData.accountName" placeholder="请输入用户名"/>
      </uni-forms-item>
      <!--localdata 只支持 localdata: {text: '显示文本', value: '选中后的值', disable: '是否禁用'} 这样格式的数据-->
      <uni-data-select
            v-model="baseFormData.technicalTitle"
            :localdata="technicalTitles"
        ></uni-data-select>
</uni-forms>
<button type="primary" hover-class="none" @click="submit('baseForm')">提交</button>
baseFormData = {
    accountName: '',
    technicalTitle: '',
};
baseFormRules = {
    accountName: {
      rules: [
        {
          required: true,
          errorMessage: '请输入用户名',
        }
      ]
    }
}
// 提交
  submit(ref) {
    this.$refs[ref].validate((err,value)=>{
      if(err) {
        // 修改失败
        wx.showToast({
          title: '请填写正确格式的信息',
          icon: 'error',
          duration: 1000
        });
      } else {
        // 修改成功
      }
    })
  }
动态表单校验
<uni-forms ref="dynamicForm" :rules="dynamicRules" :model="dynamicFormData">
	<uni-forms-item label="邮箱" required name="email">
		<uni-easyinput v-model="dynamicFormData.email" placeholder="请输入姓名" />
	</uni-forms-item>
	<template v-for="(item,index) in dynamicFormData.domains">
		<uni-forms-item :label="item.label+' '+index" required
			:rules="[{'required': true,errorMessage: '域名项必填'}]" :key="item.id"
			:name="['domains',index,'value']">
			<view class="form-item">
				<uni-easyinput v-model="dynamicFormData.domains[index].value" placeholder="请输入域名" />
				<button class="button" size="mini" type="default" @click="del(item.id)">删除</button>
			</view>
		</uni-forms-item>
	</template>

</uni-forms>
<view class="button-group">
	<button type="primary" size="mini" @click="add">新增域名</button>
	<button type="primary" size="mini" @click="submit('dynamicForm')">提交</button>
</view>
export default {
	data() {
		return {
			// 数据源
			dynamicFormData: {
				email: '',
				domains: []
			},
			// 规则
			dynamicRules: {
				email: {
					rules: [{
						required: true,
						errorMessage: '域名不能为空'
					}, {
						format: 'email',
						errorMessage: '域名格式错误'
					}]
				}
			}
		}
	},
	methods: {
		// 新增表单域
		add() {
			this.dynamicFormData.domains.push({
				label: '域名',
				value:'',
				id: Date.now()
			})
		},
		// 删除表单域
		del(id) {
			let index = this.dynamicLists.findIndex(v => v.id === id)
			this.dynamicLists.splice(index, 1)
		},
		// 提交
		submit(ref) {
			this.$refs[ref].validate((err,value)=>{
				console.log(err,value);
			})
		},
	}
}
uni-list-item 点击事件不生效
解决给uni-list-item添加上link属性。
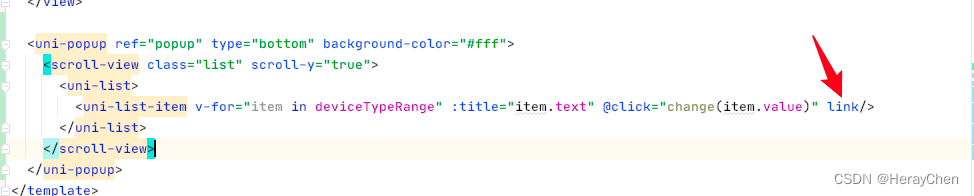
加了link之后,通过:showArrow="false"去除不了右箭头, 如果不需要右箭头可以使用clickable来实现。

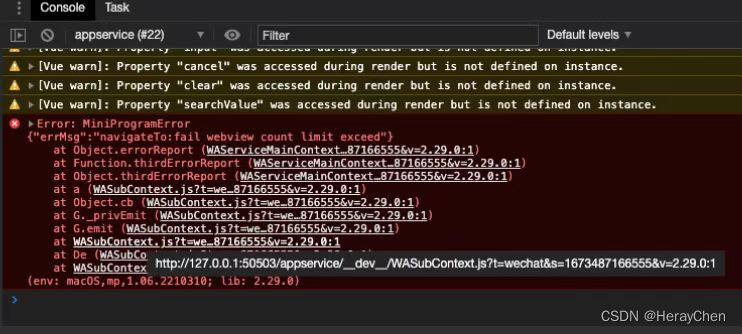
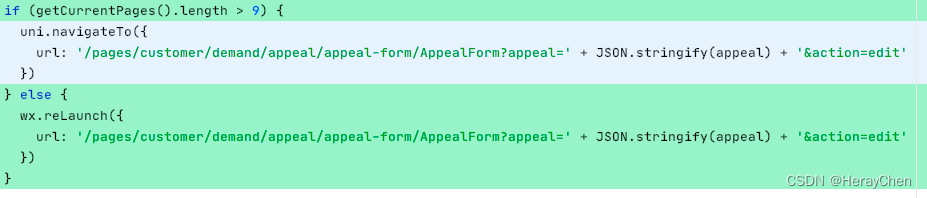
Error: MiniProgramError {“errMsg”:“navigateTo:fail webview count limit exceed”}
小程序中页面栈最多十层。
通过getCurrentPages().length来判断页面栈有多少层,大于9层的时候通过reLaunch来跳转,其他的时候通过navigateTo来跳转。

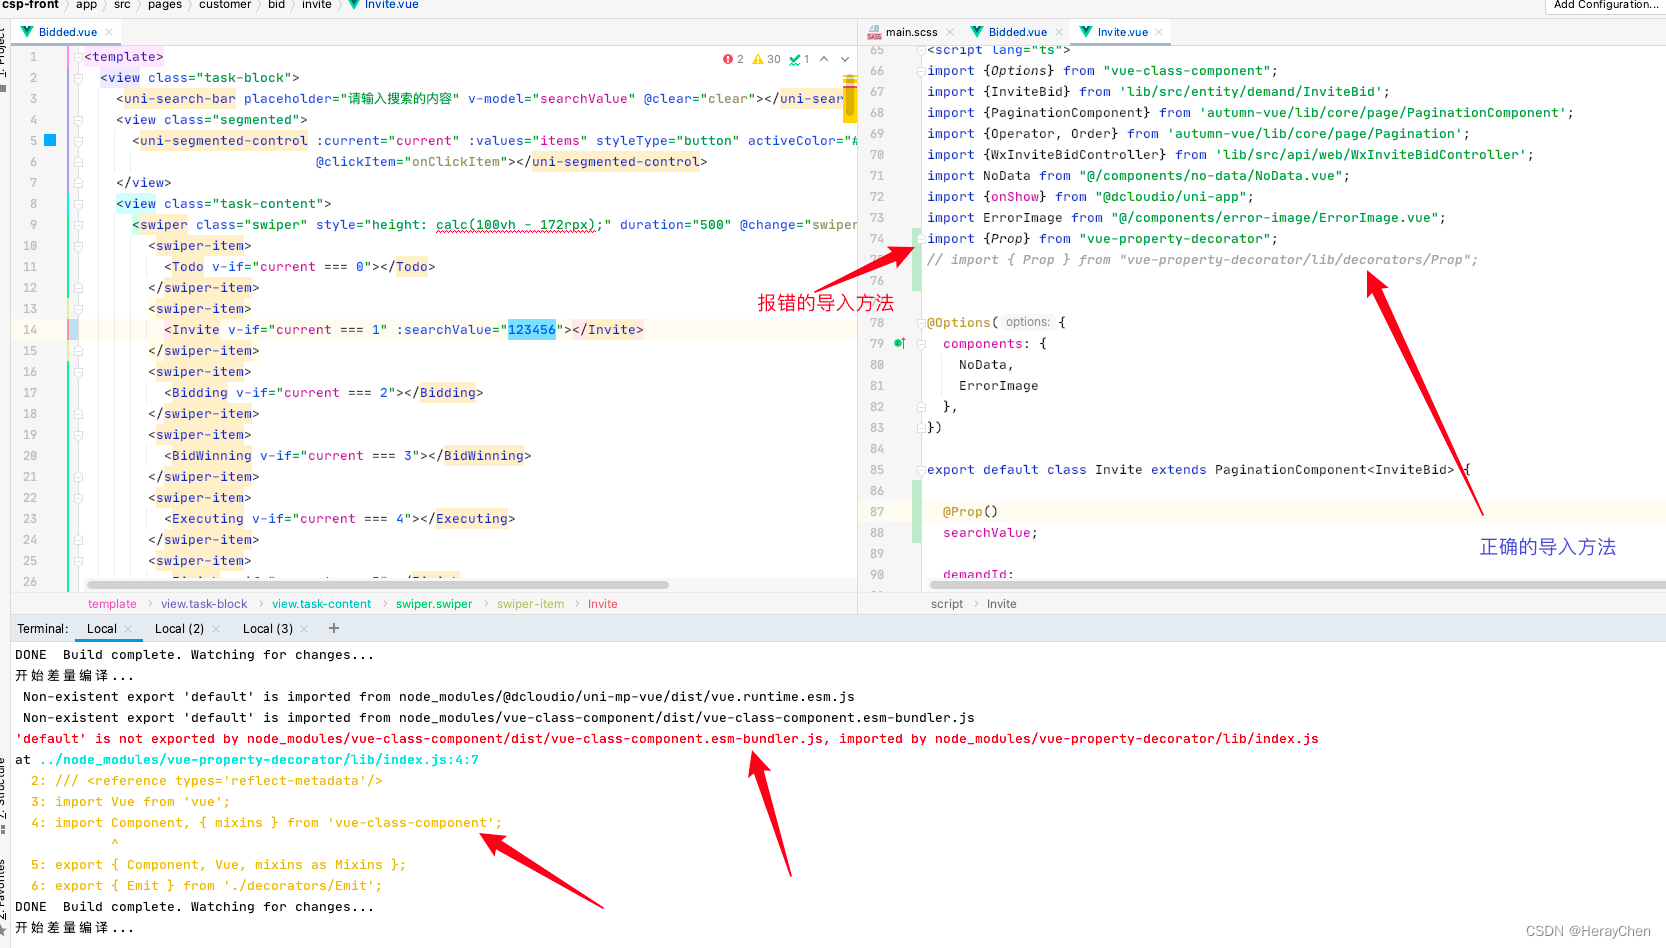
‘default’ is not exported by node_modules/vue-class-component/dist/vue-class-component.esm-bundler.js, imported by node_modules/vue-property-decorator/lib/index.js
Vue3 extends 写法 @Prop 报错。
处理导入prop包时要导入到具体的包。
通过 import { Prop } from "vue-property-decorator/lib/decorators/Prop";来导入Prop。
[Component] : should have url attribute when using navigateTo, redirectTo or switchTab(env: macOS,mp,1.06.2210310; lib: 2.27.2)
使用navigator标签实现跳转的时候要加上open-type。

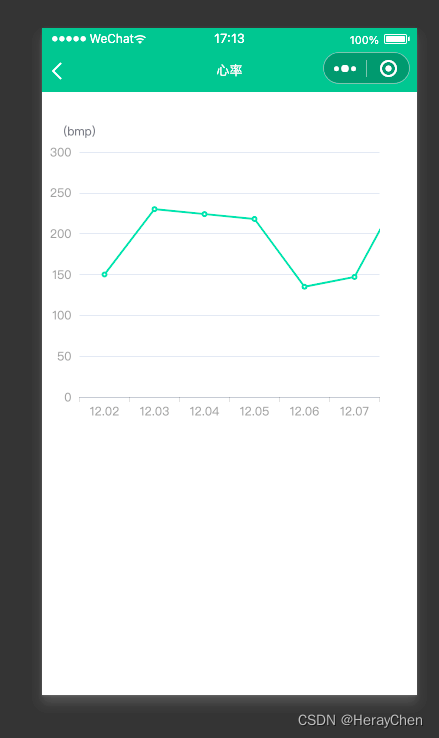
uniapp 小程序 vue3使用echarts
小程序是不支持echarts的,那么怎么使用图表呢?
- 导入echarts,
npm i echarts - 使用
lime-echart插件 插件地址
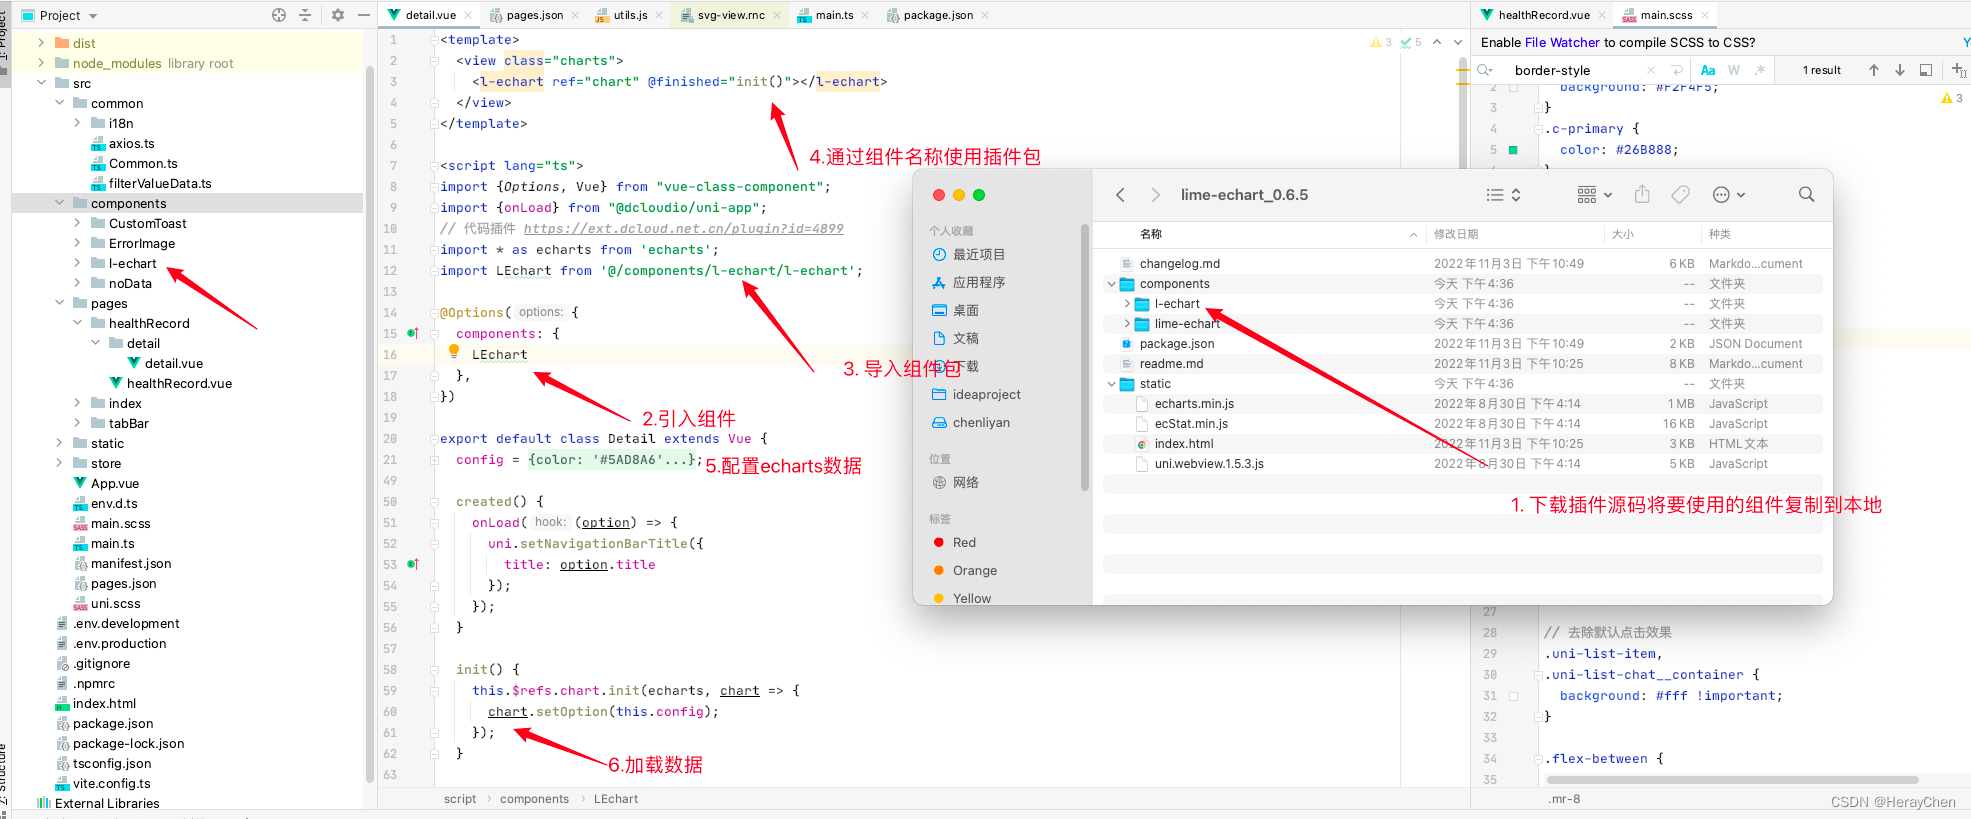
<template>
  <view class="charts">
    <l-echart ref="chart" @finished="init()"></l-echart>
  </view>
</template>

<script lang="ts">
import {Options, Vue} from "vue-class-component";
import {onLoad} from "@dcloudio/uni-app";
// 代码插件 https://ext.dcloud.net.cn/plugin?id=4899
import * as echarts from 'echarts';
import LEchart from '@/components/l-echart/l-echart';

@Options({
  components: {
    LEchart
  },
})

export default class Detail extends Vue {
  config = {
    xAxis: {
      type: 'category',
      data: ['12.02', '12.03', '12.04', '12.05', '12.06', '12.07'],
      axisLabel: {
        color: "rgba(0, 0, 0, 0.45)"
      },
      axisLine: {
        lineStyle: {
          color: 'rgba(0, 0, 0, 0.15)'
        }
      }
    },
    color: '#5AD8A6',
    yAxis: {
      type: 'value',
      name: "(bmp)",
      axisLabel: {
        color: "rgba(0, 0, 0, 0.45)"
      }
    },
    series: [
      {
        data: [150, 230, 224, 218, 135, 147, 260],
        type: 'line'
      }
    ]
  };

  created() {
    onLoad((option) => {
      uni.setNavigationBarTitle({
        title: option.title
      });
    });
  }

  init() {
    this.$refs.chart.init(echarts, chart => {
      chart.setOption(this.config);
    });
  }

}
</script>

<style>
.charts {
  width: 375px;
  height: 375px;
}
</style>
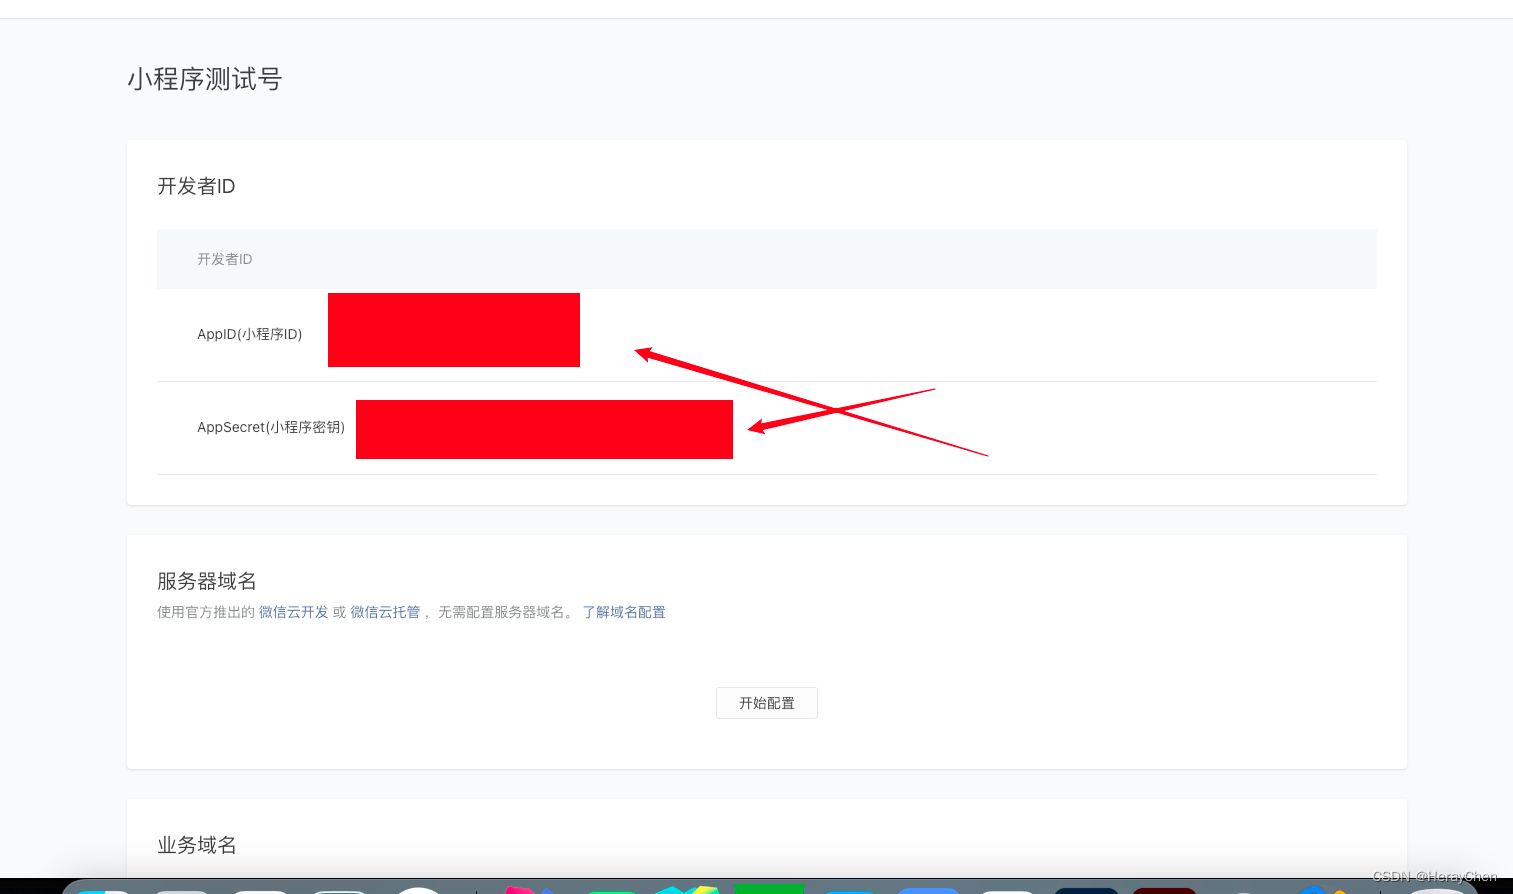
测试号真机调试
准备条件:
-
测试号(在微信开发者工具中将测试号修改成自己申请的测试号)
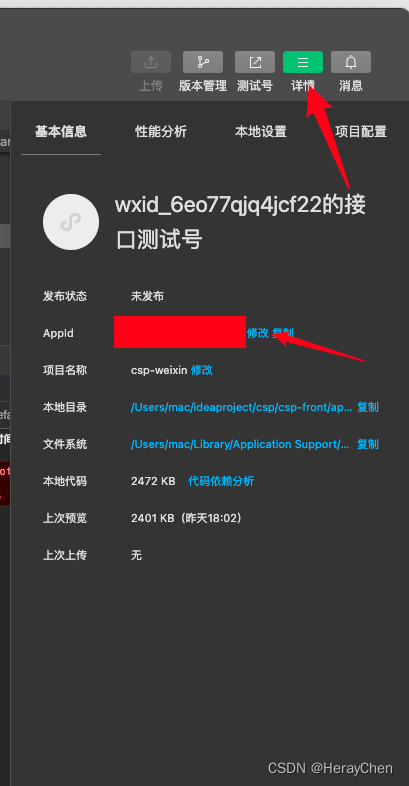
-
本机ip地址(将之前配置的地址映射使用的地址换成本机的ip地址)
利用swiper实现3d轮播
<swiper class="swiper" previous-margin="45rpx" next-margin="45rpx" circular @change="swiperChange" :current="current">
 <swiper-item class="item" v-for="(item, index) in sceneList" :key="index">
   <view class="content-block" :class="{'actived': current == index}">
     {{index}}
   </view>
 </swiper-item>
</swiper>
current = 1;

sceneList = [
  { img: '/static/1.png' },
  { img: '/static/2.png' },
  { img: '/static/3.png' },
  { img: '/static/4.png' }
];

// swiper 左右滑动切换
swiperChange(e) {
  console.log({e})
  this.current = e.detail.current;
}
.swiper {
  width: 750rpx;
  height: 350rpx;
  .item {
    display: flex;
    justify-content: center;
    align-items: center;
    width: 630rpx;
    height: 256px;
    .content-block {
      width: 630rpx;
      height: 256rpx;
      background-color: #fff;
      box-shadow: 0 3rpx 13rpx 0 rgba(0,0,0,0.08);
      border-radius: 6rpx;
      transition: height .5s ease 0s;
      &.actived {
        height: 320rpx !important;
        background: #FFFFFF;
        box-shadow: 0 4rpx 16rpx 0 rgba(0,0,0,0.08) !important;
        border-radius: 8rpx !important;
      }
    }
  }
}
页面问题
uni-easyinput text-align:end 真机调试不生效

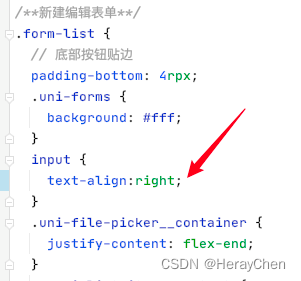
在写样式控制的时候用text-align:right。
uni-easyinput type=“textarea” placeholder 层级问题
这个问题只在安卓上有,ios是正常的。
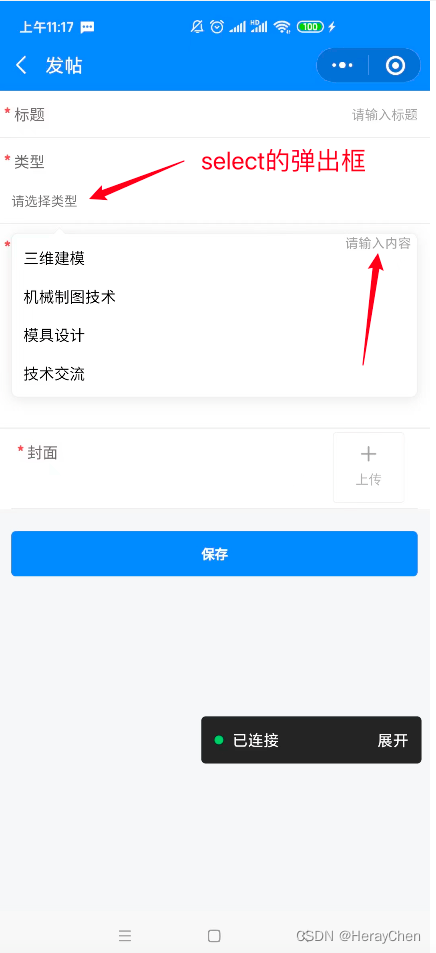
通过 cover-view 来解决
cover-view 是不支持嵌套input的。

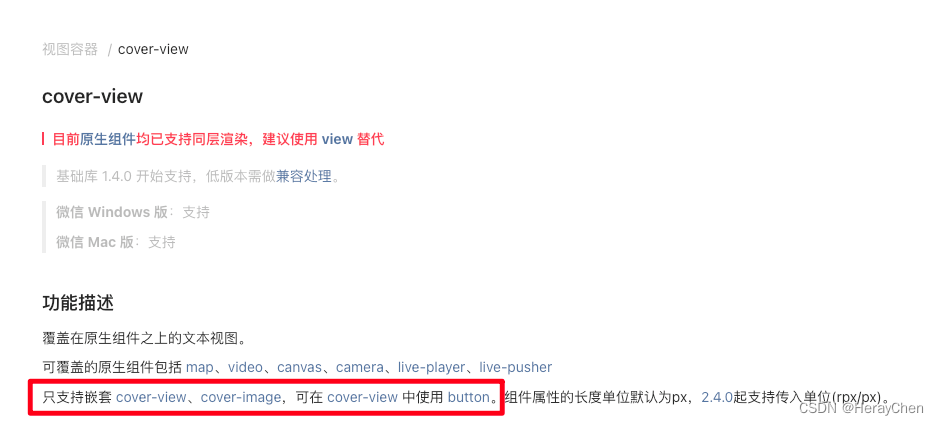
出现弹框时将uni-easyinput的类型改为 text
这种方法反应有延迟,select只有一个change事件。
封装一个textarea
通过view标签来代替不点击输入时的状态。
去除uniapp button自带边框
button {
  &::after{
    border: initial;
  }
}
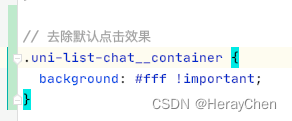
去除uni-list-chat的边框
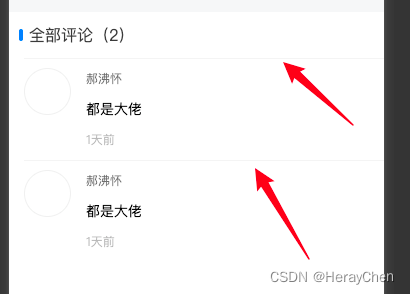
<uni-section titleFontSize="28" class="comments" title="全部评论(2)" type="line">
  <!-- 重点  :border="false"-->
  <uni-list :border="false">
    <uni-list-chat avatar="@/static/dashboard/icon1.png" :avatar-circle="true" >
      <view class="chat-custom-right">
        <view class="name">郝沸怀</view>
        <view class="comments-content">都是大佬</view>
        <view class="time">1天前</view>
      </view>
    </uni-list-chat>
    <uni-list-chat avatar="@/static/dashboard/icon1.png" :avatar-circle="true" >
      <view class="chat-custom-right">
        <view class="name">郝沸怀</view>
        <view class="comments-content">都是大佬</view>
        <view class="time">1天前</view>
      </view>
    </uni-list-chat>
  </uni-list>
</uni-section>
然后通过阴影来给uni-section下添加分割线,达到如下效果

::v-deep(.uni-section-header) {
   box-shadow: inset 0px -1px 0px 0px rgba(0,0,0,0.08);
 }
uni-list-item 使用link跳转,右箭头不能去除

解决方法:
使用clickable来实现跳转。
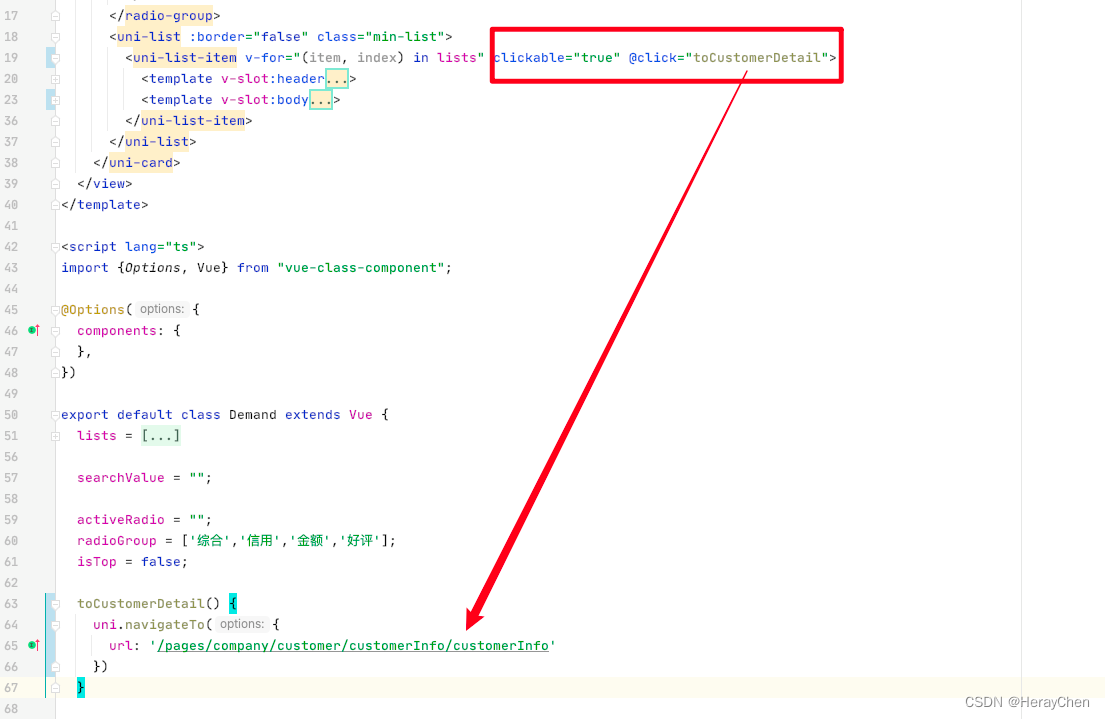
这样虽然能跳转,但是点击uni-list-item点击的时候uni-list-item有一个黑色背景,可以通过把点击时间写在slot自定义内容上,点击时就不会有背景色了。
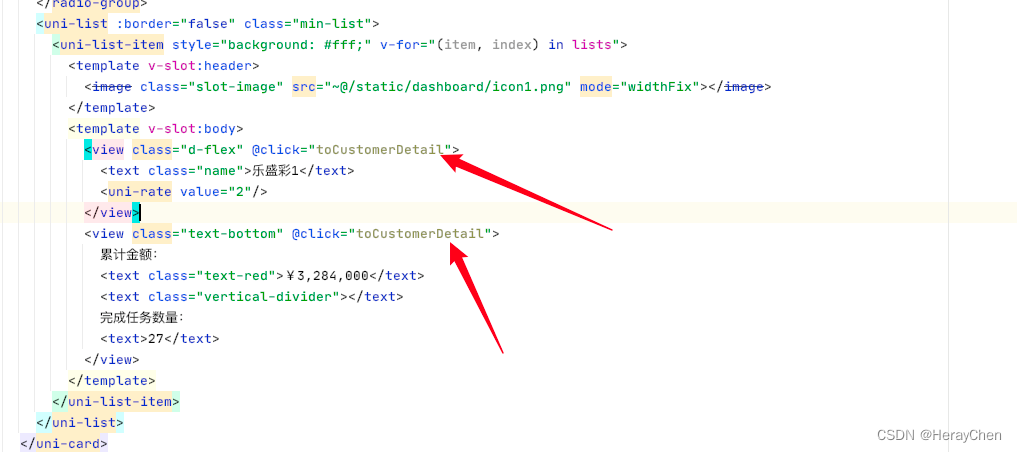
有时候会有点击态效果,可以通过设置它的背景色来去除。
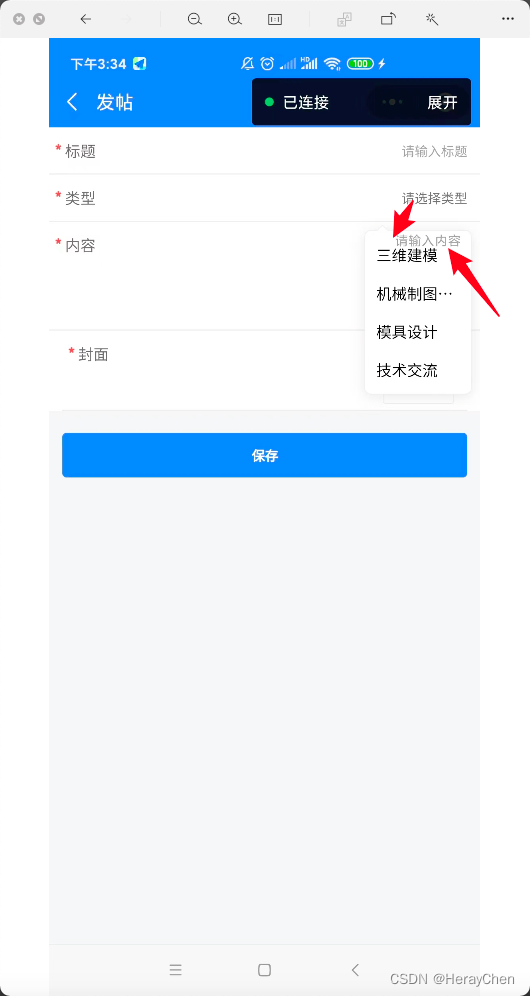
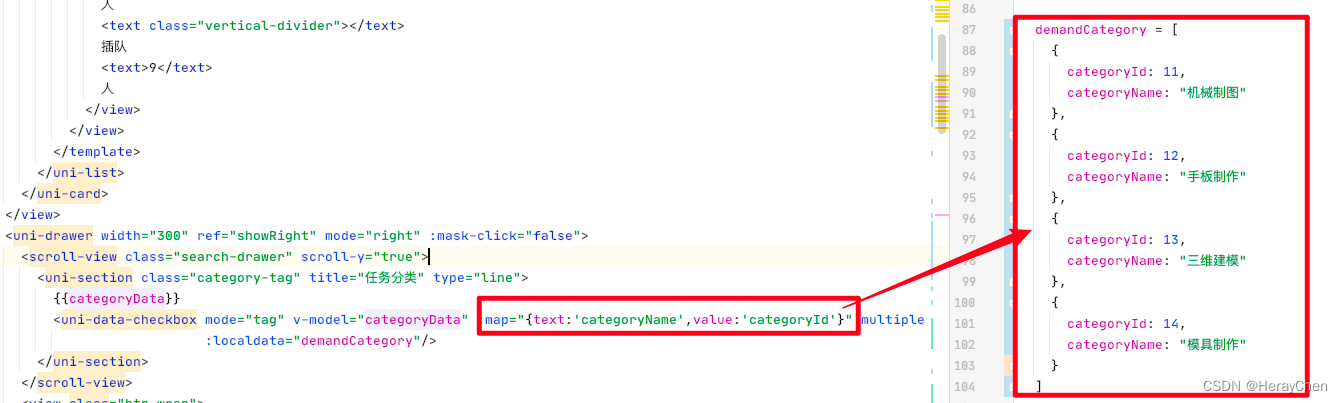
uni-data-checkbox 字段映射
text是显示的值,value是选中后显示的绑定的id值, 和v-model绑定的categoryData息息相关。
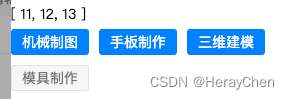
修改uni-data-checkbox默认样式
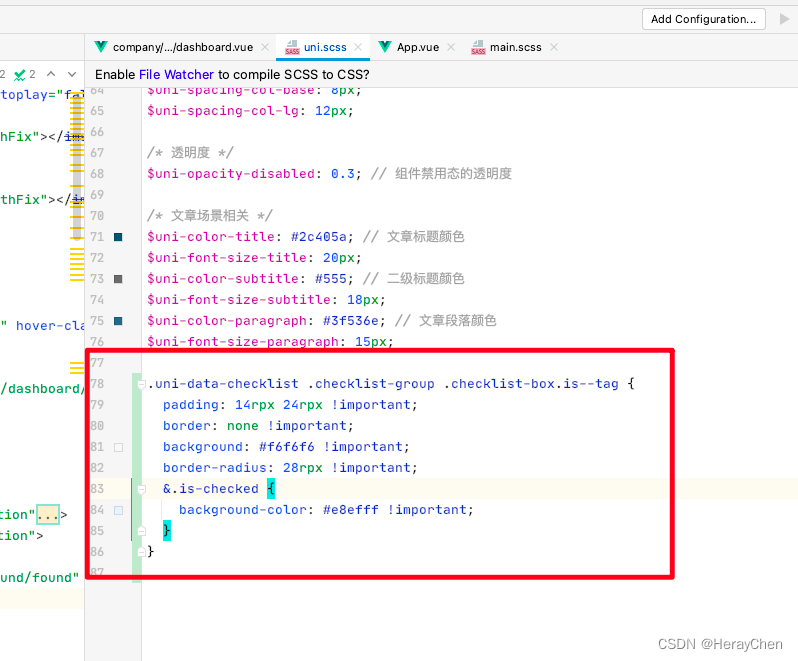
.uni-data-checklist .checklist-group .checklist-box.is--tag {
  padding: 14rpx 24rpx !important;
  border: none !important;
  background: #f6f6f6 !important;
  border-radius: 28rpx !important;
  &.is-checked {
    background-color: #e8efff !important;
  }
}
改完之后的样子:
通过 repeating-conic-gradient 实现表盘过渡
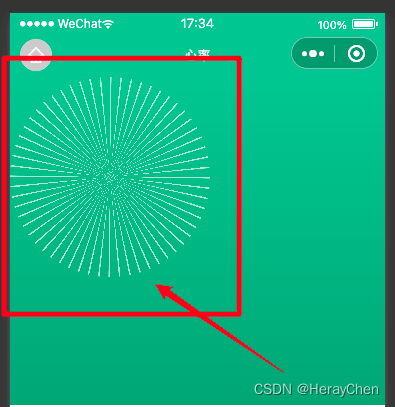
样式:
background: repeating-conic-gradient(rgba(255, 255, 255, .6) 0, rgba(255, 255, 255, .6) .8deg, transparent 1deg, transparent calc((360 / 60) * 1deg))
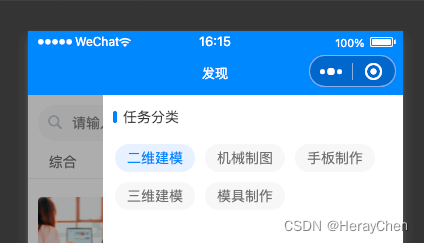
微信小程序checkbox样式调整
从这样:
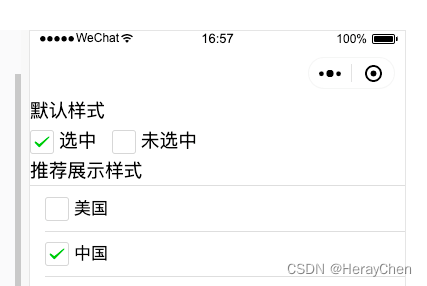
改成这样:

<label class="checkbox">
  <checkbox value="cb" checked="true" color="#26B888"/>
</label>
// 默认样式
checkbox .wx-checkbox-input {
  width: 32rpx;
  height: 32rpx;
  background-color: transparent;
}

// 选中的样式
checkbox .wx-checkbox-input.wx-checkbox-input-checked {
  color: #fff;
  background-color: #26B888; // 选中后的背景色
}

// 选中 ✓ 的样式
.wx-checkbox-input-checked::before {
  color: #fff; //  ✓ 的颜色
}
交互问题
动态修改页面标题
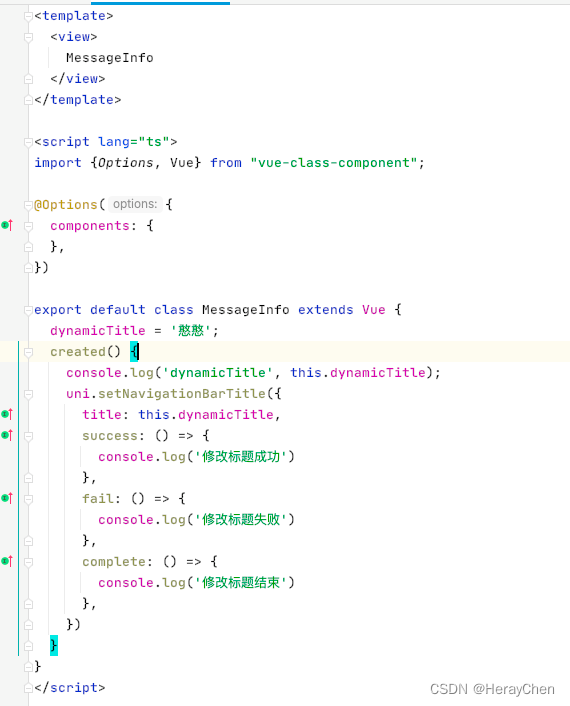
created() {
   console.log('dynamicTitle', this.dynamicTitle);
   uni.setNavigationBarTitle({
     title: this.dynamicTitle,
     success: () => {
       console.log('修改标题成功')
     },
     fail: () => {
       console.log('修改标题失败')
     },
     complete: () => {
       console.log('修改标题结束')
     },
   })
 }
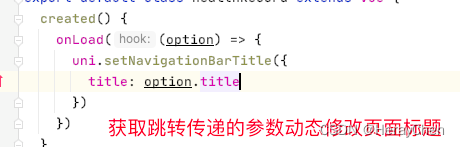
动态渲染页面的title:
传参:

获取动态设置:
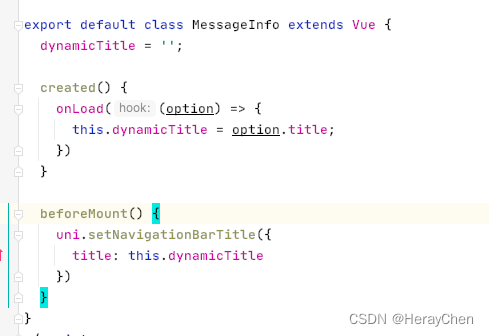
也可以直接设置:


![Leetcode 03. 无重复字符的最长子串 [C语言]](https://img-blog.csdnimg.cn/2a7f8a0283f647039c01b7f74b67d470.png)