lnmp
文章目录
- lnmp
- 1.LNMP是什么
- 2. lnmp简介
- 3.系统特点
- 4.优点
- 5.lnmp部署
- 5.1 nginx安装
- 5.2 mysql安装
- 5.3 php安装
- 5.4配置nginx服务处理php
- 6.扩展知识点
- 1.什么是集群
- 2.常见的集群有哪些
- 集群的分类
- 1、高可用集群
- 2、负载均衡集群
- 3、分布式计算集群
- 4、高性能集群(High Performance Computing Cluster)HPC
- 3.这些集群通过什么软件去实现
- 4.什么是正向、反向、透明代理
- 1、透明代理
- 2、正向代理
- 3、正向代理和透明代理的区别
- 4、反向代理
1.LNMP是什么
LNMP是指一组通常一起使用来运行动态网站或者服务器的自由软件名称首字母缩写。L指Linux,N指Nginx,M一般指MySQL,也可以指MariaDB,P一般指PHP,也可以指Perl或Python。

2. lnmp简介
LNMP是指一组通常一起使用来运行动态网站或者服务器的自由软件名称首字母缩写。L指Linux,N指Nginx,M一般指MySQL,也可以指MariaDB,P一般指PHP,也可以指Perl或Python。
LNMP代表的就是:Linux系统下Nginx+MySQL+PHP这种网站服务器架构。
Linux是一类Unix计算机操作系统的统称,是目前最流行的免费操作系统。代表版本有:debian、centos、ubuntu、fedora、gentoo等。
Nginx是一个高性能的HTTP和反向代理服务器,也是一个IMAP/POP3/SMTP代理服务器。
Mysql是一个小型关系型数据库管理系统。
PHP是一种在服务器端执行的嵌入HTML文档的脚本语言。
这四种软件均为免费开源软件,组合到一起,成为一个免费、高效、扩展性强的网站服务系统。
3.系统特点
Nginx是一个小巧而高效的Linux下的Web服务器软件,是由 Igor Sysoev 为俄罗斯访问量第二的 Rambler 站点开发的,已经在一些俄罗斯的大型网站上运行多年,相当的稳定。
Nginx性能稳定、功能丰富、运维简单、处理静态文件速度快且消耗系统资源极少。
4.优点
(1)四种软件均为免费开源软件,组合到一起,成为一个免费、高效、扩展性强的网站服务系统。
(2)Nginx使用更少的资源,支持更多的并发连接,体现更高的效率。
(3)Nginx 既可以在内部直接支持Rails和PHP,也可以支持作为 HTTP代理服务器对外进行服务。
(4)Nginx 安装非常的简单,配置文件非常简洁(还能够支持perl语法)。Nginx支持平滑加载新的配置,还能够在不间断服务的情况下进行软件版本的升级。
5.lnmp部署
环境说明:
| 系统平台 | IP | 需要安装的服务 |
|---|---|---|
| rockylinux9 | 192.168.116.140 | nginx-1.24.0 mysql-8.0.35 php-8.3.1 |
lnmp平台软件安装次序:
nginx --> mysql --> php
关闭防火墙selinux
[root@localhost ~]# systemctl disable --now firewalld
Removed "/etc/systemd/system/multi-user.target.wants/firewalld.service".
Removed "/etc/systemd/system/dbus-org.fedoraproject.FirewallD1.service".
[root@localhost ~]# vi /etc/selinux/config
SELINUX=disabled
[root@localhost ~]# setenforce 0
[root@localhost ~]# getenforce
Permissive
5.1 nginx安装
1.安装依赖包和编译工具
[root@localhost ~]# yum -y install make gcc gcc-c++ gd-devel pcre-devel openssl openssl-devel vim wget
Complete!

2.下载软件包(官网nginx.org)
[root@localhost ~]# wget https://nginx.org/download/nginx-1.24.0.tar.gz
--2024-01-15 14:28:00--  https://nginx.org/download/nginx-1.24.0.tar.gz
Resolving nginx.org (nginx.org)... 52.58.199.22, 3.125.197.172, 2a05:d014:edb:5704::6, ...
Connecting to nginx.org (nginx.org)|52.58.199.22|:443... connected.
HTTP request sent, awaiting response... 200 OK
Length: 1112471 (1.1M) [application/octet-stream]
Saving to: ‘nginx-1.24.0.tar.gz’

nginx-1.24.0.tar.gz                       100%[===================================================================================>]   1.06M   899KB/s    in 1.2s

2024-01-15 14:28:02 (899 KB/s) - ‘nginx-1.24.0.tar.gz’ saved [1112471/1112471]

3.创建系统用户
[root@localhost ~]# useradd -r -M -s /sbin/nologin nginx
[root@localhost ~]# id nginx
uid=991(nginx) gid=991(nginx) groups=991(nginx)

4.解压软件包
[root@localhost ~]# ls
anaconda-ks.cfg  nginx-1.24.0.tar.gz
[root@localhost ~]# tar xf nginx-1.24.0.tar.gz
[root@localhost ~]# ls
anaconda-ks.cfg  nginx-1.24.0  nginx-1.24.0.tar.gz

5.编译
[root@localhost ~]# cd nginx-1.24.0
[root@localhost nginx-1.24.0]# ls
auto  CHANGES  CHANGES.ru  conf  configure  contrib  html  LICENSE  man  README  src
[root@localhost nginx-1.24.0]# ./configure \
> --prefix=/usr/local/nginx \
> --user=nginx \
> --group=nginx \
> --with-debug \
> --with-http_ssl_module \
> --with-http_realip_module \
> --with-http_image_filter_module \
> --with-http_gunzip_module \
> --with-http_gzip_static_module \
> --with-http_stub_status_module \
> --http-log-path=/var/log/nginx/access.log \
> --error-log-path=/var/log/nginx/error.log
[root@localhost nginx-1.24.0]# make && make install
[root@localhost nginx-1.24.0]# echo $?
0
[root@localhost nginx-1.24.0]# ls
auto  CHANGES  CHANGES.ru  conf  configure  contrib  html  LICENSE  Makefile  man  objs  README  src

6.配置环境变量
[root@localhost ~]# ls /usr/local/nginx
conf  html  logs  sbin
[root@localhost ~]# ls /usr/local/nginx/sbin
nginx
[root@localhost ~]# echo 'export PATH=/usr/local/nginx/sbin:$PATH' > /etc/profile.d/nginx.sh
[root@localhost ~]# source /etc/profile.d/nginx.sh
[root@localhost ~]# which nginx
/usr/local/nginx/sbin/nginx

7.启动服务与停止服务
[root@localhost ~]# nginx
[root@localhost ~]# ss -antl
State              Recv-Q             Send-Q                           Local Address:Port                           Peer Address:Port             Process
LISTEN             0                  511                                    0.0.0.0:80                                  0.0.0.0:*
LISTEN             0                  128                                    0.0.0.0:22                                  0.0.0.0:*
LISTEN             0                  128                                       [::]:22                                     [::]:*
[root@localhost ~]# nginx -s stop
[root@localhost ~]# ss -antl
State              Recv-Q             Send-Q                           Local Address:Port                           Peer Address:Port             Process
LISTEN             0                  128                                    0.0.0.0:22                                  0.0.0.0:*
LISTEN             0                  128                                       [::]:22                                     [::]:*

8.设置开机自启
[root@localhost ~]# cp /usr/lib/systemd/system/sshd.service /usr/lib/systemd/system/nginx.service
[root@localhost ~]# vim /usr/lib/systemd/system/nginx.service
[root@localhost ~]# cat /usr/lib/systemd/system/nginx.service
[Unit]
Description=nginx server daemon
After=network.target

[Service]
Type=forking
ExecStart=/usr/local/nginx/sbin/nginx
ExecStop=/usr/local/nginx/sbin/nginx -s stop
ExecReload=/bin/kill -HUP $MAINPID

[Install]
WantedBy=multi-user.target
[root@localhost ~]# systemctl daemon-reload
[root@localhost ~]# systemctl status nginx
○ nginx.service - nginx server daemon
     Loaded: loaded (/usr/lib/systemd/system/nginx.service; disabled; preset: disabled)
     Active: inactive (dead)
[root@localhost ~]# systemctl enable --now nginx
Created symlink /etc/systemd/system/multi-user.target.wants/nginx.service → /usr/lib/systemd/system/nginx.service.
[root@localhost ~]# systemctl status nginx
● nginx.service - nginx server daemon
     Loaded: loaded (/usr/lib/systemd/system/nginx.service; enabled; preset: disabled)
     Active: active (running) since Mon 2024-01-15 14:38:55 CST; 1s ago
    Process: 73798 ExecStart=/usr/local/nginx/sbin/nginx (code=exited, status=0/SUCCESS)
   Main PID: 73799 (nginx)
      Tasks: 2 (limit: 10820)
     Memory: 2.3M
        CPU: 10ms
     CGroup: /system.slice/nginx.service
             ├─73799 "nginx: master process /usr/local/nginx/sbin/nginx"
             └─73800 "nginx: worker process"

Jan 15 14:38:55 localhost.localdomain systemd[1]: Starting nginx server daemon...
Jan 15 14:38:55 localhost.localdomain systemd[1]: Started nginx server daemon.
[root@localhost ~]# ss -antl
State              Recv-Q             Send-Q                           Local Address:Port                           Peer Address:Port             Process
LISTEN             0                  511                                    0.0.0.0:80                                  0.0.0.0:*
LISTEN             0                  128                                    0.0.0.0:22                                  0.0.0.0:*
LISTEN             0                  128                                       [::]:22                                     [::]:*
5.2 mysql安装
1.安装依赖包
[root@localhost ~]# yum -y install ncurses-devel openssl-devel openssl
Complete!

2.下载软件包(mysql.com)
[root@localhost ~]# ls
anaconda-ks.cfg  mysql-8.0.35-linux-glibc2.28-x86_64.tar.xz  nginx-1.24.0  nginx-1.24.0.tar.gz

3.创建系统用户
[root@localhost ~]# useradd -r -M -s /sbin/nologin mysql
[root@localhost ~]# id mysql
uid=990(mysql) gid=990(mysql) groups=990(mysql)

4.解压软件包
[root@localhost ~]# tar xf mysql-8.0.35-linux-glibc2.28-x86_64.tar.xz -C /usr/local
[root@localhost ~]# cd /usr/local
[root@localhost local]# mv mysql-8.0.35-linux-glibc2.28-x86_64/ mysql
[root@localhost local]# ls
bin  etc  games  include  lib  lib64  libexec  mysql  nginx  sbin  share  src

5.配置环境变量
[root@localhost ~]# cd /usr/local/mysql/
[root@localhost mysql]# ls
bin  docs  include  lib  LICENSE  man  README  share  support-files
[root@localhost mysql]# ls bin/
ibd2sdi         myisam_ftdump      mysql        mysql_config         mysqld_multi   mysqlimport                mysqlshow            mysql_upgrade
innochecksum    myisamlog          mysqladmin   mysql_config_editor  mysqld_safe    mysql_migrate_keyring      mysqlslap            perror
lz4_decompress  myisampack         mysqlbinlog  mysqld               mysqldump      mysqlpump                  mysql_ssl_rsa_setup  zlib_decompress
myisamchk       my_print_defaults  mysqlcheck   mysqld-debug         mysqldumpslow  mysql_secure_installation  mysql_tzinfo_to_sql
[root@localhost mysql]# echo 'export PATH=/usr/local/mysql/bin:$PATH' > /etc/profile.d/mysql.sh
[root@localhost mysql]# source /etc/profile.d/mysql.sh
[root@localhost mysql]# which mysql
/usr/local/mysql/bin/mysql

6.给include做软链接
[root@localhost mysql]# ln -s /usr/local/mysql/include/ /usr/include/mysql

7.读取lib库
[root@localhost mysql]# vim /etc/ld.so.conf.d/mysql.conf
/usr/local/mysql/lib
[root@localhost mysql]# ldconfig

8.添加帮助文档
[root@localhost mysql]# vim /etc/man_db.conf
MANDATORY_MANPATH                       /usr/man
MANDATORY_MANPATH                       /usr/share/man
MANDATORY_MANPATH                       /usr/local/share/man
MANDATORY_MANPATH                       /usr/local/mysql/man  //添加这一行

9.修改所有者和所属组
[root@localhost ~]# chown -R mysql.mysql /usr/local/mysql
[root@localhost ~]# ll -d /usr/local/mysql
drwxr-xr-x. 9 mysql mysql 129 Jan 15 14:46 /usr/local/mysql

10.创建mysql数据库数据存放位置,并修改属组
[root@localhost ~]# mkdir /opt/data
[root@localhost ~]# chown -R mysql.mysql /opt/data
[root@localhost ~]# ll -d /opt/data
drwxr-xr-x. 2 mysql mysql 6 Jan 15 14:57 /opt/data

11.初始化
[root@localhost ~]# mysqld --initialize --user mysql --datadir /opt/data
2024-01-15T06:58:54.516453Z 0 [System] [MY-013169] [Server] /usr/local/mysql/bin/mysqld (mysqld 8.0.35) initializing of server in progress as process 125263
2024-01-15T06:58:54.525753Z 1 [System] [MY-013576] [InnoDB] InnoDB initialization has started.
2024-01-15T06:58:54.835212Z 1 [System] [MY-013577] [InnoDB] InnoDB initialization has ended.
2024-01-15T06:58:55.859731Z 6 [Note] [MY-010454] [Server] A temporary password is generated for root@localhost: ypyqur?5nRHF
[root@localhost ~]# echo 'ypyqur?5nRHF' > pass
[root@localhost ~]# cat pass
ypyqur?5nRHF

12.编辑配置文件,向其中添加如下数据
[root@localhost ~]# vim /etc/my.cnf
[mysqld]
basedir = /usr/local/mysql
datadir = /opt/data
socket = /tmp/mysql.sock
port = 3306
pid-file = /opt/data/mysql.pid
user = mysql
skip-name-resolve

13.配置启动服务
[root@localhost ~]# cd /usr/local/mysql/
[root@localhost mysql]# ls
bin  docs  include  lib  LICENSE  man  README  share  support-files
[root@localhost mysql]# cd support-files/
[root@localhost support-files]# ls
mysqld_multi.server  mysql-log-rotate  mysql.server
[root@localhost support-files]# pwd
/usr/local/mysql/support-files
[root@localhost support-files]# mkdir /etc/init.d
[root@localhost support-files]# cp -a mysql.server /etc/init.d/mysqld
[root@localhost support-files]# vim /etc/init.d/mysqld
basedir=/usr/local/mysql    //添加位置
datadir=/opt/data           //添加位置
[root@localhost support-files]# systemctl daemon-reload

14.启动服务与停止服务
[root@localhost ~]# service mysqld start
Starting MySQL.Logging to '/opt/data/localhost.localdomain.err'.
 SUCCESS!
[root@localhost ~]# ss -antl
State              Recv-Q             Send-Q                          Local Address:Port                            Peer Address:Port             Process
LISTEN             0                  511                                   0.0.0.0:80                                   0.0.0.0:*
LISTEN             0                  128                                   0.0.0.0:22                                   0.0.0.0:*
LISTEN             0                  70                                          *:33060                                      *:*
LISTEN             0                  151                                         *:3306                                       *:*
LISTEN             0                  128                                      [::]:22                                      [::]:*
[root@localhost ~]# service mysqld stop
Shutting down MySQL. SUCCESS!
[root@localhost ~]# ss -antl
State              Recv-Q             Send-Q                           Local Address:Port                           Peer Address:Port             Process
LISTEN             0                  511                                    0.0.0.0:80                                  0.0.0.0:*
LISTEN             0                  128                                    0.0.0.0:22                                  0.0.0.0:*
LISTEN             0                  128                                       [::]:22                                     [::]:*

15.设置开机自启
[root@localhost ~]# cp /usr/lib/systemd/system/sshd.service /usr/lib/systemd/system/mysqld.service
[root@localhost ~]# vim /usr/lib/systemd/system/mysqld.service
[root@localhost ~]# cat /usr/lib/systemd/system/mysqld.service
[Unit]
Description=mysqld server daemon
After=network.target

[Service]
Type=forking
ExecStart=service mysqld start
ExecStop=service mysqld stop
ExecReload=/bin/kill -HUP $MAINPID

[Install]
WantedBy=multi-user.target
[root@localhost ~]# systemctl daemon-reload
[root@localhost ~]# systemctl status mysqld
○ mysqld.service - mysqld server daemon
     Loaded: loaded (/usr/lib/systemd/system/mysqld.service; disabled; preset: disabled)
     Active: inactive (dead)
[root@localhost ~]# systemctl enable --now mysqld
Created symlink /etc/systemd/system/multi-user.target.wants/mysqld.service → /usr/lib/systemd/system/mysqld.service.
[root@localhost ~]# systemctl status mysqld
● mysqld.service - mysqld server daemon
     Loaded: loaded (/usr/lib/systemd/system/mysqld.service; enabled; preset: disabled)
     Active: active (running) since Mon 2024-01-15 15:09:46 CST; 7s ago
    Process: 152056 ExecStart=service mysqld start (code=exited, status=0/SUCCESS)
   Main PID: 152073 (mysqld_safe)
      Tasks: 39 (limit: 10820)
     Memory: 369.0M
        CPU: 861ms
     CGroup: /system.slice/mysqld.service
             ├─152073 /bin/sh /usr/local/mysql/bin/mysqld_safe --datadir=/opt/data --pid-file=/opt/data/mysql.pid
             └─152288 /usr/local/mysql/bin/mysqld --basedir=/usr/local/mysql --datadir=/opt/data --plugin-dir=/usr/local/mysql/lib/plugin --user=mysql --log-error=lo>

Jan 15 15:09:45 localhost.localdomain systemd[1]: Starting mysqld server daemon...
Jan 15 15:09:46 localhost.localdomain service[152060]: Starting MySQL. SUCCESS!
Jan 15 15:09:46 localhost.localdomain systemd[1]: Started mysqld server daemon.
[root@localhost ~]# ss -antl
State              Recv-Q             Send-Q                          Local Address:Port                            Peer Address:Port             Process
LISTEN             0                  511                                   0.0.0.0:80                                   0.0.0.0:*
LISTEN             0                  128                                   0.0.0.0:22                                   0.0.0.0:*
LISTEN             0                  70                                          *:33060                                      *:*
LISTEN             0                  151                                         *:3306                                       *:*
LISTEN             0                  128                                      [::]:22                                      [::]:*

16.修改数据库密码
[root@localhost ~]# cat pass
ypyqur?5nRHF
[root@localhost ~]# mysql -uroot -p'ypyqur?5nRHF'
mysql: [Warning] Using a password on the command line interface can be insecure.
Welcome to the MySQL monitor.  Commands end with ; or \g.
Your MySQL connection id is 8
Server version: 8.0.35

Copyright (c) 2000, 2023, Oracle and/or its affiliates.

Oracle is a registered trademark of Oracle Corporation and/or its
affiliates. Other names may be trademarks of their respective
owners.

Type 'help;' or '\h' for help. Type '\c' to clear the current input statement.

mysql> alter user root@localhost identified with mysql_native_password by 'Passw0rd@_~';
Query OK, 0 rows affected (0.01 sec)

mysql> quit
Bye
[root@localhost ~]# mysql -uroot -pPassw0rd@_~
mysql: [Warning] Using a password on the command line interface can be insecure.
Welcome to the MySQL monitor.  Commands end with ; or \g.
Your MySQL connection id is 9
Server version: 8.0.35 MySQL Community Server - GPL

Copyright (c) 2000, 2023, Oracle and/or its affiliates.

Oracle is a registered trademark of Oracle Corporation and/or its
affiliates. Other names may be trademarks of their respective
owners.

Type 'help;' or '\h' for help. Type '\c' to clear the current input statement.

mysql> quit
Bye
5.3 php安装
1.安装依赖包
[root@localhost ~]# yum -y install libxml2 libxml2-devel openssl openssl-devel bzip2 bzip2-devel libcurl libcurl-devel libicu-devel libjpeg libjpeg-devel libpng libpng-devel openldap-devel pcre-devel freetype freetype-devel gmp gmp-devel readline readline-devel libxslt libxslt-devel php-mysqlnd epel-release
Complete!

[root@localhost ~]# cd /etc/yum.repos.d/
[root@localhost yum.repos.d]# ls
epel-cisco-openh264.repo  epel.repo  epel-testing.repo  rocky-addons.repo  rocky-devel.repo  rocky-extras.repo  rocky.repo
[root@localhost yum.repos.d]# vim rocky-devel.repo
[devel]
name=Rocky Linux $releasever - Devel WARNING! FOR BUILDROOT ONLY DO NOT LEAVE ENABLED
mirrorlist=https://mirrors.rockylinux.org/mirrorlist?arch=$basearch&repo=devel-$releasever$rltype
#baseurl=http://dl.rockylinux.org/$contentdir/$releasever/devel/$basearch/os/
gpgcheck=1
enabled=1            //把0改为1
countme=1
gpgkey=file:///etc/pki/rpm-gpg/RPM-GPG-KEY-Rocky-9
[root@localhost ~]# yum -y install libsqlite3x-devel oniguruma-devel libzip-devel
Complete!

2.下载软件包(php.net)
[root@localhost ~]# wget https://www.php.net/distributions/php-8.3.1.tar.gz
--2024-01-15 15:26:19--  https://www.php.net/distributions/php-8.3.1.tar.gz
Resolving www.php.net (www.php.net)... 185.85.0.29, 2a02:cb40:200::1ad
Connecting to www.php.net (www.php.net)|185.85.0.29|:443... connected.
HTTP request sent, awaiting response... 200 OK
Length: 19735704 (19M) [application/octet-stream]
Saving to: ‘php-8.3.1.tar.gz’

php-8.3.1.tar.gz                          100%[===================================================================================>]  18.82M  1.91MB/s    in 8.8s

2024-01-15 15:26:30 (2.15 MB/s) - ‘php-8.3.1.tar.gz’ saved [19735704/19735704]

[root@localhost ~]# ls
anaconda-ks.cfg  mysql-8.0.35-linux-glibc2.28-x86_64.tar.xz  nginx-1.24.0  nginx-1.24.0.tar.gz  pass  php-8.3.1.tar.gz

3.解压软件包
[root@localhost ~]# tar xf php-8.3.1.tar.gz
[root@localhost ~]# ls
anaconda-ks.cfg  mysql-8.0.35-linux-glibc2.28-x86_64.tar.xz  nginx-1.24.0  nginx-1.24.0.tar.gz  pass  php-8.3.1  php-8.3.1.tar.gz

4.编译
[root@localhost ~]# cd php-8.3.1
[root@localhost php-8.3.1]# ./configure --prefix=/usr/local/php8  \
> --with-config-file-path=/etc \
> --enable-fpm \
> --disable-debug \
> --disable-rpath \
> --enable-shared \
> --enable-soap \
> --with-openssl \
> --enable-bcmath \
> --with-iconv \
> --with-bz2 \
> --enable-calendar \
> --with-curl \
> --enable-exif  \
> --enable-ftp \
> --enable-gd \
> --with-jpeg \
> --with-zlib-dir \
> --with-freetype \
> --with-gettext \
> --enable-mbstring \
> --enable-pdo \
> --with-mysqli=mysqlnd \
> --with-pdo-mysql=mysqlnd \
> --with-readline \
> --enable-shmop \
> --enable-simplexml \
> --enable-sockets \
> --with-zip \
> --enable-mysqlnd-compression-support \
> --with-pear \
> --enable-pcntl \
> --enable-posix

+--------------------------------------------------------------------+
| License:                                                           |
| This software is subject to the PHP License, available in this     |
| distribution in the file LICENSE. By continuing this installation  |
| process, you are bound by the terms of this license agreement.     |
| If you do not agree with the terms of this license, you must abort |
| the installation process at this point.                            |
+--------------------------------------------------------------------+

Thank you for using PHP.

[root@localhost php-8.3.1]# make && make install
[root@localhost php-8.3.1]# echo $?
0

5.配置环境变量
[root@localhost php-8.3.1]# echo 'export PATH=/usr/local/php8/bin:/usr/local/php8/sbin:$PATH' > /etc/profile.d/php8.sh
[root@localhost php-8.3.1]# source /etc/profile.d/php8.sh
[root@localhost php-8.3.1]# which php
/usr/local/php8/bin/php
[root@localhost php-8.3.1]# ln -s /usr/local/php8/include/ /usr/include/php8

6.配置php-fpm
[root@localhost php-8.3.1]# pwd
/root/php-8.3.1
[root@localhost php-8.3.1]# ls
appveyor       CODEOWNERS           configure        EXTENSIONS  main                NEWS                 README.REDIST.BINS  tests                win32
benchmark      CODING_STANDARDS.md  configure.ac     include     Makefile            pear                 run-tests.php       travis               Zend
build          config.log           CONTRIBUTING.md  libs        Makefile.fragments  php.ini-development  sapi                TSRM
buildconf      config.nice          docs             libtool     Makefile.objects    php.ini-production   scripts             UPGRADING
buildconf.bat  config.status        ext              LICENSE     modules             README.md            SECURITY.md         UPGRADING.INTERNALS
[root@localhost php-8.3.1]# cp php.ini-production /etc/php.ini
cp: overwrite '/etc/php.ini'? y

[root@localhost php-8.3.1]# cd sapi/
[root@localhost sapi]# ls
apache2handler  cgi  cli  embed  fpm  fuzzer  litespeed  phpdbg
[root@localhost sapi]# cd fpm/
[root@localhost fpm]# ls
config.m4  fpm             init.d.php-fpm.in  Makefile.frag  php-fpm.8     php-fpm.conf     php-fpm.service     status.html     tests     www.conf.in
CREDITS    init.d.php-fpm  LICENSE            php-fpm        php-fpm.8.in  php-fpm.conf.in  php-fpm.service.in  status.html.in  www.conf
[root@localhost fpm]# cp init.d.php-fpm /etc/init.d/php-fpm
[root@localhost fpm]# chmod +x /etc/init.d/php-fpm
[root@localhost fpm]# ll -d /etc/init.d/php-fpm
-rwxr-xr-x. 1 root root 2402 Jan 15 16:00 /etc/init.d/php-fpm

[root@localhost ~]# cd /usr/local/php8/etc
[root@localhost etc]# ls
pear.conf  php-fpm.conf.default  php-fpm.d
[root@localhost etc]# mv php-fpm.conf.default /usr/local/php8/etc/php-fpm.conf
[root@localhost etc]# cd php-fpm.d
[root@localhost php-fpm.d]# ls
www.conf.default
[root@localhost php-fpm.d]# mv www.conf.default www.conf
[root@localhost php-fpm.d]# ls
www.conf

7.启动php.fpm服务与停止php-fpm服务
[root@localhost ~]# service php-fpm start
Starting php-fpm  done
[root@localhost ~]# ss -antl
State              Recv-Q             Send-Q                          Local Address:Port                            Peer Address:Port             Process
LISTEN             0                  4096                                127.0.0.1:9000                                 0.0.0.0:*
LISTEN             0                  511                                   0.0.0.0:80                                   0.0.0.0:*
LISTEN             0                  128                                   0.0.0.0:22                                   0.0.0.0:*
LISTEN             0                  70                                          *:33060                                      *:*
LISTEN             0                  151                                         *:3306                                       *:*
LISTEN             0                  128                                      [::]:22                                      [::]:*
[root@localhost ~]# service php-fpm stop
Gracefully shutting down php-fpm  done
[root@localhost ~]# ss -antl
State              Recv-Q             Send-Q                          Local Address:Port                            Peer Address:Port             Process
LISTEN             0                  511                                   0.0.0.0:80                                   0.0.0.0:*
LISTEN             0                  128                                   0.0.0.0:22                                   0.0.0.0:*
LISTEN             0                  70                                          *:33060                                      *:*
LISTEN             0                  151                                         *:3306                                       *:*
LISTEN             0                  128                                      [::]:22                                      [::]:*

8.设置开机自启
[root@localhost ~]# cp /usr/lib/systemd/system/sshd.service /usr/lib/systemd/system/php.service
[root@localhost ~]# vim /usr/lib/systemd/system/php.service
[root@localhost ~]# cat /usr/lib/systemd/system/php.service
[Unit]
Description=php-fpm server daemon
After=network.target

[Service]
Type=forking
ExecStart=service php-fpm start
ExecStop=service php-fpm stop
ExecReload=/bin/kill -HUP $MAINPID

[Install]
WantedBy=multi-user.target
[root@localhost ~]# systemctl daemon-reload
[root@localhost ~]# systemctl status php
○ php.service - php-fpm server daemon
     Loaded: loaded (/usr/lib/systemd/system/php.service; disabled; preset: disabled)
     Active: inactive (dead)
[root@localhost ~]# systemctl enable --now php
Created symlink /etc/systemd/system/multi-user.target.wants/php.service → /usr/lib/systemd/system/php.service.
[root@localhost ~]# systemctl status php
● php.service - php-fpm server daemon
     Loaded: loaded (/usr/lib/systemd/system/php.service; enabled; preset: disabled)
     Active: active (running) since Mon 2024-01-15 16:12:16 CST; 3s ago
    Process: 447677 ExecStart=service php-fpm start (code=exited, status=0/SUCCESS)
   Main PID: 447683 (php-fpm)
      Tasks: 3 (limit: 10820)
     Memory: 7.2M
        CPU: 54ms
     CGroup: /system.slice/php.service
             ├─447683 "php-fpm: master process (/usr/local/php8/etc/php-fpm.conf)"
             ├─447684 "php-fpm: pool www"
             └─447685 "php-fpm: pool www"

Jan 15 16:12:16 localhost.localdomain systemd[1]: Starting php-fpm server daemon...
Jan 15 16:12:16 localhost.localdomain service[447681]: Starting php-fpm  done
Jan 15 16:12:16 localhost.localdomain systemd[1]: Started php-fpm server daemon.
[root@localhost ~]# ss -antl
State              Recv-Q             Send-Q                          Local Address:Port                            Peer Address:Port             Process
LISTEN             0                  4096                                127.0.0.1:9000                                 0.0.0.0:*
LISTEN             0                  511                                   0.0.0.0:80                                   0.0.0.0:*
LISTEN             0                  128                                   0.0.0.0:22                                   0.0.0.0:*
LISTEN             0                  70                                          *:33060                                      *:*
LISTEN             0                  151                                         *:3306                                       *:*
LISTEN             0                  128                                      [::]:22                                      [::]:*
5.4配置nginx服务处理php
1.编辑配置文件,让它能够访问php页面
[root@localhost ~]# cd /usr/local/nginx/
[root@localhost nginx]# ls
client_body_temp conf fastcgi_temp html logs proxy_temp sbin scgi_temp uwsgi_temp
[root@localhost nginx]# cd conf/
[root@localhost conf]# ls
fastcgi.conf fastcgi_params koi-utf mime.types nginx.conf scgi_params uwsgi_params win-utf
fastcgi.conf.default fastcgi_params.default koi-win mime.types.default nginx.conf.default scgi_params.default uwsgi_params.default
[root@localhost conf]# vim nginx.conf //取消65-71行注释,原本是有注释的
43 location / {
44 root html;
45 index index.html index.php index.htm; //添加index.php
46 }
..................
65 location ~ \.php$ {
66 root html;
67 fastcgi_pass 127.0.0.1:9000;
68 fastcgi_index index.php;
69 fastcgi_param SCRIPT_FILENAME $Document_Root$fastcgi_script_name; //把/script改为$Docu.
70 include fastcgi_params;
71 }
//检查语法与重新加载
[root@localhost conf]# nginx -t
nginx: the configuration file /usr/local/nginx/conf/nginx.conf syntax is ok
nginx: configuration file /usr/local/nginx/conf/nginx.conf test is successful
[root@localhost conf]# nginx -s reload
2.添加php文件
[root@localhost ~]# cd /usr/local/nginx/html/
[root@localhost html]# ll
total 8
-rw-r--r--. 1 root root 497 Jan 15 14:31 50x.html
-rw-r--r--. 1 root root 615 Jan 15 14:31 index.html
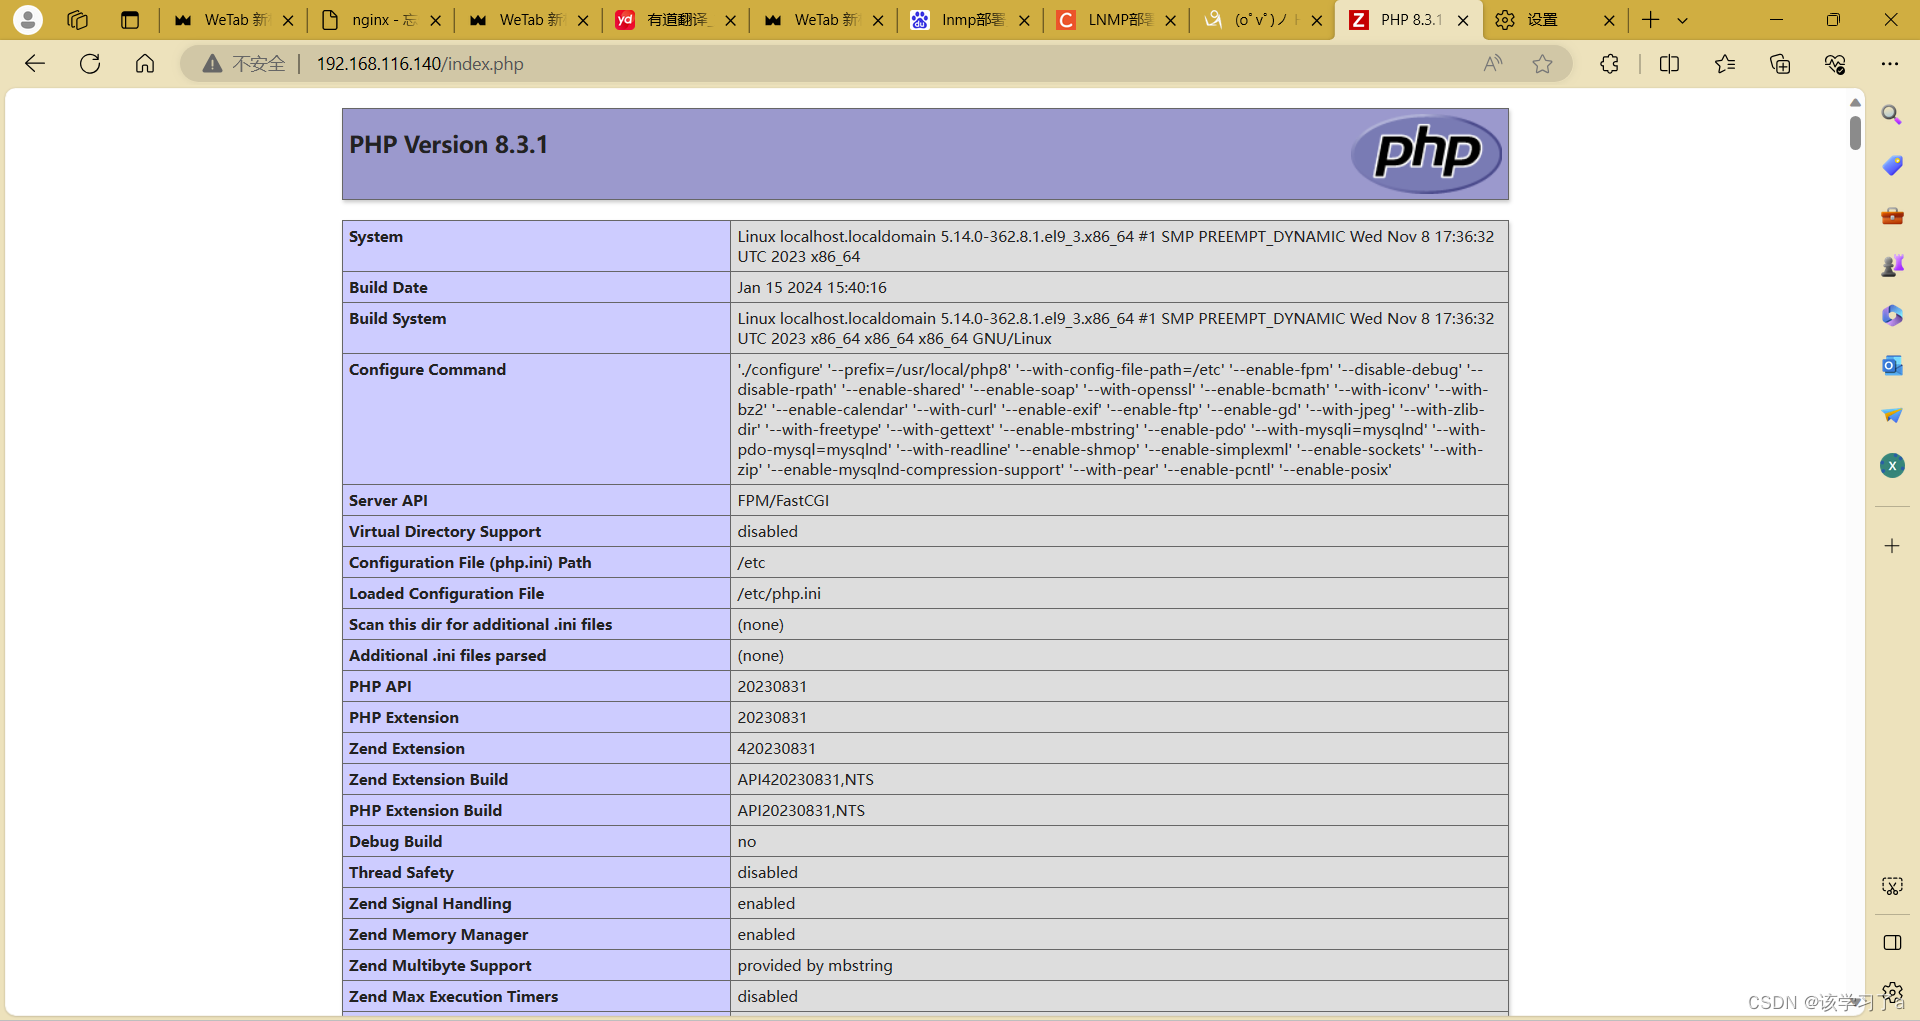
[root@localhost html]# vim index.php
[root@localhost html]# cat index.php
<?php
phpinfo();
?>
[root@localhost html]# nginx -s reload
3.重启服务
[root@localhost conf]# systemctl restart nginx
[root@localhost conf]# systemctl restart php
[root@localhost conf]# ss -antl
State Recv-Q Send-Q Local Address:Port Peer Address:Port Process
LISTEN 0 4096 127.0.0.1:9000 0.0.0.0:*
LISTEN 0 511 0.0.0.0:80 0.0.0.0:*
LISTEN 0 128 0.0.0.0:22 0.0.0.0:*
LISTEN 0 70 *:33060 *:*
LISTEN 0 151 *:3306 *:*
LISTEN 0 128 [::]:22 [::]:*
6.扩展知识点
1.什么是集群
集群是由一些相互独立、通过高速网络互联的计算机或服务器组成。集群上的计算机构成了一个组,可以通过单一系统的模式对其进行管理。
客户在与集群相互作用时,集群像是一个独立的服务器。集群的配置主要用于提高可用性和可缩放性,通过部署集群架构可以将成百上千台的主机结合在一起,以满足大数据时代的海量访问负载。
总结起来,集群是一种分布式计算架构,通过将多个计算设备组合在一起,提供更高的计算能力和可靠性,以满足大规模计算需求
2.常见的集群有哪些
集群的分类
根据自身的功能不同,可以将集群分为高可用集群、负载平衡集群和分布式计算集群 4 种。
1、高可用集群
高可用集群也叫 HA 集群,常被称作“双机热备”。
高可用集群一般有两台服务器,其中一台进行工作,另外一台作为冗余,当提供服务的机器出现故障时,冗余将接替出现故障的服务器继续提供服务。通常实现高可用集群的开源软件是 Keepalived。
高可用集群就是当某一个节点或服务器发生故障时,另一个节点能够自动且立即向外提供服务,即将有故障节点上的资源转移到另一个节点上去,这样另一个节点有了资源就可以立即向外提供服务。
高可用集群在单个节点发生故障时,能够自动将资源、服务进行切换,这样可以保证服务一直在线。而在这个过程中,所有行为过程对于客户端来说是透明的。
2、负载均衡集群
负载均衡集群,需要有一台服务器作为分发器,它负责把用户的请求分发给后端的服务器处理,在这个集群里,除了分发器外,就是给用户提供服务的服务器了,这些服务器数量至少为 2,实现负载均衡的开源软件有 LVS、Keepalived、haproxy、nginx,商业的有 F5、Netscaler。
3、分布式计算集群
分布式是以缩短单个任务的执行时间来提升效率的,而集群则是通过提高单位时间内执行的任务数来提升效率。
分布式集群主要是解决大型应用平台,由于高并发的负载,集群可以分发各个服务器的访问压力,也可以实现服务器故障转移,一台硬件出问题,会快速转到好的服务器上继续运行,业务不会中断。这样就避免了因单台服务器出现故障,引发访问负载过高,而导致业务中断的问题。
4、高性能集群(High Performance Computing Cluster)HPC
利用计算集群软件将多个节点的计算机联结在一起,完成通常只有超级计算机才能完的计算任务。
HP:高性能的集群是当某一个任务量非常大的时候,我们做一个集群共同来完成这一个任务。这种处理方式我们称为并行处理集群,并行处理集群是将大任务划分为小任务,分别进行处理的机制,常常用于大数据分析,海量资源整合,目前比较出名的就是Hadoop。
总之,在实际生产环境中我们都可以根据实际情况来挑选合适的集群解决方案,3种集群的侧重各有不同,LB集群着重在于提供服务并发处理能力,HA集群以提升服务在线的能力实现服务不间断,HP集群着重用于处理一个海量任务
3.这些集群通过什么软件去实现
- 高可用集群(High Availability Cluster):用于确保系统持续可用性的集群。常用的软件包括:
- Pacemaker:一个开源的高可用性集群软件,用于在集群中管理资源和提供故障转移。
- Keepalived:用于配置和监控冗余路由器,确保在主路由器故障时能够无缝切换到备用路由器。
- LSB(Linux Standards Base):LSB是一套核心标准,它保证了LINUX发行版同LINUX应用程序之间的良好结合。LSB 是 Linux 标准化领域中事实上的标准,制定了应用程序与运行环境之间的二进制接口。
- 负载均衡集群(Load Balancing Cluster):用于在多个服务器之间分配请求流量,以提高性能和可用性。常用的软件包括:
- Nginx:一种高性能的反向代理服务器,可以用于负载均衡以及静态和动态内容的缓存。
- HAProxy:一种高可用性的负载均衡器,支持TCP和HTTP应用程序代理。
- LSB(Linux Standards Base):LSB是一套核心标准,它保证了LINUX发行版同LINUX应用程序之间的良好结合。LSB 是 Linux 标准化领域中事实上的标准,制定了应用程序与运行环境之间的二进制接口。
- 分布式计算集群(Distributed Computing Cluster):用于在多台计算机上并行执行复杂的计算任务。常用的软件包括:
- Apache Hadoop:用于在分布式服务器集群上存储和处理大规模数据的开源软件框架。
- Apache Spark:用于在集群上进行大数据分析和处理的开源计算引擎。
- Kubernetes:用于自动部署、扩展和操作容器化应用程序的开源平台,可在集群中实现分布式计算和服务编排。
- 高性能集群(high-performance cluster):高性能集群通常通过一些专门设计的软件和技术来实现。
- Message Passing Interface (MPI):MPI 是一种用于编写并行程序的标准,它定义了一组库函数和语义,可用于在高性能计算集群上进行通信和协同工作。
- HPC schedulers:高性能计算(HPC)调度器,如 Slurm、PBS Pro、Torque 等,用于在集群中管理作业调度和资源分配,以确保任务在集群节点间高效地分布和执行。
- InfiniBand 和 RDMA:InfiniBand 是一种高性能的互连技术,用于构建高速、低延迟的通信网络,对于需要快速数据传输和低延迟通信的高性能计算任务非常重要。RDMA(Remote Direct Memory Access)则是一种通过网络直接访问远程内存的技术,可用于在集群节点之间实现高性能数据传输。
- 大规模文件系统:针对大规模数据存储和访问,在高性能集群中通常会使用专门的分布式文件系统,如 Lustre、GPFS 等,以实现高性能、高可靠性和可扩展性的文件存储。
- 高速网络技术:高性能集群通常会采用高速网络技术,如 100Gbps 以太网、Omni-Path 等,以确保节点之间的高速数据传输。
以上所提到的软件和技术只是其中的一部分,实际上还有许多其他工具和框架可用于实现高可用集群、负载均衡集群和分布式计算集群、高性能集群,具体选择取决于实际需求和环境。
4.什么是正向、反向、透明代理
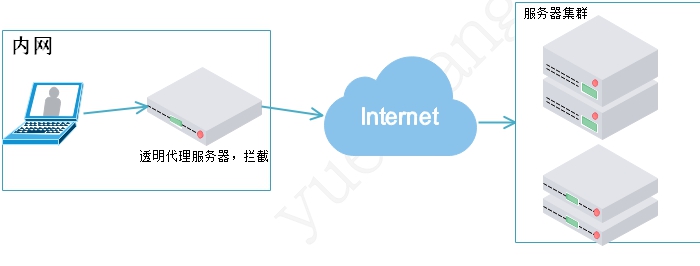
1、透明代理
透明代理(transparent proxy),也叫内网代理(inline proxy)、拦截代理(inercepting proxy)已经强制代理(force proxy)。透明代理和正向代理的行为很相似,但细节上有所不同,透明代理将拦截客户端发送的请求,拦截后自己代为访问客户端,获取响应结果后再有透明代理交给客户端,其实网康一类的上网行为管理设备就是透明代理。
架构图如下:
2、正向代理
正向代理(forward proxy),看名字就知道是转发代理,客户端将请求转发正向代理服务器,正向再负责转发给服务端,响应时服务端先响应给正向代理服务器,正向代理服务器再转发给对应的客户端。也就是说,正向代理可以但不限于为局域网内客户端做代理,它扮演的角色类似与NAT。

FQ其实用的也是正向代理
3、正向代理和透明代理的区别
正向和透明主要区别如下:
正向代理是,客户端明确请求给正向代理,而透明代理对客户端是透明的,客户端不知道有代理的存在,也不用设置代理,因为客户端发出去的请i去都会被透明拦截
正向代理为了实现某些额外的需求,有可能会修改该请求报文,但是安装rfc文档的要求,透明代理不会修改该请求报文。
正向代理可以内网也可以外网,但透明代理只能内网
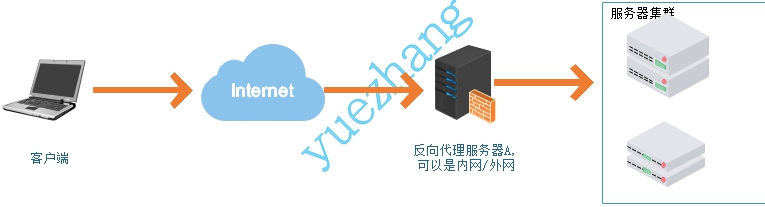
4、反向代理
反向代理是为服务端转发请求,客户端将请求发送值反向代理服务器,反向代理服务器再将请求转发给真正的服务器处理请求,响应时后端真正的服务器将处理结果发送给反向代理,再由反向代理构建响应并响应给客户端。
架构图如下


![Pikachu上的CSRF以及NSSCTF上的[NISACTF 2022]bingdundun~、 [SWPUCTF 2022 新生赛]xff](https://img-blog.csdnimg.cn/direct/5f9028f3eeca4c8095c7a348143dd77e.png)