目录
1.介绍一下github中的 asset_id
2. GitHub 的 asset_id相关操作
2.1.获取特定 repository 的 release 列表:
2.2.获取特定 release 中的 asset 列表,并找到 asset_id:
2.3.使用ASSET_ID获取资材
3.返回的 assets 的信息 是什么样样子的,请给出一个数据的例子
4.介绍一下 Linux 中 的 jq 命令
5.举一个例子( jq 命令)
========↑【草稿】整理,↓ 【实际操作】整理========
6.获取的数据结构
7.使用【jq】命令提取数据
7.1.提取 RELEASE_ID
7.2.提取 ASSET_ID
8.使用AssetId获取资源文件
■其他
1.github连接超时解决办法
2.Jenkins内置变量
3.Jenkins的Git插件,内置变量
4.jq命令详解
5.是否必须注册用户才能使用------不用
6.GitHub WebAPI使用帮助文档
7.XXXX
===
1.介绍一下github中的 asset_id
在 GitHub 中,asset_id 是与 release assets(发布的资源文件)相关联的唯一标识符。当您在 GitHub 上发布一个 release(版本发布)时,您可以附带一个或多个资源文件(如二进制文件、文档、压缩包等),这些资源文件会被称为 release assets。每个发布的资源文件都会被分配一个唯一的 asset_id,用来标识该资源文件。
---
通过 asset_id,您可以在 GitHub API 中准确定位和操作特定的发布资源文件。一般来说,您可以使用 asset_id 来下载、删除、更新或获取有关特定发布资源文件的详细信息。
---
在 GitHub Release API 的响应中,您会看到针对每个发布资源文件的 asset_id,这使得在开发人员和项目中对发布的资源文件进行管理和操作变得更加灵活和方便。
2. GitHub 的 asset_id相关操作
2.1.获取特定 repository 的 release 列表:
curl -H "Authorization: token YOUR_ACCESS_TOKEN"
     -H "Accept: application/vnd.github.v3+json"
     https://api.github.com/repos/{owner}/{repo}/releases
将
YOUR_ACCESS_TOKEN替换为您的 GitHub 访问令牌,{owner}替换为 repository 的所有者名称,{repo}替换为 repository 的名称。此命令将返回指定 repository 的所有 release 信息,包括每个 release 的 asset_id。
2.2.获取特定 release 中的 asset 列表,并找到 asset_id:
curl -H "Authorization: token YOUR_ACCESS_TOKEN"
     -H "Accept: application/vnd.github.v3+json"
     https://api.github.com/repos/{owner}/{repo}/releases/{release_id}/assets
此命令将返回指定 release 中的所有 assets 的信息,包括它们的 asset_id。
----------------
请注意,为了成功调用 GitHub 的 Web API,您需要正确的访问令牌以及适当的权限。确保在命令中正确替换您的访问令牌和相关信息,并根据您的需求进行进一步的处理
===
2.3.使用ASSET_ID获取资材
发布资产的 REST API 终结点 - GitHub 文档
curl -L \
  -H "Accept: application/vnd.github+json" \
  -H "Authorization: Bearer <YOUR-TOKEN>" \
  -H "X-GitHub-Api-Version: 2022-11-28" \
  https://api.github.com/repos/OWNER/REPO/releases/assets/ASSET_ID
====
{
"url": "https://api.github.com/repos/octocat/Hello-World/releases/assets/1",
"browser_download_url": "https://github.com/octocat/Hello-World/releases/download/v1.0.0/example.zip",
"id": 1,
"node_id": "MDEyOlJlbGVhc2VBc3NldDE=",
"name": "example.zip",
"label": "short description",
"state": "uploaded",
"content_type": "application/zip",
"size": 1024,
"download_count": 42,
"created_at": "2013-02-27T19:35:32Z",
"updated_at": "2013-02-27T19:35:32Z",
"uploader": {
"login": "octocat",
"id": 1,
"node_id": "MDQ6VXNlcjE=",
"avatar_url": "https://github.com/images/error/octocat_happy.gif",
"gravatar_id": "",
"url": "https://api.github.com/users/octocat",
"html_url": "https://github.com/octocat",
"followers_url": "https://api.github.com/users/octocat/followers",
"following_url": "https://api.github.com/users/octocat/following{/other_user}",
"gists_url": "https://api.github.com/users/octocat/gists{/gist_id}",
"starred_url": "https://api.github.com/users/octocat/starred{/owner}{/repo}",
"subscriptions_url": "https://api.github.com/users/octocat/subscriptions",
"organizations_url": "https://api.github.com/users/octocat/orgs",
"repos_url": "https://api.github.com/users/octocat/repos",
"events_url": "https://api.github.com/users/octocat/events{/privacy}",
"received_events_url": "https://api.github.com/users/octocat/received_events",
"type": "User",
"site_admin": false
}
}
===
curl -k -sS -L \
  -H "Accept: application/vnd.github+json" \
  -H "Authorization: Bearer <YOUR-TOKEN>" \
  -H "X-GitHub-Api-Version: 2022-11-28" \
  https://api.github.com/repos/OWNER/REPO/releases/assets/ASSET_ID \
  -o \Work\AAA\
===
3.返回的 assets 的信息 是什么样样子的,请给出一个数据的例子
{
  "id": 123456,
  "name": "example-release",
  "assets": [
    {
      "name": "example-asset1",
      "download_url": "https://github.com/user/repo/releases/download/v1.0/example-asset1.zip",
      "content_type": "application/zip",
      "size": 1024
    },
    {
      "name": "example-asset2",
      "download_url": "https://github.com/user/repo/releases/download/v1.0/example-asset2.tar.gz",
      "content_type": "application/gzip",
      "size": 2048
    }
  ]
}
在这个示例中,每个 asset 都有
name,download_url,content_type,size等字段。您可以使用jq命令来提取这些字段,例如提取第一个 asset 的name和download_url:
cat response.json | jq '.assets[0] | {name, download_url}'这将输出第一个 asset 的
name和download_url字段内容。您可以根据需要适配提取其他字段。希望这个示例能够帮助您更好地处理您的数据。如果您有任何问题或需要进一步助,请随时告诉我。
===
4.介绍一下 Linux 中 的 jq 命令
jq是一个强大的命令行工具,用于处理JSON格式的数据。它可以读取、过滤、排序和转换JSON数据,并提供了丰富的操作选项和函数。
jq的基本语法如下: jq [options] 'filter' [file...]
其中,options是一些命令行选项,filter是一个用于处理JSON数据的jq过滤器,可以是一个表达式、函数或由多个过滤器组成的复合表达式,file是一个包含JSON数据的文件。
jq的功能包括但不限于以下几个方面:
- 选择和过滤:使用jq可以选择和过滤JSON数据中的特定字段或元素,例如提取某个字段的值、选择特定的数组元素等。
- 修改和更新:jq可以在原始JSON数据上进行修改和更新操作,例如添加、删除、修改字段等。
- 转换和格式化:jq可以将JSON数据转换为其他格式,例如转换为文本、CSV或XML。
- 聚合和统计:jq可以对JSON数据进行聚合和统计操作,例如求和、计数、最值等。
- 迭代和循环:jq支持迭代和循环操作,可以对JSON数据进行递归处理。
- 表达式和函数:jq提供了丰富的内置表达式和函数,可以进行逻辑运算、算术运算、正则表达式匹配等操作。
总而言之,jq是Linux中一个非常实用的工具,用于处理和操作JSON格式的数据。它简单易用,功能强大,对于处理和分析JSON数据非常有帮助。
5.举一个例子( jq 命令)
假设有一个包含JSON数据的文件data.json如下所示:
{
  "name": "Alice",
  "age": 30,
  "city": "New York",
  "pets": [
    {
      "name": "Fluffy",
      "type": "cat"
    },
    {
      "name": "Buddy",
      "type": "dog"
    }
  ]
}
我们可以使用jq来处理这个JSON数据,例如提取name字段和pets数组中每个宠物的name字段,可以使用以下命令:
cat data.json | jq '{name, pets: [.pets[] | {name: .name}]}'运行上面的命令后,可以得到如下输出:
{
  "name": "Alice",
  "pets": [
    {
      "name": "Fluffy"
    },
    {
      "name": "Buddy"
    }
  ]
}
这个例子演示了如何使用jq命令选择和转换JSON数据中的特定字段,可以根据具体需求编写不同的jq过滤器来处理JSON数据。
===
========↑【草稿】整理,↓ 【实际操作】整理========
------------------------------------------------
6.获取的数据结构
【命令】(仅仅是单位的项目的GitHub,OK)
curl -k -u "UserID:tokenID" "https://github.com/api/v3/repos/terasoluna-batch/terasoluna-batch/releases/tags/3.6.5.RELEASE"【命令OK】(【全世界使用的】GitHub)
curl -k -u "UserID:tokenID" "https://api.github.com/repos/terasoluna-batch/terasoluna-batch/releases/tags/3.6.5.RELEASE"===
【要获取的Tags的地址】
https://github.com/terasoluna-batch/terasoluna-batch/releases/tag/3.6.5.RELEASETags · terasoluna-batch/terasoluna-batch (github.com)

===
Release 3.6.5.RELEASE · terasoluna-batch/terasoluna-batch (github.com)
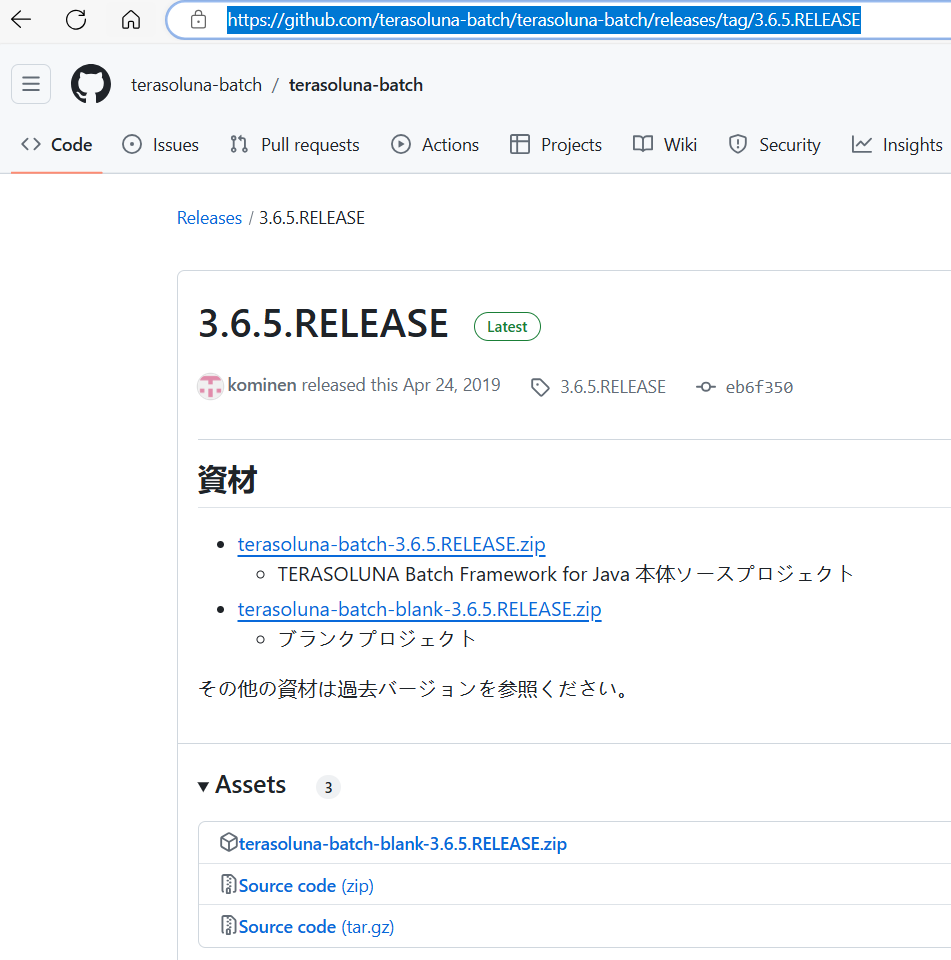
===蓝色是 RELEASE_ID
红色是 ASSET_ID
{
"url": "https://api.github.com/repos/terasoluna-batch/terasoluna-batch/releases/16942929",
"assets_url": "https://api.github.com/repos/terasoluna-batch/terasoluna-batch/releases/16942929/assets",
"upload_url": "https://uploads.github.com/repos/terasoluna-batch/terasoluna-batch/releases/16942929/assets{?name,label}",
"html_url": "https://github.com/terasoluna-batch/terasoluna-batch/releases/tag/3.6.5.RELEASE",
"id": 16942929,
"author": {
"login": "kominen",
"id": 11765662,
"node_id": "MDQ6VXNlcjExNzY1NjYy",
"avatar_url": "https://avatars.githubusercontent.com/u/11765662?v=4",
"gravatar_id": "",
"url": "https://api.github.com/users/kominen",
"html_url": "https://github.com/kominen",
"followers_url": "https://api.github.com/users/kominen/followers",
"following_url": "https://api.github.com/users/kominen/following{/other_user}",
"gists_url": "https://api.github.com/users/kominen/gists{/gist_id}",
"starred_url": "https://api.github.com/users/kominen/starred{/owner}{/repo}",
"subscriptions_url": "https://api.github.com/users/kominen/subscriptions",
"organizations_url": "https://api.github.com/users/kominen/orgs",
"repos_url": "https://api.github.com/users/kominen/repos",
"events_url": "https://api.github.com/users/kominen/events{/privacy}",
"received_events_url": "https://api.github.com/users/kominen/received_events",
"type": "User",
"site_admin": false
},
"node_id": "MDc6UmVsZWFzZTE2OTQyOTI5",
"tag_name": "3.6.5.RELEASE",
"target_commitish": "release/3.6.5.RELEASE",
"name": "3.6.5.RELEASE",
"draft": false,
"prerelease": false,
"created_at": "2019-04-23T08:14:09Z",
"published_at": "2019-04-24T09:16:46Z",
"assets": [
{
"url": "https://api.github.com/repos/terasoluna-batch/terasoluna-batch/releases/assets/12210663",
"id": 12210663,
"node_id": "MDEyOlJlbGVhc2VBc3NldDEyMjEwNjYz",
"name": "terasoluna-batch-blank-3.6.5.RELEASE.zip",
"label": null,
"uploader": {
"login": "kominen",
"id": 11765662,
"node_id": "MDQ6VXNlcjExNzY1NjYy",
"avatar_url": "https://avatars.githubusercontent.com/u/11765662?v=4",
"gravatar_id": "",
"url": "https://api.github.com/users/kominen",
"html_url": "https://github.com/kominen",
"followers_url": "https://api.github.com/users/kominen/followers",
"following_url": "https://api.github.com/users/kominen/following{/other_user}",
"gists_url": "https://api.github.com/users/kominen/gists{/gist_id}",
"starred_url": "https://api.github.com/users/kominen/starred{/owner}{/repo}",
"subscriptions_url": "https://api.github.com/users/kominen/subscriptions",
"organizations_url": "https://api.github.com/users/kominen/orgs",
"repos_url": "https://api.github.com/users/kominen/repos",
"events_url": "https://api.github.com/users/kominen/events{/privacy}",
"received_events_url": "https://api.github.com/users/kominen/received_events",
"type": "User",
"site_admin": false
},
"content_type": "application/x-zip-compressed",
"state": "uploaded",
"size": 38201,
"download_count": 311,
"created_at": "2019-04-24T09:14:17Z",
"updated_at": "2019-04-24T09:14:19Z",
"browser_download_url": "https://github.com/terasoluna-batch/terasoluna-batch/releases/download/3.6.5.RELEASE/terasoluna-batch-blank-3.6.5.RELEASE.zip"
}
],
"tarball_url": "https://api.github.com/repos/terasoluna-batch/terasoluna-batch/tarball/3.6.5.RELEASE",
"zipball_url": "https://api.github.com/repos/terasoluna-batch/terasoluna-batch/zipball/3.6.5.RELEASE",
"body": "## 資材\r\n* [terasoluna-batch-3.6.5.RELEASE.zip](https://github.com/terasoluna-batch/terasoluna-batch/archive/3.6.5.RELEASE.zip)\r\n * TERASOLUNA Batch Framework for Java 本体 ソースプロジェクト\r\n* [terasoluna-batch-blank-3.6.5.RELEASE.zip](https://github.com/terasoluna-batch/terasoluna-batch/releases/download/3.6.5.RELEASE/terasoluna-batch-blank-3.6.5.RELEASE.zip)\r\n * ブランクプロジェクト\r\n\r\nその他の資材は過去バージョンを参照ください。"
}
===

====
7.使用【jq】命令提取数据
7.1.提取 RELEASE_ID
curl -k "https://api.github.com/repos/terasoluna-batch/terasoluna-batch/releases/tags/3.6.5.RELEASE" | jq '{id}'
7.2.提取 ASSET_ID
Step1
curl -k "https://api.github.com/repos/terasoluna-batch/terasoluna-batch/releases/tags/3.6.5.RELEASE" | jq '{id, assets}'
Step1 (方法2)
curl -k "https://api.github.com/repos/terasoluna-batch/terasoluna-batch/releases/tags/3.6.5.RELEASE" | jq .assets[]
Step2(方法2)
curl -k "https://api.github.com/repos/terasoluna-batch/terasoluna-batch/releases/tags/3.6.5.RELEASE" | jq .assets[0].id
---注意,等于号后面不能有空格
myAssetsId=`curl -k "https://api.github.com/repos/terasoluna-batch/terasoluna-batch/releases/tags/3.6.5.RELEASE" | jq .assets[0].i
d`
echo $myAssetsIdxxx
8.使用AssetId获取资源文件
xxx
===
■其他
1.github连接超时解决办法
打卡下面目录中的【hosts】文件 (要是有管理员权限打卡)
C:\Windows\System32\drivers\etc\在文件中添加下面内容
140.82.113.3 github.comxxx
2.Jenkins内置变量
| 变量名 | 解释 |
| BUILD_NUMBER | The current build number, such as "153" |
| BUILD_ID | The current build ID, identical to BUILD_NUMBER for builds created in 1.597+, but a YYYY-MM-DD_hh-mm-ss timestamp for older builds |
| BUILD_DISPLAY_NAME | The display name of the current build, which is something like "#153" by default. |
| JOB_NAME | Name of the project of this build, such as "foo" or "foo/bar". (To strip off folder paths from a Bourne shell script, try: ${JOB_NAME##*/}) |
| BUILD_TAG | String of "jenkins-${JOB_NAME}-${BUILD_NUMBER}". Convenient to put into a resource file, a jar file, etc for easier identification. |
| EXECUTOR_NUMBER | The unique number that identifies the current executor (among executors of the same machine) that’s carrying out this build. This is the number you see in the "build executor status", except that the number starts from 0, not 1. |
| NODE_NAME | Name of the slave if the build is on a slave, or "master" if run on master |
| NODE_LABELS | Whitespace-separated list of labels that the node is assigned. |
| WORKSPACE | The absolute path of the directory assigned to the build as a workspace. |
| JENKINS_HOME | The absolute path of the directory assigned on the master node for Jenkins to store data. |
| JENKINS_URL | Full URL of Jenkins, like http://server:port/jenkins/ (note: only available if Jenkins URL set in system configuration) |
| BUILD_URL | Full URL of this build, like http://server:port/jenkins/job/foo/15/ (Jenkins URL must be set) |
| SVN_REVISION | Subversion revision number that's currently checked out to the workspace, such as "12345" |
| SVN_URL | Subversion URL that's currently checked out to the workspace. |
| JOB_URL | Full URL of this job, like http://server:port/jenkins/job/foo/ (Jenkins URL must be set) |
==
3.Jenkins的Git插件,内置变量
GIT_COMMIT –对当前Git提交的安全哈希算法(SHA)的引用
GIT_COMMITTER_NAME或GIT_AUTHOR_NAME –发出新的Git提交时使用的名称
GIT_COMMITTER_EMAIL或GIT_AUTHOR_EMAIL –发出新的Git提交时使用的电子邮件地址
GIT_URL –远程GIT存储库的基本名称
GIT_URL_N –如果您使用多个远程Git存储库(即n个Git存储库),它将以数字方式列出所有它们
GIT_BRANCH – Jenkins Git插件正在运行的当前Git分支的名称
GIT_LOCAL_BRANCH –选择“检出到特定本地分支” Jenkins Git插件选项时,本地Git分支的名称
GIT_PREVIOUS_COMMIT –当前分支上的先前提交的ID
GIT_PREVIOUS_S
xxx

4.jq命令详解
shell编程-jq命令详解_shell jq命令-CSDN博客
========================
5.是否必须注册用户才能使用------不用
curl -k "https://api.github.com/repos/terasoluna-batch/terasoluna-batch/releases/tags/3.6.5.RELEASE"
---
curl -k "https://api.github.com/repos/terasoluna-batch/terasoluna-batch/releases/tags/3.6.5.RELEASE" | jq .assets[0].id
===
6.GitHub WebAPI使用帮助文档
发布资产的 REST API 终结点 - GitHub 文档
===“Get a release asset”的示例代码
curl -L \
-H "Accept: application/vnd.github+json" \
-H "Authorization: Bearer <YOUR-TOKEN>" \
-H "X-GitHub-Api-Version: 2022-11-28" \
https://api.github.com/repos/OWNER/REPO/releases/assets/ASSET_ID
====“Update a release asset”的示例代码
curl -L \
-X PATCH \
-H "Accept: application/vnd.github+json" \
-H "Authorization: Bearer <YOUR-TOKEN>" \
-H "X-GitHub-Api-Version: 2022-11-28" \
https://api.github.com/repos/OWNER/REPO/releases/assets/ASSET_ID \
-d '{"name":"foo-1.0.0-osx.zip","label":"Mac binary"}'
=============
7.XXXX
xxx
====