这里总结 FasterTransformer Encoder(BERT) 的cuda相关优化技巧
解读:https://github.com/NVIDIA/FasterTransformer/blob/main/docs/bert_guide.md ,优化点解读之前是翻译了下 Faster Transformer BERT 的文档,然后省略了运行样例等环节,主要是解读下 BERT 的优化技巧。也就是 bert workflow 这张图。
FasterTransformer BERT
FasterTransformer BERT 包含优化的 BERT 模型、高效的 FasterTransformer 和 INT8 量化推理。
模型结构
标准的 BERT 和 高效的 FasterTransformer
FasterTransformer 编码器支持以下配置。
- Batch size (B1): 批量大小 <= 4096
- Sequence length (S): 序列长度 <= 4096。 对于 INT8 模型,当 S > 384 时 S 需要是 32 的倍数。
- Size per head (N): 小于 128 的偶数。
- Head number (H): 在 FP32 下满足 H * N <= 1024 或在 FP16 下满足 H * N <= 2048 的任何数字。
- Data type: FP32, FP16, BF16, INT8 and FP8 (Experimental).
- 如果内存足够,任意层数(N1)
在 FasterTransformer v1.0 中,我们提供了高度优化的 BERT 等效编码器模型。 接下来,基于Effective Transformer的思想,我们在 FasterTransformer v2.1 中通过去除无用的 padding 来进一步优化BERT推理,并提供 Effective FasterTransformer。 在 FasterTransformer v3.0 中,我们提供了 INT8 量化推理以获得更好的性能。 在 FasterTransformer v3.1 中,我们优化了 INT8 Kernel 以提高 INT8 推理的性能,并将 TensorRT 的多头注意力插件集成到 FasterTransformer 中。 在 FasterTransformer v4.0 中,我们添加了多头注意力 Kernel 支持 V100 的 FP16 模式和 T4, A100 的 INT8 模式。 下图演示了除 INT8 外的这些优化的流程图。 在FasterTransformer v5.0中,我们重构了代码,将 mask building 和 padding 移动到 Bert 的 forward 函数中,并在 Ampere GPU 上基于稀疏特性来加速GEMM。 在 FasterTransformer v5.1 中,我们支持对 Bert FP16 进行进行多节点多 GPU 推理。
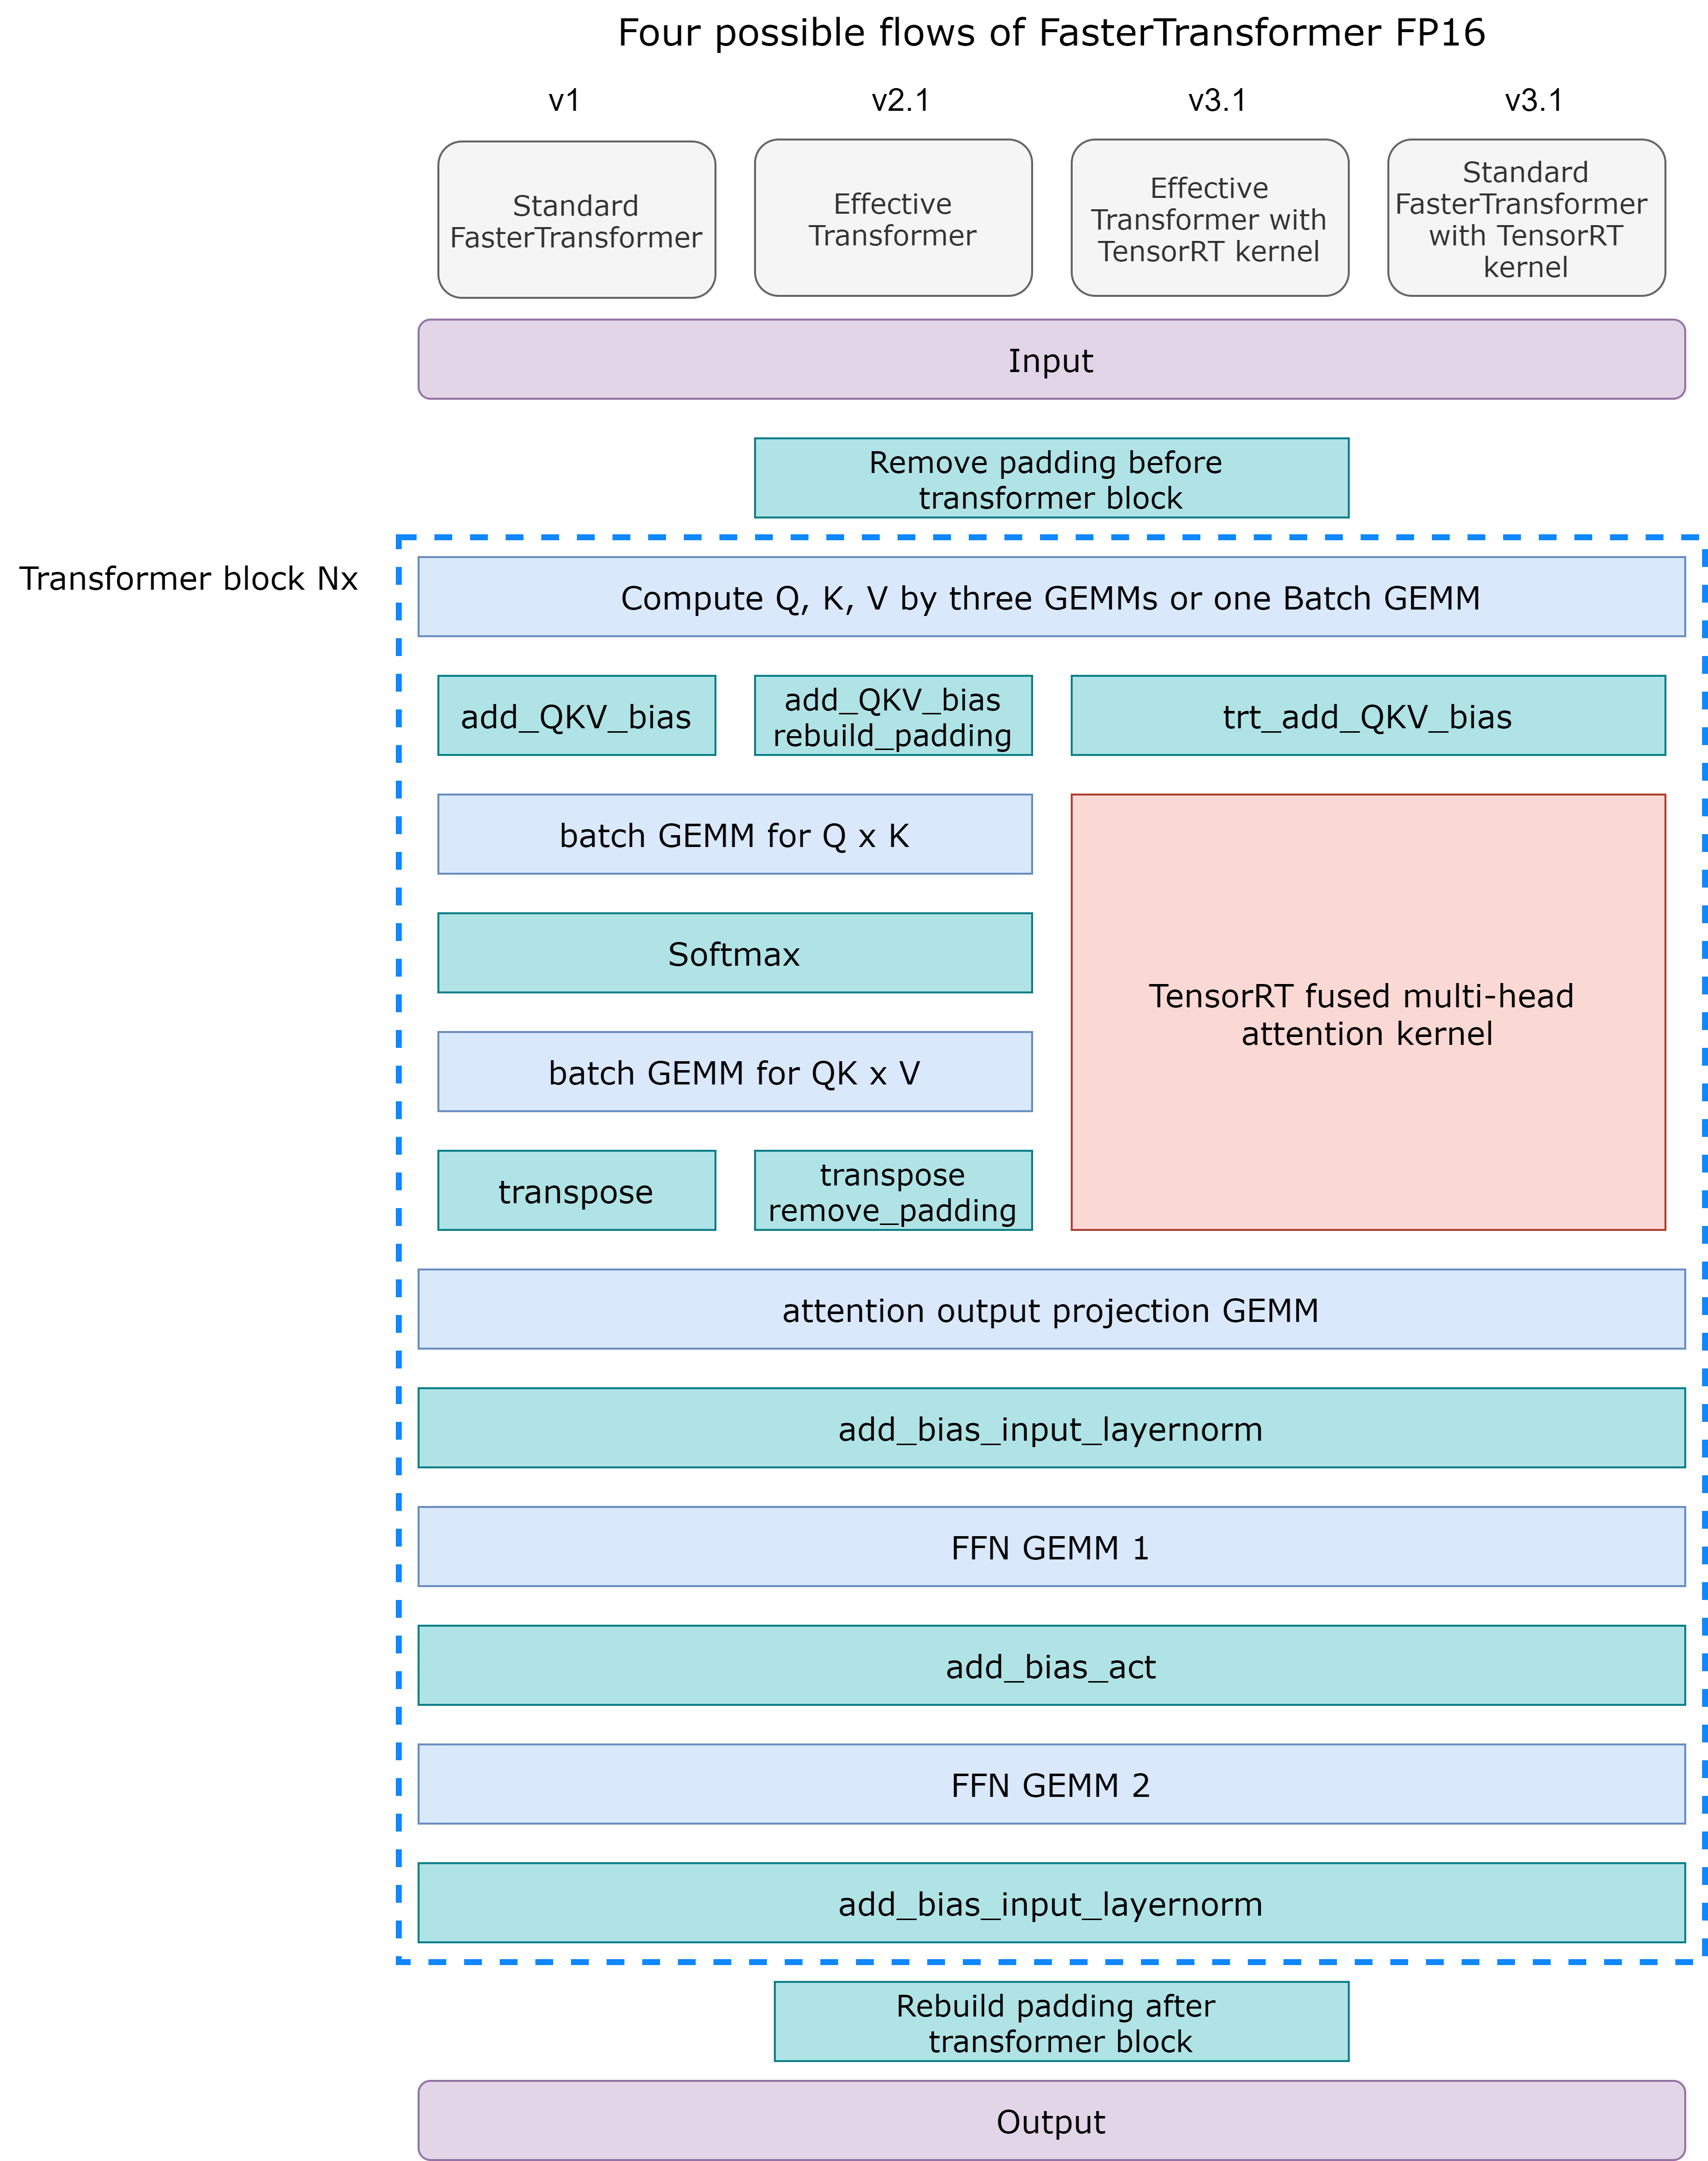
BERT 模型是 google 在2018年提出的。FasterTransformer 的encoder 相当于 BERT 模型,但是做了很多优化。 图 1 最左边的流程显示了 FasterTransformer 中的优化。 经过优化后,FasterTransformer 仅使用 8 或 6 个 gemms(蓝色块)和 6 个自定义 CUDA kernel(绿色块)来实现一个 transformer 块。
对于 Effective FasterTransformer,主要思想是去除句子的填充以防止计算无用的标记。 当一个 Batch 的平均序列长度远小于最大序列长度时,此方法可以节省大量时间。 图 2 显示了我们使用的想法和偏移量(橙色)。 要实现 Effective FasterTransformer,我们需要考虑两个问题。 首先,我们需要去除 BERT 之前的 padding,离开 BERT 之后重建 padding 以保持结果的形状。 这很简单,带来的开销基本可以忽略。 第二个问题是多头注意力的计算。一个天真的解决方案是在多头注意力之前重建填充并在多头注意力之后移除填充,如图 1 的第二个流程图所示。因为我们可以将这些重建/移除融合到其他 kernel 中,额外的开销也是可以忽略的。
为了进一步提高多头注意力的性能,我们集成了 TensorRT 的多头注意力,将整个注意力计算融合到一个 kernel 中。 源代码在这里。 该 kernel 同时支持 Effective FasterTransformer 和标准 BERT 模型。 图 1 中的第三个和第四个流程图显示了工作流程。 有了这样的 kernel ,我们就不用担心多头注意力的填充问题了。 这个 kernel 需要另一个偏移量,如图 2 所示。

第一个偏移量 [0, 0, 1, 3, 3, 3]比较好理解,直接和[0, 1, 2, 3, 4, 5]迭代就可以得到原始的位置了。第二个偏移量是从0位置开始,记录连续的原始token个数,比如我们将[0, 2, 3, 6]做差分,得到[2, 1, 3]也对应了原始的数据中每行做的padding的tokn数目。
此外,我们发现 padding 会影响某些任务的准确性,尽管它们应该是无用的。 因此,我们建议删除下游任务最终输出中的填充。
编码器的参数、输入和输出:
- Constructor of BERT
| Classification | Name | Data Type | Description |
|---|---|---|---|
| [0] | max_batch_size | int | Deprecated, move to input |
| [1] | max_seq_len | int | Deprecated, move to input |
| [2] | head_num | int | Head number for model configuration |
| [3] | size_per_head | int | Size per head for model configuration |
| [4] | inter_size | int | The inter size of feed forward network. It is often set to 4 * head_num * size_per_head. |
| [5] | num_layer | int | Number of transformer layers for model configuration |
| [6] | sm | int | The compute capacity of GPU |
| [7] | q_scaling | float | It is used to scale the query before the batch multiplication of query and key |
| [8] | stream | cudaStream_t | CUDA stream |
| [9] | cublas_wrapper | cublasMMWrapper* | Pointer of cuBLAS wrapper, which is declared in src/fastertransformer/utils/cublasMMWrapper.h |
| [10] | allocator | IAllocator* | Pointer of memory allocator, which is declared in src/fastertransformer/utils/allocator.h |
| [11] | is_free_buffer_after_forward | bool | If setting to be true, FasterTransformer will allocate buffer before forward, and free buffer after forward. When the allocator is based on memory pool, setting to true may help reducing the memory usage during inference. |
| [12] | attention_type | AttentionType | Determine fusing the attention or not, remove padding or not, which is declared in src/fastertransformer/layers/attention_layers/BaseAttentionLayer.h |
| [13] | sparse | bool | Is using sparsity. Experimental feature |
| [14] | activation_type | ActivationType | Determine the activation in FFN, which is declared in src/fastertransformer/layers/attention_layers/FfnLayer.h |
| [15] | layernorm_type | LayerNormType | Determine using pre-layernorm or post-layernorm, which is declared in src/fastertransformer/kernels/layernorm_kernels.h |
| [16] | tensor_para | NcclParam | Tensor Parallel information, which is declared in src/fastertransformer/utils/nccl_utils.h |
| [17] | pipeline_para | NcclParam | Pipeline Parallel information, which is declared in src/fastertransformer/utils/nccl_utils.h |
| [18] | custom_all_reduce_comm | AbstractCustomComm | Custom all reduction communication for custom all reduction in model parallelism. It is only supported in 8-way tensor parallelism |
| [19] | enable_custom_all_reduce | int | Flag of enabling custom all reduction or not |
- Input of BERT
| Name | Tensor/Parameter Shape | Location | Data Type | Description |
|---|---|---|---|---|
| input_hidden_state | [batch_size, sequence_length, head_num * size_per_head] | GPU | fp32/fp16/bf16 | The input of transformer layer |
| input_lengths | [batch_size] | GPU | int | The lengths of input_hidden_state |
- Output of BERT
| Name | Tensor/Parameter Shape | Location | Data Type | Description |
|---|---|---|---|---|
| output_hidden_state | [batch_size, sequence_length, head_num * size_per_head] | GPU | fp32/fp16/bf16 | The output of transformer layer |
上面声明了 Bert 模型的输入参数,以及输入和输出Tensor的shape。
此外,注意到 TensorRT 的多头注意力Kernel虽然功能很强大但是也有一些限制。首先,这个kernel需要 Turing 或者更新架构的 GPU,并且每个头的大小必须是64。当条件不满足时,我们使用FasterTransformer的原始多头注意力实现。其次,它需要一个额外的序列长度偏移量,如Figure2所示,更多的细节在这里 。当输入有 padding 时,序列长度偏移的形状为 [ 2 × B 1 + 1 ] [2 \times B_1 +1] [2×B1+1] 。假设这里有3个序列,长度分别为 s 1 s_1 s1, s 2 s_2 s2, s 3 s_3 s3 ,然后 padding 之后的序列长度为 S S S 。那么序列长度偏移时 [ 0 , s 1 , s 1 + s 2 , s 1 + s 2 + s 3 ] [0, s_1, s1+s2, s1+s2+s3] [0,s1,s1+s2,s1+s2+s3] 。即,序列长度偏移记录了每个句子的序列长度。 当我们有 padding 时,我们将 padding 视为一些独立的句子。
在 FasterTransformer v4.0 中,我们实现了两条 INT8 推理的流水线,如图 3 所示。对于 int8_mode == 1 (int8v1),我们不量化残差连接,使用 int32 作为 int8 gemms 的输出,并对权重采用逐通道的量化方式。 对于 int8_mode == 2 (int8v2),我们量化残差连接,使用 int8 作为 int8 gemms 的输出,并对权重采用逐张量的量化。 一般来说,int8_mode == 1 的精度更高,而 int8_mode == 2 的性能更好。
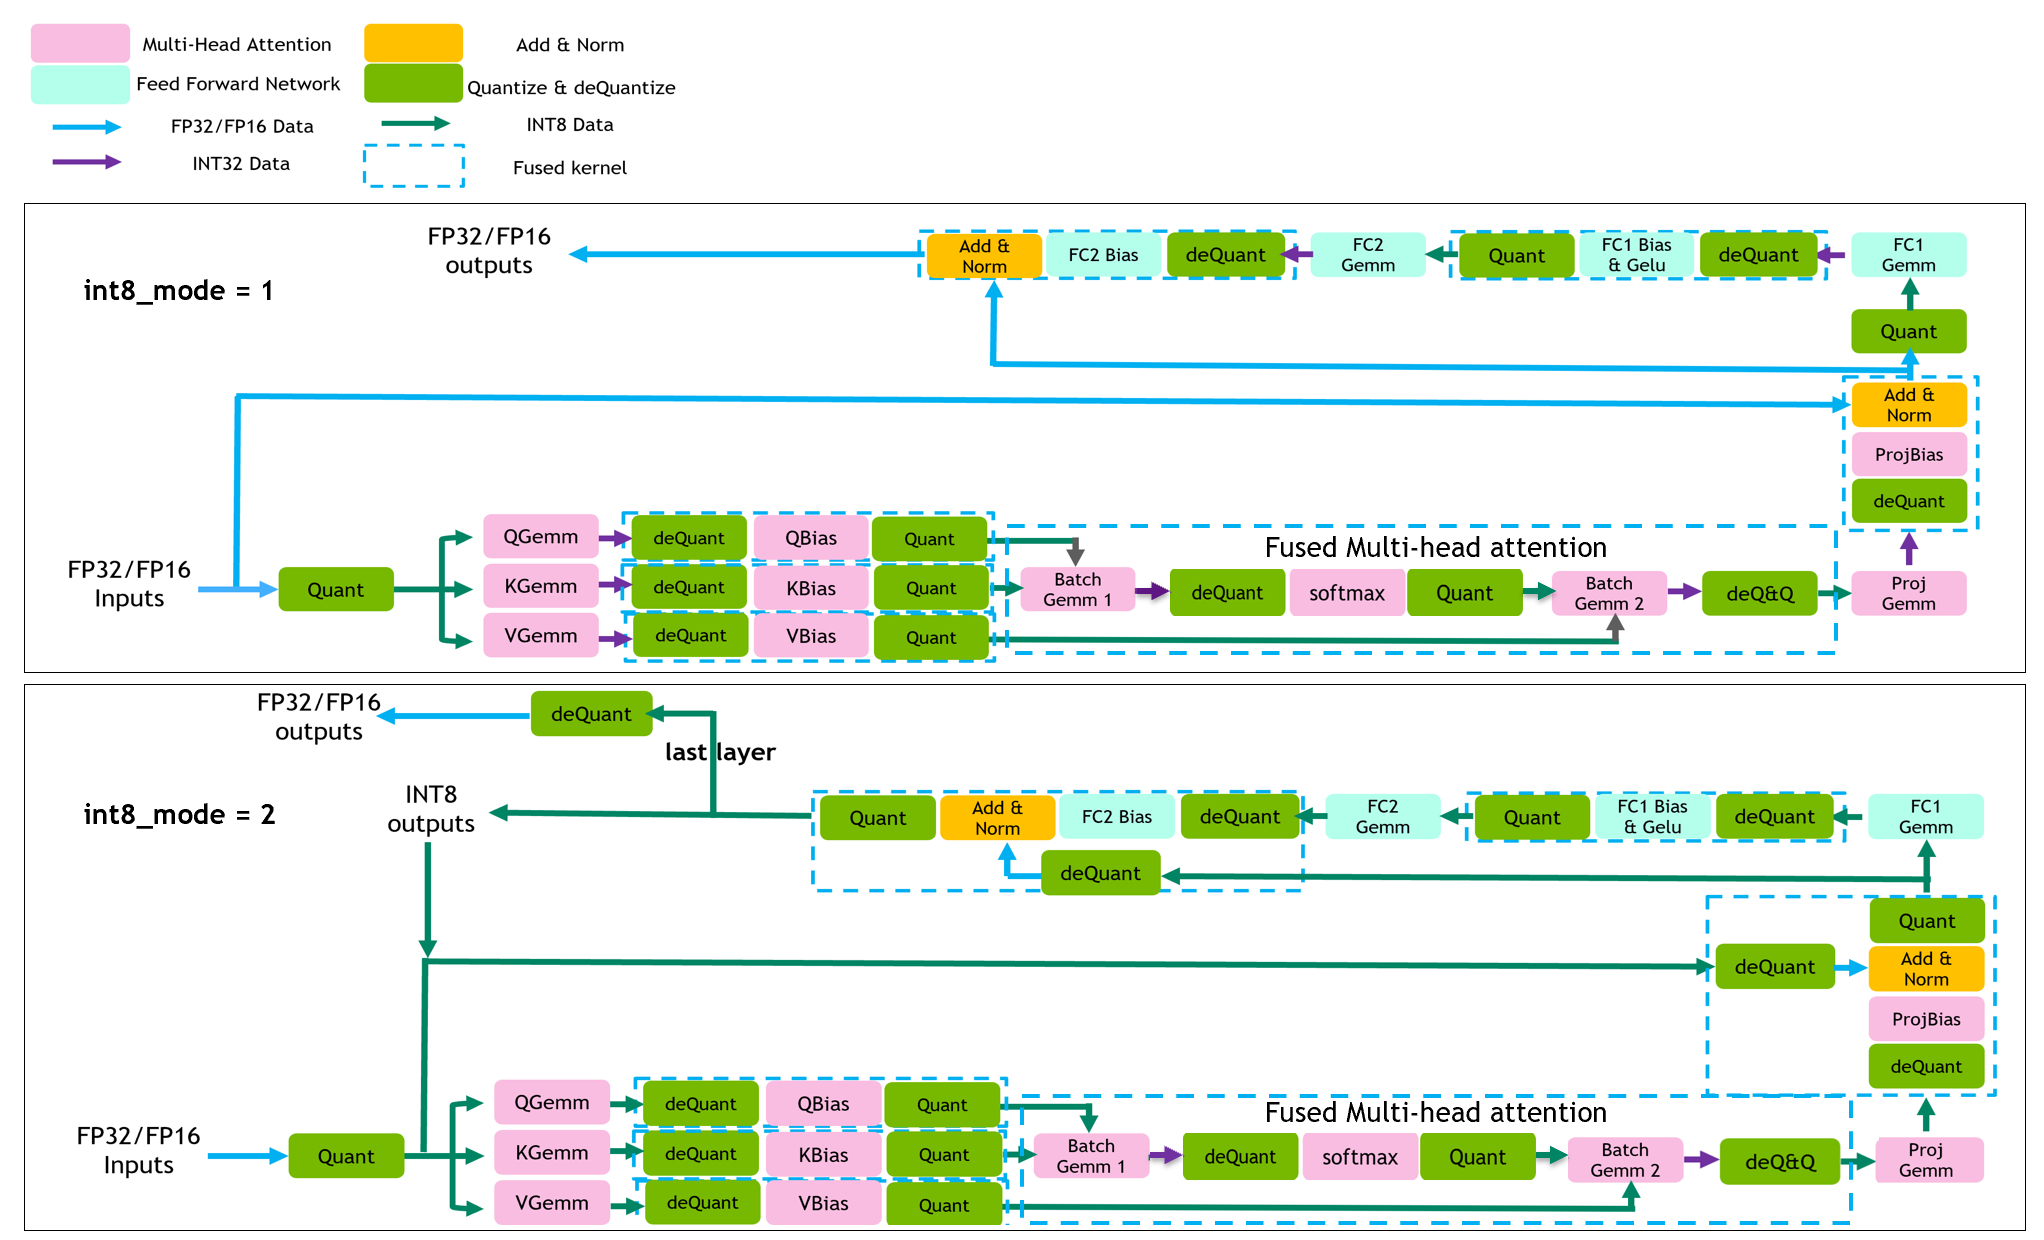
| feature | int8_mode == 1 | int8_mode == 2 |
|---|---|---|
| quantize residual | No | Yes |
| int8 output gemm | No | Yes |
| per-channel quantiztion for weights | Yes | No |
对于 INT8 推理,需要量化模型。 我们提供了 TensorFlow 量化工具和示例代码,同时还提供了带有 TensorRT 量化工具的 PyTorch 示例代码。 请先参考bert-quantization/bert-tf-quantization和examples/pytorch/bert/bert-quantization-sparsity中的README。
在 FasterTransformer v5.0 中,我们支持稀疏 gemm 以利用 Ampere GPU 的稀疏特性。 我们还提供了一个关于 PyTorch 的示例。
在 FasterTransformer v5.1 中,我们支持 BERT 模型的多 GPU 多节点推理。
优化点解读
优化主要是针对 Figure 1 也就是 BERT 的编码器模块的各个组件来讲(我这里忽略了 Figure1 的和 padding 相关的组建的讲解,感兴趣的读者可以自己看看 FasterTransformer)。我么先把 BERT 的多头注意力机制的实现贴一下(代码来自:https://github.com/codertimo/BERT-pytorch/blob/master/bert_pytorch/model/attention/multi_head.py ),方便下面的讲解:
import torch.nn as nn

class Attention(nn.Module):
    """
    Compute 'Scaled Dot Product Attention
    """

    def forward(self, query, key, value, mask=None, dropout=None):
        scores = torch.matmul(query, key.transpose(-2, -1)) \
                 / math.sqrt(query.size(-1))

        if mask is not None:
            scores = scores.masked_fill(mask == 0, -1e9)

        p_attn = F.softmax(scores, dim=-1)

        if dropout is not None:
            p_attn = dropout(p_attn)

        return torch.matmul(p_attn, value),


class MultiHeadedAttention(nn.Module):
    """
    Take in model size and number of heads.
    """

    def __init__(self, h, d_model, dropout=0.1):
        super().__init__()
        assert d_model % h == 0

        # We assume d_v always equals d_k
        self.d_k = d_model // h
        self.h = h

        self.linear_layers = nn.ModuleList([nn.Linear(d_model, d_model) for _ in range(3)])
        self.output_linear = nn.Linear(d_model, d_model)
        self.attention = Attention()

        self.dropout = nn.Dropout(p=dropout)

    def forward(self, query, key, value, mask=None):
        batch_size = query.size(0)

        # 1) Do all the linear projections in batch from d_model => h x d_k
        query, key, value = [l(x).view(batch_size, -1, self.h, self.d_k).transpose(1, 2)
                             for l, x in zip(self.linear_layers, (query, key, value))]

        # 2) Apply attention on all the projected vectors in batch.
        x, attn = self.attention(query, key, value, mask=mask, dropout=self.dropout)

        # 3) "Concat" using a view and apply a final linear.
        x = x.transpose(1, 2).contiguous().view(batch_size, -1, self.h * self.d_k)

        return self.output_linear(x)
Compute Q, K, V by three GEMMs or one Batch GEMM
这里的意思就是计算 Q,K,V 的时候有两种方式,一种是用3个单独的gemm算子对应FasterTransformer v1.0版本的这段代码:https://github.com/NVIDIA/FasterTransformer/blob/release/v1.0_tag/fastertransformer/cuda/open_attention.h#L162-L193 。另外一种就是通过一个 Batch GEMM算子同时完成对 Q, K, V 的计算,对应这段代码:https://github.com/NVIDIA/FasterTransformer/blob/main/src/fastertransformer/layers/attention_layers/FusedAttentionLayer.cu#L131。
add_QKV_bias 优化
这个是针对上面forward函数中 (1) 这部分存在的分别对 Q, K, V进行bias_add以及transpose的优化,将其融合成一个cuda kernel。从 https://github.com/NVIDIA/FasterTransformer/blob/release/v1.0_tag/fastertransformer/cuda/open_attention.cu#L327-L343 这里启动 add_QKV_bias 的参数来看。
对于FP32,FasterTransformer是启动 batch_size * seq_len * 3 个 Block, 每个 Block 里面启动 head_num * size_per_head 个线程只处理一个token(对应 head_num * size_per_head 次计算)的 bias_add 计算。我们注意到这里还将输入的shape进行了改变,也就是将原始的[batch_size, seq_length, head_num * size_per_head] -> [batch_size, seq_length, head_num, size_per_head](对应 .view(batch_size, -1, self.h, self.d_k))->[batch_size, head_num, seq_length, size_per_head](对应.transpose(1, 2)),这个过程对应了 https://github.com/NVIDIA/FasterTransformer/blob/release/v1.0_tag/fastertransformer/cuda/open_attention.cu#L149 这里的索引代码。
而对于FP16模式,FasterTransformer是启动 batch_size * seq_len 个 Block,,每个 Block 里面启动 head_num * size_per_head 个线程同时处理QKV的同一个token(对应head_num * size_per_head次计算),在实际计算时会把half pack成half2进行计算:https://github.com/NVIDIA/FasterTransformer/blob/release/v1.0_tag/fastertransformer/cuda/open_attention.cu#L172 ,并使用了half2相关的数学函数。这样不仅仅可以达到2倍于half的访存带宽和计算吞吐,还可以极大地减少指令的发射数量。
高效的softmax kernel
这里我没有怎么看,因为oneflow已经有一个比FasterTransformer更好的softmax kernel实现了。对应 https://github.com/NVIDIA/FasterTransformer/blob/release/v1.0_tag/fastertransformer/cuda/open_attention.cu#L189-L268 。
可以看:https://zhuanlan.zhihu.com/p/341059988
transpose kernel
代码实现在:https://github.com/NVIDIA/FasterTransformer/blob/release/v1.0_tag/fastertransformer/cuda/open_attention.cu#L270-L298 。调用这个 kernel 是在:https://github.com/NVIDIA/FasterTransformer/blob/release/v1.0_tag/fastertransformer/cuda/open_attention.cu#L397-L416 。
这个 kernel 是对应上面 BERT 的 Encoder 部分的:
x = x.transpose(1, 2).contiguous().view(batch_size, -1, self.h * self.d_k)
这里的 x 的 shape 仍然和之前的 q 的 shape 一致, 为[batch_size, head_num, seq_length, size_per_head]。因为Attetion 层不会改变输入的形状,因为 Attention 的计算过程是:q * k 转置(.transpose(2, 3)),除以 d_k ** 0.5,输出维度是 [b, head_num , seq_length, seq_length] 即单词和单词直接的相似性 ,然后对最后一个维度进行 softmax 操作得到 [b, head_num, seq_length, seq_length] , 最后和 v(shape 也是 [batch_size, head_num, seq_length, size_per_head]) 做一个矩阵乘法,结果的 shape 和输入的 shape 形状都是:[batch_size, head_num, seq_length, size_per_head] 。因此这里的 x.transpose(1, 2) 就是把 shape 为 [batch_size, head_num, seq_length, size_per_head] 的 x 重新排列为 [batch_size, head_num, size_per_head, seq_length]。然后 x.contiguous().view(batch_size, -1, self.h * self.d_k) 进一步将 shape 重新排列为 [batch_size, seq_length, head_num * size_per_head] 。
对于 FP32 模式,启动 batch_size * head_num * seq_length 个 Block , 然后每个 Block 启动 size_per_head 个线程处理一个序列(一个序列对应 size_per_head 个元素)。如下:
const int seq_per_block = 1;
      grid.x = batch_size * head_num * seq_len / seq_per_block;
      block.x = seq_per_block * size_per_head;
      transpose<DataType_><<<grid, block, 0, stream>>>(transpose_dst_, dst,
          batch_size, seq_len, head_num, size_per_head);
而 transpose 的kernel实现也比较简单,根据blockIdx.x计算下batch_id和seq_id以及head_id(输入 x 的 shape 为 [batch_size, head_num, seq_length, size_per_head]):
template<typename T>
__global__
void transpose(T* src, T* dst, const int batch_size, const int seq_len, const int head_num, const int size_per_head)
{
  int batch_id = blockIdx.x / (head_num * seq_len);
  int seq_id = blockIdx.x % seq_len;
  int head_id = (blockIdx.x % (head_num * seq_len))/ seq_len;
  dst[batch_id * (head_num * seq_len * size_per_head) + seq_id * head_num * size_per_head
    + head_id * size_per_head + threadIdx.x] = src[blockIdx.x * size_per_head + threadIdx.x];
}
对于 half 来说,采用和 add_QKV_bias 一样的优化方式,每个 block 处理 4 个sequence。具体来说,就是现在启动 batch_size * head_num * seq_len / 4 个 Block, 每个 Block 使用 2 * size_per_head 个线程处理 4 个序列。为什么 2 * size_per_head 个线程可以处理 4 个序列(一个序列对应 size_per_head 个元素),原因是因为使用了 half2 来做数据读取。half 类型的 kernel 实现如下:
  __inline__ __device__
int target_index(int id1, int id2, int id3, int id4, int dim_1, int dim_2, int dim_3, int dim_4)
{
  return id1 * (dim_2 * dim_3 * dim_4) + id3 * (dim_2 * dim_4) + id2 * dim_4 + id4;
}

template<>
  __global__
void transpose(__half* src, __half* dst,
    const int batch_size, const int seq_len, const int head_num, const int size_per_head)
{
  int tid = blockIdx.x * blockDim.x + threadIdx.x;

  int batch_id = tid / (head_num * seq_len * size_per_head);
  int head_id = (tid % (head_num * seq_len * size_per_head)) / (seq_len * size_per_head);
  int seq_id = (tid % (seq_len * size_per_head)) / size_per_head;
  int id = tid % size_per_head;

  int target_id = target_index(batch_id, head_id, seq_id, id, batch_size, head_num, seq_len, size_per_head);
  half2* src_ptr = (half2*)src;
  half2* dst_ptr = (half2*)dst;

  dst_ptr[target_id] = src_ptr[tid];
}
trt_add_QKV_bias 和 TensorRT fused multi-head attention kernel
实际上从 Figure1 也可以看出我们上面讲到的 batch GEMM,softmax, GEMM,transpose 等操作都可以被合成一个超大的 cuda kernel,进一步进行优化,也就是这里的 TensorRT fused multi-head attention kernel。这个是将 TensorRT 的这个插件作为第三方仓库引入到 FasterTransformer 进行加速的,具体的代码我没有研究过,这里就不展开了。给一下这个插件在 FasterTransformer 中使用的位置: https://github.com/NVIDIA/FasterTransformer/blob/main/src/fastertransformer/layers/attention_layers/FusedAttentionLayer.cu#L174-L182 。
现在 MultiHeadAttention 部分涉及到的优化其实就讲完了,我们接着看一下FasterTransformer 对 BERT Encoder 的其它部分的优化。我们这里贴一下 Transformer 的结构图:
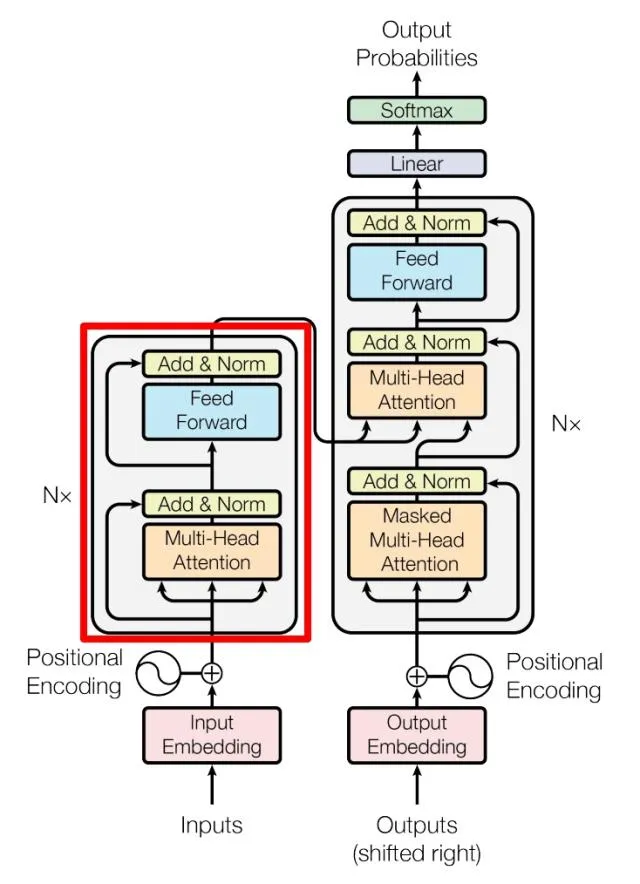
在 MultiHeadAttention 的后面接了一个 Add & Norm,这里的 Add 其实就是残差,Norm 就是 LayerNorm。所以 Encoder 部分的两个 Add & Norm 可以总结为:

add_bias_input_layernorm
这里的 LayerNorm(X + MultiHeadAttention(X)) 就对应了 FasterTransformer 里面的 add_bias_input_layernorm 这个优化,代码见:https://github.com/NVIDIA/FasterTransformer/blob/release/v1.0_tag/fastertransformer/cuda/cuda_kernels.cu#L125-L151 。
实际上 layernorm 在 oneflow 也有比 Faster Transformer 更好的 kernel,大家可以看一看:https://zhuanlan.zhihu.com/p/443026261 。
对于 softmax 和 layernorm 我还没看 FasterTransformer 的源码,后续研究了之后再分享。
总的来说就是 add_bias_input_layernorm 这个优化把残差连接和LayerNorm fuse到一起了,性能更好并且降低了kernel launch的开销。
add_bias_act
在上图的 Feed Forward 的实现中,还有一个 bias_add 和 gelu 激活函数挨着的 pattern ,所以 FasterTransformer 实现了这个 add_bias_act kernel 将两个操作融合起来,常规操作。在 FasterTransformer 中的对应的代码实现在:https://github.com/NVIDIA/FasterTransformer/blob/release/v1.0_tag/fastertransformer/cuda/cuda_kernels.cu#L75-L121 。
番外
除了上述优化技巧之外,在文档的 https://github.com/NVIDIA/FasterTransformer/blob/main/docs/bert_guide.md#how-to-use 这一节可以观察到,我们可以为 BERT 模型在我们的GPU上试跑 GEMM,并且保存 GEMM 性能最高的超参数配置,这个对于 cublas 和 cutlass 实现的卷积应该都是成立的。
另外我观察到在 Faster Transformer 的cuda kernel实现中,大量应用了__ldg这个指令,查了一下资料说这个是只读缓存指令,在读地址比较分散的情况下,这个只读缓存比L1的表现要好,对一些带宽受限的kernel有性能提升。后续有空继续研究下…

总结
我这边从文档上初步看的东西也就这么多,后续可能会继续研究学习下Faster Transformer的softmax/layernorm实现,或者解读一下其它Transformer架构的优化技巧。
