目录
11.4 SpringAMQP
11.4.2 Work Queue工作队列
11.4.3 发布订阅模型
11.4.4 FanoutExchange(广播交换机)
11.4.5 DirectExchange(路由模式交换机)
11.4.6 TopicExchange
11.5 消息转换器
11.4 SpringAMQP
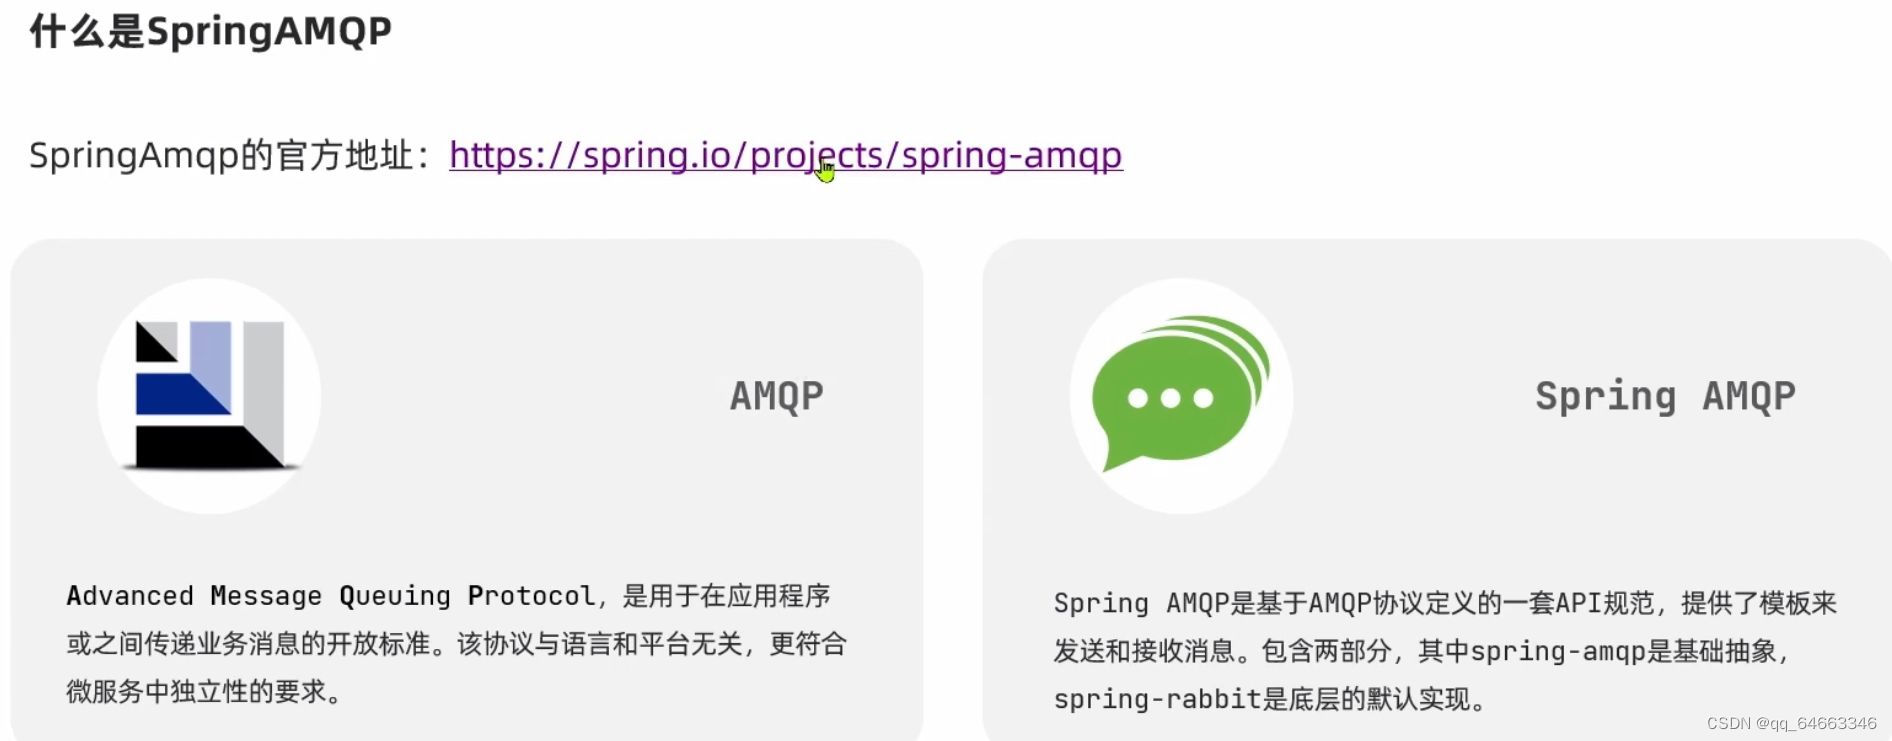
父工程引入AMQP依赖
          <!--AMQP依赖,包含RabbitMQ-->
          <dependency>
              <groupId>org.springframework.boot</groupId>
              <artifactId>spring-boot-starter-amqp</artifactId>
          </dependency>
编写测试方法
yml配置文件中编写配置
  spring:
    rabbitmq:
      host: 192.168.142.130   # rabbitmq的ip地址
      port: 5672  # 端口
      username: xxxxx
      password: xxxxxxx
      virtual-host: /
发消息测试
@SpringBootTest
public class AMQPTest {
@Autowired
private RabbitTemplate rabbitTemplate;
@Test
public void testSendMessage2SimpleQueue(){
String queueName = "simple.queue";
String message = "hello,spring amqp";
rabbitTemplate.convertAndSend(queueName,message);
}
}
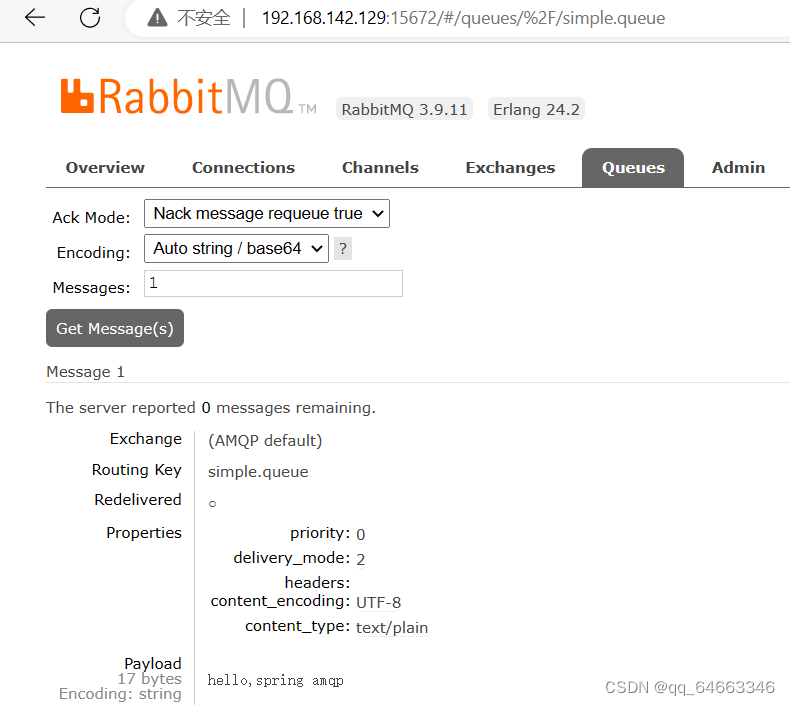
在consumer中编写消费逻辑,监听simple.queue
配置文件配置 :
  spring:
    rabbitmq:
      host: 192.168.142.129   # rabbitmq的ip地址
      port: 5672  # 端口
      username: xxxxx
      password: xxxxx
      virtual-host: /
编写监听类
  @Component
  public class SpringRabbitListener {
      @RabbitListener(queues = "simple.queue")
      public void ListenSimpleQueue(String msg){
          System.out.println("消费者接收到simple.queue的消息 : " + msg);
      }
  }
启动主启动类,控制台可看到输出的监听到的消息
消息一旦被消费,就会从队列中删除,没有回收机制
11.4.2 Work Queue工作队列
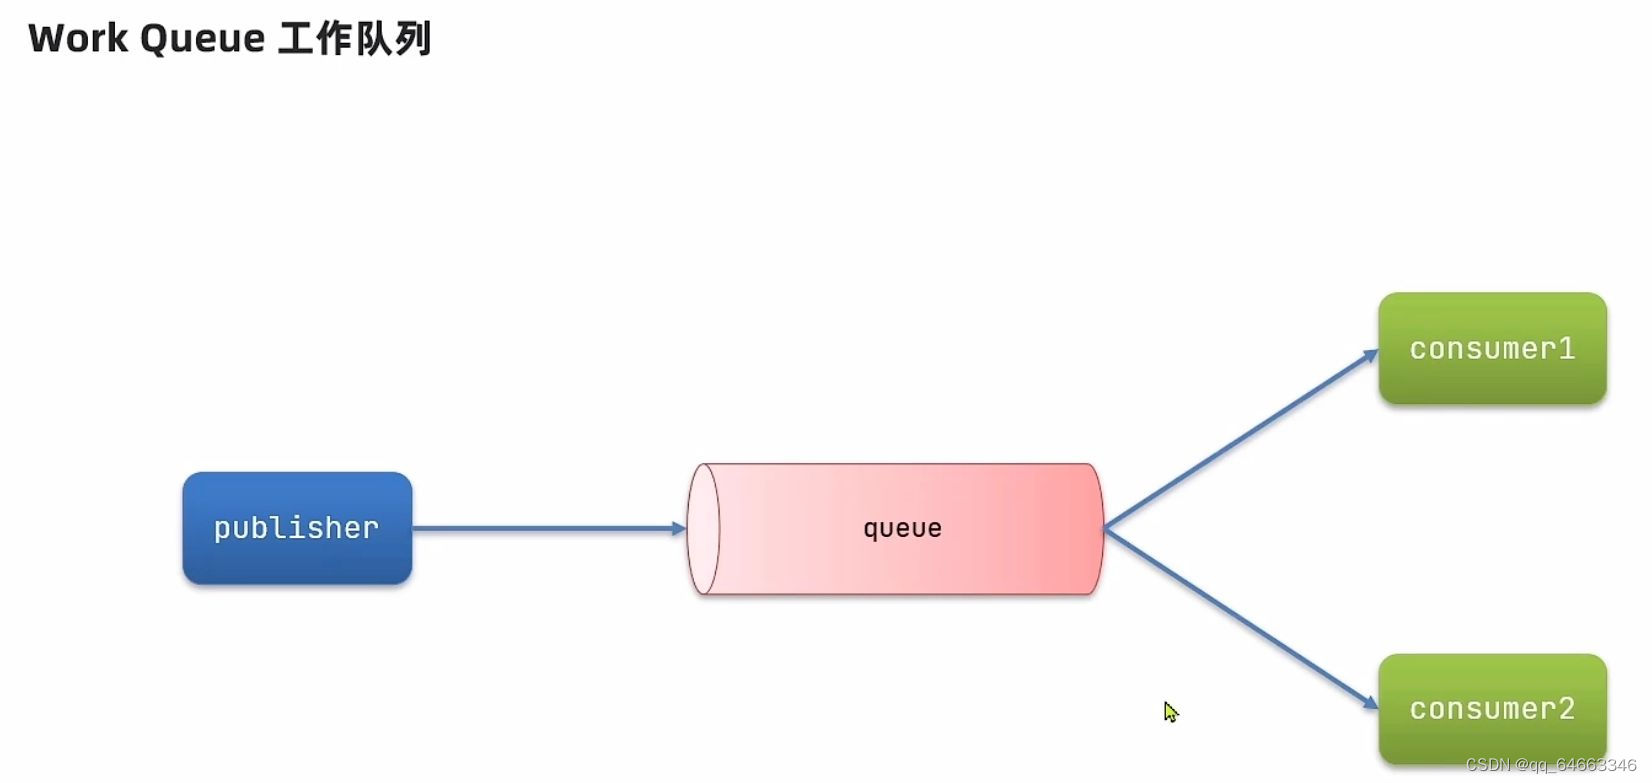

publisher代码
      @Test
      public void testSendMessage2WorkQueue() throws InterruptedException {
          String queueName = "simple.queue";
          String message = "hello,spring amqp__";
          for(int i = 1 ; i <= 50 ; i ++){
              rabbitTemplate.convertAndSend(queueName,message + i);
              Thread.sleep(20);
          }
      }
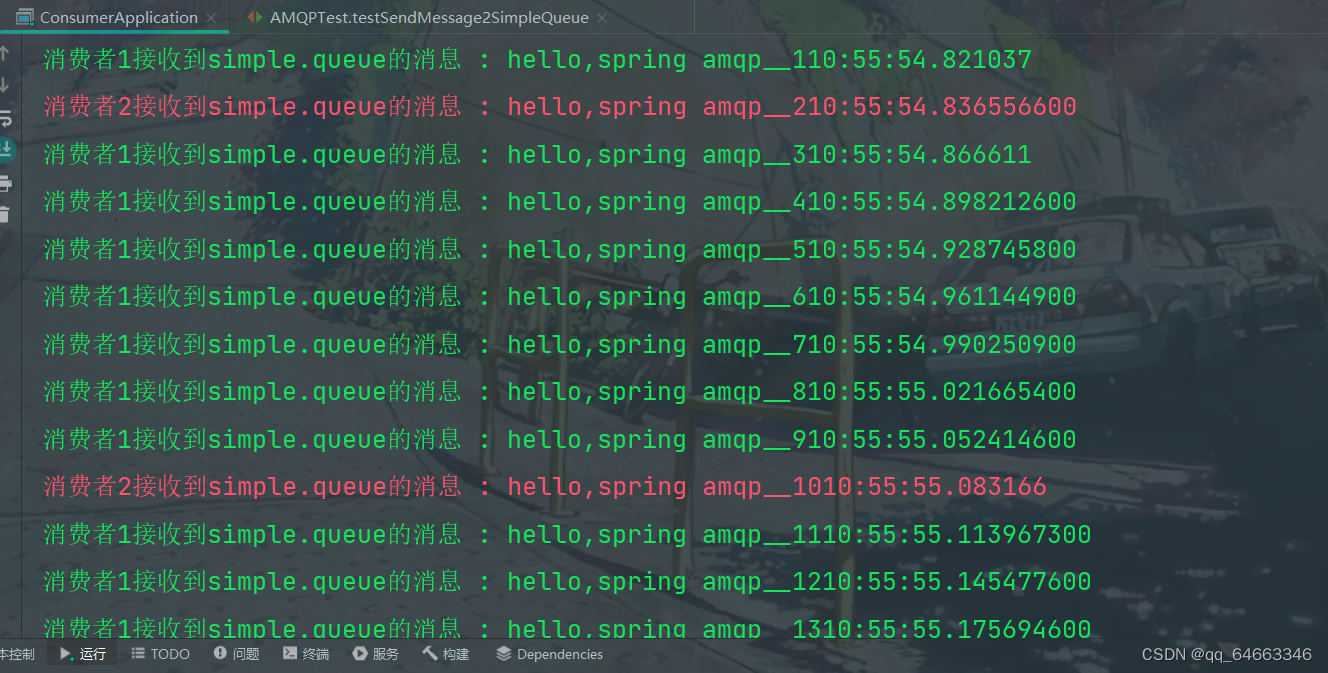
consumer接收消息
// 消费者1
@RabbitListener(queues = "simple.queue")
public void ListenWork1Queue(String msg) throws InterruptedException {
System.out.println("消费者1接收到simple.queue的消息 : " + msg + LocalTime.now());
Thread.sleep(20);
}
// 消费者2
@RabbitListener(queues = "simple.queue")
public void ListenWork2Queue(String msg) throws InterruptedException {
System.err.println("消费者2接收到simple.queue的消息 : " + msg + LocalTime.now());
Thread.sleep(200);
}
消息预取机制使得两者平均分配消息 不符预期
配置文件中 :
处理预取值
  spring:
    rabbitmq:
      host: 192.168.142.129   # rabbitmq的ip地址
      port: 5672  # 端口
      username: xxxxxx
      password: xxxxxxx
      virtual-host: /
      listener:
        simple:
          prefetch: 1    # 每次只能获取一条消息 ,处理完成才能获取下一个信息
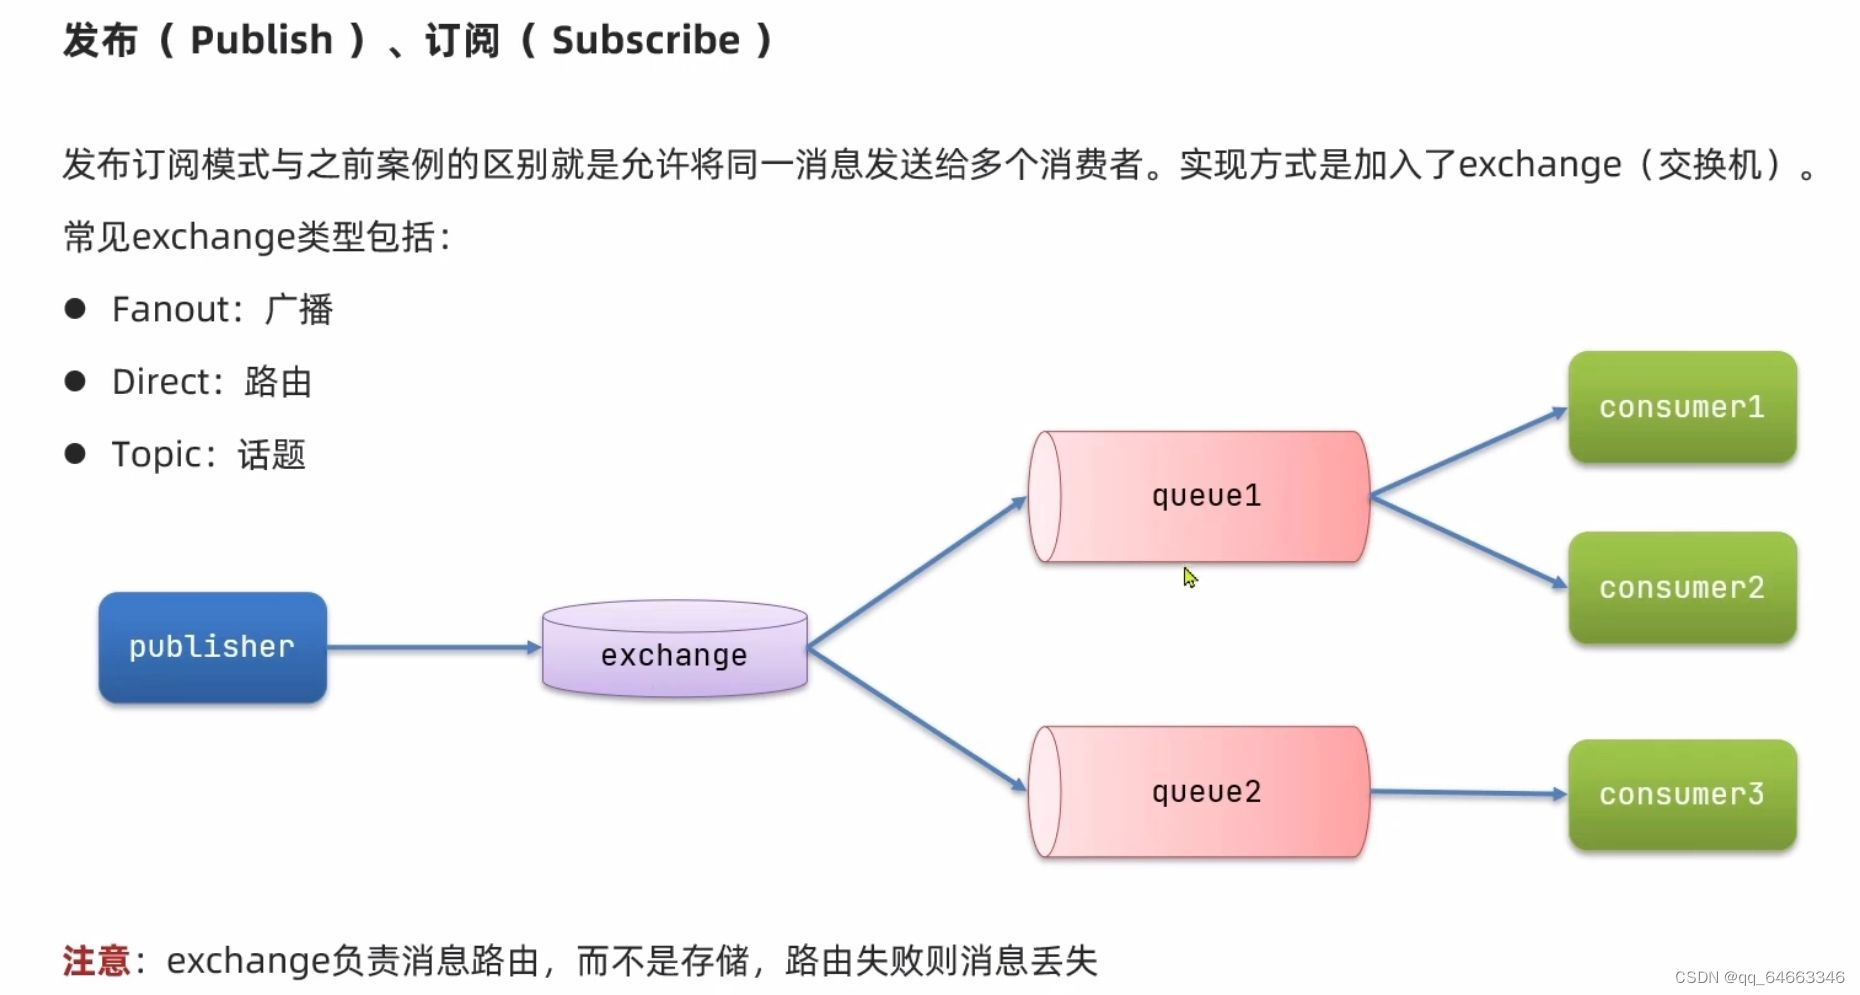
11.4.3 发布订阅模型
11.4.4 FanoutExchange(广播交换机)
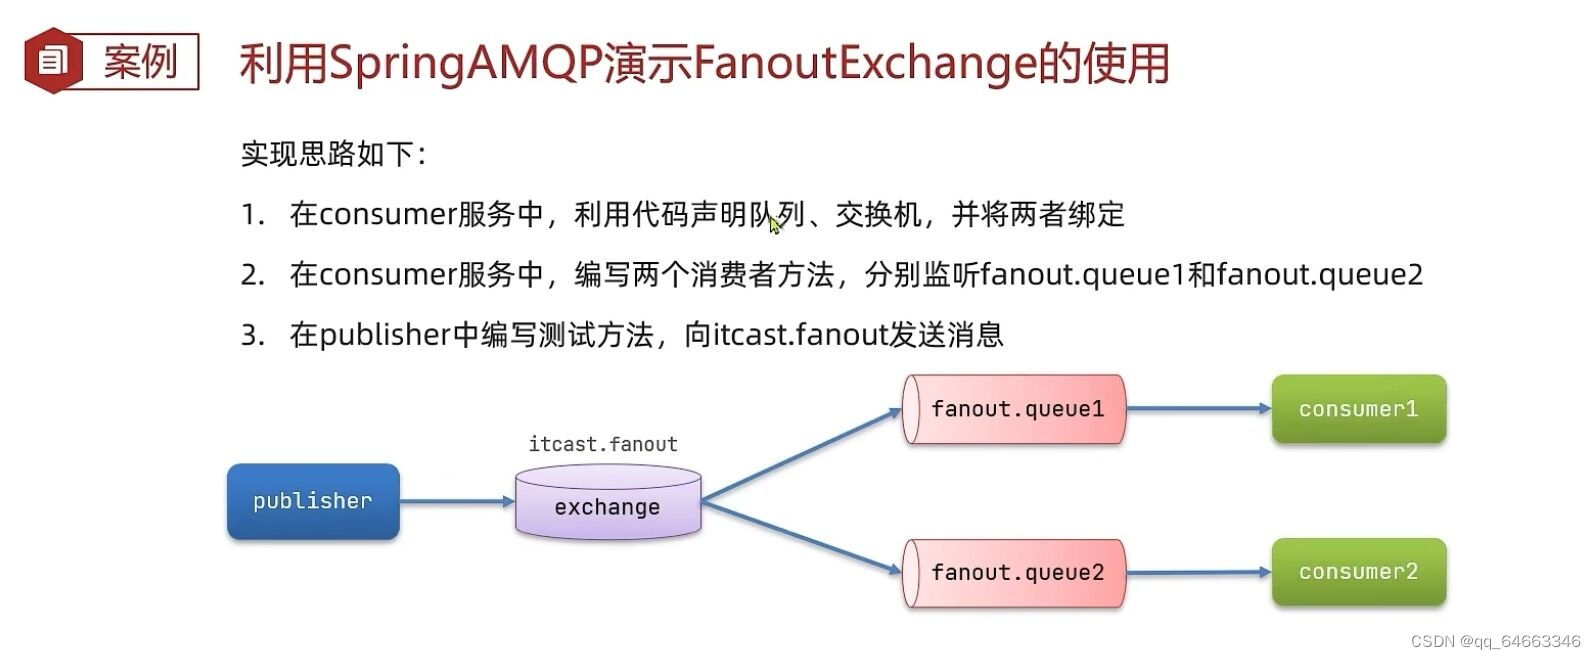
步骤一 : 声明交换机,队列 , 并绑定队列和交换机
在consumer中编写配置类
@Configuration
public class FanoutConfig {
// 声明交换机
@Bean
public FanoutExchange fanoutExchange(){
return new FanoutExchange("xinbo.fanout");
}
// 声明队列1
@Bean
public Queue fanoutQueue1(){
return new Queue("fanout.queue1");
}
// 绑定队列1到交换机
@Bean
public Binding fanoutBindind(Queue fanoutQueue1,FanoutExchange fanoutExchange){
return BindingBuilder
.bind(fanoutQueue1)
.to(fanoutExchange);
}
// 声明队列2
@Bean
public Queue fanoutQueue2(){
return new Queue("fanout.queue2");
}
// 绑定队列2到交换机
@Bean
public Binding fanoutBindind2(Queue fanoutQueue2,FanoutExchange fanoutExchange){
return BindingBuilder
.bind(fanoutQueue2)
.to(fanoutExchange);
}
}
消息监听 :
@Component
public class SpringRabbitListener {
// 消费者1
@RabbitListener(queues = "fanout.queue1")
public void ListenWork1Queue(String msg) throws InterruptedException {
System.out.println("消费者1接收到fanout.queue1的消息 : " + msg + LocalTime.now());
Thread.sleep(20);
}
// 消费者2
@RabbitListener(queues = "fanout.queue2")
public void ListenWork2Queue(String msg) throws InterruptedException {
System.err.println("消费者2接收到fanout.queue2的消息 : " + msg + LocalTime.now());
Thread.sleep(200);
}
}
消息发送 :
      @Test
      public void testSendFanoutExchange(){
          String exchangeName = "xinbo.fanout";               // 交换机名称
          String message = "hello,everyone";
          rabbitTemplate.convertAndSend(exchangeName,null,message);
      }
11.4.5 DirectExchange(路由模式交换机)
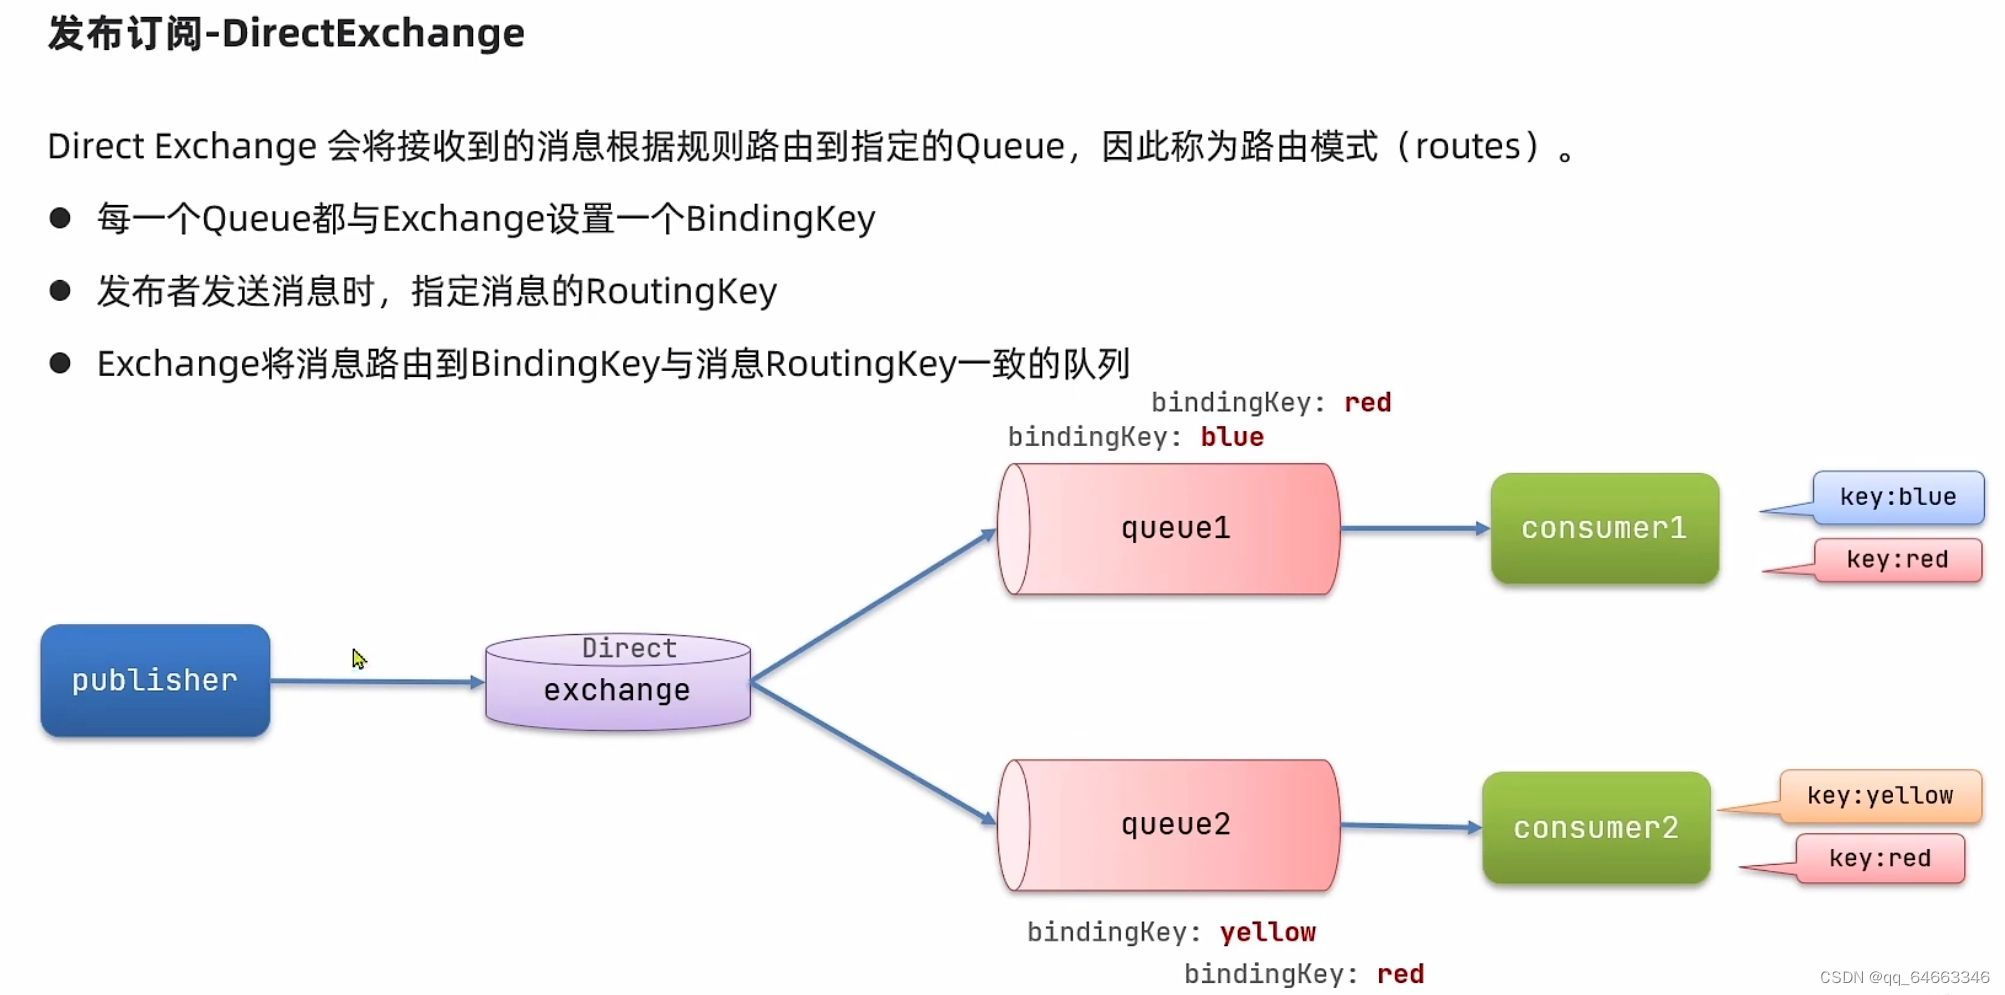
利用@RabbitListener声明Exchange Queue RoutingKey
SpirngRabbitListener中
@Component
public class SpringRabbitListener {
@RabbitListener(bindings = @QueueBinding(
value = @Queue(name = "direct.queue1"),
exchange = @Exchange(name = "xinbo.direct",type = ExchangeTypes.DIRECT),
key = {"red","blue"}
))
public void ListenDirectQueue1(String msg) throws InterruptedException {
System.out.println("消费者接收到direct.queue1的消息 : " + msg + LocalTime.now());
Thread.sleep(20);
}
@RabbitListener(bindings = @QueueBinding(
value = @Queue(name = "direct.queue2"),
exchange = @Exchange(name = "xinbo.direct",type = ExchangeTypes.DIRECT),
key = {"red","yellow"}
))
public void ListenDirectQueue2(String msg) throws InterruptedException {
System.out.println("消费者接收到direct.queue2的消息 : " + msg + LocalTime.now());
Thread.sleep(20);
}
}
发送消息测试 :
      @Test
      public void testSendDirectExchange(){
          // 交换机名称
          String exchangeName = "xinbo.direct";
          String message = "hello,blue";
          rabbitTemplate.convertAndSend(exchangeName,"blue",message);
      }
11.4.6 TopicExchange
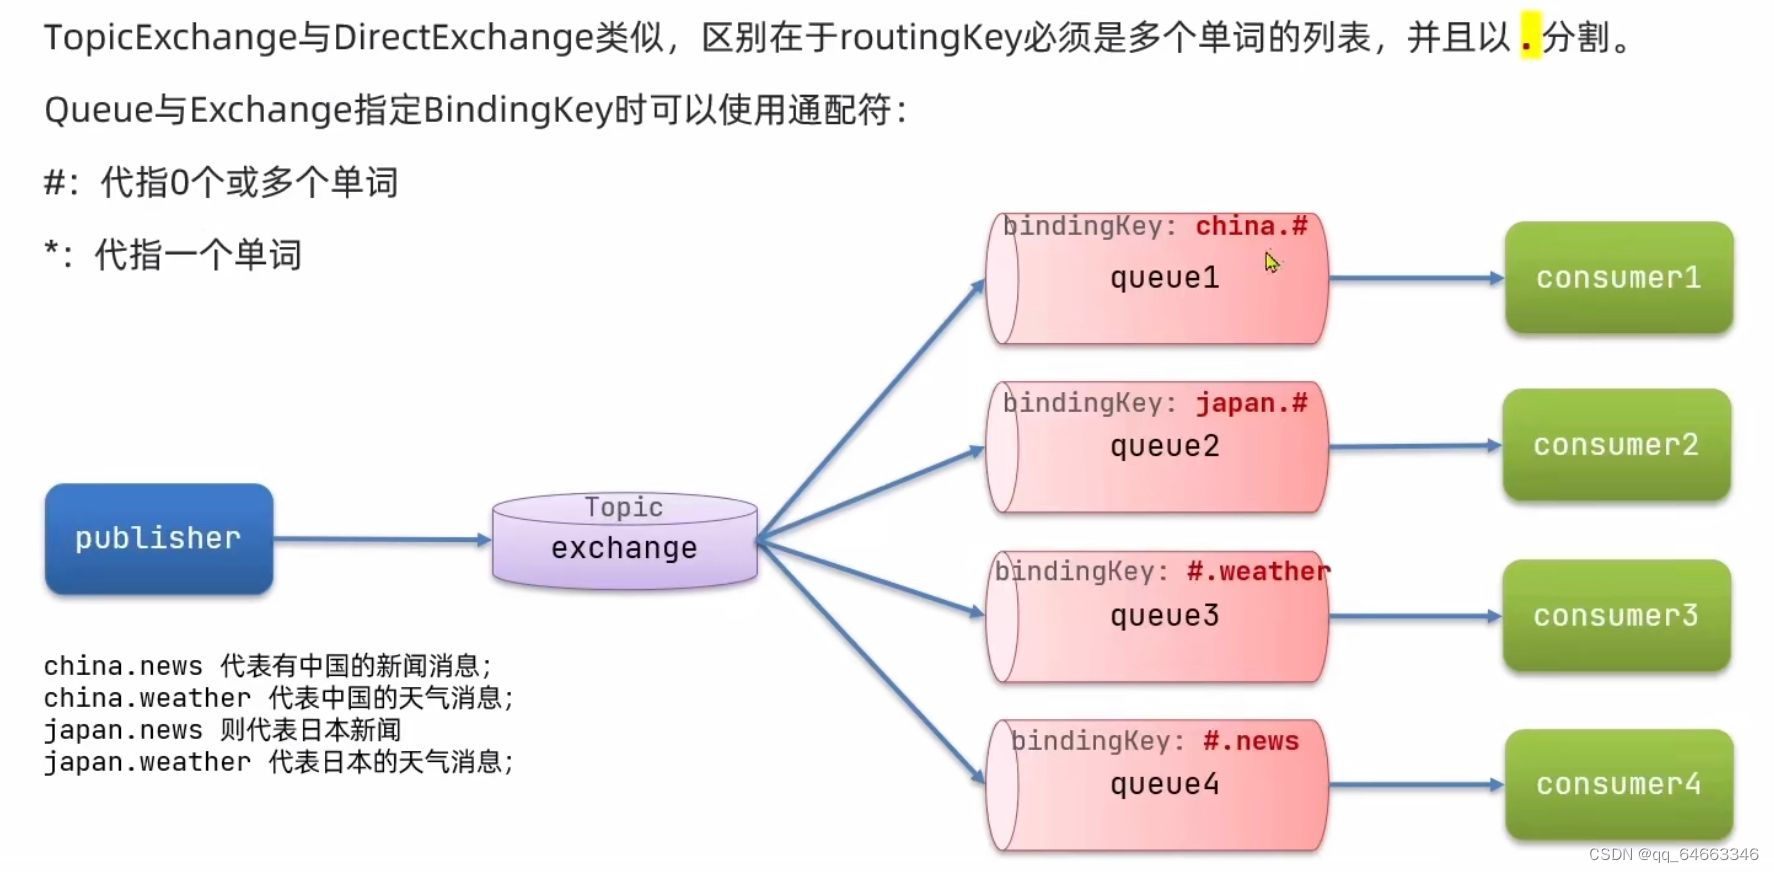
绑定队列和交换机的关系 :
@Component
public class SpringRabbitListener {
@RabbitListener(bindings = @QueueBinding(
value = @Queue(name = "topic.queue1"),
exchange = @Exchange(name="xinbo.topic",type = ExchangeTypes.TOPIC),
key = "china.#"
))
public void ListenTopicQueue1(String msg){
System.out.println("消费者接收到topic.queue1的消息 : " + msg + LocalTime.now());
}
@RabbitListener(bindings = @QueueBinding(
value = @Queue(name = "topic.queue2"),
exchange = @Exchange(name="xinbo.topic",type = ExchangeTypes.TOPIC),
key = "#.news"
))
public void ListenTopicQueue2(String msg){
System.out.println("消费者接收到topic.queue2的消息 : " + msg + LocalTime.now());
}
}
发送消息 :
      @Test
      public void testSendTopicExchange(){
          // 交换机名称
          String exchangeName = "xinbo.topic";
          String message = "中国发生了xxxxx";
          rabbitTemplate.convertAndSend(exchangeName,"china.news",message);
      }
11.5 消息转换器
发送和接受json类型的消息
添加依赖 :
          <dependency>
              <groupId>com.fasterxml.jackson.dataformat</groupId>
              <artifactId>jackson-dataformat-xml</artifactId>
          </dependency>
在配置类中
      @Bean
      public MessageConverter messageCondition(){
          return new Jackson2JsonMessageConverter();
      }
接收消息 :
引依赖 :同上
在Listener中 :
      @RabbitListener(queues = "object.queue")
      public void ListenObjectQueue(Map<String,Object> msg){
          System.out.println(msg);
      }
