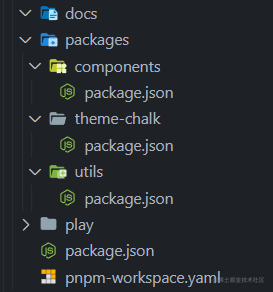
文章目录
- 前言
- 一、项目简介
- 二、项目技术栈
- 三、准备工作
- 1、Spring Boot 项目创建
- 2、mybatis 配置
- 3、数据库创建
- 四、基本框架搭建
- 1、实体层(model)
- 2、控制器层(controller)
- 3、服务层(service)
- 4、持久层(mapper)
- 5、工具层(common)
- ① 统一数据返回
- ② 统一异常处理
- 五、引入前端页面
- 六、具体功能实现
- 1、注册
- ① 前端页面
- ② 后端代码
- Ⅰ. 数据库
- Ⅱ. 服务层
- Ⅲ. 控制层
- ③ 效果演示
- 2、登录
- ① 前端页面
- ② 后端代码(基础功能)
- Ⅰ. 数据库
- Ⅱ. 服务层
- Ⅲ. 控制层
- ③ 效果演示
- ④ 后端代码(拦截器/存储session)
- Ⅰ. 添加常量类
- Ⅱ. 控制层
- Ⅲ. 拦截器
- 3、博客列表
- ① 前端页面
- ② 后端代码(退出登录)
- Ⅰ. 控制层
- Ⅱ. 效果演示
- a. 已登录
- b. 未登录
- ③ 后端代码(个人博客显示)
- Ⅰ. 数据库
- Ⅱ. 服务层
- Ⅲ. 控制层
- Ⅳ. 效果演示
- ④ 后端代码(个人信息)
- Ⅰ. 控制层
- Ⅱ. 效果演示
- 4、文章查询
- ① 前端页面
- ② 后端代码(文章展示)
- Ⅰ. 数据库
- Ⅱ. 服务层
- Ⅲ. 控制层
- Ⅳ. 拦截器
- Ⅴ. 效果演示
- ③ 后端代码(作者信息)
- Ⅰ. 数据库
- Ⅱ. 服务层
- Ⅲ. 控制层
- Ⅳ. 效果演示
- 5、文章修改
- ① 前端页面
- ② 后端代码(查询文章)
- Ⅰ. 工具层
- Ⅱ. 控制层
- Ⅲ. 效果演示
- ③ 后端代码(修改文章)
- Ⅰ. 数据库
- Ⅱ. 服务层
- Ⅲ. 控制层
- Ⅳ. 效果演示
- 6、文章删除
- ① 前端页面
- ② 后端代码
- Ⅰ. 数据库
- Ⅱ. 服务层
- Ⅲ. 控制层
- ③ 效果演示
- 7、发布文章
- ① 前端页面
- ② 后端代码
- Ⅰ. 数据库
- Ⅱ. 服务层
- Ⅲ. 控制层
- ③ 效果演示
- 8、文章分页列表
- ① 前端页面
- ② 后端代码(分页功能)
- Ⅰ. 数据库
- Ⅱ. 服务层
- Ⅲ. 控制层
- Ⅳ. 拦截器
- Ⅴ. 效果演示
- ③ 后端代码(尾页功能)
- Ⅰ. 数据库
- Ⅱ. 服务层
- Ⅲ. 控制层
- Ⅳ. 拦截器
- Ⅴ. 效果演示
- 9、密码加盐
- ① 工具类
- ② 具体实现
- Ⅰ. 数据库
- Ⅱ. 服务层
- Ⅲ. 控制层
- ③ 效果演示
- 总结
前言
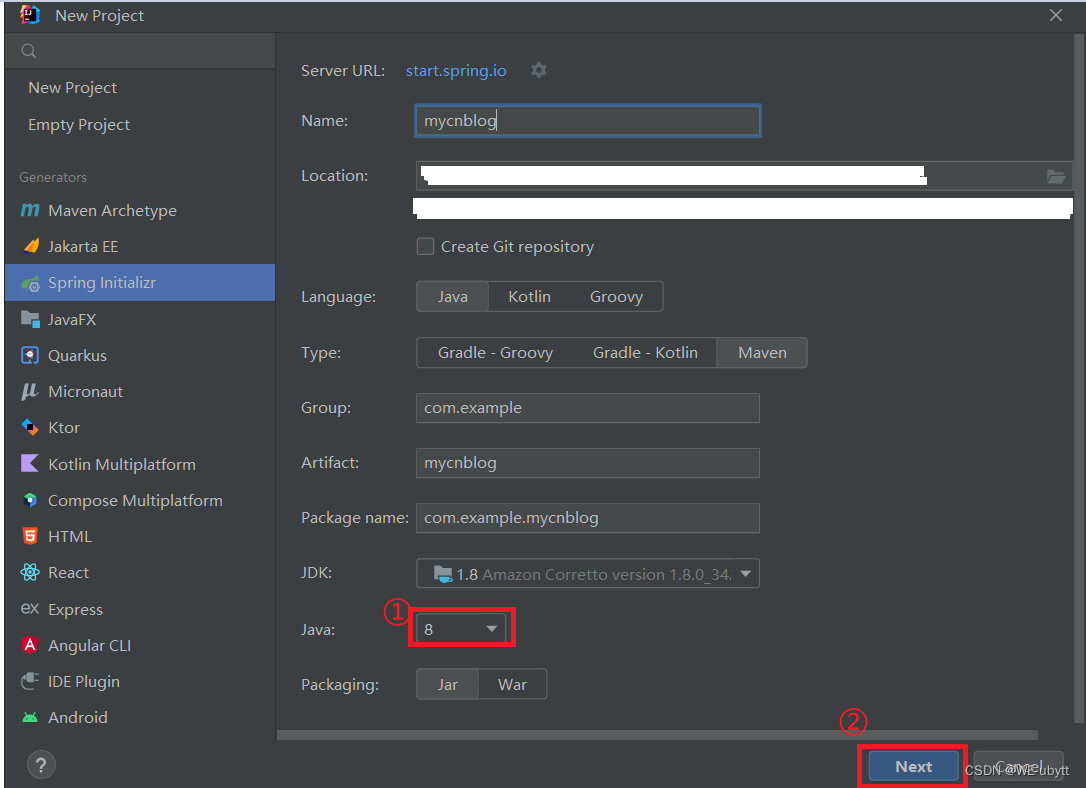
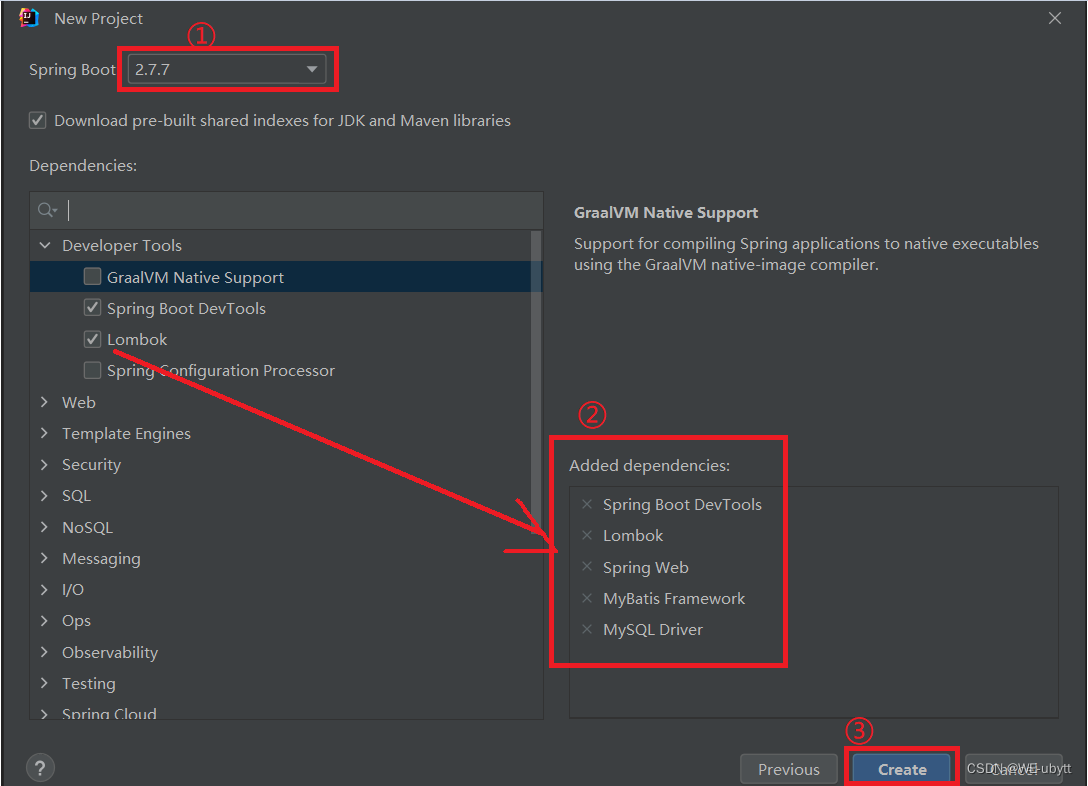
本次项目,完全从 0 到 1,从创建项目开始手把手教程,源码地址:个人博客
一、项目简介
基本功能:
- 框架升级:SSM
- 密码升级:明文存储/md5存储 -> 加盐处理
- 用户登录状态持久化升级:session内存 -> 持久化到Redis/MySQL
- 功能升级:分页功能
- 使用拦截器升级用户登录验证
二、项目技术栈
前端:HTML + CSS + JS + Jquery
后端: Spring MVC + Spring Boot + Mybatis + Redis
数据库: MySQL
开发环境:Windows 10 、IDEA
项目构建工具: maven
三、准备工作
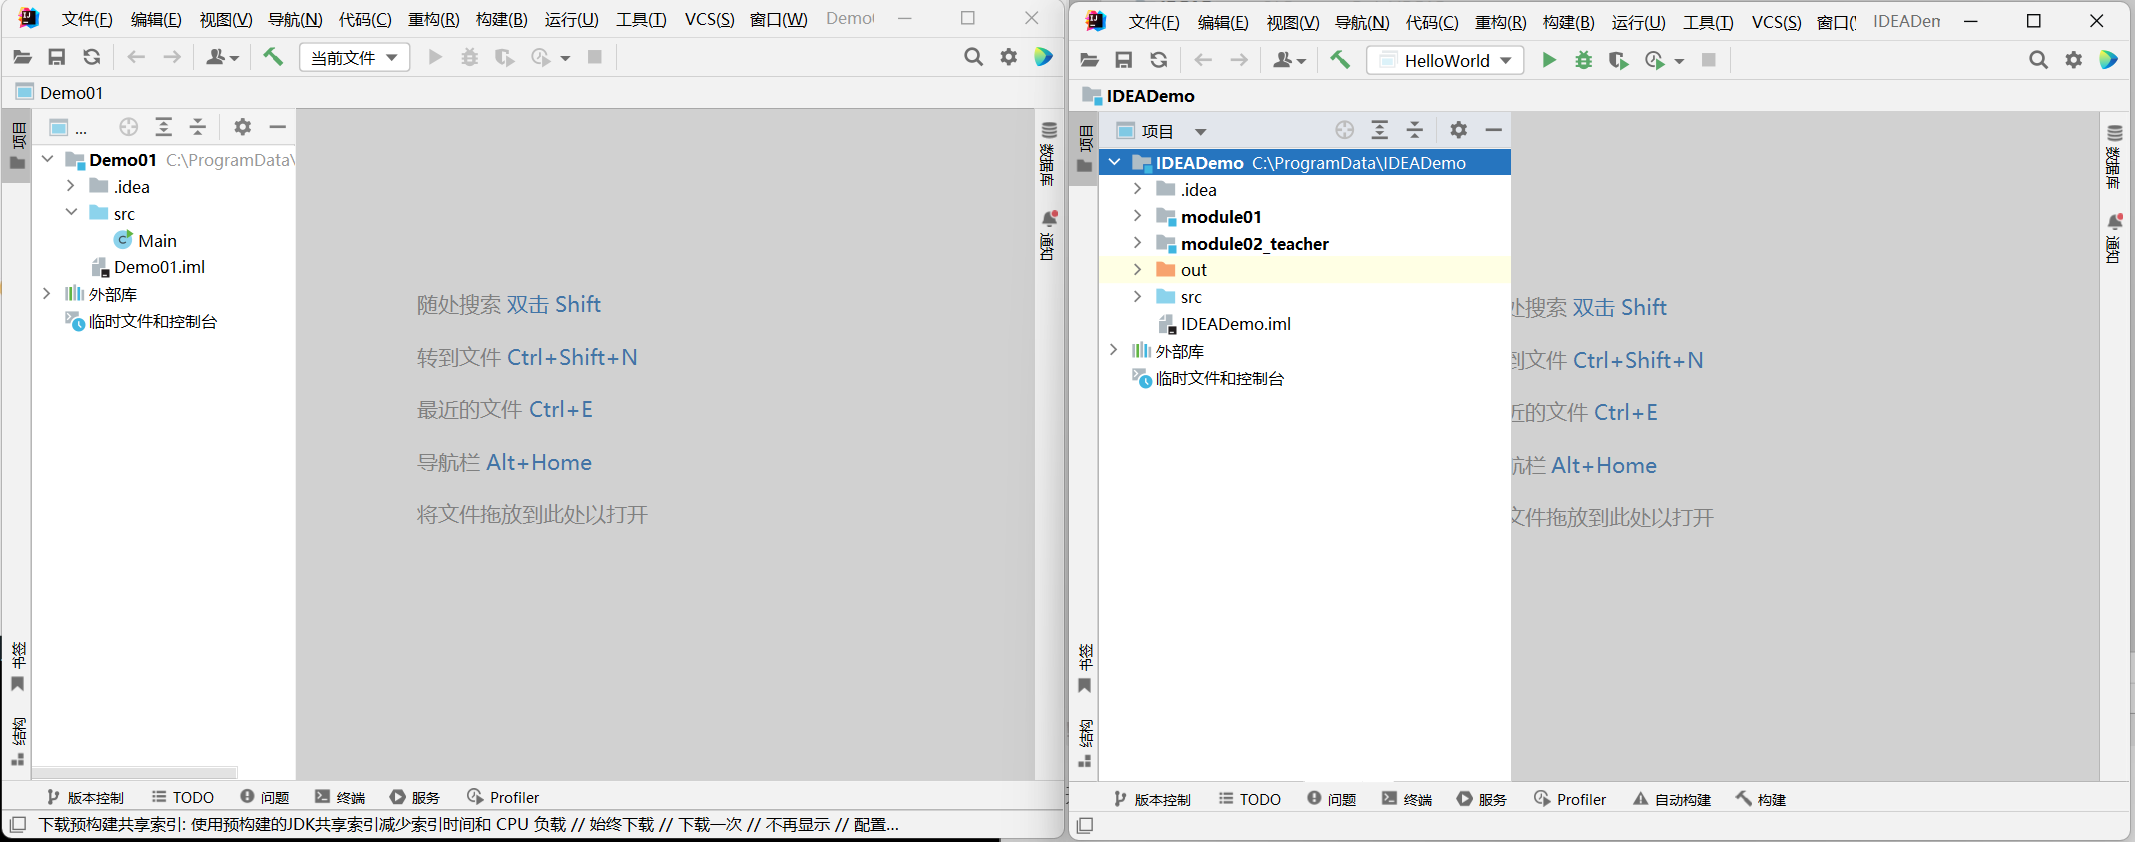
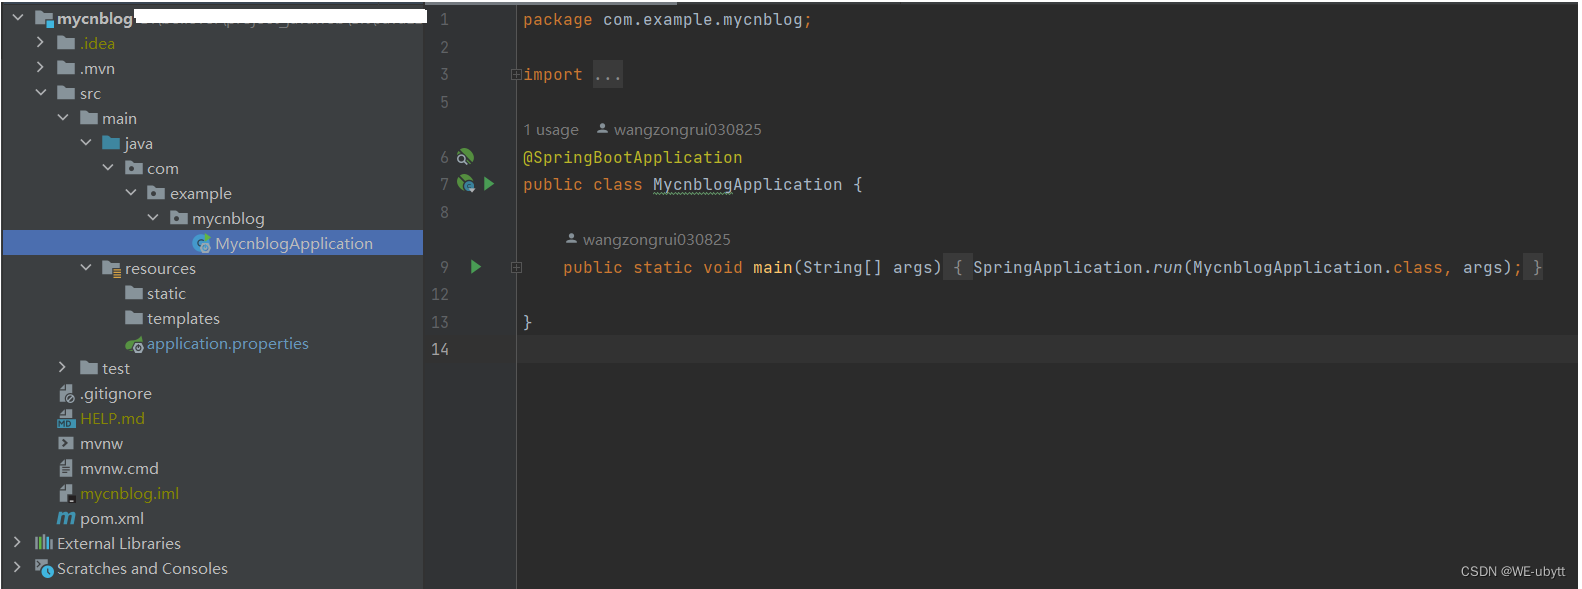
1、Spring Boot 项目创建
创建完成是这样的:
2、mybatis 配置
在 resource 下面创建 application.yml

在 application.yml 中添加 mybatis 配置:
# 配置数据库的连接字符串
spring:
  datasource:
    url: jdbc:mysql://localhost:3306/mycnblog?characterEncoding=utf8
    username: root
    password: 12345678
    driver-class-name: com.mysql.cj.jdbc.Driver
# 设置 Mybatis 的 xml 保存路径
mybatis:
  mapper-locations: classpath:mapper/**Mapper.xml
  configuration: # 配置打印 MyBatis 执行的 SQL
    log-impl: org.apache.ibatis.logging.stdout.StdOutImpl
# 配置打印 MyBatis 执行的 SQL
logging:
  level:
    com:
      example:
        demo: debug
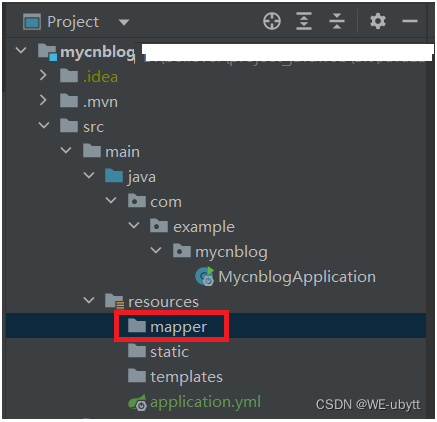
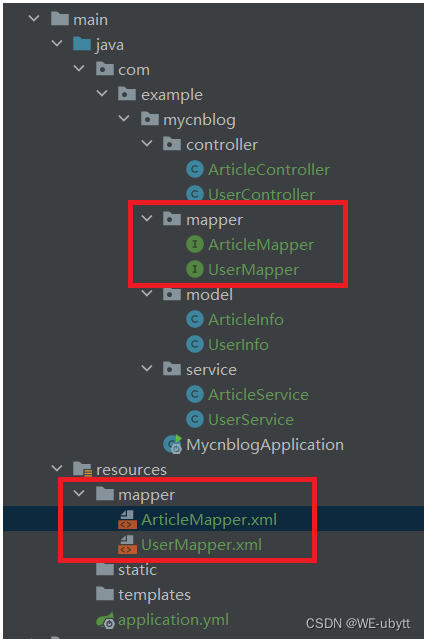
在 resource 下面创建 mapper 包:
3、数据库创建
SQL:
-- 创建数据库
drop database if exists mycnblog;
create database mycnblog DEFAULT CHARACTER SET utf8mb4;

-- 使用数据数据
use mycnblog;

-- 创建表[用户表]
drop table if exists userinfo;
create table userinfo(
    id int primary key auto_increment,
    username varchar(100) not null UNIQUE,
    password varchar(64) not null,
    photo varchar(500) default '',
    createtime datetime default now(),
    updatetime datetime default now(),
    `state` int default 1
) default charset 'utf8mb4';

-- 创建文章表
drop table if exists  articleinfo;
create table articleinfo(
    id int primary key auto_increment,
    title varchar(100) not null,
    content text not null,
    createtime datetime default now(),
    updatetime datetime default now(),
    uid int not null,
    rcount int not null default 1,
    `state` int default 1
)default charset 'utf8mb4';

-- 添加一个用户信息
INSERT INTO `mycnblog`.`userinfo` (`id`, `username`, `password`, `photo`, `createtime`, `updatetime`, `state`) VALUES
(1, 'admin', 'admin', '', '2021-12-06 17:10:48', '2021-12-06 17:10:48', 1);

-- 文章添加测试数据
insert into articleinfo(title,content,uid)
    values('Java','Java正文',1);
四、基本框架搭建
1、实体层(model)
实体层就直接实现了,就两个表对应的实体类
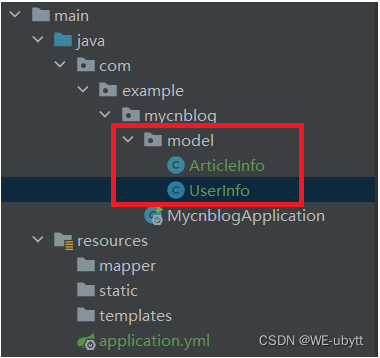
UserInfo:
package com.example.mycnblog.model;

import lombok.Data;

@Data
public class UserInfo {
    /**
     * 用户id
     */
    private Integer id;
    /**
     * 用户名
     */
    private String username;
    /**
     * 密码
     */
    private String password;
    /**
     * 电话号码
     */
    private String photo;
    /**
     * 创建时间
     */
    private String createTime;
    /**
     * 修改时间
     */
    private String updateTime;
    /**
     * 状态
     */
    private Integer state;
}
ArticleInfo:
package com.example.mycnblog.model;

import lombok.Data;

@Data
public class ArticleInfo {
    /**
     * 文章id
     */
    private Integer id;
    /**
     * 标题
     */
    private String title;
    /**
     * 正文
     */
    private String content;
    /**
     * 创建时间
     */
    private String createTime;
    /**
     * 修改时间
     */
    private String updateTime;
    /**
     * 发布文章的uid
     */
    private Integer uid;
    /**
     * 访问量
     */
    private Integer rcount;
    /**
     * 状态
     */
    private Integer state;
}
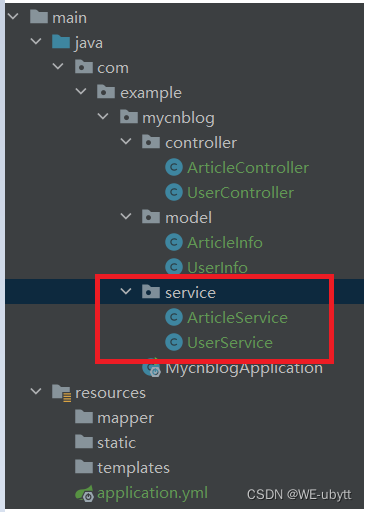
2、控制器层(controller)
控制层,具体内容等功能实现的时候再来完善
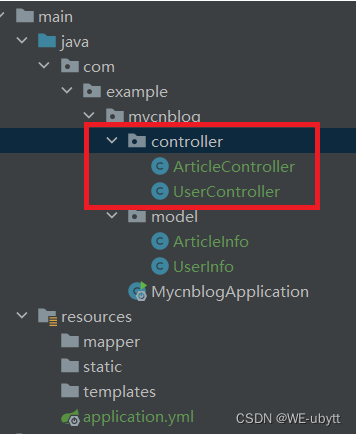
UserController:
package com.example.mycnblog.controller;

import org.springframework.web.bind.annotation.RequestMapping;
import org.springframework.web.bind.annotation.RestController;

/**
 * 用户控制器
 */
@RestController
@RequestMapping("/user")
public class UserController {

}
ArticleController:
package com.example.mycnblog.controller;

import org.springframework.web.bind.annotation.RequestMapping;
import org.springframework.web.bind.annotation.RestController;

/**
 * 文章控制器
 */
@RestController
@RequestMapping("/art")
public class ArticleController {

}
3、服务层(service)
服务层,具体内容之后完善
UserService:
package com.example.mycnblog.service;

import org.springframework.stereotype.Service;

/**
 * 用户表的服务层
 */
@Service
public class UserService {

}
ArticleService:
package com.example.mycnblog.service;

import org.springframework.stereotype.Service;

/**
 * 文章表的服务层
 */
@Service
public class ArticleService {

}
4、持久层(mapper)
持久层,具体内容之后完善
UserMapper:
package com.example.mycnblog.mapper;

import org.apache.ibatis.annotations.Mapper;

/**
 * 用户表的 mapper
 */
@Mapper
public interface UserMapper {

}
ArticleMapper:
package com.example.mycnblog.mapper;

import org.apache.ibatis.annotations.Mapper;

/**
 * 文章表的 mapper
 */
@Mapper
public interface ArticleMapper {

}
UserMapper.xml:
<?xml version="1.0" encoding="UTF-8"?>
<!DOCTYPE mapper PUBLIC "-//mybatis.org//DTD Mapper 3.0//EN" "http://mybatis.org/dtd/mybatis-3-mapper.dtd">
<mapper namespace="com.example.mycnblog.mapper.UserMapper">

</mapper>
ArticleMapper.xml:
<?xml version="1.0" encoding="UTF-8"?>
<!DOCTYPE mapper PUBLIC "-//mybatis.org//DTD Mapper 3.0//EN" "http://mybatis.org/dtd/mybatis-3-mapper.dtd">
<mapper namespace="com.example.mycnblog.mapper.ArticleMapper">

</mapper>
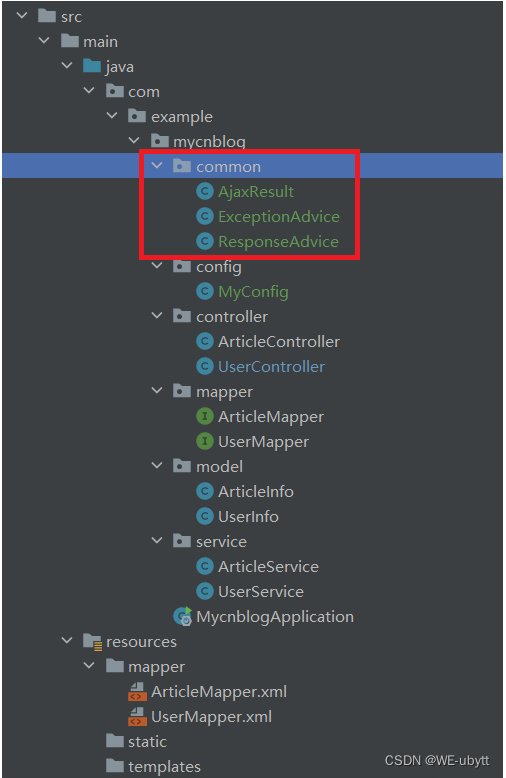
5、工具层(common)
工具层,主要是一些统一处理(返回的数据类型,异常等等)
① 统一数据返回
AjaxResult:
package com.example.mycnblog.common;

import java.util.HashMap;

/**
 * 自定义的统一返回对象
 */
public class AjaxResult {

    /**
     * 业务执行成功时,返回的数据格式
     *
     * @param data
     * @return
     */
    public static HashMap<String, Object> success(Object data) {
        HashMap<String, Object> result = new HashMap<>();
        result.put("code", 200);
        result.put("msg", "");
        result.put("data", data);
        return result;
    }

    /**
     * 业务执行成功时,返回的数据格式
     *
     * @param msg
     * @param data
     * @return
     */
    public static HashMap<String, Object> success(String msg, Object data) {
        HashMap<String, Object> result = new HashMap<>();
        result.put("code", 200);
        result.put("msg", msg);
        result.put("data", data);
        return result;
    }

    /**
     * 业务执行失败时,返回的数据格式
     *
     * @param code
     * @param msg
     * @return
     */
    public static HashMap<String, Object> fail(int code, String msg) {
        HashMap<String, Object> result = new HashMap<>();
        result.put("code", code);
        result.put("msg", msg);
        result.put("data", "");
        return result;
    }

    /**
     * 业务执行失败时,返回的数据格式
     *
     * @param code
     * @param msg
     * @param data
     * @return
     */
    public static HashMap<String, Object> fail(int code, String msg, Object data) {
        HashMap<String, Object> result = new HashMap<>();
        result.put("code", code);
        result.put("msg", msg);
        result.put("data", data);
        return result;
    }
}
这个地方在做统一返回的时候需要注意一下 String 类的情况
ResponseAdvice:
package com.example.mycnblog.common;

import com.fasterxml.jackson.databind.ObjectMapper;
import lombok.SneakyThrows;
import org.springframework.core.MethodParameter;
import org.springframework.http.MediaType;
import org.springframework.http.server.ServerHttpRequest;
import org.springframework.http.server.ServerHttpResponse;
import org.springframework.web.bind.annotation.ControllerAdvice;
import org.springframework.web.servlet.mvc.method.annotation.ResponseBodyAdvice;

import java.util.HashMap;

/**
 * 统一数据返回封装
 */
@ControllerAdvice
public class ResponseAdvice implements ResponseBodyAdvice {
    @Override
    public boolean supports(MethodParameter returnType, Class converterType) {
        return true;
    }

    @SneakyThrows
    @Override
    public Object beforeBodyWrite(Object body, MethodParameter returnType, MediaType selectedContentType, Class selectedConverterType, ServerHttpRequest request, ServerHttpResponse response) {

        if(body instanceof HashMap){ // 本身已经是封装好的对象
            return body;
        }

        if (body instanceof String) { // 返回类型是 string 类
            ObjectMapper objectMapper = new ObjectMapper();
            return objectMapper.writeValueAsString(AjaxResult.success(body));
        }

        return AjaxResult.success(body);
    }
}
② 统一异常处理
这里还可以具体到各个异常
ExceptionAdvice:
package com.example.mycnblog.common;

import org.springframework.web.bind.annotation.ControllerAdvice;
import org.springframework.web.bind.annotation.ExceptionHandler;
import org.springframework.web.bind.annotation.ResponseBody;

/**
 * 异常类的统一处理
 */
@ControllerAdvice
@ResponseBody
public class ExceptionAdvice {

    @ExceptionHandler(Exception.class)
    public Object exceptionAdvice(Exception e) {
        return AjaxResult.fail(-1, e.getMessage());
    }
}
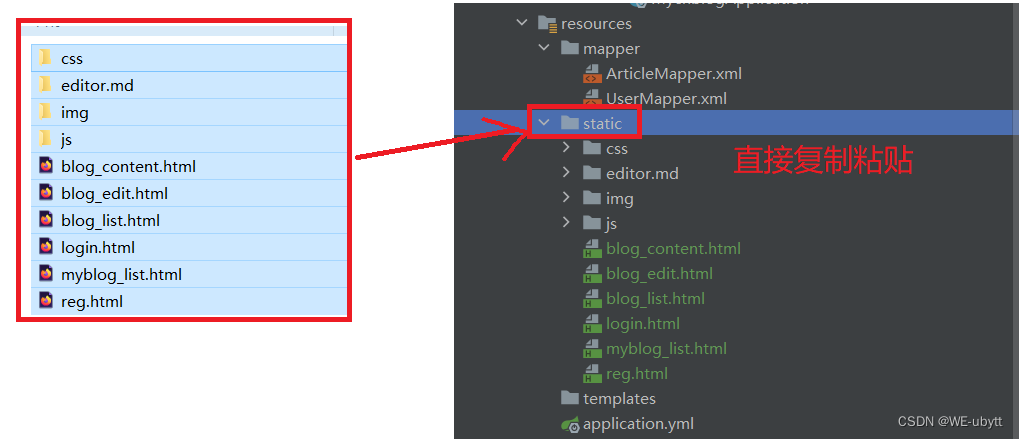
五、引入前端页面
直接将我们提前准备好的前端页面直接复制粘贴到 /resource/static 目录下:
六、具体功能实现
1、注册
① 前端页面
reg.html:
<!DOCTYPE html>
<html lang="en">

<head>
    <meta charset="UTF-8">
    <meta http-equiv="X-UA-Compatible" content="IE=edge">
    <meta name="viewport" content="width=device-width, initial-scale=1.0">
    <title>注册页面</title>
    <link rel="stylesheet" href="css/conmmon.css">
    <link rel="stylesheet" href="css/login.css">
    <!-- 引入 jQuery -->
    <script src="js/jquery.min.js"></script>
</head>

<body>
<!-- 导航栏 -->
<div class="nav">
    <img src="img/logo2.jpg" alt="">
    <span class="title">我的博客系统</span>
    <!-- 用来占据中间位置 -->
    <span class="spacer"></span>
    <a href="blog_list.html">主页</a>
    <a href="blog_edit.html">写博客</a>
    <a href="login.html">登陆</a>
    <!-- <a href="#">注销</a> -->
</div>
<!-- 版心 -->
<div class="login-container">
    <!-- 中间的注册框 -->
    <div class="login-dialog">
        <h3>注册</h3>
        <div class="row">
            <span>用户名</span>
            <input type="text" id="username">
        </div>
        <div class="row">
            <span>密码</span>
            <input type="password" id="password">
        </div>
        <div class="row">
            <span>确认密码</span>
            <input type="password" id="password2">
        </div>
        <div class="row">
            <button id="submit" onclick="mysub()">提交</button>
        </div>
    </div>
</div>
</body>
<script>
    function mysub() {
        // 1.非空效验
        var username = jQuery("#username");
        var password = jQuery("#password");
        var password2 = jQuery("#password2");
        if (username.val() == "") {
            alert("请先输入用户名!");
            username.focus();
            return false;
        }
        if (password.val() == "") {
            alert("请先输入密码!");
            password.focus();
            return false;
        }
        if (password2.val() == "") {
            alert("请先输入确认密码!");
            password2.focus();
            return false;
        }
        if (password.val() != password2.val()) {
            alert("两次密码输入不一致,请先检查!");
            password.focus();
            return false;
        }
        // 2.发送 Ajax 给后端
        jQuery.ajax({
            url: "/user/reg",
            type: "POST",
            data: {
                username: username.val(),
                password: password.val()
            },
            success: function (result) {
                if (result.code == 200 && result.data == 1) {
                    alert("恭喜,注册成功!");
                    if (confirm("是否现在就去登录?")) {
                        location.href = "login.html";
                    }
                } else {
                    alert("抱歉,注册失败,请重试!");
                }
            }
        })
    }
</script>
</html>
② 后端代码
注册功能,后端只需要将用户名和密码保存到数据库即可,就是一个简单的 insert。
Ⅰ. 数据库
UserMapper:->add
package com.example.mycnblog.mapper;

import org.apache.ibatis.annotations.Mapper;
import org.apache.ibatis.annotations.Param;

/**
 * 用户表的 mapper
 */
@Mapper
public interface UserMapper {

	/**
     * 用户注册
     * @param username
     * @param password
     * @return
     */
    public int add(@Param("username") String username,
                   @Param("password") String password);

}
UserMapper.xml:->add
<?xml version="1.0" encoding="UTF-8"?>
<!DOCTYPE mapper PUBLIC "-//mybatis.org//DTD Mapper 3.0//EN" "http://mybatis.org/dtd/mybatis-3-mapper.dtd">
<mapper namespace="com.example.mycnblog.mapper.UserMapper">
    <insert id="add">
        insert into userinfo(username, password)
        values (#{username}, #{password})
    </insert>
</mapper>
Ⅱ. 服务层
UserService:->add
package com.example.mycnblog.service;

import com.example.mycnblog.mapper.UserMapper;
import org.springframework.beans.factory.annotation.Autowired;
import org.springframework.stereotype.Service;

/**
 * 用户表的服务层
 */
@Service
public class UserService {

    @Autowired
    private UserMapper userMapper;

	/**
     * 用户注册
     * @param username
     * @param password
     * @return
     */
    public int add(String username, String password) {
        return userMapper.add(username, password);
    }

}
Ⅲ. 控制层
UserController:->reg
package com.example.mycnblog.controller;

import com.example.mycnblog.common.AjaxResult;
import com.example.mycnblog.service.UserService;
import org.springframework.beans.factory.annotation.Autowired;
import org.springframework.util.StringUtils;
import org.springframework.web.bind.annotation.RequestMapping;
import org.springframework.web.bind.annotation.RestController;

/**
 * 用户控制器
 */
@RestController
@RequestMapping("/user")
public class UserController {

    @Autowired
    private UserService userService;

	/**
     * 用户注册
     * @param username
     * @param password
     * @return
     */
    @RequestMapping("/reg")
    public Object reg(String username, String password) {
        // 1.非空效验
        if (!StringUtils.hasLength(username) || !StringUtils.hasLength(password)) {
            return AjaxResult.fail(-1, "非法的参数请求!");
        }
        // 2.进行添加操作
        int result = userService.add(username, password);
        if (result == 1) {
            return AjaxResult.success("注册成功!", 1);
        } else {
            return AjaxResult.fail(-1, "数据库添加出错!");
        }
    }
}
③ 效果演示
页面:
输入 -> 张三 123456
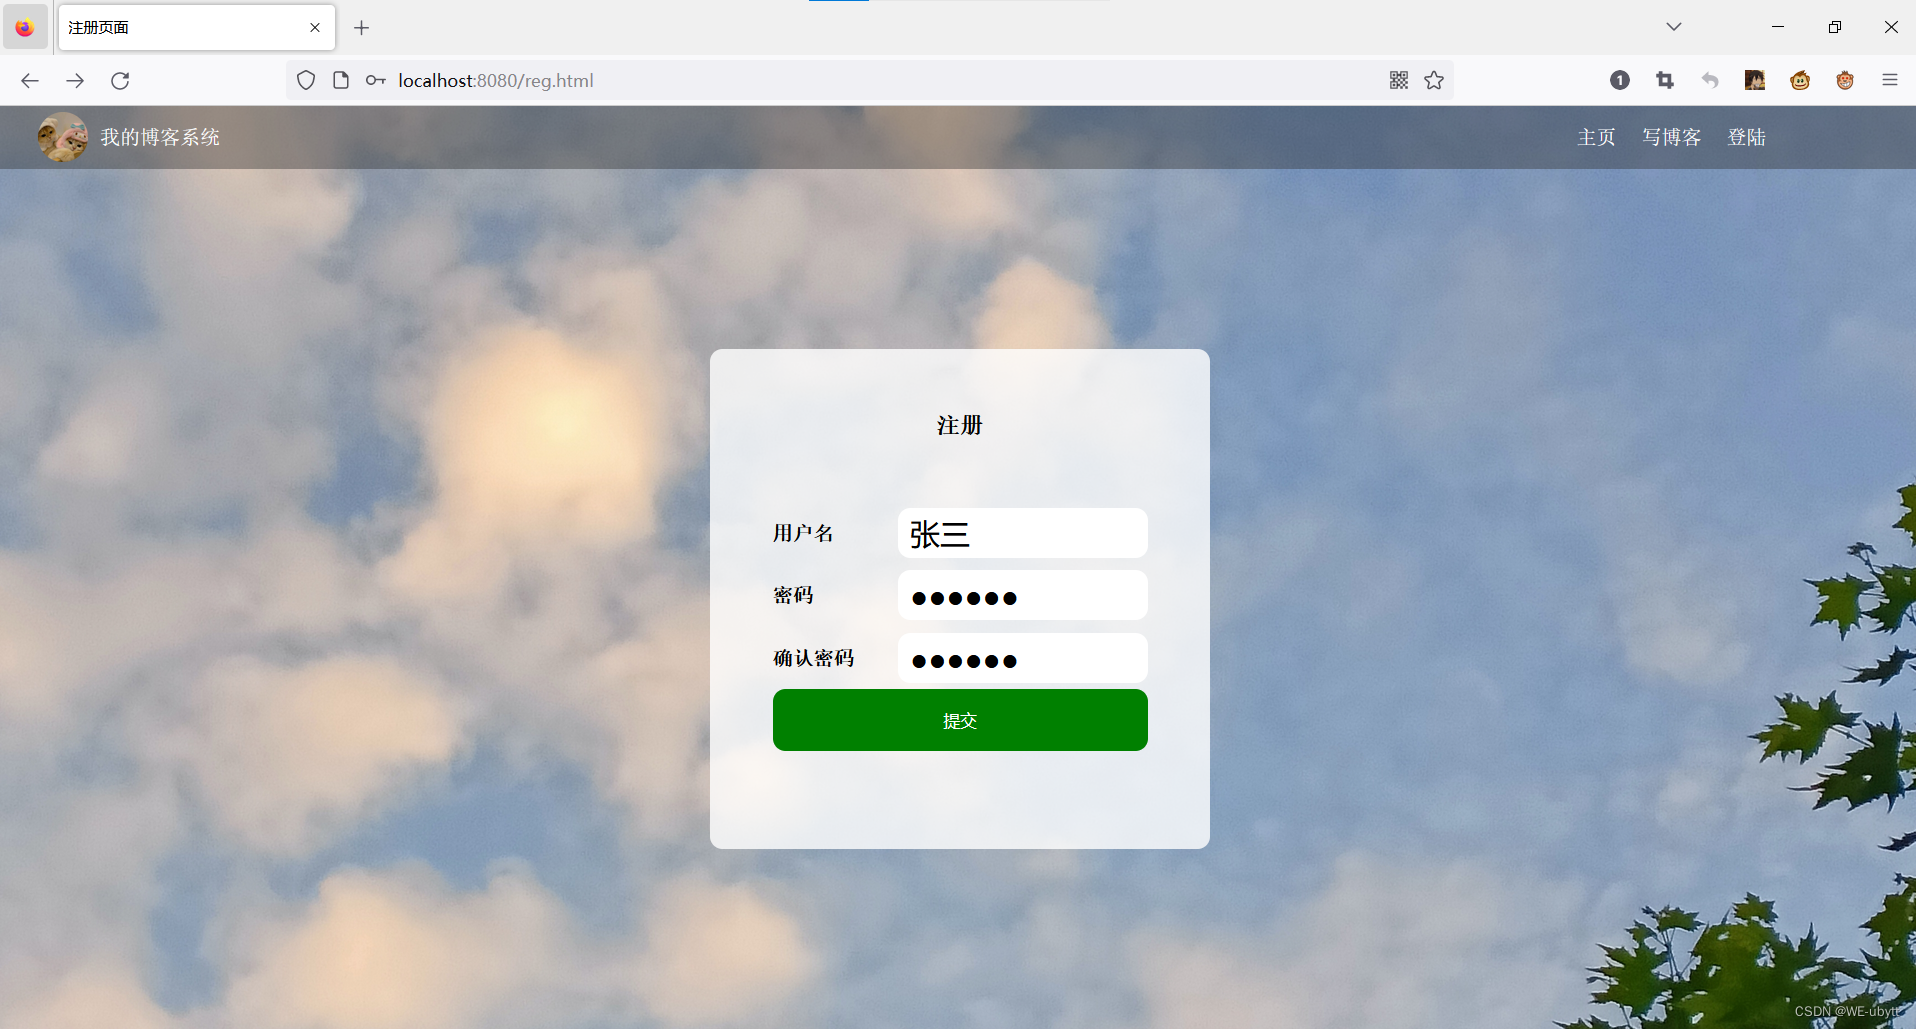
点击提交

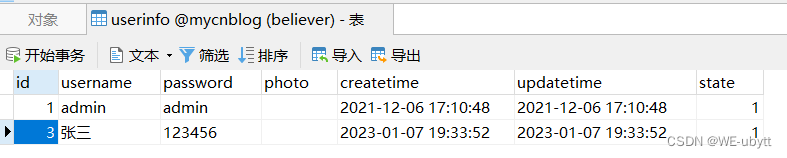
日志信息:
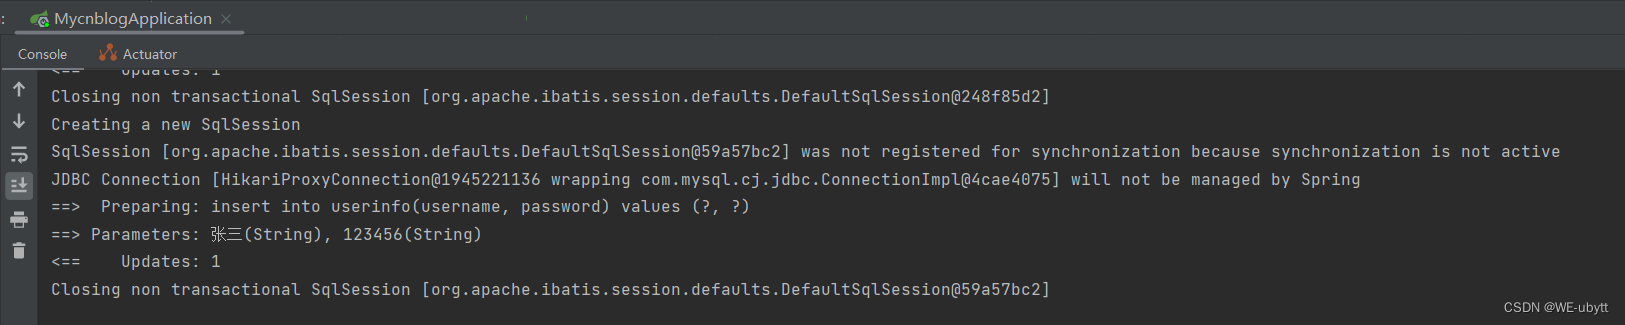
数据库信息:
2、登录
① 前端页面
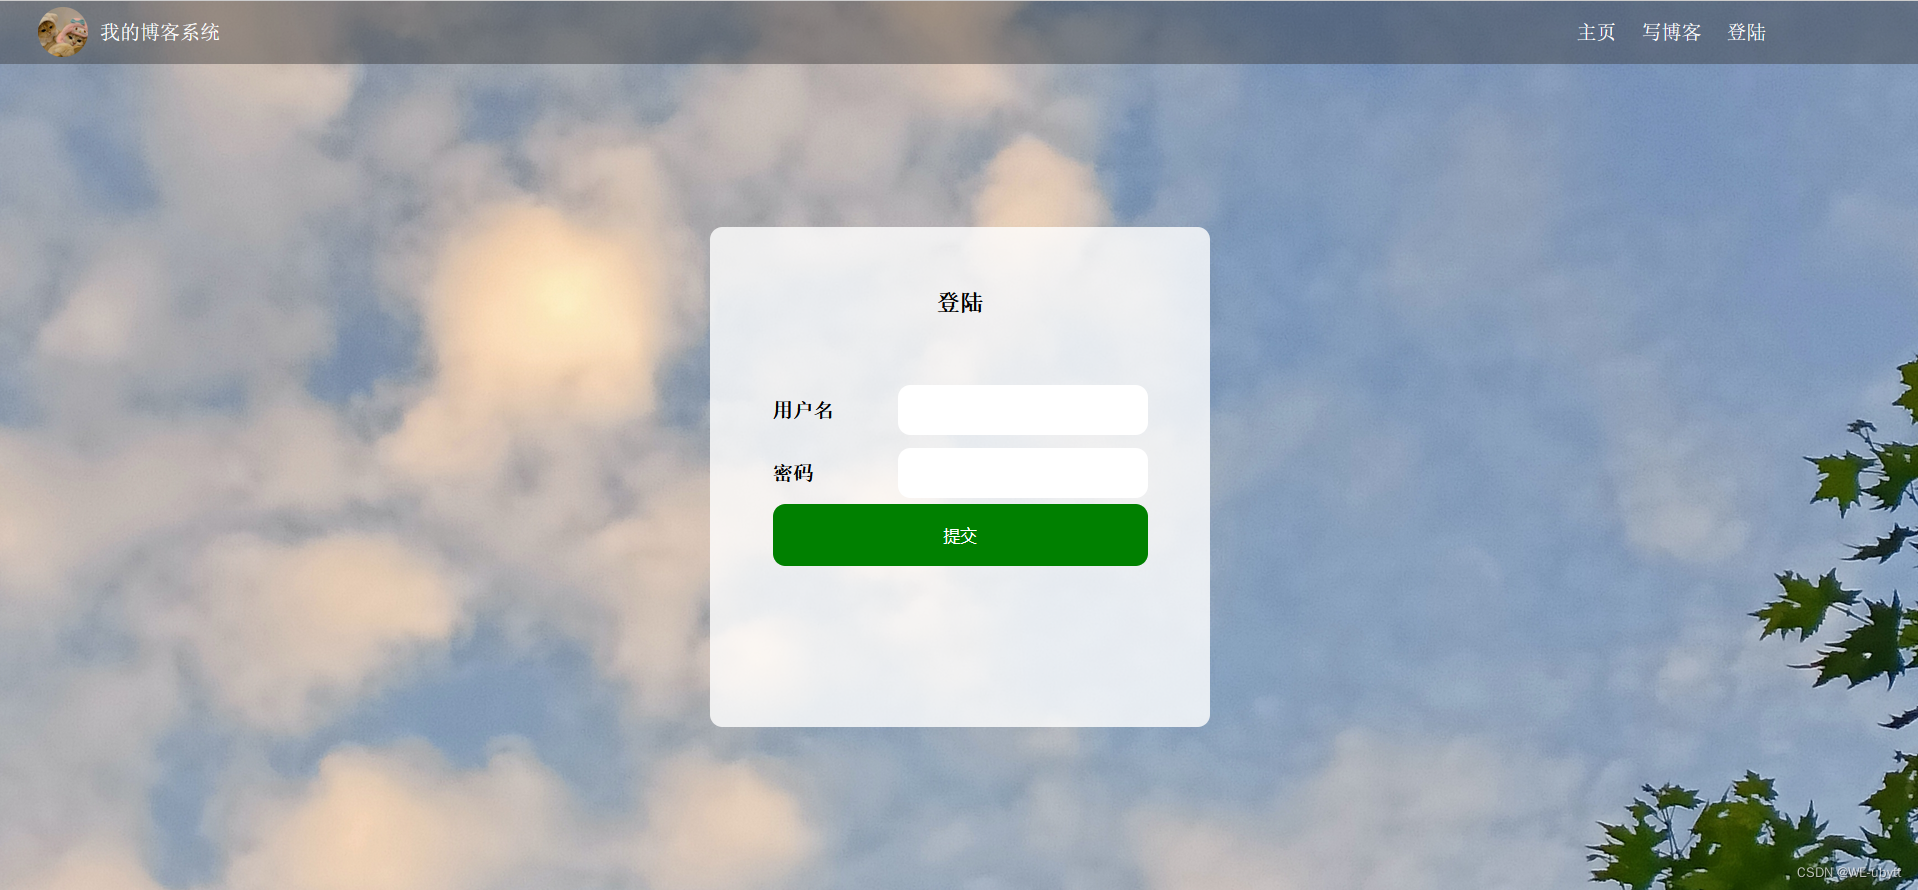
login.html:
<!DOCTYPE html>
<html lang="en">

<head>
    <meta charset="UTF-8">
    <meta http-equiv="X-UA-Compatible" content="IE=edge">
    <meta name="viewport" content="width=device-width, initial-scale=1.0">
    <title>登陆页面</title>
    <link rel="stylesheet" href="css/conmmon.css">
    <link rel="stylesheet" href="css/login.css">
    <!-- 引入 jQuery -->
    <script src="js/jquery.min.js"></script>
</head>

<body>
<!-- 导航栏 -->
<div class="nav">
    <img src="img/logo2.jpg" alt="">
    <span class="title">我的博客系统</span>
    <!-- 用来占据中间位置 -->
    <span class="spacer"></span>
    <a href="blog_list.html">主页</a>
    <a href="blog_edit.html">写博客</a>
    <a href="reg.html">注册</a>
    <!-- <a href="#">注销</a> -->
</div>
<!-- 版心 -->
<div class="login-container">
    <!-- 中间的登陆框 -->
    <div class="login-dialog">
        <h3>登陆</h3>
        <div class="row">
            <span>用户名</span>
            <input type="text" id="username">
        </div>
        <div class="row">
            <span>密码</span>
            <input type="password" id="password">
        </div>
        <div class="row">
            <button id="submit" onclick="mysub()">提交</button>
        </div>
    </div>
</div>
</body>
<script>
    function mysub() {
        // 1.非空效验
        var username = jQuery("#username");
        var password = jQuery("#password");
        if (username.val() == "") {
            alert("请先输入用户名!");
            username.focus();
            return false;
        }
        if (password.val() == "") {
            alert("请先输入密码!");
            password.focus();
            return false;
        }
        // 2.发送 Ajax 给后端
        jQuery.ajax({
            url: "/user/login",
            type: "POST",
            data: {
                username: username.val(),
                password: password.val()
            },
            success: function (result) {
                if (result.code == 200 && result.data == 1) {
                    alert("登录成功!");
                    location.href = "myblog_list.html";
                } else {
                    alert("抱歉,用户名或密码错误,请重试!");
                    username.focus();
                }
            }
        })
    }
</script>
</html>
② 后端代码(基础功能)
登录功能的基础:就是从数据库中查找用户名和密码,与用户输入是否匹配
Ⅰ. 数据库
UserMapper:->login
package com.example.mycnblog.mapper;

import com.example.mycnblog.model.UserInfo;
import org.apache.ibatis.annotations.Mapper;
import org.apache.ibatis.annotations.Param;

/**
 * 用户表的 mapper
 */
@Mapper
public interface UserMapper {

    /**
     * 用户注册
     * @param username
     * @param password
     * @return
     */
    public int add(@Param("username") String username,
                   @Param("password") String password);

    /**
     * 用户登录
     * @param username
     * @param password
     * @return
     */
    public UserInfo login(@Param("username") String username,
                        @Param("password") String password);
}
UserMapper.xml:->login
<?xml version="1.0" encoding="UTF-8"?>
<!DOCTYPE mapper PUBLIC "-//mybatis.org//DTD Mapper 3.0//EN" "http://mybatis.org/dtd/mybatis-3-mapper.dtd">
<mapper namespace="com.example.mycnblog.mapper.UserMapper">
    <insert id="add">
        insert into userinfo(username, password)
        values (#{username}, #{password})
    </insert>

    <select id="login" resultType="com.example.mycnblog.model.UserInfo">
        select *
        from userinfo
        where username = #{username}
          and password = #{password}
    </select>
</mapper>
Ⅱ. 服务层
UserService:->login
package com.example.mycnblog.service;

import com.example.mycnblog.mapper.UserMapper;
import com.example.mycnblog.model.UserInfo;
import org.apache.ibatis.annotations.Param;
import org.springframework.beans.factory.annotation.Autowired;
import org.springframework.stereotype.Service;

/**
 * 用户表的服务层
 */
@Service
public class UserService {

    @Autowired
    private UserMapper userMapper;

    /**
     * 用户注册
     * @param username
     * @param password
     * @return
     */
    public int add(String username, String password) {
        return userMapper.add(username, password);
    }

    /**
     * 用户登录
     * @param username
     * @param password
     * @return
     */
    public UserInfo login(String username, String password) {
        return userMapper.login(username, password);
    }

}
Ⅲ. 控制层
UserController:->login
package com.example.mycnblog.controller;

import com.example.mycnblog.common.AjaxResult;
import com.example.mycnblog.model.UserInfo;
import com.example.mycnblog.service.UserService;
import org.springframework.beans.factory.annotation.Autowired;
import org.springframework.util.StringUtils;
import org.springframework.web.bind.annotation.RequestMapping;
import org.springframework.web.bind.annotation.RestController;

/**
 * 用户控制器
 */
@RestController
@RequestMapping("/user")
public class UserController {

    @Autowired
    private UserService userService;

    /**
     * 用户注册
     * @param username
     * @param password
     * @return
     */
    @RequestMapping("/reg")
    public Object reg(String username, String password) {
        // 1.非空效验
        if (!StringUtils.hasLength(username) || !StringUtils.hasLength(password)) {
            return AjaxResult.fail(-1, "非法的参数请求!");
        }
        // 2.进行添加操作
        int result = userService.add(username, password);
        if (result == 1) {
            return AjaxResult.success("注册成功!", 1);
        } else {
            return AjaxResult.fail(-1, "数据库添加出错!");
        }
    }

    /**
     * 用户登录
     * @param username
     * @param password
     * @return
     */
    @RequestMapping("/login")
    public int login(String username, String password) {
        // 1.非空效验
        if (!StringUtils.hasLength(username) || !StringUtils.hasLength(password)) {
            // 参数有误
            return 0;
        }
        // 2.进行查找操作
        UserInfo userInfo = userService.login(username, password);
        if (userInfo == null || userInfo.getId() <= 0) { // userinfo 无效
            // 用户名或密码错误
            return -1;
        } else {
        	// 用户名和密码正确
            return 1;
        }
    }
}
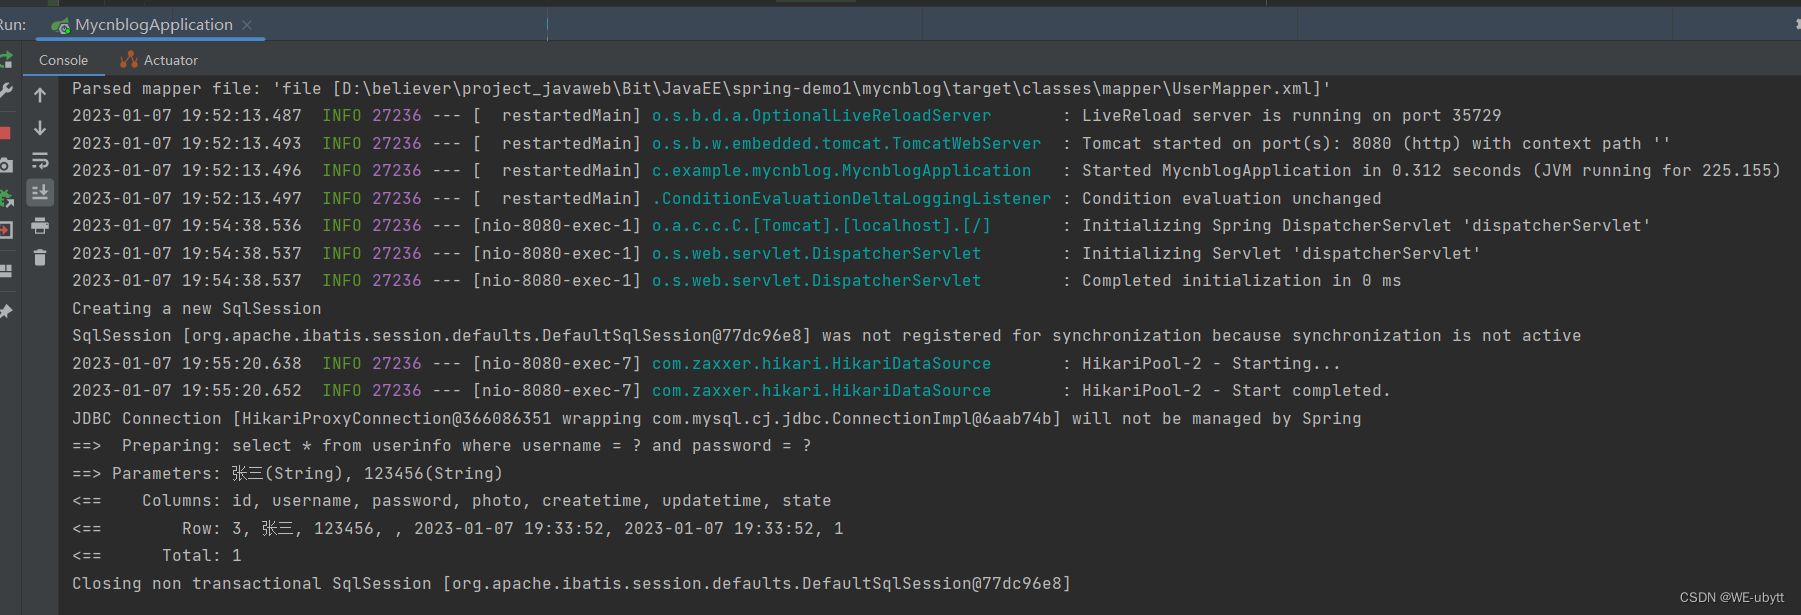
③ 效果演示
页面:
输入 -> 张三 123456
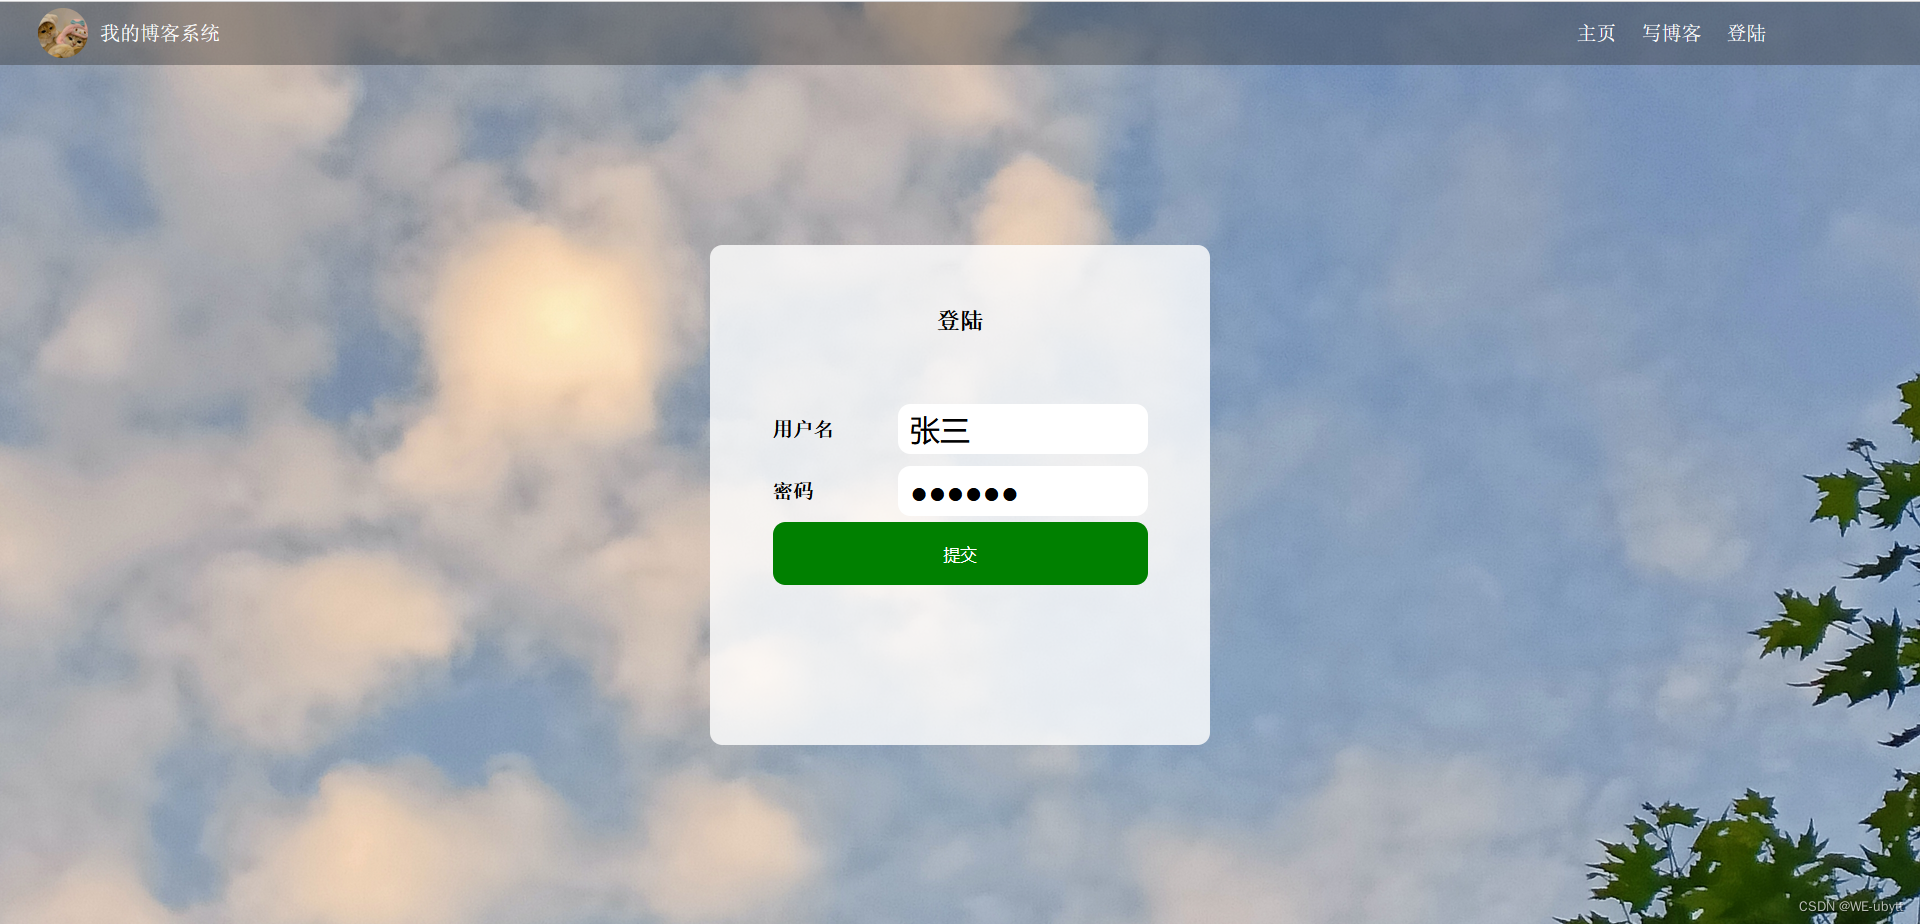
点击提交
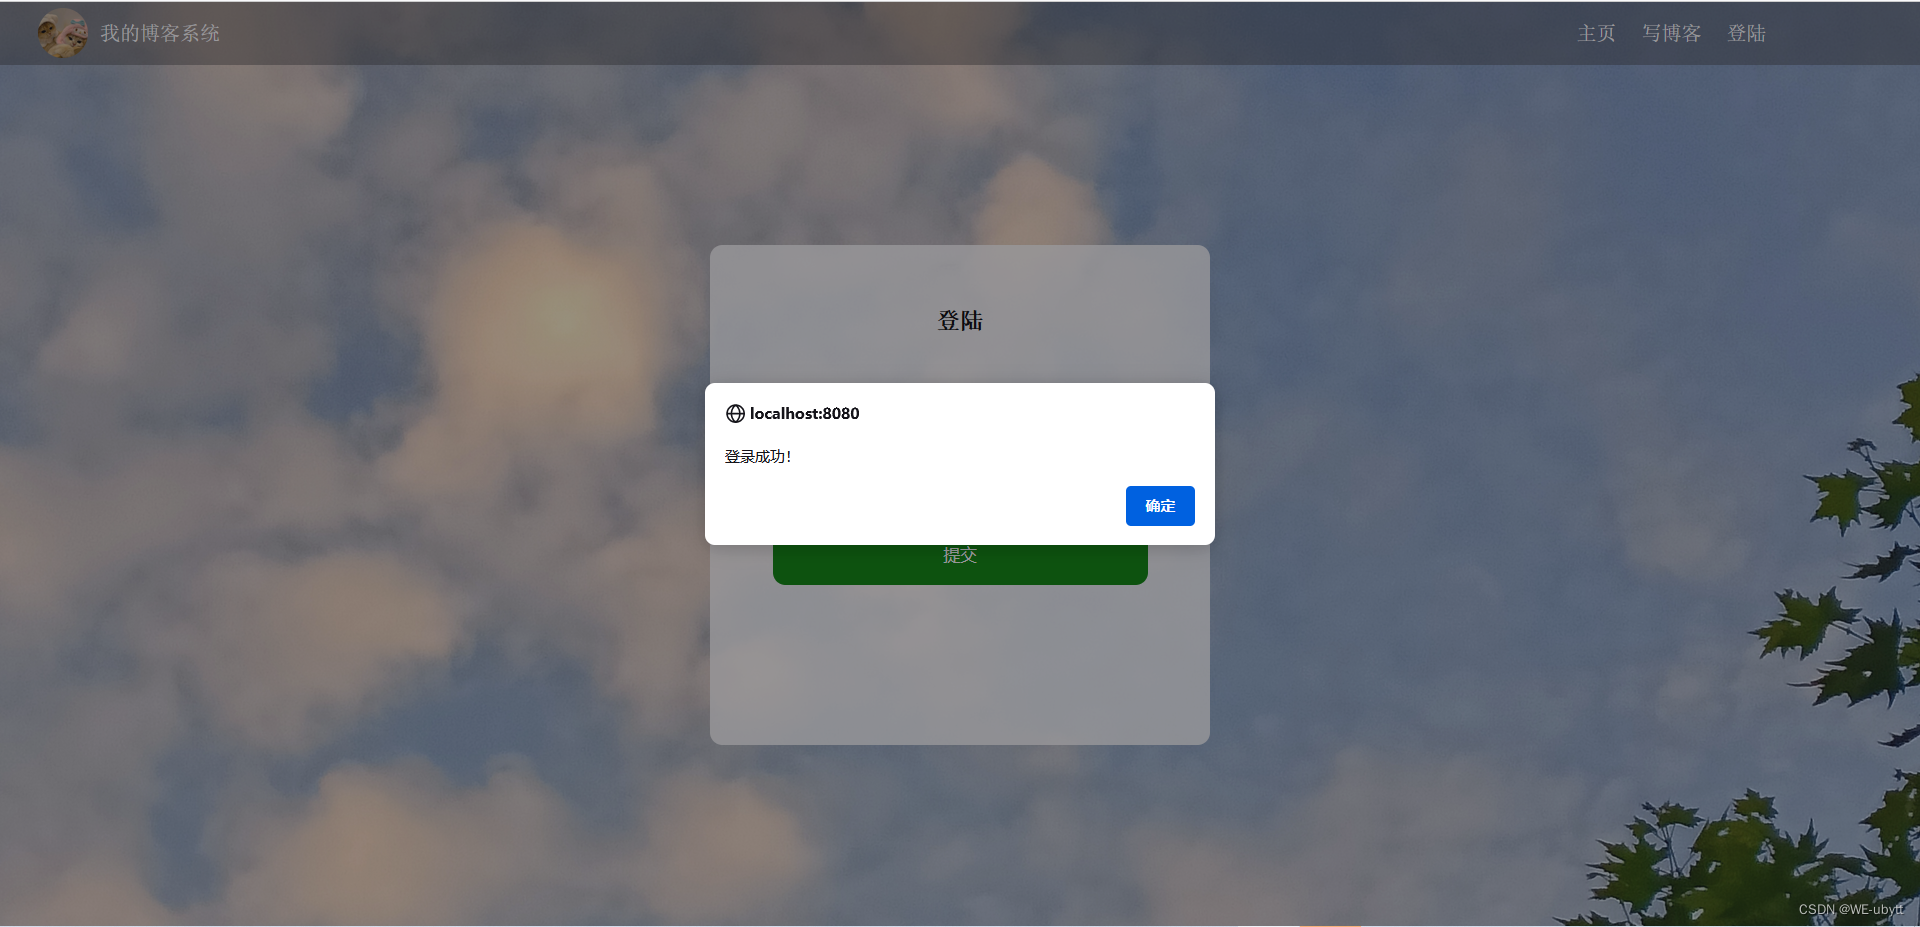
日志信息:
④ 后端代码(拦截器/存储session)
- 存储session:需要用一个常量,来存放 session 的 key,我们之后也可以通过这个 key 拿到当前登录用户的信息;我们在存储 session 时,同样也是把 value 存放到对应的 key 中。
- 拦截器:具体可以看看我之前的博客——SpringBoot 统一功能处理
Ⅰ. 添加常量类
在 common 包下添加一个 Constant 类,用来存放常量
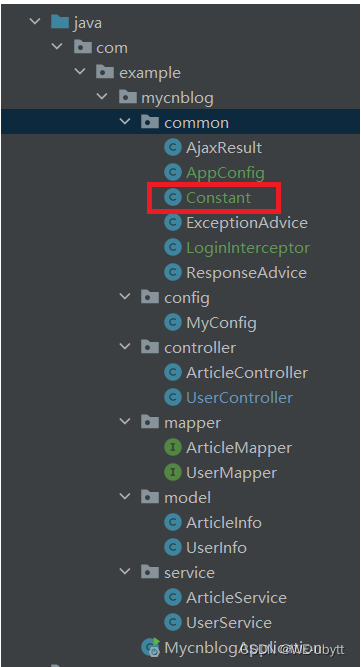
Constant:
package com.example.mycnblog.common;

/**
 * 当前项目中的所有常量
 */
public class Constant {
    // 登录信息存储到 session 中的 key
    public static final String SESSION_USERINFO_KEY = "session_userinfo_key";
}
Ⅱ. 控制层
UserController:->login
package com.example.mycnblog.controller;

import com.example.mycnblog.common.AjaxResult;
import com.example.mycnblog.common.Constant;
import com.example.mycnblog.model.UserInfo;
import com.example.mycnblog.service.UserService;
import org.springframework.beans.factory.annotation.Autowired;
import org.springframework.util.StringUtils;
import org.springframework.web.bind.annotation.RequestMapping;
import org.springframework.web.bind.annotation.RestController;

import javax.servlet.http.HttpServletRequest;
import javax.servlet.http.HttpSession;

/**
 * 用户控制器
 */
@RestController
@RequestMapping("/user")
public class UserController {

    @Autowired
    private UserService userService;

    /**
     * 用户注册
     *
     * @param username
     * @param password
     * @return
     */
    @RequestMapping("/reg")
    public Object reg(String username, String password) {
        // 1.非空效验
        if (!StringUtils.hasLength(username) || !StringUtils.hasLength(password)) {
            return AjaxResult.fail(-1, "非法的参数请求!");
        }
        // 2.进行添加操作
        int result = userService.add(username, password);
        if (result == 1) {
            return AjaxResult.success("注册成功!", 1);
        } else {
            return AjaxResult.fail(-1, "数据库添加出错!");
        }
    }

    /**
     * 用户登录
     *
     * @param username
     * @param password
     * @return 如果用户名和密码都正确,返回1;如果用户名或密码为空/不正确,返回非1
     */
    @RequestMapping("/login")
    public int login(HttpServletRequest request, String username, String password) {
        // 1.非空效验
        if (!StringUtils.hasLength(username) || !StringUtils.hasLength(password)) {
            // 参数有误
            return 0;
        }
        // 2.进行查找操作
        UserInfo userInfo = userService.login(username, password);
        if (userInfo == null || userInfo.getId() <= 0) { // userinfo 无效
            // 用户名或密码错误
            return -1;
        } else {
            // 用户名和密码正确
            // 将 userinfo 保存到 session 中
            HttpSession session = request.getSession();
            session.setAttribute(Constant.SESSION_USERINFO_KEY, userInfo);
            return 1;
        }
    }
}
Ⅲ. 拦截器
在 common 包下添加一个 LoginInterceptor 类,自定义拦截器;以及一个 AppConfig 类,配置拦截器。
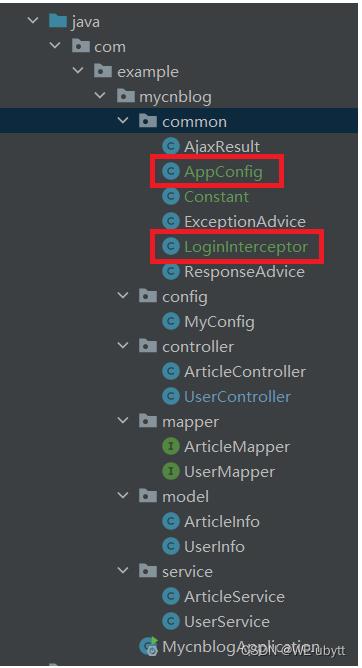
LoginInterceptor:
package com.example.mycnblog.common;

import org.springframework.stereotype.Component;
import org.springframework.web.servlet.HandlerInterceptor;

import javax.servlet.http.HttpServletRequest;
import javax.servlet.http.HttpServletResponse;
import javax.servlet.http.HttpSession;

/**
 * 自定义拦截器
 */
@Component
public class LoginInterceptor implements HandlerInterceptor {
    @Override
    public boolean preHandle(HttpServletRequest request, HttpServletResponse response, Object handler) throws Exception {
        // session 得到用户信息【如果从 session 中得到了 userinfo 对象,说明用户已经登录了,如果没得到,说明未登录】
        HttpSession session = request.getSession(false);
        if (session != null && session.getAttribute(Constant.SESSION_USERINFO_KEY) != null) {
            // 当前用户已经登录了
            return true;
        }
        response.setStatus(401);
        return false;
    }
}
AppConfig:->addInterceptors
package com.example.mycnblog.common;

import org.springframework.beans.factory.annotation.Autowired;
import org.springframework.context.annotation.Configuration;
import org.springframework.web.servlet.config.annotation.InterceptorRegistration;
import org.springframework.web.servlet.config.annotation.InterceptorRegistry;
import org.springframework.web.servlet.config.annotation.WebMvcConfigurer;

import java.util.ArrayList;
import java.util.List;

/**
 * 配置拦截器
 */
@Configuration
public class AppConfig implements WebMvcConfigurer {

    // 不拦截的 url 集合
    List<String> excludes = new ArrayList<String>(){{
        add("/**/*.html");
        add("/js/**"); // 放行 static/js 下的所有文件
        add("/editor.md/**"); // 放行 static/editor.md 下的所有文件
        add("/css/**"); // 放行 static/css 下的所有文件
        add("/img/**"); // 放行 static/img 下的所有文件
        add("/user/reg"); // 放行注册接口
        add("/user/login"); // 放行登录接口
    }};

    @Autowired
    private LoginInterceptor loginInterceptor;

    @Override
    public void addInterceptors(InterceptorRegistry registry) {
        // 配置拦截器
        InterceptorRegistration registration =
                registry.addInterceptor(loginInterceptor);
        registration.addPathPatterns("/**"); // 拦截所有请求
        registration.excludePathPatterns(excludes); // 排除不拦截的 url
    }
}
3、博客列表
① 前端页面
myblog_list.html:
<!DOCTYPE html>
<html lang="en">
<head>
<meta charset="UTF-8">
<meta http-equiv="X-UA-Compatible" content="IE=edge">
<meta name="viewport" content="width=device-width, initial-scale=1.0">
<title>博客列表</title>
<link rel="stylesheet" href="css/conmmon.css">
<link rel="stylesheet" href="css/blog_list.css">
<!-- 引入 jQuery -->
<script src="js/jquery.min.js"></script>
</head>
<body>
<!-- 导航栏 -->
<div class="nav">
<img src="img/logo2.jpg" alt="">
<span class="title">我的博客系统</span>
<!-- 用来占据中间位置 -->
<span class="spacer"></span>
<a href="blog_list.html">主页</a>
<a href="blog_edit.html">写博客</a>
<a href="javascript:onExit()">退出登陆</a>
<!-- <a href="#">注销</a> -->
</div>
<!-- 版心 -->
<div class="container">
<!-- 左侧个人信息 -->
<div class="container-left">
<div class="card">
<img src="img/doge.jpg" class="avtar" alt="">
<h3 id="username">狗</h3>
<a href="http:www.github.com">github 地址</a>
<div class="counter">
<span>文章</span>
<span>分类</span>
</div>
<div class="counter">
<span>2</span>
<span>1</span>
</div>
</div>
</div>
<!-- 右侧内容详情 -->
<div class="container-right" id="artlistDiv">
<!-- 每一篇博客包含标题, 摘要, 时间 -->
<div class="blog">
<div class="title">文章标题</div>
<div class="date">创建时间</div>
<div class="desc">
文章内容
</div>
<a href="blog_content.html?id=1" class="detail">查看全文 >></a>
</div>
</div>
</div>
</body>
<script>
var descLength = 80; // 简介的长度
// 字符串截取,将文章正文截取成简介
function mySubstr(content) {
if (content.length > descLength) {
return content.substr(0, descLength);
}
return content;
}
// 初始化个人列表信息
function initList() {
jQuery.ajax({
url: "/art/mylist",
type: "POST",
data: {},
success: function (result) {
console.dir(result);
if (result.code == 200 && result.data != null && result.data.length > 0) {
// 此人发表文章了
var html = "";
result.data.forEach(function (item) {
html += '<div class="blog">\n' +
' <div class="title">' + item.title + '</div>\n' +
' <div class="date">' + item.createTime + '</div>\n' +
' <div class="desc">\n' + mySubstr(item.content) + '</div>\n' +
' <div style="margin-left: 200px;margin-top: 50px">' +
' <a href="blog_content.html?id=' + item.id + '">查看详情</a> ' +
' <a href="blog_update.html?id=' + item.id + '">修改</a> ' +
' <a href="javascript:myDel(' + item.id + ')">删除</a> ' +
' </div>' +
' </div>';
});
jQuery("#artlistDiv").html(html);
} else {
// 此人未发表任何文章
jQuery("#artlistDiv").html("<h1>暂无数据</h1>");
}
},
error: function (err) {
if (err != null && err.status == 401) {
alert("用户未登录,即将跳转到登录页")
// 已经被拦截器拦截了,未登录
location.href = "/login.html";
}
}
});
}
initList(); // 当浏览器渲染引擎执行到此行的时候,就会调用 initList() 方法
// 获取个人信息
function myinfo() {
jQuery.ajax({
url: "/user/myinfo",
type: "POST",
data: {},
success: function (result) {
if (result.code == 200 && result.data != null) {
jQuery("#username").text(result.data.username);
}
},
error: function (err) {
}
});
}
myinfo();
// 删除文章
function myDel(aid) {
if (confirm("确认删除?")) {
// Ajax 请求后端进行退出操作
jQuery.ajax({
url: "/art/delete",
type: "POST",
data: {
"aid": aid
},
success: function (result) {
location.href = "/myblog_list.html";
},
error: function (err) {
if (err != null && err.status == 401) {
alert("用户未登录,即将跳转到登录页")
// 已经被拦截器拦截了,未登录
location.href = "/login.html";
}
}
});
}
}
// 退出登录
function onExit() {
if (confirm("确认退出?")) {
// Ajax 请求后端进行退出操作
jQuery.ajax({
url: "/user/logout",
type: "POST",
data: {},
success: function (result) {
location.href = "/login.html";
},
error: function (err) {
if (err != null && err.status == 401) {
alert("用户未登录,即将跳转到登录页")
// 已经被拦截器拦截了,未登录
location.href = "/login.html";
}
}
});
}
}
</script>
</html>
② 后端代码(退出登录)
退出登录:这个主要就是把 session 中的信息删除。
Ⅰ. 控制层
UserController:->logout
package com.example.mycnblog.controller;

import com.example.mycnblog.common.AjaxResult;
import com.example.mycnblog.common.Constant;
import com.example.mycnblog.model.UserInfo;
import com.example.mycnblog.service.UserService;
import org.springframework.beans.factory.annotation.Autowired;
import org.springframework.util.StringUtils;
import org.springframework.web.bind.annotation.RequestMapping;
import org.springframework.web.bind.annotation.RestController;

import javax.servlet.http.HttpServletRequest;
import javax.servlet.http.HttpSession;

/**
 * 用户控制器
 */
@RestController
@RequestMapping("/user")
public class UserController {

    @Autowired
    private UserService userService;

    /**
     * 用户注册
     *
     * @param username
     * @param password
     * @return
     */
    @RequestMapping("/reg")
    public Object reg(String username, String password) {
        // 1.非空效验
        if (!StringUtils.hasLength(username) || !StringUtils.hasLength(password)) {
            return AjaxResult.fail(-1, "非法的参数请求!");
        }
        // 2.进行添加操作
        int result = userService.add(username, password);
        if (result == 1) {
            return AjaxResult.success("注册成功!", 1);
        } else {
            return AjaxResult.fail(-1, "数据库添加出错!");
        }
    }

    /**
     * 用户登录
     *
     * @param username
     * @param password
     * @return 如果用户名和密码都正确,返回1;如果用户名或密码为空/不正确,返回非1
     */
    @RequestMapping("/login")
    public int login(HttpServletRequest request, String username, String password) {
        // 1.非空效验
        if (!StringUtils.hasLength(username) || !StringUtils.hasLength(password)) {
            // 参数有误
            return 0;
        }
        // 2.进行查找操作
        UserInfo userInfo = userService.login(username, password);
        if (userInfo == null || userInfo.getId() <= 0) { // userinfo 无效
            // 用户名或密码错误
            return -1;
        } else {
            // 用户名和密码正确
            // 将 userinfo 保存到 session 中
            HttpSession session = request.getSession();
            session.setAttribute(Constant.SESSION_USERINFO_KEY, userInfo);
            return 1;
        }
    }

    /**
     * 退出登录
     * @param request
     * @return
     */
    @RequestMapping("/logout")
    public boolean logout(HttpServletRequest request) {
        HttpSession session = request.getSession(false);
        if (session != null &&
                session.getAttribute(Constant.SESSION_USERINFO_KEY) != null) {
            // 移除 session 中当前登录的用户
            session.removeAttribute(Constant.SESSION_USERINFO_KEY);
        }
        return true;
    }
}
Ⅱ. 效果演示
a. 已登录
成功登录后:

点击退出登录:
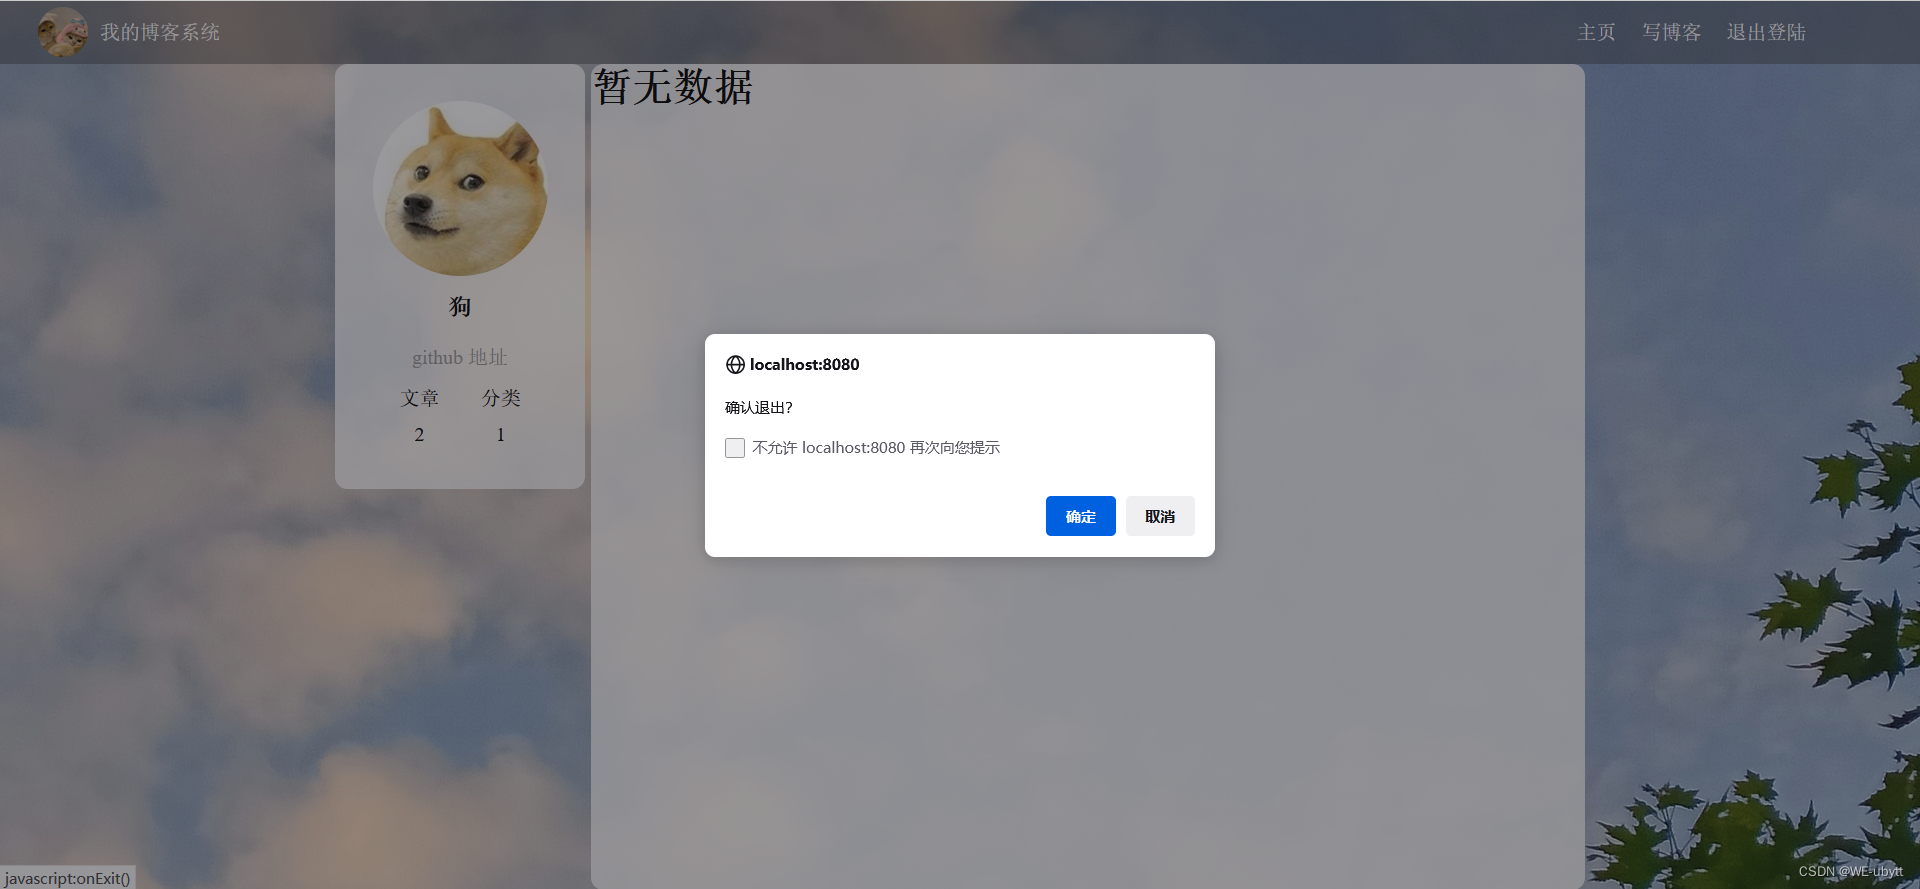
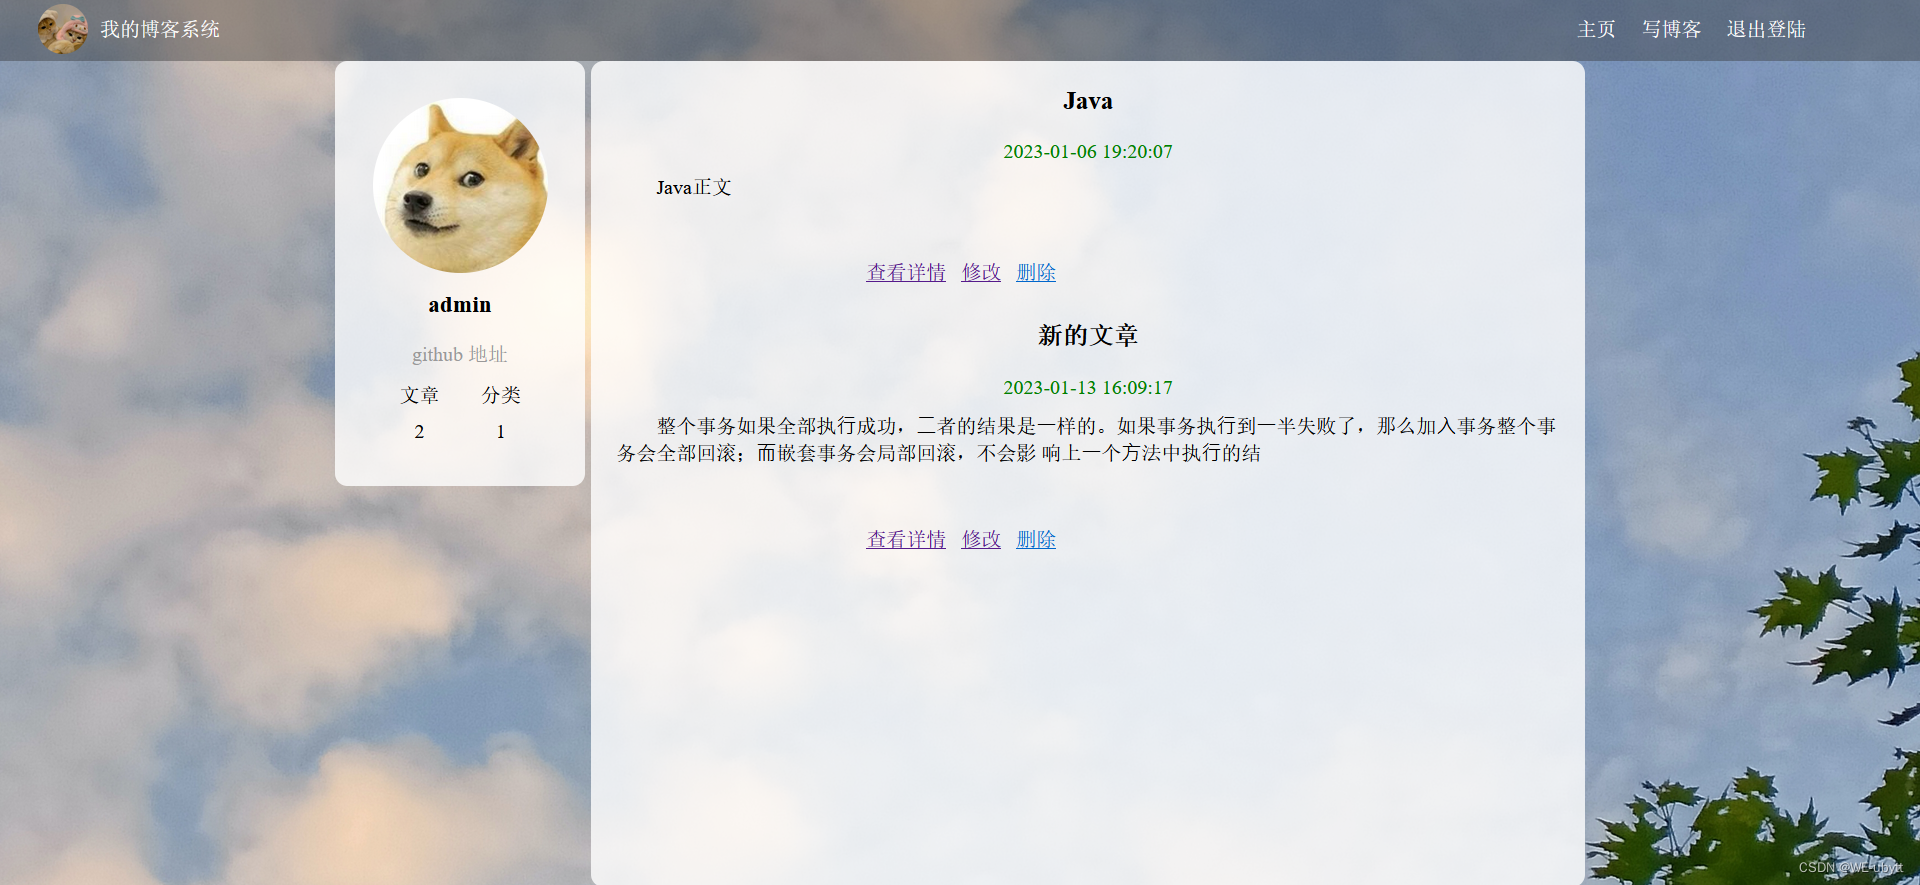
点击确定 -> 来到登录界面:

b. 未登录
在未登录的情况下,直接进入博客列表,点击退出登录 -> 确定:
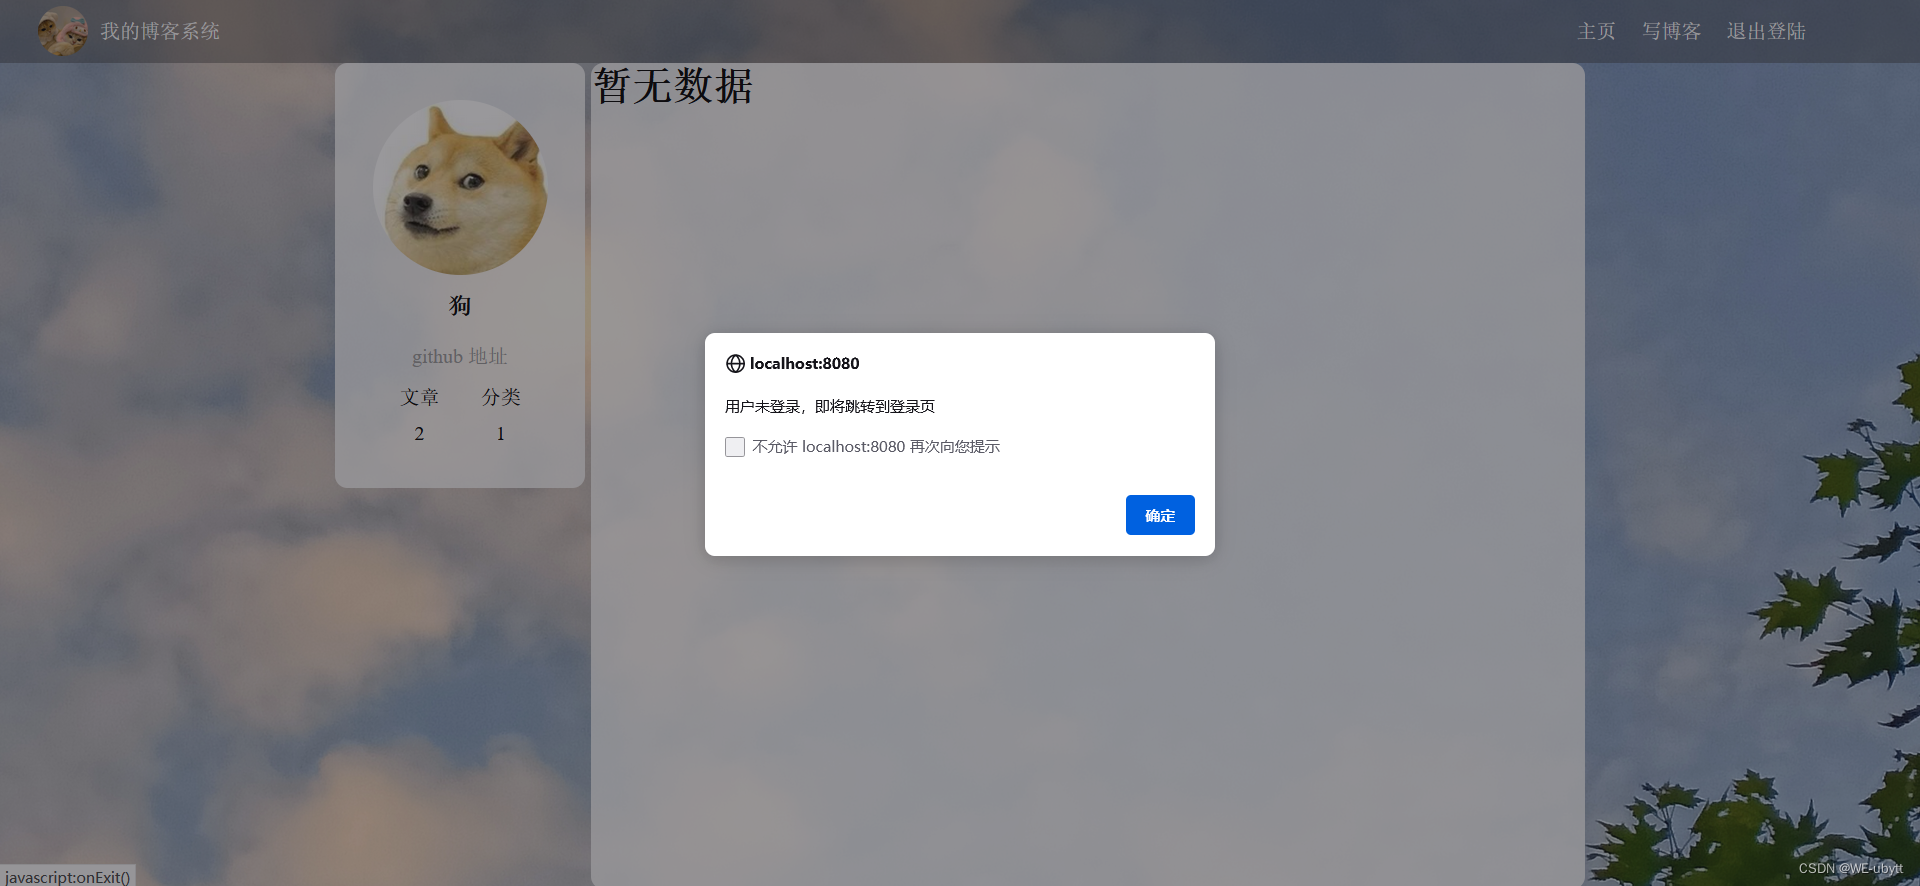
就会来到登录界面:
③ 后端代码(个人博客显示)
个人博客展示:这个就是在 session 中拿到用户信息,然后根据用户的 id,来查询文章。
Ⅰ. 数据库
ArticleMapper:getMyList
package com.example.mycnblog.mapper;

import com.example.mycnblog.model.ArticleInfo;
import org.apache.ibatis.annotations.Mapper;
import org.apache.ibatis.annotations.Param;

import java.util.List;

/**
 * 文章表的 mapper
 */
@Mapper
public interface ArticleMapper {

    /**
     * 根据用户id(uid)查询所有文章
     * @param uid
     * @return
     */
    public List<ArticleInfo> getMyList(@Param("uid") Integer uid);

}
ArticleMapper.xml:getMyList
<?xml version="1.0" encoding="UTF-8"?>
<!DOCTYPE mapper PUBLIC "-//mybatis.org//DTD Mapper 3.0//EN" "http://mybatis.org/dtd/mybatis-3-mapper.dtd">
<mapper namespace="com.example.mycnblog.mapper.ArticleMapper">
    <select id="getMyList" resultType="com.example.mycnblog.model.ArticleInfo">
        select *
        from articleinfo
        where uid = #{uid}
    </select>
</mapper>
Ⅱ. 服务层
ArticleServic:->getMyList
package com.example.mycnblog.service;

import com.example.mycnblog.mapper.ArticleMapper;
import com.example.mycnblog.model.ArticleInfo;
import org.springframework.beans.factory.annotation.Autowired;
import org.springframework.stereotype.Service;

import java.util.List;

/**
 * 文章表的服务层
 */
@Service
public class ArticleService {

    @Autowired
    private ArticleMapper articleMapper;

    /**
     * 查询用户的所有文章
     * @param uid
     * @return
     */
    public List<ArticleInfo> getMyList(Integer uid){
        return articleMapper.getMyList(uid);
    }

}
Ⅲ. 控制层
ArticleController:->myList
package com.example.mycnblog.controller;

import com.example.mycnblog.common.Constant;
import com.example.mycnblog.model.ArticleInfo;
import com.example.mycnblog.model.UserInfo;
import com.example.mycnblog.service.ArticleService;
import org.springframework.beans.factory.annotation.Autowired;
import org.springframework.web.bind.annotation.RequestMapping;
import org.springframework.web.bind.annotation.RestController;

import javax.servlet.http.HttpServletRequest;
import javax.servlet.http.HttpSession;
import java.util.List;

/**
 * 文章控制器
 */
@RestController
@RequestMapping("/art")
public class ArticleController {

    @Autowired
    private ArticleService articleService;

    /**
     * 查询用户的所有文章
     * @param request
     * @return
     */
    @RequestMapping("/mylist")
    public List<ArticleInfo> myList(HttpServletRequest request) {
        HttpSession session = request.getSession(false);
        if (session != null &&
                session.getAttribute(Constant.SESSION_USERINFO_KEY) != null) {
            UserInfo userInfo = (UserInfo) session.getAttribute(Constant.SESSION_USERINFO_KEY);
            return articleService.getMyList(userInfo.getId());
        }
        return null;
    }

}
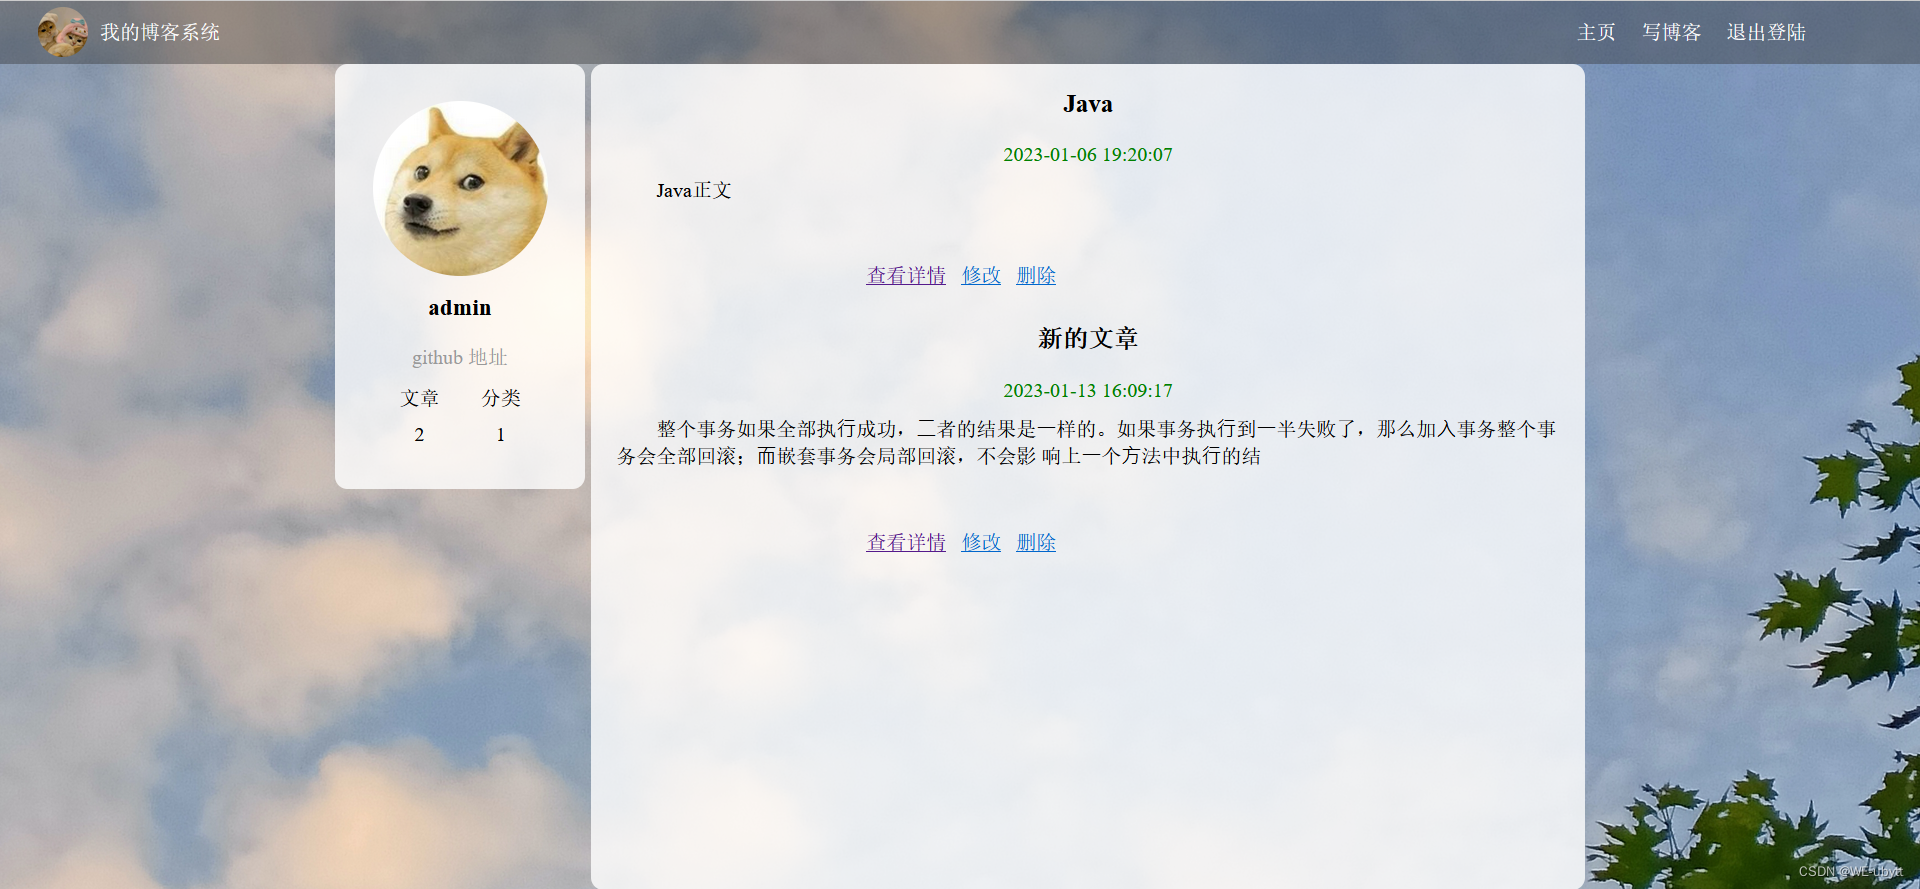
Ⅳ. 效果演示
页面:
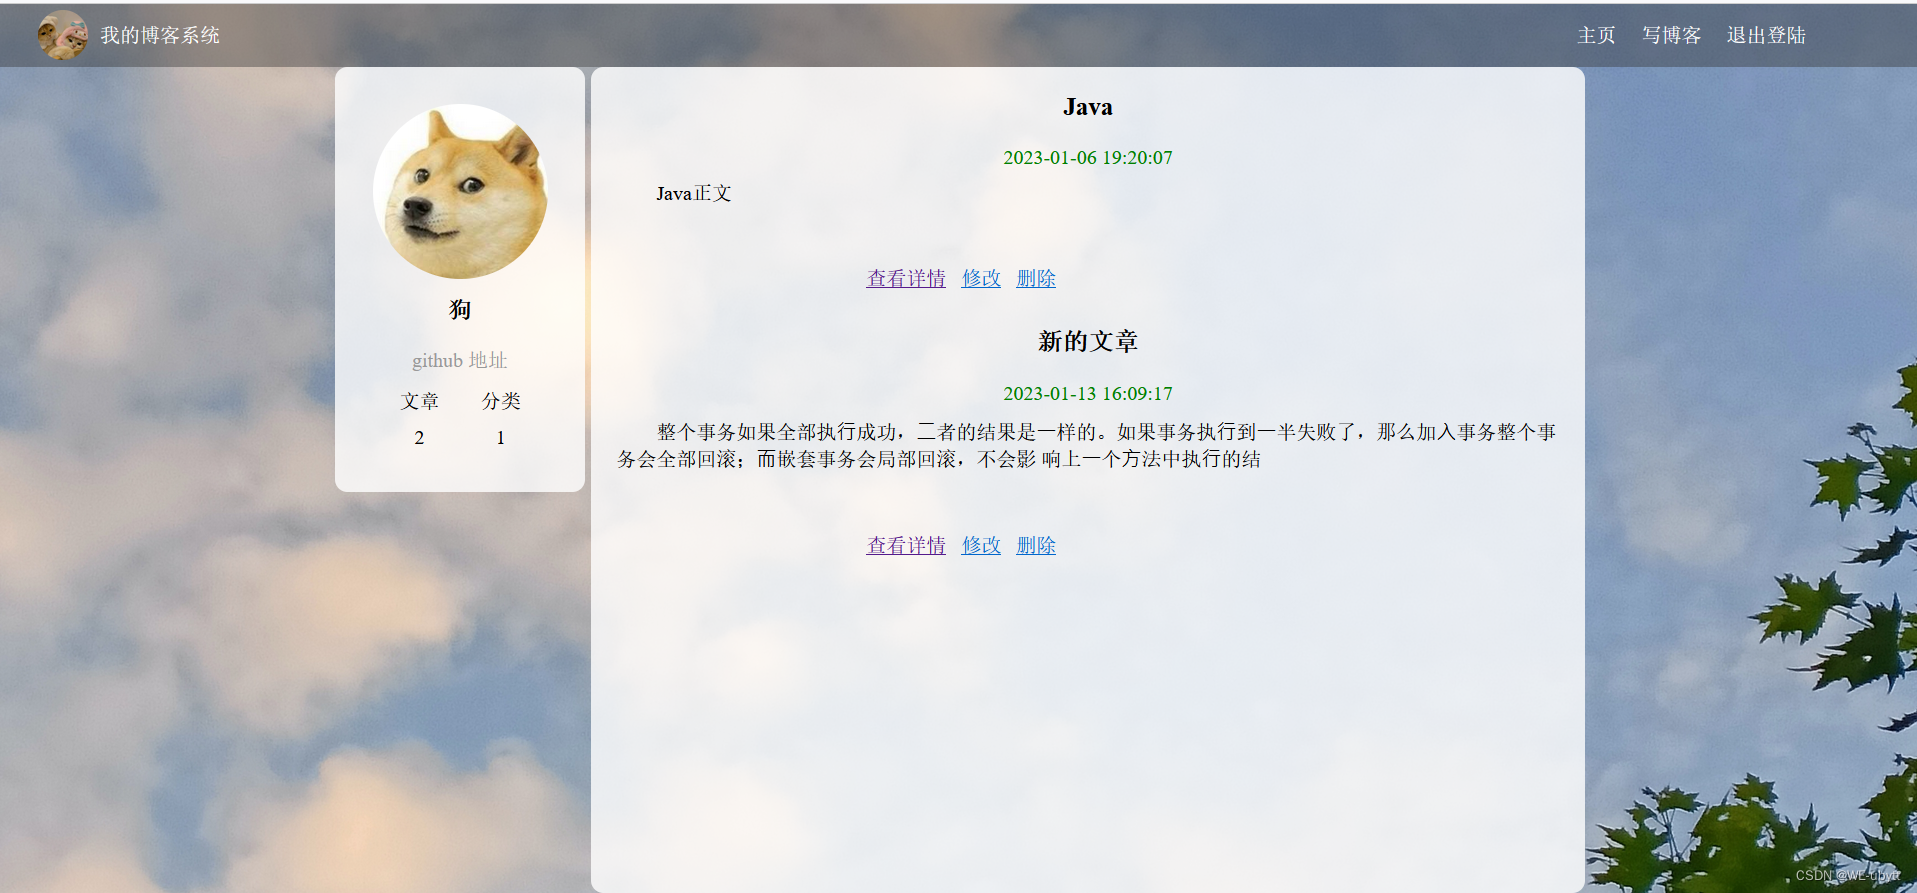
日志信息:
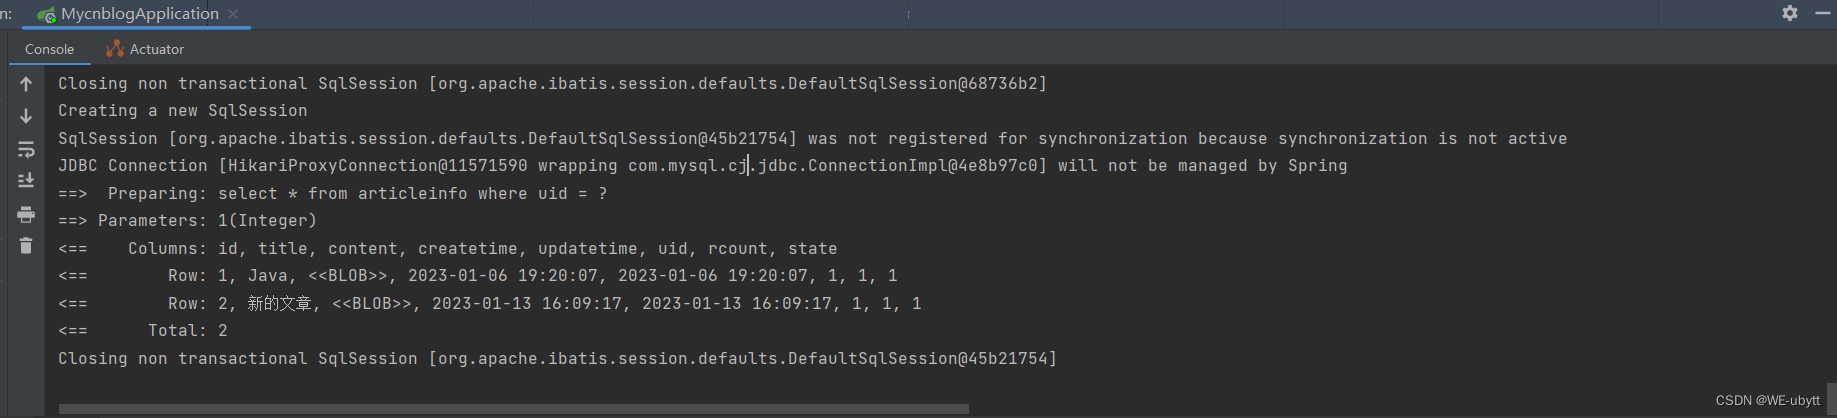
数据库信息:

④ 后端代码(个人信息)
个人信息:这个跟博客展示其实差不多,直接在 session 中就可以拿到信息。
Ⅰ. 控制层
UserController:->myInfo
package com.example.mycnblog.controller;

import com.example.mycnblog.common.AjaxResult;
import com.example.mycnblog.common.Constant;
import com.example.mycnblog.model.UserInfo;
import com.example.mycnblog.service.UserService;
import org.springframework.beans.factory.annotation.Autowired;
import org.springframework.util.StringUtils;
import org.springframework.web.bind.annotation.RequestMapping;
import org.springframework.web.bind.annotation.RestController;

import javax.servlet.http.HttpServletRequest;
import javax.servlet.http.HttpSession;

/**
 * 用户控制器
 */
@RestController
@RequestMapping("/user")
public class UserController {

    @Autowired
    private UserService userService;

    /**
     * 用户注册
     *
     * @param username
     * @param password
     * @return
     */
    @RequestMapping("/reg")
    public Object reg(String username, String password) {
        // 1.非空效验
        if (!StringUtils.hasLength(username) || !StringUtils.hasLength(password)) {
            return AjaxResult.fail(-1, "非法的参数请求!");
        }
        // 2.进行添加操作
        int result = userService.add(username, password);
        if (result == 1) {
            return AjaxResult.success("注册成功!", 1);
        } else {
            return AjaxResult.fail(-1, "数据库添加出错!");
        }
    }

    /**
     * 用户登录
     *
     * @param username
     * @param password
     * @return 如果用户名和密码都正确,返回1;如果用户名或密码为空/不正确,返回非1
     */
    @RequestMapping("/login")
    public int login(HttpServletRequest request, String username, String password) {
        // 1.非空效验
        if (!StringUtils.hasLength(username) || !StringUtils.hasLength(password)) {
            // 参数有误
            return 0;
        }
        // 2.进行查找操作
        UserInfo userInfo = userService.login(username, password);
        if (userInfo == null || userInfo.getId() <= 0) { // userinfo 无效
            // 用户名或密码错误
            return -1;
        } else {
            // 用户名和密码正确
            // 将 userinfo 保存到 session 中
            HttpSession session = request.getSession();
            session.setAttribute(Constant.SESSION_USERINFO_KEY, userInfo);
            return 1;
        }
    }

    /**
     * 退出登录
     *
     * @param request
     * @return
     */
    @RequestMapping("/logout")
    public boolean logout(HttpServletRequest request) {
        HttpSession session = request.getSession(false);
        if (session != null &&
                session.getAttribute(Constant.SESSION_USERINFO_KEY) != null) {
            // 移除 session 中当前登录的用户
            session.removeAttribute(Constant.SESSION_USERINFO_KEY);
        }
        return true;
    }

    /**
     * 获取个人信息
     * @param request
     * @return
     */
    @RequestMapping("/myinfo")
    public UserInfo myInfo(HttpServletRequest request) {
        HttpSession session = request.getSession(false);
        if (session != null &&
                session.getAttribute(Constant.SESSION_USERINFO_KEY) != null) {
            return (UserInfo) session.getAttribute(Constant.SESSION_USERINFO_KEY);
        }
        return null;
    }
}
Ⅱ. 效果演示
4、文章查询
① 前端页面
这里的 tools.js 是因为这个功能在很多地方都用到了,所以封装成 js 工具类。
tools.js:
// 获取当前 url 中某个参数的方法
function getURLParam(key) {
    var params = location.search;
    if (params.indexOf("?") >= 0) {
        params = params.substring(params.indexOf("?") + 1);
        var paramArr = params.split('&');
        for (var i = 0; i < paramArr.length; i++) {
            var namevalues = paramArr[i].split("=");
            if (namevalues[0] == key) {
                return namevalues[1];
            }
        }
    } else {
        return "";
    }
}
blog_content.html:
<!DOCTYPE html>
<html lang="en">
<head>
<meta charset="UTF-8">
<meta http-equiv="X-UA-Compatible" content="IE=edge">
<meta name="viewport" content="width=device-width, initial-scale=1.0">
<title>博客正文</title>
<link rel="stylesheet" href="css/conmmon.css">
<link rel="stylesheet" href="css/blog_content.css">
<link rel="stylesheet" href="editor.md/css/editormd.preview.min.css"/>
<script src="js/jquery.min.js"></script>
<script src="editor.md/editormd.js"></script>
<script src="editor.md/lib/marked.min.js"></script>
<script src="editor.md/lib/prettify.min.js"></script>
<script src="js/tools.js"></script>
</head>
<body>
<!-- 导航栏 -->
<div class="nav">
<img src="img/logo2.jpg" alt="">
<span class="title">我的博客系统</span>
<!-- 用来占据中间位置 -->
<span class="spacer"></span>
<a href="myblog_list.html">我的</a>
<a href="blog_list.html">主页</a>
<a href="blog_edit.html">写博客</a>
<a href="login.html">登陆</a>
</div>
<!-- 版心 -->
<div class="container">
<!-- 左侧个人信息 -->
<div class="container-left">
<div class="card">
<img src="img/doge.jpg" class="avtar" alt="">
<h3 id="username">用户名称</h3>
<a href="http:www.github.com">github 地址</a>
<div class="counter">
<span>文章</span>
<span>分类</span>
</div>
<div class="counter">
<span>2</span>
<span>1</span>
</div>
</div>
</div>
<!-- 右侧内容详情 -->
<div class="container-right">
<div class="blog-content">
<!-- 博客标题 -->
<h3 id="title">标题</h3>
<!-- 博客时间 -->
<div class="date">
<span id="data"></span>
访问量:<span id="rcount"></span>
</div>
<!-- 博客正文 -->
<div id="editorDiv">
</div>
</div>
</div>
</div>
<script type="text/javascript">
var editormd;
function initEdit(md) {
editormd = editormd.markdownToHTML("editorDiv", {
markdown: md, // Also, you can dynamic set Markdown text
// htmlDecode : true, // Enable / disable HTML tag encode.
// htmlDecode : "style,script,iframe", // Note: If enabled, you should filter some dangerous HTML tags for website security.
});
}
// 获取个人信息
function myInfo(uid) {
// 后端添加 /user/myinfobyuid 通过用户 id 查询用户对象
jQuery.ajax({
url: "/user/myinfobyuid",
type: "POST",
data: {"uid": uid},
success: function (result) {
if (result.code == 200 && result.data != null) {
jQuery("#username").text(result.data.username);
}
},
error: function (err) {
}
});
}
// 获取文章的详情信息
function getArtDetail() {
// 从 url 中获取到文章id
var aid = getURLParam("id");
if (aid != null && aid > 0) {
// 访问后端查询文章详情
jQuery.ajax({
url: "/art/detail",
type: "POST",
data: {"aid": aid},
success: function (result) {
if (result.code == 200 && result.data != null) {
var art = result.data;
jQuery("#title").text(art.title);
jQuery("#data").text(art.createTime);
jQuery("#rcount").text(art.rcount);
editormd = editormd.markdownToHTML("editorDiv", {
markdown: art.content
});
myInfo(art.uid);
}
}
});
}
}
getArtDetail();
</script>
</body>
</html>
② 后端代码(文章展示)
文章展示:通过文章 id 查询文章的详细信息,值得注意的就是后面我们在全部博客列表中,也会用到这个功能,所以我们需要在拦截器中放行该接口。
Ⅰ. 数据库
ArticleMapper:->getDetil
package com.example.mycnblog.mapper;

import com.example.mycnblog.model.ArticleInfo;
import org.apache.ibatis.annotations.Mapper;
import org.apache.ibatis.annotations.Param;

import java.util.List;

/**
 * 文章表的 mapper
 */
@Mapper
public interface ArticleMapper {

    /**
     * 根据用户id(uid)查询所有文章
     * @param uid
     * @return
     */
    public List<ArticleInfo> getMyList(@Param("uid") Integer uid);

    /**
     * 根据文章id(id)获取文章的详情信息
     * @param aid
     * @return
     */
    public ArticleInfo getDetail(@Param("aid") Integer aid);
}
ArticleMapper.xml:->getDetil
<?xml version="1.0" encoding="UTF-8"?>
<!DOCTYPE mapper PUBLIC "-//mybatis.org//DTD Mapper 3.0//EN" "http://mybatis.org/dtd/mybatis-3-mapper.dtd">
<mapper namespace="com.example.mycnblog.mapper.ArticleMapper">
    <select id="getMyList" resultType="com.example.mycnblog.model.ArticleInfo">
        select *
        from articleinfo
        where uid = #{uid}
    </select>

    <select id="getDetail" resultType="com.example.mycnblog.model.ArticleInfo">
        select *
        from articleinfo
        where id = #{aid}
    </select>
</mapper>
Ⅱ. 服务层
ArticleService:->getDetil
package com.example.mycnblog.service;

import com.example.mycnblog.mapper.ArticleMapper;
import com.example.mycnblog.model.ArticleInfo;
import org.springframework.beans.factory.annotation.Autowired;
import org.springframework.stereotype.Service;

import java.util.List;

/**
 * 文章表的服务层
 */
@Service
public class ArticleService {

    @Autowired
    private ArticleMapper articleMapper;

    /**
     * 查询用户的所有文章
     *
     * @param uid
     * @return
     */
    public List<ArticleInfo> getMyList(Integer uid) {
        return articleMapper.getMyList(uid);
    }

    /**
     * 获取文章的详情信息
     *
     * @param aid
     * @return
     */
    public ArticleInfo getDetil(Integer aid) {
        return articleMapper.getDetail(aid);
    }
}
Ⅲ. 控制层
ArticleController:->getDetil
package com.example.mycnblog.controller;

import com.example.mycnblog.common.AjaxResult;
import com.example.mycnblog.common.Constant;
import com.example.mycnblog.model.ArticleInfo;
import com.example.mycnblog.model.UserInfo;
import com.example.mycnblog.service.ArticleService;
import org.springframework.beans.factory.annotation.Autowired;
import org.springframework.web.bind.annotation.RequestMapping;
import org.springframework.web.bind.annotation.RestController;

import javax.servlet.http.HttpServletRequest;
import javax.servlet.http.HttpSession;
import java.util.List;

/**
 * 文章控制器
 */
@RestController
@RequestMapping("/art")
public class ArticleController {

    @Autowired
    private ArticleService articleService;

    /**
     * 查询用户的所有文章
     *
     * @param request
     * @return
     */
    @RequestMapping("/mylist")
    public List<ArticleInfo> myList(HttpServletRequest request) {
        HttpSession session = request.getSession(false);
        if (session != null &&
                session.getAttribute(Constant.SESSION_USERINFO_KEY) != null) {
            UserInfo userInfo = (UserInfo) session.getAttribute(Constant.SESSION_USERINFO_KEY);
            return articleService.getMyList(userInfo.getId());
        }
        return null;
    }

    /**
     * 获取文章的详情信息
     *
     * @param aid
     * @return
     */
    @RequestMapping("/detail")
    public Object getDetil(Integer aid) {
        if (aid != null && aid > 0) {
            return AjaxResult.success(articleService.getDetil(aid));
        }
        return AjaxResult.fail(-1, "查询失败");
    }
}
Ⅳ. 拦截器
涉及到之后,我们可能在所有文章列表中也需要,查询文章详情,所以直接把这个接口放行。
AppConfig:->放行文章详情接口
package com.example.mycnblog.common;

import org.springframework.beans.factory.annotation.Autowired;
import org.springframework.context.annotation.Configuration;
import org.springframework.web.servlet.config.annotation.InterceptorRegistration;
import org.springframework.web.servlet.config.annotation.InterceptorRegistry;
import org.springframework.web.servlet.config.annotation.WebMvcConfigurer;

import java.util.ArrayList;
import java.util.List;

/**
 * 配置拦截器
 */
@Configuration
public class AppConfig implements WebMvcConfigurer {

    // 不拦截的 url 集合
    List<String> excludes = new ArrayList<String>(){{
        add("/**/*.html");
        add("/js/**"); // 放行 static/js 下的所有文件
        add("/editor.md/**"); // 放行 static/editor.md 下的所有文件
        add("/css/**"); // 放行 static/css 下的所有文件
        add("/img/**"); // 放行 static/img 下的所有文件
        add("/user/reg"); // 放行注册接口
        add("/user/login"); // 放行登录接口
        add("/art/detail"); // 放行文章详情接口
    }};

    @Autowired
    private LoginInterceptor loginInterceptor;

    @Override
    public void addInterceptors(InterceptorRegistry registry) {
        // 配置拦截器
        InterceptorRegistration registration =
                registry.addInterceptor(loginInterceptor);
        registration.addPathPatterns("/**"); // 拦截所有请求
        registration.excludePathPatterns(excludes); // 排除不拦截的 url
    }
}
Ⅴ. 效果演示
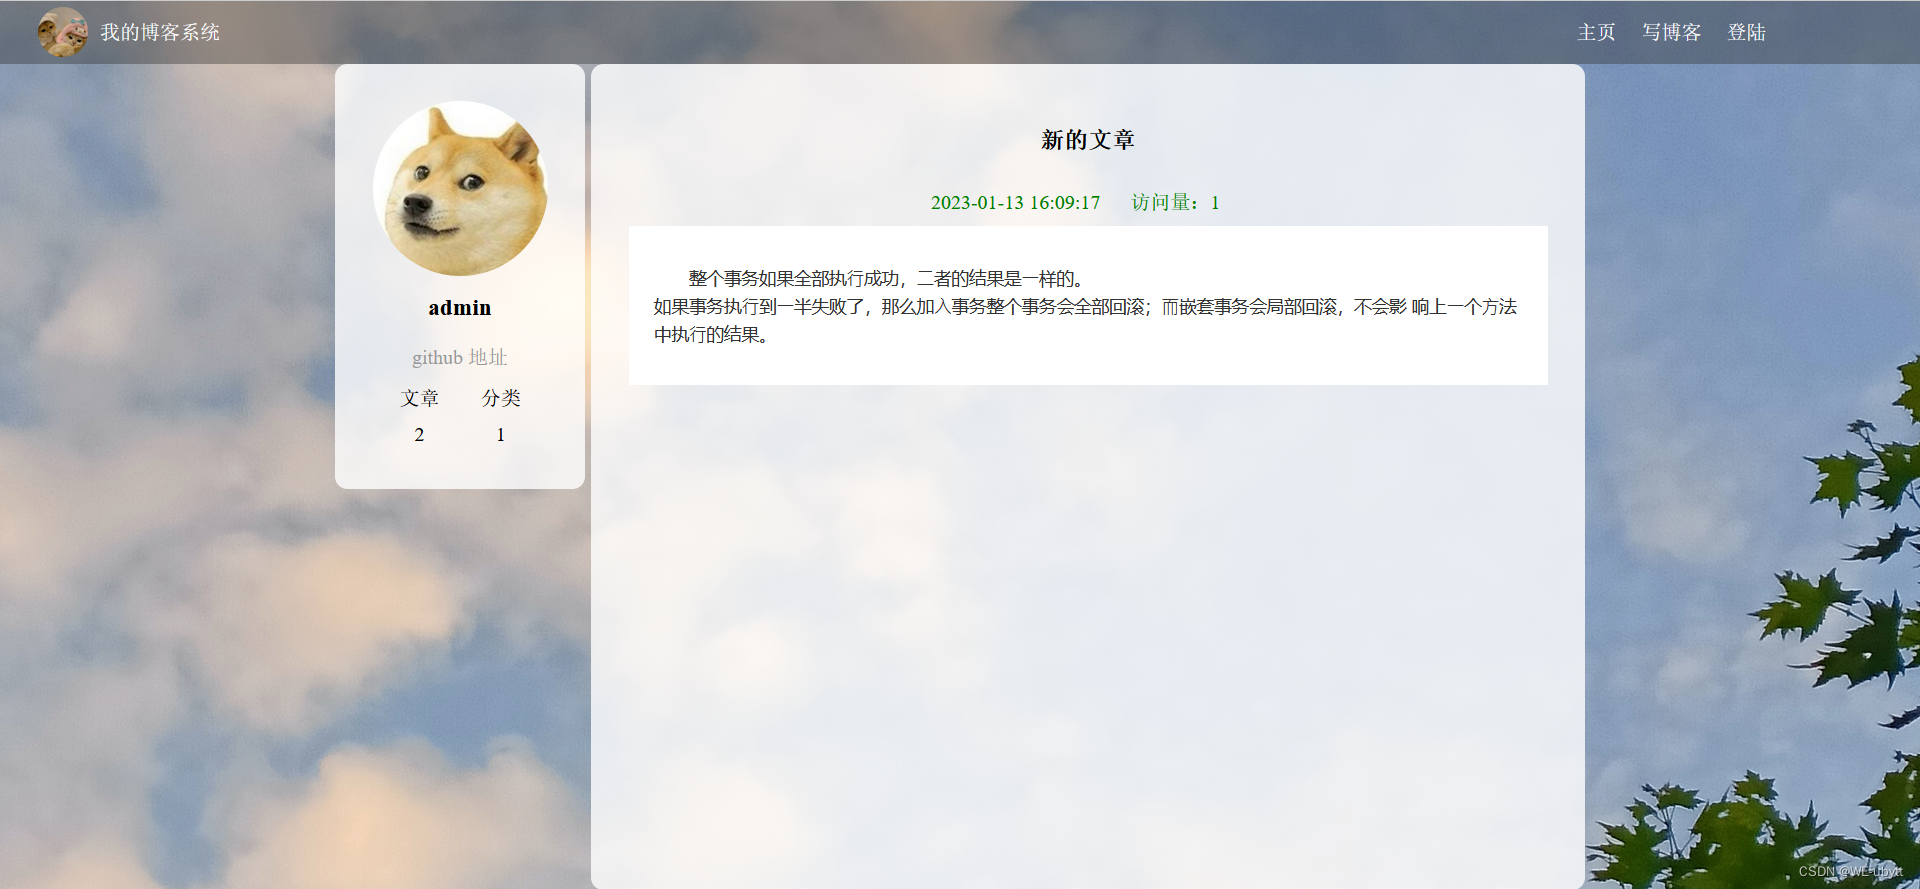
进入个人博客页面,点击查看详情:

就得到了文章的详情内容:

③ 后端代码(作者信息)
作者信息:在文章展示的同时,前端可以获取到文章的 uid,然后后端就可以通过这个 uid 查询作者信息。
Ⅰ. 数据库
UserMapper:->myInfoByUid
package com.example.mycnblog.mapper;

import com.example.mycnblog.model.UserInfo;
import org.apache.ibatis.annotations.Mapper;
import org.apache.ibatis.annotations.Param;

/**
 * 用户表的 mapper
 */
@Mapper
public interface UserMapper {

    /**
     * 用户注册
     * @param username
     * @param password
     * @return
     */
    public int add(@Param("username") String username,
                   @Param("password") String password);

    /**
     * 用户登录
     * @param username
     * @param password
     * @return
     */
    public UserInfo login(@Param("username") String username,
                        @Param("password") String password);

    /**
     * 通过用户 id 查询用户信息
     * @param uid
     * @return
     */
    public UserInfo myInfoByUid(@Param("uid") Integer uid);
}
UserMapper.xml:->myInfoByUid
<?xml version="1.0" encoding="UTF-8"?>
<!DOCTYPE mapper PUBLIC "-//mybatis.org//DTD Mapper 3.0//EN" "http://mybatis.org/dtd/mybatis-3-mapper.dtd">
<mapper namespace="com.example.mycnblog.mapper.UserMapper">
    <insert id="add">
        insert into userinfo(username, password)
        values (#{username}, #{password})
    </insert>

    <select id="login" resultType="com.example.mycnblog.model.UserInfo">
        select *
        from userinfo
        where username = #{username}
          and password = #{password}
    </select>

    <select id="myInfoByUid" resultType="com.example.mycnblog.model.UserInfo">
        select *
        from userinfo
        where id = #{uid}
    </select>
</mapper>
Ⅱ. 服务层
UserService:->myInfoByUid
package com.example.mycnblog.service;

import com.example.mycnblog.mapper.UserMapper;
import com.example.mycnblog.model.UserInfo;
import org.apache.ibatis.annotations.Param;
import org.springframework.beans.factory.annotation.Autowired;
import org.springframework.stereotype.Service;

/**
 * 用户表的服务层
 */
@Service
public class UserService {

    @Autowired
    private UserMapper userMapper;

    /**
     * 用户注册
     * @param username
     * @param password
     * @return
     */
    public int add(String username, String password) {
        return userMapper.add(username, password);
    }

    /**
     * 用户登录
     * @param username
     * @param password
     * @return
     */
    public UserInfo login(String username, String password) {
        return userMapper.login(username, password);
    }

    /**
     * 获取作者信息
     * @param uid
     * @return
     */
    public UserInfo myInfoByUid(Integer uid){
        return userMapper.myInfoByUid(uid);
    }
}
Ⅲ. 控制层
UserController:->myInfoByUid
package com.example.mycnblog.controller;

import com.example.mycnblog.common.AjaxResult;
import com.example.mycnblog.common.Constant;
import com.example.mycnblog.model.UserInfo;
import com.example.mycnblog.service.UserService;
import org.springframework.beans.factory.annotation.Autowired;
import org.springframework.util.StringUtils;
import org.springframework.web.bind.annotation.RequestMapping;
import org.springframework.web.bind.annotation.RestController;

import javax.servlet.http.HttpServletRequest;
import javax.servlet.http.HttpSession;

/**
 * 用户控制器
 */
@RestController
@RequestMapping("/user")
public class UserController {

    @Autowired
    private UserService userService;

    /**
     * 用户注册
     *
     * @param username
     * @param password
     * @return
     */
    @RequestMapping("/reg")
    public Object reg(String username, String password) {
        // 1.非空效验
        if (!StringUtils.hasLength(username) || !StringUtils.hasLength(password)) {
            return AjaxResult.fail(-1, "非法的参数请求!");
        }
        // 2.进行添加操作
        int result = userService.add(username, password);
        if (result == 1) {
            return AjaxResult.success("注册成功!", 1);
        } else {
            return AjaxResult.fail(-1, "数据库添加出错!");
        }
    }

    /**
     * 用户登录
     *
     * @param username
     * @param password
     * @return 如果用户名和密码都正确,返回1;如果用户名或密码为空/不正确,返回非1
     */
    @RequestMapping("/login")
    public int login(HttpServletRequest request, String username, String password) {
        // 1.非空效验
        if (!StringUtils.hasLength(username) || !StringUtils.hasLength(password)) {
            // 参数有误
            return 0;
        }
        // 2.进行查找操作
        UserInfo userInfo = userService.login(username, password);
        if (userInfo == null || userInfo.getId() <= 0) { // userinfo 无效
            // 用户名或密码错误
            return -1;
        } else {
            // 用户名和密码正确
            // 将 userinfo 保存到 session 中
            HttpSession session = request.getSession();
            session.setAttribute(Constant.SESSION_USERINFO_KEY, userInfo);
            return 1;
        }
    }

    /**
     * 退出登录
     *
     * @param request
     * @return
     */
    @RequestMapping("/logout")
    public boolean logout(HttpServletRequest request) {
        HttpSession session = request.getSession(false);
        if (session != null &&
                session.getAttribute(Constant.SESSION_USERINFO_KEY) != null) {
            // 移除 session 中当前登录的用户
            session.removeAttribute(Constant.SESSION_USERINFO_KEY);
        }
        return true;
    }

    /**
     * 获取个人信息
     *
     * @param request
     * @return
     */
    @RequestMapping("/myinfo")
    public UserInfo myInfo(HttpServletRequest request) {
        HttpSession session = request.getSession(false);
        if (session != null &&
                session.getAttribute(Constant.SESSION_USERINFO_KEY) != null) {
            return (UserInfo) session.getAttribute(Constant.SESSION_USERINFO_KEY);
        }
        return null;
    }

    /**
     * 获取作者信息
     * @param uid
     * @return
     */
    @RequestMapping("/myinfobyuid")
    public UserInfo myInfoByUid(Integer uid) {
        if (uid != null && uid > 0) {
            return userService.myInfoByUid(uid);
        }
        return null;
    }
}
Ⅳ. 效果演示
5、文章修改
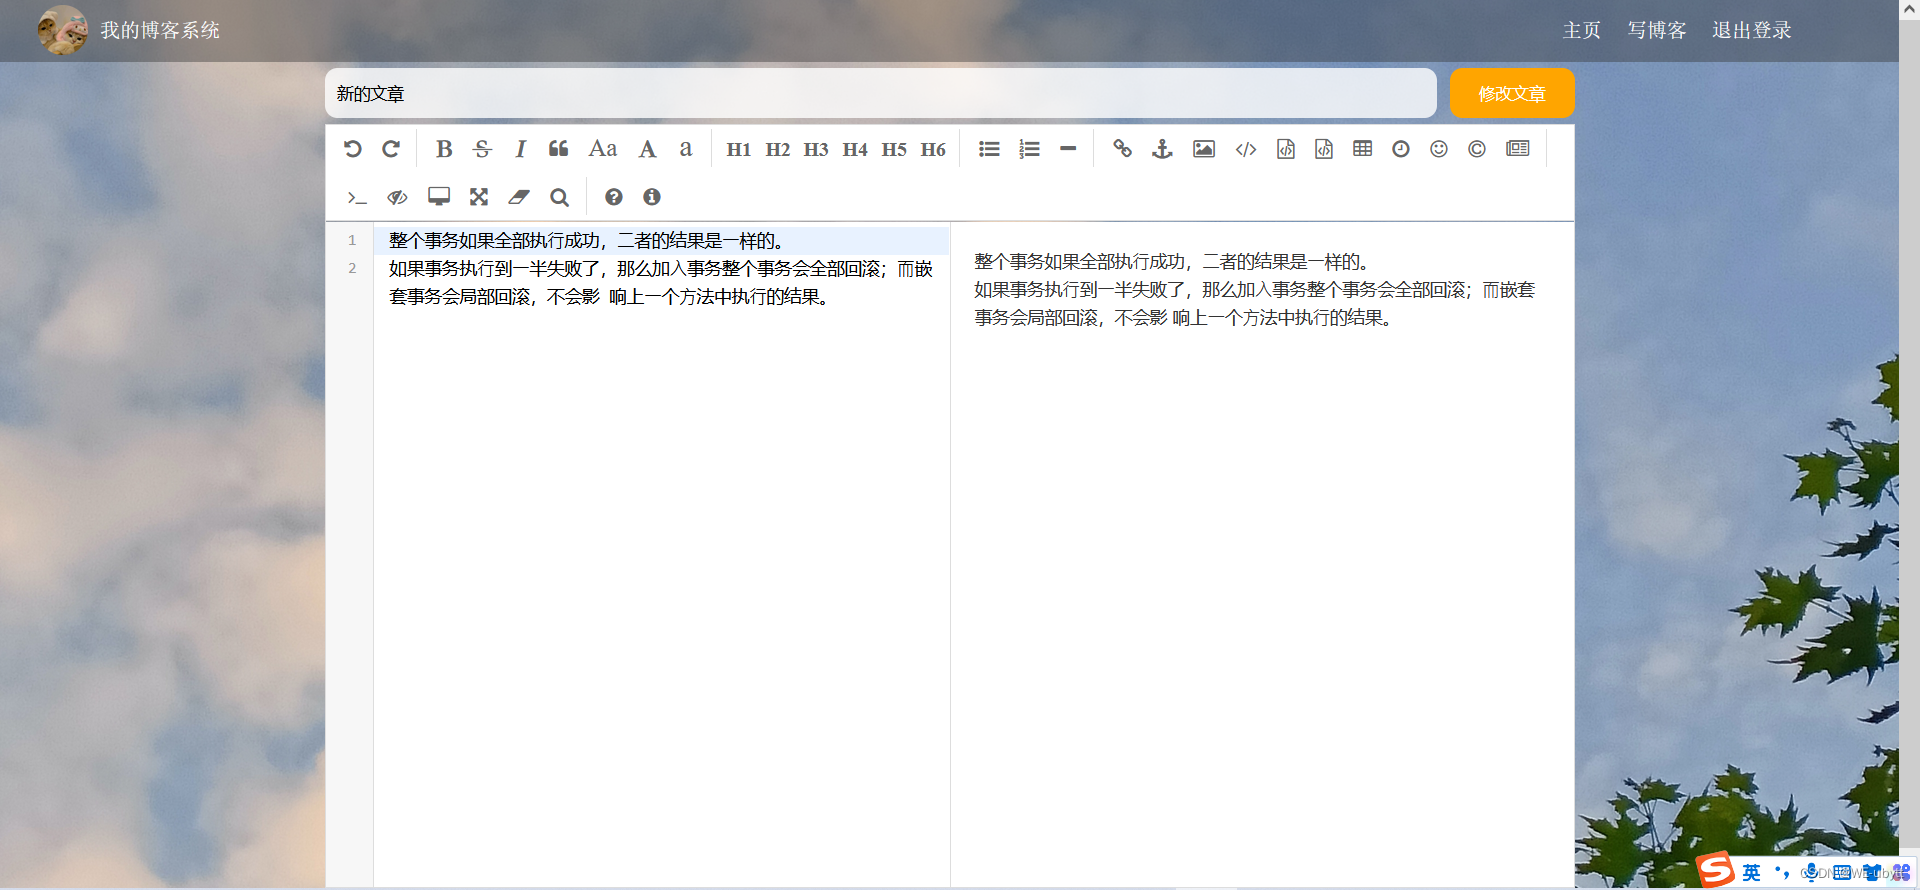
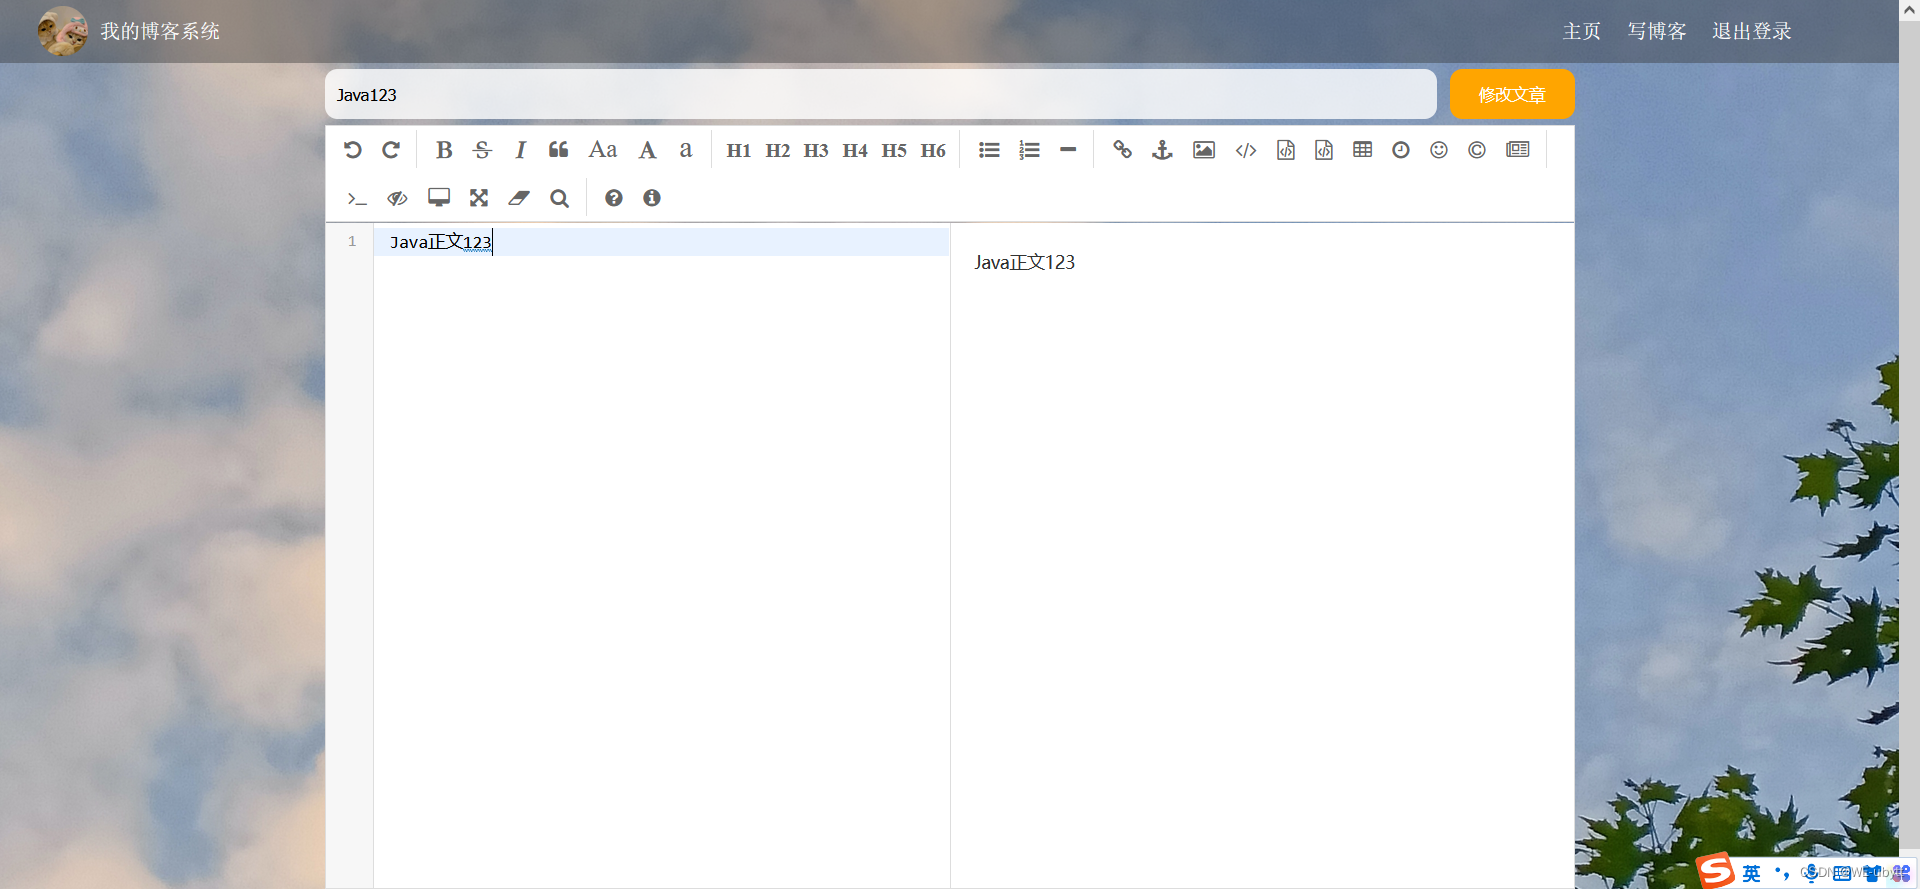
① 前端页面
blog_update.html:
<!DOCTYPE html>
<html lang="en">
<head>
<meta charset="UTF-8">
<meta http-equiv="X-UA-Compatible" content="IE=edge">
<meta name="viewport" content="width=device-width, initial-scale=1.0">
<title>博客编辑</title>
<!-- 引入自己写的样式 -->
<link rel="stylesheet" href="css/conmmon.css">
<link rel="stylesheet" href="css/blog_edit.css">
<!-- 引入 editor.md 的依赖 -->
<link rel="stylesheet" href="editor.md/css/editormd.min.css"/>
<script src="js/jquery.min.js"></script>
<script src="editor.md/editormd.js"></script>
<!-- 引入工具js -->
<script src="js/tools.js"></script>
</head>
<body>
<!-- 导航栏 -->
<div class="nav">
<img src="img/logo2.jpg" alt="">
<span class="title">我的博客系统</span>
<!-- 用来占据中间位置 -->
<span class="spacer"></span>
<a href="blog_list.html">主页</a>
<a href="blog_edit.html">写博客</a>
<a href="#">退出登录</a>
</div>
<!-- 编辑框容器 -->
<div class="blog-edit-container">
<!-- 标题编辑区 -->
<div class="title">
<input id="title" type="text" placeholder="在这里写下文章标题">
<button onclick="mysub()">修改文章</button>
</div>
<!-- 创建编辑器标签 -->
<div id="editorDiv">
<textarea id="editor-markdown" style="display:none;"></textarea>
</div>
</div>
<script>
var aid;
var editor;
function initEdit(md) {
// 编辑器设置
editor = editormd("editorDiv", {
// 这里的尺寸必须在这里设置. 设置样式会被 editormd 自动覆盖掉.
width: "100%",
// 高度 100% 意思是和父元素一样高. 要在父元素的基础上去掉标题编辑区的高度
height: "calc(100% - 50px)",
// 编辑器中的初始内容
markdown: md,
// 指定 editor.md 依赖的插件路径
path: "editor.md/lib/",
saveHTMLToTextarea: true //
});
}
// 提交
function mysub() {
// alert(editor.getValue()); // 获取值
var title = jQuery("#title");
var content = editor.getValue();
// 非空效验
if (title.val() == "") {
title.focus();
alert("请先输入标题!");
return false;
}
if (content == "") {
content.focus();
alert("请先输入正文!");
return false;
}
jQuery.ajax({
url: "/art/update",
type: "POST",
data: {
"aid": aid,
"title": title.val(),
"content": content
},
success: function (result) {
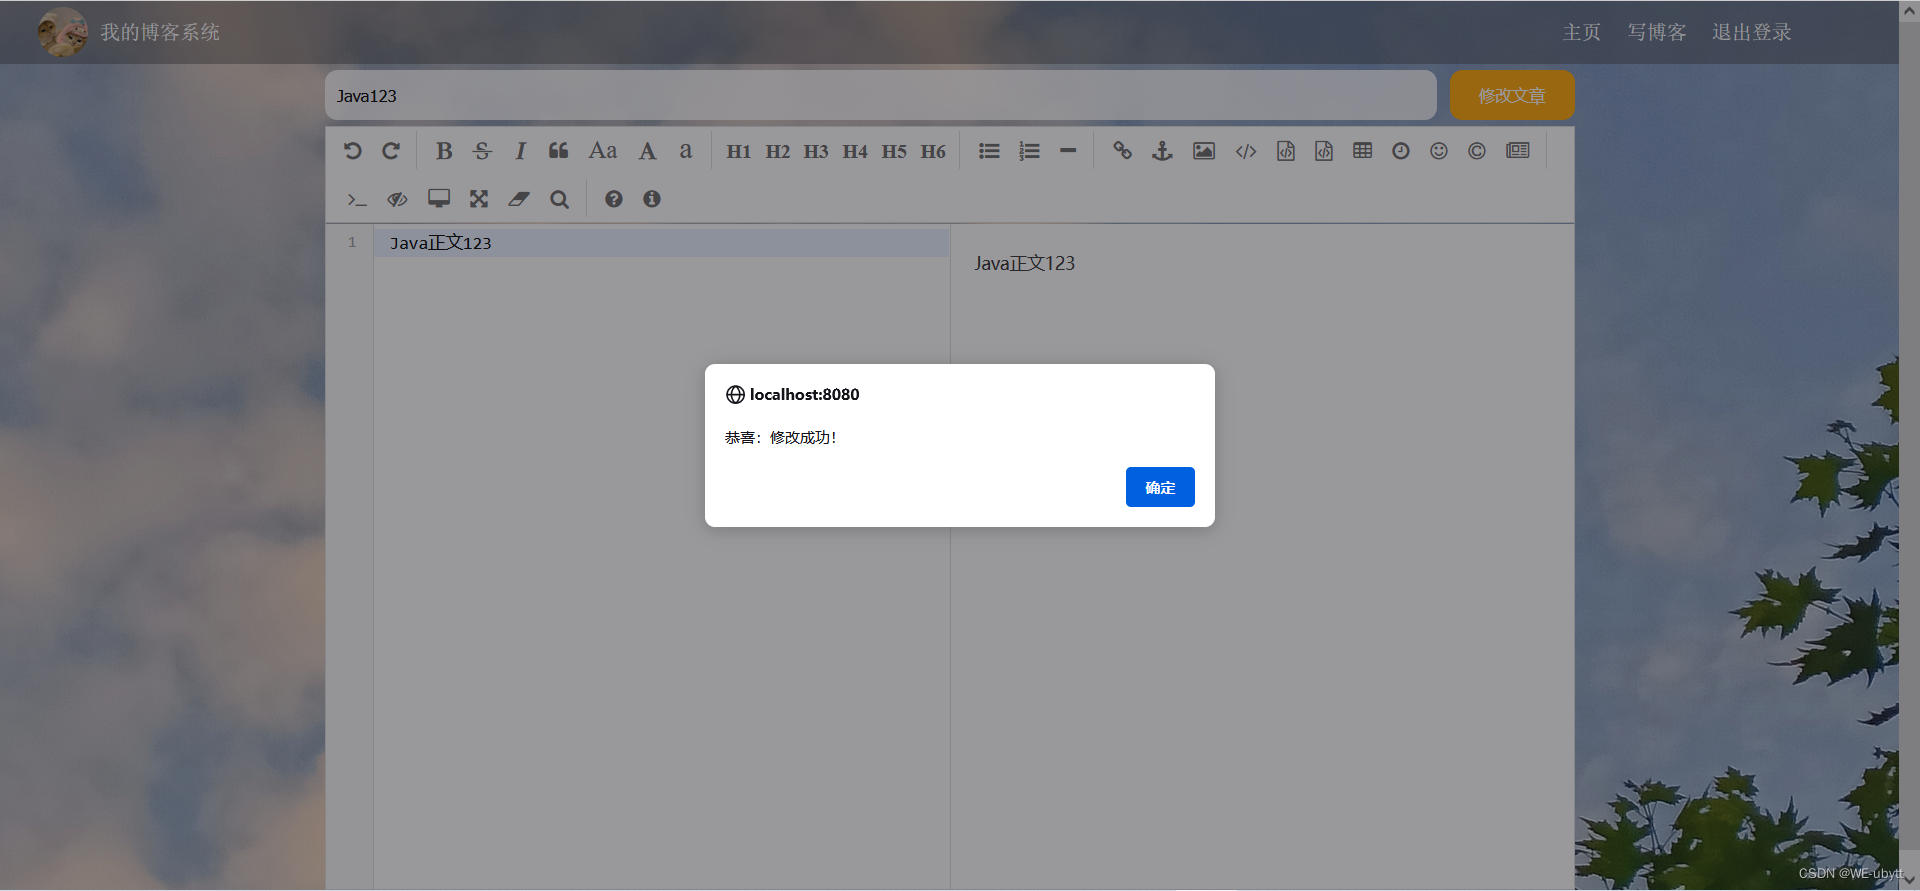
if (result.code == 200 && result.data > 0) {
alert("恭喜:修改成功!")
location.href = "myblog_list.html";
} else {
alert("抱歉:修改失败,请重试!");
}
},
error: function (err) {
if (err != null && err.status == 401) {
alert("用户未登录,即将跳转到登录页!");
// 已经被拦截器拦截了,未登录
location.href = "/login.html";
}
}
});
}
// 查询文章详情并展现
function showArt() {
// 从 url 中获取文章 id
aid = getURLParam("id");
if (aid != null && aid > 0) {
// 访问后端查询文章详情
jQuery.ajax({
url: "/art/detailbyid",
type: "POST",
data: {"aid": aid},
success: function (result) {
if (result.code == 200 && result.data != null) {
var art = result.data;
jQuery("#title").val(art.title);
initEdit(art.content);
} else {
alert("查询失败,请重试!");
}
},
error: function (err) {
if (err != null && err.status == 401) {
alert("用户未登录,即将跳转到登录页!");
// 已经被拦截器拦截了,未登录
location.href = "/login.html";
}
}
});
}
}
showArt();
</script>
</body>
</html>
② 后端代码(查询文章)
查询文章:这个就是通过文章 id 查询文章内容,这里的数据库和服务层可以用我们之前已经实现好的 getDetil;同时还有进行一次文章的归属人验证,这里就需要用到获取 session 信息,之前 myList 这个接口也用到了,所以我们就可以把它封装起来。
Ⅰ. 工具层
SessionUtil:->getLoginUser
package com.example.mycnblog.common;

import com.example.mycnblog.model.UserInfo;

import javax.servlet.http.HttpServletRequest;
import javax.servlet.http.HttpSession;

public class SessionUtil {

    /**
     * 查询当前登录用户的 session 信息
     * @param request
     * @return
     */
    public static UserInfo getLoginUser(HttpServletRequest request){
        HttpSession session = request.getSession(false);
        if (session != null &&
                session.getAttribute(Constant.SESSION_USERINFO_KEY) != null) {
            return (UserInfo) session.getAttribute(Constant.SESSION_USERINFO_KEY);
        }
        return null;
    }
}
Ⅱ. 控制层
ArticleController:->getDetailById
package com.example.mycnblog.controller;

import com.example.mycnblog.common.AjaxResult;
import com.example.mycnblog.common.Constant;
import com.example.mycnblog.common.SessionUtil;
import com.example.mycnblog.model.ArticleInfo;
import com.example.mycnblog.model.UserInfo;
import com.example.mycnblog.service.ArticleService;
import org.springframework.beans.factory.annotation.Autowired;
import org.springframework.util.StringUtils;
import org.springframework.web.bind.annotation.RequestMapping;
import org.springframework.web.bind.annotation.RestController;

import javax.servlet.http.HttpServletRequest;
import javax.servlet.http.HttpSession;
import java.util.List;

/**
 * 文章控制器
 */
@RestController
@RequestMapping("/art")
public class ArticleController {

    @Autowired
    private ArticleService articleService;

    /**
     * 查询用户的所有文章
     *
     * @param request
     * @return
     */
    @RequestMapping("/mylist")
    public List<ArticleInfo> myList(HttpServletRequest request) {
        UserInfo userInfo = SessionUtil.getLoginUser(request);
        if (userInfo != null) {
            return articleService.getMyList(userInfo.getId());
        }
        return null;
    }

    /**
     * 获取文章的详情信息
     *
     * @param aid
     * @return
     */
    @RequestMapping("/detail")
    public Object getDetil(Integer aid) {
        if (aid != null && aid > 0) {
            return AjaxResult.success(articleService.getDetil(aid));
        }
        return AjaxResult.fail(-1, "查询失败");
    }

    /**
     * 修改页面,查询文章
     *
     * @param request
     * @param aid
     * @return
     */
    @RequestMapping("/detailbyid")
    public Object getDetailById(HttpServletRequest request, Integer aid) {
        if (aid != null && aid > 0) {
            // 根据文章查询文章的详情
            ArticleInfo articleInfo = articleService.getDetil(aid);
            // 文章的归属人验证
            UserInfo userInfo = SessionUtil.getLoginUser(request);
            if (userInfo != null && articleInfo != null &&
                    userInfo.getId() == articleInfo.getUid()) { // 文章归属人正确
                return AjaxResult.success(articleInfo);
            }
        }
        return AjaxResult.fail(-1, "查询失败");
    }
}
Ⅲ. 效果演示
进入个人博客页面,点击修改:
就到了修改界面:
③ 后端代码(修改文章)
Ⅰ. 数据库
ArticleMapper:->update
package com.example.mycnblog.mapper;

import com.example.mycnblog.model.ArticleInfo;
import org.apache.ibatis.annotations.Mapper;
import org.apache.ibatis.annotations.Param;

import java.util.List;

/**
 * 文章表的 mapper
 */
@Mapper
public interface ArticleMapper {

    /**
     * 根据用户id(uid)查询所有文章
     *
     * @param uid
     * @return
     */
    public List<ArticleInfo> getMyList(@Param("uid") Integer uid);

    /**
     * 根据文章id(id)获取文章的详情信息
     *
     * @param aid
     * @return
     */
    public ArticleInfo getDetail(@Param("aid") Integer aid);

    /**
     * 根据文章id(id)和用户id(uid)修改文章的标题和内容
     *
     * @param aid
     * @param uid
     * @param title
     * @param content
     * @return
     */
    public int update(@Param("aid") Integer aid,
                      @Param("uid") Integer uid,
                      @Param("title") String title,
                      @Param("content") String content);
}
ArticleMapper.xml:->update
<?xml version="1.0" encoding="UTF-8"?>
<!DOCTYPE mapper PUBLIC "-//mybatis.org//DTD Mapper 3.0//EN" "http://mybatis.org/dtd/mybatis-3-mapper.dtd">
<mapper namespace="com.example.mycnblog.mapper.ArticleMapper">
    <select id="getMyList" resultType="com.example.mycnblog.model.ArticleInfo">
        select *
        from articleinfo
        where uid = #{uid}
    </select>

    <select id="getDetail" resultType="com.example.mycnblog.model.ArticleInfo">
        select *
        from articleinfo
        where id = #{aid}
    </select>

    <update id="update">
        update articleinfo
        set title=#{title},
            content=#{content}
        where id = #{aid}
          and uid = #{uid}
    </update>
</mapper>
Ⅱ. 服务层
ArticleService:->update
package com.example.mycnblog.service;

import com.example.mycnblog.mapper.ArticleMapper;
import com.example.mycnblog.model.ArticleInfo;
import org.springframework.beans.factory.annotation.Autowired;
import org.springframework.stereotype.Service;

import java.util.List;

/**
 * 文章表的服务层
 */
@Service
public class ArticleService {

    @Autowired
    private ArticleMapper articleMapper;

    /**
     * 查询用户的所有文章
     *
     * @param uid
     * @return
     */
    public List<ArticleInfo> getMyList(Integer uid) {
        return articleMapper.getMyList(uid);
    }

    /**
     * 获取文章的详情信息
     *
     * @param aid
     * @return
     */
    public ArticleInfo getDetil(Integer aid) {
        return articleMapper.getDetail(aid);
    }

    /**
     * 修改页面,修改文章
     * @param aid
     * @param uid
     * @param title
     * @param content
     * @return
     */
    public int update(Integer aid, Integer uid, String title, String content) {
        return articleMapper.update(aid, uid, title, content);
    }
}
Ⅲ. 控制层
ArticleController:->update
package com.example.mycnblog.controller;

import com.example.mycnblog.common.AjaxResult;
import com.example.mycnblog.common.Constant;
import com.example.mycnblog.common.SessionUtil;
import com.example.mycnblog.model.ArticleInfo;
import com.example.mycnblog.model.UserInfo;
import com.example.mycnblog.service.ArticleService;
import org.springframework.beans.factory.annotation.Autowired;
import org.springframework.util.StringUtils;
import org.springframework.web.bind.annotation.RequestMapping;
import org.springframework.web.bind.annotation.RestController;

import javax.servlet.http.HttpServletRequest;
import javax.servlet.http.HttpSession;
import java.util.List;

/**
 * 文章控制器
 */
@RestController
@RequestMapping("/art")
public class ArticleController {

    @Autowired
    private ArticleService articleService;

    /**
     * 查询用户的所有文章
     *
     * @param request
     * @return
     */
    @RequestMapping("/mylist")
    public List<ArticleInfo> myList(HttpServletRequest request) {
        UserInfo userInfo = SessionUtil.getLoginUser(request);
        if (userInfo != null) {
            return articleService.getMyList(userInfo.getId());
        }
        return null;
    }

    /**
     * 获取文章的详情信息
     *
     * @param aid
     * @return
     */
    @RequestMapping("/detail")
    public Object getDetil(Integer aid) {
        if (aid != null && aid > 0) {
            return AjaxResult.success(articleService.getDetil(aid));
        }
        return AjaxResult.fail(-1, "查询失败");
    }

    /**
     * 修改页面,查询文章
     *
     * @param request
     * @param aid
     * @return
     */
    @RequestMapping("/detailbyid")
    public Object getDetailById(HttpServletRequest request, Integer aid) {
        if (aid != null && aid > 0) {
            // 根据文章查询文章的详情
            ArticleInfo articleInfo = articleService.getDetil(aid);
            // 文章的归属人验证
            UserInfo userInfo = SessionUtil.getLoginUser(request);
            if (userInfo != null && articleInfo != null &&
                    userInfo.getId() == articleInfo.getUid()) { // 文章归属人正确
                return AjaxResult.success(articleInfo);
            }
        }
        return AjaxResult.fail(-1, "查询失败");
    }

    /**
     * 修改页面,修改文章
     * @param request
     * @param aid
     * @param title
     * @param content
     * @return
     */
    @RequestMapping("/update")
    public int update(HttpServletRequest request, Integer aid, String title, String content) {
        // 非空校验
        if (aid == null || !StringUtils.hasLength(title) || !StringUtils.hasLength(content)) {
            // 参数有误
            return 0;
        }
        UserInfo userInfo = SessionUtil.getLoginUser(request);
        if (userInfo != null && userInfo.getId() > 0) {
            return articleService.update(aid, userInfo.getId(), title, content);
        }
        return 0;
    }
}
Ⅳ. 效果演示
修改前数据库信息:

进入修改页面,做出修改,点击修改文章:
提示修改成功:
跳转至个人博客列表:

修改后数据库信息:

6、文章删除
① 前端页面
myblog_list.html:
<!DOCTYPE html>
<html lang="en">
<head>
<meta charset="UTF-8">
<meta http-equiv="X-UA-Compatible" content="IE=edge">
<meta name="viewport" content="width=device-width, initial-scale=1.0">
<title>博客列表</title>
<link rel="stylesheet" href="css/conmmon.css">
<link rel="stylesheet" href="css/blog_list.css">
<!-- 引入 jQuery -->
<script src="js/jquery.min.js"></script>
</head>
<body>
<!-- 导航栏 -->
<div class="nav">
<img src="img/logo2.jpg" alt="">
<span class="title">我的博客系统</span>
<!-- 用来占据中间位置 -->
<span class="spacer"></span>
<a href="blog_list.html">主页</a>
<a href="blog_edit.html">写博客</a>
<a href="javascript:onExit()">退出登陆</a>
<!-- <a href="#">注销</a> -->
</div>
<!-- 版心 -->
<div class="container">
<!-- 左侧个人信息 -->
<div class="container-left">
<div class="card">
<img src="img/doge.jpg" class="avtar" alt="">
<h3 id="username">狗</h3>
<a href="http:www.github.com">github 地址</a>
<div class="counter">
<span>文章</span>
<span>分类</span>
</div>
<div class="counter">
<span>2</span>
<span>1</span>
</div>
</div>
</div>
<!-- 右侧内容详情 -->
<div class="container-right" id="artlistDiv">
<!-- 每一篇博客包含标题, 摘要, 时间 -->
<div class="blog">
<div class="title">文章标题</div>
<div class="date">创建时间</div>
<div class="desc">
文章内容
</div>
<a href="blog_content.html?id=1" class="detail">查看全文 >></a>
</div>
</div>
</div>
</body>
<script>
var descLength = 80; // 简介的长度
// 字符串截取,将文章正文截取成简介
function mySubstr(content) {
if (content.length > descLength) {
return content.substr(0, descLength);
}
return content;
}
// 初始化个人列表信息
function initList() {
jQuery.ajax({
url: "/art/mylist",
type: "POST",
data: {},
success: function (result) {
console.dir(result);
if (result.code == 200 && result.data != null && result.data.length > 0) {
// 此人发表文章了
var html = "";
result.data.forEach(function (item) {
html += '<div class="blog">\n' +
' <div class="title">' + item.title + '</div>\n' +
' <div class="date">' + item.createTime + '</div>\n' +
' <div class="desc">\n' + mySubstr(item.content) + '</div>\n' +
' <div style="margin-left: 200px;margin-top: 50px">' +
' <a href="blog_content.html?id=' + item.id + '">查看详情</a> ' +
' <a href="blog_update.html?id=' + item.id + '">修改</a> ' +
' <a href="javascript:myDel(' + item.id + ')">删除</a> ' +
' </div>' +
' </div>';
});
jQuery("#artlistDiv").html(html);
} else {
// 此人未发表任何文章
jQuery("#artlistDiv").html("<h1>暂无数据</h1>");
}
},
error: function (err) {
if (err != null && err.status == 401) {
alert("用户未登录,即将跳转到登录页")
// 已经被拦截器拦截了,未登录
location.href = "/login.html";
}
}
});
}
initList(); // 当浏览器渲染引擎执行到此行的时候,就会调用 initList() 方法
// 获取个人信息
function myinfo() {
jQuery.ajax({
url: "/user/myinfo",
type: "POST",
data: {},
success: function (result) {
if (result.code == 200 && result.data != null) {
jQuery("#username").text(result.data.username);
}
},
error: function (err) {
}
});
}
myinfo();
// 删除文章
function myDel(aid) {
if (confirm("确认删除?")) {
// Ajax 请求后端进行退出操作
jQuery.ajax({
url: "/art/delete",
type: "POST",
data: {
"aid": aid
},
success: function (result) {
location.href = "/myblog_list.html";
},
error: function (err) {
if (err != null && err.status == 401) {
alert("用户未登录,即将跳转到登录页")
// 已经被拦截器拦截了,未登录
location.href = "/login.html";
}
}
});
}
}
// 退出登录
function onExit() {
if (confirm("确认退出?")) {
// Ajax 请求后端进行退出操作
jQuery.ajax({
url: "/user/logout",
type: "POST",
data: {},
success: function (result) {
location.href = "/login.html";
},
error: function (err) {
if (err != null && err.status == 401) {
alert("用户未登录,即将跳转到登录页")
// 已经被拦截器拦截了,未登录
location.href = "/login.html";
}
}
});
}
}
</script>
</html>
② 后端代码
文章删除:这个其实很简单,对于后端来说,就是一个简单的通过文章 id 删除文章。
Ⅰ. 数据库
ArticleMapper:->delete
package com.example.mycnblog.mapper;

import com.example.mycnblog.model.ArticleInfo;
import org.apache.ibatis.annotations.Mapper;
import org.apache.ibatis.annotations.Param;

import java.util.List;

/**
 * 文章表的 mapper
 */
@Mapper
public interface ArticleMapper {

    /**
     * 根据用户id(uid)查询所有文章
     *
     * @param uid
     * @return
     */
    public List<ArticleInfo> getMyList(@Param("uid") Integer uid);

    /**
     * 根据文章id(id)获取文章的详情信息
     *
     * @param aid
     * @return
     */
    public ArticleInfo getDetail(@Param("aid") Integer aid);

    /**
     * 根据文章id(id)和用户id(uid)修改文章的标题和内容
     *
     * @param aid
     * @param uid
     * @param title
     * @param content
     * @return
     */
    public int update(@Param("aid") Integer aid,
                      @Param("uid") Integer uid,
                      @Param("title") String title,
                      @Param("content") String content);

    /**
     * 根据文章id(id)删除文章
     *
     * @param aid
     * @return
     */
    public int delete(@Param("aid") Integer aid);
}
ArticleMapper.xml:->delete
<?xml version="1.0" encoding="UTF-8"?>
<!DOCTYPE mapper PUBLIC "-//mybatis.org//DTD Mapper 3.0//EN" "http://mybatis.org/dtd/mybatis-3-mapper.dtd">
<mapper namespace="com.example.mycnblog.mapper.ArticleMapper">
    <select id="getMyList" resultType="com.example.mycnblog.model.ArticleInfo">
        select *
        from articleinfo
        where uid = #{uid}
    </select>

    <select id="getDetail" resultType="com.example.mycnblog.model.ArticleInfo">
        select *
        from articleinfo
        where id = #{aid}
    </select>

    <update id="update">
        update articleinfo
        set title=#{title},
            content=#{content}
        where id = #{aid}
          and uid = #{uid}
    </update>

    <delete id="delete">
        delete
        from articleinfo
        where id = #{aid}
    </delete>
</mapper>
Ⅱ. 服务层
ArticleService:->delete
package com.example.mycnblog.service;

import com.example.mycnblog.mapper.ArticleMapper;
import com.example.mycnblog.model.ArticleInfo;
import org.springframework.beans.factory.annotation.Autowired;
import org.springframework.stereotype.Service;

import javax.servlet.http.HttpServletRequest;
import java.util.List;

/**
 * 文章表的服务层
 */
@Service
public class ArticleService {

    @Autowired
    private ArticleMapper articleMapper;

    /**
     * 用户博客列表,查询用户的所有文章
     *
     * @param uid
     * @return
     */
    public List<ArticleInfo> getMyList(Integer uid) {
        return articleMapper.getMyList(uid);
    }

    /**
     * 用户博客列表,获取文章的详情信息
     *
     * @param aid
     * @return
     */
    public ArticleInfo getDetil(Integer aid) {
        return articleMapper.getDetail(aid);
    }

    /**
     * 修改页面,修改文章
     *
     * @param aid
     * @param uid
     * @param title
     * @param content
     * @return
     */
    public int update(Integer aid, Integer uid, String title, String content) {
        return articleMapper.update(aid, uid, title, content);
    }

    /**
     * 用户博客列表,删除文章
     *
     * @param aid
     * @return
     */
    public int delete(Integer aid) {
        return articleMapper.delete(aid);
    }
}
Ⅲ. 控制层
ArticleController:->delete
package com.example.mycnblog.controller;

import com.example.mycnblog.common.AjaxResult;
import com.example.mycnblog.common.Constant;
import com.example.mycnblog.common.SessionUtil;
import com.example.mycnblog.model.ArticleInfo;
import com.example.mycnblog.model.UserInfo;
import com.example.mycnblog.service.ArticleService;
import org.springframework.beans.factory.annotation.Autowired;
import org.springframework.util.StringUtils;
import org.springframework.web.bind.annotation.RequestMapping;
import org.springframework.web.bind.annotation.RestController;

import javax.servlet.http.HttpServletRequest;
import javax.servlet.http.HttpSession;
import java.util.List;

/**
 * 文章控制器
 */
@RestController
@RequestMapping("/art")
public class ArticleController {

    @Autowired
    private ArticleService articleService;

    /**
     * 查询用户的所有文章
     *
     * @param request
     * @return
     */
    @RequestMapping("/mylist")
    public List<ArticleInfo> myList(HttpServletRequest request) {
        UserInfo userInfo = SessionUtil.getLoginUser(request);
        if (userInfo != null) {
            return articleService.getMyList(userInfo.getId());
        }
        return null;
    }

    /**
     * 获取文章的详情信息
     *
     * @param aid
     * @return
     */
    @RequestMapping("/detail")
    public Object getDetil(Integer aid) {
        if (aid != null && aid > 0) {
            return AjaxResult.success(articleService.getDetil(aid));
        }
        return AjaxResult.fail(-1, "查询失败");
    }

    /**
     * 修改页面,查询文章
     *
     * @param request
     * @param aid
     * @return
     */
    @RequestMapping("/detailbyid")
    public Object getDetailById(HttpServletRequest request, Integer aid) {
        if (aid != null && aid > 0) {
            // 根据文章查询文章的详情
            ArticleInfo articleInfo = articleService.getDetil(aid);
            // 文章的归属人验证
            UserInfo userInfo = SessionUtil.getLoginUser(request);
            if (userInfo != null && articleInfo != null &&
                    userInfo.getId() == articleInfo.getUid()) { // 文章归属人正确
                return AjaxResult.success(articleInfo);
            }
        }
        return AjaxResult.fail(-1, "查询失败");
    }

    /**
     * 修改页面,修改文章
     *
     * @param request
     * @param aid
     * @param title
     * @param content
     * @return
     */
    @RequestMapping("/update")
    public int update(HttpServletRequest request, Integer aid, String title, String content) {
        // 非空校验
        if (aid == null || !StringUtils.hasLength(title) || !StringUtils.hasLength(content)) {
            // 参数有误
            return 0;
        }
        UserInfo userInfo = SessionUtil.getLoginUser(request);
        if (userInfo != null && userInfo.getId() > 0) {
            return articleService.update(aid, userInfo.getId(), title, content);
        }
        return 0;
    }

    /**
     * 博客列表,删除文章
     *
     * @param request
     * @param aid
     * @return
     */
    @RequestMapping("/delete")
    public int delete(HttpServletRequest request, Integer aid) {
        // 非空校验
        if (aid == null && aid <= 0) {
            // 参数有误
            return 0;
        }
        UserInfo userInfo = SessionUtil.getLoginUser(request);
        if (userInfo != null) { // 当前已登录
            return articleService.delete(aid);
        }
        return 0;
    }
}
③ 效果演示
删除前数据库信息:

登录后,进入博客列表:
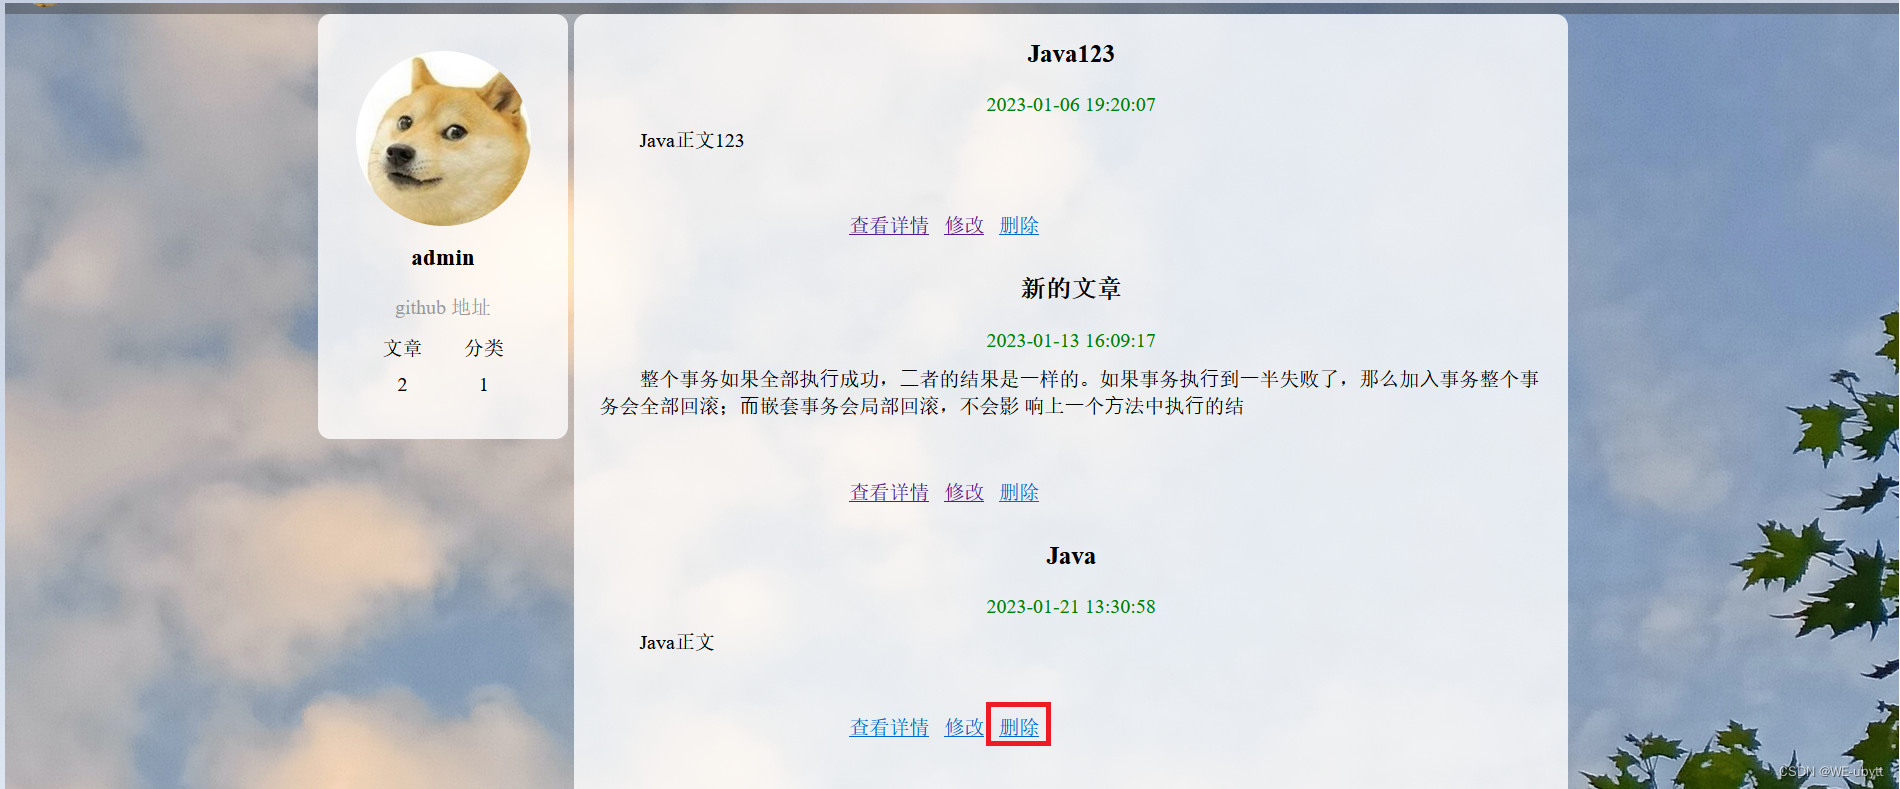
点击删除:
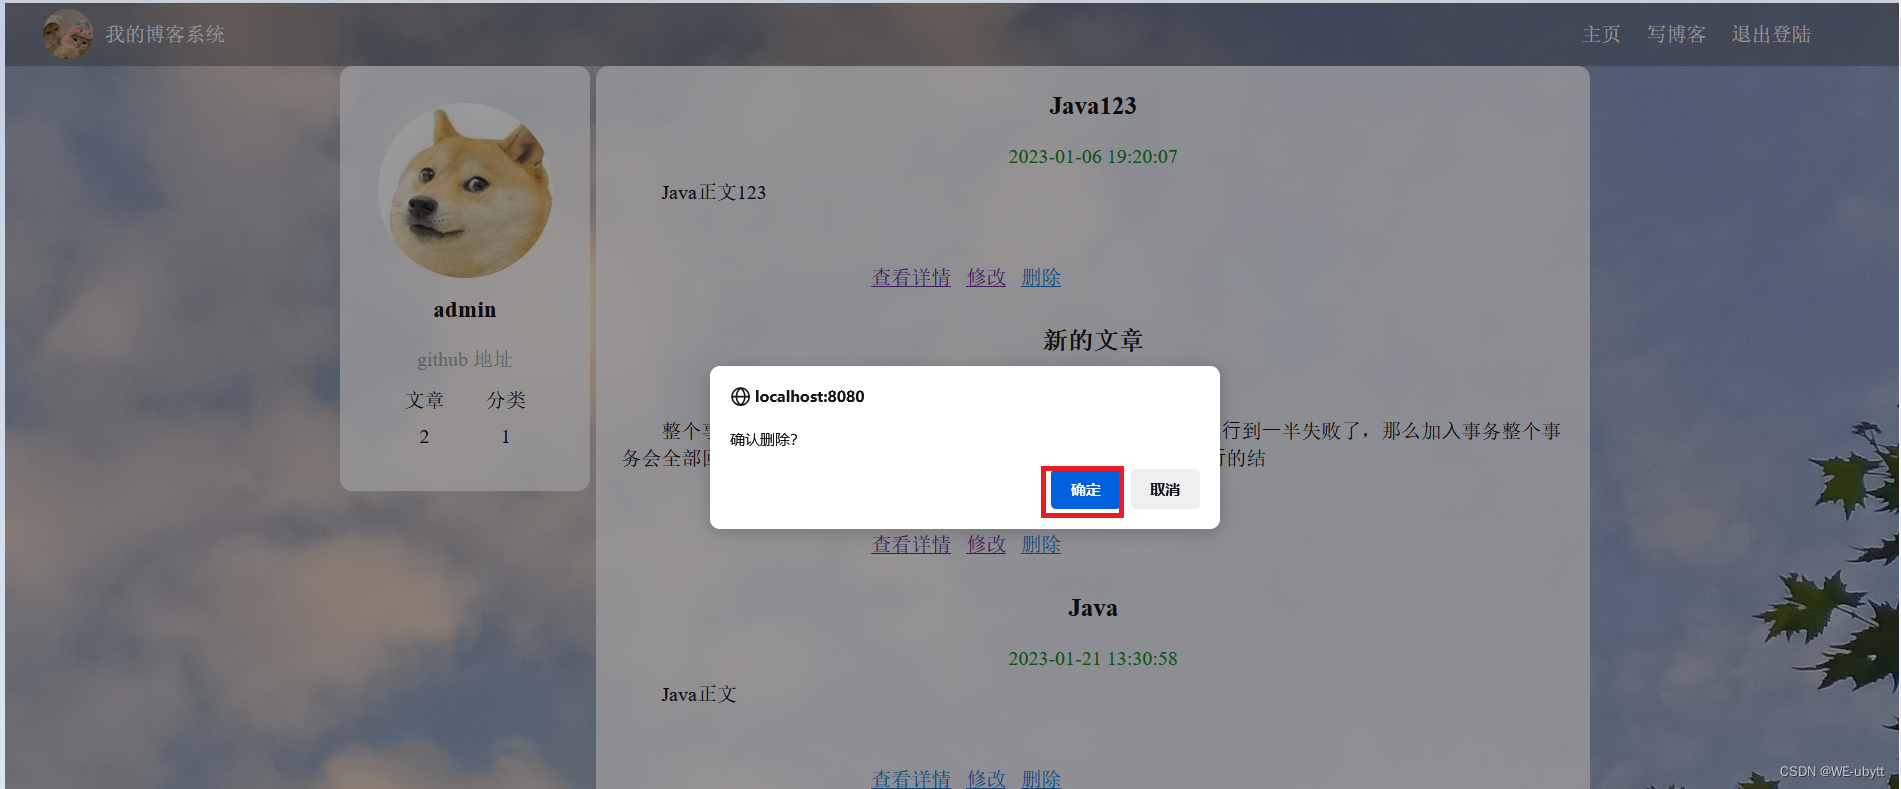
确定删除:

删除后数据库信息:

7、发布文章
① 前端页面
blog_edit.html:
<!DOCTYPE html>
<html lang="en">

<head>
    <meta charset="UTF-8">
    <meta http-equiv="X-UA-Compatible" content="IE=edge">
    <meta name="viewport" content="width=device-width, initial-scale=1.0">
    <title>博客编辑</title>

    <!-- 引入自己写的样式 -->
    <link rel="stylesheet" href="css/conmmon.css">
    <link rel="stylesheet" href="css/blog_edit.css">

    <!-- 引入 editor.md 的依赖 -->
    <link rel="stylesheet" href="editor.md/css/editormd.min.css"/>
    <script src="js/jquery.min.js"></script>
    <script src="editor.md/editormd.js"></script>

    <!-- 引入工具js -->
    <script src="js/tools.js"></script>
</head>

<body>
<!-- 导航栏 -->
<div class="nav">
    <img src="img/logo2.jpg" alt="">
    <span class="title">我的博客系统</span>
    <!-- 用来占据中间位置 -->
    <span class="spacer"></span>
    <a href="blog_list.html">主页</a>
    <a href="blog_edit.html">写博客</a>
    <a href="#">退出登录</a>
</div>
<!-- 编辑框容器 -->
<div class="blog-edit-container">
    <!-- 标题编辑区 -->
    <div class="title">
        <input id="title" type="text" placeholder="在这里写下文章标题">
        <button onclick="mysub()">发布文章</button>
    </div>
    <!-- 创建编辑器标签 -->
    <div id="editorDiv">
        <textarea id="editor-markdown" style="display:none;"></textarea>
    </div>
</div>

<script>
    var editor;

    function initEdit(md) {
        // 编辑器设置
        editor = editormd("editorDiv", {
            // 这里的尺寸必须在这里设置. 设置样式会被 editormd 自动覆盖掉.
            width: "100%",
            // 高度 100% 意思是和父元素一样高. 要在父元素的基础上去掉标题编辑区的高度
            height: "calc(100% - 50px)",
            // 编辑器中的初始内容
            markdown: md,
            // 指定 editor.md 依赖的插件路径
            path: "editor.md/lib/",
            saveHTMLToTextarea: true //
        });
    }

    initEdit("# 在这里写下一篇博客"); // 初始化编译器的值
    // 提交
    function mysub() {
        // alert(editor.getValue()); // 获取值
        // editor.setValue("#123") // 设置值
        var title = jQuery("#title");
        var content = editor.getValue();
        // 非空效验
        if (title.val() == "") {
            title.focus();
            alert("请先输入标题!");
            return false;
        }
        if (content == "") {
            content.focus();
            alert("请先输入正文!");
            return false;
        }
        jQuery.ajax({
            url: "/art/add",
            type: "POST",
            data: {
                "title": title.val(),
                "content": content
            },
            success: function (result) {
                if (result.code == 200 && result.data > 0) {
                    alert("恭喜:发布成功!")
                    location.href = "myblog_list.html";
                } else {
                    alert("抱歉:发布失败,请重试!");
                }
            },
            error: function (err) {
                if (err != null && err.status == 401) {
                    alert("用户未登录,即将跳转到登录页!");
                    // 已经被拦截器拦截了,未登录
                    location.href = "/login.html";
                }
            }
        });
    }
</script>
</body>

</html>
② 后端代码
发布文章:这个它其实和修改文章差不多,只是不需要获取文章的 id了,这个在发布时,数据库会自己自增 id。
Ⅰ. 数据库
ArticleMapper:->add
package com.example.mycnblog.mapper;

import com.example.mycnblog.model.ArticleInfo;
import org.apache.ibatis.annotations.Mapper;
import org.apache.ibatis.annotations.Param;

import java.util.List;

/**
 * 文章表的 mapper
 */
@Mapper
public interface ArticleMapper {

    /**
     * 根据用户id(uid)查询所有文章
     *
     * @param uid
     * @return
     */
    public List<ArticleInfo> getMyList(@Param("uid") Integer uid);

    /**
     * 根据文章id(id)获取文章的详情信息
     *
     * @param aid
     * @return
     */
    public ArticleInfo getDetail(@Param("aid") Integer aid);

    /**
     * 根据文章id(id)和用户id(uid)修改文章的标题和内容
     *
     * @param aid
     * @param uid
     * @param title
     * @param content
     * @return
     */
    public int update(@Param("aid") Integer aid,
                      @Param("uid") Integer uid,
                      @Param("title") String title,
                      @Param("content") String content);

    /**
     * 根据文章id(id)删除文章
     *
     * @param aid
     * @return
     */
    public int delete(@Param("aid") Integer aid);

    /**
     * 添加文章(uid,文章标题,文章内容)
     *
     * @param uid
     * @param title
     * @param content
     * @return
     */
    public int add(@Param("uid") Integer uid,
                   @Param("title") String title,
                   @Param("content") String content);
}
ArticleMapper.xml:->add
<?xml version="1.0" encoding="UTF-8"?>
<!DOCTYPE mapper PUBLIC "-//mybatis.org//DTD Mapper 3.0//EN" "http://mybatis.org/dtd/mybatis-3-mapper.dtd">
<mapper namespace="com.example.mycnblog.mapper.ArticleMapper">
    <select id="getMyList" resultType="com.example.mycnblog.model.ArticleInfo">
        select *
        from articleinfo
        where uid = #{uid}
    </select>

    <select id="getDetail" resultType="com.example.mycnblog.model.ArticleInfo">
        select *
        from articleinfo
        where id = #{aid}
    </select>

    <update id="update">
        update articleinfo
        set title=#{title},
            content=#{content}
        where id = #{aid}
          and uid = #{uid}
    </update>

    <delete id="delete">
        delete
        from articleinfo
        where id = #{aid}
    </delete>

    <insert id="add">
        insert into articleinfo(title, content, uid)
        values (#{title}, #{content}, #{uid});
    </insert>
</mapper>
Ⅱ. 服务层
ArticleService:->add
package com.example.mycnblog.service;

import com.example.mycnblog.mapper.ArticleMapper;
import com.example.mycnblog.model.ArticleInfo;
import org.springframework.beans.factory.annotation.Autowired;
import org.springframework.stereotype.Service;

import javax.servlet.http.HttpServletRequest;
import java.util.List;

/**
 * 文章表的服务层
 */
@Service
public class ArticleService {

    @Autowired
    private ArticleMapper articleMapper;

    /**
     * 用户博客列表,查询用户的所有文章
     *
     * @param uid
     * @return
     */
    public List<ArticleInfo> getMyList(Integer uid) {
        return articleMapper.getMyList(uid);
    }

    /**
     * 用户博客列表,获取文章的详情信息
     *
     * @param aid
     * @return
     */
    public ArticleInfo getDetil(Integer aid) {
        return articleMapper.getDetail(aid);
    }

    /**
     * 修改页面,修改文章
     *
     * @param aid
     * @param uid
     * @param title
     * @param content
     * @return
     */
    public int update(Integer aid, Integer uid, String title, String content) {
        return articleMapper.update(aid, uid, title, content);
    }

    /**
     * 用户博客列表,删除文章
     *
     * @param aid
     * @return
     */
    public int delete(Integer aid) {
        return articleMapper.delete(aid);
    }

    /**
     * 博客编辑,发布文章
     *
     * @param uid
     * @param title
     * @param content
     * @return
     */
    public int add(Integer uid, String title, String content) {
        return articleMapper.add(uid, title, content);
    }
}
Ⅲ. 控制层
ArticleController:->add
package com.example.mycnblog.controller;

import com.example.mycnblog.common.AjaxResult;
import com.example.mycnblog.common.Constant;
import com.example.mycnblog.common.SessionUtil;
import com.example.mycnblog.model.ArticleInfo;
import com.example.mycnblog.model.UserInfo;
import com.example.mycnblog.service.ArticleService;
import org.springframework.beans.factory.annotation.Autowired;
import org.springframework.util.StringUtils;
import org.springframework.web.bind.annotation.RequestMapping;
import org.springframework.web.bind.annotation.RestController;

import javax.servlet.http.HttpServletRequest;
import javax.servlet.http.HttpSession;
import java.util.List;

/**
 1. 文章控制器
 */
@RestController
@RequestMapping("/art")
public class ArticleController {

    @Autowired
    private ArticleService articleService;

    /**
     * 查询用户的所有文章
     *
     * @param request
     * @return
     */
    @RequestMapping("/mylist")
    public List<ArticleInfo> myList(HttpServletRequest request) {
        UserInfo userInfo = SessionUtil.getLoginUser(request);
        if (userInfo != null) {
            return articleService.getMyList(userInfo.getId());
        }
        return null;
    }

    /**
     * 获取文章的详情信息
     *
     * @param aid
     * @return
     */
    @RequestMapping("/detail")
    public Object getDetil(Integer aid) {
        if (aid != null && aid > 0) {
            return AjaxResult.success(articleService.getDetil(aid));
        }
        return AjaxResult.fail(-1, "查询失败");
    }

    /**
     * 修改页面,查询文章
     *
     * @param request
     * @param aid
     * @return
     */
    @RequestMapping("/detailbyid")
    public Object getDetailById(HttpServletRequest request, Integer aid) {
        if (aid != null && aid > 0) {
            // 根据文章查询文章的详情
            ArticleInfo articleInfo = articleService.getDetil(aid);
            // 文章的归属人验证
            UserInfo userInfo = SessionUtil.getLoginUser(request);
            if (userInfo != null && articleInfo != null &&
                    userInfo.getId() == articleInfo.getUid()) { // 文章归属人正确
                return AjaxResult.success(articleInfo);
            }
        }
        return AjaxResult.fail(-1, "查询失败");
    }

    /**
     * 修改页面,修改文章
     *
     * @param request
     * @param aid
     * @param title
     * @param content
     * @return
     */
    @RequestMapping("/update")
    public int update(HttpServletRequest request, Integer aid, String title, String content) {
        // 非空校验
        if (aid == null || !StringUtils.hasLength(title) || !StringUtils.hasLength(content)) {
            // 参数有误
            return 0;
        }
        UserInfo userInfo = SessionUtil.getLoginUser(request);
        if (userInfo != null && userInfo.getId() > 0) {
            return articleService.update(aid, userInfo.getId(), title, content);
        }
        return 0;
    }

    /**
     * 博客列表,删除文章
     *
     * @param request
     * @param aid
     * @return
     */
    @RequestMapping("/delete")
    public int delete(HttpServletRequest request, Integer aid) {
        // 非空校验
        if (aid == null && aid <= 0) {
            // 参数有误
            return 0;
        }
        UserInfo userInfo = SessionUtil.getLoginUser(request);
        if (userInfo != null) { // 当前已登录
            return articleService.delete(aid);
        }
        return 0;
    }

    /**
     * 博客编辑,发布文章
     *
     * @param request
     * @param title
     * @param content
     * @return
     */
    @RequestMapping("/add")
    public int add(HttpServletRequest request, String title, String content) {
        // 非空校验
        if (!StringUtils.hasLength(title) || !StringUtils.hasLength(content)) {
            // 参数有误
            return 0;
        }
        UserInfo userInfo = SessionUtil.getLoginUser(request);
        if (userInfo != null && userInfo.getId() > 0) {
            return articleService.add(userInfo.getId(), title, content);
        }
        return 0;
    }
}
③ 效果演示
进入个人博客列表:

点击写博客:
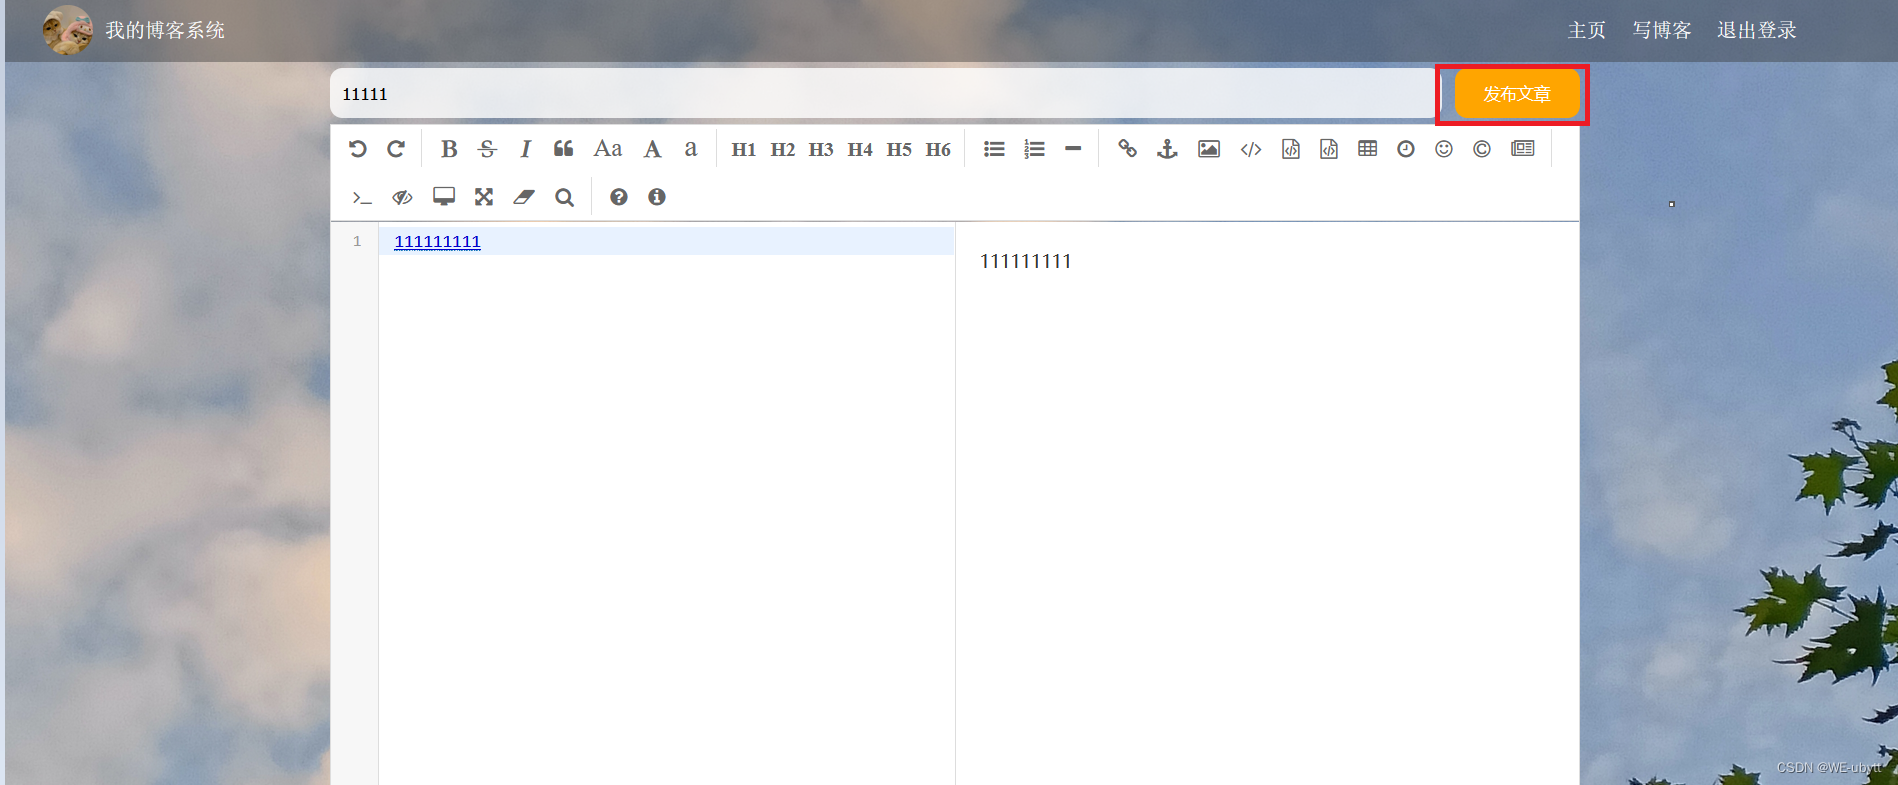
写一些内容点击,发布文章:
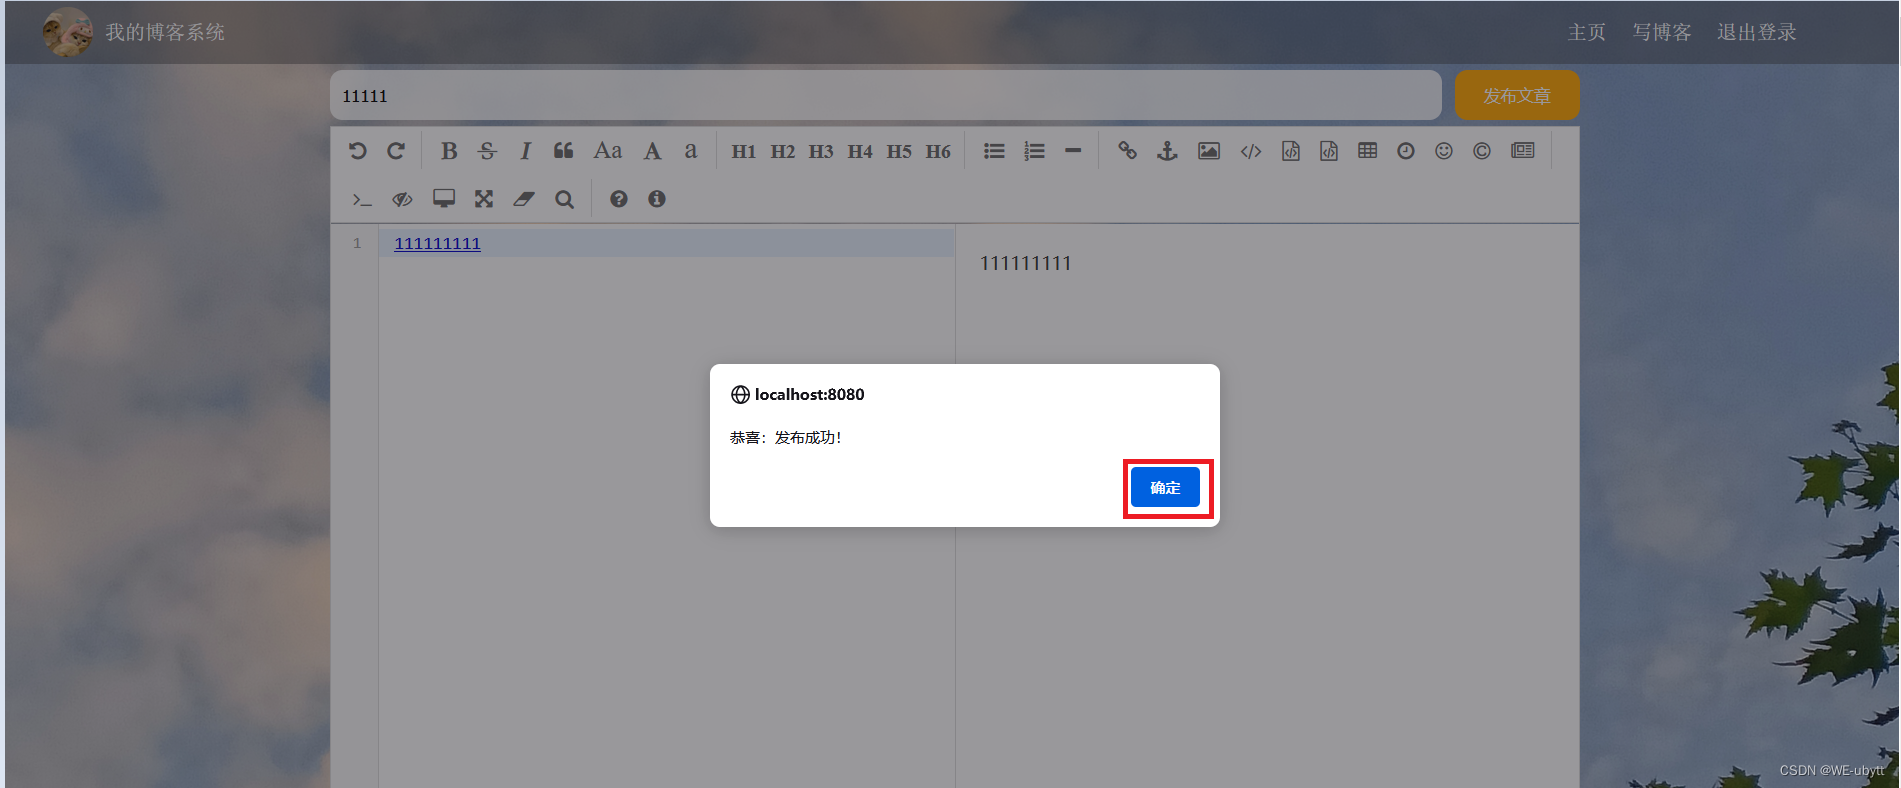
点击确定,发布文章成功:
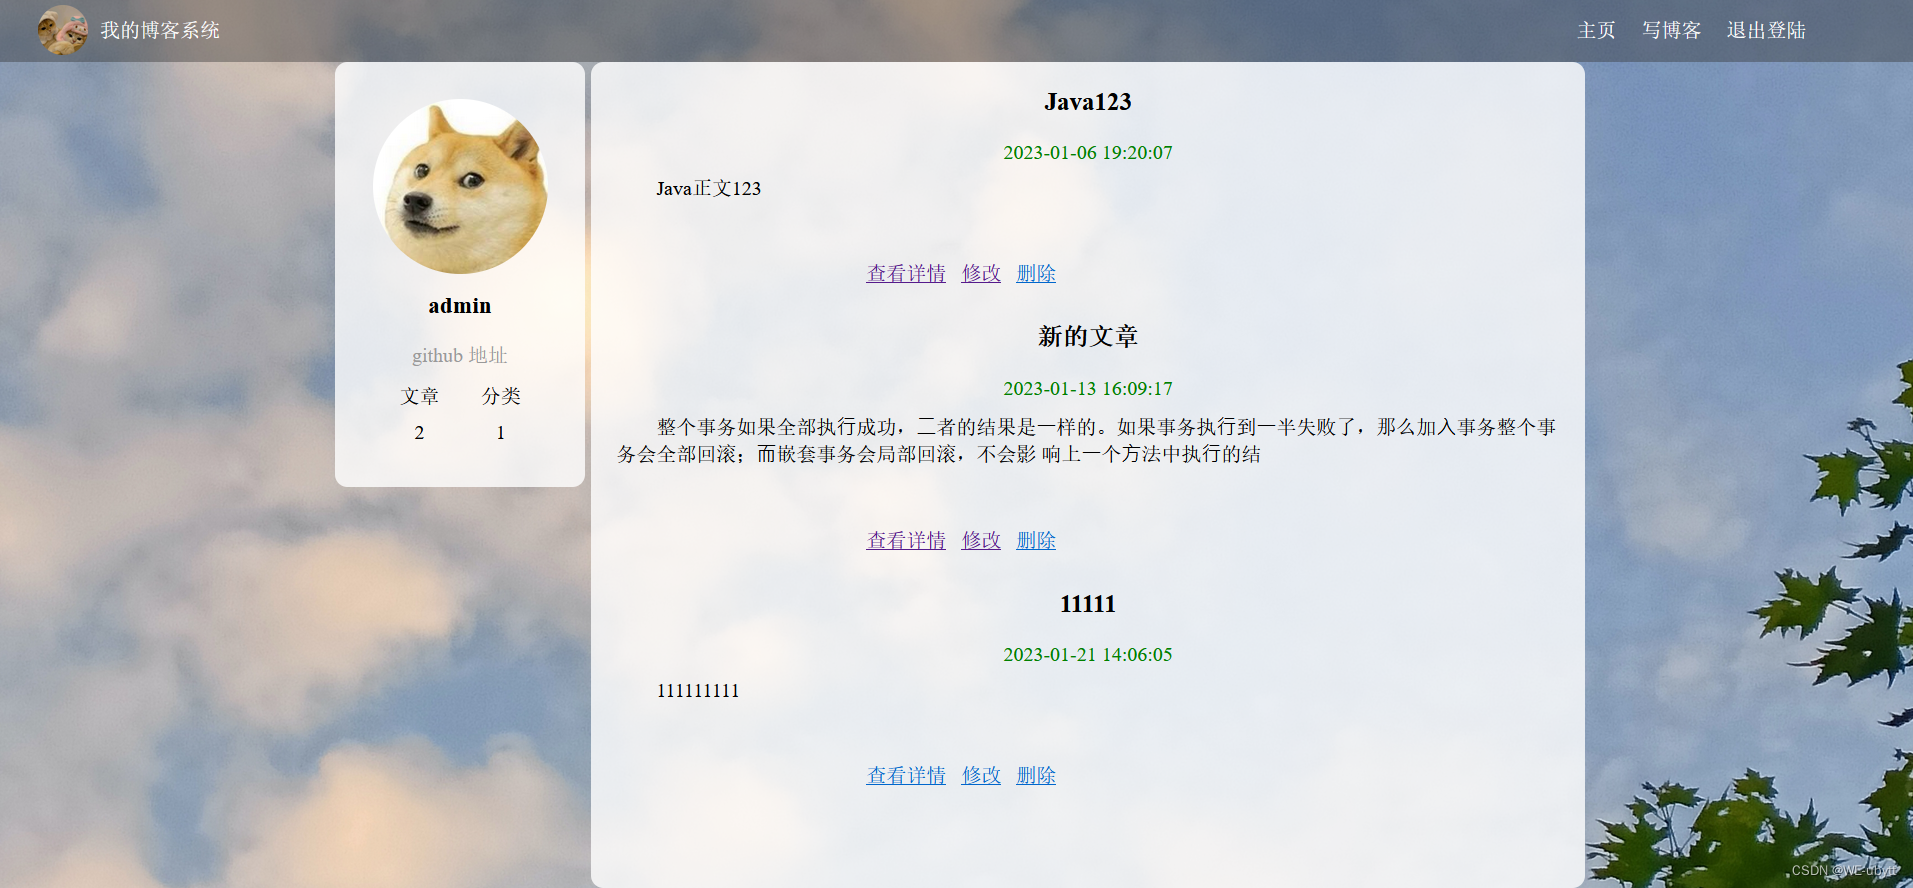
发布前数据库信息:

发布后数据库信息:

8、文章分页列表
① 前端页面
blog_list.html:
<!DOCTYPE html>
<html lang="en">
<head>
<meta charset="UTF-8">
<meta http-equiv="X-UA-Compatible" content="IE=edge">
<meta name="viewport" content="width=device-width, initial-scale=1.0">
<title>博客列表</title>
<link rel="stylesheet" href="css/list.css">
<link rel="stylesheet" href="css/blog_list.css">
<style>
.nav {
position: fixed;
top: 0;
left: 0;
right: 0;
height: 50px;
}
.container {
padding-top: 80px;
height: auto;
}
.container-right {
width: auto;
}
.blog-pagnation-wrapper {
height: 40px;
margin: 16px 0;
text-align: center;
}
.blog-pagnation-item {
display: inline-block;
padding: 8px;
border: 1px solid #d0d0d5;
color: #333;
}
.blog-pagnation-item:hover {
background: #4e4eeb;
color: #fff;
}
.blog-pagnation-item.actvie {
background: #4e4eeb;
color: #fff;
}
</style>
<!-- 引入 jQuery -->
<script src="js/jquery.min.js"></script>
<!-- 引入工具js -->
<script src="js/tools.js"></script>
</head>
<body>
<!-- 导航栏 -->
<div class="nav">
<img src="img/logo2.jpg" alt="">
<span class="title">我的博客系统</span>
<!-- 用来占据中间位置 -->
<span class="spacer"></span>
<a href="myblog_list.html">我的</a>
<a href="blog_list.html">主页</a>
<a href="blog_edit.html">写博客</a>
<a href="login.html">登陆</a>
<!-- <a href="#">注销</a> -->
</div>
<!-- 版心 -->
<div class="container">
<!-- 右侧内容详情 -->
<div class="container-right" style="width: 100%">
<div id="listDiv">
<!-- 每一篇博客包含标题, 摘要, 时间 -->
<div class="blog">
<div class="title">文章标题</div>
<div class="date">创建时间</div>
<div class="desc">正文</div>
<a href="blog_content.html?id=1" class="detail">查看全文</a>
</div>
</div>
<hr>
<div class="blog-pagnation-wrapper">
<button class="blog-pagnation-item" onclick="firstClick()">首页</button>
<button class="blog-pagnation-item" onclick="beforeClick()">上一页</button>
<button class="blog-pagnation-item" onclick="nextClick()">下一页</button>
<button class="blog-pagnation-item" onclick="lastClick()">末页</button>
</div>
</div>
</div>
<script>
var PageIndex = 1; // 当前的页码
var PageSize = 3; // 每页最大容量
var TotalPage = 1; // 总页数
// 初始化分页的参数,尝试从 url 中 获取 PageIndex 和 PageSize
function initPageParam() {
var pi = getURLParam("PageIndex");
if (pi != "") {
PageIndex = pi;
}
var ps = getURLParam("PageSize");
if (ps != "") {
PageSize = ps;
}
}
initPageParam();
// 查询总共有多少页的数据
function getTotalPage() {
jQuery.ajax({
url: "/art/totalpage",
type: "GET",
data: {
"PageSize": PageSize
},
success: function (result) {
if (result.code == 200 && result.data != null) {
TotalPage = result.data;
}
}
});
}
getTotalPage();
// 查询分页数据
function getList() {
jQuery.ajax({
url: "/art/list",
type: "GET",
data: {
"PageIndex": PageIndex,
"PageSize": PageSize
},
success: function (result) {
if (result.code == 200 && result.data != null && result.data.length > 0) {
// 循环拼接数据到 document
var finalHtml = "";
for (var i = 0; i < result.data.length; i++) {
var item = result.data[i];
finalHtml += '<div class="blog">\n' +
' <div class="title">' + item.title + '</div>\n' +
' <div class="date">' + item.createTime + '</div>\n' +
' <div class="desc">' + item.content + '</div>\n' +
' <a href="blog_content.html?id=' + item.id + '" class="detail">查看详情</a> ' +
' </div>';
}
jQuery("#listDiv").html(finalHtml);
}
}
});
}
getList();
// 首页
function firstClick() {
location.href = "blog_list.html";
}
// 上一页
function beforeClick() {
if (PageIndex <= 1) {
alert("已经是首页了!");
return false;
}
PageIndex = parseInt(PageIndex) - 1;
location.href = "blog_list.html?PageIndex=" + PageIndex + "&PageSize=" + PageSize;
}
// 下一页
function nextClick() {
if (PageIndex >= TotalPage) {
alert("已经是末页了!");
return false;
}
PageIndex = parseInt(PageIndex) + 1;
location.href = "blog_list.html?PageIndex=" + PageIndex + "&PageSize=" + PageSize;
}
// 末页
function lastClick() {
PageIndex = TotalPage;
location.href = "blog_list.html?PageIndex=" + PageIndex + "&PageSize=" + PageSize;
}
</script>
</body>
</html>
② 后端代码(分页功能)
分页要素:
- 页码(PageIndex):要查询第几页的数据;
- 容量(PageSize):每页最多显示多少条数据。
分页语法(SQL):
-- 注意 (PageIndex-1)*PageSize 这种sql是不对的,后端需要自行计算,然后传给mapper
limit PageSize offset (PageIndex-1)*PageSize
Ⅰ. 数据库
ArticleMapper:->getList
package com.example.mycnblog.mapper;

import com.example.mycnblog.model.ArticleInfo;
import org.apache.ibatis.annotations.Mapper;
import org.apache.ibatis.annotations.Param;

import java.util.List;

/**
 * 文章表的 mapper
 */
@Mapper
public interface ArticleMapper {

    /**
     * 根据用户id(uid)查询所有文章
     *
     * @param uid
     * @return
     */
    public List<ArticleInfo> getMyList(@Param("uid") Integer uid);

    /**
     * 分页——查询所有文章
     *
     * @param Offset
     * @param PageSize
     * @return
     */
    public List<ArticleInfo> getList(@Param("Offset") Integer Offset,
                                     @Param("PageSize") Integer PageSize);

    /**
     * 根据文章id(id)获取文章的详情信息
     *
     * @param aid
     * @return
     */
    public ArticleInfo getDetail(@Param("aid") Integer aid);

    /**
     * 根据文章id(id)和用户id(uid)修改文章的标题和内容
     *
     * @param aid
     * @param uid
     * @param title
     * @param content
     * @return
     */
    public int update(@Param("aid") Integer aid,
                      @Param("uid") Integer uid,
                      @Param("title") String title,
                      @Param("content") String content);

    /**
     * 根据文章id(id)删除文章
     *
     * @param aid
     * @return
     */
    public int delete(@Param("aid") Integer aid);

    /**
     * 添加文章(uid,文章标题,文章内容)
     *
     * @param uid
     * @param title
     * @param content
     * @return
     */
    public int add(@Param("uid") Integer uid,
                   @Param("title") String title,
                   @Param("content") String content);
}
ArticleMapper.xml:->getList
<?xml version="1.0" encoding="UTF-8"?>
<!DOCTYPE mapper PUBLIC "-//mybatis.org//DTD Mapper 3.0//EN" "http://mybatis.org/dtd/mybatis-3-mapper.dtd">
<mapper namespace="com.example.mycnblog.mapper.ArticleMapper">
    <select id="getMyList" resultType="com.example.mycnblog.model.ArticleInfo">
        select *
        from articleinfo
        where uid = #{uid}
    </select>

    <select id="getList" resultType="com.example.mycnblog.model.ArticleInfo">
        select *
        from articleinfo limit #{PageSize}
        offset #{Offset}
    </select>

    <select id="getDetail" resultType="com.example.mycnblog.model.ArticleInfo">
        select *
        from articleinfo
        where id = #{aid}
    </select>

    <update id="update">
        update articleinfo
        set title=#{title},
            content=#{content}
        where id = #{aid}
          and uid = #{uid}
    </update>

    <delete id="delete">
        delete
        from articleinfo
        where id = #{aid}
    </delete>

    <insert id="add">
        insert into articleinfo(title, content, uid)
        values (#{title}, #{content}, #{uid});
    </insert>
</mapper>
Ⅱ. 服务层
ArticleService:->getList
package com.example.mycnblog.service;

import com.example.mycnblog.mapper.ArticleMapper;
import com.example.mycnblog.model.ArticleInfo;
import org.apache.ibatis.annotations.Param;
import org.springframework.beans.factory.annotation.Autowired;
import org.springframework.stereotype.Service;

import javax.servlet.http.HttpServletRequest;
import java.util.List;

/**
 * 文章表的服务层
 */
@Service
public class ArticleService {

    @Autowired
    private ArticleMapper articleMapper;

    /**
     * 用户博客列表,查询用户的所有文章
     *
     * @param uid
     * @return
     */
    public List<ArticleInfo> getMyList(Integer uid) {
        return articleMapper.getMyList(uid);
    }

    /**
     * 分页——查询所有文章
     *
     * @param Offset
     * @param PageSize
     * @return
     */
    public List<ArticleInfo> getList(Integer Offset, Integer PageSize) {
        return articleMapper.getList(Offset, PageSize);
    }

    /**
     * 用户博客列表,获取文章的详情信息
     *
     * @param aid
     * @return
     */
    public ArticleInfo getDetil(Integer aid) {
        return articleMapper.getDetail(aid);
    }

    /**
     * 修改页面,修改文章
     *
     * @param aid
     * @param uid
     * @param title
     * @param content
     * @return
     */
    public int update(Integer aid, Integer uid, String title, String content) {
        return articleMapper.update(aid, uid, title, content);
    }

    /**
     * 用户博客列表,删除文章
     *
     * @param aid
     * @return
     */
    public int delete(Integer aid) {
        return articleMapper.delete(aid);
    }

    /**
     * 博客编辑,发布文章
     *
     * @param uid
     * @param title
     * @param content
     * @return
     */
    public int add(Integer uid, String title, String content) {
        return articleMapper.add(uid, title, content);
    }
}
Ⅲ. 控制层
ArticleController:->getList
package com.example.mycnblog.controller;

import com.example.mycnblog.common.AjaxResult;
import com.example.mycnblog.common.Constant;
import com.example.mycnblog.common.SessionUtil;
import com.example.mycnblog.model.ArticleInfo;
import com.example.mycnblog.model.UserInfo;
import com.example.mycnblog.service.ArticleService;
import org.springframework.beans.factory.annotation.Autowired;
import org.springframework.util.StringUtils;
import org.springframework.web.bind.annotation.RequestMapping;
import org.springframework.web.bind.annotation.RestController;

import javax.servlet.http.HttpServletRequest;
import javax.servlet.http.HttpSession;
import java.util.List;

/**
 * 文章控制器
 */
@RestController
@RequestMapping("/art")
public class ArticleController {

    @Autowired
    private ArticleService articleService;

    /**
     * 查询用户的所有文章
     *
     * @param request
     * @return
     */
    @RequestMapping("/mylist")
    public List<ArticleInfo> myList(HttpServletRequest request) {
        UserInfo userInfo = SessionUtil.getLoginUser(request);
        if (userInfo != null) {
            return articleService.getMyList(userInfo.getId());
        }
        return null;
    }

	/**
     * 分页——查询所有文章
     *
     * @param PageIndex
     * @param PageSize
     * @return
     */
    @RequestMapping("/list")
    public List<ArticleInfo> getList(Integer PageIndex, Integer PageSize) {
        if (PageIndex == null || PageSize == null || PageIndex <= 0 || PageSize <= 0) {
            return null;
        }
        // 分页公式,计算偏移量
        int Offset = (PageIndex - 1) * PageSize;
        return articleService.getList(Offset, PageSize);
    }

    /**
     * 获取文章的详情信息
     *
     * @param aid
     * @return
     */
    @RequestMapping("/detail")
    public Object getDetil(Integer aid) {
        if (aid != null && aid > 0) {
            return AjaxResult.success(articleService.getDetil(aid));
        }
        return AjaxResult.fail(-1, "查询失败");
    }

    /**
     * 修改页面,查询文章
     *
     * @param request
     * @param aid
     * @return
     */
    @RequestMapping("/detailbyid")
    public Object getDetailById(HttpServletRequest request, Integer aid) {
        if (aid != null && aid > 0) {
            // 根据文章查询文章的详情
            ArticleInfo articleInfo = articleService.getDetil(aid);
            // 文章的归属人验证
            UserInfo userInfo = SessionUtil.getLoginUser(request);
            if (userInfo != null && articleInfo != null &&
                    userInfo.getId() == articleInfo.getUid()) { // 文章归属人正确
                return AjaxResult.success(articleInfo);
            }
        }
        return AjaxResult.fail(-1, "查询失败");
    }

    /**
     * 修改页面,修改文章
     *
     * @param request
     * @param aid
     * @param title
     * @param content
     * @return
     */
    @RequestMapping("/update")
    public int update(HttpServletRequest request, Integer aid, String title, String content) {
        // 非空校验
        if (aid == null || !StringUtils.hasLength(title) || !StringUtils.hasLength(content)) {
            // 参数有误
            return 0;
        }
        UserInfo userInfo = SessionUtil.getLoginUser(request);
        if (userInfo != null && userInfo.getId() > 0) {
            return articleService.update(aid, userInfo.getId(), title, content);
        }
        return 0;
    }

    /**
     * 博客列表,删除文章
     *
     * @param request
     * @param aid
     * @return
     */
    @RequestMapping("/delete")
    public int delete(HttpServletRequest request, Integer aid) {
        // 非空校验
        if (aid == null && aid <= 0) {
            // 参数有误
            return 0;
        }
        UserInfo userInfo = SessionUtil.getLoginUser(request);
        if (userInfo != null) { // 当前已登录
            return articleService.delete(aid);
        }
        return 0;
    }

    /**
     * 博客编辑,发布文章
     *
     * @param request
     * @param title
     * @param content
     * @return
     */
    @RequestMapping("/add")
    public int add(HttpServletRequest request, String title, String content) {
        // 非空校验
        if (!StringUtils.hasLength(title) || !StringUtils.hasLength(content)) {
            // 参数有误
            return 0;
        }
        UserInfo userInfo = SessionUtil.getLoginUser(request);
        if (userInfo != null && userInfo.getId() > 0) {
            return articleService.add(userInfo.getId(), title, content);
        }
        return 0;
    }
}
Ⅳ. 拦截器
这里放行,是因为这个博客列表是所有文章的列表,用户不需要登录就可以访问。
AppConfig:->放行文章分页列表
package com.example.mycnblog.common;

import org.springframework.beans.factory.annotation.Autowired;
import org.springframework.context.annotation.Configuration;
import org.springframework.web.servlet.config.annotation.InterceptorRegistration;
import org.springframework.web.servlet.config.annotation.InterceptorRegistry;
import org.springframework.web.servlet.config.annotation.WebMvcConfigurer;

import java.util.ArrayList;
import java.util.List;

/**
 * 配置拦截器
 */
@Configuration
public class AppConfig implements WebMvcConfigurer {

    // 不拦截的 url 集合
    List<String> excludes = new ArrayList<String>(){{
        add("/**/*.html");
        add("/js/**"); // 放行 static/js 下的所有文件
        add("/editor.md/**"); // 放行 static/editor.md 下的所有文件
        add("/css/**"); // 放行 static/css 下的所有文件
        add("/img/**"); // 放行 static/img 下的所有文件
        add("/user/reg"); // 放行注册接口
        add("/user/login"); // 放行登录接口
        add("/art/detail"); // 放行文章详情接口
        add("/art/list"); // 放行文章分页列表
    }};

    @Autowired
    private LoginInterceptor loginInterceptor;

    @Override
    public void addInterceptors(InterceptorRegistry registry) {
        // 配置拦截器
        InterceptorRegistration registration =
                registry.addInterceptor(loginInterceptor);
        registration.addPathPatterns("/**"); // 拦截所有请求
        registration.excludePathPatterns(excludes); // 排除不拦截的 url
    }
}
Ⅴ. 效果演示
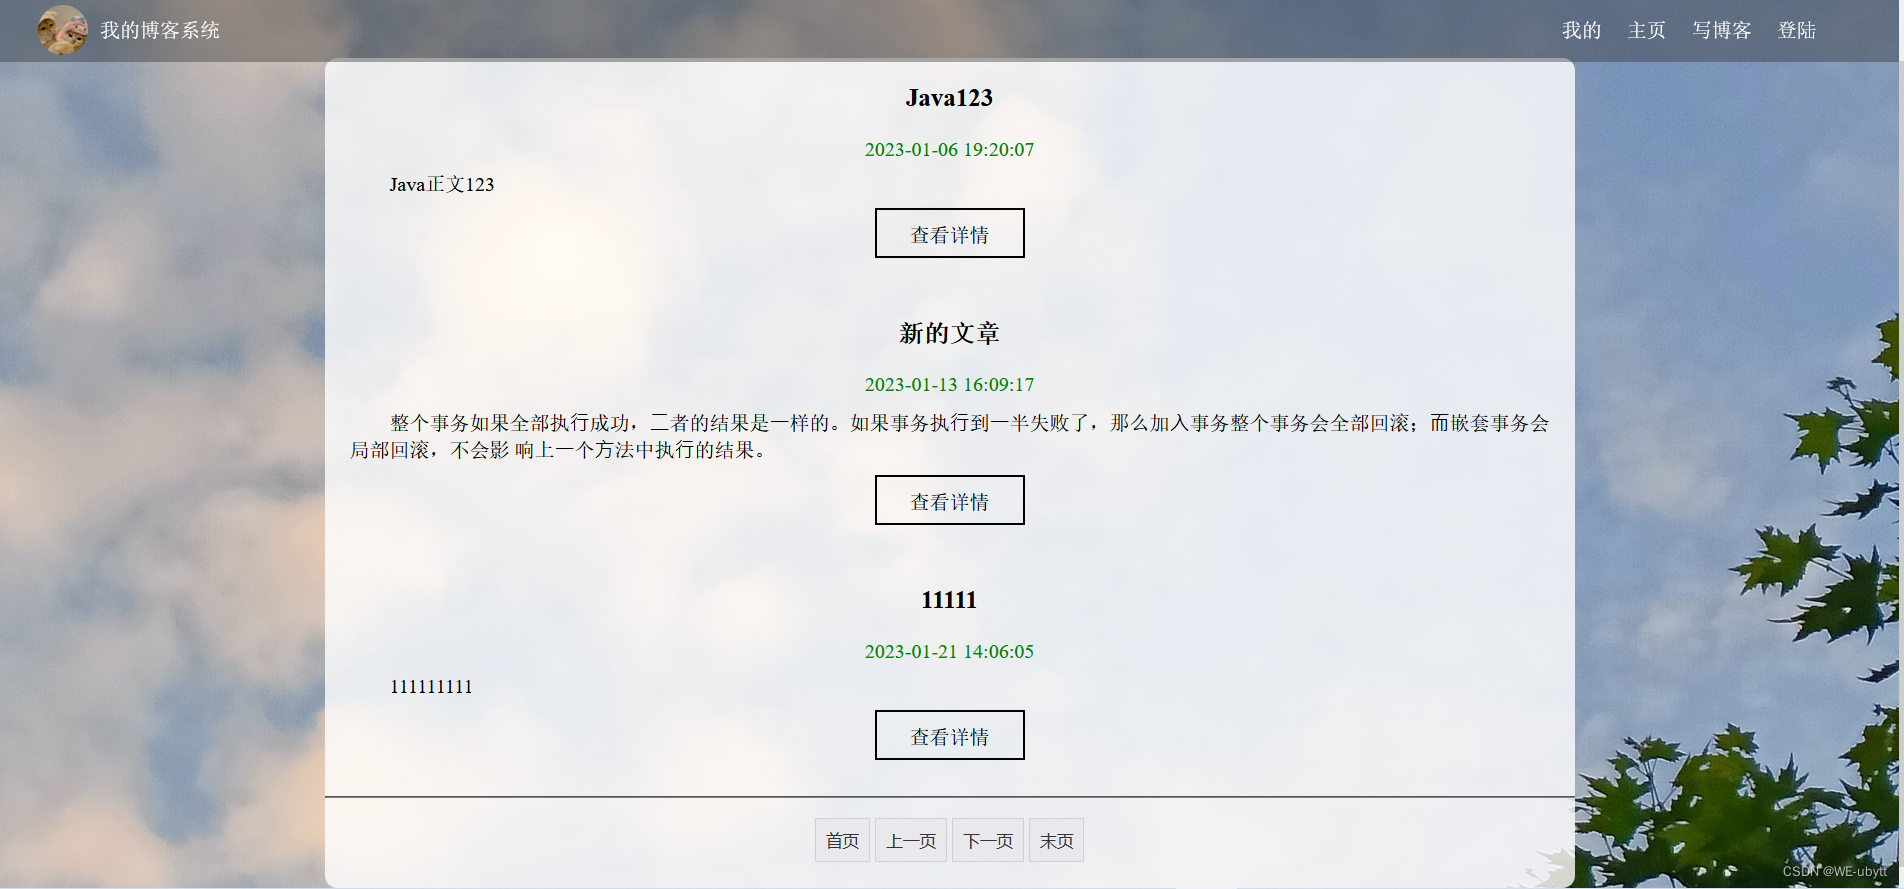
③ 后端代码(尾页功能)
尾页:这里计算尾页的方法,主要是文章总数 / 每页容量,但是要向上进位。
例如——5 / 2 = 2.5 -> 3,这里的进位可以采用 Math 类里的 ceil 方法;但是又有一个问题,对于 int 类型 5 / 2 = 2,所以要再 * 1.0,这样就是 2.5 了。
Ⅰ. 数据库
ArticleMapper:->getTotalCount
package com.example.mycnblog.mapper;

import com.example.mycnblog.model.ArticleInfo;
import org.apache.ibatis.annotations.Mapper;
import org.apache.ibatis.annotations.Param;

import java.util.List;

/**
 * 文章表的 mapper
 */
@Mapper
public interface ArticleMapper {

    /**
     * 根据用户id(uid)查询所有文章
     *
     * @param uid
     * @return
     */
    public List<ArticleInfo> getMyList(@Param("uid") Integer uid);

    /**
     * 分页——查询所有文章
     *
     * @param Offset
     * @param PageSize
     * @return
     */
    public List<ArticleInfo> getList(@Param("Offset") Integer Offset,
                                     @Param("PageSize") Integer PageSize);

    /**
     * 跳转文章列表尾页——查询文章总数
     *
     * @return
     */
    public int getTotalCount();

    /**
     * 根据文章id(id)获取文章的详情信息
     *
     * @param aid
     * @return
     */
    public ArticleInfo getDetail(@Param("aid") Integer aid);

    /**
     * 根据文章id(id)和用户id(uid)修改文章的标题和内容
     *
     * @param aid
     * @param uid
     * @param title
     * @param content
     * @return
     */
    public int update(@Param("aid") Integer aid,
                      @Param("uid") Integer uid,
                      @Param("title") String title,
                      @Param("content") String content);

    /**
     * 根据文章id(id)删除文章
     *
     * @param aid
     * @return
     */
    public int delete(@Param("aid") Integer aid);

    /**
     * 添加文章(uid,文章标题,文章内容)
     *
     * @param uid
     * @param title
     * @param content
     * @return
     */
    public int add(@Param("uid") Integer uid,
                   @Param("title") String title,
                   @Param("content") String content);
}
ArticleMapper.xml:->getTotalCount
<?xml version="1.0" encoding="UTF-8"?>
<!DOCTYPE mapper PUBLIC "-//mybatis.org//DTD Mapper 3.0//EN" "http://mybatis.org/dtd/mybatis-3-mapper.dtd">
<mapper namespace="com.example.mycnblog.mapper.ArticleMapper">
    <select id="getMyList" resultType="com.example.mycnblog.model.ArticleInfo">
        select *
        from articleinfo
        where uid = #{uid}
    </select>

    <select id="getList" resultType="com.example.mycnblog.model.ArticleInfo">
        select *
        from articleinfo limit #{PageSize}
        offset #{Offset}
    </select>

    <select id="getTotalCount" resultType="java.lang.Integer">
        select count(*)
        from articleinfo
    </select>

    <select id="getDetail" resultType="com.example.mycnblog.model.ArticleInfo">
        select *
        from articleinfo
        where id = #{aid}
    </select>

    <update id="update">
        update articleinfo
        set title=#{title},
            content=#{content}
        where id = #{aid}
          and uid = #{uid}
    </update>

    <delete id="delete">
        delete
        from articleinfo
        where id = #{aid}
    </delete>

    <insert id="add">
        insert into articleinfo(title, content, uid)
        values (#{title}, #{content}, #{uid});
    </insert>
</mapper>
Ⅱ. 服务层
ArticleService:
package com.example.mycnblog.service;

import com.example.mycnblog.mapper.ArticleMapper;
import com.example.mycnblog.model.ArticleInfo;
import org.apache.ibatis.annotations.Param;
import org.springframework.beans.factory.annotation.Autowired;
import org.springframework.stereotype.Service;

import javax.servlet.http.HttpServletRequest;
import java.util.List;

/**
 * 文章表的服务层
 */
@Service
public class ArticleService {

    @Autowired
    private ArticleMapper articleMapper;

    /**
     * 用户博客列表,查询用户的所有文章
     *
     * @param uid
     * @return
     */
    public List<ArticleInfo> getMyList(Integer uid) {
        return articleMapper.getMyList(uid);
    }

    /**
     * 分页——查询所有文章
     *
     * @param Offset
     * @param PageSize
     * @return
     */
    public List<ArticleInfo> getList(Integer Offset, Integer PageSize) {
        return articleMapper.getList(Offset, PageSize);
    }

    /**
     * 跳转文章列表尾页——查询文章总数
     *
     * @return
     */
    public int getTotalCount() {
        return articleMapper.getTotalCount();
    }

    /**
     * 用户博客列表,获取文章的详情信息
     *
     * @param aid
     * @return
     */
    public ArticleInfo getDetil(Integer aid) {
        return articleMapper.getDetail(aid);
    }

    /**
     * 修改页面,修改文章
     *
     * @param aid
     * @param uid
     * @param title
     * @param content
     * @return
     */
    public int update(Integer aid, Integer uid, String title, String content) {
        return articleMapper.update(aid, uid, title, content);
    }

    /**
     * 用户博客列表,删除文章
     *
     * @param aid
     * @return
     */
    public int delete(Integer aid) {
        return articleMapper.delete(aid);
    }

    /**
     * 博客编辑,发布文章
     *
     * @param uid
     * @param title
     * @param content
     * @return
     */
    public int add(Integer uid, String title, String content) {
        return articleMapper.add(uid, title, content);
    }
}
Ⅲ. 控制层
ArticleController:
package com.example.mycnblog.controller;

import com.example.mycnblog.common.AjaxResult;
import com.example.mycnblog.common.Constant;
import com.example.mycnblog.common.SessionUtil;
import com.example.mycnblog.model.ArticleInfo;
import com.example.mycnblog.model.UserInfo;
import com.example.mycnblog.service.ArticleService;
import org.springframework.beans.factory.annotation.Autowired;
import org.springframework.util.StringUtils;
import org.springframework.web.bind.annotation.RequestMapping;
import org.springframework.web.bind.annotation.RestController;

import javax.servlet.http.HttpServletRequest;
import javax.servlet.http.HttpSession;
import java.util.List;

/**
 * 文章控制器
 */
@RestController
@RequestMapping("/art")
public class ArticleController {

    @Autowired
    private ArticleService articleService;

    /**
     * 查询用户的所有文章
     *
     * @param request
     * @return
     */
    @RequestMapping("/mylist")
    public List<ArticleInfo> myList(HttpServletRequest request) {
        UserInfo userInfo = SessionUtil.getLoginUser(request);
        if (userInfo != null) {
            return articleService.getMyList(userInfo.getId());
        }
        return null;
    }

    /**
     * 分页——查询所有文章
     *
     * @param PageIndex
     * @param PageSize
     * @return
     */
    @RequestMapping("/list")
    public List<ArticleInfo> getList(Integer PageIndex, Integer PageSize) {
        if (PageIndex == null || PageSize == null || PageIndex <= 0 || PageSize <= 0) {
            return null;
        }
        // 分页公式,计算偏移量
        int Offset = (PageIndex - 1) * PageSize;
        return articleService.getList(Offset, PageSize);
    }

    /**
     * 跳转文章列表尾页——获取尾页
     *
     * @param PageSize
     * @return
     */
    @RequestMapping("/totalpage")
    public Integer getTotalPage(Integer PageSize) {
        if (PageSize != null && PageSize > 0) {
            // 参数有效
            // 文章总数
            int TotalCount = articleService.getTotalCount();
            // 总页数
            int TotalPage = (int) Math.ceil(TotalCount * 1.0 / PageSize);
            return TotalPage;
        }
        return null;
    }

    /**
     * 获取文章的详情信息
     *
     * @param aid
     * @return
     */
    @RequestMapping("/detail")
    public Object getDetil(Integer aid) {
        if (aid != null && aid > 0) {
            return AjaxResult.success(articleService.getDetil(aid));
        }
        return AjaxResult.fail(-1, "查询失败");
    }

    /**
     * 修改页面,查询文章
     *
     * @param request
     * @param aid
     * @return
     */
    @RequestMapping("/detailbyid")
    public Object getDetailById(HttpServletRequest request, Integer aid) {
        if (aid != null && aid > 0) {
            // 根据文章查询文章的详情
            ArticleInfo articleInfo = articleService.getDetil(aid);
            // 文章的归属人验证
            UserInfo userInfo = SessionUtil.getLoginUser(request);
            if (userInfo != null && articleInfo != null &&
                    userInfo.getId() == articleInfo.getUid()) { // 文章归属人正确
                return AjaxResult.success(articleInfo);
            }
        }
        return AjaxResult.fail(-1, "查询失败");
    }

    /**
     * 修改页面,修改文章
     *
     * @param request
     * @param aid
     * @param title
     * @param content
     * @return
     */
    @RequestMapping("/update")
    public int update(HttpServletRequest request, Integer aid, String title, String content) {
        // 非空校验
        if (aid == null || !StringUtils.hasLength(title) || !StringUtils.hasLength(content)) {
            // 参数有误
            return 0;
        }
        UserInfo userInfo = SessionUtil.getLoginUser(request);
        if (userInfo != null && userInfo.getId() > 0) {
            return articleService.update(aid, userInfo.getId(), title, content);
        }
        return 0;
    }

    /**
     * 博客列表,删除文章
     *
     * @param request
     * @param aid
     * @return
     */
    @RequestMapping("/delete")
    public int delete(HttpServletRequest request, Integer aid) {
        // 非空校验
        if (aid == null && aid <= 0) {
            // 参数有误
            return 0;
        }
        UserInfo userInfo = SessionUtil.getLoginUser(request);
        if (userInfo != null) { // 当前已登录
            return articleService.delete(aid);
        }
        return 0;
    }

    /**
     * 博客编辑,发布文章
     *
     * @param request
     * @param title
     * @param content
     * @return
     */
    @RequestMapping("/add")
    public int add(HttpServletRequest request, String title, String content) {
        // 非空校验
        if (!StringUtils.hasLength(title) || !StringUtils.hasLength(content)) {
            // 参数有误
            return 0;
        }
        UserInfo userInfo = SessionUtil.getLoginUser(request);
        if (userInfo != null && userInfo.getId() > 0) {
            return articleService.add(userInfo.getId(), title, content);
        }
        return 0;
    }
}
Ⅳ. 拦截器
同理,这里也需要放行。
AppConfig:->放行文章分页总页数接口
package com.example.mycnblog.common;

import org.springframework.beans.factory.annotation.Autowired;
import org.springframework.context.annotation.Configuration;
import org.springframework.web.servlet.config.annotation.InterceptorRegistration;
import org.springframework.web.servlet.config.annotation.InterceptorRegistry;
import org.springframework.web.servlet.config.annotation.WebMvcConfigurer;

import java.util.ArrayList;
import java.util.List;

/**
 * 配置拦截器
 */
@Configuration
public class AppConfig implements WebMvcConfigurer {

    // 不拦截的 url 集合
    List<String> excludes = new ArrayList<String>(){{
        add("/**/*.html");
        add("/js/**"); // 放行 static/js 下的所有文件
        add("/editor.md/**"); // 放行 static/editor.md 下的所有文件
        add("/css/**"); // 放行 static/css 下的所有文件
        add("/img/**"); // 放行 static/img 下的所有文件
        add("/user/reg"); // 放行注册接口
        add("/user/login"); // 放行登录接口
        add("/art/detail"); // 放行文章详情接口
        add("/art/list"); // 放行文章分页列表接口
        add("/art/totalpage"); // 放行文章分页总页数接口
    }};

    @Autowired
    private LoginInterceptor loginInterceptor;

    @Override
    public void addInterceptors(InterceptorRegistry registry) {
        // 配置拦截器
        InterceptorRegistration registration =
                registry.addInterceptor(loginInterceptor);
        registration.addPathPatterns("/**"); // 拦截所有请求
        registration.excludePathPatterns(excludes); // 排除不拦截的 url
    }
}
Ⅴ. 效果演示
进入文章分页列表:
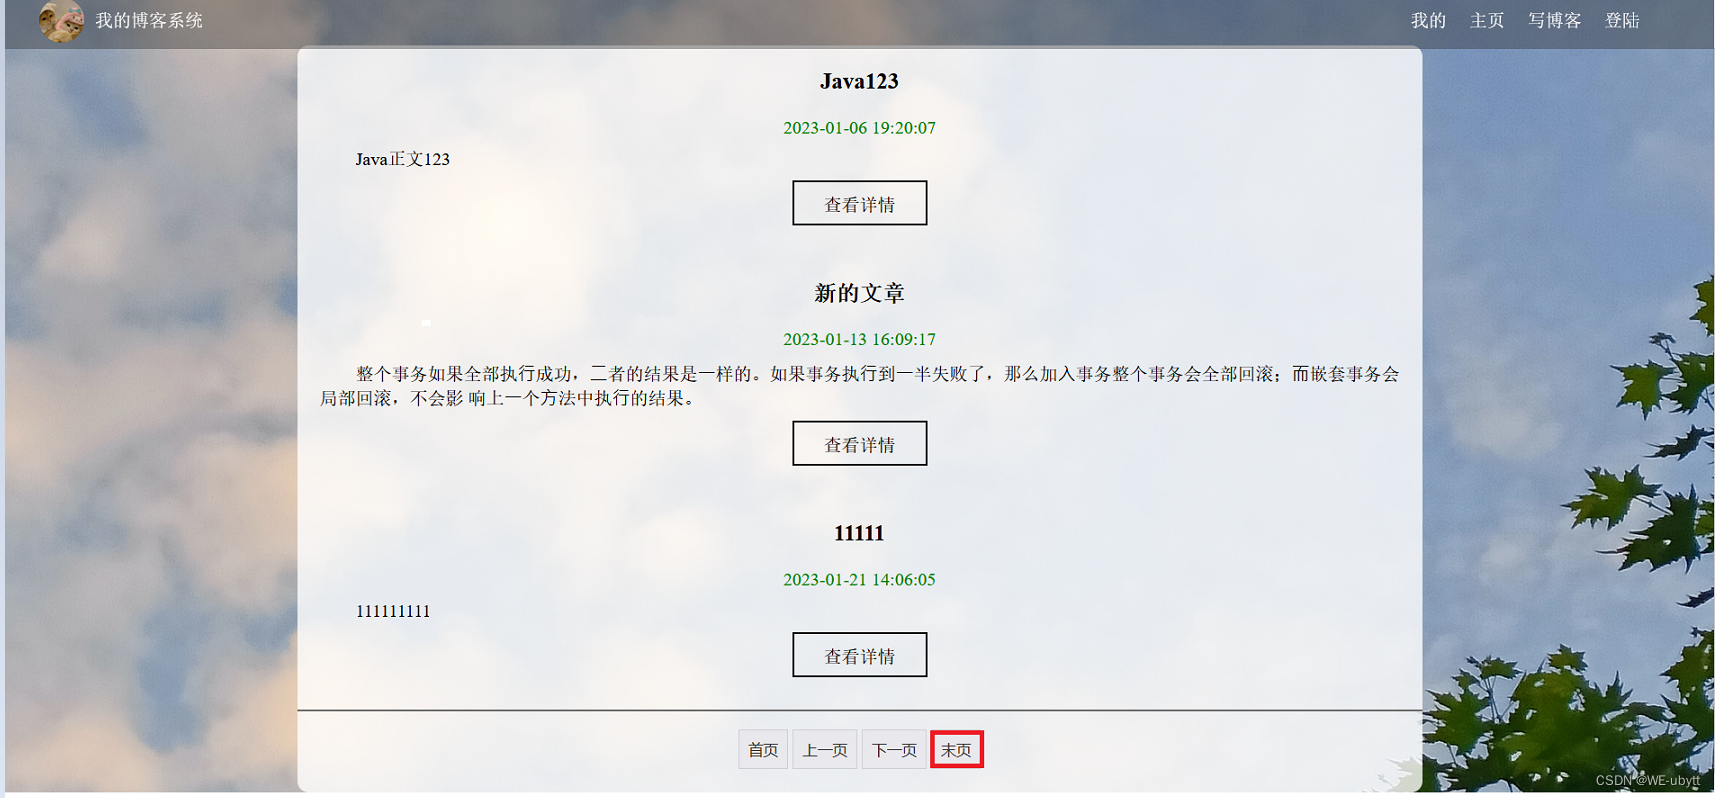
点击尾页:
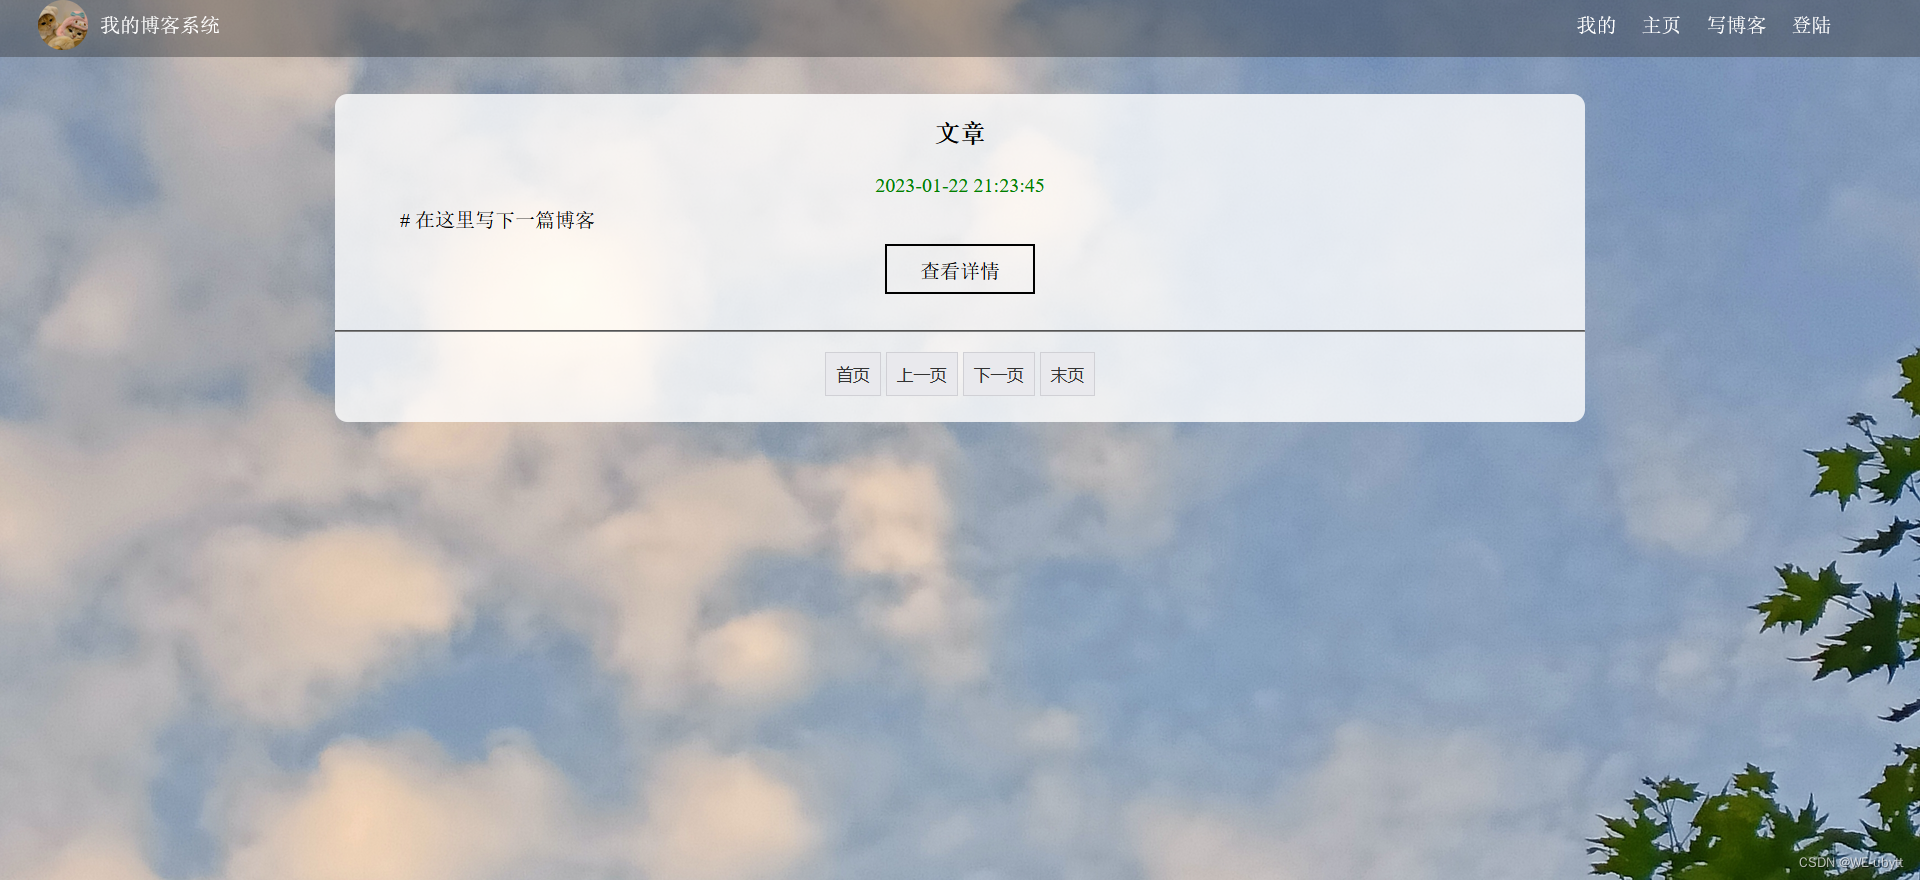
9、密码加盐
很多人其实在这里会用到 md5,直接加盐,但是实际上这种方式并不好,虽然 md5 加密是不可逆的,但是由于 md5 加密的相同密码对应的加密后密码相同,并且都是32位的,这样我们就可以做一个彩虹表,来破解了。
理想的加盐方式,其实就是我们每一次都随机盐值,这样加密出来的密码,想要破解就会浪费大量的时间,安全性也更高了。
既然加密了,那肯定就要有验证密码,我们验证密码需要三个数据,一个是待验证的密码,一个是盐值,一个是已经加密后的密码。所以我们其实可以将验证和加密后的密码拼接起来,这样我们的密码长度也很长,然后我们可以再用 md5 进行加密,因为 md5 加密后,密文都是32位的,这样我们就可以根据位数进行分割盐值和密码。
通过上述分析,公式为:
最终密码 = (md5)(盐值 + 原始密码)
① 工具类
common->SecurityUtil:
package com.example.mycnblog.common;

import org.springframework.util.DigestUtils;
import org.springframework.util.StringUtils;

import java.util.UUID;

/**
 * 加盐加密类
 */
public class SecurityUtil {

    /**
     * 加盐加密
     *
     * @param password
     * @return
     */
    public static String encrypt(String password) {
        // 每次生成内容不同的,但长度固定的 32 位盐值
        String salt = UUID.randomUUID().toString().replace("-", "");
        // 最终密码 = (md5)(盐值 + 原始密码)
        String finalPassword = DigestUtils.md5DigestAsHex((salt + password).getBytes());
        return salt + finalPassword;
    }

    /**
     * 密码验证
     *
     * @param password      待验证密码
     * @param finalPassword 数据库中加盐的密码
     * @return
     */
    public static boolean decrypt(String password, String finalPassword) {
        // 非空效验
        if (!StringUtils.hasLength(password) || !StringUtils.hasLength(finalPassword)) {
            return false;
        }
        // 最终密码不正确
        if (finalPassword.length() != 64) {
            return false;
        }
        // 获取盐值
        String salt = finalPassword.substring(0, 32);
        // 加盐密码 = (md5)(盐值 + 待确定密码)
        String securityPassword =
                DigestUtils.md5DigestAsHex((salt + password).getBytes());
        // (盐值 + 加盐密码) 与 (最终密码) 进行比较
        return (salt + securityPassword).equals(finalPassword);
    }
}
② 具体实现
这个地方主要是要修改注册和登录这两个接口。
Ⅰ. 数据库
UserMapper:->getUserByName
package com.example.mycnblog.mapper;

import com.example.mycnblog.model.UserInfo;
import org.apache.ibatis.annotations.Mapper;
import org.apache.ibatis.annotations.Param;

/**
 * 用户表的 mapper
 */
@Mapper
public interface UserMapper {

    /**
     * 用户注册
     *
     * @param username
     * @param password
     * @return
     */
    public int add(@Param("username") String username,
                   @Param("password") String password);

    /**
     * 用户登录
     *
     * @param username
     * @param password
     * @return
     */
    public UserInfo login(@Param("username") String username,
                          @Param("password") String password);

    /**
     * 根据用户名获取用户信息
     *
     * @param username
     * @return
     */
    public UserInfo getUserByName(@Param("username") String username);

    /**
     * 通过用户 id 查询用户信息
     *
     * @param uid
     * @return
     */
    public UserInfo myInfoByUid(@Param("uid") Integer uid);
}
UserMapper.xml:->getUserByName
<?xml version="1.0" encoding="UTF-8"?>
<!DOCTYPE mapper PUBLIC "-//mybatis.org//DTD Mapper 3.0//EN" "http://mybatis.org/dtd/mybatis-3-mapper.dtd">
<mapper namespace="com.example.mycnblog.mapper.UserMapper">
    <insert id="add">
        insert into userinfo(username, password)
        values (#{username}, #{password})
    </insert>

    <select id="login" resultType="com.example.mycnblog.model.UserInfo">
        select *
        from userinfo
        where username = #{username}
          and password = #{password}
    </select>

    <select id="getUserByName" resultType="com.example.mycnblog.model.UserInfo">
        select *
        from userinfo
        where username = #{username}
    </select>

    <select id="myInfoByUid" resultType="com.example.mycnblog.model.UserInfo">
        select *
        from userinfo
        where id = #{uid}
    </select>
</mapper>
Ⅱ. 服务层
UserService:->getUserByName
package com.example.mycnblog.service;

import com.example.mycnblog.mapper.UserMapper;
import com.example.mycnblog.model.UserInfo;
import org.apache.ibatis.annotations.Param;
import org.springframework.beans.factory.annotation.Autowired;
import org.springframework.stereotype.Service;

/**
 * 用户表的服务层
 */
@Service
public class UserService {

    @Autowired
    private UserMapper userMapper;

    /**
     * 用户注册
     *
     * @param username
     * @param password
     * @return
     */
    public int add(String username, String password) {
        return userMapper.add(username, password);
    }

    /**
     * 用户登录
     *
     * @param username
     * @param password
     * @return
     */
    public UserInfo login(String username, String password) {
        return userMapper.login(username, password);
    }

    /**
     * 用户登录——根据用户名获取用户信息
     *
     * @param username
     * @return
     */
    public UserInfo getUserByName(String username) {
        return userMapper.getUserByName(username);
    }

    /**
     * 获取作者信息
     *
     * @param uid
     * @return
     */
    public UserInfo myInfoByUid(Integer uid) {
        return userMapper.myInfoByUid(uid);
    }
}
Ⅲ. 控制层
UserController:->reg / login
package com.example.mycnblog.controller;

import com.example.mycnblog.common.AjaxResult;
import com.example.mycnblog.common.Constant;
import com.example.mycnblog.common.SecurityUtil;
import com.example.mycnblog.model.UserInfo;
import com.example.mycnblog.service.UserService;
import org.springframework.beans.factory.annotation.Autowired;
import org.springframework.util.StringUtils;
import org.springframework.web.bind.annotation.RequestMapping;
import org.springframework.web.bind.annotation.RestController;

import javax.servlet.http.HttpServletRequest;
import javax.servlet.http.HttpSession;

/**
 * 用户控制器
 */
@RestController
@RequestMapping("/user")
public class UserController {

    @Autowired
    private UserService userService;

    /**
     * 用户注册
     *
     * @param username
     * @param password
     * @return
     */
    @RequestMapping("/reg")
    public Object reg(String username, String password) {
        // 1.非空效验
        if (!StringUtils.hasLength(username) || !StringUtils.hasLength(password)) {
            return AjaxResult.fail(-1, "非法的参数请求!");
        }
        // 2.进行添加操作
        int result = userService.add(username, SecurityUtil.encrypt(password));
        if (result == 1) {
            return AjaxResult.success("注册成功!", 1);
        } else {
            return AjaxResult.fail(-1, "数据库添加出错!");
        }
    }

    /**
     * 用户登录
     *
     * @param username
     * @param password
     * @return 如果用户名和密码都正确,返回1;如果用户名或密码为空/不正确,返回非1
     */
    @RequestMapping("/login")
    public int login(HttpServletRequest request, String username, String password) {
        // 1.非空效验
        if (!StringUtils.hasLength(username) || !StringUtils.hasLength(password)) {
            // 参数有误
            return 0;
        }
        // 2.进行查找操作
        UserInfo userInfo = userService.getUserByName(username);
        if (userInfo == null || userInfo.getId() <= 0) { // userinfo 无效
            // 用户名错误
            return -1;
        } else {
            // 用户名正确
            boolean result = SecurityUtil.decrypt(password, userInfo.getPassword());
            if (result) {
                // 密码正确
                // 将 userinfo 保存到 session 中
                HttpSession session = request.getSession();
                session.setAttribute(Constant.SESSION_USERINFO_KEY, userInfo);
                return 1;
            }
            // 密码错误
            return -1;
        }
    }

    /**
     * 退出登录
     *
     * @param request
     * @return
     */
    @RequestMapping("/logout")
    public boolean logout(HttpServletRequest request) {
        HttpSession session = request.getSession(false);
        if (session != null &&
                session.getAttribute(Constant.SESSION_USERINFO_KEY) != null) {
            // 移除 session 中当前登录的用户
            session.removeAttribute(Constant.SESSION_USERINFO_KEY);
        }
        return true;
    }

    /**
     * 获取个人信息
     *
     * @param request
     * @return
     */
    @RequestMapping("/myinfo")
    public UserInfo myInfo(HttpServletRequest request) {
        HttpSession session = request.getSession(false);
        if (session != null &&
                session.getAttribute(Constant.SESSION_USERINFO_KEY) != null) {
            return (UserInfo) session.getAttribute(Constant.SESSION_USERINFO_KEY);
        }
        return null;
    }

    /**
     * 获取作者信息
     *
     * @param uid
     * @return
     */
    @RequestMapping("/myinfobyuid")
    public UserInfo myInfoByUid(Integer uid) {
        if (uid != null && uid > 0) {
            return userService.myInfoByUid(uid);
        }
        return null;
    }
}
③ 效果演示
来到注册页面:李四 / 123456
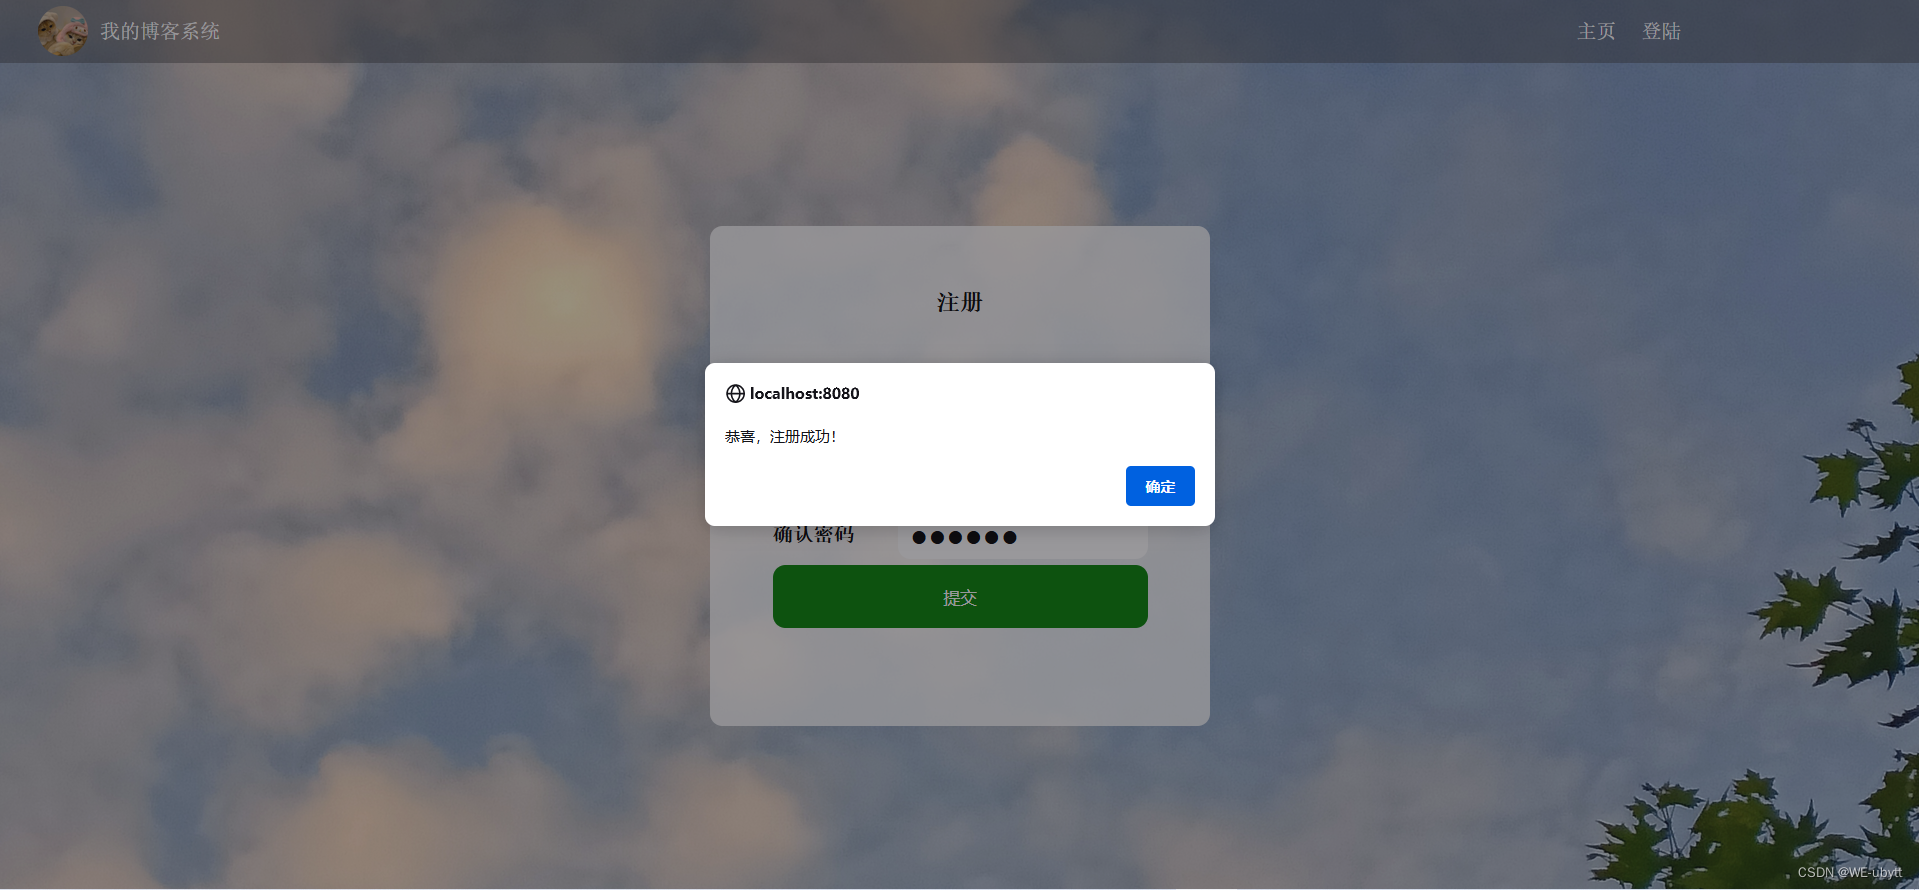
来到登录页面:李四 / 123456
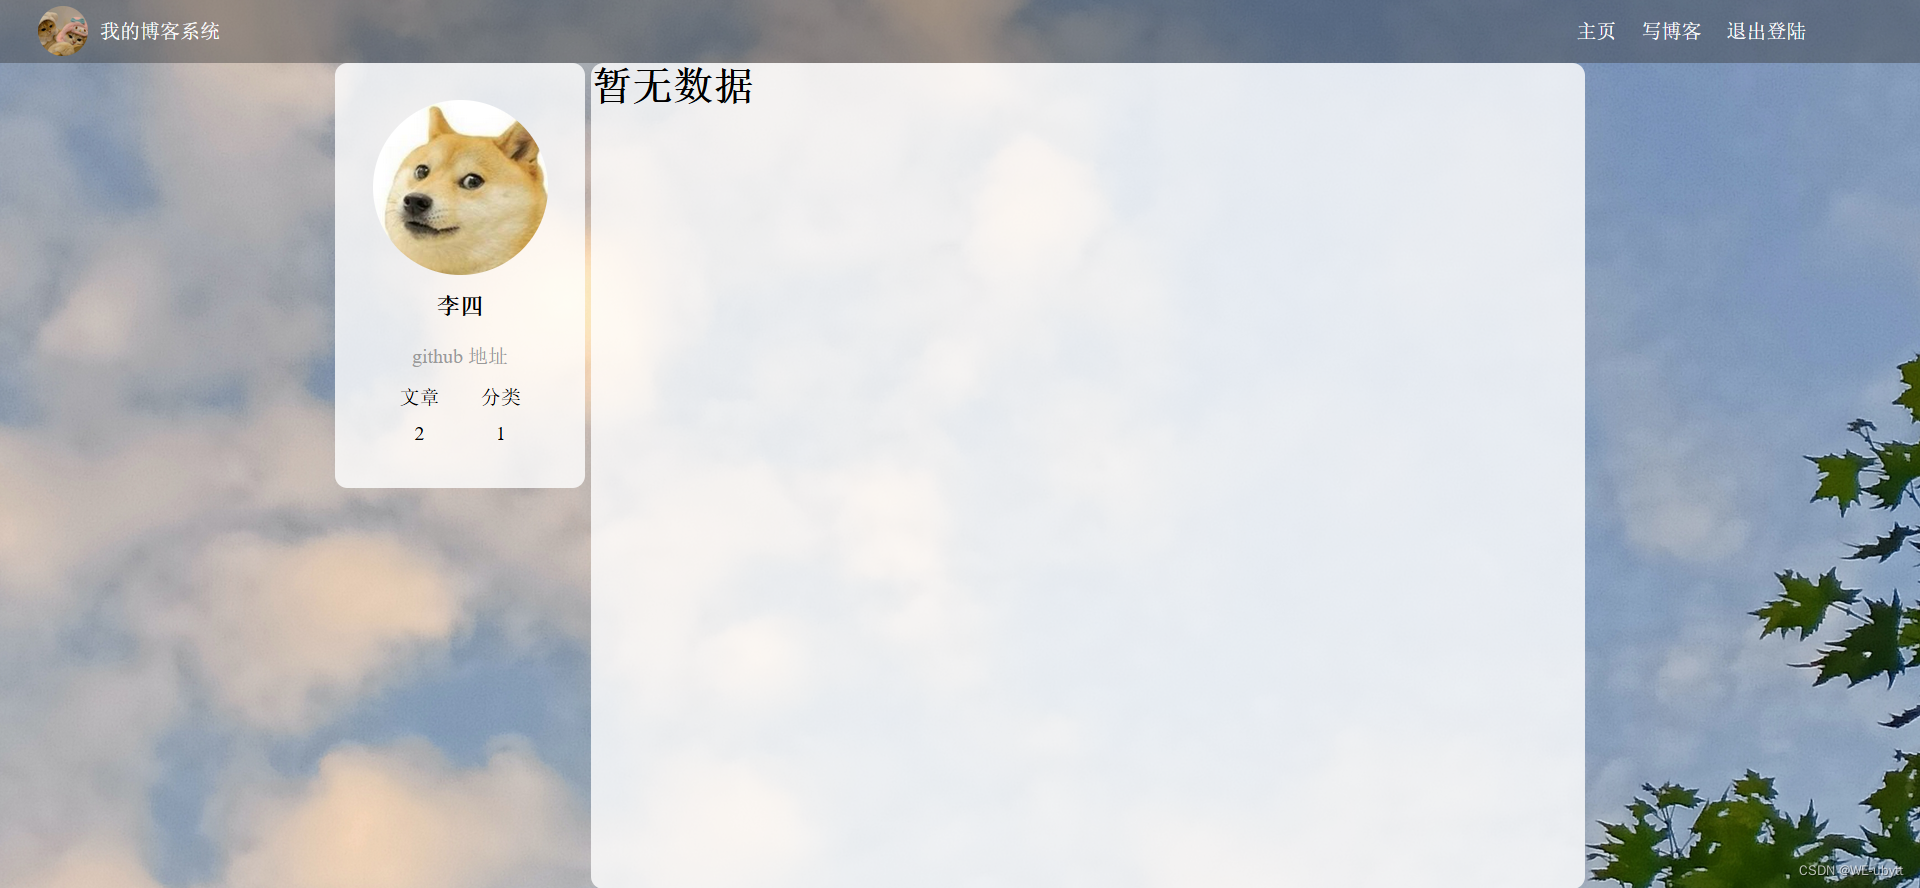
总结
这个项目还是花了很多功夫的,完成之后也是松了一口气,复习了很多知识,也从中学到了一些新知识,文章中实现的功能都是一些基础部分,还有一些进阶部分,各位可以自行实现!
可扩展功能:
- 文章保存草稿
- 文章定时发布功能
- 用户多次尝试登录,账号冻结
- 评论功能
- 个人中心
- 登录界面的验证码(增加系统的安全性)
- 找回密码
- 文章点赞/踩