Tech:React,Node.js,Socket.io,MongoDB
styled-component
目录
Base setup
Register funcitonality
Login funcitonality
set Avatar/profile picture
Chat container setup
useEffect basic hook
ChatHeader
ChatInput
ChatMessage
Set socket and application
What is socket?
Base setup
npx create-react-app chat-app
cd server
npm init
npm i express mongoose nodemon socket.io bcrypt cors dotenv(dependencies)
接着配置env用来存储环境变量
env是用来存储环境变量的,就是那些会随着环境的变化而变化的东西,比如数据库的用户名、密码、缓存驱动、时区,还有静态文件的存储路径之类的。
因为这些信息应该是和环境绑定的,不应该随代码的更新而变化,所以一般不会把 .env 文件放到版本控制中。
从.env文件中为NodeJS加载环境变量_xiaokanfuchen86的博客-CSDN博客_env nodejs
的步骤
index.js
const express = require("express");
const mongoose = require("mongoose");
const bcrypt = require("bcrypt");
const cors = require("cors");

const app = express();
require("dotenv").config();

app.use(cors());
app.use(express.json());

const server = app.listen(process.env.PORT,() => {
    console.log('Server Started on Port',process.env.PORT);
});
.env 文件
PORT=3000
MONGO_URL="mongodb://localhost:27017/chat"
连接数据库
mongoose.connect(process.env.MONGO_URL,{
    useNewUrlParser: true,
    useUnifiedTopology:true,

}).then(()=>{
    console.log("DB Connection Successfully");
}).catch((err)=>{
    console.log(err.message);
})
之后初始化,react app
使用
yarn start就可以打开react.js的文件了

之后需要使用加载一些dependencies
yarn add axios styled-components react-router-dom之后建立pages,utils,components文件夹,并在pages里面建立register,login,chat.jsx

可维护的 React 程序之项目结构梳理 - 知乎
https://blog.webdevsimplified.com/2022-07/react-folder-structure/
之后就是构建路径,然后可以通过路径直接访问
import React from 'react';
import {BrowserRouter,Routes,Route} from "react-router-dom";
import Register from "./pages/Register";
import Login from "./pages/Login";
import Chat from "./pages/Chat";

export default function App() {
  return (
    <BrowserRouter>
      <Routes>
        <Route path='/register' element={<Register />}></Route>
        <Route path='/login' element={<Login />}></Route>
        <Route path='/' element={<Chat />}></Route>
      </Routes>
    </BrowserRouter>
  )
}
Register funcitonality
然后将register 添加了样式,使用styled.div这个玩意
然后跟其它的一样使用spread operator 和[name]:value 加入同步更新数据,我输入什么就是什么。
    const handleChange = (event)=>{
        setValues({...values,[event.target.name]:event.target.value})
    };
接着还是写样式,如果password不相同需要给出提示,给出样式的提示
React-Toastify allows you to add notifications to your app with ease.
yarn add react-toastify使用toast的一个notification的功能,如果不匹配的话,那么就给出notification
const handleValidation = () => {
    const { password, confirmPassword, username, email } = values;
    if (password !== confirmPassword) {
      toast.error(
        "Password and confirm password should be same.",
        toastOptions
      );
      return false;
    } else if (username.length < 3) {
      toast.error(
        "Username should be greater than 3 characters.",
        toastOptions
      );
      return false;
    } else if (password.length < 8) {
      toast.error(
        "Password should be equal or greater than 8 characters.",
        toastOptions
      );
      return false;
    } else if (email === "") {
      toast.error("Email is required.", toastOptions);
      return false;
    }

    return true;
  };
然后使用axios调用api route
const handleSubmit = async(event)=>{
        event.preventDefault();
        if (handleValidation()){
            const {password,confirmPassword,username,email} = values;
            const {data} = await axios.post(registerRoute,{
                username,
                email,
                password,
            });
        }
    };
然后又建立utils文件夹
接着使用框架express.js的框架
创建文件夹,创建了routers,controller,model文件夹。
这是最基本的网络框架、router to forward the supported request to approciate controller funcitions
Express Tutorial Part 4: Routes and controllers - Learn web development | MDN
写中间件
在userRoutes.js中
const {register} = require("../controller/userController");

const router = require("express").Router();

router.post("/register",register);

module.exports = router;
这个教程涵盖了axios是如何工作的?
axios是使用Node.js和 XMLHttpRequests在浏览器中来发送Http request。如果request成功,将会接受response。如果request失败了,将会收到error。后面会将转化后的相应返回给发送服务器请求的客户端。
Making HTTP requests with Axios
https://www.youtube.com/watch?v=_qIdC1N2qcQ
然后在controller 中加入userController.js
module.exports.register = (req,res,next)=>{
    console.log(req.body);
};
之后测试了服务器是否能获取客户端发送过来的数据。获取成功了。获取req.body的数据需要加上,在index.js上面,不然就会报错
// axios出现了无法404的状况,无法获取data,所以使用这个来获取数据
app.use(express.urlencoded({extended: true}));
需要创建数据库model的内容,定义数据库的schema是什么。
const mongoose = require("mongoose");

const userSchema = new mongoose.Schema({
    username:{
        type: String,
        required: true,
        min:3,
        max:20,
        unique:true,
    },
    email:{
        type: String,
        required: true,
        max:50,
        unique:true,
    },
    password:{
        type: String,
        required: true,
        min:8,
    },
    isAvatarImageSet:{
        type: Boolean,
        default: false,
    },
    avatarImage:{
        type:String,
        default:"",
    },

});
module.exports = mongoose.model("Users",userSchema);
之后我们需要在写完整usercontroller的内容。这里controller 需要使用写一些关于数据库的判断逻辑。需要获取email,password,username 的信息,然后在数据库里面找,如果有的话,就返回存在的信息。然后需要将数据加入数据库,还需要将密码加密。最后还需要返回json状态。
module.exports.register = async(req,res,next)=>{
    try{
        const {email, username, password} = req.body;
        const usernameCheck = await User.findOne({username});
        if (usernameCheck)
            return res.json({msg:"Username already used",status:false});
        const emailCheck = await User.findOne({email})
        if (emailCheck)
            return res.json({msg:"Email already used",status:false});
        const hashedPassword = await brcypt.hash(password,10);
        const user = await User.create({
            email,
            username,
            password: hashedPassword,
        });
        delete user.password;
        return res.json({status:true,user});
    }catch(ex){
        next(ex)
    }
};
随后补register.js 的逻辑.check status 的状态是false还是true。如果一切都没有问题就使用const navigate = useNavigate();返回到“/”。这个hook 跟redirect一样的作用
 const handleSubmit = async (event) => {
      event.preventDefault();
      if (handleValidation()) {
        const { email, username, password } = values;
        const { data } = await axios.post(registerRoute, {
          username,
          email,
          password,
        });

      if(data.status===false){
        toast.error(data.msg,toastOptions);
      }
      if(data.status===true){
        localStorage.setItem('chat-app-user',JSON.stringify(data.user))
        navigate("/");
      }
    }
    };
useNavigate v6.6.1 | React Router
温习:
到底前端页面的数据怎么传送到server中的?
在client-app中,输入了注册的信息。在表单上使用button submit,就会提交数据,触发handleSubmit
register.js
 return (
        <>
            <FormContainer>
                <form onSubmit={(event)=>handleSubmit(event)}>
const handleSubmit = async (event) => {
event.preventDefault();
if (handleValidation()) {
const { email, username, password } = values;
const { data } = await axios.post(registerRoute, {
username,
email,
password,
});
if(data.status===false){
toast.error(data.msg,toastOptions);
}
if(data.status===true){
localStorage.setItem('chat-app-user',JSON.stringify(data.user))
navigate("/");
}
}
};handleValidation函数用来检测这些密码合不合要求,password 是否相同,username长度是否和要求,password长度是否和要求。和的话,继续往下走。使用axios 当api 调用server。
之后就到了APIRoutes.js这个文件,使用${host}/api/auth/register路径。
这就跑到了server中的index.js的文件中。
app.use("/api/auth",userRoute)The app.use() function is used to mount the specified middleware function(s) at the path which is being specified. It is mostly used to set up middleware for your application.
然后callback到这里,调用controller中的东西
userController.js
const {register} = require("../controller/userController");

const router = require("express").Router();

router.post("/register",register);

module.exports = router;
之后在controller中就确定是否存在email username等,没有任何问题的话,就加入数据库,并且return status到客户端。并且使用一个session保存一下记录
register.app
if(data.status===false){
        toast.error(data.msg,toastOptions);
}
if(data.status===true){
        localStorage.setItem('chat-app-user',JSON.stringify(data.user))
        navigate("/");
}
Login funcitonality
在客户端页面修改了Login.jsx文件,基本上就是复制register 上面的内容
然后更新了controller 的内容。
在register和login上localStorage.getItem,为了就是如果存在localStorage的话,那么就不需要重新登陆,直接有session,直接登录
    useEffect(()=>{
      if(localStorage.getItem("chat-app-user")){
        navigate("/");
      }
    }, []);
set Avatar/profile picture
设置样式,设置button还有随机profile的图片,并且使用map将图片呈现出来。这些随机图片是通过一个free的图片库获取的,使用api获取。用一个for循环,获取了四张图片。然后使用了buffer相当于一个缓冲区,buffer会存储信息直到有足够的地方存储更多的数据
Node.js buffer: A complete guide - LogRocket Blog
const api = `https://api.multiavatar.com/4645646`;
useEffect(() => {
        async function fetchData(){
            const data = [];
            for (let i = 0; i < 4; i++) {
                const image = await axios.get(
                    `${api}/${Math.round(Math.random() * 1000)}`
            );
            const buffer = new Buffer(image.data);
            data.push(buffer.toString("base64"));
            }
            setAvatars(data);
            setIsLoading(false);
        }
        fetchData();
      }, []);
使用buffet的时候遇到了bug,webpack把它删除了,无法使用,只能自己配置文件
How to polyfill node core modules in webpack 5
设置完button,需要点击button。这时候又需要设置函数。
如果没有点击正确的avatar就会报错,如果点击了,就获取当前session中的数据,并使用user._id找到相应的位置。
setAvatar.jsx
const setProfilePicture = async() =>{
        if(selectedAvatar===undefined){
            toast.error("Please select an avatar", toastOptions);
        }else{
            const user = await JSON.parse(localStorage.getItem("chat-app-user"));
            const {data} = await axios.post(`${setAvatarRoute}/${user._id}`,{
            image:avatars[selectedAvatar],
        });
        if (data.isSet){
            user.isAvatarImageSet = true;
            user.avatarImage = data.image;
            localStorage.setItem(
                process.env.REACT_APP_LOCALHOST_KEY,
                JSON.stringify(user)
            );
            navigate("/");
        }else{
            toast.error("Error setting avatar. Please try again.", toastOptions)
        }
    }
    };
调用api接口
export const setAvatarRoute = `${host}/api/auth/setAvatar`;调用index,js
app.use("/api/auth",userRoute)调用路径
router.post("/setAvatar/:id",setAvatar);调用controller。controller中编辑关于数据库的逻辑,找得到userData的话,就更新。然后返回json数据到客户端
module.exports.setAvatar = async(req,res,next)=>{
    try {
        const userId = req.params.id;
        const avatarImage = req.body.image;
        const userData = await User.findByIdAndUpdate(
          userId,
          {
            isAvatarImageSet: true,
            avatarImage,
          });
        return res.json({
          isSet: userData.isAvatarImageSet,
          image: userData.avatarImage,
        });
      } catch (ex) {
        next(ex);
      }
};
客户端接收到数据.需要把localsession的东西更新一下
if (data.isSet){
            user.isAvatarImageSet = true;
            user.avatarImage = data.image;
            localStorage.setItem(
                process.env.REACT_APP_LOCALHOST_KEY,
                JSON.stringify(user)
            );
            navigate("/");
        }else{
            toast.error("Error setting avatar. Please try again.", toastOptions)
        }
Chat container setup
首先是设置样式
const Container = styled.div`
  height: 100vh;
  width: 100vw;
  display: flex;
  flex-direction: column;
  justify-content: center;
  gap: 1rem;
  align-items: center;
  background-color: #131324;
  .container {
    height: 85vh;
    width: 85vw;
    background-color: #00000076;
    display: grid;
    grid-template-columns: 25% 75%;
    @media screen and (min-width: 720px) and (max-width: 1080px) {
      grid-template-columns: 35% 65%;
    }
  }
`;
在components文件夹中建立Contacts.jsx组件
然后设置api routes
export const allUsersRoute = `${host}/api/auth/allusers`;再设置server中的routes
router.get("/allusers/:id",getAllUsers);Controller:
获取数据,返回除了当前用户之外的所有的人的信息,Json object 到客户端
module.exports.getAllUsers = async(req,res,next)=>{
    // find all the user except for current user
    try{
        const users = await User.find({_id:{$ne:req.params.id}}).select([
            "email",
            "username",
            "avatarImage",
            "_id",
        ])
        return res.json(users);
    }catch(ex){
        next(ex);
    }
};
如果在localstorage中存在数据的话,就直接返回到chat 页面,煮页面,如果没有存在的话,
useEffect(()=>{
      async function fetchData(){
        if(!localStorage.getItem("chat-app-user")){
          navigate("/login");
        }else{
          setCurrentUser(await JSON.parse(localStorage.getItem("chat-app-user")))
        }
    }
    fetchData();
    },[])
用来解析JSON 字符串的用法
JSON.parse() - JavaScript | MDN
如果currentUser 存在,并且它的设置了AvatarImage,那么,要获取数据, 将数据存入setContacts中,如果没有设置一下avatarImage
Chat.jsx
// call the api
    useEffect(()=>{
      async function fetchData(){
        if (currentUser){
          if(currentUser.isAvatarImageSet){
            const data = await axios.get(`${allUsersRoute}/${currentUser._id}`);
            setContacts(data.data);
          }
        } else{
          navigate("/setAvatar");
        }
    }
    fetchData();
    },[])
<Container>
<div className='container'>
<Contacts contacts={contacts} currentUser={currentUser} changeChat = {handleChatChange} />
</div>
</Container>Contacts.jsx
获取currentUser的一切信息
useEffect(()=>{
        if(currentUser){
            setCurrentUserImage(currentUser.avatarImage);
            setCurrentUserName(currentUser.username);
        }

    },[currentUser]);
如果当前用户的图象存在,姓名存在,遍历显示。以下都是样式,就是遍历所有的信息,打上所对应的名字
return <>
{
currentUserImage&¤tUserName&&(
<Container>
<div className="brand">
<img src={Logo} alt="logo" />
<h3>snappy</h3>
</div>
<div className="contacts">
{
contacts.map((contact,index)=>{
return (
<div
className={`contact ${index === currentSelected ? "selected" : ""}`}
key={index}
>
<div className="avatar">
<img
src={`data:image/svg+xml;base64,${contact.avatarImage}`}
alt=""
/>
</div>
<div className="username">
<h3>{contact.username}</h3>
</div>
</div>
);
})}
</div>
<div className="current-user">
<div className="avatar">
<img
src={`data:image/svg+xml;base64,${currentUserImage}`}
alt="avatar"
/>
</div>
<div className="username">
<h2>{currentUserName}</h2>
</div>
</div>
</Container>
)
}
</>Bug:
1.有bug,setAvatarImage的时候,key 变成了undefined了,没有在当前app上面存。
解决:解决bug,因为我在更新localstorge的时候,key设置成了未知参数,所以根本找不到。
2.又出现了一个bug,就是设置完后,无法返回到/,而且他不会判断到底有没有设置图片,如果设置了,直接返回到/
问题出现在,没有办法获取到currentuser,currentUser 为undefined
解决了是关于useEffect的问题。
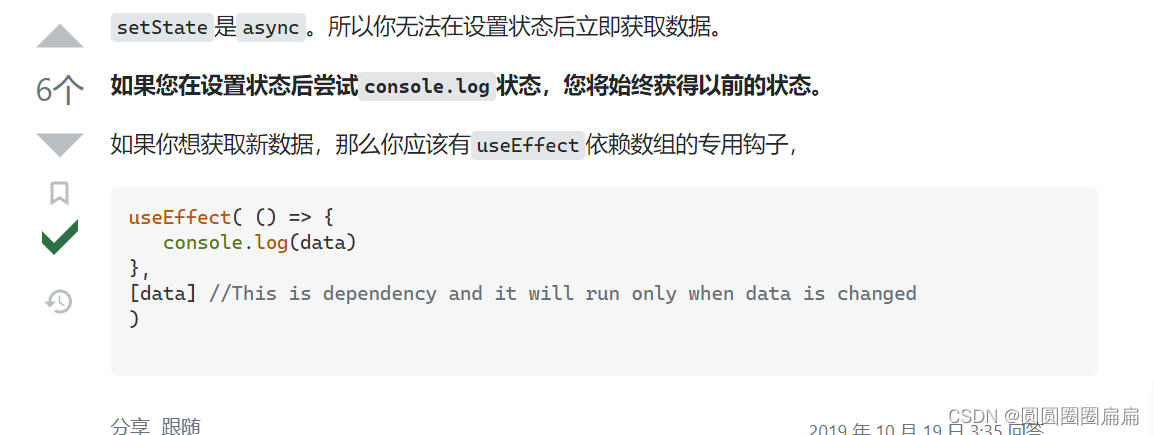
javascript - react hook useState can not store json or string - Stack Overflow
之后到了contacts.js,因为需要设置页面,但是我在测试这个数据库的时候get data的时候,打开server,总是有点问题,所以没有测试它。下次再说,已测试就到setAvatar中,所以把navigate设置为("/")
 useEffect(()=>{
      async function fetchData(){
        if (currentUser){
          console.log("new");
          if(currentUser.isAvatarImageSet){
            const data = await axios.get(`${allUsersRoute}/${currentUser._id}`);
            console.log(data.data)
            setContacts(data.data);
          }
        } else{
          // navigate("/setAvatar");
          navigate("/");
        }
    }
    fetchData();
    },[currentUser])
然后又解决了一个问题,因为总是不能server和cilent 同时打开,所以查了一下,发现占用了同一个端口,所以他们总是冲突,同时报错
报错的原因是因为useeffect这个函数写的有问题,然后他不能实时更新,所以访问server 的时候有问题.前面对了,然后重新测试的时候,又有问题,不知道哪里有问题。是因为这里写错了,就是逻辑错误,所以导致一直navigate到setvatar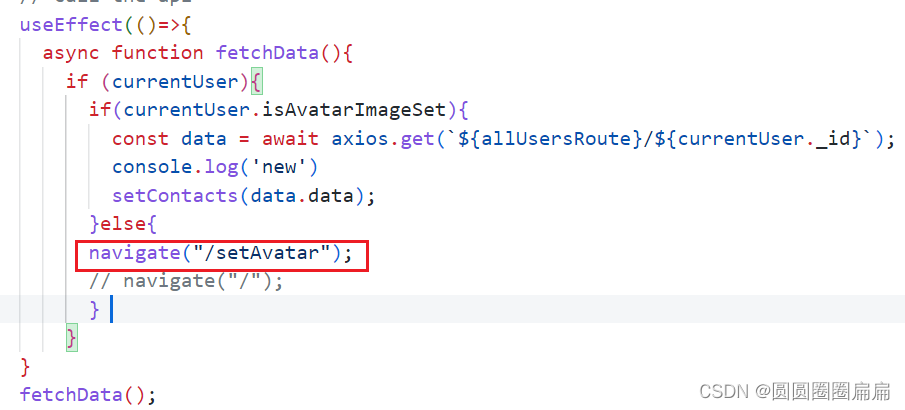
但是又出现了另一个问题,就是我把那些空array都删除之后,出现了这个问题。好像是死循环了,不知道怎么修改,再说把
VM102 react_devtools_backend.js:4012 Warning: Maximum update depth exceeded. This can happen when a component calls setState inside useEffect, but useEffect either doesn't have a dependency array, or one of the dependencies changes on every render.
就是useEffect 的问题。,我去 就是说,她有时候成功,有时候不成功,不知道为什么
感觉明天得学习一下useEffect到底怎么用的,怎么设置的。不然的话,总是有bug,tutorial又不是最新的
useEffect basic hook
import React, { useState, useEffect } from 'react';

function Example() {
  const [count, setCount] = useState(0);

  // On Every render
  // 一直在不断的更新,when component mounts
  useEffect(() => {
    // Update the document title using the browser API
    document.title = `You clicked ${count} times`;
  });

  // On first Render/Mount pnly-compentDidMount alternative
  // 只有一次
  useEffect(() => {
    // Update the document title using the browser API
    document.title = `You clicked ${count} times`;
  },[]);

 // On first Render +whenever dependancy changes!-componentDidUpdate alternative

  useEffect(() => {
    // Update the document title using the browser API
    document.title = `You clicked ${count} times`;
  },[count]);

// componentWillUnmount alternative
// 就是它会一直更新render,但是不会记录内容。清内存的感觉
  useEffect(() => {
    window.addEventListener("resize",updateWindowWidth);

    return () =>{
        // when component unmounts,this cleanup code runs....
        window.removeEventListener("resize,updateWindowWidth);
    }
  });

  return (
    <div>
      <p>You clicked {count} times</p>
      <button onClick={() => setCount(count + 1)}>
        Click me
      </button>
    </div>
  );
}
视频讲解在此
https://www.youtube.com/watch?v=UVhIMwHDS7k
ChatHeader
头部大概就需要布置好头像,还有名字还有关闭键。
ChatInput
主要的功能就是用来输入内容的。
emoji 的选项+输入框+submit button
 return (
    <Container>
      <div className="button-container">
        <div className="emoji">
          <BsEmojiSmileFill onClick={handleEmojiPickerHideShow} />
          {showEmojiPicker && <Picker onEmojiClick={handleEmojiClick} />}
        </div>
      </div>
      <form className="input-container" onSubmit={(e) => sendChat(e)}>
        <input
          type="text"
          placeholder="type your message here"
          value={msg}
          onChange={(e) => setMsg(e.target.value)}
        />
        <button className="submit">
          <IoMdSend />
        </button>
      </form>
    </Container>
  );
}
一旦点击了这个键,那么会出现一堆emoji的选项。有点急emoji的话,就将他更新到msg变量中。如果按了submit button就直接setMsg
const [showEmojiPicker, setShowEmojiPicker] = useState(false);
  const [msg, setMsg] = useState("");
  const handleEmojiPickerHideShow = () => {
    setShowEmojiPicker(!showEmojiPicker);
  };

  const handleEmojiClick = (event, emoji) => {
    let message = msg;
    message += emoji.emoji;
    setMsg(message);
  };

  const sendChat = (event) => {
    event.preventDefault();
    if (msg.length > 0) {
      handleSendMsg(msg);
      setMsg("");
    }
  };
之后
在chatContainer.jsx中
<ChatInput handleSendMsg={handleSendMsg} />将msg放入其中。然后就是处理传输过来输入的东西,将它放入数据库中,使用axios post来传输内容
const handleSendMsg = async (msg) => {
    await axios.post(sendMessageRoute, {
      from: currentUser._id,
      to: currentChat._id,
      message: msg,
    });
    const msgs = [...messages];
    msgs.push({ fromSelf: true, message: msg });
    setMessages(msgs);
  };
APIRoutes.js
export const sendMessageRoute = `${host}/api/messages/addMsg`;index.js
app.use("/api/messages",messageRoute)messageRoute.js
router.post("/addMsg",addMessage);到controller就要处理加入数据到数据库中,create一个数据库,
module.exports.addMessage = async (req, res, next) => {
  try {
    const { from, to, message } = req.body;
    const data = await messageModel.create({
      message: { text: message },
      users: [from, to],
      sender: from,
    });
    if (data) {
      console.log("create message database");
      return res.json({ msg: "Message added sucessfully" });
    } else {
      return res.json({ msg: "Failed to add message to the datatbase" });
    }
  } catch (ex) {
    next(ex);
  }
};
建立数据库schema
const mongoose = require("mongoose");

const messageSchema = mongoose.Schema(
    {
      message: {
        text: { type: String, required: true },
      },
      users: Array,
      sender: {
        type: mongoose.Schema.Types.ObjectId,
        ref: "User",
        required: true,
      },
    },
    {
      timestamps: true,
    }
  );
module.exports = mongoose.model("Messages",messageSchema);
感觉这里加入信息有bug,因为同个用户,没有家到同一个object里面,而是重新创建了一个列存放。还待确认。
ChatMessage
显示传输的内容
首先需要获得所有的数据。需要获得所有数据,然后将数据传输到respons中,
ChatContainer.jsx
useEffect(() => {
    async function fetchData() {
      if (currentChat) {
        const response = await axios.post(getAllMessagesRoute, {
          from: currentUser._id,
          to: currentChat._id,
        });
        setMessages(response.data);
      }
    }
    fetchData();
  }, [currentChat]);
APIRoutes.js
export const getAllMessagesRoute = `${host}/api/messages/getMsg`;messageRoute.js
router.post("/getMsg",getAllMessage);messageController.js
module.exports.getAllMessage = async (req, res, next) => {
  try {
    const { from, to } = req.body;
    const messages = await messageModel
      .find({
        users: {
          $all: [from, to],
        },
      })
      .sort({ updateAt: 1 });
    const projectMessages = messages.map((msg) => {
      return {
        fromSelf: msg.sender.toString() === from,
        message: msg.message.text,
      };
    });
    res.json(projectMessages);
  } catch (ex) {
    next(ex);
  }
};
find users中的所有users 存储的是0,1的数据。并且以updateAt排序,应该是升序(1)的意思。降序是(-1)。
然后就是返回projectMessages object 对象,以fromSelf和message为对象名,如果发送者相同与from 相同。
然后点击submit 的时候,将message 存放到数组中,然后更新message,以方便后面的message 的map
const handleSendMsg = async (msg) => {

    const msgs = [...messages];
    msgs.push({ fromSelf: true, message: msg });
    setMessages(msgs);
  };
方便遍历使用message来遍历,然后是更新类名。
<div className="chat-messages">
            {messages.map((message) => {
              return (
                <div ref={scrollRef} key={uuidv4()}>
                  <div
                    className={`message ${
                      message.fromSelf ? "sended" : "recieved"
                    }`}
                  >
                    <div className="content">
                      <p>{message.message}</p>
                    </div>
                  </div>
                </div>
              );
            })}
          </div>
然后设置样式
Set socket and application
index.js
set server API
const io = socket(server,{
    cors:{
        origin:"http://localhost:3000",
        credentials:true,
    },
});
global.onlineUsers = new Map();

//Connection socket
io.on("connnection",(socket)=>{
    global.chatSocket = socket;
    socket.on("add-user",(userId)=>{
        onlineUsers.set(userId,socket.id);
    });
    socket.on("send-msg",(data)=>{
        const sendUserSocket = onlineUsers.get(data.to);
        if(sendUserSocket){
            socket.to(sendUserSocket).emit("msg-receive",data.message);
        }
    });
});
Server API | Socket.IO
Server API | Socket.IO
在client 也需要设置api
Chat.jsx
import { io } from 'socket.io-client';
useEffect(() => {
    if (currentUser) {
      socket.current = io(host);
      socket.current.emit("add-user", currentUser._id);
    }
  }, [currentUser]);
客户端设置好,如果emit是发送数据
ChatContainer.jsx
const handleSendMsg = async (msg) => {

    socket.current.emit("send-msg", {
      to: currentChat._id,
      from: currentUser._id,
      message: msg,
    });

  };
在客户端发送数据,在server监听事件
 useEffect(() => {
    if (socket.current) {
//监听事件
      socket.current.on("msg-receive", (msg) => {
        setArrivalMessage({ fromSelf: false, message: msg });
      });
    }
  }, [socket]);
//
  useEffect(() => {
    arrivalMessage && setMessages((prev) => [...prev, arrivalMessage]);
  }, [arrivalMessage]);

  useEffect(() => {
    scrollRef.current?.scrollIntoView({ behaviour: "smooth" });
  }, [messages]);
Hooks API Reference – React
出现了bug

又解決了個bug,因为路径设置的不对,所以一直访问不到,路径应该一直统一
又出现了一个bug,数据库创建不起来,是没有引用model,在controller里面,所以一直没有建立起来

What is socket?
就是用来实现通信的。
网络编程:socket套接字通俗理解_举世无双勇的博客-CSDN博客
