什么是元编程
没想到吧,这世上除了元宇宙,还有元编程,如果没有接触过,可能会有点懵,不过没关系,简单的说就是用代码来生成代码。实现元编程的传统常见手段主要是使用 APT注解处理器 + JavaPoet 组合拳,如果你是作为一名Android 开发者,一定在曾经或者现在使用过很多知名的开源库,比如ButterKnife 、ARouter等,这些都是基于 注解处理器 + JavaPoet 的方式实现的元编程,是的,虽然元编程这个词很高大上,但是可能你已经默默的使用了很多年了。
元编程就是以源代码作为输入数据的程序,比如编译器、链接器、解释器、调试工具和程序分析工具等等,它们可以在编译时分析源码,对源码进行处理或修改,或者产生中间代码。当然主要的目的还是为了生成代码。
在什么场景下需要元编程呢?
- 当我们需要生成某种模板代码、样板代码的时候
- 当我们厌倦了写太多重复代码的时候
- 当我们需要隐藏实现细节的时候
- 当我们想要创建语法糖的时候
Kotlin 元编程的常见实现手段
- Kotlin 反射 / Java 反射
- Kotlin 注解处理器 (KAPT:Kotlin Annotation Processor Tool)
- Kotlin 符号处理器 (KSP:Kotlin Symbol Processing)
- Kotlin 编译器插件(KCP:Kotlin Compiler Plugin)
kotlin 元编程的几种方案对比
| Reflection | KAPT | KSP | KCP | |
|---|---|---|---|---|
| 运行时 | 慢 | - | - | - |
| 编译时 | - | 解析metadata | 基于 Kotlin AST | 基于 Kotlin AST |
| 复杂度 | 较低 | 中 | 中 | 较高 |
| 主要场景 | 提供动态能力 | 生成源码 | 生成源码 | 生成、修改IR |
| 现状 | 稳定 | 稳定 | 稳定 | 实验 |
| 多平台 | JVM + JS | JVM | 全部 | 全部 |
KAPT 的工作机制
在进行Android应用开发时,不少人吐槽 Kotlin 的编译速度慢,而 KAPT 便是拖慢编译的元凶之一。我们知道,Android的很多库都会使用注解简化模板代码,例如 Room、Dagger、Retrofit 等,而默认情况下Kotlin 使用的是 KAPT 来处理注解的。KAPT没有专门的注解处理器,需要借助APT实现的,因此需要先生成 APT 可解析的 stub (Java代码),这拖慢了 Kotlin 的整体编译速度。

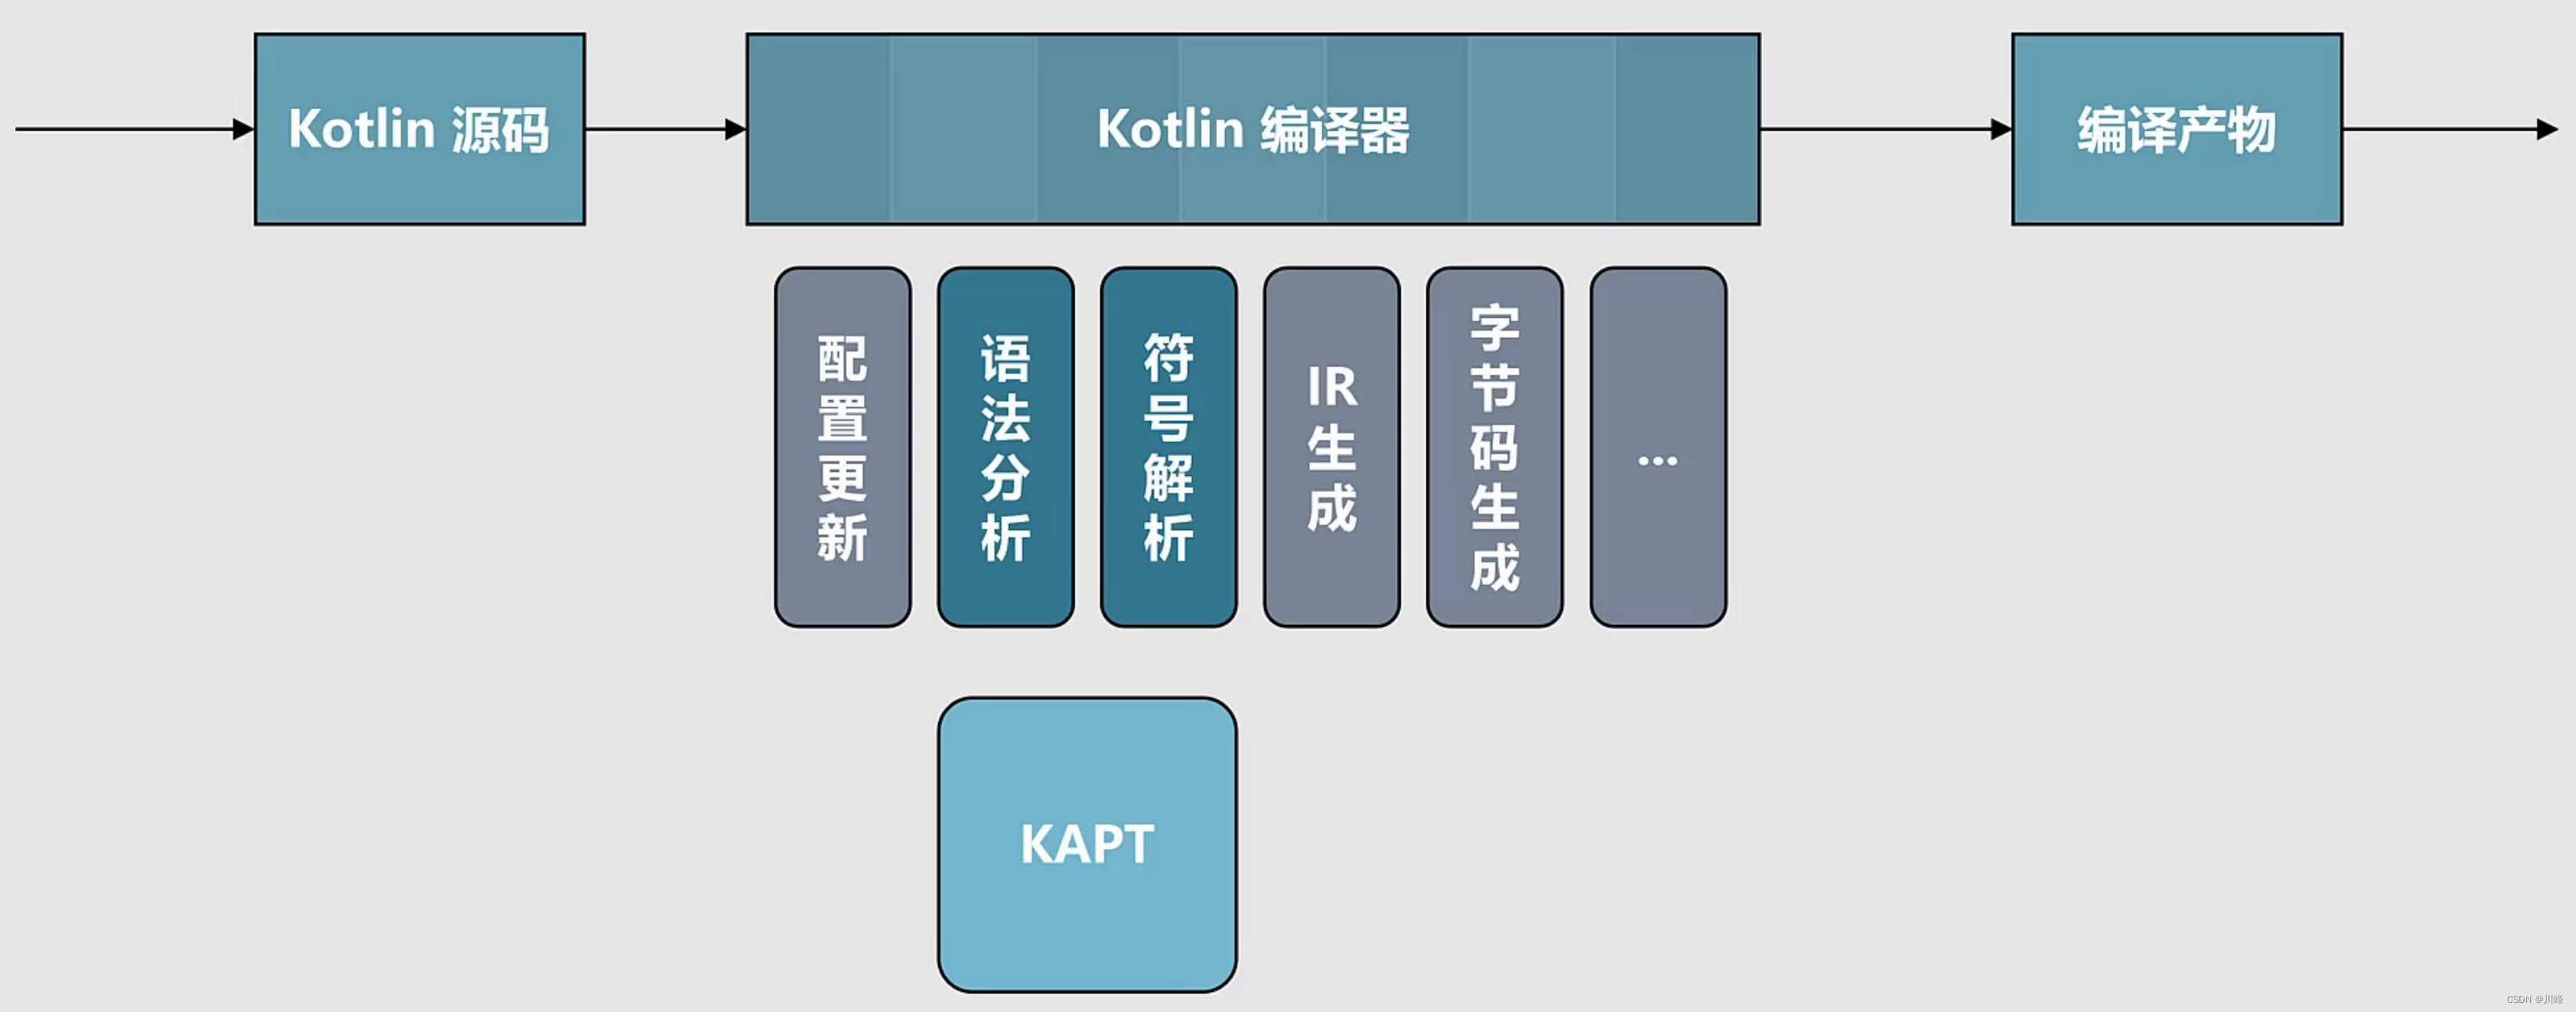
所以 KAPT 的本质还是基于 Java 注解处理器实现的一个Kotlin 编译器插件。
KAPT 处理 Kotlin 源码存在的问题:
- 实现复杂,需要手动解析 Kotlin 类信息
- 编译耗时,KAPT 需将 Kotlin 类转成 Java Stubs
- 只支持Kotlin-JVM
KCP
KCP是在 kotlinc 过程中提供 Hook 时机,可以在期间解析 AST、修改字节码产物等,Kotlin 的不少语法糖都是 KCP 实现的。例如, data class、 @Parcelize、kotlin-android-extension 等,如今火爆的 Jetpack Compose也是借助 KCP 完成的。
理论上来说, KCP 的能力是 KAPT 的超集,完全可以替代 KAPT 以提升编译速度。但是 KCP 的开发成本太高,涉及 Gradle Plugin、Kotlin Plugin 等的使用,API 涉及一些编译器知识的了解,一般开发者很难掌握。
KSP 简化了KCP的整个流程,开发者无需了解编译器工作原理,处理注解等成本也变得像 KAPT 一样低。
什么是 KSP
KSP 的全称是 Kotlin Symbol Processing ,Kotlin符号处理器,由Google开发,它提供了一套API可以开发轻量级的编译器插件。KSP 官网:https://github.com/google/ksp
KSP本身也是一种KCP插件的实现。
KSP API 根据Kotlin语法在符号级对Kotlin程序结构进行建模。当基于KSP 的插件处理源代码时,可以访问类、类成员、函数和相关参数等结构,但是不能访问 if 块和 for 循环等。
从概念上讲,KSP类似于Kotlin反射中的KType。该API允许处理器从类声明导航到具有特定类型参数的对应类型,反之亦然。还可以替换类型参数、指定方差、应用星型投影和标记类型的可空性。
另一种理解KSP的方式是将其视为Kotlin程序的预处理器框架。编译中的数据流可以按照以下步骤描述:
- KSP读取并分析源代码。
- KSP生成代码或输出其他形式的产物。
- Kotlin编译器将源代码与KSP生成的代码一起编译。
与成熟的编译器插件不同,KSP不能修改代码。因为改变语言语义的编译器插件有时会让人非常困惑。KSP是以只读的方式来处理源代码,从而避免这种情况。
为什么更推荐使用 KSP
KSP 使得创建轻量级编译器插件更加容易
KSP被设计为隐藏编译器更改,最大限度地减少使用它的处理器的维护工作。KSP被设计成不与JVM绑定,因此将来可以更容易地适应其他平台。
KSP VS KCP
KCP相比于KSP的不足:
- 技能过于复杂,凡人难以驾驭:KCP插件几乎可以访问编译器中的所有内容,具有最大的功能和灵活性,但这种强大的功能是有代价的。即使要编写最简单的插件,你也需要有一些编译器的背景知识,以及对特定编译器的实现细节有一定程度的熟悉。一般的开发者很难在短时间内通过学习成为编译器大师,并且这会花费很多的时间。如果你不需要修改源代码,那么KSP则是一个更好的选择。
- 依赖项过多,凡人难以维护:由于KCP插件可能依赖于编译器中的任何东西,所以它们对编译器的更改很敏感,需要经常维护。在实际中,插件通常与特定的编译器版本紧密相关,这意味着每次你想要支持一个更新版本的编译器时,你可能需要更新你的插件。
KSP通过定义良好的API隐藏大多数编译器更改,尽管编译器甚至Kotlin语言的重大更改可能仍然需要向API用户公开。KSP试图通过提供一个API来实现常见的用例,该API以功能换取简单性。它的功能是一个通用kotlinc插件的严格子集。例如,kotlinc可以检查表达式和语句,甚至可以修改代码,而KSP不能。
KSP VS 反射
KSP的API看起来类似于kotlin.reflect。它们之间的主要区别是KSP中的类型引用需要显式地解析。这是不共享接口的原因之一。
KSP VS KAPT
KAPT使大量的Java注释处理器可以为Kotlin程序开箱即用。与KAPT相比,KSP的主要优点是改进了构建性能(不依赖于JVM)、更习惯的Kotlin API以及理解Kotlin专用符号的能力。
在性能方面,相比于 KAPT,使用KSP生成代码性能要快2倍以上,因为它省掉了生成 Java Stubs 的耗时过程。

为了不加修改的直接运行 Java 注解处理器,kapt 将 Kotlin 代码编译为 Java 桩代码(stub),其中保留了 Java 注解处理器关注的信息。为了创建这些桩代码, kapt 需要解析 Kotlin 程序中的所有符号。桩代码生成占据了 kotlinc 完整分析过程的大约 1/3, kotlinc 的代码生成过程也是如此。 对于很多注解处理器,这个过程比处理器本身耗费的时间要长很多。比如, Glide 只会分析使用了预定义注解的非常少量的类,它的代码生成非常快速, 几乎所有的构建开销都发生在桩代码生成阶段,切换到 KSP 可以立即减少编译器消耗时间的 25%。
与 kapt 不同, KSP 中的处理器不会以 Java 的方式看待输入程序。 API 对 Kotlin 来说更加自然,尤其是对于 Kotlin 专有的功能,比如顶层函数。由于 KSP 不会象 kapt 那样将处理代理给 javac, 因此它不会依赖于 JVM 专有的行为,并且将来有可能用于其它平台。
KSP 的限制
虽然KSP试图成为大多数常见用例的简单解决方案,但与其他插件解决方案相比,它做了一些权衡。KSP目前存在以下几点限制:
- 无法做到检查源代码的表达式级信息。
- 无法修改源代码。
- 无法 100% 的兼容
Java注解处理API。 - 目前IDE对
KSP生成的代码无法感知,必须手动为项目配置生成路径。
Kotlin Symbols
大多数处理器通过输入源代码的各种程序结构进行导航。在深入研究API的使用之前,让我们看看从 KSP 的视角来看Kotlin源文件是怎样的:
KSFile
  packageName: KSName
  fileName: String
  annotations: List<KSAnnotation>  (File annotations)
  declarations: List<KSDeclaration>
    KSClassDeclaration // class, interface, object
      simpleName: KSName
      qualifiedName: KSName
      containingFile: String
      typeParameters: KSTypeParameter
      parentDeclaration: KSDeclaration
      classKind: ClassKind
      primaryConstructor: KSFunctionDeclaration
      superTypes: List<KSTypeReference>
      // contains inner classes, member functions, properties, etc.
      declarations: List<KSDeclaration>
    KSFunctionDeclaration // top level function
      simpleName: KSName
      qualifiedName: KSName
      containingFile: String
      typeParameters: KSTypeParameter
      parentDeclaration: KSDeclaration
      functionKind: FunctionKind
      extensionReceiver: KSTypeReference?
      returnType: KSTypeReference
      parameters: List<KSValueParameter>
      // contains local classes, local functions, local variables, etc.
      declarations: List<KSDeclaration>
    KSPropertyDeclaration // global variable
      simpleName: KSName
      qualifiedName: KSName
      containingFile: String
      typeParameters: KSTypeParameter
      parentDeclaration: KSDeclaration
      extensionReceiver: KSTypeReference?
      type: KSTypeReference
      getter: KSPropertyGetter
        returnType: KSTypeReference
      setter: KSPropertySetter
        parameter: KSValueParameter
这里列出了一个Kotlin源文件中声明的常见内容如: 类、函数、属性等等。该结构也被称为AST(抽象语法树),类似的, APT/KAPT 则是对 Java AST 的抽象,我们可以找到一些对应关系,比如 Java 使用 Element 描述包、类、方法或者变量等, KSP 中使用 Declaration。
KSP 是如何组织 Kotlin 代码模型的

类型解析
在 KSP API 的底层实现中, 主要的资源消耗是类型解析。因此类型引用被设计为由处理器明确解析的类型(也有少数例外情况)。当一个类型(Type) (比如 KSFunctionDeclaration.returnType 或 KSAnnotation.annotationType)被引用时,它永远是一个 KSTypeReference类型,这是一个带有注解和修饰符的 KSReferenceElement。
interface KSFunctionDeclaration : ... {
  val returnType: KSTypeReference?
  // ...
}

interface KSTypeReference : KSAnnotated, KSModifierListOwner {
  val type: KSReferenceElement
}
一个 KSTypeReference 可以解析为一个 KSType, 它引用到 Kotlin 类型系统中的一个类型。
一个KSTypeReference 拥有一个 KSReferenceElement, 它是 Kotlin 程序结构的数据模型:也就是类型引用是如何编写的。它对应于 Kotlin 语法中的 type 元素。
一个 KSReferenceElement 可以是一个 KSClassifierReference 或 KSCallableReference,其中包含很多不需要解析的有用信息。 比如 KSClassifierReference 拥有 referencedName,而 KSCallableReference 拥有 receiverType, functionArguments, 和 returnType。
如果需要一个 KSTypeReference 引用的原始声明, 通常可以通过将其解析为 KSType, 并通过访问 KSType.declaration 得到。要从一个类型得到它的类声明, 代码如下:
val ksType: KSType = ksTypeReference.resolve()
val ksDeclaration: KSDeclaration = ksType.declaration
类型解析的代价很高,因此需要明确调用。通过解析得到的有些信息在 KSReferenceElement 中已经存在了。 比如, 通过 KSClassifierReference.referencedName 可以过滤掉很多不感兴趣的元素。你应该只有在需要从 KSDeclaration 或 KSType 得到具体信息的时候才进行类型解析。
指向一个函数类型的 KSTypeReference 在它的元素中已经有了大部分信息。尽管可以解析到 Function0, Function1 等等的函数群, 但这些解析不会带来比 KSCallableReference 更多的任何信息。有一种情况需要解析函数类型引用,就是处理函数原型(Function Prototype)的 identity.
KSP 和 Java 中的程序元素对应关系
| Java / APT | KSP 中的类似功能 | 注意事项 |
|---|---|---|
| AnnotationMirror | KSAnnotation | |
| AnnotationValue | KSValueArguments | |
| Element | KSDeclaration/KSDeclarationContainer | |
| ExecutableElement | KSFunctionDeclaration | |
| PackageElement | KSFile | KSP不会将package建模为程序元素 |
| ExecuteableElement | KSFunctionDeclaration | 某个类或接口的方法、构造方法或初始化程序(静态或实例),包括注释类型元素 |
| TypeElement | KSClassDeclaration | 一个类或接口程序元素。提供对有关类型及其成员的信息的访问。注意,枚举类型是一种类,而注解类型是一种接口 |
| VariableElement | KSVariableParameter / KSPropertyDeclaration | 一个字段、enum 常量、方法或构造方法参数、局部变量或异常参数 |
| Parameterizable | KSDeclaration | |
| QualifiedNameable | KSDeclaration | |
| TypeElement | KSClassDeclaration | |
| TypeParameterElement | KSTypeParameter | |
| VariableElement | KSValueParameter/KSPropertyDeclaration |
类型
KSP 要求明确解析类型, 因此在解析之前, Java 中的有些功能只能通过 KSType 和对应的元素得到.
| Java / APT | KSP 中的类似功能 | 注意事项 |
|---|---|---|
| ArrayType | KSBuiltIns.arrayType | |
| DeclaredType | KSType / KSClassifierReference | |
| ErrorType | KSType.isError | |
| ExecutableType | KSType / KSCallableReference | |
| IntersectionType | KSType / KSTypeParameter | |
| NoType | KSType.isError | KSP 中没有这样的功能 |
| NullType | KSP 中没有这样的功能 | |
| PrimitiveType | KSBuiltIns | 与 Java 中的基本类型不完全相同 |
| ReferenceType | KSTypeReference | |
| TypeMirror | KSType | |
| TypeVariable | KSTypeParameter | |
| UnionType | 没有这样的功能 Kotlin 的 每个 catch 代码段只有 1 个类型. 即使对 Java 注解处理器来说, UnionType 也是不可访问的 | |
| WildcardType | KSType / KSTypeArgument |
杂项
| Java / APT | KSP 中的类似功能 | 注意事项 |
|---|---|---|
| Name | KSName | |
| ElementKind | ClassKind / FunctionKind | |
| Modifier | Modifier | |
| NestingKind | ClassKind / FunctionKind | |
| AnnotationValueVisitor | ||
| ElementVisitor | KSVisitor | |
| AnnotatedConstruct | KSAnnotated | |
| TypeVisitor | ||
| TypeKind | KSBuiltIns | 有些可以在 builtin 中得到, 其他通过 KSClassDeclaration 得到 DeclaredType |
| ElementFilter | Collection.filterIsInstance | |
| ElementKindVisitor | KSVisitor | |
| ElementScanner | KSTopDownVisitor | |
| SimpleAnnotationValueVisitor | KSP 中不需要 | |
| SimpleElementVisitor | KSVisitor | |
| SimpleTypeVisitor | ||
| TypeKindVisitor | ||
| Types | Resolver / utils | 有些 utils 也被集成在符号接口中 |
| Elements | Resolver / utils |
细节
这部分介绍 KSP 怎样提供 Java 注解处理 API 的功能.
AnnotationMirror
| Java | KSP 中的同等功能 |
|---|---|
| getAnnotationType | ksAnnotation.annotationType |
| getElementValues | ksAnnotation.arguments |
AnnotationValue
| Java | KSP 中的同等功能 |
|---|---|
| getValue | ksValueArgument.value |
Element
| Java | KSP 中的同等功能 |
|---|---|
| asType | ksClassDeclaration.asType(…) |
| getAnnotation | 未实现 |
| getAnnotationMirrors | ksDeclaration.annotations |
| getEnclosedElements | ksDeclarationContainer.declarations |
| getEnclosingElements | ksDeclaration.parentDeclaration |
| getKind | 通过 ClassKind 或 FunctionKind 进行类型检查和转换 |
| getModifiers | ksDeclaration.modifiers |
| getSimpleName | ksDeclaration.simpleName |
ExecutableElement
| Java | KSP 中的同等功能 |
|---|---|
| getDefaultValue | 未实现 |
| getParameters | ksFunctionDeclaration.parameters |
| getReceiverType | ksFunctionDeclaration.parentDeclaration |
| getReturnType | ksFunctionDeclaration.returnType |
| getSimpleName | ksFunctionDeclaration.simpleName |
| getThrownTypes | Kotlin 中不需要 |
| getTypeParameters | ksFunctionDeclaration.typeParameters |
| isDefault | 检查父类型是不是接口 |
| isVarArgs | ksFunctionDeclaration.parameters.any { it.isVarArg } |
Parameterizable
| Java | KSP 中的同等功能 |
|---|---|
| getTypeParameters | ksFunctionDeclaration.typeParameters |
QualifiedNameable
| Java | KSP 中的同等功能 |
|---|---|
| getQualifiedName | ksDeclaration.qualifiedName |
TypeElement
| Java | KSP 中的同等功能 |
|---|---|
| getEnclosedElements | ksClassDeclaration.declarations |
| getEnclosingElement | ksClassDeclaration.parentDeclaration |
| getInterfaces | // 不需要类型解析也应该能够实现 ksClassDeclaration.superTypes .map { it.resolve() } .filter { (it?.declaration as? KSClassDeclaration)?.classKind == ClassKind.INTERFACE } |
| getNestingKind | Check KSClassDeclaration.parentDeclaration 和 inner 修饰符 |
| getQualifiedName | ksClassDeclaration.qualifiedName |
| getSimpleName | ksClassDeclaration.simpleName |
| getSuperclass | // 不需要类型解析也应该能够实现 ksClassDeclaration.superTypes.map { it.resolve() }.filter { (it?.declaration as? KSClassDeclaration)?.classKind == ClassKind.CLASS } |
| getTypeParameters | ksClassDeclaration.typeParameters |
TypeParameterElement
| Java | KSP 中的同等功能 |
|---|---|
| getBounds | ksTypeParameter.bounds |
| getEnclosingElement | ksTypeParameter.parentDeclaration |
| getGenericElement | ksTypeParameter.parentDeclaration |
VariableElement
| Java | KSP 中的同等功能 |
|---|---|
| getConstantValue | 未实现 |
| getEnclosingElement | ksValueParameter.parentDeclaration |
| getSimpleName | ksValueParameter.simpleName |
ArrayType
| Java | KSP 中的同等功能 |
|---|---|
| getComponentType | ksType.arguments.first() |
DeclaredType
| Java | KSP 中的同等功能 |
|---|---|
| asElement | ksType.declaration |
| getEnclosingType | ksType.declaration.parentDeclaration |
| getTypeArguments | ksType.arguments |
ExecutableType
函数的 KSType 只是一个签名, 由 FunctionN<R, T1, T2, ..., TN> 群表达.
| Java | KSP 中的同等功能 |
|---|---|
| getParameterTypes | ksType.declaration.typeParameters, ksFunctionDeclaration.parameters.map { it.type } |
| getReceiverType | ksFunctionDeclaration.parentDeclaration.asType(…) |
| getReturnType | ksType.declaration.typeParameters.last() |
| getThrownTypes | Kotlin 中不需要 |
| getTypeVariables | ksFunctionDeclaration.typeParameters |
Elements
| Java | KSP 中的同等功能 |
|---|---|
| getAllAnnotationMirrors | KSDeclarations.annotations |
| getAllMembers | getAllFunctions, getAllProperties未实现 |
| getBinaryName | 未决定, 参见 Java Specification |
| getConstantExpression | 常数值, 而不是表达式 |
| getDocComment | 未实现 |
| getElementValuesWithDefaults | 未实现 |
| getName | resolver.getKSNameFromString |
| getPackageElement | 不支持包, 但可以取得包信息. KSP 中不能对包进行操作. |
| getPackageOf | 不支持包 |
| getTypeElement | Resolver.getClassDeclarationByName |
| hides | 未实现 |
| isDeprecated | KsDeclaration.annotations.any { it.annotationType.resolve()!!.declaration.qualifiedName!!.asString()== Deprecated::class.qualifiedName} |
| overrides | KSFunctionDeclaration.overrides / KSPropertyDeclaration.overrides (各个类的成员函数) |
| printElements | KSP 对大多数类有基本的 toString() 实现 |
Types
| Java | KSP 中的同等功能 |
|---|---|
| asElement | ksType.declaration |
| asMemberOf | resolver.asMemberOf |
| boxedClass | 不需要 |
| capture | 未决定 |
| contains | KSType.isAssignableFrom |
| directSuperTypes | (ksType.declaration as KSClassDeclaration).superTypes |
| erasure | ksType.starProjection() |
| getArrayType | ksBuiltIns.arrayType.replace(…) |
| getDeclaredType | ksClassDeclaration.asType |
| getNoType | ksBuiltIns.nothingType / null |
| getNullType | 根据上下文确定, 可能可以使用 KSType.markNullable |
| getPrimitiveType | 不需要, 检查 KSBuiltins |
| getWildcardType | 在需要 KSTypeArgument 的地方使用 Variance |
| isAssignable | ksType.isAssignableFrom |
| isSameType | ksType.equals |
| isSubsignature | functionTypeA == functionTypeB / functionTypeA == functionTypeB.starProjection() |
| isSubtype | ksType.isAssignableFrom |
| unboxedType | 不需要 |
KSP 的使用
依赖配置
在 Android Studio 已有的kotlin项目中新建一个普通的 library 工程作为KSP处理模块(其他IDE配置请参考官网),在其build.gradle中添加如下配置:
plugins {
    id 'java-library'
    id 'org.jetbrains.kotlin.jvm'
}

java {
    sourceCompatibility JavaVersion.VERSION_1_8
    targetCompatibility JavaVersion.VERSION_1_8
}

java.sourceSets {
    main {
        java.srcDirs += "src/main/kotlin"
    }
}

dependencies {
    implementation 'com.google.devtools.ksp:symbol-processing-api:1.7.21-1.0.8'
}
ksp依赖库的版本需要根据项目使用的kotlin版本来决定,最新版本的Android Studio一般默认是在根目录下的build.gradle中可以找到kotlin版本配置。然后到KSP的发布页找到对应的KSP版本即可:https://github.com/google/ksp/releases
SymbolProcessorProvider : KSP 的入口
在 library module 中需要新建一个 SymbolProcessorProvider 的实现类作为KSP的入口,SymbolProcessorProvider 接口的代码如下:
interface SymbolProcessorProvider {
    fun create(environment: SymbolProcessorEnvironment): SymbolProcessor
}
可以看到它只有一个 create 方法,该方法需要返回一个实现 SymbolProcessor 接口的对象,而 create 方法的入参SymbolProcessorEnvironment 主要就是用来给创建 SymbolProcessor 对象用的,通过environment参数可以获取到 KSP 运行时的相关依赖,我们只需将这些依赖注入到自定义的 Processor 对象即可。
class ProcessorProvider : SymbolProcessorProvider {
    override fun create(environment: SymbolProcessorEnvironment): SymbolProcessor {
        return Processor(environment.codeGenerator, environment.logger,environment.options)
    }
}
这里创建Processor使用了SymbolProcessorEnvironment 的三个字段:
codeGenerator:可以用来生成代码文件logger:可以用来输出日志options:可以用来接受命令行或Gradle插件中的配置参数
一般来说,codeGenerator 参数是一定要的,因为你总要生成代码吧,而其他的参数可以根据自己的需要选择。通过查看SymbolProcessorEnvironment的源码可以知道全部可用的字段:
class SymbolProcessorEnvironment(
    /**
     * passed from command line, Gradle, etc.
     */
    val options: Map<String, String>,

    /**
     * language version of compilation environment.
     */
    val kotlinVersion: KotlinVersion,

    /**
     * creates managed files.
     */
    val codeGenerator: CodeGenerator,

    /**
     * for logging to build output.
     */
    val logger: KSPLogger,

    /**
     * Kotlin API version of compilation environment.
     */
    val apiVersion: KotlinVersion,

    /**
     * Kotlin compiler version of compilation environment.
     */
    val compilerVersion: KotlinVersion,

    /**
     * Information of target platforms
     *
     * There can be multiple platforms in a metadata compilation.
     */
    val platforms: List<PlatformInfo>,
) {...}
当我们创建好 SymbolProcessorProvider 对象后就可以先将其添加到src/main/resources/META-INF/services/路径下的一个名为com.google.devtools.ksp.processing.SymbolProcessorProvider的文件中:

在上面的文件中,输入ProcessorProvider对象的全类名,例如:
com.fly.ksp.processor.ProcessorProvider
SymbolProcessor
SymbolProcessor 接口类就是KSP开发时唯一需要重点关注的类
interface SymbolProcessor {
    fun process(resolver: Resolver): List<KSAnnotated> // 重点关注
    fun finish() {}
    fun onError() {}
}
它有三个方法,但唯一需要覆写的只有 process 这个方法,下面定义一个类来实现该接口:
class Processor(val codeGenerator: CodeGenerator, val logger: KSPLogger) : SymbolProcessor {

    val functions = mutableListOf<String>()
    val visitor = FindFunctionsVisitor()

    override fun process(resolver: Resolver) {
        resolver.getAllFiles().map { it.accept(visitor, Unit) }
    }
}
KSVisitor
SymbolProcessor.process() 方法提供了一个 Resolver , 来解析源文件的 symbols,而Resolver 使用访问者模式去遍历 AST,需要一个KSVisitor参数。
下面代码定义了一个 FindFunctionsVisitor 给 Resolver 使用,在这个Visitor中负责找出当前 KSFile 中的 top-level 的 function 以及 Class 成员方法。
class FindFunctionsVisitor : KSVisitorVoid() {
     override fun visitClassDeclaration(classDeclaration: KSClassDeclaration, data: Unit) {
         classDeclaration.getDeclaredFunctions().map { it.accept(this, Unit) }
     }

     override fun visitFunctionDeclaration(function: KSFunctionDeclaration, data: Unit) {
         functions.add(function)
     }

     override fun visitFile(file: KSFile, data: Unit) {
         file.declarations.map { it.accept(this, Unit) }
     }
}
一些 KSP API 示例
得到所有成员函数
fun KSClassDeclaration.getDeclaredFunctions(): List<KSFunctionDeclaration> =
    declarations.filterIsInstance<KSFunctionDeclaration>()
检查一个类或函数是否为 local
fun KSDeclaration.isLocal(): Boolean =
    parentDeclaration != null && parentDeclaration !is KSClassDeclaration
查找类型别名指向的实际的类或接口声明
fun KSTypeAlias.findActualType(): KSClassDeclaration {
    val resolvedType = this.type.resolve().declaration
    return if (resolvedType is KSTypeAlias) {
        resolvedType.findActualType()
    } else {
        resolvedType as KSClassDeclaration
    }
}
在源代码文件的注解中查找被压制(Suppressed)的名称
// @file:kotlin.Suppress("Example1", "Example2")
fun KSFile.suppressedNames(): List<String> {
    val ignoredNames = mutableListOf<String>()
    annotations.filter {
        it.shortName.asString() == "Suppress" && it.annotationType.resolve()?.declaration?.qualifiedName?.asString() == "kotlin.Suppress"
    }.forEach {
        val argValues: List<String> = it.arguments.flatMap { it.value }
        ignoredNames.addAll(argValues)
    }
    return ignoredNames
}
一个简单的 demo
现在有一个类,代码如下,假如我们现在想要为其生成建造者模式的代码
class AClass(private val a: Int, val b: String, val c: Double) {
    val p = "$a, $b, $c"
    fun foo() = p
}
尽管 kotlin 中支持默认参数值和命名参数,基本上可以取代建造者模式的使用了,但是假如你更喜欢建造者模式的使用方式,你仍然可以通过代码来编写它,问题是这样的代码有大量重复的样板代码需要编写,十分的消耗体力,那么此时使用KSP就可以为我们节省劳动力。
假如我们期望在生成建造者模式的代码之后使用方式如下:
@Builder
class AClass(private val a: Int, val b: String, val c: Double) {
    val p = "$a, $b, $c"
    fun foo() = p
}

fun main() {
    val a = AClassBuilder()
        .withA(1)
        .withB("foo")
        .withC(2.3)
        .build()
    println(a.foo())
}
这里只需要通过在AClass上面添加一个@Builder注解即可,然后在build之后,KSP会自动为我们生成对应AClass的建造者模式的Builder类AClassBuilder。
下面看如何编写生成AClassBuilder的 Processor 实现代码:
首先定义一个kotlin注解类
@Target(AnnotationTarget.CLASS)
@Retention(AnnotationRetention.SOURCE)
annotation class Builder
由于我们不需要在运行时保留和使用@Builder注解,所以这里这里的Retention保留级别设置为SOURCE源码级别,kotlin中@Target和@Retention的使用方式几乎和java中的一样。
然后创建一个BuilderProcessor类:
class BuilderProcessor(val codeGenerator: CodeGenerator, val logger: KSPLogger) : SymbolProcessor {
    override fun process(resolver: Resolver): List<KSAnnotated> {
        logger.warn("BuilderProcessor=============================")
        val symbols = resolver.getSymbolsWithAnnotation("com.fly.compose.ksp.router.processor.test.Builder")
        val ret = symbols.filter { !it.validate() }.toList()
        symbols.filter { it is KSClassDeclaration && it.validate() }
            .forEach { it.accept(BuilderVisitor(), Unit) }
        return ret
    }

    inner class BuilderVisitor : KSVisitorVoid() {
        override fun visitClassDeclaration(classDeclaration: KSClassDeclaration, data: Unit) {
            classDeclaration.primaryConstructor!!.accept(this, data)
        }
        override fun visitFunctionDeclaration(function: KSFunctionDeclaration, data: Unit) {
            val parent = function.parentDeclaration as KSClassDeclaration
            val packageName = parent.containingFile!!.packageName.asString()
            val className = "${parent.simpleName.asString()}Builder"
            val file = codeGenerator.createNewFile(Dependencies(true, function.containingFile!!), packageName , className)
            file.appendText("package $packageName\n\n")
            file.appendText("class $className{\n")
            function.parameters.forEach {
                val name = it.name!!.asString()
                val typeName = StringBuilder(it.type.resolve().declaration.qualifiedName?.asString() ?: "<ERROR>")
                val typeArgs = it.type.element!!.typeArguments
                if (it.type.element!!.typeArguments.isNotEmpty()) {
                    typeName.append("<")
                    typeName.append(
                            typeArgs.map { typeArgument ->
                                val type = typeArgument.type?.resolve()
                                "${typeArgument.variance.label} ${type?.declaration?.qualifiedName?.asString() ?: "ERROR"}" +
                                        if (type?.nullability == Nullability.NULLABLE) "?" else ""
                            }.joinToString(", ")
                    )
                    typeName.append(">")
                }
                file.appendText("    private var $name: $typeName? = null\n")
                file.appendText("    internal fun with${name.replaceFirstChar { it.uppercase() } }($name: $typeName): $className {\n")
                file.appendText("        this.$name = $name\n")
                file.appendText("        return this\n")
                file.appendText("    }\n\n")
            }
            file.appendText("    internal fun build(): ${parent.qualifiedName!!.asString()} {\n")
            file.appendText("        return ${parent.qualifiedName!!.asString()}(")
            file.appendText(
                function.parameters.map {
                    "${it.name!!.asString()}!!"
                }.joinToString(", ")
            )
            file.appendText(")\n")
            file.appendText("    }\n")
            file.appendText("}\n")
            file.close()
        }
    }
}

fun OutputStream.appendText(str: String) {
    this.write(str.toByteArray())
}

class BuilderProcessorProvider : SymbolProcessorProvider {
    override fun create(environment: SymbolProcessorEnvironment): SymbolProcessor {
        return BuilderProcessor(environment.codeGenerator, environment.logger)
    }
}
上面代码需要重点关注几个点,首先在process()方法中通过其传入的resolver参数的resolver.getSymbolsWithAnnotation可以获取到具有指定注解的所有符号列表。Resolver 是一个接口类,它专门为SymbolProcessor提供了对编译器细节(如Symbols)的访问,在其中我们可以找到所有可以获取资源的方法,下面列出 Resolver 中的几个常用的方法:
| 方法名 | 作用 |
|---|---|
getAllFiles(): Sequence<KSFile> | 获取模块/编译单元中的所有文件。 返回所有输入文件,包括前几轮生成的文件,注意当启用增量时,将只返回待处理的脏文件。 |
getNewFiles(): Sequence<KSFile> | 获取在模块/编译单元中的所有新文件。 返回模块中最后一轮处理生成的新文件。 |
getSymbolsWithAnnotation(annotationName, inDepth): Sequence<KSAnnotated> | 获取并返回具有指定注解的所有符号列表。 注意,在多轮处理中,该函数只返回来自上一轮延迟符号的符号列表和来自新生成文件的符号列表。 参数: annotationName - 注解全类名(使用"."作为分隔符)。inDepth- 是否深度检查符号,即检查局部声明中的符号,默认值为false, 如果设置为true,操作将会非常耗时。 |
getClassDeclarationByName(name: KSName): KSClassDeclaration? | 在编译类路径中查找给定名称的类。 这将在给定平台名称时返回确切的平台类。注意 java.lang.String与类型系统中的kotlin.String不兼容。因此,如果需要对该方法返回的类进行类型检查,需要先显式地调用mapJavaNameToKotlin()和mapKotlinNameToJava()方法找到具体对应的平台类名,然后再调用getClassDeclarationByName方法。此行为仅限于 getClassDeclarationByName; 当processor从Java源文件获取类或类型时,转换将自动完成。例如,Java源文件中的Java.lang.string被加载为KSP中的kotlin.String。参数: name—要加载的类的全类名(使用"."作为分隔符)。返回是一个 KSClassDeclaration对象,如果没有找到则为null。 |
getFunctionDeclarationsByName(name: KSName, includeTopLevel): Sequence<KSFunctionDeclaration> | 在编译类路径中查找给定名称的函数。 参数: name—要加载的类的全类名(使用"."作为分隔符)。includeTopLevel 一个布尔值,表示是否搜索顶级函数,默认为false。注意,如果包含顶级函数,则此操作的开销可能很大。返回一个 KSFunctionDeclaration的序列。 |
getPropertyDeclarationByName(name: KSName, includeTopLevel): KSPropertyDeclaration? | 在编译类路径中查找给定名称的属性。 参数: name—要加载的类的全类名(使用"."作为分隔符)。includeTopLevel 一个布尔值,表示是否搜索顶级函数,默认为false。注意,如果包含顶级函数,则此操作的开销可能很大。返回一个 KSPropertyDeclaration对象,如果没有找到则为null。 |
getTypeArgument(typeRef: KSTypeReference, variance: Variance): KSTypeArgument | 根据类型引用和 variance 获取类型参数。 参数: typeRef 使用的类型引用,variance指定协变out还是逆变in 返回一个 KSTypeArgument对象。 |
getKSNameFromString(name: String): KSName | 从字符串获取一个KSName |
createKSTypeReferenceFromKSType(type: KSType): KSTypeReference | 根据 KSType 创建一个KSTypeReference引用 |
builtIns: KSBuiltIns | 提供内置类型。例如, KSBuiltIns.intType 是一个 KSType 。 |
overrides(overrider: KSDeclaration, overridee: KSDeclaration): Boolean | 返回 overrider 是否覆写了 overridee 的声明。 参数: overrider当前正在检查的候选声明, overridee 被检测的候选声明。该操作非常耗时,如果可能,应尽量避免使用。 |
还有很多其他方法可以在 Resolver 源码中自行查找。
Resolver可以解析出的任何输出类型都是一个KSNode类型的子类
interface KSNode {
    val origin: Origin
    val location: Location
    val parent: KSNode?
    fun <D, R> accept(visitor: KSVisitor<D, R>, data: D): R
}
而KSNode接口提供了一个accept方法,该方法接受一个KSVisitor参数,KSVisitor可以对KSNode的任何Symbol进行访问。它提供了以下访问方法:
interface KSVisitor<D, R> {

    fun visitNode(node: KSNode, data: D): R // 访问 KSNode节点

    fun visitAnnotated(annotated: KSAnnotated, data: D): R // 访问 KSAnnotated 节点

    fun visitAnnotation(annotation: KSAnnotation, data: D): R // 访问 KSAnnotation 节点

    fun visitModifierListOwner(modifierListOwner: KSModifierListOwner, data: D): R // 访问 KSModifierListOwner 节点

    fun visitDeclaration(declaration: KSDeclaration, data: D): R // 访问 KSDeclaration 节点

    fun visitDeclarationContainer(declarationContainer: KSDeclarationContainer, data: D): R // 访问 KSDeclarationContainer 节点

    fun visitDynamicReference(reference: KSDynamicReference, data: D): R // 访问 KSDynamicReference 节点

    fun visitFile(file: KSFile, data: D): R // 访问 KSFile 节点

    fun visitFunctionDeclaration(function: KSFunctionDeclaration, data: D): R // 访问 KSFunctionDeclaration 节点

    fun visitCallableReference(reference: KSCallableReference, data: D): R // 访问 KSCallableReference 节点

    fun visitParenthesizedReference(reference: KSParenthesizedReference, data: D): R // 访问 KSParenthesizedReference 节点

    fun visitPropertyDeclaration(property: KSPropertyDeclaration, data: D): R // 访问 KSPropertyDeclaration 节点

    fun visitPropertyAccessor(accessor: KSPropertyAccessor, data: D): R // 访问 KSPropertyAccessor 节点

    fun visitPropertyGetter(getter: KSPropertyGetter, data: D): R // 访问 KSPropertyGetter 节点

    fun visitPropertySetter(setter: KSPropertySetter, data: D): R // 访问 KSPropertySetter 节点

    fun visitReferenceElement(element: KSReferenceElement, data: D): R // 访问 KSReferenceElement 节点

    fun visitTypeAlias(typeAlias: KSTypeAlias, data: D): R // 访问 KSTypeAlias 节点

    fun visitTypeArgument(typeArgument: KSTypeArgument, data: D): R // 访问 KSTypeArgument 节点

    fun visitClassDeclaration(classDeclaration: KSClassDeclaration, data: D): R // 访问 KSClassDeclaration 节点

    fun visitTypeParameter(typeParameter: KSTypeParameter, data: D): R // 访问 KSTypeParameter 节点

    fun visitTypeReference(typeReference: KSTypeReference, data: D): R // 访问 KSTypeReference 节点

    fun visitValueParameter(valueParameter: KSValueParameter, data: D): R // 访问 KSValueParameter 节点

    fun visitValueArgument(valueArgument: KSValueArgument, data: D): R // 访问 KSValueArgument 节点

    fun visitClassifierReference(reference: KSClassifierReference, data: D): R // 访问 KSClassifierReference 节点
}
其中 KSVisitor<D, R> 的泛型D 是指当前visitxxx方法接受到的上一个visitxxx方法传递过来的数据,因为在当前visitxxx方法中可以继续调用解析出的KSNode类型的accept(this, data)方法触发下一个visitxxx方法的调用,而 R是指当前visitxxx方法要返回的数据,它会被传递到下一个visitxxx方法的data参数中。而KSVisitorVoid类只不过是将这两个泛型都设置为Unit类型,即什么也不传递。
open class KSVisitorVoid : KSVisitor<Unit, Unit> {...}
当然 KSVisitor 还有一些其他的默认实现类,可自行查阅。
在了解了 Resolver和 KSVisitor的一些API的功能作用以后,再简单来分析一下前面BuilderProcessor代码中的处理过程:
- 在
BuilderProcessor的process()方法中通过resolver.getSymbolsWithAnnotation()方法获取了我们需要处理的含有指定注解的Symbol列表, - 然后遍历该符号列表,过滤出符合
KSClassDeclaration的符号列表,因为@Builder是指定为只添加到类上面的, - 然后对结果列表遍历调用每一个
KSAnnotated的accetpt()方法,并传入BuilderVisitor()参数进行访问 - 在
BuilderVisitor代码中,首先会调用到visitClassDeclaration访问Class声明,然后在其中又调用了classDeclaration.primaryConstructor!!.accept(this, data)解析Class的 主构造函数,这会继续触发当前BuilderVisitor对象的visitFunctionDeclaration方法被调用, - 而在
visitFunctionDeclaration方法中可以解析到所属的packageName、className、以及主构造函数中的所有参数名字和参数类型等,从而可以根据这些信息来拼接我们需要生成的代码。 - 而生成代码则是通过先调用
codeGenerator.createNewFile创建一个文件,它会返回一个OutputStream输出流对象,我们向该输出流对象中写入文本即可生成代码到文件中。
最后在编写完上面的demo后,别忘了将 BuilderProcessorProvider 添加到前面提到的src/main/resources/META-INF/services/路径下的一个名为com.google.devtools.ksp.processing.SymbolProcessorProvider的文件中。
在项目中应用KSP插件
在编写完KSP模块的功能以后,就可以在项目的 app module 的 build.gradle 中添加对该 library 模块的依赖进行使用,具体新增配置如下:
plugins {
    ......
    id 'com.google.devtools.ksp' version '1.7.21-1.0.8'
}

//如果是android项目
android {
     ......

    // 让 Android Studio 可以感知 KSP 生成的代码
    applicationVariants.all { variant ->
        kotlin.sourceSets {
            getByName(variant.name) {
                kotlin.srcDir("build/generated/ksp/${variant.name}/kotlin")
            }
        }
    }
}
//如果是kotlin项目
//sourceSets {
//    main {
//        java.srcDirs("build/generated/ksp/main/kotlin")
//    }
//}

dependencies {
    ......
    implementation project(':my_processor')
    ksp project(':my_processor')
}
另外SymbolProcessorEnvironment提供了一些processors配置选项,可以在gradle构建脚本中指定:
  ksp {
    arg("option1", "value1")
    arg("option2", "value2")
    ...
  }
配置完毕,build一下项目工程,就会在工程目录下的build/generated/ksp/debug/下找到生产的代码,然后就可以在工程代码中直接引用了。

注意:如果你在build完后发现代码中仍然引用不到(爆红)可能需要右键执行一下 Reload from Disk 操作,若还不行就要检查磁盘目录下是否真的生成了代码文件或Processor写的哪里有问题了。
KotlinPoet
前面生成建造者模式的Builder的代码时是通过字符串拼接来生成的,对于简单的demo还好,但是对于实际生产项目中要生成的代码可能会十分复杂,如果还是自己手动去拼接,可能非常的繁琐,累死人不说,还非常容易出错,比如说少拼接了一个标点符号,可能需要排查半天。实际生产项目中使用的最多的就是由 JakeWharton 大神所写的著名的开源库 JavaPoet(很有诗意的名字,翻译过来叫Java诗人)使用该库可通过方便的函数进行拼接,减少出错。
KotlinPoet 是对应 JavaPoet 的 Kotlin 版本,同样是由square开发的,它可以用来很方便的生成 Kotlin 代码。
在ksp模块的build.gradle中添加KotlinPoet的依赖:
dependencies {
    implementation 'com.squareup:kotlinpoet:1.12.0'
    implementation 'com.squareup:kotlinpoet-ksp:1.12.0'
}
对应版本可以在Github上的KotlinPoet官网上查找。
如何使用 KotlinPoet
简单的使用,例如:
val greeterClass = ClassName("com.example.generated", "Greeter")
val fileSpec = FileSpec.builder("com.example.generated", "HelloWorld")
    .addType(
        TypeSpec.classBuilder(greeterClass)
            .primaryConstructor(
                FunSpec.constructorBuilder()
                    .addParameter("name", String::class)
                    .build()
            )
            .addProperty(
                PropertySpec.builder("name", String::class)
                    .initializer("name")
                    .build()
            )
            .addFunction(
                FunSpec.builder("greet")
                    .addStatement("println(%P)", "Hello, \$name")
                    .build()
            )
            .build()
    )
    .addFunction(
        FunSpec.builder("main")
            .addParameter("args", String::class, KModifier.VARARG)
            .addStatement("%T(args[0]).greet()", greeterClass)
            .build()
    )
    .build()

fileSpec.writeTo(System.out)
这会生成一个包含如下代码的HelloWorld.kt文件:
package com.example.generated

import kotlin.String
import kotlin.Unit

public class Greeter(
  public val name: String,
) {
  public fun greet(): Unit {
    println("""Hello, $name""")
  }
}

public fun main(vararg args: String): Unit {
  Greeter(args[0]).greet()
}
是不是很简单,而且跟前面直接拼接的方式相比,可读性很好,更加安全。
KotlinPoet的功能很丰富,使用方式也比较灵活,具体内容比较长,单独列出一篇:Kotlin 元编程之 KotlinPoet
也可以直接参考其官方文档:https://square.github.io/kotlinpoet/
将 KotlinPoet 与 KSP 结合使用
KotlinPoet可以独立使用,不依赖KSP,但是将二者结合使用是最好的选择,KSP模块中使用 KotlinPoet 时有几点需要注意:
例如现在有如下类:
class Taco {
  internal inline val seasoning: String get() = "spicy"
}
转换 KSType 为 TypeName
// returns a `ClassName` of value `kotlin.String`
seasoningKsProperty.type.toTypeName()
转换 Modifier 为 KModifier
// returns `[KModifier.INLINE]`
seasoningKsProperty.modifiers.mapNotNull { it.toKModifier() }
转换 Visibility 为 KModifier
// returns `KModifier.INTERNAL`
seasoningKsProperty.getVisibility().toKModifier()
写入 CodeGenerator
要将一个 FileSpec 写入 KSP 的 CodeGenerator 中,只需调用 FileSpec.writeTo(CodeGenerator, ...) 扩展函数即可。
fileSpec.writeTo(codeGenerator, Dependencies(true))
泛型参数
可以在类、函数和类型别名上声明泛型参数,然后这些参数可用于其所有包含的元素。为了让这些元素能在 KSP 中被解析,你必须能够通过它们的索引来引用这些泛型参数。
在 kotlinpoet-ksp 中,这是由 TypeParameterResolver API 来管理的,它可以传递到大多数 toTypeName()(或类似的)函数中,使它们能够访问其可能引用的封闭泛型参数。
一个创建TypeParameterResolver实例的标准方法是在一个 List<KSTypeParameter> 对象上调用 toTypeParameterResolver()
考虑以下类和函数:
abstract class Taco<T> {
  abstract val seasoning: T
}
要正确解析 seasoning 的类型,我们需要将 TypeParameterResolver 传递给 toTypeName()以便它可以正确解析它。
val classTypeParams = ksClassDeclaration.typeParameters.toTypeParameterResolver()
// returns `T`
val seasoningType = seasoningKsProperty.type.toTypeName(classTypeParams)
TypeParameterResolver也是可组合的,它允许多层嵌套。toTypeParameterResolver() 有一个可选parent参数来提供父实例。
再次考虑我们之前的示例,但这次它带有一个自定义参数类型的函数:
class Taco<T> {
  fun <E> getShellOfType(param1: E, param2: T) {

  }
}
要解析它的参数,我们需要从函数的 typeParameters 创建一个 TypeParameterResolver并将其与封闭类的类型参数组合为一个 parent。
val classTypeParams = ksClassDeclaration.typeParameters.toTypeParameterResolver()
val functionTypeParams = ksFunction.typeParameters.toTypeParameterResolver(parent = classTypeParams)
// returns `[E, T]`
val seasoningType = ksFunction.parameterTypes.map { it.toTypeName(functionTypeParams) }
类型别名处理
对于typealias类型,KotlinPoet KSP 互操作会将一个TypeAliasTag存储在TypeName的标签中,并引用缩写类型。这对于想要解析所有非别名类型的api非常有用。
使用 KotlinPoet 来生成建造者模式代码
下面使用 KotlinPoet 来改造前面生成建造者模式的代码:
import com.google.devtools.ksp.processing.*
import com.google.devtools.ksp.symbol.*
import com.google.devtools.ksp.validate
import com.google.devtools.ksp.visitor.KSDefaultVisitor
import com.squareup.kotlinpoet.*
import com.squareup.kotlinpoet.ksp.addOriginatingKSFile
import com.squareup.kotlinpoet.ksp.toTypeName
import com.squareup.kotlinpoet.ksp.writeTo

class BuilderProcessor(val codeGenerator: CodeGenerator, val logger: KSPLogger) : SymbolProcessor {

    ddata class BuilderData(
        var packageName: String = "",
        var className: String = "",
        var params: MutableList<Pair<String, TypeName>> = mutableListOf()
    )

    override fun process(resolver: Resolver): List<KSAnnotated> {
        val symbols = resolver.getSymbolsWithAnnotation("com.fly.compose.ksp.router.processor.test.Builder")
        val ret = symbols.filter { !it.validate() }.toList()
        symbols
            .filterIsInstance<KSClassDeclaration>()
            .filter { it.validate() }
            .forEach {
                it.accept(BuilderVisitor(), BuilderData())
            }
        return ret
    }

    inner class BuilderVisitor : KSDefaultVisitor<BuilderData, Unit>() {

        override fun visitClassDeclaration(classDeclaration: KSClassDeclaration, data: BuilderData) {
            data.packageName = classDeclaration.containingFile?.packageName?.asString() ?: ""
            data.className = classDeclaration.simpleName.asString()
            classDeclaration.primaryConstructor?.accept(this, data)
        }

        override fun visitFunctionDeclaration(function: KSFunctionDeclaration, data: BuilderData) {
            function.parameters.forEach {
                val name = it.name?.asString() ?: "<ERROR>"
                val typeName = it.type.toTypeName()
                data.params.add(name to typeName)
            }
            generateBuilderCode(data, function.containingFile!!)
        }

        private fun generateBuilderCode(data: BuilderData, containingFile: KSFile) {
            val className = ClassName(data.packageName, data.className)
            val classNameNew = ClassName(data.packageName, "${data.className}Builder")

            val propertySpecs = data.params.map { (name, typename) ->
                PropertySpec.builder(name, typename.copy(nullable = true))
                    .mutable()
                    .addModifiers(KModifier.PRIVATE)
                    .initializer("null")
                    .build()
            }

            val funSpecs = data.params.map { (name, typename) ->
                FunSpec.builder("with${name.replaceFirstChar{it.uppercase()}}")
                    .addModifiers(KModifier.INTERNAL)
                    .addParameter(name, typename)
                    .addStatement("this.%L = %L", name, name)
                    .addStatement("return this")
                    .returns(classNameNew)
                    .build()
            }

            val paramsNames = data.params.map { (name, _) -> "${name}!!" }.joinToString(",")
            val buildFunSpec = FunSpec.builder("build")
                .addModifiers(KModifier.INTERNAL)
                .returns(className)
                .addStatement("return %T(%L)", className, paramsNames)
                .build()

            val fileSpec = FileSpec.builder(data.packageName, "${data.className}Builder")
                .addType(
                    TypeSpec.classBuilder(classNameNew)
                        .addOriginatingKSFile(containingFile)
                        .addProperties(propertySpecs)
                        .addFunctions(funSpecs)
                        .addFunction(buildFunSpec)
                        .build()
                )
                .build()

            fileSpec.writeTo(codeGenerator, Dependencies(true))
        }

        override fun defaultHandler(node: KSNode, data: BuilderData) {
        }
    }
}

class BuilderProcessorProvider : SymbolProcessorProvider {
    override fun create(environment: SymbolProcessorEnvironment): SymbolProcessor {
        return BuilderProcessor(environment.codeGenerator, environment.logger)
    }
}
可以看到 visitFunctionDeclaration 中解析的代码逻辑变少了,而生成代码的逻辑也更加清晰。这里使用了一个 data class 来收集需要的信息,我们需要在KSVisitor中的不同visit方法之间传递该data对象并填充数据,因此这里BuilderVisitor继承了带泛型的KSVisitor父类。在每次 visitFunctionDeclaration 解析结束后都会调用generateBuilderCode方法来生成代码,该方法中主要是使用KotlinPoet 的Api来完成的,最终代码还是写入到KSP的codeGenerator当中。
重新构建项目后,可以在build目录下查看生成的代码:

可以看到生成的代码也比以前更加简洁了。
为了测试更多的参数类型,我们在项目中新建一个 BClass.kt 代码如下:
package com.fly.compose.ksp.application
import com.fly.compose.ksp.router.processor.test.Builder

@Builder
class BClass(val a: Int, val b: Int, val c: Boolean, val d: Map<String, Int>) {
    fun foo() : String {
        val res = if (c) a + b else a - b
        val str = StringBuilder("$res")
        for ( (key, value) in d) {
            println("key: ${key}, value: $value")
            str.append(", [${key}, $value]")
        }
        return str.toString()
    }
}
执行build以后,在build目录下生成如下代码:
package com.fly.compose.ksp.application

import kotlin.Boolean
import kotlin.Int
import kotlin.String
import kotlin.collections.Map

public class BClassBuilder {
  private var a: Int? = null

  private var b: Int? = null

  private var c: Boolean? = null

  private var d: Map<String, Int>? = null

  internal fun withA(a: Int): BClassBuilder {
    this.a = a
    return this
  }

  internal fun withB(b: Int): BClassBuilder {
    this.b = b
    return this
  }

  internal fun withC(c: Boolean): BClassBuilder {
    this.c = c
    return this
  }

  internal fun withD(d: Map<String, Int>): BClassBuilder {
    this.d = d
    return this
  }

  internal fun build(): BClass = BClass(a!!,b!!,c!!,d!!)
}
然后可以在项目中正常的使用BClassBuilder了:
fun main() {
    val b = BClassBuilder()
        .withA(2)
        .withB(3)
        .withC(true)
        .withD(mapOf("a" to 4, "b" to 5))
        .build()
    println(b.foo())
}
需要留意的是这里的参数d的类型是一个Map<String, Int>也被正确的处理了,这得益于 KotlinPoet 的ksValueParameter.type.toTypeName() 这个扩展函数, 而如果是原来KSP的解析方式,这个类型则需要很麻烦的代码来解析:
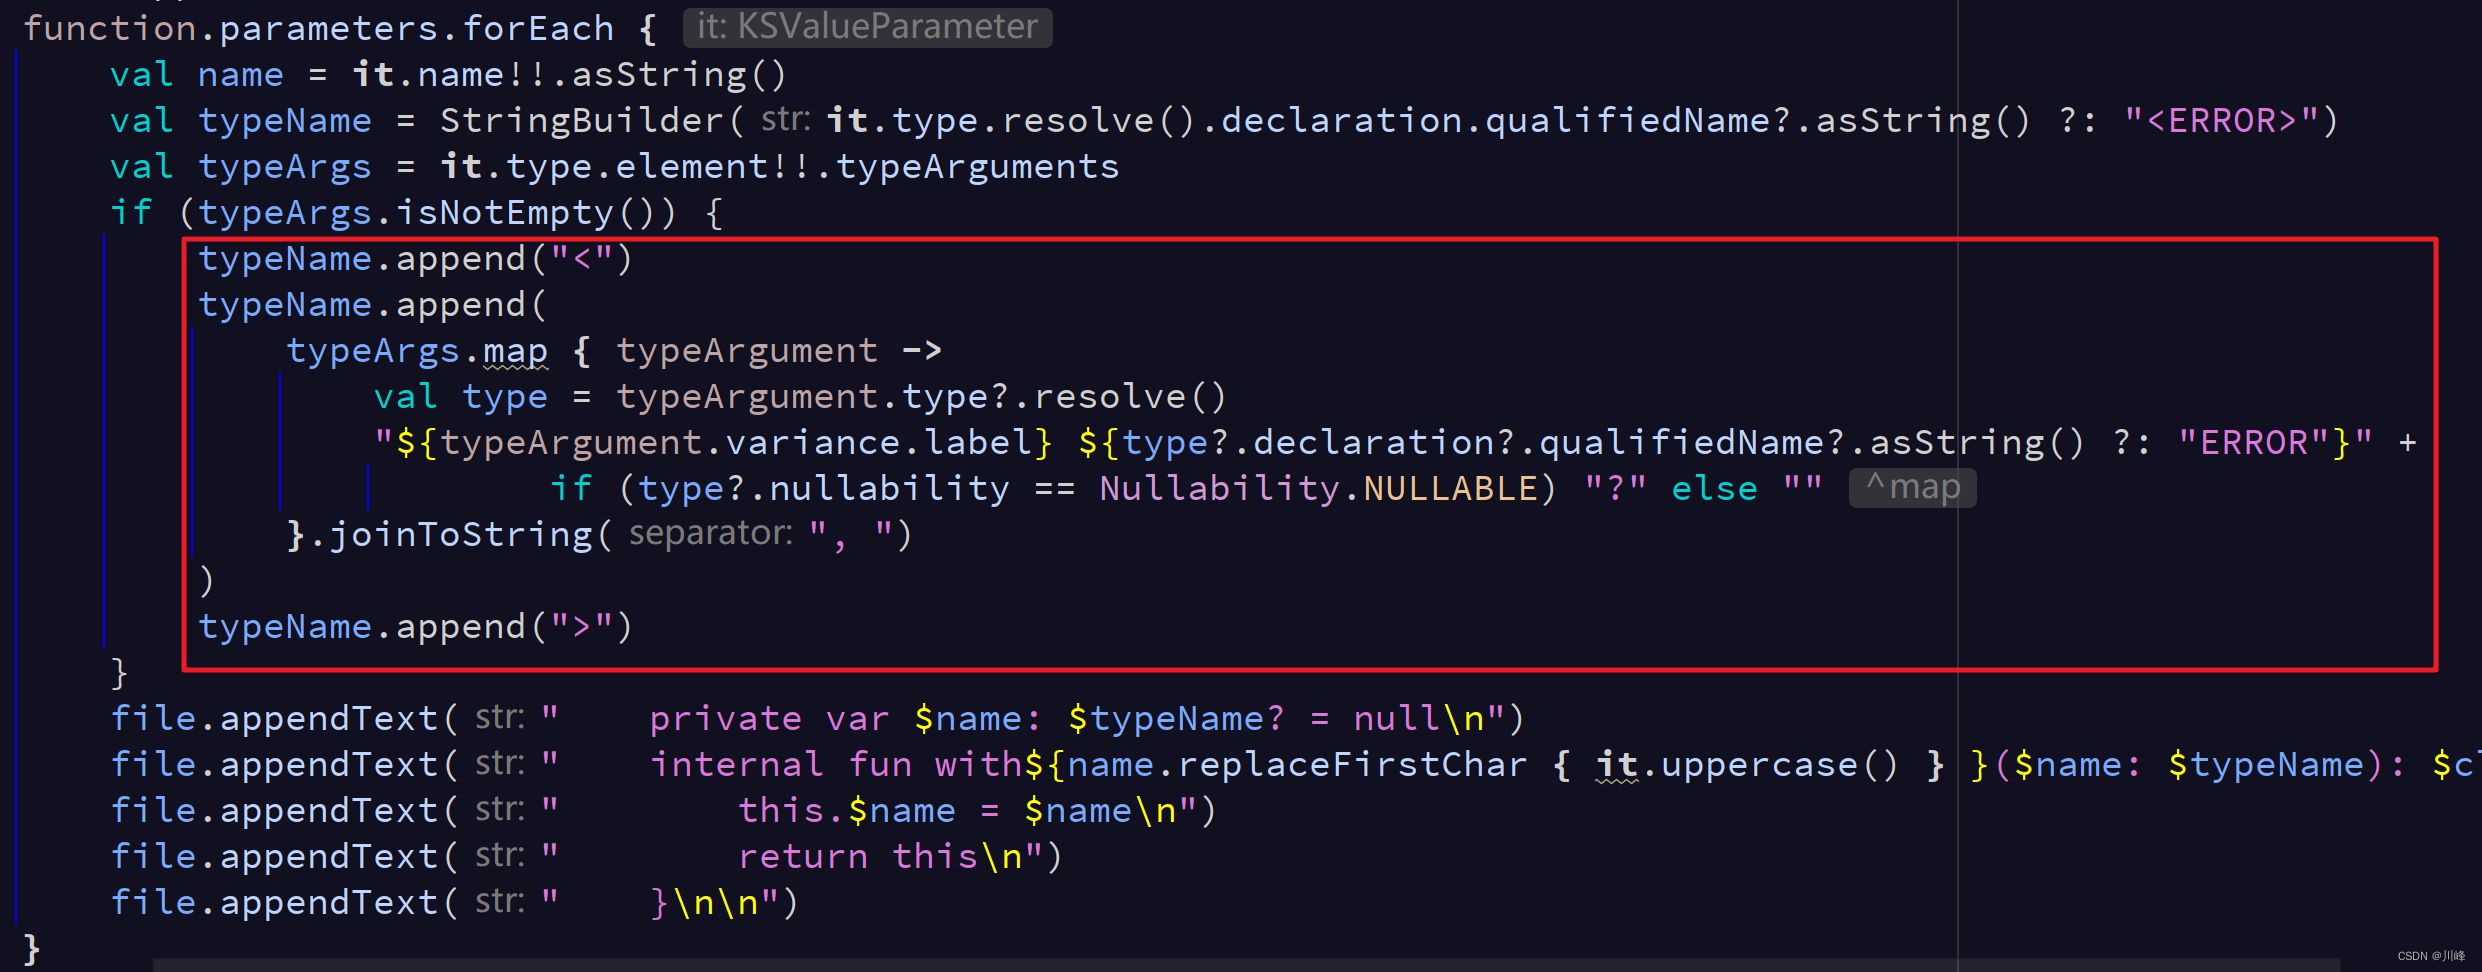
所以 KotlinPoet 的确能为我们减少很多不必要的麻烦。
这个例子在实际中可能没有多大用处,但是到这里,初步掌握了 KotlinPoet + KSP 的代码生成手段,才算是刚刚踏入元编程的门槛。
使用 KotlinPoet 生成装饰者模式样板代码
装饰者模式简单的说就是持有一个抽象类的同时继承了这个抽象类。装饰者对象和被装饰的对象都实现了相同的操作接口,装饰者将被装饰者包装起来。然后在同名的接口方法中,在调用被装饰者的方法之前或者之后可以做一些自己的操作,这样在外部调用者来看,就相当于被“装饰”了一样。
这里以多年以前学习Java设计模式时咖啡的例子为例,这里先以Kotlin的方式进行改造:
/**
 * 饮料抽象类
 */
interface Beverage {
    val description: String
    val price: Double
}

/**
 * 咖啡饮料
 */
class Coffee : Beverage {
    override val description: String = "咖啡"
    override val price: Double = 10.00
}

/**
 * 装饰者类,负责给咖啡加糖
 */
class SugarDecorator(val decorated: Beverage) : Beverage {
    override val description: String = "${decorated.description}, 加糖"
    override val price: Double = decorated.price + 2.00
}

/**
 *  装饰者类,负责给咖啡加牛奶
 */
class MilkDecorator(val decorated: Beverage) : Beverage {
    override val description: String = "${decorated.description}, 加牛奶"
    override val price: Double = decorated.price + 3.00
}

/**
 *  装饰者类,负责给咖啡加柠檬
 */
class LemonDecorator(val decorated: Beverage) : Beverage {
    override val description: String = "${decorated.description}, 加柠檬"
    override val price: Double = decorated.price + 4.00
}
调用:
fun main() {
    // 创建一种叫咖啡的饮料
    var coffee: Beverage = Coffee()
    // 给咖啡加糖
    coffee = SugarDecorator(coffee)
    // 给咖啡加牛奶
    coffee = MilkDecorator(coffee)
    // 给咖啡加柠檬
    coffee = LemonDecorator(coffee)

    print("你点的饮料是:${coffee.description}, 价格是:${coffee.price}")
}
运行后输出如下:
你点的饮料是:咖啡, 加糖, 加牛奶, 加柠檬, 价格是:19.0
Process finished with exit code 0
注意:为了方便理解,这里的示例代码将标准装饰者模式中的抽象装饰者父类去掉了,如果你喜欢更标准的(那样会更加复杂)可以参考我以前的实现。
可以看到Kotlin的实现方式已经比Java好很多了,但是在上面代码中,仍然存在着许多重复的样板代码,我们发现每个装饰者类的实现逻辑都雷同,如果这样的装饰者类很多,那么无疑会浪费我们很多的体力。下面使用 KotlinPoet + KSP 来尝试生成这些样板代码:
首先定义一个Decorator注解类
@Target(AnnotationTarget.CLASS)
@Retention(AnnotationRetention.SOURCE)
@Repeatable
annotation class Decorator(val className: String, val description: String, val price: Double)
然后我们期望的使用方式是下面这样:
/**
 * 饮料抽象类
 */
@Decorator(className = "SugarDecorator", description = "加糖", price = 2.00)
@Decorator(className = "MilkDecorator", description = "加牛奶", price = 3.00)
@Decorator(className = "LemonDecorator", description = "加柠檬", price = 4.00)
interface Beverage {
    val description: String
    val price: Double
}

/**
 * 咖啡饮料
 */
class Coffee : Beverage {
    override val description: String = "咖啡"
    override val price: Double = 10.00
}
我们只需在 Beverage 接口上添加@Decorator 注解后就会自动按照注解参数来生成对应的装饰者类,然后调用方式还跟以前一样不变。即让KSP模块来帮我们生成之前的三个具体的装饰者类。
下面定义一个 DecoratorProcessor 类来实现:
class DecoratorProcessor(
    val codeGenerator: CodeGenerator,
    val logger: KSPLogger,
) : SymbolProcessor {

    data class DecoratorData(
        var packageName: String = "",
        var className: String = "",
        var decorators: MutableList<Decorator> = mutableListOf()
    )
    data class Decorator(
        var className: String = "",
        var description: String = "",
        var price: Double = 0.00,
    )

    override fun process(resolver: Resolver): List<KSAnnotated> {
        val symbols = resolver.getSymbolsWithAnnotation("com.fly.compose.ksp.router.processor.test.Decorator")
        val ret = symbols.filter { !it.validate() }.toList()
        symbols
            .filterIsInstance<KSClassDeclaration>()
            .filter { it.validate() }
            .forEach {
                it.accept(DecoratorVisitor(), DecoratorData())
            }
        return ret
    }

    inner class DecoratorVisitor : KSDefaultVisitor<DecoratorData, Unit>() {

        override fun visitClassDeclaration(classDeclaration: KSClassDeclaration, data: DecoratorData) {
            classDeclaration.containingFile?.let { ksFile ->
                data.packageName = ksFile.packageName.asString()
                data.className = classDeclaration.simpleName.asString()

                classDeclaration.annotations
                    .filter { it.shortName.asString() == Decorator::class.simpleName }
                    .forEach { ksAnnotation ->
                        val decorator = Decorator()
                        ksAnnotation.arguments.forEach { ksValueArgument ->
                            val name = ksValueArgument.name?.asString()
                            val value = ksValueArgument.value
                            when(name) {
                                "className" -> decorator.className = value as String
                                "description" -> decorator.description = value as String
                                "price" -> decorator.price = value as Double
                            }
                        }
                        data.decorators.add(decorator)
                    }

                generateDecoratorCode(data, ksFile)
            }
        }

        override fun defaultHandler(node: KSNode, data: DecoratorData) { }

        private fun generateDecoratorCode(data: DecoratorData, containingFile: KSFile) {
            val fileSpecBuilder = FileSpec.builder(data.packageName, "${data.className}Decorator")

            val beverageClass = ClassName(data.packageName, data.className)
            data.decorators.forEach { decorator ->
                val className = ClassName(data.packageName, decorator.className)
                fileSpecBuilder.addType(
                    TypeSpec.classBuilder(className)
                        .addSuperinterface(beverageClass)
                        .primaryConstructor(
                            FunSpec.constructorBuilder()
                                .addParameter("decorated", beverageClass)
                                .build()
                        ).addProperty(
                            PropertySpec.builder("decorated", beverageClass)
                                .addModifiers(KModifier.PRIVATE)
                                .initializer("decorated")
                                .build()
                        ).addProperty(
                            PropertySpec.builder("description", String::class)
                                .addModifiers(KModifier.OVERRIDE)
                                .initializer("%P", "\${decorated.description}, ${decorator.description}")
                                .build()
                        )
                        .addProperty(
                            PropertySpec.builder("price", Double::class)
                                .addModifiers(KModifier.OVERRIDE)
                                .initializer("decorated.price + %L", decorator.price)
                                .build()
                        )
                        .build()
                )
            }

            val fileSpec = fileSpecBuilder.build()
            fileSpec.writeTo(codeGenerator, Dependencies(true, containingFile))
        }
    }
}
代码虽然很长但是逻辑非常简单,跟前面建造者模式的生成代码几乎如出一辙,首先我们在 DecoratorVisitor 类的 visitClassDeclaration方法中收集注解相关的信息保存在数据类DecoratorData对象中,然后调用KotlinPoet的相关API生成代码即可。
在这个例子中,需要解析Classs声明上的注解,需要注意的一点是,虽然通过 resolver 解析出了包含我们声明的注解的类,但是在访问该类时,该类上面的注解却不一定只包含我们声明的注解,可能还有别人家的注解,例如:
@Decorator(......)
@SomeAnnotation
interface Beverage {
    ......
}
所以说,在解析的时候还需要过滤一下,也就是上面代码中的下面这句代码的作用:
classDeclaration.annotations.filter { it.shortName.asString() == Decorator::class.simpleName }
这一点很重要,如果没有注意到,很容易出现编译失败。
另外上面例子的代码中在添加description和price属性时,由于我们已经知道了其类型分别是String和Double,所以TypeName直接传递的String::class和Double::class, 如果我们编写时不知道属性的类型,想动态的解析,可以这么做:
override fun visitClassDeclaration(classDeclaration: KSClassDeclaration, data: DecoratorData) {
	......
	classDeclaration.getDeclaredProperties().forEach { it.accept(this, data) } // 会触发下面的方法
}
// 对每个属性访问一遍,拿到其类型
override fun visitPropertyDeclaration(property: KSPropertyDeclaration, data: DecoratorData) {
    val typeName = property.type.toTypeName()
}
最后别忘了在我们的ksp模块的resources目录下的配置文件中添加自定义的 Provider 全类路径:
class DecoratorProcessorProvider : SymbolProcessorProvider {
    override fun create(environment: SymbolProcessorEnvironment): SymbolProcessor {
        return DecoratorProcessor(environment.codeGenerator, environment.logger)
    }
}
// 放在 resources/META-INF/services/com.google.devtools.ksp.processing.SymbolProcessorProvider 中
com.fly.compose.ksp.router.processor.test.DecoratorProcessorProvider
完成后build一下项目,在build目录下查看生成的代码:

可以看到生成的代码符合我们的预期,非常完美。
假设此时我们不光有咖啡,还有一款茶饮料:
/**
 * 茶饮料
 */
class Tea : Beverage {
    override val description: String = "绿茶"
    override val price: Double = 8.00
}
那么上面生成的三个装饰者类,依然可以搭配着新的茶饮料来使用,例如:
fun main() {
    // 创建一种叫绿茶的饮料
    var tea: Beverage = Tea()
    // 给绿茶加糖
    tea = SugarDecorator(tea)
    // 给绿茶加牛奶
    tea = MilkDecorator(tea)
    // 给绿茶加柠檬
    tea = LemonDecorator(tea)
    println("你点的饮料是:${tea.description}, 价格是:${tea.price}")
}
运行后输出如下:
你点的饮料是:绿茶, 加糖, 加牛奶, 加柠檬, 价格是:17.0
怎么样,是不是感觉很酷。
关于这个例子,最后要说明的一点是,由于每个装饰者类中的逻辑雷同,存在重复逻辑,并且可以通过注解参数来配置,所以我们可以用代码生成来解决。但并不是每一种装饰者模式都能这样做的,因为有可能每一个装饰者类中的处理逻辑各不相同,没有共性,那就不适合元编程了。在实际项目中可以自己思考。
使用 KotlinPoet 生成工厂方法代码
对于简单工厂方法模式,在Kotlin中实现非常简单,我们可以借助伴生对象,直接在伴生对象中添加创建对象的方法。
interface Animal {
    fun makeSound(): String
    companion object Factory
}

class Dog : Animal {
    override fun makeSound(): String = "汪汪汪汪!"
}

class Cat : Animal {
    override fun makeSound(): String = "喵喵喵喵!"
}

class Pig : Animal {
    override fun makeSound(): String = "呼噜呼噜!"
}

class Bird : Animal {
    override fun makeSound(): String = "布谷布谷!"
}

class Dragon : Animal {
    override fun makeSound(): String = "恶龙咆哮!"
}

enum class AnimalType {DOG, CAT, PIG, BIRD, DRAGON}

fun Animal.Factory.from(type: AnimalType): Animal {
    return when (type) {
        AnimalType.DOG -> Dog()
        AnimalType.CAT -> Cat()
        AnimalType.PIG -> Pig()
        AnimalType.BIRD -> Bird()
        AnimalType.DRAGON -> Dragon()
    }
}

fun main() {
    val cat = Animal.from(AnimalType.CAT)
    println(cat.makeSound())
}
这里是通过为 Animal 接口的伴生对象添加了一个扩展方法from来实现的。那么借助 KSP + KotlinPoet 我们可以通过代码来生成工厂方法。
我们期望的使用方式是下面这样:
@Factory
interface Animal {
    fun makeSound(): String
}
只需在 Animal 接口上添加注解@Factory即可生成如下代码:
enum class AnimalType {DOG, CAT, PIG, BIRD, DRAGON}

interface AnimalFactory {
    companion object {
        fun from(type: AnimalType): Animal {
            return when (type) {
                AnimalType.DOG -> Dog()
                AnimalType.CAT -> Cat()
                AnimalType.PIG -> Pig()
                AnimalType.BIRD -> Bird()
                AnimalType.DRAGON -> Dragon()
            }
        }
    }
}
使用:
fun main() {
    val dog = AnimalFactory.from(AnimalType.DOG)
    println(dog.makeSound())
}
首先定义一个Factory注解类:
@Target(AnnotationTarget.CLASS)
@Retention(AnnotationRetention.SOURCE)
annotation class Factory
然后就是编写我们的FactoryProcessor实现:
class FactoryProcessor(
    val codeGenerator: CodeGenerator,
    val logger: KSPLogger,
) : SymbolProcessor {

    data class FactoryData(
        var packageName: String = "",
        var className: String = "",
        var childClass: MutableList<ClassName> = mutableListOf()
    )

    override fun process(resolver: Resolver): List<KSAnnotated> {
        val symbols = resolver.getSymbolsWithAnnotation("com.fly.compose.ksp.router.processor.test.Factory")
        val ret = symbols.filter { !it.validate() }.toList()
        symbols
            .filterIsInstance<KSClassDeclaration>()
            .filter { it.validate() }
            .forEach { ksClassDeclaration ->
                ksClassDeclaration.containingFile?.let { ksFile ->
                    val data = FactoryData()
                    data.packageName = ksFile.packageName.asString()
                    data.className = ksClassDeclaration.simpleName.asString()
                    // 访问所有文件,在每个文件中查找父类是Animal的Class,并收集
                    resolver.getAllFiles().forEach {
                        it.accept(FileVisitor(data), Unit)
                    }
                    generateFactoryCode(data, ksFile)
                }
            }
        return ret
    }

    inner class FileVisitor(private val factoryData: FactoryData) : KSVisitorVoid() {
        val visited = HashSet<Any>()

        private fun checkVisited(symbol: Any): Boolean {
            if (visited.contains(symbol)) return true
            visited.add(symbol)
            return false
        }

        override fun visitFile(file: KSFile, data: Unit) {
            if (checkVisited(file)) return
            file.declarations
                .filterIsInstance<KSClassDeclaration>()
                .filter { it.validate() }
                .forEach {
                    it.accept(this, data)
                }
        }

        override fun visitClassDeclaration(classDeclaration: KSClassDeclaration, data: Unit) {
            if (checkVisited(classDeclaration)) return
            val ksFile = classDeclaration.containingFile ?: return
            classDeclaration.getAllSuperTypes().forEach {
                if (it.declaration.simpleName.asString() == factoryData.className) {
                    val className = ClassName(ksFile.packageName.asString(),
                        classDeclaration.simpleName.asString())
                    factoryData.childClass.add(className)
                }
            }
        }
    }

    private fun generateFactoryCode(data: FactoryData, containingFile: KSFile) {
        val animalType = "${data.className}Type"
        val animalTypeEnum = TypeSpec.enumBuilder(animalType).apply {
            data.childClass.forEach {
                addEnumConstant(it.simpleName.uppercase())
            }
        }.build()

        val animalTypeName = ClassName(data.packageName, animalType)
        val fromFun =  FunSpec.builder("from")
            .addParameter(ParameterSpec.builder("type", animalTypeName).build())
            .returns(ClassName(data.packageName, data.className))
            .beginControlFlow("return when (type)")
            .apply {
                data.childClass.forEach {
                    addStatement("${animalType}.${it.simpleName.uppercase()} -> %T()", it)
                }
            }
            .endControlFlow()
            .build()
        val animalFactory = "${data.className}Factory"
        val fileSpec = FileSpec.builder(data.packageName, animalFactory)
            .addType(animalTypeEnum)
            .addType(
                TypeSpec.interfaceBuilder(ClassName(data.packageName, animalFactory))
                    .addType(
                        TypeSpec.companionObjectBuilder()
                            .addFunction(fromFun)
                            .build()
                    )
                    .build()
            )
            .build()
        fileSpec.writeTo(codeGenerator, Dependencies(true, containingFile))

    }
}

class FactoryProcessorProvider : SymbolProcessorProvider {
    override fun create(environment: SymbolProcessorEnvironment): SymbolProcessor {
        return FactoryProcessor(environment.codeGenerator, environment.logger)
    }
}
这里的思路是对每一个添加了@Factory注解的类,都会遍历所有文件查找并收集其子类实现类信息。然后在创建文件时,先根据收集到的子类的名称创建一个枚举类,随后添加一个接口类型,再向接口中添加一个伴生对象类型,最后向伴生对象添加一个函数并根据子类信息创建when表达式作为函数体。
为了验证我们编写的代码是否可以收集到不同文件中的接口实现类,我们新建一个Other.kt文件,在其中添加两个Animal的子类:

最后build一下项目,查看生成的代码:

可以看到,生成的代码达到了我们预期的效果,并且来自不同文件中的接口实现类也被正确的收集了。
增量式处理
增量式处理是一种处理技术, 尽可能的避免重新处理源代码。增量式处理的主要目的是减少典型的修改-编译-测试循环的处理时间。
为了检测哪个源代码是脏的(dirty) (也就是需要重新处理), KSP 需要处理器的帮助, 确定哪个输入源代码对应到哪个生成的输出。 为了改善这种经常很累赘, 而且容易出错的处理, KSP 设计目标是 只需要处理器使用的最少量的 root source 作为起点来浏览代码结构。也就是说, 如果 KSNode 从以下方式得到, 那么处理器需要将一个输出关联到对应的 KSNode 的源代码:
Resolver.getAllFilesResolver.getSymbolsWithAnnotationResolver.getClassDeclarationByNameResolver.getDeclarationsFromPackage
目前, 只有
Kotlin和Java源代码中的变更会被追踪。classpath, 也就是其他模块或库中的变更, 默认会触发一次对所有源代码的完整的重新处理。要追踪classpath中的变更, 请设置Gradle属性ksp.incremental.intermodule=true
目前增量式处理会默认启用,要关闭它, 请设置 Gradle 属性 ksp.incremental=false。 要为依赖项和输出对应的脏文件集启用 log, 请使用 ksp.incremental.log=true。你可以在 build 输出文件夹中找到这些 log 文件, 扩展名为 .log。
聚合(Aggregating) 与 隔离(Isolating)
类似于Gradle 注解处理中的概念,KSP 支持 聚合(Aggregating) 与 隔离(Isolating) 两种模式。请注意,与 Gradle 注释处理不同,KSP 将每个输出分类为聚合或隔离,而不是整个处理器。
什么是聚合输出?
聚合输出可能会受到任何输入更改的影响,但删除不影响其他文件的文件除外。这意味着任何输入更改都会导致所有聚合输出的重建,这反过来意味着重新处理所有相应的已注册、新的和修改的源文件。
例如, 收集带有一个特定注解的所有符号的输出, 会被认为是一个聚合输出。
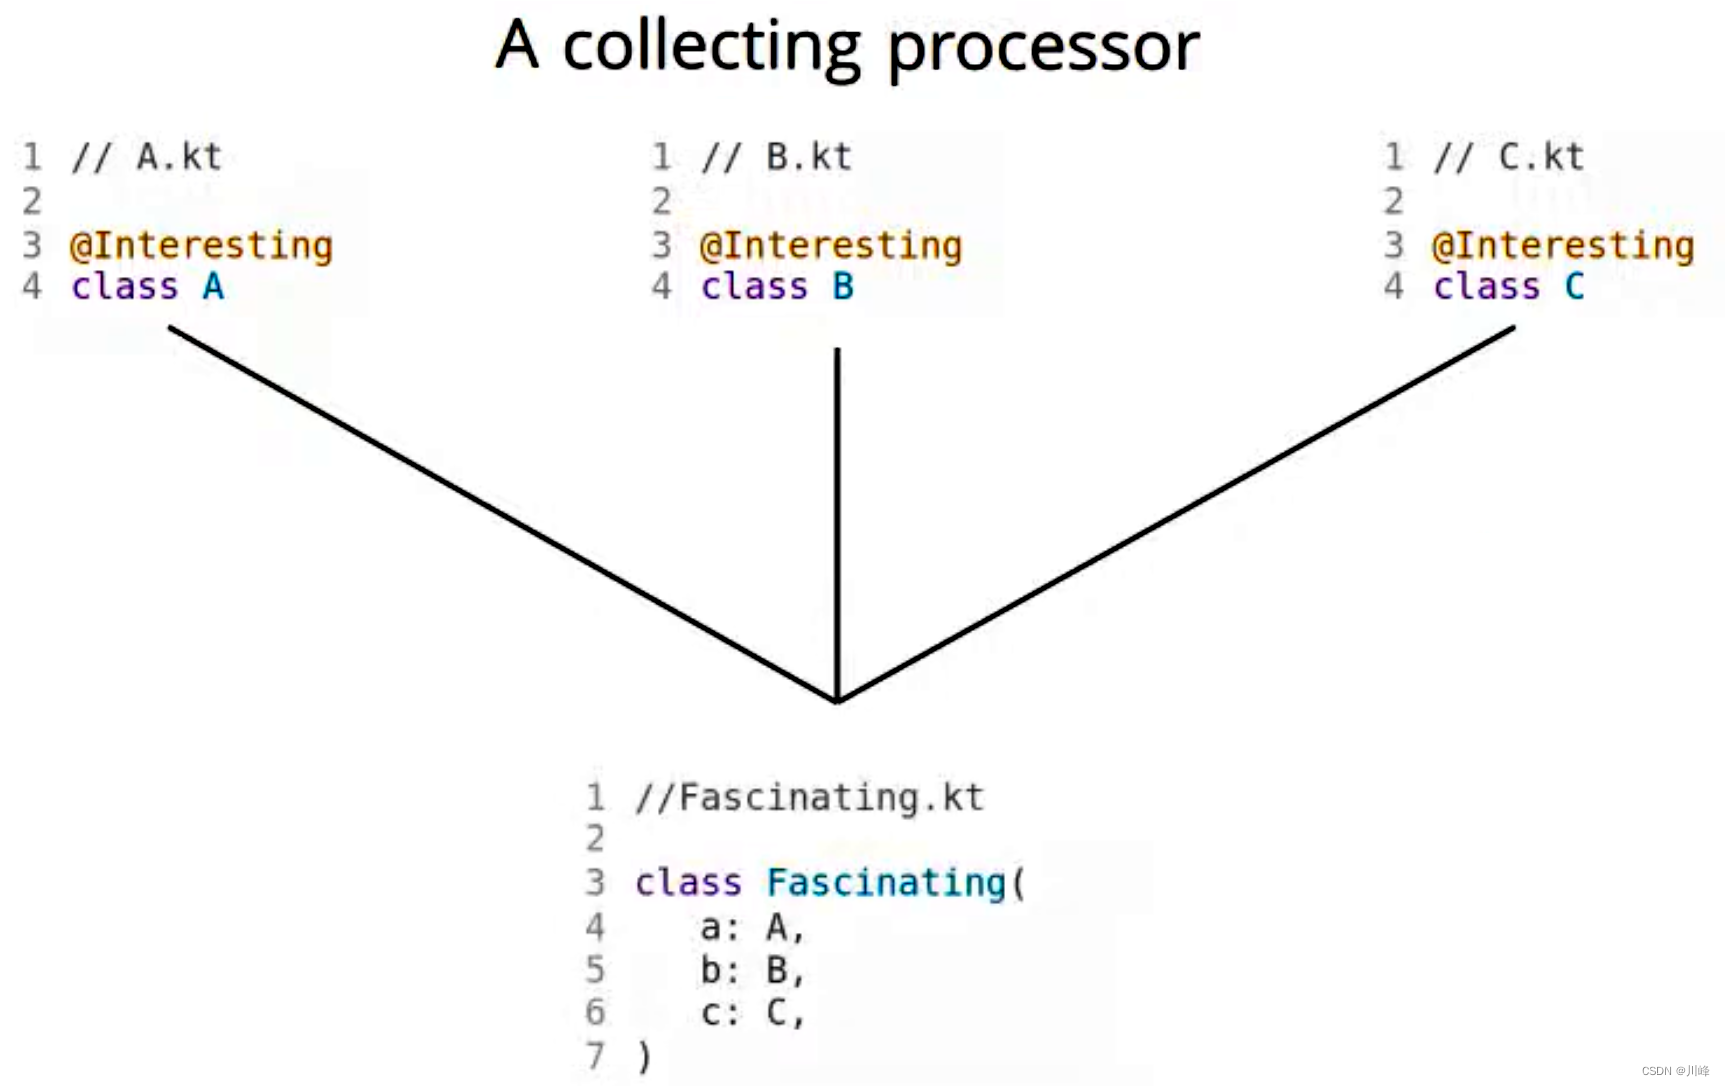
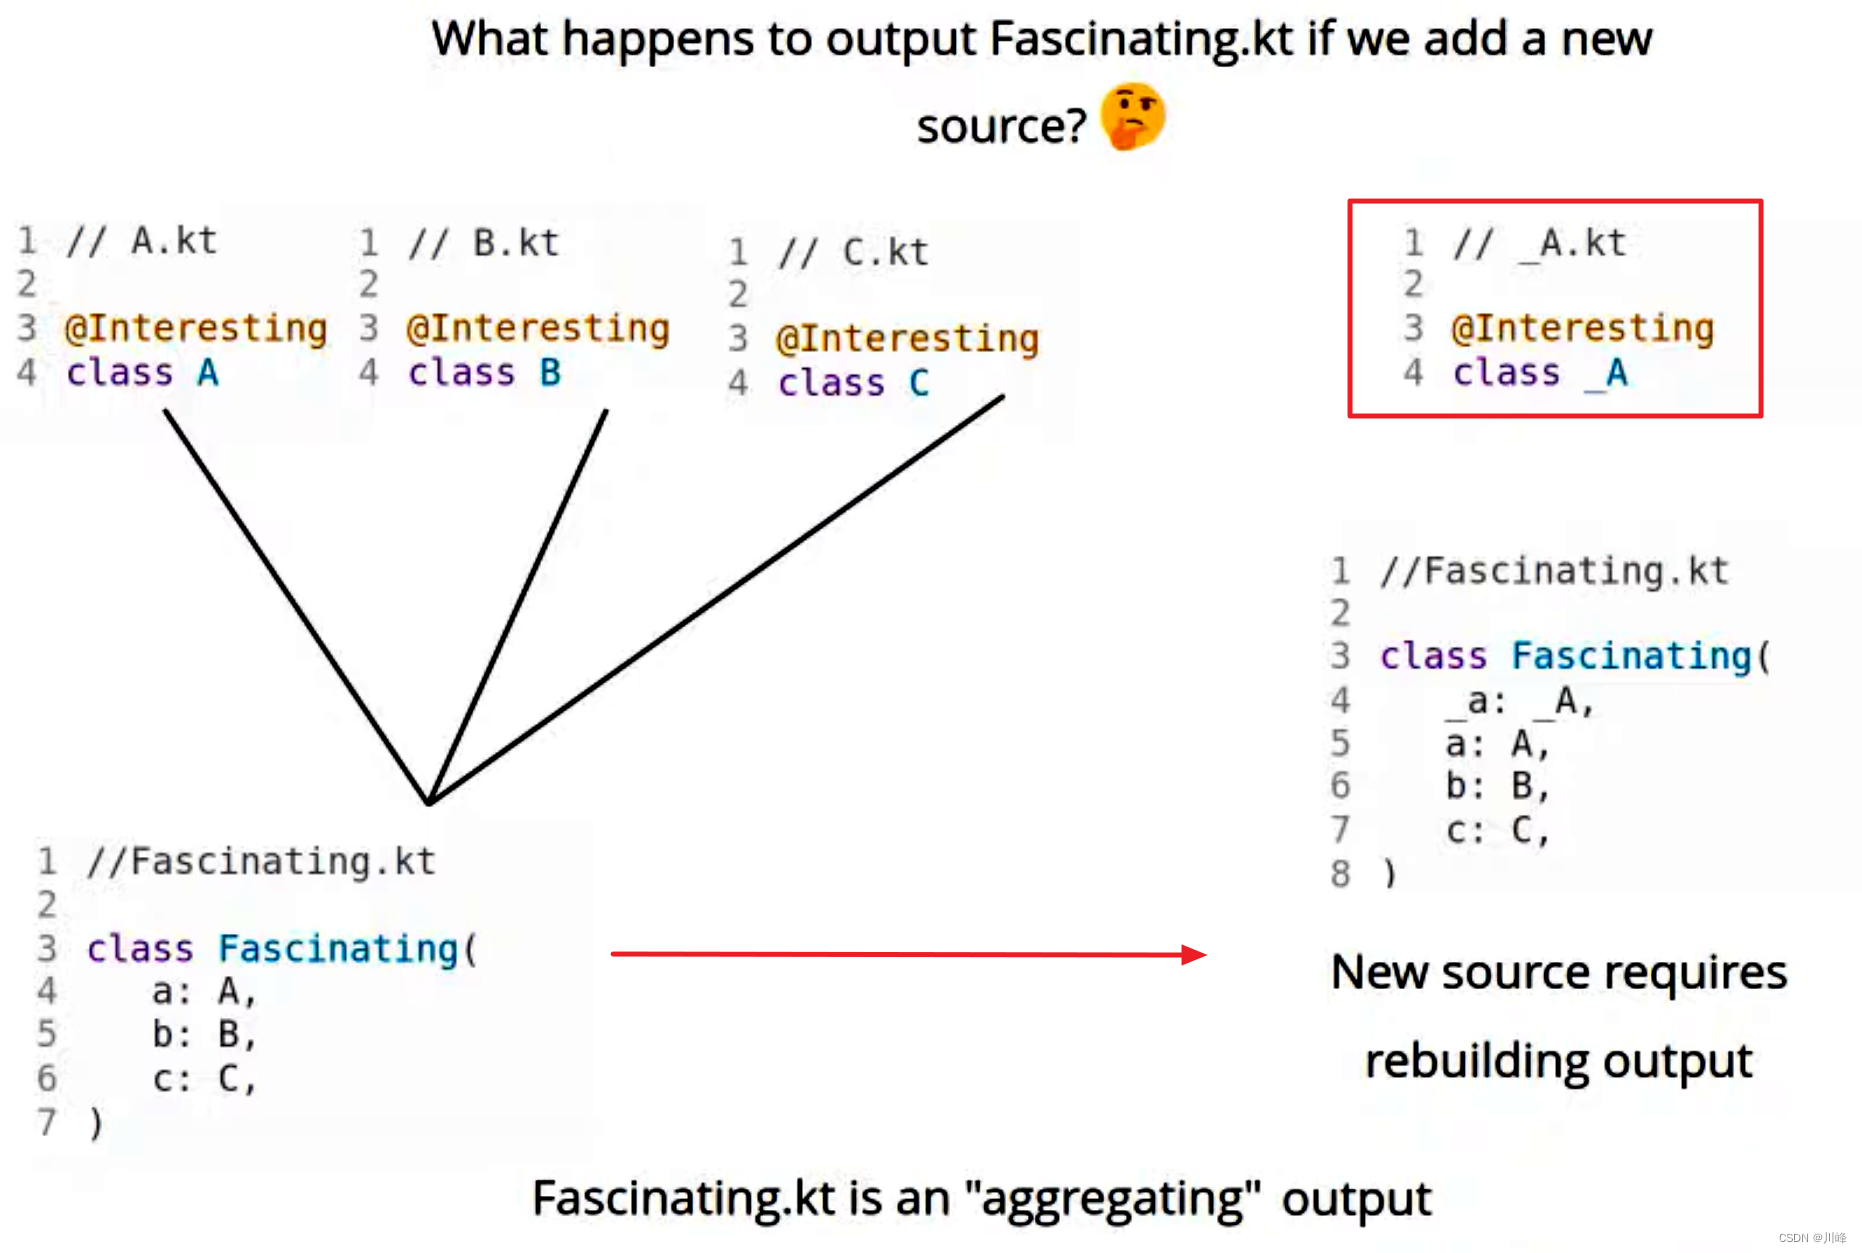
如果我们增加新的源文件,则对应的生成结果也会跟着改变。因此输出是聚合的。

在聚合输出模式下,如果我们删掉了不相干的源文件,那么不会导致处理器重新生成输出结果。
什么是隔离输出?
隔离输出只依赖于特定的源代码, 对其他源代码的变更不会影响隔离输出。例如, 针对一个接口生成的实现类, 会被认为是 隔离输出。
假设现在有一个简单的针对类的注解的处理器:

如果我们增加新的源文件,不会影响到已输出部分的文件
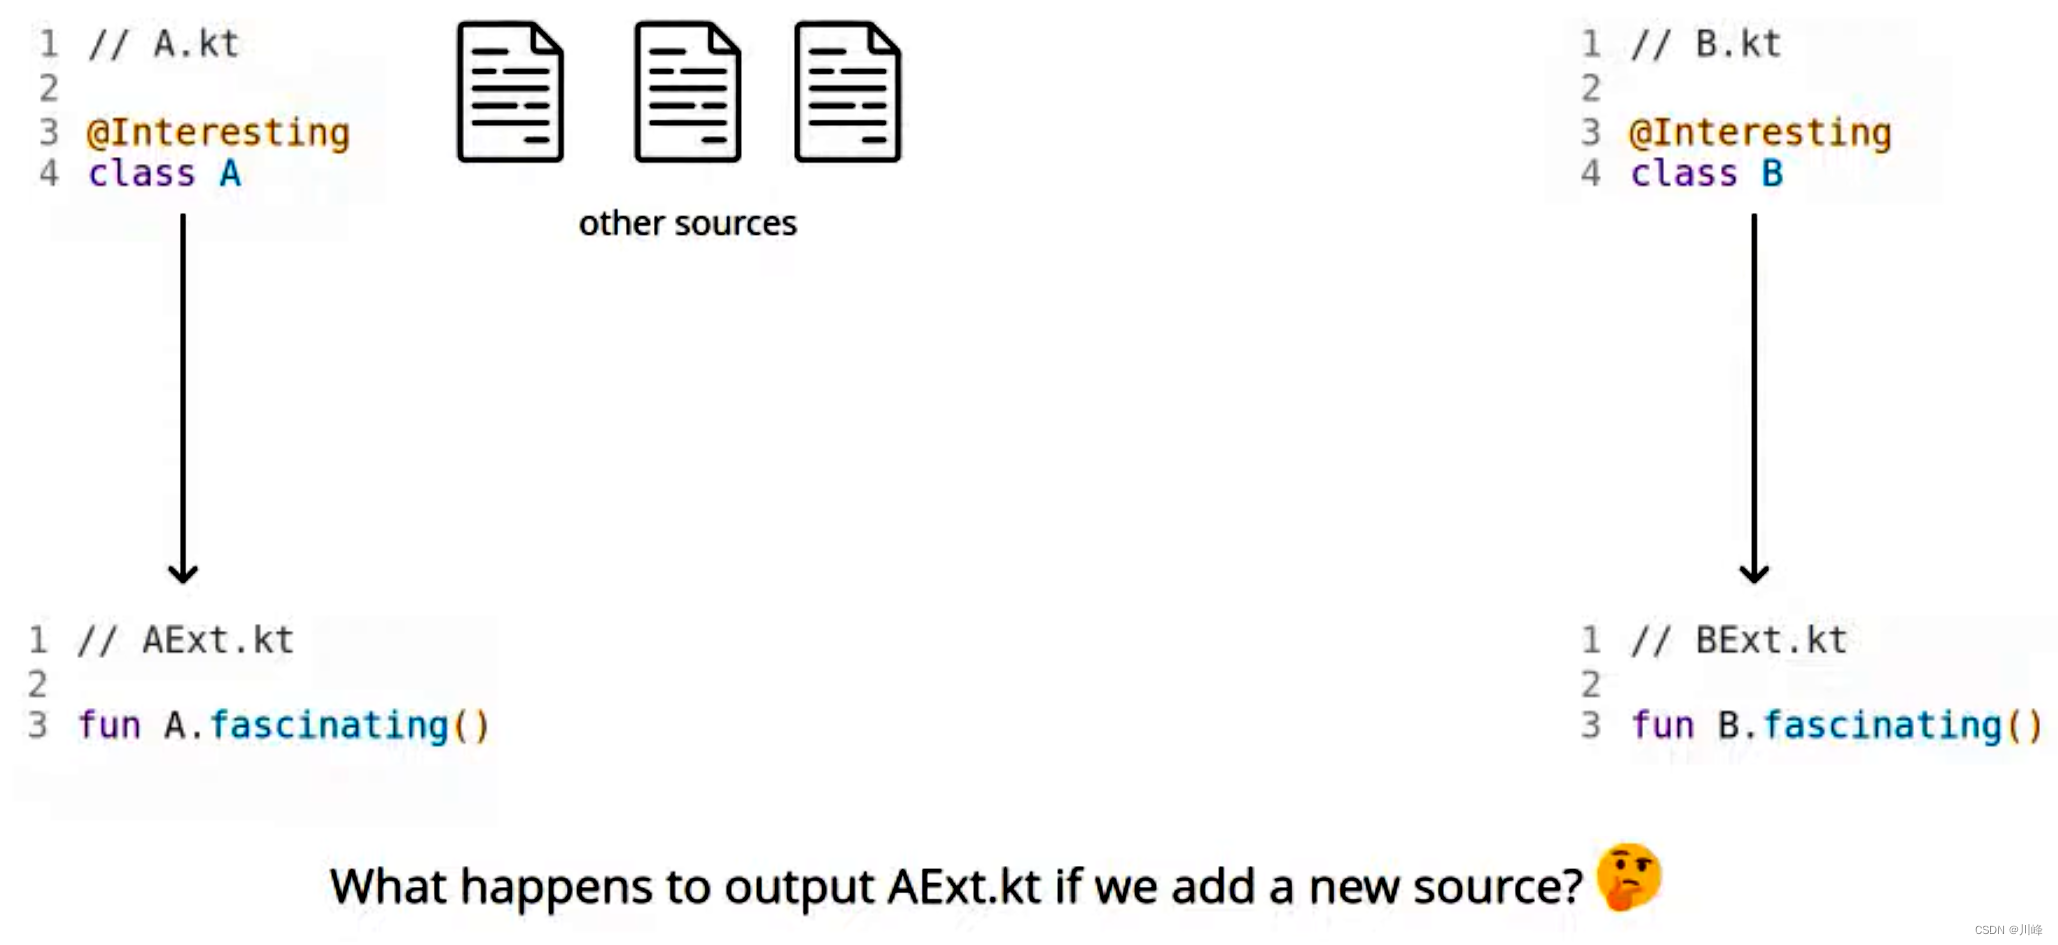

此时每一个注解类都会有一份独立的文件输出。
总的来说,如果一个输出 可能依赖于新的或任何变更过的源代码, 那么它被认为是聚合输出,否则, 是隔离输出。
我们在使用 KSP 通过codeGenerator.createNewFile()创建文件输出流时,需要传递一个 Dependencies 对象,而该对象的第一个参数 aggregating 就是表示是否为 聚合输出:
aggregating = true:一个输出可能潜在的依赖于新的信息, 可能来自新的文件, 或者既有的但被变更的文件。aggregating = false:处理器确定它的信息只来自特定的输入文件, 不会来自其它文件或新的文件。
示例 1
一个处理器读取 A.kt 中的类 A 和 B.kt 中的类 B, 其中 A 继承 B, 然后生成 outputForA。处理器通过 Resolver.getSymbolsWithAnnotation 得到 A, 然后对 A 使用 KSClassDeclaration.superTypes 得到 B。因为 包含 B 是由于 A 造成的, 所以在 outputForA 的 dependencies 中不需要显示的指定 B.kt。 这种情况下你仍然可以指定 B.kt, 但不是必须的。
// A.kt
@Interesting
class A : B()
// B.kt
open class B

// Example1Processor.kt
class Example1Processor : SymbolProcessor {
    override fun process(resolver: Resolver) {
        val declA = resolver.getSymbolsWithAnnotation("Interesting").first() as KSClassDeclaration
        val declB = declA.superTypes.first().resolve().declaration
        // 这里 B.kt 不是必须的, 因为它可以被 KSP 推断为一个依赖项
        val dependencies = Dependencies(aggregating = true, declA.containingFile!!)
        // outputForA.kt
        val outputName = "outputFor${declA.simpleName.asString()}"
        // outputForA 依赖于 A.kt 和 B.kt
        val output = codeGenerator.createNewFile(dependencies, "com.example", outputName, "kt")
        output.write("// $declA : $declB\n".toByteArray())
        output.close()
    }
    // ...
}
示例 2
假设一个处理器读取 sourceA 和 sourceB , 然后生成 outputA 和outputB。
如果 outputB 是聚合的:
- 如果修改了
sourceA:那么sourceA和sourceB都会被重新处理。 - 如果添加了
sourceC: 那么sourceC和sourceB都会被重新处理。
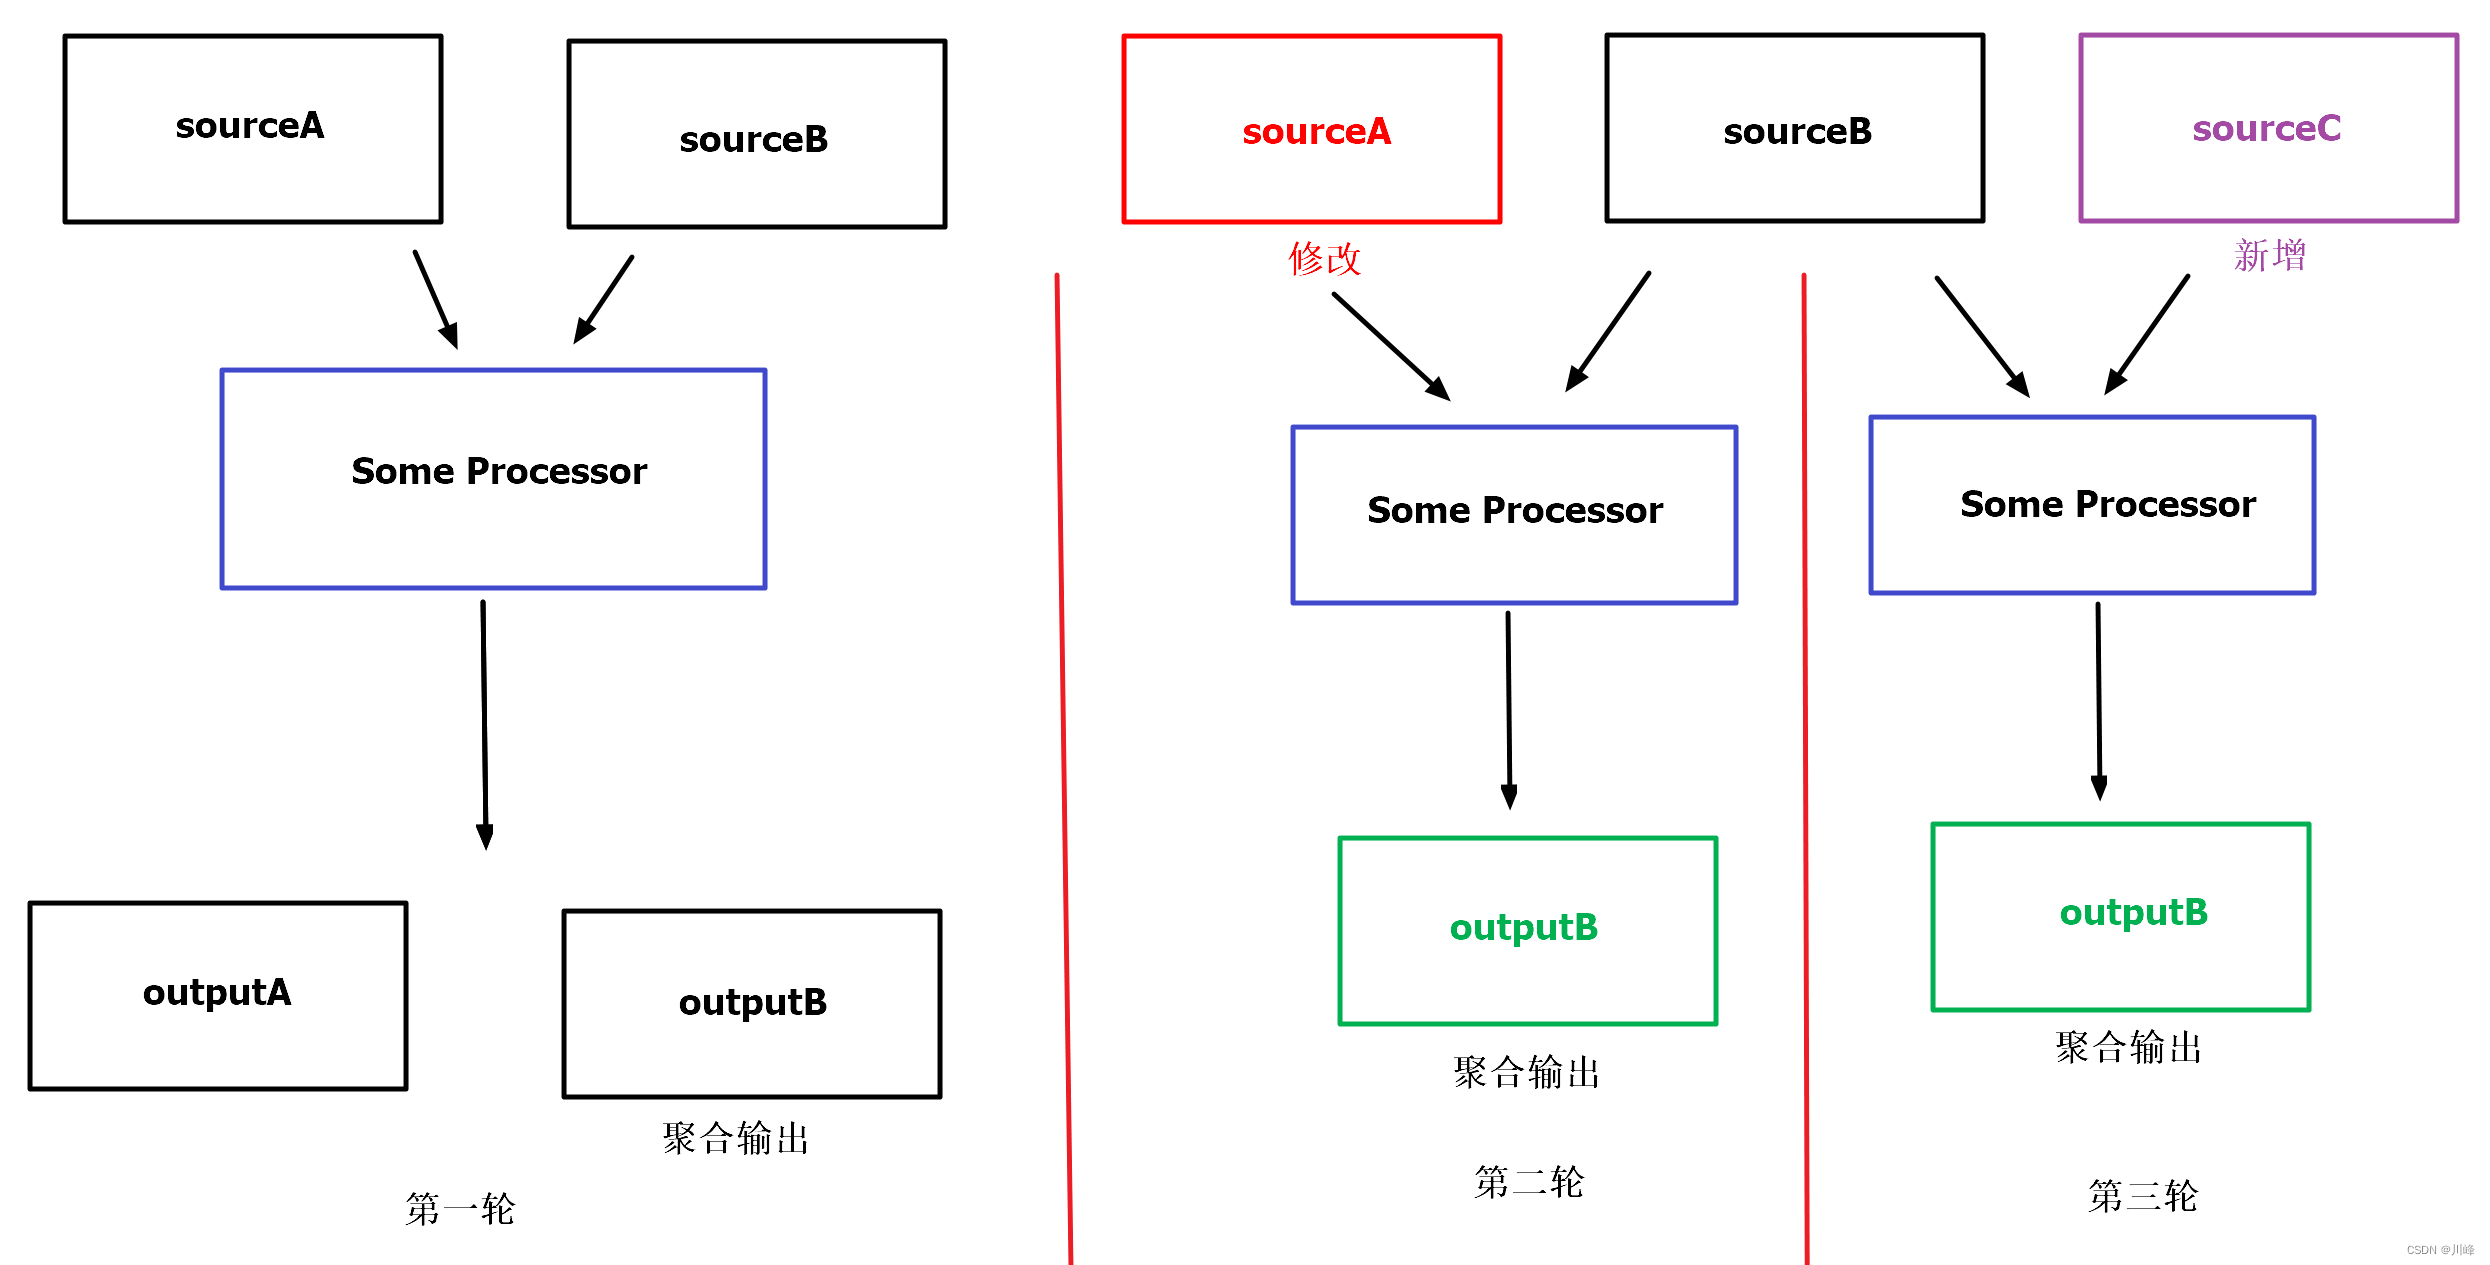
如果 outputB 是隔离的:
- 如果修改了
sourceA:那么只有sourceA会被重新处理。 - 如果添加了
sourceC: 那么只有sourceC会被重新处理。

如果删除了 sourceA, 那么没有任何代码需要重新处理。
如果删除了 sourceB, 那么没有任何代码需要重新处理。
KotlinPoet 对 KSP 增量处理的支持
kotlinpoet-ksp 通过 OriginatingKSFiles 支持这一点,这是一个位于 KotlinPoet 的 API 之上的简单Taggable API。要使用它,只需将相关的原始文件添加到任何TypeSpec、TypeAliasSpec、PropertySpec或FunSpec构建器。
val functionBuilder = FunSpec.builder("sayHello")
  .addOriginatingKSFile(sourceKsFile)
  .build()
像KotlinPoet的原始元素支持javac注解处理器一样,调用该 FileSpec.writeTo(CodeGenerator, ...)函数会自动收集这些原始 KSFile引用并去重,并在底层自动组装它们以Dependencies形式供KSP引用。
您可以选择定义自己的文件集合并将它们传递给writeTo函数,但通常不需要手动执行此操作。
最后,FileSpec.writeTo(CodeGenerator, ...) 方法同样需要你通过同名参数指定你的 processor 是否是聚合(aggregating)的。
多轮处理
KSP 支持 多轮(Multiple Round)处理, 也就是通过多次步骤处理文件。因此前一轮处理的输出可以供后一轮处理作为额外的输入。
为了使用多轮处理, SymbolProcessor.process() 函数需要对无效的符号返回延迟(deferred)符号列表 (List<KSAnnotated>)。请使用 KSAnnotated.validate() 来过滤无效的符号, 让它们延迟到下一轮。
以下示例代码演示如何使用有效性检查来延迟无效的符号:
override fun process(resolver: Resolver): List<KSAnnotated> {
    val symbols = resolver.getSymbolsWithAnnotation("com.example.annotation.Builder")
    val result = symbols.filter { !it.validate() }
    symbols
        .filter { it is KSClassDeclaration && it.validate() }
        .map { it.accept(BuilderVisitor(), Unit) }
    return result
}
多轮处理的行为
将符号延迟到下一轮处理
处理器可以将特定符号的处理延迟到下一轮。如果符号被延迟, 代表处理器在等待其他的处理器来提供更多的信息。它可以根据需要继续延迟这个符号。一旦另一个处理器提供了需要的信息, 处理器就可以处理被延迟的符号了。处理器应该只延迟那些缺乏必要信息的无效符号。因此, 处理器不应该延迟来自 classpath 的符号, KSP 也会过滤掉来自源代码以外的任何被延迟的符号。
比如, 根据注解来生成建造者模式的 builder 代码, 可能需要被注解类的构造函数的所有参数类型都是有效的 (也就是说能解析到一个具体的类型)。
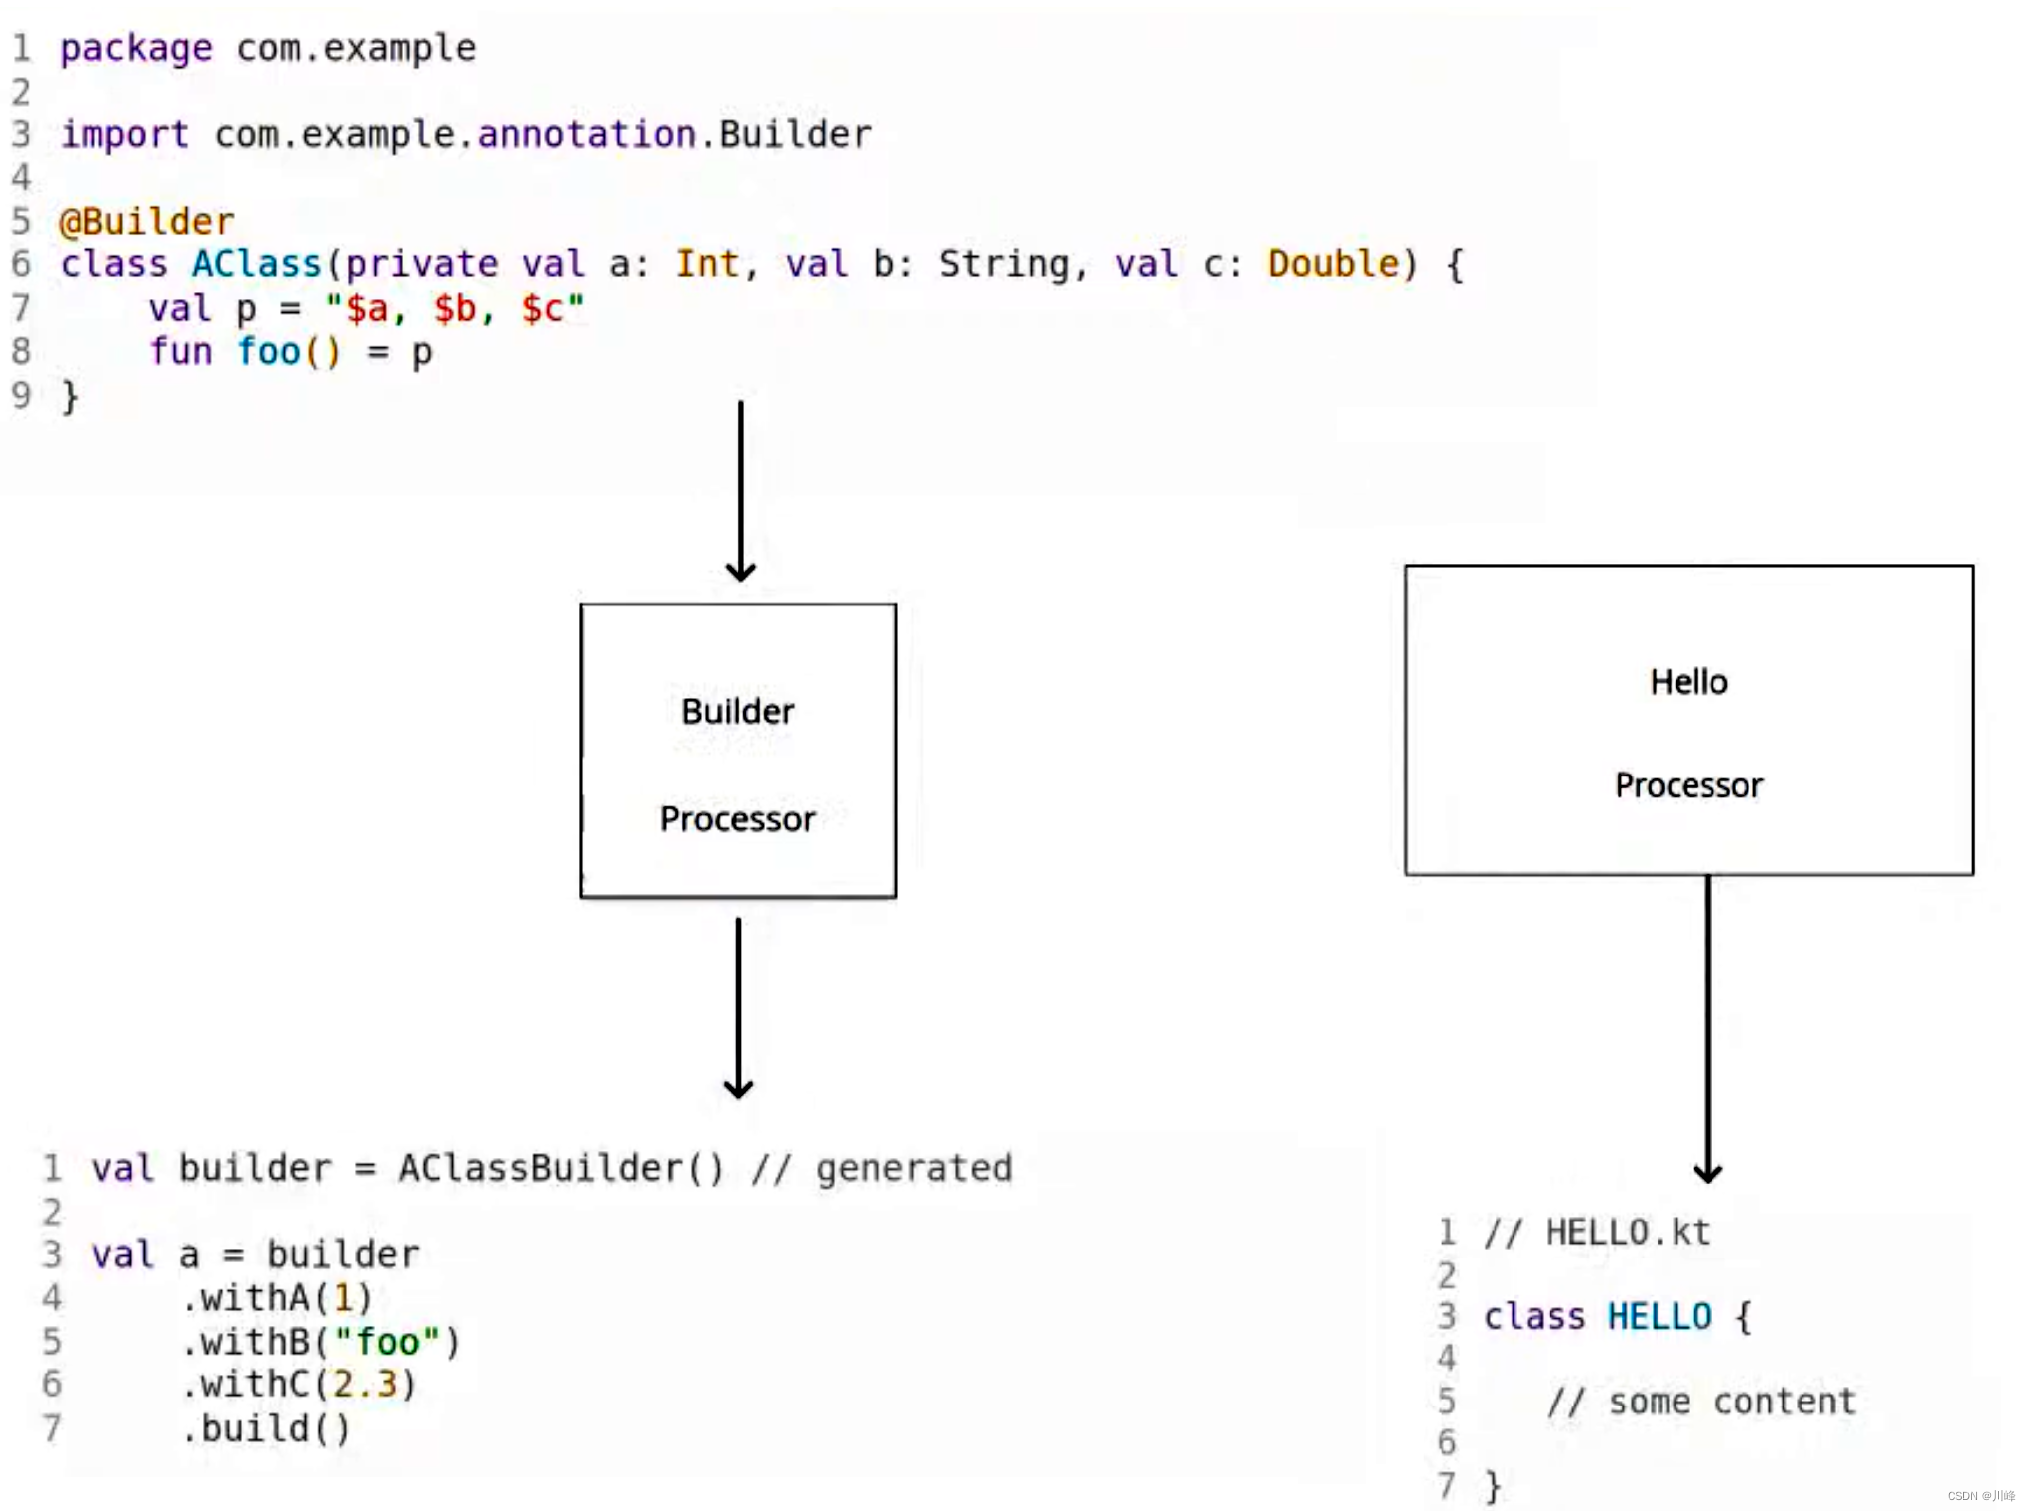
假如现在有两个Processor处理器分别用来生成Builder代码和HELLO类代码,那么在Builder处理器的第 1 轮处理中, 其中有可能会引用到HELLO这个目前尚不存在的类,也就是有 1 个类型无法解析:

处理器在当前轮无法对其处理,那么此时符号列表就会被延迟到下一轮中处理。这就是process()函数返回的 List<KSAnnotated> 的含义:
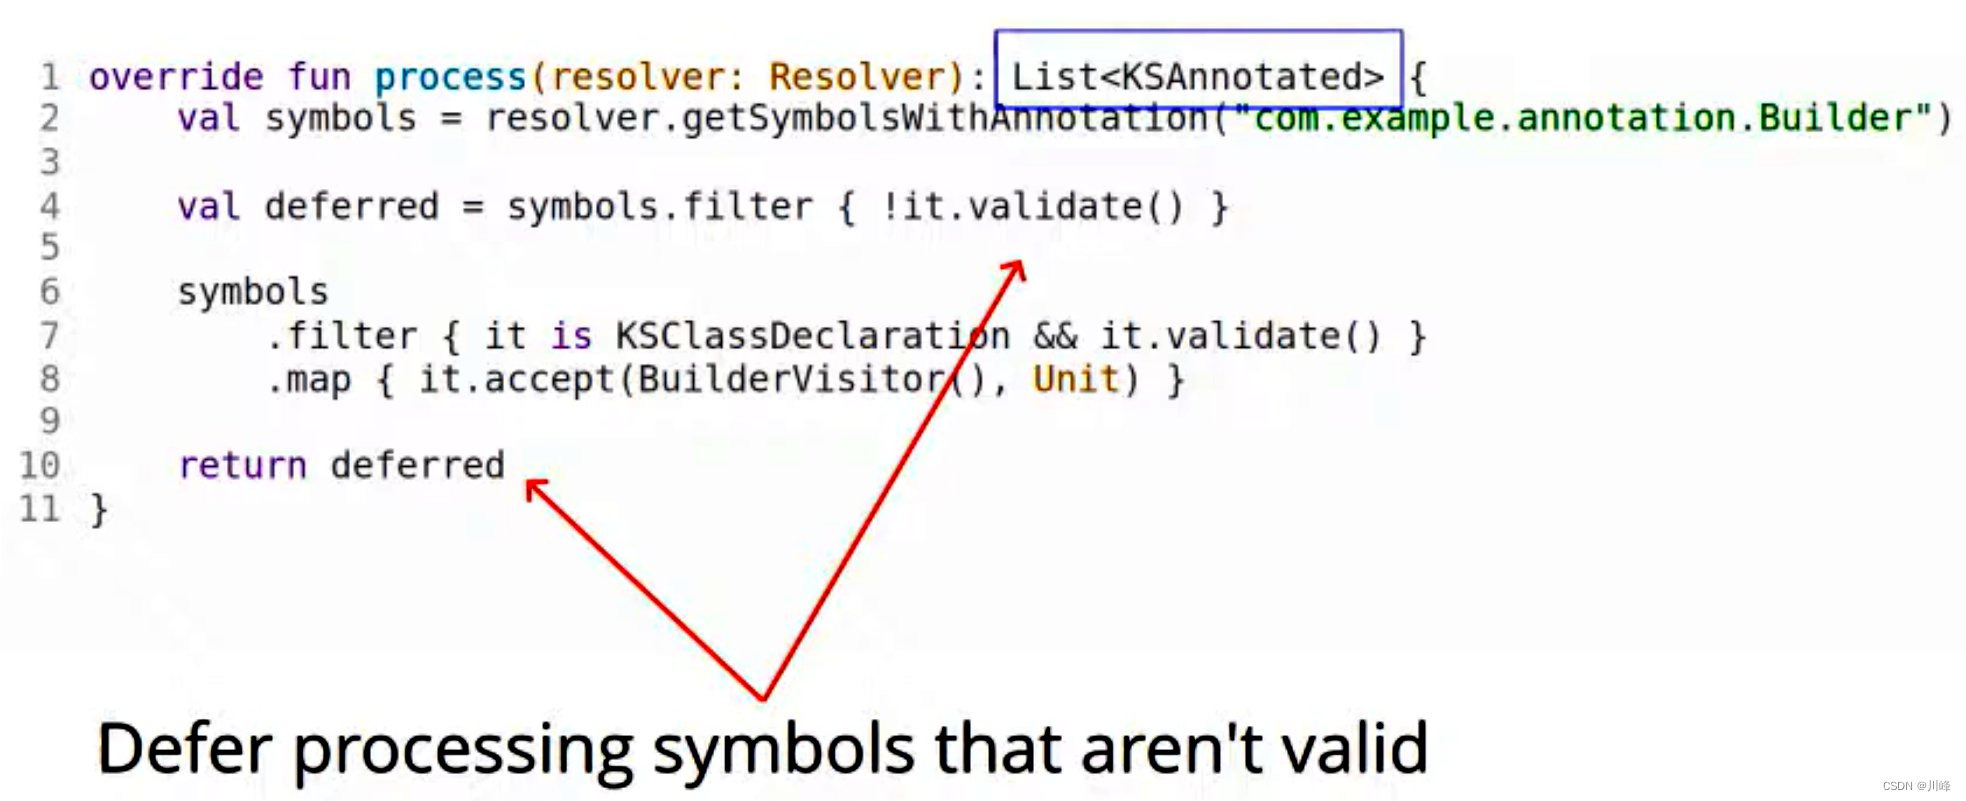
然后在第 2 轮中, 由于有了第 1 轮生成的文件, 这个类型就可以解析了:

校验符号
决定符号是否应该延迟的一个便利方法是进行校验。一个处理器应该知道为了正确的处理符号需要哪些信息。注意,校验通常需要类型解析,类型解析的代价可能很高,因此我们推荐只检查必须的信息。继续上面的例子, 对于Builder处理器来说,一个理想的校验是只检查被注解的符号的构造函数的所有已解析的参数类型是否包含 isError == false。
终止条件
当一整轮处理不再生成新的文件,此时多轮处理会终止。当终止条件达到时,如果还存在未处理的延迟符号,KSP 会对每个带有未处理的延迟符号的处理器,输出一个错误信息到 log 文件中。
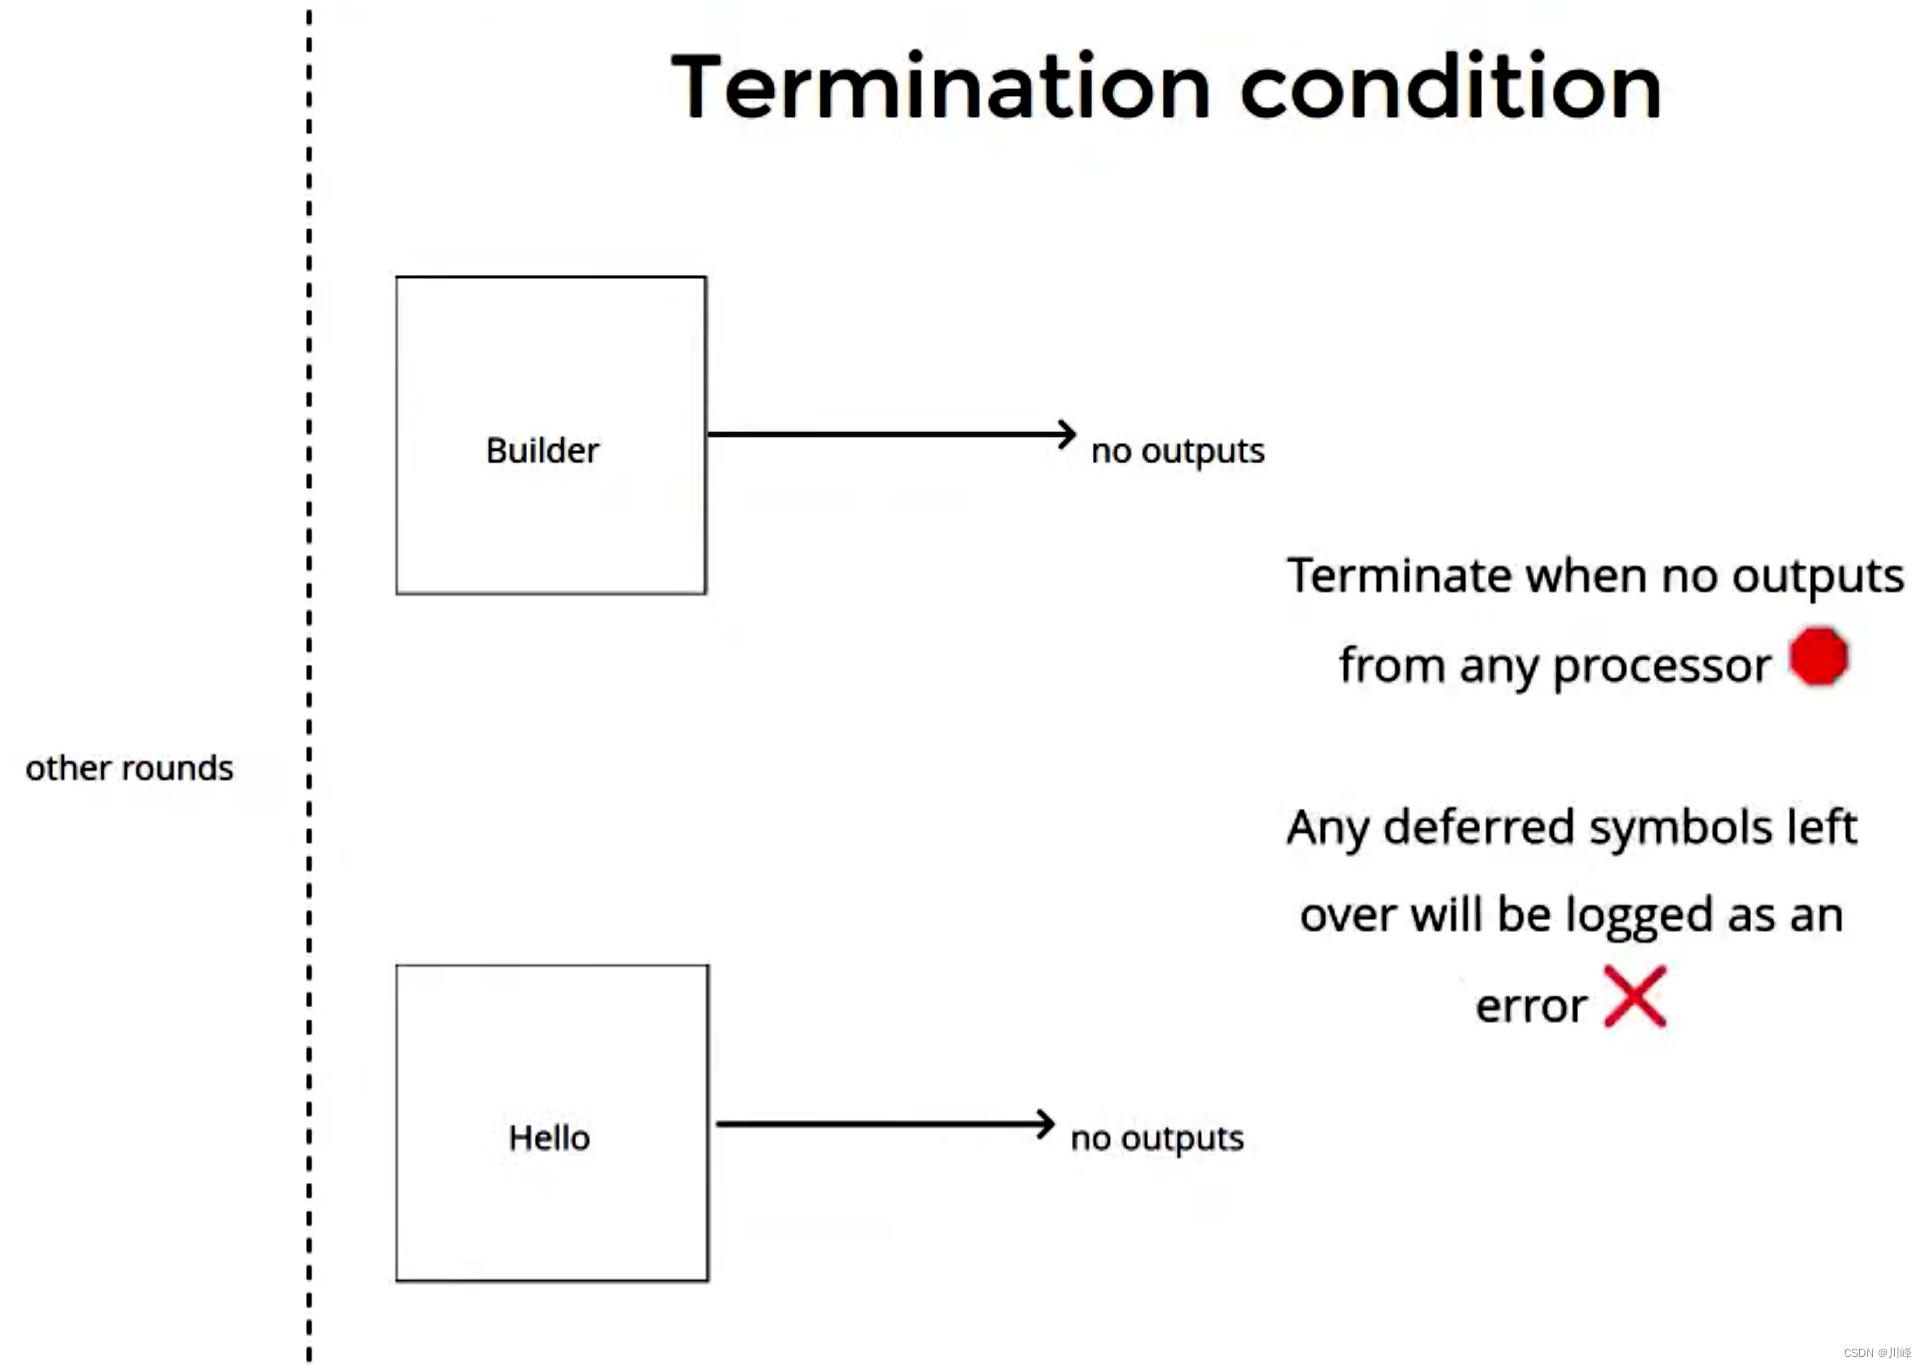
在每一轮中可以访问的文件
新生成的文件和已经存在的文件都可以通过一个 Resolver 访问。 KSP 提供 2 个 API来访问文件: Resolver.getAllFiles() 和 Resolver.getNewFiles(). getAllFiles() 返回一个组合的 List, 包含已经存在的文件和新生成的文件, 而 getNewFiles() 只返回新生成的文件。
为了避免对符号不必要的重新处理, getSymbolsAnnotatedWith() 只返回在新生成的文件中发现的符号,以及在最后一轮处理中被延迟的符号。
Processor 的实例化
一个处理器实例只创建一次, 因此你可以在处理器对象中保存信息, 供下一轮使用。
不同轮之间的信息一致性
所有的 KSP 符号都不能在不同轮之间重复使用, 因为前一轮生成的结果有可能导致解析结果发生改变。但是, 由于 KSP 不允许修改已经存在的代码, 有些信息应该还是可以重复使用的, 比如一个符号的名称字符串值。总之,处理器可以保存前一轮的信息, 但需要记住, 在后续的轮中这些信息可能会无效。
错误和异常处理
如果发生了错误 (由处理器调用 KSPLogger.error() 来定义) 或异常,处理在当前轮完毕之后会停止。所有的处理器会回调 onError() 方法,而且不会调用 finish() 方法。你可以在其中执行自己的错误处理逻辑。
在 SymbolProcessor 接口中, KSP 为 onError() 提供一个默认的无操作(no-op) 实现。你可以覆盖这个方法,提供你自己的错误处理逻辑。
注意,即使发生了错误,其他处理器还会对这一轮继续正常的处理。因此错误处理会发生在对这一轮处理完毕之后。
对于异常,KSP 会尝试区分来自 KSP 的异常和来自处理器的异常,异常会导致处理立即终止,并且会在 KSPLogger 中作为错误输出到 log。
默认的校验行为
KSP 提供的默认校验逻辑,会对被校验的符号所属的封闭范围(Enclosing Scope)之内的所有直接可到达(directly reachable)符号进行验证。默认校验会检查封闭范围中的引用是否是否可解析到一个具体的类型,但不会递归深入被引用的类型。
自定义校验逻辑
默认的校验行为可能不适用于所有情况,你可以参考 KSValidateVisitor 编写你自己的校验逻辑, 方法是提供自定义的 predicate Lambda 表达式,它会被 KSValidateVisitor 用来过滤需要被检查的符号。
在KMM 中使用 KSP
注:这部分内容可以直接参考官网:https://kotlinlang.org/docs/ksp-multiplatform.html
作为一个快速入门的示例, 可以参见 Kotlin Multiplatform 示例项目,其中定义了 KSP 处理器。
从 KSP 1.0.1 开始, 在跨平台项目中使用 KSP, 与在单一平台的 JVM 项目中类似。主要区别是, 在依赖项中不是编写 ksp(...) 配置, 而是使用 add(ksp<Target>) 或 add(ksp<SourceSet>), 指定哪个编译目标在编译之前需要符号处理.
plugins {
    kotlin("multiplatform")
    id("com.google.devtools.ksp")
}

kotlin {
    jvm {
        withJava()
    }
    linuxX64() {
        binaries {
            executable()
        }
    }
    sourceSets {
        val commonMain by getting
        val linuxX64Main by getting
        val linuxX64Test by getting
    }
}

dependencies {
    add("kspCommonMainMetadata", project(":test-processor"))
    add("kspJvm", project(":test-processor"))
    add("kspJvmTest", project(":test-processor")) // 不会进行任何处理, 因为对 JVM 平台没有测试代码
    // 对于 Linux x64 的 main 源代码集没有任何处理, 因为没有指定 kspLinuxX64
    add("kspLinuxX64Test", project(":test-processor"))
}
编译与处理
在跨平台项目中, 对每个平台 Kotlin 编译可能发生多次 (main, test, 或其他构建配置). 符号处理也是如此. 每存在一个 Kotlin 编译 task, 并且指定了对应的 ksp<Target> 或 ksp<SourceSet> 配置, 就会创建一个符号处理 task.
比如, 在上面的 build.gradle.kts 中, 有 4 个编译 task: common/metadata, JVM main, Linux x64 main, Linux x64 test, 以及 3 个符号处理 task: common/metadata, JVM main, Linux x64 test.
在 KSP 1.0.1+ 中不再使用 ksp(…) 配置
在 KSP 1.0.1 之前, 只有唯一一个, 统一的 ksp(...) 配置可以使用. 因此, 处理器要么对所有的编译目标适用, 要么不对任何编译目标适用. 注意, 即使是在传统的非跨平台项目中, ksp(...) 配置不仅适用于 main 源代码集, 如果存在 test 源代码集的话, 也会适用. 这就对构建时间带来了不必要的负担.
从 KSP 1.0.1 开始, 提供了对各个编译目标分别进行配置的功能, 如上面的示例所示. 在将来:
- 对于跨平台项目,
ksp(...)配置将被废弃, 并删除. - 对于单一平台项目,
ksp(...)配置将只适用于main, 默认编译task. 其他编译目标, 比如test, 将需要指定kspTest(...)来适用处理器.
从 KSP 1.0.1 开始, 有一个早期预览版的 flag -DallowAllTargetConfiguration=false, 可以切换到更加高效率的模式. 如果目前的模式造成了性能问题, 请试用这个 flag. 在 KSP 2.0 中, 这个 flag 的默认值将会从 true 切换到 false.
创建 Java 代码
由于 KSP 生成代码的方式是通过codeGenerator.createNewFile()创建文件输出流后,由开发者自己负责向输出流中写入内容,所以原则上可以生成任何扩展名的文件,写入任何内容。要想生成java类文件,当然也是可以的。
例如:
class TestProcessor(val codeGenerator: CodeGenerator) : SymbolProcessor {
    lateinit var file: OutputStream
    var invoked = false

    override fun process(resolver: Resolver): List<KSAnnotated> {
        if (invoked) return emptyList()
        val javaFile = codeGenerator.createNewFile(Dependencies(false), "", "Generated", "java")
        javaFile.appendText("class Generated {}")
        val fileKt = codeGenerator.createNewFile(Dependencies(false), "", "HELLO", "java")
        fileKt.appendText("public class HELLO{\n")
        fileKt.appendText("public int foo() { return 1234; }\n")
        fileKt.appendText("}")
        invoked = true
        return emptyList()
    }
}
fun OutputStream.appendText(str: String) {
    this.write(str.toByteArray())
}
这会生成到 build 目录下的 ksp下面的 java文件夹中:
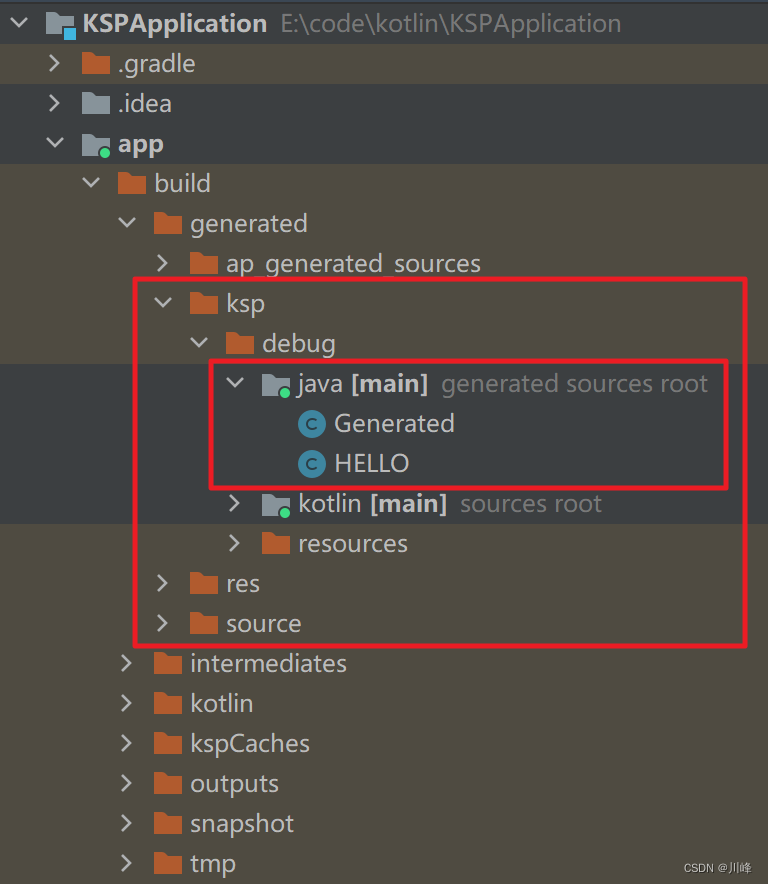
或者也可以在ksp模块中继续使用原来的 JavaPoet,在build.gradle中添加依赖:
implementation 'com.squareup:javapoet:1.13.0'
然后创建一个生产Java代码的类:
public class JavaPoetSimple {
  public static JavaFile generateJavaCode()  {
    MethodSpec main = MethodSpec.methodBuilder("main")
            .addModifiers(Modifier.PUBLIC, Modifier.STATIC)
            .returns(void.class)
            .addParameter(String[].class, "args")
            .addStatement("$T.out.println($S)", System.class, "Hello, JavaPoet!")
            .build();

    TypeSpec helloWorld = TypeSpec.classBuilder("HelloWorld")
            .addModifiers(Modifier.PUBLIC, Modifier.FINAL)
            .addMethod(main)
            .build();

    JavaFile javaFile = JavaFile.builder("com.example.helloworld", helloWorld)
            .build();

    return javaFile;
  }
}
然后在 Processor 中可以这样用:
 val javaFile = JavaPoetSimple.generateJavaCode()
 val output = codeGenerator.createNewFile(Dependencies(false), "", "HelloWorld", "java")
 val os = OutputStreamWriter(output)
 javaFile.writeTo(os)
 os.flush()
不过在 ksp 模块中这样使用有点自找麻烦了,因为 KSP 只对kotlin语言建模,它只能解析出对应的 kotlin 类型,而你无法根据 KSType 转换成java类型。除非你想根据 kotlin 代码元素上的注解生成 java 版本的代码,由于无法得到很好的类型支持,因而代码会比较死板,只能写死某些类型。
所以,还是建议使用 KSP 来生成 kotlin 代码,做它该做的事情。
参考资料:
- Kotlin Symbol Processing API
- Kotlin 元编程:从注解处理器 KAPT到符号处理器 KSP
- Codegen with KSP: A Farewell to Stubs
- KotlinPoet

