仿牛客网社区的学习笔记
- 1. 项目环境搭建
- 1.1 开发社区首页
- 2.开发社区登录模块
- 2.1 发送邮件
- 2.2 开发注册功能
- 2.3 会话管理
- 2.4 生成验证码
- 2.5 开发登录、退出功能
- 2.6 显示登录信息
- 4 Redis实现点赞关注
- 4.1 Spring整合Redis
- 访问Redis的方法:
- 4.2 Redis实现点赞
- 4.2.1 点赞
- 4.2.2 用户收到的赞
- 4.3 Redis实现关注
- 4.3.1 实现关注、取关
- 4.3.2 关注列表,粉丝列表
- 4.4 优化登录模块
- 4.4.1 使用Redis存储验证码
- 4.4.2 使用Redis存储登录凭证
- 4.4.3 使用Redis缓存用户信息
项目链接: 仿牛客网社区开发.
1. 项目环境搭建
• 构建工具:Apache Maven
• 集成开发工具:IntelliJ IDEA
• 数据库:MySQL、Redis
• 应用服务器:Apache Tomcat
• 版本控制工具:Git
Spring Boot功能:起步依赖,自动配置,断点监控。
1.1 开发社区首页
首先设计数据库表:
DROP TABLE IF EXISTS `discuss_post`;
/*!40101 SET @saved_cs_client     = @@character_set_client */;
 SET character_set_client = utf8mb4 ;
CREATE TABLE `discuss_post` (
  `id` int(11) NOT NULL AUTO_INCREMENT,
  `user_id` varchar(45) DEFAULT NULL,
  `title` varchar(100) DEFAULT NULL,
  `content` text,
  `type` int(11) DEFAULT NULL COMMENT '0-普通; 1-置顶;',
  `status` int(11) DEFAULT NULL COMMENT '0-正常; 1-精华; 2-拉黑;',
  `create_time` timestamp NULL DEFAULT NULL,
  `comment_count` int(11) DEFAULT NULL,
  `score` double DEFAULT NULL,
  PRIMARY KEY (`id`),
  KEY `index_user_id` (`user_id`)
) ENGINE=InnoDB DEFAULT CHARSET=utf8;
然后创建实体类和表结构对应,并产生getter和setter方法,toString方法。
@Document(indexName = "discusspost",type = "_doc",shards = 6,replicas = 3)
public class DiscussPost {

    @Id
    private int id;

    @Field(type = FieldType.Integer)
    private int userId;

    @Field(type = FieldType.Text,analyzer = "ik_max_work",searchAnalyzer = "ik_smart")
    private String title;

    @Field(type = FieldType.Text,analyzer = "ik_max_work",searchAnalyzer = "ik_smart")
    private String content;

    @Field(type = FieldType.Integer)
    private int type;

    @Field(type = FieldType.Integer)
    private int status;

    @Field(type = FieldType.Date)
    private Date createTime;

    @Field(type = FieldType.Integer)
    private int commentCount;

    @Field(type = FieldType.Double)
    private double score;

}
一次请求,服务器响应后显示前十个帖子,并开发分页组件,实现跳转不同分页显示不同帖子。当浏览器访问根目录后,会进行forward转发到/index,然后查询贴子,用户信息,通过model携带,再交给index.html页面进行显示。
    @RequestMapping(path = "/", method = RequestMethod.GET)
    public String root(){
        return "forward:/index";
    }
    @RequestMapping(path = "/index", method = RequestMethod.GET)
    public String getIndexPage(Model model, Page page,@RequestParam(name = "orderMode",defaultValue = "0") int orderMode){
        //方法调用之前,springmvc自动实例化Page,且注入给Model,thymeleaf可以直接访问Page
        page.setRows(discussPostService.findDiscussPostRows(0));
        page.setPath("/index?orderMode=" + orderMode);
        List<DiscussPost> list = discussPostService.findDiscussPost(0, page.getOffset(), page.getLimit(),orderMode);
        List<Map<String,Object>> discussPosts = new ArrayList<>();
        if(list!=null){
            for (DiscussPost post : list) {
                Map<String,Object> map = new HashMap<>();
                map.put("post",post);
                User user = userService.findUserById(post.getUserId());
                map.put("user",user);
                long likeCount = likeService.findEntityLikeCount(ENTITY_TYPE_POST,post.getId());
                map.put("likeCount",likeCount);
                discussPosts.add(map);
            }
        }
        model.addAttribute("discussPosts",discussPosts);
        model.addAttribute("orderMode",orderMode);
        return "index";
    }

首页效果展示:

2.开发社区登录模块
2.1 发送邮件
- 邮箱设置
以新浪邮箱为例,开启SMTP服务。

- Spring Email
导入jar包
<dependency>
    <groupId>org.springframework.boot</groupId>
    <artifactId>spring-boot-starter-mail</artifactId>
    <version>2.6.2</version>
</dependency>
邮箱参数配置,添加在配置文件中,与程序解耦
注意现在新浪邮箱改版了,密码需要输入授权码,在上图中点击开启授权码即可
spring.mail.host=smtp.sina.com
spring.mail.port=465
spring.mail.username=你的邮箱
spring.mail.password=你的密码
spring.mail.protocol=smtps
spring.mail.properties.mail.smtp.ssl.enable=true

使用JavaMailSender发送邮件
@Component
public class MailClient {

    private static final Logger logger = LoggerFactory.getLogger(MailClient.class);

    @Autowired
    private JavaMailSender mailSender;

    @Value("${spring.mail.username}")
    private String from;

    public void sendMail(String to, String subject,String content) {
        try {
            MimeMessage message = mailSender.createMimeMessage();
            MimeMessageHelper helper = new MimeMessageHelper(message);
            helper.setFrom(from);
            helper.setTo(to);
            helper.setSubject(subject);
            helper.setText(content,true);
            mailSender.send(helper.getMimeMessage());
        } catch (MessagingException e) {
            logger.error("发送邮件失败"+e.getMessage());
        }
    }
}
- 模板引擎
利用Thymeleaf模板引擎发送HTML邮件,注入模板引擎TemplateEngine,利用setVriable设置要传给模板引擎的参数,process指定html文件放在哪里,最后sendMail。
@Autowired
private TemplateEngine templateEngine;

@Test
public void testHtmlMail(){
    Context context = new Context();
    context.setVariable("username","monday");
    String content = templateEngine.process("/mail/demo", context);
    System.out.println(content);
    mailClient.sendMail("***@sina.com","HTML",content);
}
2.2 开发注册功能
- 访问注册页面
@RequestMapping(path = "/register", method = RequestMethod.GET)
public String getRegisterPage(){
    return "/site/register";
}

- 提交注册数据
先导入commons lang包,有些和字符串判断的工具类后面会经常用到
<dependency>
    <groupId>org.apache.commons</groupId>
    <artifactId>commons-lang3</artifactId>
    <version>3.12.0</version>
</dependency>
把域名配置好,因为邮件的链接中需要用到,以及上传文件的位置也可以配置好
community.path.domain=http://localhost:8080
community.path.upload=e:/data/upload
service层代码如下,需要判断账号密码是否为空,账号邮箱是否已存在,也可以加上对密码形式的限制。如果格式合格,再把用户数据写到数据库中,并发送一封激活邮件到用户邮箱中,用户点击邮箱中的激活链接就能激活并正常使用账号了。
    public Map<String ,Object> register(User user){
        Map<String ,Object> map = new HashMap<>();
        //空值处理
        if(user==null){
            throw new IllegalArgumentException("参数不能为空!");
        }
        if(StringUtils.isBlank(user.getUserName())){
            map.put("usernameMsg","账号不能为空!");
            return map;
        }
        if(StringUtils.isBlank(user.getPassword())){
            map.put("passwordMsg","密码不能为空!");
            return map;
        }
        if(StringUtils.isBlank(user.getEmail())){
            map.put("emailMsg","邮箱不能为空!");
            return map;
        }
        //验证是否可以注册
        User u = userMapper.selectByName(user.getUserName());
        if(u!=null){
            map.put("usernameMsg","该账号已存在!");
            return map;
        }
        u = userMapper.selectByEmail(user.getEmail());
        if(u!=null){
            map.put("emailMsg","该邮箱已被注册!");
            return map;
        }
        //注册用户
        user.setSalt(CommunityUtil.generateUUID().substring(0,5));
        user.setPassword(CommunityUtil.md5(user.getPassword()+user.getSalt()));
        user.setType(0);
        user.setStatus(0);
        user.setActivationCode(CommunityUtil.generateUUID());
        user.setHeaderUrl(String.format("http://images.nowcoder.com/head/%dt.png",new Random().nextInt(1000)));
        user.setCreateTime(new Date());
        //添加到数据库
        userMapper.insertUser(user);
        //发邮件
        Context context = new Context();
        context.setVariable("email",user.getEmail());
        String url = domain + contextPath + "/activation/" + user.getId() +"/" + user.getActivationCode();
        context.setVariable("url",url);
        String content = templateEngine.process("/mail/activation",context);
        mailClient.sendMail(user.getEmail(),"激活账号",content);
        return map;
    }
controller层代码如下,如果service传过来的map不空则用model携带错误信息,并重定向到注册页面,如果map为空,用model携带注册成功信息,重定向到操作结果页面,几秒后跳转,提示用户激活邮件。
    @RequestMapping(path = "/register", method = RequestMethod.POST)
    public String register(Model model, User user){
        Map<String, Object> map = userService.register(user);
        if(map==null||map.isEmpty()){
            model.addAttribute("msg","注册成功,我们已经向您的邮箱发送了一封激活邮件,请尽快激活!");
            model.addAttribute("target","/index");
            return "/site/operate-result";
        }
        else{
            model.addAttribute("usernameMsg",map.get("usernameMsg"));
            model.addAttribute("passwordMsg",map.get("passwordMsg"));
            model.addAttribute("emailMsg",map.get("emailMsg"));
            return "/site/register";
        }
    }
- 激活注册账号
用户点击激活链接后访问服务器,服务器取到路径中的激活码和用户ID,和数据库中进行对比,如果对比成功则激活成功。
在接口CommunityConst中定义一些常量,表示激活的状态:
    int ACTIVATION_SUCCESS = 0;

    int ACTIVATION_REPEAT = 1;

    int ACTIVATION_FAIL = 2;
service层代码如下,利用controller传过来的用户ID和激活码在数据库中查询是否存在,如果查询不到,则激活失败,如果查询到了,再根据激活状态status判断是否重复激活或者是激活成功,将激活状态返回到controller。
    public int activation(int userId, String code){
        User user = userMapper.selectById(userId);
        if(user.getStatus()==1){
            return ACTIVATION_REPEAT;
        }
        else if(user.getActivationCode().equals(code)){
            userMapper.updateStatus(userId,1);
            //数据更新,清除缓存
            clearCache(userId);
            return ACTIVATION_SUCCESS;
        }
        else{
            return ACTIVATION_FAIL;
        }
    }
controller层代码如下,利用PathVariable注解获得路径中的参数,然后根据service层传过来的结果判断是哪种情况,并利用model携带相关信息,重定向到操作结果页面。
    @RequestMapping(path = "/activation/{userId}/{code}", method = RequestMethod.GET)
    public String activation(Model model, @PathVariable("userId") int userId,@PathVariable("code") String code){
        int result = userService.activation(userId, code);
        if(result==ACTIVATION_SUCCESS){
            model.addAttribute("msg","激活成功,您的账号已经可以正常使用了!");
            model.addAttribute("target","/login");
        }
        else if(result==ACTIVATION_REPEAT){
            model.addAttribute("msg","无效操作,该账号已经激活过!");
            model.addAttribute("target","/index");
        }
        else{
            model.addAttribute("msg","激活失败,您提供的激活码不正确");
            model.addAttribute("target","/index");
        }
        return "/site/operate-result";
激活效果如下:

2.3 会话管理
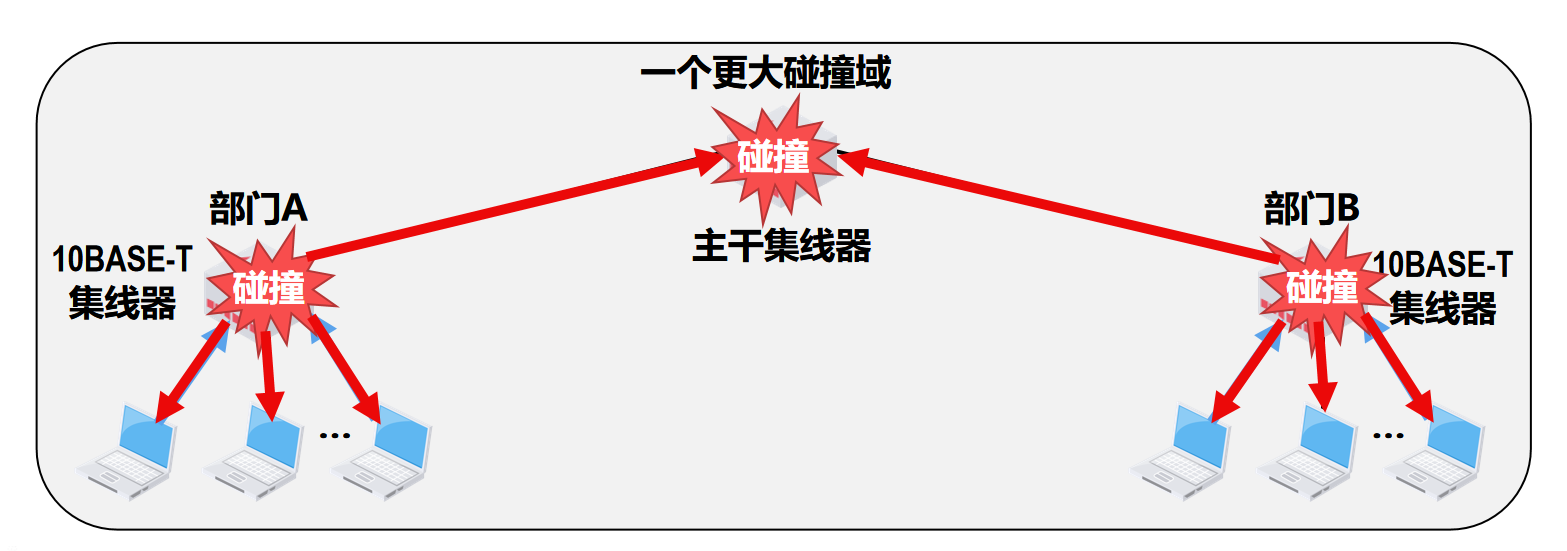
为什么需要使用会话管理呢?因为HTTP协议是无状态的,有会话的,如果不同请求之间有联系,我们可以通过会话技术使得用户感觉不同请求之间是有记忆性的。常用会话技术有Cookie和Session,Cookie是保存在用户浏览器缓存中的,可以设置过期时间,每次浏览器访问服务器都会把Cookie携带过来;Session是保存在服务器内存中的,一般重要的消息防止黑客通过用户浏览器盗取,会放在Session中,但过多的Session也会增大服务器的压力,注意Session的实现依赖于Cookie,需要携带一个SessionId才能获取相应的Session。
面试题:分布式部署时使用Session会有什么问题?怎么解决?
分布式部署,不同服务器之间存的Session不同,下次某个浏览器访问的服务器可能不存在需要的Session
1、可以同步Session,但是每一个服务器都保存一份一样的Session则浪费内存资源,影响性能,并且服务器之间会产生耦合,并不是独立的
2、可以设置粘性Session,只要是相同IP,就分给同一个服务器处理,但这样缺点就是负载不能均衡,不能有效利用分布式部署的优点。
3、可以考虑单独设置一台服务器管理Session,其他服务器需要查询Session时访问这个服务器,但是万一这个服务器挂了,也是一个瓶颈,如果也使用集群,其实和之前没什么区别了
4、更通用的解决方法是,能存到Cookie就存到Cookie中,如果不能存到Cookie就存到数据库中,数据库是可以做集群的,技术也比较成熟,但是传统数据库依靠硬盘存储数据,读取比较慢,可以考虑会话数据存到非关系型数据库中,比如Redis
2.4 生成验证码
- 导入jar包
<dependency>
    <groupId>com.github.penggle</groupId>
    <artifactId>kaptcha</artifactId>
    <version>2.3.2</version>
</dependency>
- 编写Kaptcha配置类
@Configuration
public class KaptchaConfig {

    @Bean
    public Producer kaptchaProducer(){
        Properties properties = new Properties();
        properties.setProperty("kaptcha.image.width","100");
        properties.setProperty("kaptcha.image.height","40");
        properties.setProperty("kaptcha.textproducer.font.size","32");
        properties.setProperty("kaptcha.textproducer.font.color","0,0,0");
        properties.setProperty("kaptcha.textproducer.char.string","0123456789ABCDEFGHIJKLNOPQRSTUVWXYZ");
        properties.setProperty("kaptcha.textproducer.char.length","4");
        properties.setProperty("kaptcha.noise.impl","com.google.code.kaptcha.impl.NoNoise");
        DefaultKaptcha kaptcha = new DefaultKaptcha();
        Config config = new Config(properties);
        kaptcha.setConfig(config);
        return kaptcha;
    }
}
- 生成随机字符、生成随机图片
先用刚刚配置好的kaptchaProducer产生随机字符串,并根据字符串产生图片,这里还没有用到Redis,先把字符串存到Session中,由于这时候用户还没有登录,不能根据用户ID等信息去鉴别是哪个用户,这个时候可以生成随机字符串当作临时凭证,存在Cookie中,设置最大过期时间60s,下次再访问服务器就能携带过来登录凭证。获得response的输出流,把图片输到输出流中,而且不用我们手动关闭资源,Spring会自动关闭response的输出流。
    @RequestMapping(path = "/kaptcha", method = RequestMethod.GET)
    public void getKaptcha(HttpServletResponse response/*, HttpSession session*/){
        String text = kaptchaProducer.createText();
        BufferedImage image = kaptchaProducer.createImage(text);
        session.setAttribute("kaptcha",text);
        //验证码的归属
        String kaptchaOwner = CommunityUtil.generateUUID();
        Cookie cookie = new Cookie("kaptchaOwner",kaptchaOwner);
        cookie.setMaxAge(60);
        cookie.setPath(contextPath);
        response.addCookie(cookie);
        response.setContentType("image/png");
        try {
            OutputStream os = response.getOutputStream();
            ImageIO.write(image,"png",os);
        } catch (IOException e) {
            logger.error("响应验证码失败" + e.getMessage());
        }

    }
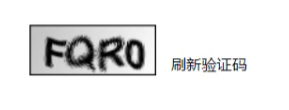
验证码图片效果如下:
2.5 开发登录、退出功能
- 登录
浏览器发送用户名,密码,验证码到服务器,服务器判断是否都符合,如果符合则生成登陆凭证,下次根据登陆凭证就能自动登录,而不用重复登录,如果不符合,则跳转回登陆页面。数据库中的表login_ticket和LoginTicket对应。ticket是登陆凭证,status是登陆状态,expired是登录过期时间。

dao层的接口代码如下,这里演示用注解方式写sql语句,实现的函数有插入登录登陆凭证,查询登录凭证,更新登录凭证,这里的登录凭证是指包含的login_ticket全部字段。注意动态sql要放在script标签内。
@Mapper
public interface LoginTicketMapper {
    @Insert({
            "insert into login_ticket (user_id,ticket,status,expired) ",
            "values(#{userId},#{ticket},#{status},#{expired})"
    })
    @Options(useGeneratedKeys = true,keyProperty = "id")
    int insertLoginTicket(LoginTicket loginTicket);
    //以ticket为条件
    @Select({
            "select id,user_id,ticket,status,expired from login_ticket ",
            "where ticket = #{ticket}"
    })
    LoginTicket selectByTicket(String ticket);
    //演示注解中写动态sql,前后要有script标签
    @Update({
            "<script>",
            "update login_ticket set status = #{status} where ticket = #{ticket} ",
            "<if test=\"ticket!=null\">",
            "and 1=1",
            "</if>",
            "</script>"
    })
    int updateStatus(String ticket, int status);
}
service层的代码如下,首先判断账号密码是否为空,账号是否激活,是否存在,密码是否正确,都通过后再生成登陆凭证,并存到数据库中,并在map中携带登陆凭证返回给controlller。
    public Map<String ,Object> login(String userName, String password, long expiredSeconds){
        Map<String ,Object> map = new HashMap<>();
        if(StringUtils.isBlank(userName)){
            map.put("usernameMsg","账号不能为空!");
            return map;
        }
        if(StringUtils.isBlank(password)){
            map.put("passwordMsg","密码不能为空");
            return map;
        }
        //验证账号
        User user = userMapper.selectByName(userName);
        if(user==null){
            map.put("usernameMsg","该账号不存在!");
            return map;
        }
        if(user.getStatus()==0){
            map.put("usernameMsg","该账号未激活!");
            return map;
        }
        password = CommunityUtil.md5(password + user.getSalt());
        if(!password.equals(user.getPassword())){
            map.put("passwordMsg","密码不正确!");
            return map;
        }
        //生成登录凭证
        LoginTicket loginTicket = new LoginTicket();
        loginTicket.setUserId(user.getId());
        loginTicket.setTicket(CommunityUtil.generateUUID());
        loginTicket.setStatus(0);
        loginTicket.setExpired(new Date(System.currentTimeMillis() + expiredSeconds * 1000));
        loginTicketMapper.insertLoginTicket(loginTicket);

        map.put("ticket",loginTicket.getTicket());
        return map;
    }
controller层代码如下,kan1验证码是否正确,根据用户是否勾选记住我来设置过期时间,如果map中有ticket,将ticket存入Cookie中。失败时携带错误信息,跳转到登陆页面。
    @RequestMapping(path = "/login", method = RequestMethod.POST)
    public String login(String userName, String password, String code, boolean rememberMe,
                        Model model, HttpSession session, HttpServletResponse response,
                        @CookieValue("kaptchaOwner") String kaptchaOwner){
        String kaptcha = (String) session.getAttribute("kaptcha");
        if(StringUtils.isBlank(kaptcha)||StringUtils.isBlank(code)||!kaptcha.equalsIgnoreCase(code)){
            model.addAttribute("codeMsg","验证码不正确");
            return "/site/login";
        }
        int expiredSeconds = rememberMe?REMEMBER_EXPIRED_SECOND:DEFAULT_EXPIRED_SECOND;
        Map<String, Object> map = userService.login(userName, password, expiredSeconds);
        if(map.containsKey("ticket")){
            Cookie cookie = new Cookie("ticket",map.get("ticket").toString());
            cookie.setPath(contextPath);
            cookie.setMaxAge(expiredSeconds);
            response.addCookie(cookie);
            return "redirect:/index";
        }
        else{
            model.addAttribute("usernameMsg",map.get("usernameMsg"));
            model.addAttribute("passwordMsg",map.get("passwordMsg"));
            return "/site/login";
        }

    }
- 退出
将登陆状态改为失效状态,跳转回网站首页
service层的代码如下,更新登陆凭证的状态,
    public void logout(String ticket){
        loginTicketMapper.updateStatus(ticket,1);
        redisTemplate.opsForValue().set(redisKey,loginTicket);
    }
controller层代码如下,利用注解CookieValue获得键为ticket的Cookie,使用业务层的登出方法,重定向到登陆页面。
    @RequestMapping(path = "/logout",method = RequestMethod.GET)
    public String logout(@CookieValue("ticket") String ticket){
        userService.logout(ticket);
        SecurityContextHolder.clearContext();
        return "redirect:/login";
    }
2.6 显示登录信息
- 拦截器
4 Redis实现点赞关注
Redis是一款基于键值对的NoSQL数据库,它的值支持多种数据结构:字符串(strings)、哈希(hashes)、列表(lists)、集合(sets)、有序集合(sorted sets)等。Redis将所有的数据都存放在内存中,所以它的读写性能十分惊人。同时,Redis还可以将内存中的数据以快照或日志的形式保存到硬盘上,以保证数据的安全性。Redis典型的应用场景包括:缓存、排行榜、计数器、社交网络、消息队列等。
4.1 Spring整合Redis
引入依赖,version可以不写,因为继承的父pom会声明好版本。
<dependency>
	<groupId>org.springframework.boot</groupId>
	<artifactId>spring-boot-starter-data-redis</artifactId>
</dependency>
配置Redis
配置数据库参数,在Application.properties配置
从图中可以看到Spring Boot配置的为RedisAutoConfiguration,配置的是RedisProperties类,因此我们也配置RedisProperties。

配置含义:Redis默认数据库有16个,选择第11个使用,端口为6379,默认为此端口。
# RedisProperties
spring.redis.database=11
spring.redis.host=localhost
spring.redis.port=6379
编写配置类,构造RedisTemplate
Spring Boot已经配好了RedisTemplate,但是Key是Object类型,虽然更通用,但是我们用String作为Key,因此重新配置一下。首先加上注解@Configuration,让Spring知道这是一个配置类,然后重写@Bean的RedisTemplate,Key是String,Value是Object。形参需要Spring注入连接工厂RedisConnectionFactory,这里使用了工厂模式。当定义Bean时,声明形参,Spring会将它注入进来。实例化RedisTemplate,将工厂给template,具有访问数据库的能力。然后指定数据的序列化方式,依次指定Key和Value序列化方式,而Hash比较特殊,它的值又包含Key和Value,因此要设置Hash的Value的Key和Value。设置后afterPropertiesSet触发生效,并将template返回。
@Configuration
public class RedisConfig {

    @Bean
    public RedisTemplate<String,Object> redisTemplate(RedisConnectionFactory factory){
        RedisTemplate<String ,Object> template = new RedisTemplate<>();
        template.setConnectionFactory(factory);
    //    设置key的序列化方式
        template.setKeySerializer(RedisSerializer.string());
    //    设置value的序列化方式
        template.setValueSerializer(RedisSerializer.json());
    //    设置hash的key的序列化方式
        template.setHashKeySerializer(RedisSerializer.string());
    //    设置hash的value的序列化方式
        template.setHashValueSerializer(RedisSerializer.json());
        //生效
        template.afterPropertiesSet();
        return template;
    }
}
访问Redis的方法:
- redisTemplate.opsForValue()
- redisTemplate.opsForHash()
- redisTemplate.opsForList()
- redisTemplate.opsForSet()
- redisTemplate.opsForZSet()
4.2 Redis实现点赞
点赞需要实现的功能:对评论,帖子都可以点赞,第一次点赞,第二次会取消点赞。首页统计点赞数量,每个帖子详情页也要统计点赞数量和用户点赞状态。
4.2.1 点赞
首先对于频繁获取Key,我们可以考虑写一个工具类RedisKeyUtil将这个功能进行提取:
public class RedisKeyUtil {

    private static final String SPLIT = ":";
    private static final String PREFIX_ENTITY_LIKE = "like:entity";
//    生成某个实体的赞
//    like:entity:entityType:entityId -> set 看谁赞了,set里装userId
    public static String getEntityLikeKey(int entityType, int entityId){
        return PREFIX_ENTITY_LIKE + SPLIT + entityType + SPLIT + entityId;
    }
}
编写业务层LikeService,将RedisTemplate注入,like方法形参传进来用户ID,实体类型是帖子或者评论,以及实体ID,这里考虑了事务。不考虑事务的话,先通过isMember判断键值对是否在Redis中存在,如果存在则remove,不存在则add。
findEntityLikeCount方法统计点赞数量,findEntityLikeStatus统计点赞状态。
@Service
public class LikeService {

    @Autowired
    private RedisTemplate redisTemplate;

    public void like(int userId,int entityType, int entityId){
        String entityLikeKey = RedisKeyUtil.getEntityLikeKey(entityType,entityId);
        boolean isMember = operations.opsForSet().isMember(entityLikeKey,userId);
        if (isMember){
            redisTemplate.opsForSet().remove(entityLikeKey,userId);
        }
        else{
            redisTemplate.opsForSet().add(entityLikeKey,userId);
        }
    }

    public long findEntityLikeCount(int entityType, int entityId){
        String entityLikeKey = RedisKeyUtil.getEntityLikeKey(entityType,entityId);
        return redisTemplate.opsForSet().size(entityLikeKey);
    }
    public int findEntityLikeStatus(int userId,int entityType,int entityId){
        String entityLikeKey = RedisKeyUtil.getEntityLikeKey(entityType,entityId);
        return redisTemplate.opsForSet().isMember(entityLikeKey,userId)?1:0;
    }
}
编写表现层LikeController,使用HostHolder获得当前用户,从而获得用户ID,调用业务层的like方法点赞,并统计实体的点赞数量,用户对实体的点赞状态,将这两个信息装到map中。最后返回JSON格式的数据,状态码为0,带上map。
@Controller
public class LikeController implements CommunityConstant {

    @Autowired
    private LikeService likeService;

    @Autowired
    private HostHolder hostHolder;

    @Autowired
    private RedisTemplate redisTemplate;

    @RequestMapping(path = "/like",method = RequestMethod.POST)
    @ResponseBody
    public String like(int entityType, int entityId,int entityUserId,int postId){
        User user = hostHolder.getUser();
        likeService.like(user.getId(),entityType,entityId,entityUserId);
        long likeCount = likeService.findEntityLikeCount(entityType, entityId);
        int likeStatus = likeService.findEntityLikeStatus(user.getId(), entityType, entityId);
        Map<String ,Object> map = new HashMap<>();
        map.put("likeCount",likeCount);
        map.put("likeStatus",likeStatus);
        return CommunityUtil.getJSONString(0,null,map);
    }
}
在discuss-detail.html修改点赞,使用AJAX异步请求,绑定onclick,一旦点击使用javascript方法like进行点赞。发送post请求提交数据,访问路径为CONTEXT_PATH加上/like,携带上JSON数据,定义响应函数,把返回的数据解析成JSON字符串,如果状态码为0,则正常返回,将赞状态进行修改,并修改点赞数量。如果状态码不是0,弹出携带的错误信息。
function like(btn,entityType,entityId,entityUserId,postId){
    $.post(
        CONTEXT_PATH + "/like",
        {"entityType":entityType,"entityId":entityId,"entityUserId":entityUserId,"postId":postId},
        function (data){
            data = $.parseJSON(data);
            if(data.code==0){
                $(btn).children("b").text(data.likeStatus==1?"已赞":"赞");
                $(btn).children("i").text(data.likeCount);
            }
            else{
                alert(data.msg);
            }
        }
    );
}
此时还存在问题,主页刚打开时并未点赞,点赞数量没有及时更新,因此我们需要在HomeController里加上统计点赞数的功能。
long likeCount = likeService.findEntityLikeCount(ENTITY_TYPE_POST,post.getId());
map.put("likeCount",likeCount);
帖子详情页面刚打开时也需要统计点赞数,因此在DiscussPostController加上功能,注意这里复杂一些,首先需要统计帖子点赞数和点赞状态,然后在评论区和回复区也要统计点赞数和点赞状态。最后修改html页面。
效果展示:

4.2.2 用户收到的赞
这时候需要重构点赞功能,在点赞时使用incement,取消赞时使用decrement。这样虽然数据有一些冗余(因此通过用户id也能查处总赞数),但是换来查询用户赞数的时间大大缩短。
添加Key和获取Key的方法
private static final String PREFIX_USER_LIKE = "like:user";
//    某一个用户的赞
//    like:user:userId -> int
    public static String getUserLikeKey(int userId){
        return PREFIX_USER_LIKE + SPLIT + userId;
    }
需要对like方法进行修改,使用编程式事务,修改后如下,增加查询用户赞数方法findUserLikeCount:
//重构,因为要执行两次操作,因此要使用编程式事务
public void like(int userId,int entityType, int entityId,int entityUserId){
    redisTemplate.execute(new SessionCallback() {
        @Override
        public Object execute(RedisOperations operations) throws DataAccessException {
            String entityLikeKey = RedisKeyUtil.getEntityLikeKey(entityType,entityId);
            String userLikeKey = RedisKeyUtil.getUserLikeKey(entityUserId);
            boolean isMember = operations.opsForSet().isMember(entityLikeKey,userId);
            operations.multi();
            if (isMember){
                operations.opsForSet().remove(entityLikeKey,userId);
                operations.opsForValue().decrement(userLikeKey);
            }
            else{
                operations.opsForSet().add(entityLikeKey,userId);
                operations.opsForValue().increment(userLikeKey);
            }
            return operations.exec();
        }
    });
}

//查询某个用户获得的赞数
public int findUserLikeCount(int userId){
    String userLikeKey = RedisKeyUtil.getUserLikeKey(userId);
    Integer userLikeCount = (Integer) redisTemplate.opsForValue().get(userLikeKey);
    return userLikeCount==null?0:userLikeCount.intValue();
}
接下来重构表现层LikeController,增加entityUserId,like方法增加进去即可。
likeService.like(user.getId(),entityType,entityId,entityUserId);
修改html页面。
在UserController中,追加更新赞数,并且用户主页自己可以访问,其他用户也能访问。需要页面传过来用户ID。使用@PathVariable注解,将yonghuID解析。查出用户,如果没有则抛出异常,如果有则在model中携带用户和查询的点赞数。返回到profile.html,进行修改动态显示数据。
@RequestMapping(path = "/profile/{userId}",method = RequestMethod.GET)
public String getProfilePage(@PathVariable("userId") int userId, Model model){
    User user = userService.findUserById(userId);
    if (user==null){
        throw new RuntimeException("该用户不存在!");
    }
    model.addAttribute("user",user);
    int likeCount = likeService.findUserLikeCount(userId);
    model.addAttribute("likeCount",likeCount);
    return "/site/profile";
}

4.3 Redis实现关注
4.3.1 实现关注、取关
开发关注功能,需要关注,取消关注,统计用户关注了几个人,被几个人关注。这里粉丝用Follower,被关注者用Followee。被关注的目标可以是用户,帖子,题目等,这些都叫做实体entity,通过entityType来区分具体哪个实体。1是帖子,2是评论,3是用户。
在RedisKeyUtil添加的常量和方法,第一个方法某用户关注的实体,Key包含关注者ID,关注的类型,而后面加的Value是具体关注的实体ID,第二个方法是实体的关注数,Key包含实体类型,实体ID,Value为关注数。使用Zset能进行排序,根据时间排序,使用now。
    private static final String PREFIX_FOLLOWER = "follower";
    private static final String PREFIX_FOLLOWEE = "followee";

//    某个用户关注的实体
//    followee:userId:entityType -> zset有序集合(entityId,now)
    public static String getFolloweeKey(int userId,int entityType){
        return PREFIX_FOLLOWEE + SPLIT + userId + SPLIT + entityType;
    }

//    某个用户拥有的粉丝
//    follower:entityType:entityId -> zset(userId,now)
    public static String getFollowerKey(int entityType, int entityId){
        return PREFIX_FOLLOWER + SPLIT + entityType + SPLIT + entityId;
    }
编写业务层FollowService,使用编程式事务,分别构造两个Key,进行两次添加。包含关注和取关两个功能。
@Service
public class FollowService implements CommunityConstant {

    @Autowired
    private RedisTemplate redisTemplate;

    @Autowired
    private UserService userService;

    //关注
    public void follow(int userId, int entityType, int entityId) {
        redisTemplate.execute(new SessionCallback() {
            @Override
            public Object execute(RedisOperations operations) throws DataAccessException {
                String followeeKey = RedisKeyUtil.getFolloweeKey(userId, entityType);
                String followerKey = RedisKeyUtil.getFollowerKey(entityType, entityId);
                operations.multi();
                operations.opsForZSet().add(followeeKey, entityId, System.currentTimeMillis());
                operations.opsForZSet().add(followerKey, userId, System.currentTimeMillis());
                return operations.exec();
            }
        });
    }
    //取关
    public void unfollow(int userId, int entityType, int entityId) {
        redisTemplate.execute(new SessionCallback() {
            @Override
            public Object execute(RedisOperations operations) throws DataAccessException {
                String followeeKey = RedisKeyUtil.getFolloweeKey(userId, entityType);
                String followerKey = RedisKeyUtil.getFollowerKey(entityType, entityId);
                operations.multi();
                operations.opsForZSet().remove(followeeKey, entityId);
                operations.opsForZSet().remove(followerKey, userId);
                return operations.exec();
            }
        });
    }
}
编写表现层FollowController,
@Controller
public class FollowController implements CommunityConstant{

    @Autowired
    private FollowService followService;

    @Autowired
    private HostHolder hostHolder;

    @Autowired
    private UserService userService;

    @Autowired
    private EventProducer eventProducer;

    @RequestMapping(path = "/follow",method = RequestMethod.POST)
    @ResponseBody
    public String  follow(int entityType, int entityId){
        User user = hostHolder.getUser();
        followService.follow(user.getId(),entityType,entityId);
        return CommunityUtil.getJSONString(0,"关注成功!");
    }

    @RequestMapping(path = "/unfollow",method = RequestMethod.POST)
    @ResponseBody
    public String  unfollow(int entityType, int entityId){
        User user = hostHolder.getUser();
        followService.unfollow(user.getId(),entityType,entityId);
        return CommunityUtil.getJSONString(0,"取消关注成功!");
    }
接下来修改页面,有许多地方都要求有关注功能,比如用户主页可以被其他用户关注,帖子详情页可以被关注等,需要一一修改。
function follow() {
	var btn = this;
	if($(btn).hasClass("btn-info")) {
		// 关注TA
		$.post(
			CONTEXT_PATH + "/follow",
			{"entityType":3,"entityId":$(btn).prev().val()},
			function (data){
				data = $.parseJSON(data);
				if(data.code==0){
					window.location.reload();
				}
				else{
					alert(data.msg);
				}
			}
		);
		// $(btn).text("已关注").removeClass("btn-info").addClass("btn-secondary");
	} else {
		$.post(
			CONTEXT_PATH + "/unfollow",
			{"entityType":3,"entityId":$(btn).prev().val()},
			function (data){
				data = $.parseJSON(data);
				if(data.code==0){
					window.location.reload();
				}
				else{
					alert(data.msg);
				}
			}
		);
		// 取消关注
		// $(btn).text("关注TA").removeClass("btn-secondary").addClass("btn-info");
	}
}
然后实现查询关注数量,被关注数量,编写FollowService,这里统计zset数量使用zCard方法。
    //    查询关注的实体的数量
    public long findFolloweeCount(int userId, int entityType) {
        String followeeKey = RedisKeyUtil.getFolloweeKey(userId, entityType);
        return redisTemplate.opsForZSet().zCard(followeeKey);
    }
    //查询粉丝数
    public long findFollowerCount(int entityType, int entityId) {
        String followerKey = RedisKeyUtil.getFollowerKey(entityType, entityId);
        return redisTemplate.opsForZSet().zCard(followerKey);
    }
        //    查询当前用户是否已关注该实体
    public boolean hasFollowed(int userId, int entityType, int entityId) {
        String followeeKey = RedisKeyUtil.getFolloweeKey(userId, entityType);
        return redisTemplate.opsForZSet().score(followeeKey, entityId) != null;
    }
修改UserController,这里传进来的userId是指被关注者的ID。
    //个人主页,自己访问自己的或者访问别人的
    @RequestMapping(path = "/profile/{userId}",method = RequestMethod.GET)
    public String getProfilePage(@PathVariable("userId") int userId, Model model){
        User user = userService.findUserById(userId);
        if (user==null){
            throw new RuntimeException("该用户不存在!");
        }
        model.addAttribute("user",user);
        int likeCount = likeService.findUserLikeCount(userId);
        model.addAttribute("likeCount",likeCount);
        //关注数量
        long followeeCount = followService.findFolloweeCount(userId, ENTITY_TYPE_USER);
        model.addAttribute("followeeCount",followeeCount);
        //粉丝数量
        long followerCount = followService.findFollowerCount(ENTITY_TYPE_USER, userId);
        model.addAttribute("followerCount",followerCount);
        //是否关注
        boolean hasFollowed = false;
        if(hostHolder.getUser()!=null){
            hasFollowed = followService.hasFollowed(hostHolder.getUser().getId(),ENTITY_TYPE_USER,userId);
            model.addAttribute("hasFollowed",hasFollowed);
        }
        return "/site/profile";
    }
修改profile.html,展示效果如下:


4.3.2 关注列表,粉丝列表
编写业务层FollowService,查询当前用户关注了哪些人,方法findFollowees,传入用户ID,以及分页的偏移量offeset,当前页显示数量limit。首先获得Key,包含用户ID,实体类型为用户,即为3,范围查询使用range方法,但是我们希望页面上是显示最新的,所以使用reverseRange方法。获得集合后进行遍历,查询关注的人以及关注时间。要取关注时间,由于我们存的时候把时间当作分数来存,因此取的时候取分数score即可。查询某用户的粉丝类似逻辑。
    //查询某个用户关注的人
    public List<Map<String, Object>> findFollowees(int userId, int offset, int limit) {
        String followeeKey = RedisKeyUtil.getFolloweeKey(userId, ENTITY_TYPE_USER);
        Set<Integer> targetIds = redisTemplate.opsForZSet().reverseRange(followeeKey, offset, offset + limit - 1);
        if (targetIds == null) {
            return null;
        }
        List<Map<String, Object>> list = new ArrayList<>();
        for (Integer targetId : targetIds) {
            Map<String, Object> map = new HashMap<>();
            User user = userService.findUserById(targetId);
            map.put("user", user);
            Double score = redisTemplate.opsForZSet().score(followeeKey, targetId);
            map.put("followTime", new Date(score.longValue()));
            list.add(map);
        }
        return list;
    }
        //    查询某用户的粉丝
    public List<Map<String, Object>> findFollowers(int userId, int offset, int limit) {
        String followerKey = RedisKeyUtil.getFollowerKey(ENTITY_TYPE_USER, userId);
        //实现类,是有序集合
        Set<Integer> targetIds = redisTemplate.opsForZSet().reverseRange(followerKey, offset, offset + limit - 1);
        if (targetIds == null) {
            return null;
        }
        List<Map<String, Object>> list = new ArrayList<>();
        for (Integer targetId : targetIds) {
            Map<String, Object> map = new HashMap<>();
            User user = userService.findUserById(targetId);
            map.put("user", user);
            Double score = redisTemplate.opsForZSet().score(followerKey, targetId);
            map.put("followTime", new Date(score.longValue()));
            list.add(map);
        }
        return list;
    }
编写FollowController,传入用户ID,根据ID调用业务层方法查询出关注者列表,然后对每个关注者遍历查询是否关注,
    @RequestMapping(path = "/followees/{userId}",method = RequestMethod.GET)
    public String getFollowees(@PathVariable("userId") int userId, Page page, Model model){
        User user = userService.findUserById(userId);
        if (user==null){
            throw new RuntimeException("该用户不存在!");
        }
        model.addAttribute("user",user);
        page.setLimit(5);
        page.setPath("/followees/" + userId);
        page.setRows((int) followService.findFolloweeCount(userId, ENTITY_TYPE_USER));
        List<Map<String,Object>> userList = followService.findFollowees(userId,page.getOffset(),page.getLimit());
        if (userList!=null){
            for (Map<String, Object> map : userList) {
                User u = (User) map.get("user");
                map.put("hasFollowed",hasFollowed(u.getId()));
            }
        }
        model.addAttribute("users",userList);

        return "/site/followee";
	}
    @RequestMapping(path = "/followers/{userId}",method = RequestMethod.GET)
    public String getFollowers(@PathVariable("userId") int userId, Page page, Model model){
        User user = userService.findUserById(userId);
        if (user==null){
            throw new RuntimeException("该用户不存在!");
        }
        model.addAttribute("user",user);
        page.setLimit(5);
        page.setPath("/followers/" + userId);
        page.setRows((int) followService.findFollowerCount(ENTITY_TYPE_USER,userId));
        List<Map<String,Object>> userList = followService.findFollowers(userId,page.getOffset(),page.getLimit());
        if (userList!=null){
            for (Map<String, Object> map : userList) {
                User u = (User) map.get("user");
                map.put("hasFollowed",hasFollowed(u.getId()));
            }
        }
        model.addAttribute("users",userList);

        return "/site/follower";

    }
        private boolean hasFollowed(int userId){
        if (hostHolder.getUser()==null){
            return false;
        }
        return followService.hasFollowed(hostHolder.getUser().getId(),ENTITY_TYPE_USER, userId);
    }
修改followee.html和follower.html页面,显示效果如下:


4.4 优化登录模块
使用Redis存储验证码
- 验证码需要频繁的访问与刷新,对性能要求较高。
- 验证码不需永久保存,通常在很短的时间后就会失效。
- 分布式部署时,存在Session共享的问题。
使用Redis存储登录凭证
- 处理每次请求时,都要查询用户的登录凭证,访问的频率非常高。
使用Redis缓存用户信息
- 处理每次请求时,都要根据凭证查询用户信息,访问的频率非常高。
4.4.1 使用Redis存储验证码
此时用户还没登录,不能传入用户ID作为唯一凭证拼Key,因此我们用随机字符串给用户,作为登录的唯一凭证,同时拿来拼Key,这个字符串存到Cookie里,设置过期时间短一些。
    private static final String PREFIX_KAPTCHA = "kaptcha";
        //登录验证码
    public static String getKaptchaKey(String owner){
        return PREFIX_KAPTCHA + SPLIT + owner;
    }
修改LoginController,对getCaptcha方法进行重构:原来是存在Session里,现在存到Redis里。前面获取验证码不变,使用UUID给用户,创建Cookie,设置Cookie键和值,设置过期时间为60s,然后拼出Redis的Key,存到Redis里,然后在response中输出验证码图片。
    @RequestMapping(path = "/kaptcha", method = RequestMethod.GET)
    public void getKaptcha(HttpServletResponse response/*, HttpSession session*/){
        String text = kaptchaProducer.createText();
        BufferedImage image = kaptchaProducer.createImage(text);
        // session.setAttribute("kaptcha",text);
        //验证码的归属
        String kaptchaOwner = CommunityUtil.generateUUID();
        Cookie cookie = new Cookie("kaptchaOwner",kaptchaOwner);
        cookie.setMaxAge(60);
        cookie.setPath(contextPath);
        response.addCookie(cookie);
        //将验证码存入redis
        String redisKey = RedisKeyUtil.getKaptchaKey(kaptchaOwner);
        redisTemplate.opsForValue().set(redisKey,text,60, TimeUnit.SECONDS);
        response.setContentType("image/png");
        try {
            OutputStream os = response.getOutputStream();
            ImageIO.write(image,"png",os);
        } catch (IOException e) {
            logger.error("响应验证码失败" + e.getMessage());
        }

    }
在登录时,对login重构:Session不需要再传入,使用注解@CookieValue获得kaptchaOwner,然后使用redisTemplate查询对应的验证码,对比用户输入的验证码code是否正确,后面逻辑都保持一致。
    @RequestMapping(path = "/login", method = RequestMethod.POST)
    public String login(String userName, String password, String code, boolean rememberMe,
                        Model model/*, HttpSession session*/, HttpServletResponse response,
                        @CookieValue("kaptchaOwner") String kaptchaOwner){
        // String kaptcha = (String) session.getAttribute("kaptcha");
        String kaptcha = null;
        if (StringUtils.isNotBlank(kaptchaOwner)){
            String redisKey = RedisKeyUtil.getKaptchaKey(kaptchaOwner);
            kaptcha = (String) redisTemplate.opsForValue().get(redisKey);
        }
        if(StringUtils.isBlank(kaptcha)||StringUtils.isBlank(code)||!kaptcha.equalsIgnoreCase(code)){
            model.addAttribute("codeMsg","验证码不正确");
            return "/site/login";
        }
        int expiredSeconds = rememberMe?REMEMBER_EXPIRED_SECOND:DEFAULT_EXPIRED_SECOND;
        Map<String, Object> map = userService.login(userName, password, expiredSeconds);
        if(map.containsKey("ticket")){
            Cookie cookie = new Cookie("ticket",map.get("ticket").toString());
            cookie.setPath(contextPath);
            cookie.setMaxAge(expiredSeconds);
            response.addCookie(cookie);
            return "redirect:/index";
        }
        else{
            model.addAttribute("usernameMsg",map.get("usernameMsg"));
            model.addAttribute("passwordMsg",map.get("passwordMsg"));
            return "/site/login";
        }

    }
4.4.2 使用Redis存储登录凭证
登陆成功后生成登陆凭证,不再保存到MySQL中,而是保存到Redis中。登陆凭证是不删除的,因为后续如果拓展功能,比如看用户什么时候注册的等需要登陆凭证里的信息。
    private static final String PREFIX_TICKET = "ticket";
    //    登录凭证
    public static String getTicketKey(String  ticket){
        return PREFIX_TICKET + SPLIT + ticket;
    }
把LoginTicketMapper废弃,但不用真的删去,而是加上注解@Deprecated。
修改UserService
	//login部分代码
    String redisKey = RedisKeyUtil.getTicketKey(loginTicket.getTicket());
    redisTemplate.opsForValue().set(redisKey,loginTicket);
    //logout,状态改为1,而不是删掉凭证
    String redisKey = RedisKeyUtil.getTicketKey(ticket);
    LoginTicket loginTicket = (LoginTicket) redisTemplate.opsForValue().get(redisKey);
    loginTicket.setStatus(1);
    redisTemplate.opsForValue().set(redisKey,loginTicket);
4.4.3 使用Redis缓存用户信息
缓存的用户信息是会过期的。
首先添加Key的前缀和获取Key的函数。
private static final String PREFIX_USER = "user";
public static String getUserKey(int userId){
    return PREFIX_USER + SPLIT + userId;
}
- 查询User时先尝试在缓存中查询,可能可以查询
    private User getCache(int userId){
        String redisKey = RedisKeyUtil.getUserKey(userId);
        return (User) redisTemplate.opsForValue().get(redisKey);
    }
- 可能查不到,在数据库中查,并添加缓存
    private User initCache(int userId){
        User user = userMapper.selectById(userId);
        String redisKey = RedisKeyUtil.getUserKey(userId);
        redisTemplate.opsForValue().set(redisKey,user,60*60, TimeUnit.SECONDS);
        return user;
    }
- 当数据变化时,数据删掉,数据更新麻烦
    private void clearCache(int userId){
        String redisKey = RedisKeyUtil.getUserKey(userId);
        redisTemplate.delete(redisKey);
    }
修改查询User的函数
    public User findUserById(int id){
        // return userMapper.selectById(id);
        User user = getCache(id);
        if (user==null){
            user = initCache(id);
        }
        return user;
    }
修改User信息的地方,都要把Redis中User的缓存清理掉
    public int activation(int userId, String code){
        User user = userMapper.selectById(userId);
        if(user.getStatus()==1){
            return ACTIVATION_REPEAT;
        }
        else if(user.getActivationCode().equals(code)){
            userMapper.updateStatus(userId,1);
            //数据更新,清除缓存
            clearCache(userId);
            return ACTIVATION_SUCCESS;
        }
        else{
            return ACTIVATION_FAIL;
        }
    }
    public int updateHeader(int userId, String headerUrl){
        // return userMapper.updateHeader(userId, headerUrl);
        int rows = userMapper.updateHeader(userId, headerUrl);
        clearCache(userId);
        return rows;
    }
    public int updatePassword(int userId, String password, String salt){
        // return userMapper.updatePassword(userId,CommunityUtil.md5(password + salt));
        int rows = userMapper.updatePassword(userId, CommunityUtil.md5(password + salt));
        clearCache(userId);
        return rows;
    }