定时任务的使用场景
在遇到如下几种场景可以考虑使用定时任务来解决:
- 某个时刻或者时间间隔执行任务
- 批量数据进行处理
- 对两个动作进行解耦
Quartz
介绍
Quartz 是一个特性丰富的、开源的任务调度库,几乎可以嵌入所有的 Java 程序,包括很小的独立应用程序到大型商业系统。Quartz 可以用来创建成百上千的简单的或者复杂的任务,并且这些任务可以作为执行任何事情的标准 Java 组件。Quartz 拥有很多企业级别的特性,包括支持 JTA 事务和集群。
Quartz is a richly featured, open source job scheduling library that can be integrated within virtually any Java application - from the smallest stand-alone application to the largest e-commerce system. Quartz can be used to create simple or complex schedules for executing tens, hundreds, or even tens-of-thousands of jobs; jobs whose tasks are defined as standard Java components that may execute virtually anything you may program them to do. The Quartz Scheduler includes many enterprise-class features, such as support for JTA transactions and clustering.
体系结构
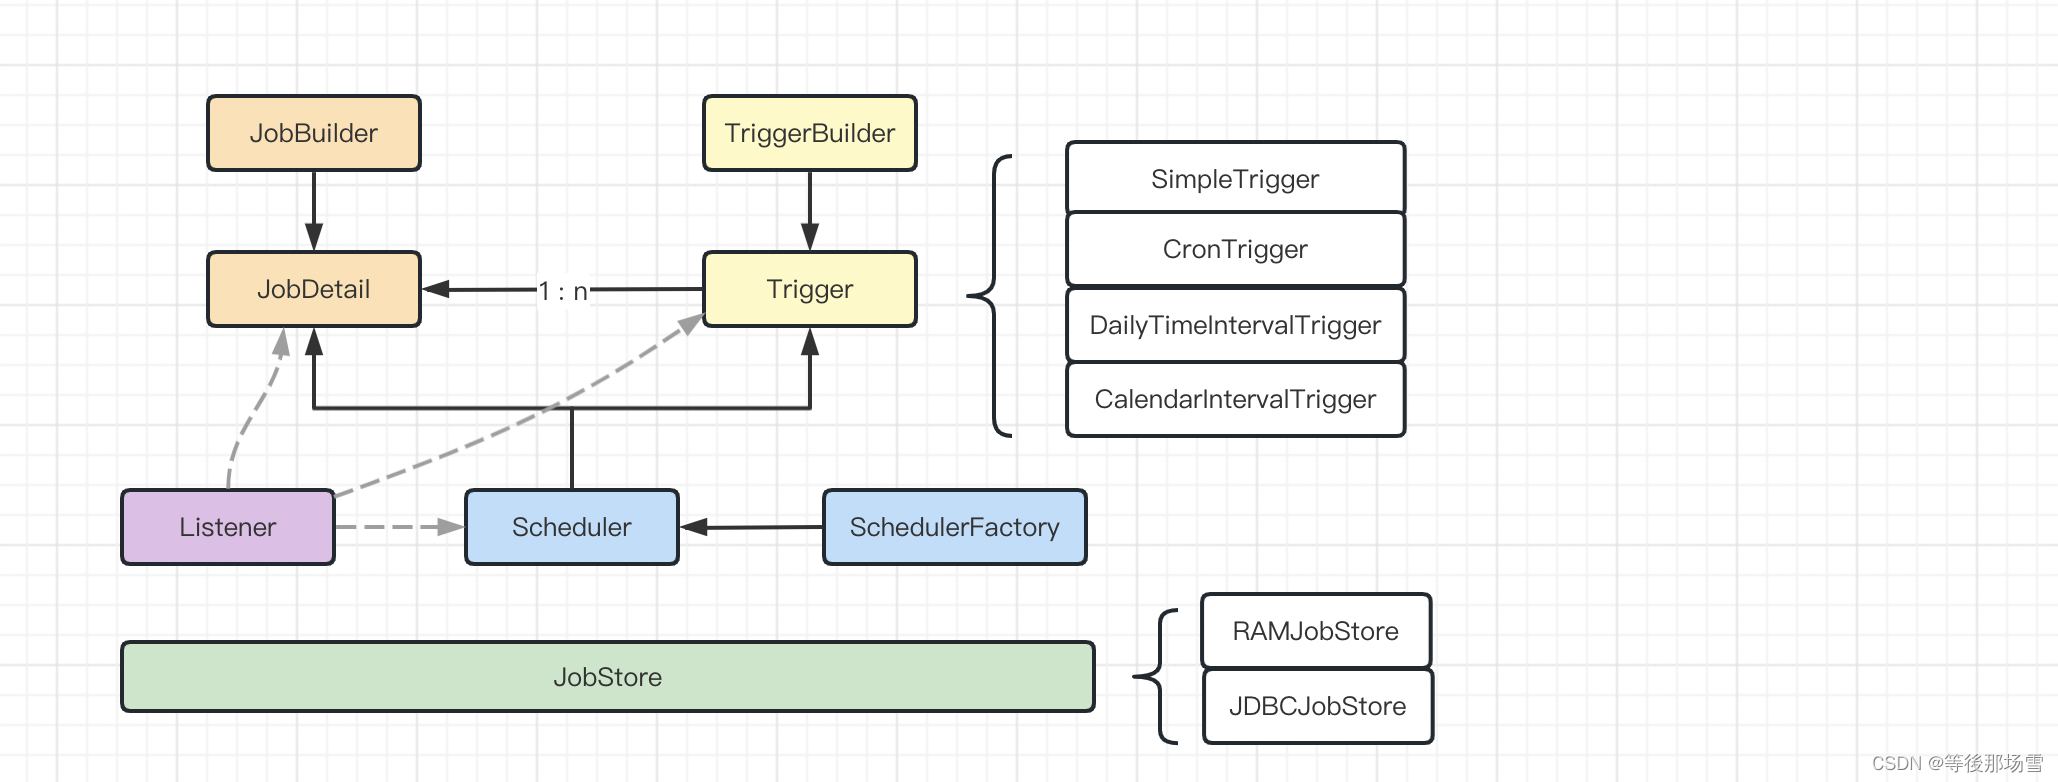
配置触发的规则
定义要执行的任务,代码/脚本
集中管理配置
并发执行任务,互不干扰
调度器控制任务的生命周期
可以集成 Spring、Spring Boot
任务
可以实现 Job 接口来定义一个任务,然后重写它的 execute 方法来定义任务执行的逻辑。
public class MyJob implements Job {

    private static final Logger LOGGER = LoggerFactory.getLogger(MyJob.class);

    @Override
    public void execute(JobExecutionContext jobExecutionContext) throws JobExecutionException {
        JobDataMap jobDataMap = jobExecutionContext.getJobDetail().getJobDataMap();
        SimpleDateFormat simpleDateFormat = new SimpleDateFormat("yyyy-MM-dd HH:mm:ss");
        LOGGER.info(simpleDateFormat.format(new Date()) + ", 任务1执行了, " + jobDataMap.getString("hello"));
    }
}
而调度器的调度方法需要指定一个 JobDetail,即任务明细。JobDetail 可以通过 JobBuilder 的相关方法进行实例化。
JobDetail jobDetail = JobBuilder.newJob(MyJob.class)
        .withIdentity("myJob", "my-job-group")
        .usingJobData("hello", "tom")
        .usingJobData("hi", "selina")
        .build();
接下来,看下 JobBuilder 中定义的一些比较重要的方法。
1、newJob 方法
实例化 JobBuilder(可以指定一个任务)
public static JobBuilder newJob() {
  return new JobBuilder();
}

public static JobBuilder newJob(Class<? extends Job> jobClass) {
  JobBuilder b = new JobBuilder();
  b.ofType(jobClass);
  return b;
}
2、ofType 方法
指定任务
public JobBuilder ofType(Class<? extends Job> jobClazz) {
  this.jobClass = jobClazz;
  return this;
}
3、withIdentity 方法
指定任务的名字和组
public JobBuilder withIdentity(String name) {
  key = new JobKey(name, null);
  return this;
}

public JobBuilder withIdentity(String name, String group) {
  key = new JobKey(name, group);
  return this;
}

public JobBuilder withIdentity(JobKey jobKey) {
  this.key = jobKey;
  return this;
}
4、withDescription 方法
指定任务的描述
public JobBuilder withDescription(String description) {
  this.description = description;
  return this;
}
5、requestRecovery 方法
指定任务遇到“recovery”或者“fail-over”情形是否应该重新执行
public JobBuilder requestRecovery() {
  this.shouldRecover = true;
  return this;
}

public JobBuilder requestRecovery(boolean jobShouldRecover) {
  this.shouldRecover = jobShouldRecover;
  return this;
}
6、storeDurably 方法
指定任务是否应该持久化
public JobBuilder storeDurably() {
  this.durability = true;
  return this;
}

public JobBuilder storeDurably(boolean jobDurability) {
  this.durability = jobDurability;
  return this;
}
7、usingJobData 方法
添加一组键值对到 JobDetail 的 JobDataMap 属性中
public JobBuilder usingJobData(String dataKey, String value) {
  jobDataMap.put(dataKey, value);
  return this;
}

public JobBuilder usingJobData(String dataKey, Integer value) {
  jobDataMap.put(dataKey, value);
  return this;
}

public JobBuilder usingJobData(String dataKey, Long value) {
  jobDataMap.put(dataKey, value);
  return this;
}

public JobBuilder usingJobData(String dataKey, Float value) {
  jobDataMap.put(dataKey, value);
  return this;
}

public JobBuilder usingJobData(String dataKey, Double value) {
  jobDataMap.put(dataKey, value);
  return this;
}

public JobBuilder usingJobData(String dataKey, Boolean value) {
  jobDataMap.put(dataKey, value);
  return this;
}

public JobBuilder usingJobData(JobDataMap newJobDataMap) {
  jobDataMap.putAll(newJobDataMap);
  return this;
}
8、setJobData 方法
覆盖 JobDetail 的 JobDataMap 属性
public JobBuilder setJobData(JobDataMap newJobDataMap) {
  jobDataMap = newJobDataMap;
  return this;
}
9、build 方法
构建 JobDetailImpl 实例
public JobDetail build() {

    JobDetailImpl job = new JobDetailImpl();

    job.setJobClass(jobClass);
    job.setDescription(description);
    if(key == null)
        key = new JobKey(Key.createUniqueName(null), null);
    job.setKey(key);
    job.setDurability(durability);
    job.setRequestsRecovery(shouldRecover);


    if(!jobDataMap.isEmpty())
        job.setJobDataMap(jobDataMap);

    return job;
}
触发器
任务触发的规则。
调度器的调度方法需要指定一个 Trigger 实例,即触发器。可以通过 TriggerBuilder 的相关方法构建一个 Trigger 实例。
Trigger trigger = TriggerBuilder.newTrigger()
        .withIdentity("myTrigger", "my-trigger-group")
        .startNow()
        .withSchedule(SimpleScheduleBuilder.simpleSchedule()
                .withIntervalInSeconds(5)
                .repeatForever())
        .build();
接下来看下 TriggerBuilder 定义的一些比较重要的方法。
1、newTrigger 方法
构建 TriggerBuilder 实例
public static TriggerBuilder<Trigger> newTrigger() {
  return new TriggerBuilder<Trigger>();
}
2、withIdentity 方法
设置触发器的名字和组名
public TriggerBuilder<T> withIdentity(String name) {
  key = new TriggerKey(name, null);
  return this;
}

public TriggerBuilder<T> withIdentity(String name, String group) {
  key = new TriggerKey(name, group);
  return this;
}

public TriggerBuilder<T> withIdentity(TriggerKey triggerKey) {
  this.key = triggerKey;
  return this;
}
3、withDescription 方法
设置触发器的描述
public TriggerBuilder<T> withDescription(String triggerDescription) {
  this.description = triggerDescription;
  return this;
}
4、withPriority 方法
设置触发器的优先级(如果有多个启动时间相同的触发器,根据触发器的优先级由大到小的顺序进行启动)
public TriggerBuilder<T> withPriority(int triggerPriority) {
  this.priority = triggerPriority;
  return this;
}
5、modifiedByCalendar 方法
设置应用到该触发器调度的 Calendar 的名字
public TriggerBuilder<T> modifiedByCalendar(String calName) {
  this.calendarName = calName;
  return this;
}
6、startAt 方法
设置触发器的开始时间
public TriggerBuilder<T> startAt(Date triggerStartTime) {
  this.startTime = triggerStartTime;
  return this;
}
7、startNow 方法
设置触发器立即开始
public TriggerBuilder<T> startNow() {
  this.startTime = new Date();
  return this;
}
8、endAt 方法
设置触发器的结束时间
public TriggerBuilder<T> endAt(Date triggerEndTime) {
  this.endTime = triggerEndTime;
  return this;
}
9、withSchedule 方法
设置用于触发器调度的 ScheduleBuilder
public <SBT extends T> TriggerBuilder<SBT> withSchedule(ScheduleBuilder<SBT> scheduleBuilder) {
  this.scheduleBuilder = scheduleBuilder;
  returnt (TriggerBuilder<SBT>) this;
}
10、forJob 方法
设置触发器关联的任务
public TriggerBuilder<T> forJob(JobKey jobKey) {
  this.jobKey = jobKey;
  return this;
}

public TriggerBuilder<T> forJob(String jobName) {
  this.jobKey = new JobKey(jobName, null);
  retun this;
}

public TriggerBuilder<T> forJob(String jobName, String jobGroup) {
  this.jobKey = new JobKey(jobName, jobGroup);
  return this;
}

public TriggerBuilder<T> forJob(JobDetail jobDetail) {
  JobKey k = jobDetail.getKey();
  if (k.getName() == null) {
    throw new IllegalArgumentException("The given job has not yet had a name assigned to it.");
  }
  this.jobKey = k;
  return this;
}
11、usingJobData 方法
添加一组键值对到触发器的 JobDataMap 属性中
public TriggerBuilder<T> usingJobData(String dataKey, String value) {
  jobDataMap.put(dataKey, value);
  return this;
}

public TriggerBuilder<T> usingJobData(String dataKey, String value) {
  jobDataMap.put(dataKey, value);
  return this;
}

public TriggerBuilder<T> usingJobData(String dataKey, Integer value) {
  jobDataMap.put(dataKey, value);
  return this;
}

public TriggerBuilder<T> usingJobData(String dataKey, Long value) {
  jobDataMap.put(dataKey, value);
  return this;
}

public TriggerBuilder<T> usingJobData(String dataKey, Float value) {
  jobDataMap.put(dataKey, value);
  return this;
}

public TriggerBuilder<T> usingJobData(String dataKey, Double value) {
  jobDataMap.put(dataKey, value);
  return this;
}

public TriggerBuilder<T> usingJobData(String dataKey, Boolean value) {
  jobDataMap.put(dataKey, value);
  return this;
}

public TriggerBuilder<T> usingJobData(JobDataMap newJobDataMap) {
  for(String dataKey: jobDataMap.keySet()) {
    newJobDataMap.put(dataKey, jobDataMap.get(dataKey));
  }
  jobDataMap = newJobDataMap;
  return this;
}
12、build 方法
构建具体的 Trigger 实例
public T build() {

    if(scheduleBuilder == null)
        scheduleBuilder = SimpleScheduleBuilder.simpleSchedule();
    MutableTrigger trig = scheduleBuilder.build();

    trig.setCalendarName(calendarName);
    trig.setDescription(description);
    trig.setStartTime(startTime);
    trig.setEndTime(endTime);
    if(key == null)
        key = new TriggerKey(Key.createUniqueName(null), null);
    trig.setKey(key);
    if(jobKey != null)
        trig.setJobKey(jobKey);
    trig.setPriority(priority);

    if(!jobDataMap.isEmpty())
        trig.setJobDataMap(jobDataMap);

    return (T) trig;
}
SimpleTrigger
时间间隔执行n次(时分秒)
1、simpleSchedule 方法
构建 SimpleScheduleBuilder 实例
public static SimpleScheduleBuilder simpleSchedule() {
    return new SimpleScheduleBuilder();
}
2、repeat…Forever 方法
指定时间间隔,永久重复执行
// 指定每隔一分钟永久重复执行
public static SimpleScheduleBuilder repeatMinutelyForever() {
    return simpleSchedule()
        .withIntervalInMinutes(1)
        .repeatForever();
}

// 指定每隔多少分钟永久重复执行
public static SimpleScheduleBuilder repeatMinutelyForever(int minutes) {
    return simpleSchedule()
        .withIntervalInMinutes(minutes)
        .repeatForever();
}

// 指定每隔一秒永久重复执行
public static SimpleScheduleBuilder repeatSecondlyForever() {
    return simpleSchedule()
        .withIntervalInSeconds(1)
        .repeatForever();
}

// 指定每隔多少秒永久重复执行
public static SimpleScheduleBuilder repeatSecondlyForever(int seconds) {
    return simpleSchedule()
        .withIntervalInSeconds(seconds)
        .repeatForever();
}

// 指定每隔一小时永久重复执行
public static SimpleScheduleBuilder repeatHourlyForever() {
    return simpleSchedule()
        .withIntervalInHours(1)
        .repeatForever();
}

// 指定每隔多少小时永久重复执行
public static SimpleScheduleBuilder repeatHourlyForever(int hours) {
    return simpleSchedule()
        .withIntervalInHours(hours)
        .repeatForever();
}
3、repeat…ForTotalCount 方法
指定时间间隔,重复执行直到指定次数
// 每隔一分钟重复执行一次,直到指定次数
public static SimpleScheduleBuilder repeatMinutelyForTotalCount(int count) {
    if(count < 1)
        throw new IllegalArgumentException("Total count of firings must be at least one! Given count: " + count);
    return simpleSchedule()
        .withIntervalInMinutes(1)
        .withRepeatCount(count - 1);
}

// 每隔多少分钟重复执行一次,直到指定次数
public static SimpleScheduleBuilder repeatMinutelyForTotalCount(int count, int minutes) {
    if(count < 1)
        throw new IllegalArgumentException("Total count of firings must be at least one! Given count: " + count);
    return simpleSchedule()
        .withIntervalInMinutes(minutes)
        .withRepeatCount(count - 1);
}

// 每隔一秒重复执行一次,直到指定次数
public static SimpleScheduleBuilder repeatSecondlyForTotalCount(int count) {
    if(count < 1)
        throw new IllegalArgumentException("Total count of firings must be at least one! Given count: " + count);
    return simpleSchedule()
        .withIntervalInSeconds(1)
        .withRepeatCount(count - 1);
}

// 每隔多少秒重复执行一次,直到指定次数
public static SimpleScheduleBuilder repeatSecondlyForTotalCount(int count, int seconds) {
    if(count < 1)
        throw new IllegalArgumentException("Total count of firings must be at least one! Given count: " + count);
    return simpleSchedule()
        .withIntervalInSeconds(seconds)
        .withRepeatCount(count - 1);
}

// 每隔一小时重复执行一次,直到指定次数
public static SimpleScheduleBuilder repeatHourlyForTotalCount(int count) {
    if(count < 1)
        throw new IllegalArgumentException("Total count of firings must be at least one! Given count: " + count);
    return simpleSchedule()
        .withIntervalInHours(1)
        .withRepeatCount(count - 1);
}

// 每隔多少小时重复执行一次,直到指定次数
public static SimpleScheduleBuilder repeatHourlyForTotalCount(int count, int hours) {
    if(count < 1)
        throw new IllegalArgumentException("Total count of firings must be at least one! Given count: " + count);
    return simpleSchedule()
        .withIntervalInHours(hours)
        .withRepeatCount(count - 1);
}
4、withInterval… 方法
指定时间间隔,执行一次
// 每隔多少毫秒执行一次
public SimpleScheduleBuilder withIntervalInMilliseconds(long intervalInMillis) {
    this.interval = intervalInMillis;
    return this;
}

// 每隔多少秒执行一次
public SimpleScheduleBuilder withIntervalInSeconds(int intervalInSeconds) {
    this.interval = intervalInSeconds * 1000L;
    return this;
}

// 每隔多少分钟执行一次
public SimpleScheduleBuilder withIntervalInMinutes(int intervalInMinutes) {
    this.interval = intervalInMinutes * DateBuilder.MILLISECONDS_IN_MINUTE;
    return this;
}

// 每隔多少小时执行一次
public SimpleScheduleBuilder withIntervalInHours(int intervalInHours) {
    this.interval = intervalInHours * DateBuilder.MILLISECONDS_IN_HOUR;
    return this;
}
5、withRepeatCount 方法
指定重复执行的次数
public SimpleScheduleBuilder withRepeatCount(int triggerRepeatCount) {
    this.repeatCount = triggerRepeatCount;
    return this;
}
6、repeatForever 方法
指定永久重复执行
public SimpleScheduleBuilder repeatForever() {
    this.repeatCount = SimpleTrigger.REPEAT_INDEFINITELY;
    return this;
}
7、withMisfire 方法
设置触发器错过启动时间的补偿策略
public SimpleScheduleBuilder withMisfireHandlingInstructionIgnoreMisfires() {
    misfireInstruction = Trigger.MISFIRE_INSTRUCTION_IGNORE_MISFIRE_POLICY;
    return this;
}

public SimpleScheduleBuilder withMisfireHandlingInstructionFireNow() {
    misfireInstruction = SimpleTrigger.MISFIRE_INSTRUCTION_FIRE_NOW;
    return this;
}

public SimpleScheduleBuilder withMisfireHandlingInstructionNextWithExistingCount() {
    misfireInstruction = SimpleTrigger.MISFIRE_INSTRUCTION_RESCHEDULE_NEXT_WITH_EXISTING_COUNT;
    return this;
}

public SimpleScheduleBuilder withMisfireHandlingInstructionNextWithRemainingCount() {
    misfireInstruction = SimpleTrigger.MISFIRE_INSTRUCTION_RESCHEDULE_NEXT_WITH_REMAINING_COUNT;
    return this;
}

public SimpleScheduleBuilder withMisfireHandlingInstructionNowWithExistingCount() {
    misfireInstruction = SimpleTrigger.MISFIRE_INSTRUCTION_RESCHEDULE_NOW_WITH_EXISTING_REPEAT_COUNT;
    return this;
}

public SimpleScheduleBuilder withMisfireHandlingInstructionNowWithRemainingCount() {
    misfireInstruction = SimpleTrigger.MISFIRE_INSTRUCTION_RESCHEDULE_NOW_WITH_REMAINING_REPEAT_COUNT;
    return this;
}
CalendarIntervalTrigger
时间间隔执行一次(年月周日时分秒)
1、calendarIntervalSchedule 方法
构建 CalendarIntervalScheduleBuilder 实例
public static CalendarIntervalScheduleBuilder calendarIntervalSchedule() {
  return new CalendarIntervalScheduleBuilder();
}
2、withInterval…方法
每隔多少时间间隔执行一次
// 每隔多少时间单位执行一次
public CalendarIntervalScheduleBuilder withInterval(int timeInterval, IntervalUnit unit) {
    if(unit == null)
        throw new IllegalArgumentException("TimeUnit must be specified.");
    validateInterval(timeInterval);
    this.interval = timeInterval;
    this.intervalUnit = unit;
    return this;
}

// 每隔多少秒执行一次
public CalendarIntervalScheduleBuilder withIntervalInSeconds(int intervalInSeconds) {
    validateInterval(intervalInSeconds);
    this.interval = intervalInSeconds;
    this.intervalUnit = IntervalUnit.SECOND;
    return this;
}

// 每隔多少分钟执行一次
public CalendarIntervalScheduleBuilder withIntervalInMinutes(int intervalInMinutes) {
    validateInterval(intervalInMinutes);
    this.interval = intervalInMinutes;
    this.intervalUnit = IntervalUnit.MINUTE;
    return this;
}

// 每隔多少小时执行一次
public CalendarIntervalScheduleBuilder withIntervalInHours(int intervalInHours) {
    validateInterval(intervalInHours);
    this.interval = intervalInHours;
    this.intervalUnit = IntervalUnit.HOUR;
    return this;
}

// 每隔多少天执行一次
public CalendarIntervalScheduleBuilder withIntervalInDays(int intervalInDays) {
    validateInterval(intervalInDays);
    this.interval = intervalInDays;
    this.intervalUnit = IntervalUnit.DAY;
    return this;
}

// 每隔多少周执行一次
public CalendarIntervalScheduleBuilder withIntervalInWeeks(int intervalInWeeks) {
    validateInterval(intervalInWeeks);
    this.interval = intervalInWeeks;
    this.intervalUnit = IntervalUnit.WEEK;
    return this;
}

// 每隔多少月执行一次
public CalendarIntervalScheduleBuilder withIntervalInMonths(int intervalInMonths) {
    validateInterval(intervalInMonths);
    this.interval = intervalInMonths;
    this.intervalUnit = IntervalUnit.MONTH;
    return this;
}

// 每隔多少年执行一次
public CalendarIntervalScheduleBuilder withIntervalInYears(int intervalInYears) {
    validateInterval(intervalInYears);
    this.interval = intervalInYears;
    this.intervalUnit = IntervalUnit.YEAR;
    return this;
}
3、withMisfire… 方法
设置触发器错过启动时间的补偿策略
public CalendarIntervalScheduleBuilder withMisfireHandlingInstructionIgnoreMisfires() {
    misfireInstruction = Trigger.MISFIRE_INSTRUCTION_IGNORE_MISFIRE_POLICY;
    return this;
}

public CalendarIntervalScheduleBuilder withMisfireHandlingInstructionDoNothing() {
    misfireInstruction = CalendarIntervalTrigger.MISFIRE_INSTRUCTION_DO_NOTHING;
    return this;
}

public CalendarIntervalScheduleBuilder withMisfireHandlingInstructionFireAndProceed() {
    misfireInstruction = CalendarIntervalTrigger.MISFIRE_INSTRUCTION_FIRE_ONCE_NOW;
    return this;
}
4、inTimeZone 方法
设置时区
public CalendarIntervalScheduleBuilder inTimeZone(TimeZone timezone) {
    this.timeZone = timezone;
    return this;
}
5、build 方法
构建 CalendarIntervalTriggerImpl 实例
@Override
public MutableTrigger build() {
    CalendarIntervalTriggerImpl st = new CalendarIntervalTriggerImpl();
    st.setRepeatInterval(interval);
    st.setRepeatIntervalUnit(intervalUnit);
    st.setMisfireInstruction(misfireInstruction);
    st.setTimeZone(timeZone);
    st.setPreserveHourOfDayAcrossDaylightSavings(preserveHourOfDayAcrossDaylightSavings);
    st.setSkipDayIfHourDoesNotExist(skipDayIfHourDoesNotExist);
    return st;
}


![[拆轮子] PaddleDetection中__shared__、__inject__ 和 from_config 三者分别做了什么](https://img-blog.csdnimg.cn/b9e372fc214c4ff89128210a7661db71.png)