CAS(Compare And Swap 比较并交换),通常指的是这样一种原子操作:针对一个变量,首先比较它的内存值与某个期望值是否相同,如果相同,就给它赋一个新值,底层是能保证cas是原子性的
CAS的应用
在Java 中,CAS 操作是由 Unsafe 类提供支持的,该类定义了三种针对不同类型变量的 CAS 操作,对Object,Int,Long类型数据的操作,CAS可以理解为乐观锁的一种实现

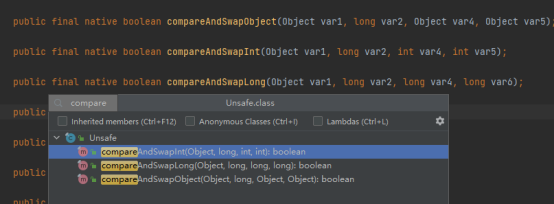
Jvm会去保证可见性和有序性,
CAS源码分析:
Hotspot 虚拟机对compareAndSwapInt 方法的实现如下:
#unsafe.cpp
UNSAFE_ENTRY(jboolean, Unsafe_CompareAndSwapInt(JNIEnv *env, jobject unsafe, jo
bject obj, jlong offset, jint e, jint x))
UnsafeWrapper("Unsafe_CompareAndSwapInt");
oop p = JNIHandles::resolve(obj);
// 根据偏移量,计算value的地址
jint* addr = (jint *) index_oop_from_field_offset_long(p, offset);
// Atomic::cmpxchg(x, addr, e) cas逻辑x:要交换的值e:要比较的值
//cas成功,返回期望值e,等于e,此方法返回true
//cas失败,返回内存中的value值,不等于e,此方法返回false
return (jint)(Atomic::cmpxchg(x, addr, e)) == e;
UNSAFE_END
CAS缺陷
CAS 只是一个指令,不涉及用户态到内核态的切换,性能的影响是很低的,虽然高效地解决了原子操作,但是还是存在一些缺陷的,主要表现在三个方面:
1.自旋 CAS 长时间地不成功,则会给 CPU 带来非常大的开销
2.只能保证一个共享变量原子操作
3.ABA 问题
Public class AtomicIntegerTest {
    static AtomicInteger sum=new AtomicInteger(0);
    public static void main(String[] args) {
        for (int i = 0; i < 10; i++) {
            Thread thread = new Thread(()->{
                for (int j = 0; j < 10000; j++) {
                    //原子 自增 cas
                    sum.incrementAndGet();
                }
            });
            thread.start();
        }

        try {
            Thread.sleep(3000);
        } catch (InterruptedException e) {
            e.printStackTrace();
        }
        System.out.println(sum.get());

    }
}

ABA问题及其解决方案
CAS算法实现一个重要前提需要取出内存中某时刻的数据,而在下时刻比较并替换,那么在这个时间差类会导致数据的变化。
ABA:当有多个线程对一个原子类进行操作的时候,某个线程在短时间内将原子类的值A修改为B,又马上将其修改为A,此时其他线程不感知,还是会修改成功。
示例:
public class ABATest {
    public static void main(String[] args) {
        AtomicInteger atomicInteger = new AtomicInteger(1);
        new Thread(()->{
            int value = atomicInteger.get();
            System.out.println("Thread1 read value:"+value);
            //阻塞1s
            LockSupport.parkNanos(1000000000L);
            //Thread1通过CAS修改value值为3
            if(atomicInteger.compareAndSet(value,3)){
                System.out.println("Thread1 update from "+value+"to 3");
            }else {
                System.out.println("Thread1 update fail!");
            }
        },"Thread1").start();
        new Thread(()->{
            int value=atomicInteger.get();
            System.out.println("Thread2 read value:"+value);
            if(atomicInteger.compareAndSet(value,2)){
                System.out.println("Thread2 update from"+value+"to 2");
                value=atomicInteger.get();
                System.out.println("Thread2 read value:"+value);
                if(atomicInteger.compareAndSet(value,1)){
                    System.out.println("Thread2 update from"+value+"to 1");
                }
            }else {
                System.out.println("Thread2 update fail");
            }
        },"Thread2").start();
    }
}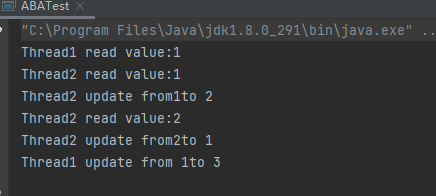
Thread1不清楚Thread2对value的操作,Thread1阻塞一秒期间,Thread2进行了修改操作,但最后value值都是1。
ABA问题的解决方案
数据库有个锁称为乐观锁,是一种基于数据版本实现数据同步的机制,每次修改一次数据,版本就会进行累加。同样,Java也提供了相应的原子引用类
AtomicStampedReference<V>

reference即我们实际存储的变量,stamp是版本,每次修改可以通过+1保证版本唯一性。这样就可以保证每次修改后的版本也会往上递增。
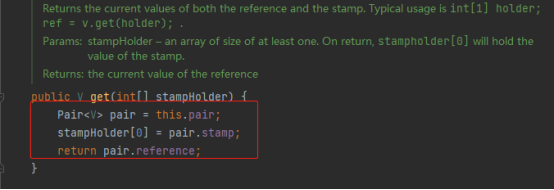
示例:
public class AtomicStampedReferenceTest {
    public static void main(String[] args) {
        //初始值 1    ,版本号 1
        //定义AtomicStampedReference Pair.reference 值为1,Pair.stamp 为1
        AtomicStampedReference atomicStampedReference = new AtomicStampedReference(1, 1);
        new Thread(() -> {
            int[] stampHolder = new int[1];
            //传入一个至少长度为1的数组 返回真实的值
            int value = (int) atomicStampedReference.get(stampHolder);
            //传入的数组 的0号位存放的是版本信息
            int stamp = stampHolder[0];
            System.out.println("Thread1 read value:" + value + ",版本 stamp:" + stamp);
            //阻塞1s
            LockSupport.parkNanos(1000000000L);
            //Thread1通过CAS修改value值为3 stamp是版本,每次修改可以通过+1保证版本唯一性
            if (atomicStampedReference.compareAndSet(value, 3, stamp, stamp + 1)) {
                System.out.println("Thread1 update from " + value + "to 3");
            } else {
                System.out.println("Thread1 update fail");
            }
        }, "Thread1").start();
        new Thread(() -> {
            int[] stampHolder = new int[1];
            int value = (int) atomicStampedReference.get(stampHolder);
            int stamp = stampHolder[0];
            System.out.println("Thread2 read value:" + value + ",stamp:" + stamp);
            //Thread2通过CAS修改value值为2
            if (atomicStampedReference.compareAndSet(value, 2, stamp, stamp + 1)) {
                System.out.println("Thread2 update from" + value + "to 2");
                value = (int) atomicStampedReference.get(stampHolder);
                stamp = stampHolder[0];
                System.out.println("Thread2 read value:" + value + ",stamp:" + stamp);
                // Thread2通过CAS修改value值为1
                if (atomicStampedReference.compareAndSet(value, 1, stamp, stamp + 1)) {
                    System.out.println("Thread2 update from" + value + "to 1");
                }
            }
        }, "Thread2").start();
    }
}
通过版本控制,最后线程1更新失败
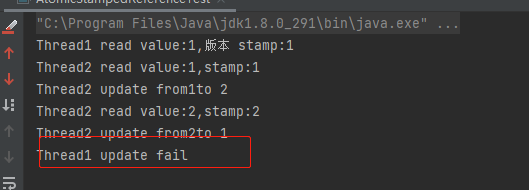
补充:AtomicMarkableReference可以理解为上面AtomicStampedReference的简化版,就是 不关心修改过几次,仅仅关心是否修改过。因此变量mark是boolean类型,仅记录值是否有过修改。

Atomic原子操作类
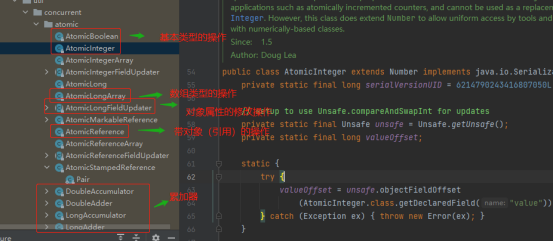
基本类型:AtomicInteger、AtomicLong、AtomicBoolean;
引用类型:AtomicReference、AtomicStampedRerence、AtomicMarkableReference;
数组类型:AtomicIntegerArray、AtomicLongArray、AtomicReferenceArray
对象属性原子修改器:AtomicIntegerFieldUpdater、AtomicLongFieldUpdater、
AtomicReferenceFieldUpdater
原子类型累加器(jdk1.8增加的类):DoubleAccumulator、DoubleAdder、
LongAccumulator、LongAdder、Striped64
数组类型示例:
public class AtomicIntegerArrayTest {
    static int[] value=new int[]{1,2,3,4,5};
    static AtomicIntegerArray atomicIntegerArray=new AtomicIntegerArray(value);

    public static void main(String[] args) {
        //设置索引0的元素为100
        atomicIntegerArray.set(0,100);
        System.out.println(atomicIntegerArray.get(0));
        //以原子更新的方式将数组中索引为1的元素与输入值相加
        atomicIntegerArray.getAndAdd(1,5);
        System.out.println(atomicIntegerArray);
    }
}


原子更新引用类型示例:
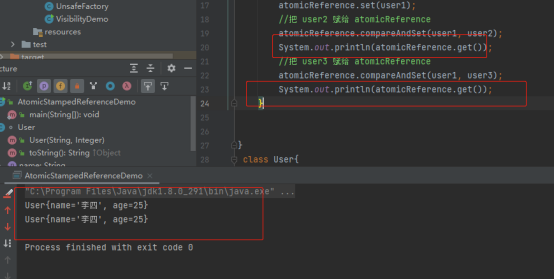
AtomicReference作用是对普通对象的封装,它可以保证你在修改对象引用时的线程安全性
public class AtomicStampedReferenceDemo {
    public static void main(String[] args) {
        User user1 = new User("张三", 23);
        User user2 = new User("李四", 25);
        User user3 = new User("王五", 20);
        //初始化为 user1
        AtomicReference<User> atomicReference = new AtomicReference<>();
        atomicReference.set(user1);
        //把 user2 赋给 atomicReference
        atomicReference.compareAndSet(user1, user2);
        System.out.println(atomicReference.get());
        //把 user3 赋给 atomicReference
        atomicReference.compareAndSet(user1, user3);
        System.out.println(atomicReference.get());
    }
}
LongAdder/DoubleAdder详解 累加器
AtomicLong是利用底层的CAS操作来提供并发性的,比如addAndGet方法:


上述方法内部用的CAS方式,逻辑是采用自旋的方式不断更新目标值,直到更新成功,在并发量较低的环境下,线程冲突的概率比较小,自旋的次数不会很多,但是,高并发环境下,N个线程同时进行自旋操作,会出现大量失败并不断自旋的情况,此时AtomicLong的自旋会成为瓶颈,这就是LongAdder引入的初衷,解决高并发环境下AtomicInteger / AtomicLong的自旋瓶颈问题。
LongAdder示例:
public class LongAdderTest {
    public static void main(String[] args) {
        testAtomicLongVSLongAdder(10, 10000);
        System.out.println("==================");
        testAtomicLongVSLongAdder(10, 200000);
        System.out.println("==================");
        testAtomicLongVSLongAdder(100, 200000);
    }

    static void testAtomicLongVSLongAdder(final int threadCount, final int times) {
        try {
            long start = System.currentTimeMillis();
            testLongAdder(threadCount, times);
            long end = System.currentTimeMillis() - start;
            System.out.println("条件=====线程数:" + threadCount + ",单线程操作数" + times);
            System.out.println("结果=====LongAdder方式增加计数" + (threadCount * times) + "次,共计耗时:" + end);
            long start2 = System.currentTimeMillis();
            testAtomicLong(threadCount, times);
            long end2 = System.currentTimeMillis() - start2;
            System.out.println("条件>>>>>>线程数:" + threadCount + ", 单线程操作计数" + times);
            System.out.println("结果>>>>>>AtomicLong方式增加计数" + (threadCount * times) + "次,共计耗时:" + end2);
        } catch (InterruptedException e) {
            e.printStackTrace();
        }
    }

    static void testAtomicLong(final int threadCount, final int times) throws InterruptedException {
        CountDownLatch countDownLatch = new CountDownLatch(threadCount);
        AtomicLong atomicLong = new AtomicLong();
        for (int i = 0; i < threadCount; i++) {
            new Thread(new Runnable() {
                @Override
                public void run() {
                    for (int j = 0; j < times; j++) {
                        atomicLong.incrementAndGet();
                    }
                    countDownLatch.countDown();
                }
            }, "my‐thread" + i).start();
        }
        countDownLatch.await();

    }

    static void testLongAdder(final int threadCount, final int times) throws InterruptedException {
        CountDownLatch countDownLatch = new CountDownLatch(threadCount);
        LongAdder longAdder = new LongAdder();
        for (int i = 0; i < threadCount; i++) {
            new Thread(new Runnable() {
                @Override
                public void run() {
                    for (int j = 0; j < times; j++) {
                        longAdder.add(1);
                    }
                    countDownLatch.countDown();
                }
            }, "my‐thread" + i).start();
        }
        countDownLatch.await();

    }
}
低并发、一般的业务场景下AtomicLong是足够了。如果并发量很多,存在大量写多读少的情况,那LongAdder可能更合适。
LongAdder原理
AtomicLong中有个内部变量value保存着实际的long值,所有的操作都是针对该变量进行。也就是说,高并发环境下,value变量其实是一个热点,也就是N个线程竞争一个热点。
LongAdder的基本思路就是分散热点,将value值分散到一个数组中,不
同线程会命中到数组的不同槽中,各个线程只对自己槽中的那个值进行CAS操作,这样热点就被分散了,冲突的概率就小很多。如果要获取真正的long值,只要将各个槽中的变量值累加返回。

LongAdder的内部结构
LongAdder内部有一个base变量,一个Cell[]数组:
base变量:非竞态条件下,直接累加到该变量上
Cell[]数组:竞态条件下,累加个各个线程自己的槽Cell[i]中


