用正点原子代码的usmart分析,如下:


usmart.h
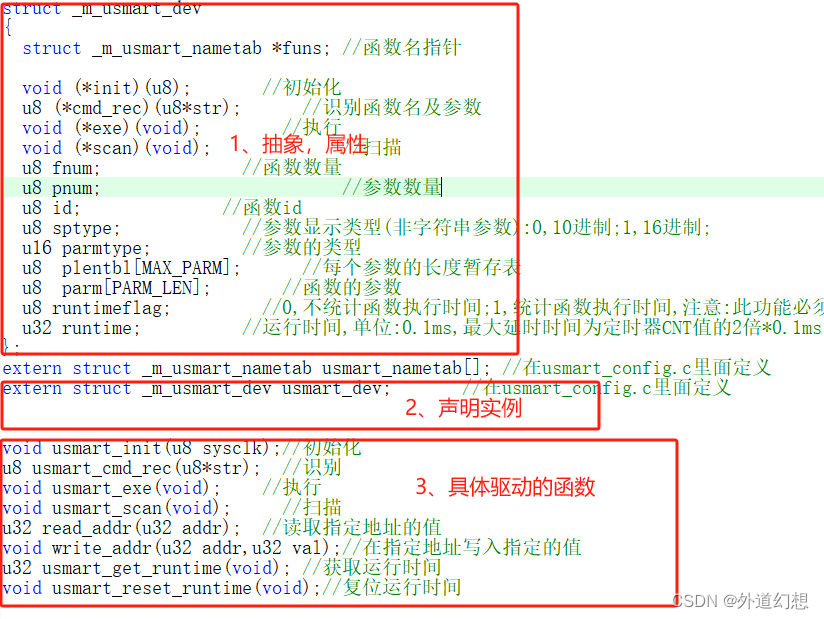
usmart_config.c 实例:把结构体与具体驱动绑定一起


/*
正点原子的usmart串口的封装
涉及文件:usmart.h usmart.c usmart_config.c 还有外面使用的文件(应用层调用)

底层驱动的实现都在usmart.h usmart.c实现的,也就是具体的代码实现层都在这里
//---------------------------------------------------------------------------
usmart.h做的个事情
1、把驱动抽象,把具体实现的代码以结构体的方式抽象成接口;

typedef struct
{
    void (*init)(u8);//init属性
    void (*show)(void);//show属性
}lcd_dev;

2、声明实体(因为实体在usmart_config.c定义,因为没有usmart_config.h,应用层只包含usmart.h);
extern lcd_dev demo实例;

3、声明usmart.c具体实现的函数(由于具体实现代码在usmart.c,但是实例在usmart_config.c,也就是usmart_config.c会调用usmart.c的函数)

void Myinit(u8 data);//具体实现
void Myshow(void);

//---------------------------------------------------------------------------
usmart.c把具体的设备的驱动实现了,也就是它是实实在在一个一个函数
例如:它具体实现 void Myshow(void);但是结构体是抽象为show:void (*show)(void);它不关心是谁的show

void Myinit(u8 data)
{
    具体实现细节
}
void Myshow(u8 data)
{
    具体实现细节
}
//---------------------------------------------------------------------------
总结:usmart.h的lcd_dev和usmart.c里面的实现函数,目前看没有半毛钱关系;
usmart.c里面实现的函数是实实在在只关注硬件驱动的事情。
//---------------------------------------------------------------------------
usmart_config.c
定义一个实体,并且把他的函数功能与usmart.c具体实现的函数,绑定在一起

lcd_dev demo实例
{
    .init = Myinit,//Myinit在
    .show = Myshow,
}
有个疑问?usmart_config.c是不是可以省掉,lcd_dev demo实例可以在usmart.c实现

//---------------------------------------------------------------------------
为什么说会有分层的效果呢?
因为应用层只调用结构体的属性名字,如 demo实例.show;(当然事先应用层要先声明(extern lcd_dev demo实例))
外面调用的都是  demo实例.属性   以这种方式调用。只要具体的实例名称+抽象结构体属性的名字。
即外面可以写的天花乱坠,只要是demo实例.属性的调用方式

*/
//-------------------------------------------------------------------------
 /*usmart.h*/
 //以结构体的方式 抽象出设备的函数功能,应用层是这样调用的:具体设备名.exe、具体设备名.scan,应用的要包含实体的声明
 struct _m_usmart_dev
{
	struct _m_usmart_nametab *funs;	//函数名指针

	void (*init)(u8);				//初始化
	u8 (*cmd_rec)(u8*str);			//识别函数名及参数
	void (*exe)(void); 				//执行
	void (*scan)(void);             //扫描
	u8 fnum; 				  		//函数数量
	u8 pnum;                        //参数数量
	u8 id;							//函数id
	u8 sptype;						//参数显示类型(非字符串参数):0,10进制;1,16进制;
	u16 parmtype;					//参数的类型
	u8  plentbl[MAX_PARM];  		//每个参数的长度暂存表
	u8  parm[PARM_LEN];  			//函数的参数
	u8 runtimeflag;					//0,不统计函数执行时间;1,统计函数执行时间,注意:此功能必须在USMART_ENTIMX_SCAN使能的时候,才有用
	u32 runtime;					//运行时间,单位:0.1ms,最大延时时间为定时器CNT值的2倍*0.1ms
};

extern struct _m_usmart_dev usmart_dev;				//在usmart_config.c里面定义

void usmart_init(u8 sysclk);//初始化
u8 usmart_cmd_rec(u8*str);	//识别
void usmart_exe(void);		//执行
void usmart_scan(void);     //扫描
u32 read_addr(u32 addr);	//读取指定地址的值
void write_addr(u32 addr,u32 val);//在指定地址写入指定的值
u32 usmart_get_runtime(void);	//获取运行时间
void usmart_reset_runtime(void);//复位运行时间


//-------------------------------------------------------------------------
/*usmart_config.c*/
struct _m_usmart_dev usmart_dev=
{
	usmart_nametab,
	usmart_init,
	usmart_cmd_rec,
	usmart_exe,
	usmart_scan,
	sizeof(usmart_nametab)/sizeof(struct _m_usmart_nametab),//函数数量
	0,	  	//参数数量
	0,	 	//函数ID
	1,		//参数显示类型,0,10进制;1,16进制
	0,		//参数类型.bitx:,0,数字;1,字符串
	0,	  	//每个参数的长度暂存表,需要MAX_PARM个0初始化
	0,		//函数的参数,需要PARM_LEN个0初始化
};

