文章目录
- 服务器准备工作
- 一、升级操作系统内核
- 1 查看操作系统和内核版本
- 2 下载内核离线升级包
- 3 升级内核
- 4 确认内核版本
- 二、修改主机名/hosts文件
- 1 修改主机名
- 2 修改hosts文件
- 三、关闭防火墙
- 四、关闭SELINUX配置
- 五、时间同步
- 1 下载NTP
- 2 卸载
- 3 安装
- 4 配置
- 4.1 主节点配置
- 4.2 从节点配置
- 六、配置内核路由转发以及网桥过滤
- 七、安装ipset、ipvsadm
- 1 离线下载
- 2 安装
- 八、关闭swap交换区
- 九、配置ssh免密登录
- 十、安装docker-ce/cri-dockerd
- 1 安装docker-ce
- 1.1 下载
- 1.2 安装
- 2 安装cri-docker
- 2.1 下载
- 2.2 安装
- 十一、安装kubernetes
- 1 下载 kubelet kubeadm kubectl
- 2 安装kubelet kubeadm kubectl
- 3 安装tab命令补全工具(可选)
- 4 下载K8S运行依赖的镜像
- 5 安装docker registry并做一些关联配置
- 5.1 下载docker-registry
- 5.2 安装docker-registry
- 5.3 将k8s依赖的镜像传入docker-registry
- 5.4 修改cri-docker将pause镜像修改为docker-registry中的
- 6 安装kubernetes
- 6.1 k8s-normal-master安装
- 6.2 k8s-normal-node01安装
- 7 安装网络组件calico
- 7.1 下载镜像
- 7.2 安装
- 十二、延长证书有效期
服务器准备工作
| 主机ip | 用途 |
|---|---|
| 192.168.115.120 | K8s-normal-master |
| 192.168.115.121 | K8s-normal-node01 |
一、升级操作系统内核
每台机器都执行
1 查看操作系统和内核版本
查看内核:
[root@localhost ~]# uname -r
3.10.0-1160.71.1.el7.x86_64
[root@localhost ~]#

[root@localhost ~]# cat /proc/version
Linux version 3.10.0-1160.71.1.el7.x86_64 (mockbuild@kbuilder.bsys.centos.org) (gcc version 4.8.5 20150623 (Red Hat 4.8.5-44) (GCC) ) #1 SMP Tue Jun 28 15:37:28 UTC 2022
查看操作系统:
[root@localhost ~]# cat /etc/*release
CentOS Linux release 7.9.2009 (Core)
NAME="CentOS Linux"
VERSION="7 (Core)"
ID="centos"
ID_LIKE="rhel fedora"
VERSION_ID="7"
PRETTY_NAME="CentOS Linux 7 (Core)"
ANSI_COLOR="0;31"
CPE_NAME="cpe:/o:centos:centos:7"
HOME_URL="https://www.centos.org/"
BUG_REPORT_URL="https://bugs.centos.org/"

CENTOS_MANTISBT_PROJECT="CentOS-7"
CENTOS_MANTISBT_PROJECT_VERSION="7"
REDHAT_SUPPORT_PRODUCT="centos"
REDHAT_SUPPORT_PRODUCT_VERSION="7"

CentOS Linux release 7.9.2009 (Core)
CentOS Linux release 7.9.2009 (Core)
[root@localhost ~]#
2 下载内核离线升级包
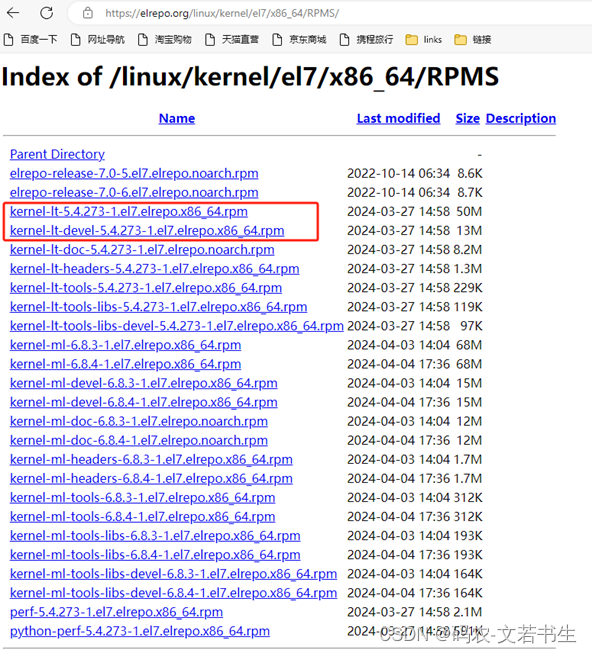
下载地址:https://elrepo.org/linux/kernel/el7/x86_64/RPMS/
3 升级内核
上传下载的内核安装包,执行命令:
rpm -ivh *.rpm --nodeps --force
执行命令:
awk -F\' '$1=="menuentry " {print $2}' /etc/grub2.cfg

修改/etc/default/grub
GRUB_DEFAULT=saved 改为 GRUB_DEFAULT=0,保存退出

重新加载内核
grub2-mkconfig -o /boot/grub2/grub.cfg

重启机器
reboot
4 确认内核版本
[root@localhost ~]# uname -r
5.4.273-1.el7.elrepo.x86_64
[root@localhost ~]#
二、修改主机名/hosts文件
1 修改主机名
192.168.115.120上执行:
hostnamectl set-hostname k8s-normal-master
192.168.115.121上执行:
hostnamectl set-hostname k8s-normal-node01
2 修改hosts文件
每台机器上执行
cat >> /etc/hosts << EOF
192.168.115.120 k8s-normal-master
192.168.115.121 k8s-normal-node01
EOF
三、关闭防火墙
每台机器上执行:
systemctl stop firewalld.service
systemctl disable firewalld.service
systemctl status firewalld.service

四、关闭SELINUX配置
每台机器上执行:
setenforce 0
sed -ri 's/SELINUX=enforcing/SELINUX=disabled/' /etc/selinux/config
sestatus

五、时间同步
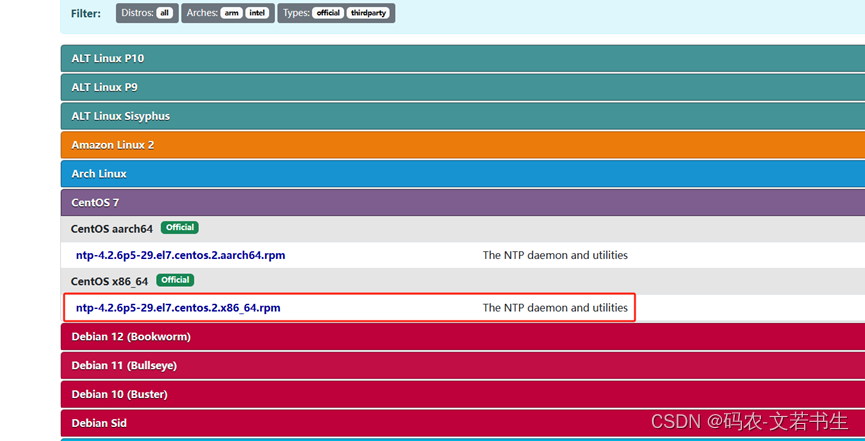
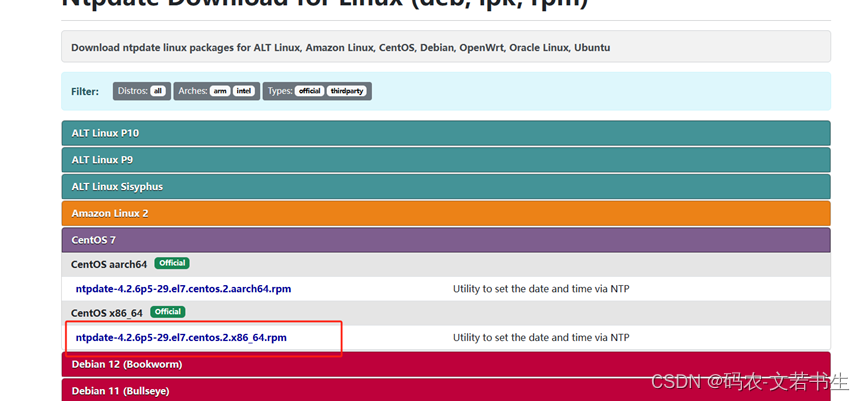
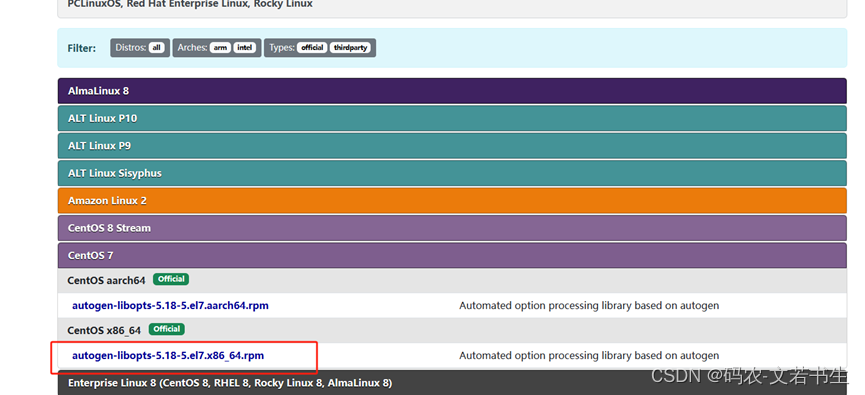
1 下载NTP
在有网的一台机器下载包待离线使用
下载地址:https://pkgs.org/download/ntp
https://pkgs.org/download/ntpdate
https://pkgs.org/download/libopts.so.25()(64bit)
2 卸载
每个机器都执行。
如果已安装了ntp,查询版本信息,如果版本不对,可卸载
查询ntp:
rpm -qa | grep ntp
卸载:
rpm -e --nodeps ntp-xxxx
3 安装
每个机器都执行。
将ntp、ntpdate、libopts上传至各个机器,执行安装命令。
rpm -ivh *.rpm

设置开机自启
systemctl start ntpd
systemctl enable ntpd
4 配置
将一台机器设置为ntp主节点(这里使用192.168.115.120),其他几台机器为从节点
4.1 主节点配置
vi /etc/ntp.conf
按下面的配置注释一些信息添加或修改中文注释附近的配置, 其中192.168.115.0是这几台机器所在的网段。
完整配置如下:
# For more information about this file, see the man pages
# ntp.conf(5), ntp_acc(5), ntp_auth(5), ntp_clock(5), ntp_misc(5), ntp_mon(5).

driftfile /var/lib/ntp/drift

# Permit time synchronization with our time source, but do not
# permit the source to query or modify the service on this system.
restrict default nomodify notrap nopeer noquery

# Permit all access over the loopback interface.  This could
# be tightened as well, but to do so would effect some of
# the administrative functions.
restrict 127.0.0.1
restrict ::1

# Hosts on local network are less restricted.
# 允许内网其他机器同步时间,如果不添加该约束默认允许所有IP访问本机同步服务
#restrict 192.168.1.0 mask 255.255.255.0 nomodify notrap
restrict 192.168.115.0 mask 255.255.255.0 nomodify notrap

# Use public servers from the pool.ntp.org project.
# Please consider joining the pool (http://www.pool.ntp.org/join.html).
#server 0.centos.pool.ntp.org iburst
#server 1.centos.pool. p.org iburst
#server 2.centos.pool.ntp.org iburst
#server 3.centos.pool.ntp.org iburst

# 配置和上游标准时间nt
同步
server 210.72.145.44  # 中国国家授时中心
server 133.100.11.8  #日本[福冈大学]
server 0.cn.pool.ntp.org
server 1.cn.pool.ntp.org
server 2.cn.pool.ntp.org
server 3.cn.pool.ntp.org

# 配置允许上游时间服务器主动修改本机(内网ntp Server)的时间
restrict 210.72.145.44 nomodify notrap noquery
restrict 133.100.11.8 nomodify notrap noquery
restrict 0.cn.pool.ntp.org nomodify notrap noquery
restrict 1.cn.pool.ntp.org nomodify notrap noquery
restrict 2.cn.pool.ntp.org nomodify notrap noquery
restrict 3.cn.pool.ntp.org nomodify notrap noquery

# 确保localhost有足够权限,使用没有任何限制关键词的语法。
# 外部时间服务器不可用时,以本地时间作为时间服务。
# 注意:这里不能改,必须使用127.127.1.0,否则会导致无法
#在ntp客户端运行ntpdate serverIP,出现no server suitable for synchronization found的错误。
#在ntp客户端用ntpdate –d serverIP查看,发现有“Server dropped: strata too high”的错误,并且显示“stratum 16”。而正常情况下stratum这个值得范围是“0~15”。
#这是因为NTP server还没有和其自身或者它的server同步上。
#以下的定义是让NTP Server和其自身保持同步,如果在ntp.conf中定义的server都不可用时,将使用local时间作为ntp服务提供给ntp客户端。
#下面这个配置,建议NTP Client关闭,建议NTP Server打开。因为Client如果打开,可能导致NTP自动选择合适的最近的NTP Server、也就有可能选择了LOCAL作为Server进行同步,而不与远程Server进行同步。
server 127.127.1.0 iburst
fudge 127.127.1.0 stratum 10

#broadcast 192.168.1.255 autokey        # broadcast server
#broadcastclient                        # broadcast client
#broadcast 224.0.1.1 autokey            # multicast server
#multicastclient 224.0.1.1              # multicast client
#manycastserver 239.255.254.254         # manycast server
#manycastclient 239.255.254.254 autokey # manycast client

# Enable public key cryptography.
#crypto

includefile /etc/ntp/crypto/pw

# Key file containing the keys and key identifiers used when operating
# with symmetric key cryptography.
keys /etc/ntp/keys

# Specify the key identifiers which are trusted.
#trustedkey 4 8 42

# Specify the key identifier to use with the ntpdc utility.
#requestkey 8

# Specify the key identifier to use with the ntpq utility.
#controlkey 8

# Enable writing of statistics records.
#statistics clockstats cryptostats loopstats peerstats

# Disable the monitoring facility to prevent amplification attacks using ntpdc
# monlist command when default restrict does not include the noquery flag. See
# CVE-2013-5211 for more details.
# Note: Monitoring will not be disabled with the limited restriction flag.
disable monitor
重启ntp
systemctl restart ntpd
4.2 从节点配置
vi /etc/ntp.conf
按下面的配置注释一些信息添加或修改中文注释附近的配置, 其中192.168.115.120是NTP服务节点的IP。
完整配置:
# Use public servers from the # For more information about this file, see the man pages
# ntp.conf(5), ntp_acc(5), ntp_auth(5), ntp_clock(5), ntp_misc(5), ntp_mon(5).

driftfile /var/lib/ntp/drift

# Permit time synchronization with our time source, but do not
# permit the source to query or modify the service on this system.
restrict default nomodify notrap nopeer noquery

# Permit all access over the loopback interface.  This could
# be tightened as well, but to do so would effect some of
# the administrative functions.
restrict 127.0.0.1
restrict ::1

# Hosts on local network are less restricted.
#restrict 192.168.1.0 mask 255.255.255.0 nomodify notrap

pool.ntp.org project.
# Please consider joining the pool (http://www.pool.ntp.org/join.html).
#server 0.centos.pool.ntp.org iburst
#server 1.centos.pool.ntp.org iburst
#server 2.centos.pool.ntp.org iburst
#server 3.centos.pool.ntp.org iburst

#配置上游时间服务器为本地的ntpd Server服务器
server 192.168.115.11  iburst

# 配置允许上游时间服务器主动修改本机的时间
restrict 192.168.115.11 nomodify notrap noquery

#下面这个配置,建议NTP Client关闭,建议NTP Server打开。因为Client如果打开,可能导致NTP自动选择合适的最近的NTP Server、也就有可能选择了LOCAL作为Server进行同步,而不与远程Server进行同步。
#server 127.127.1.0
#fudge 127.127.1.0 stratum 10

#broadcast 192.168.1.255 autokey        # broadcast server
#broadcastclient                        # broadcast client
#broadcast 224.0.1.1 autokey            # multicast server
#multicastclient 224.0.1.1              # multicast client
#manycastserver 239.255.254.254         # manycast server
#manycastclient 239.255.254.254 autokey # manycast client

# Enable public key cryptography.
#crypto

includefile /etc/ntp/crypto/pw

# Key file containing the keys and key identifiers used when operating
# with symmetric key cryptography.
keys /etc/ntp/keys

# Specify the key identifiers which are trusted.
#trustedkey 4 8 42

# Specify the key identifier to use with the ntpdc utility.
#requestkey 8

# Specify the key identifier to use with the ntpq utility.
#controlkey 8

# Enable writing of statistics records.
#statistics clockstats cryptostats loopstats peerstats

# Disable the monitoring facility to prevent amplification attacks using ntpdc
# monlist command when default restrict does not include the noquery flag. See
# CVE-2013-5211 for more details.
# Note: Monitoring will not be disabled with the limited restriction flag.
disable monitor
重启ntp
systemctl restart ntpd
查看ntp服务状态
[root@localhost ntp]# systemctl status ntpd
● ntpd.service - Network Time Service
   Loaded: loaded (/usr/lib/systemd/system/ntpd.service; enabled; vendor preset: disabled)
   Active: active (running) since 一 2024-04-08 21:36:18 CST; 3min 42s ago
  Process: 9129 ExecStart=/usr/sbin/ntpd -u ntp:ntp $OPTIONS (code=exited, status=0/SUCCESS)
 Main PID: 9130 (ntpd)
   CGroup: /system.slice/ntpd.service
           └─9130 /usr/sbin/ntpd -u ntp:ntp -g

4月 08 21:36:18 k8s-master02 ntpd[9130]: Listen and drop on 0 v4wildcard 0.0.0.0 UDP 123
4月 08 21:36:18 k8s-master02 ntpd[9130]: Listen and drop on 1 v6wildcard :: UDP 123
4月 08 21:36:18 k8s-master02 ntpd[9130]: Listen normally on 2 lo 127.0.0.1 UDP 123
4月 08 21:36:18 k8s-master02 ntpd[9130]: Listen normally on 3 ens33 192.168.115.12 UDP 123
4月 08 21:36:18 k8s-master02 ntpd[9130]: Listen normally on 4 ens33 fe80::20c:29ff:febe:19d4 UDP 123
4月 08 21:36:18 k8s-master02 ntpd[9130]: Listen normally on 5 lo ::1 UDP 123
4月 08 21:36:18 k8s-master02 ntpd[9130]: Listening on routing socket on fd #22 for interface updates
4月 08 21:36:18 k8s-master02 ntpd[9130]: 0.0.0.0 c016 06 restart
4月 08 21:36:18 k8s-master02 ntpd[9130]: 0.0.0.0 c012 02 freq_set kernel 0.000 PPM
4月 08 21:36:18 k8s-master02 ntpd[9130]: 0.0.0.0 c011 01 freq_not_set
[root@localhost ntp]#
查看ntp服务器有无和上层ntp连通
[root@localhost ntp]# ntpstat
unsynchronised
  time server re-starting
   polling server every 8 s
[root@localhost ntp]#
查看ntp服务器和上层ntp的状态
[root@localhost ntp]# ntpq -p
     remote           refid      st t when poll reach   delay   offset  jitter
=============================================================================
 k8s-master01    .INIT.          16 u   32   64    0    0.000    0.000   0.000
[root@localhost ntp]#
六、配置内核路由转发以及网桥过滤
# 配置内核路由转发及网桥过滤
# 添加网桥过滤及内核转发配置文件
cat > /etc/sysctl.d/k8s.conf << EOF
net.bridge.bridge-nf-call-ip6tables = 1
net.bridge.bridge-nf-call-iptables = 1
net.ipv4.ip_forward=1
vm.swappiness=0
EOF
# 加载br_netfilter模块
modprobe br_netfilter
# 查看是否加载成功
[root@localhost ntp]# lsmod | grep br_netfilter
br_netfilter           28672  0
# 使其生效
sysctl --system
七、安装ipset、ipvsadm
本次安装使用的centos系统 ipset已经安装了不再安装,仅安装ipvsadm,如果使用的没有ipset请自行安装
1 离线下载
在一台有网的机器下载包
yum -y install --downloadonly --downloaddir /opt/software/ipset_ipvsadm ipset ipvsadm
2 安装
每台机器都安装。
将ipvsadm的rpm安装包上传至服务器
安装:
rpm -ivh ipvsadm-1.27-8.el7.x86_64.rpm
八、关闭swap交换区
# 临时关闭Swap分区
swapoff -a
# 永久关闭Swap分区
sed -ri 's/.*swap.*/#&/' /etc/fstab
# 查看下
grep swap /etc/fstab
九、配置ssh免密登录
在一台机器上创建:
[root@k8s-master01 ~]# ssh-keygen
Generating public/private rsa key pair.
# 回车
Enter file in which to save the key (/root/.ssh/id_rsa):
Created directory '/root/.ssh'.
# 回车
Enter passphrase (empty for no passphrase):
# 回车
Enter same passphrase again:
Your identification has been saved in /root/.ssh/id_rsa.
Your public key has been saved in /root/.ssh/id_rsa.pub.
The key fingerprint is:
SHA256:wljf8M0hYRw4byXHnwgQpZcVCGA8R0+FmzXfHYpSzE8 root@k8s-master01
The key's randomart image is:
+---[RSA 2048]----+
|     .oo=BO*+.   |
|     .o +=*B*E . |
|      .ooo*O==.oo|
|     + . *==.++ o|
|    . o S.+ o    |
|       .         |
|                 |
|                 |
|                 |
+----[SHA256]-----+
[root@k8s-master01 ~]#
复制id_rsa.pub
[root@k8s-master01 ~]# cd /root/.ssh
[root@k8s-master01 .ssh]# ls
id_rsa  id_rsa.pub
# 复制
[root@k8s-master01 .ssh]# cp id_rsa.pub authorized_keys
[root@k8s-master01 .ssh]# ll
总用量 12
-rw-r--r--. 1 root root  399 4月   8 22:34 authorized_keys
-rw-------. 1 root root 1766 4月   8 22:31 id_rsa
-rw-r--r--. 1 root root  399 4月   8 22:31 id_rsa.pub
[root@k8s-master01 .ssh]#
在其他机器创建/root/.ssh目录
mkdir -p /root/.ssh
将/root/.ssh拷贝到其他机器
scp -r /root/.ssh/* 192.168.115.121:/root/.ssh/
到各个机器验证免密
[root@k8s-node01 ~]# ssh root@192.168.115.121
The authenticity of host '192.168.115.11 (192.168.115.11)' can't be established.
ECDSA key fingerprint is SHA256:DmSlU9aS8ikfAB9IHc6N7HMY/X/Z4qc6QGA0/TrhRo8.
ECDSA key fingerprint is MD5:6d:08:b2:e4:18:d0:78:eb:9a:92:2b:1e:4d:a4:e6:28.
Are you sure you want to continue connecting (yes/no)? yes
Warning: Permanently added '192.168.115.11' (ECDSA) to the list of known hosts.
Last login: Mon Apr  8 22:42:08 2024 from k8s-master03
[root@k8s-master01 ~]# exit
登出
十、安装docker-ce/cri-dockerd
1 安装docker-ce
1.1 下载
在一台有网的机器下载包
(1) 配置阿里云源
cd /etc/yum.repos.d/
# 备份默认的repo文件
mkdir bak && mv *.repo bak
# 下载阿里云yum源文件
curl -o /etc/yum.repos.d/CentOS-Base.repo http://mirrors.aliyun.com/repo/Centos-7.repo
# 清理、更新缓存
yum clean all && yum makecache
(2) 如果存在docker,卸载
yum remove docker docker-client docker-client-latest docker-common docker-latest docker-latest-logrotate docker-logrotate docker-engine
(3) 建议重新安装epel源
rpm -qa | grep epel
yum remove epel-release
yum -y install epel-release
(4) 安装yum-utils
yum install -y yum-utils
(5) 添加docker仓库
yum-config-manager --add-repo http://mirrors.aliyun.com/docker-ce/linux/centos/docker-ce.repo
(6) 更新软件包索引
yum makecache fast
(7) 下载RPM包
# 查看docker版本,这里选择25.0.5
yum list docker-ce --showduplicates |sort –r

# 查看containerd.io版本,这里选择1.6.31
yum list containerd.io --showduplicates |sort –r

# 下载命令,下载后包在/tmp/docker下
mkdier -p /tmp/docker
yum install -y docker-ce-25.0.5 docker-ce-cli-25.0.5 containerd.io-1.6.31 --downloadonly --downloaddir=/tmp/docker
1.2 安装
每台机器都安装
将下载好的安装包上传至各个虚拟机
rpm -ivh *.rpm
启动docker
systemctl daemon-reload                                                       #重载unit配置文件
systemctl start docker                                                             #启动Docker
systemctl enable docker.service                                           #设置开机自启
查看docker版本
[root@k8s-master01 docker-ce]# docker --version
Docker version 25.0.5, build 5dc9bcc
[root@k8s-master01 docker-ce]#
2 安装cri-docker
在 Kubernetes v1.24 及更早版本中,可以在 Kubernetes 中使用 Docker Engine, 依赖于一个称作 dockershim 的内置 Kubernetes 组件。 dockershim 组件在 Kubernetes v1.24 发行版本中已被移除;不过,一种来自第三方的替代品, cri-dockerd 是可供使用的。 cri-dockerd 适配器允许通过 容器运行时接口(Container Runtime Interface,CRI) 来使用 Docker Engine。
2.1 下载
在一台有网的机器下载安装包
下载地址:https://github.com/Mirantis/cri-dockerd/releases
选择对应的架构和版本,这里下载:https://github.com/Mirantis/cri-dockerd/releases/download/v0.3.8/cri-dockerd-0.3.8-3.el7.x86_64.rpm
2.2 安装
每台机器都安装
将RPM包上传至机器
#安装
rpm -ivh cri-dockerd-0.3.8-3.el7.x86_64.rpm

# 修改/usr/lib/system/system/cri-docker.service中ExecStart那一行,制定用作Pod的基础容器镜像(pause)
ExecStart=/usr/bin/cri-dockerd --pod-infra-container-image=registry.k8s.io/pause:3.9 --container-runtime-endpoint fd://
启动cri-dockerd
systemctl enable --now cri-docker
查看状态
[root@k8s-master01 cri-dockerd]# systemctl status cri-docker
● cri-docker.service - CRI Interface for Docker Application Container Engine
   Loaded: loaded (/usr/lib/systemd/system/cri-docker.service; enabled; vendor preset: disabled)
   Active: active (running) since 二 2024-04-09 03:20:54 CST; 16s ago
     Docs: https://docs.mirantis.com
 Main PID: 11598 (cri-dockerd)
    Tasks: 8
   Memory: 14.3M
   CGroup: /system.slice/cri-docker.service
           └─11598 /usr/bin/cri-dockerd --pod-infra-container-image=registry.k8s.io/pause:3.9 --container-runtime-endpoint fd://

4月 09 03:20:54 k8s-master01 cri-dockerd[11598]: time="2024-04-09T03:20:54+08:00" level=info msg="Hairpin mode is set to none"
4月 09 03:20:54 k8s-master01 cri-dockerd[11598]: time="2024-04-09T03:20:54+08:00" level=info msg="The binary conntrack is not installed, this can cause failures in network connection cleanup."
4月 09 03:20:54 k8s-master01 cri-dockerd[11598]: time="2024-04-09T03:20:54+08:00" level=info msg="The binary conntrack is not installed, this can cause failures in network connection cleanup."
4月 09 03:20:54 k8s-master01 cri-dockerd[11598]: time="2024-04-09T03:20:54+08:00" level=info msg="Loaded network plugin cni"
4月 09 03:20:54 k8s-master01 cri-dockerd[11598]: time="2024-04-09T03:20:54+08:00" level=info msg="Docker cri networking managed by network plugin cni"
4月 09 03:20:54 k8s-master01 systemd[1]: Started CRI Interface for Docker Application Container Engine.
4月 09 03:20:54 k8s-master01 cri-dockerd[11598]: time="2024-04-09T03:20:54+08:00" level=info msg="Setting cgroupDriver systemd"
4月 09 03:20:54 k8s-master01 cri-dockerd[11598]: time="2024-04-09T03:20:54+08:00" level=info msg="Docker cri received runtime config &RuntimeConfig{NetworkConfig:&NetworkConfig{PodCidr:,},}"
4月 09 03:20:54 k8s-master01 cri-dockerd[11598]: time="2024-04-09T03:20:54+08:00" level=info msg="Starting the GRPC backend for the Docker CRI interface."
4月 09 03:20:54 k8s-master01 cri-dockerd[11598]: time="2024-04-09T03:20:54+08:00" level=info msg="Start cri-dockerd grpc backend"
[root@k8s-master01 cri-dockerd]#
十一、安装kubernetes
1 下载 kubelet kubeadm kubectl
在一台有网的机器执行:
# 配置镜像源
# k8s源镜像源准备(社区版yum源,注意区分版本)
cat <<EOF | tee /etc/yum.repos.d/kubernetes.repo
[kubernetes]
name=Kubernetes
baseurl=https://pkgs.k8s.io/core:/stable:/v1.30/rpm/
enabled=1
gpgcheck=1
gpgkey=https://pkgs.k8s.io/core:/stable:/v1.30/rpm/repodata/repomd.xml.key
# exclude=kubelet kubeadm kubectl cri-tools kubernetes-cni
EOF
下载RPM包
#查看可安装的版本,选择合适的版本,这里选择1.30.0-150500.1.1
yum list kubeadm.x86_64 --showduplicates |sort -r
yum list kubelet.x86_64 --showduplicates |sort -r
yum list kubectl.x86_64 --showduplicates |sort -r

# yum下载(不安装)
yum -y install --downloadonly --downloaddir=/opt/software/k8s-package kubeadm-1.30.0-150500.1.1 kubelet-1.30.0-150500.1.1 kubectl-1.30.0-150500.1.1
2 安装kubelet kubeadm kubectl
每台机器都执行
将安装包上传至各个机器
安装
rpm -ivh *.rpm
修改docker的cgroup-driver
vi /etc/docker/daemon.json

# 添加或修改内容
{
  "exec-opts": ["native.cgroupdriver=systemd"]
}

#重启docker
systemctl daemon-reload
systemctl restart docker
systemctl status docker
配置kublet的cgroup 驱动与docker一致
# 备份原文件
cp /etc/sysconfig/kubelet{,.bak}
# 修改kubelet文件
vi /etc/sysconfig/kubelet
# 修改内容
KUBELET_EXTRA_ARGS="--cgroup-driver=systemd"
开启自启kubelet
systemctl enable kubelet
3 安装tab命令补全工具(可选)
在一个有网的机器下载
yum install -y --downloadonly --downloaddir=/opt/software/command-tab/ bash-completion
安装
rpm -ivh bash-completion-2.1-8.el7.noarch.rpm
source /usr/share/bash-completion/bash_completion
echo "source <(kubectl completion bash)" >> ~/.bashrc
source  ~/.bashrc
4 下载K8S运行依赖的镜像
在一个有网的机器执行下载(已安装过docker的机器)
查看k8s1.30需要依赖的镜像
[root@k8s-master01 ~]# kubeadm config images list
registry.k8s.io/kube-apiserver:v1.30.0
registry.k8s.io/kube-controller-manager:v1.30.0
registry.k8s.io/kube-scheduler:v1.30.0
registry.k8s.io/kube-proxy:v1.30.0
registry.k8s.io/coredns/coredns:v1.11.1
registry.k8s.io/pause:3.9
registry.k8s.io/etcd:3.5.12-0
K8s.io需要梯子才能下载,这里使用阿里云国内镜像
docker pull registry.aliyuncs.com/google_containers/kube-apiserver:v1.30.0
docker pull registry.aliyuncs.com/google_containers/kube-controller-manager:v1.30.0
docker pull registry.aliyuncs.com/google_containers/kube-scheduler:v1.30.0
docker pull registry.aliyuncs.com/google_containers/kube-proxy:v1.30.0
docker pull registry.aliyuncs.com/google_containers/coredns:1.11.1
docker pull registry.aliyuncs.com/google_containers/pause:3.9
docker pull registry.aliyuncs.com/google_containers/etcd:3.5.12-0
将docker镜像保存为tar包,并保存待离线使用
docker save -o kube-apiserver-v1.30.0.tar registry.aliyuncs.com/google_containers/kube-apiserver:v1.30.0
docker save -o kube-controller-manager-v1.30.0.tar registry.aliyuncs.com/google_containers/kube-controller-manager:v1.30.0
docker save -o kube-scheduler-v1.30.0.tar registry.aliyuncs.com/google_containers/kube-scheduler:v1.30.0
docker save -o kube-proxy-v1.30.0.tar registry.aliyuncs.com/google_containers/kube-proxy:v1.30.0
docker save -o coredns-1.11.1.tar registry.aliyuncs.com/google_containers/coredns:1.11.1
docker save -o pause-3.9.tar registry.aliyuncs.com/google_containers/pause:3.9
docker save -o etcd-3.5.12-0.tar registry.aliyuncs.com/google_containers/etcd:3.5.12-0
5 安装docker registry并做一些关联配置
5.1 下载docker-registry
在一个有网的已安装docker的机器上执行
#下载
docker pull docker.io/registry
#保存为tar包待离线使用
docker save -o docker-registry.tar  docker.io/registry
5.2 安装docker-registry
将docker-registry镜像包上传至一个机器,这里选择k8s-normal-master
# 解压镜像
docker load -i docker-registry.tar
# 运行docker-registry
mkdir -p /opt/software/registry-data
docker run -d --name registry --restart=always -v /opt/software/registry-data:/var/lib/registry -p 81:5000 docker.io/registry
查看是否已运行
[root@k8s-master01 docker-registry]# docker ps
CONTAINER ID   IMAGE          COMMAND                   CREATED          STATUS          PORTS                                                                                                                     NAMES
72b1ee0dd35d   registry       "/entrypoint.sh /etc…"   17 seconds ago   Up 15 seconds   0.0.0.0:81->5000/tcp, :::81->5000/tcp                                                                                     registry
5.3 将k8s依赖的镜像传入docker-registry
将K8S依赖的镜像上传至k8s-normal-master节点,执行
docker load -i kube-apiserver-v1.30.0.tar
docker load -i kube-controller-manager-v1.30.0.tar
docker load -i kube-scheduler-v1.30.0.tar
docker load -i kube-proxy-v1.30.0.tar
docker load -i coredns-1.11.1.tar
docker load -i pause-3.9.tar
docker load -i etcd-3.5.12-0.tar

docker tag registry.aliyuncs.com/google_containers/kube-apiserver:v1.30.0 192.168.115.120:81/kube-apiserver:v1.30.0
docker tag registry.aliyuncs.com/google_containers/kube-controller-manager:v1.30.0 192.168.115.120:81/kube-controller-manager:v1.30.0
docker tag registry.aliyuncs.com/google_containers/kube-scheduler:v1.30.0 192.168.115.120:81/kube-scheduler:v1.30.0
docker tag registry.aliyuncs.com/google_containers/kube-proxy:v1.30.0 192.168.115.120:81/kube-proxy:v1.30.0
docker tag registry.aliyuncs.com/google_containers/coredns:1.11.1 192.168.115.120:81/coredns:v1.11.1
docker tag registry.aliyuncs.com/google_containers/pause:3.9 192.168.115.120:81/pause:3.9
docker tag registry.aliyuncs.com/google_containers/etcd:3.5.12-0 192.168.115.120:81/etcd:3.5.12-0
在每台机器执行配置,将docker-registry以及k8s的镜像的地址配置到/etc/docker/daemon.json中
vi /etc/docker/daemon.json
添加配置
"insecure-registries":["192.168.115.11:81", "quay.io", "k8s.gcr.io", "gcr.io"]

[root@k8s-master02 ~]# cat /etc/docker/daemon.json
{
  "exec-opts": ["native.cgroupdriver=systemd"],
  "insecure-registries":["192.168.115.11:81", "quay.io", "k8s.gcr.io", "gcr.io"]
}

[root@k8s-master02 ~]#systemctl daemon-reload
[root@k8s-master02 ~]#systemctl restart docker
在k8s-normal-master上将镜像推送到docker-registry
docker push 192.168.115.120:81/kube-apiserver:v1.30.0
docker push 192.168.115.120:81/kube-controller-manager:v1.30.0
docker push 192.168.115.120:81/kube-scheduler:v1.30.0
docker push 192.168.115.120:81/kube-proxy:v1.30.0
docker push 192.168.115.120:81/coredns:v1.11.1
docker push 192.168.115.120:81/pause:3.9
docker push 192.168.115.120:81/etcd:3.5.12-0
5.4 修改cri-docker将pause镜像修改为docker-registry中的
每台电脑都执行
# vi /usr/lib/systemd/system/cri-docker.service
# 修改--pod-infra-container-image=registry.k8s.io/pause:3.9 为--pod-infra-container-image=192.168.115.120:81/pause:3.9
# 重启cri-docker
systemctl daemon-reload
systemctl restart cri-docker
6 安装kubernetes
6.1 k8s-normal-master安装
在主节点k8s-normal-master操作 :
kubeadm init --kubernetes-version=v1.30.0 --pod-network-cidr=10.244.0.0/16 --apiserver-advertise-address=192.168.115.120 --cri-socket unix:///var/run/cri-dockerd.sock --image-repository 192.168.115.120:81
执行完后成功后会生成一些配置信息,如下
Your Kubernetes control-plane has initialized successfully!

To start using your cluster, you need to run the following as a regular user:

  mkdir -p $HOME/.kube
  sudo cp -i /etc/kubernetes/admin.conf $HOME/.kube/config
  sudo chown $(id -u):$(id -g) $HOME/.kube/config

Alternatively, if you are the root user, you can run:

  export KUBECONFIG=/etc/kubernetes/admin.conf

You should now deploy a pod network to the cluster.
Run "kubectl apply -f [podnetwork].yaml" with one of the options listed at:
  https://kubernetes.io/docs/concepts/cluster-administration/addons/

Then you can join any number of worker nodes by running the following on each as root:

kubeadm join 192.168.115.120:6443 --token x85qie.5mbjg836d5dz20hs \
        --discovery-token-ca-cert-hash sha256:00e98e3824a636455824c853467aa4d893f9e307f8f44e25a435295fcdeb1624
其中两处join拷贝出来待用。
执行提示的三条命令
mkdir -p $HOME/.kube
  sudo cp -i /etc/kubernetes/admin.conf $HOME/.kube/config
  sudo chown $(id -u):$(id -g) $HOME/.kube/config
6.2 k8s-normal-node01安装
在从节点k8s-normal-node01执行
kubeadm join 192.168.115.120:6443 --token x85qie.5mbjg836d5dz20hs \
        --discovery-token-ca-cert-hash sha256:00e98e3824a636455824c853467aa4d893f9e307f8f44e25a435295fcdeb1624 \
--cri-socket unix:///var/run/cri-dockerd.sock
至此,k8s的2个节点都安装好了。在其主节点通过命令查看节点情况
[root@k8s-normal-master k8s-config]# kubectl get node
NAME                STATUS     ROLES           AGE     VERSION
k8s-normal-master   NotReady   control-plane   3m21s   v1.30.0
k8s-normal-node01   NotReady   <none>          9s      v1.30.0
7 安装网络组件calico
7.1 下载镜像
在一个有网的机器下载镜像
docker pull docker.io/calico/node:v3.27.3
docker pull docker.io/calico/kube-controllers:v3.27.3
docker pull docker.io/calico/cni:v3.27.3

docker save -o calico-node.tar docker.io/calico/node:v3.27.3
docker save -o calico-kube-controllers.tar docker.io/calico/kube-controllers:v3.27.3
docker save -o calico-cni.tar docker.io/calico/cni:v3.27.3

# 如果以上方式不好下载,从github下载:https://github.com/projectcalico/calico/releases/tag/v3.27.3,选择release-v3.27.3.tgz,下载后解压,从image中找到三个镜像
下载calico.yaml: https://github.com/projectcalico/calico/blob/v3.27.3/manifests/calico.yaml
7.2 安装
将calico的tar包和calico.yaml上传至k8s-master01
docker load -i calico-cni.tar
docker load -i calico-kube-controllers.tar
docker load -i calico-node.tar

docker tag calico/node:v3.27.3 192.168.115.120:81/calico/node:v3.27.3
docker tag calico/kube-controllers:v3.27.3 192.168.115.120:81/calico/kube-controllers:v3.27.3
docker tag docker.io/calico/cni:v3.27.3 192.168.115.120:81/calico/cni:v3.27.3

docker push 192.168.115.120:81/calico/node:v3.27.3
docker push 192.168.115.120:81/calico/kube-controllers:v3.27.3
docker push 192.168.115.120:81/calico/cni:v3.27.3
将calico.yaml上传至主节点
修改其中的镜像,都修改为192.168.115.120:81中的三个镜像:192.168.115.120:81/calico/node:v3.27.3,192.168.115.120:81/calico/kube-controllers:v3.27.3,192.168.115.120:81/calico/cni:v3.27.3
修改网络,value修改为kubuedm-config.yaml中的podSubnet值一致
- name: CALICO_IPV4POOL_CIDR
  value: "10.244.0.0/16"
启动calico
kubectl apply -f calico.yaml
等待几分钟后查看calico的pod,都在running状态了
[root@k8s-normal-master calico]# kubectl get pods -n kube-system -owide
NAME                                        READY   STATUS    RESTARTS   AGE     IP                NODE                NOMINATED NODE   READINESS GATES
calico-kube-controllers-8456bdf5b5-774qd    1/1     Running   0          5m50s   10.244.83.194     k8s-normal-master   <none>           <none>
calico-node-k4mzn                           1/1     Running   0          5m50s   192.168.115.120   k8s-normal-master   <none>           <none>
calico-node-phxxd                           1/1     Running   0          5m50s   192.168.115.121   k8s-normal-node01   <none>           <none>
coredns-5b6b6594c6-f4jbf                    1/1     Running   0          15m     10.244.83.195     k8s-normal-master   <none>           <none>
coredns-5b6b6594c6-x9swg                    1/1     Running   0          15m     10.244.83.193     k8s-normal-master   <none>           <none>
etcd-k8s-normal-master                      1/1     Running   0          15m     192.168.115.120   k8s-normal-master   <none>           <none>
kube-apiserver-k8s-normal-master            1/1     Running   0          15m     192.168.115.120   k8s-normal-master   <none>           <none>
kube-controller-manager-k8s-normal-master   1/1     Running   0          15m     192.168.115.120   k8s-normal-master   <none>           <none>
kube-proxy-b45nw                            1/1     Running   0          12m     192.168.115.121   k8s-normal-node01   <none>           <none>
kube-proxy-v82d8                            1/1     Running   0          15m     192.168.115.120   k8s-normal-master   <none>           <none>
kube-scheduler-k8s-normal-master            1/1     Running   0          15m     192.168.115.120   k8s-normal-master   <none>           <none>
[root@k8s-normal-master calico]#
查看节点状态,都是ready了
[root@k8s-normal-master calico]# kubectl get node
NAME                STATUS   ROLES           AGE   VERSION
k8s-normal-master   Ready    control-plane   15m   v1.30.0
k8s-normal-node01   Ready    <none>          12m   v1.30.0
[root@k8s-normal-master calico]#
十二、延长证书有效期
K8S默认证书有效期为1年,需要延长
在主节点执行命令查看证书有效期
openssl x509 -in /etc/kubernetes/pki/apiserver.crt -noout -text | grep Not
            Not Before: Apr 22 14:09:36 2024 GMT
            Not After : Apr 22 14:14:36 2025 GMT

openssl x509 -in /etc/kubernetes/pki/apiserver-etcd-client.crt -noout -text |grep Not
            Not Before: Apr 22 14:09:36 2024 GMT
            Not After : Apr 22 14:14:36 2025 GMT

openssl x509 -in /etc/kubernetes/pki/front-proxy-ca.crt -noout -text |grep Not
            Not Before: Apr 22 14:09:36 2024 GMT
            Not After : Apr 20 14:14:36 2034 GMT
将update-kubeadm-cert.sh上传至主节点,并执行
chmod +x update-kubeadm-cert.sh
./update-kubeadm-cert.sh
update-kubeadm-cert.sh:
#!/bin/bash

set -o errexit
set -o pipefail
# set -o xtrace

log::err() {
  printf "[$(date +'%Y-%m-%dT%H:%M:%S.%N%z')]: \033[31mERROR: \033[0m$@\n"
}

log::info() {
  printf "[$(date +'%Y-%m-%dT%H:%M:%S.%N%z')]: \033[32mINFO: \033[0m$@\n"
}

log::warning() {
  printf "[$(date +'%Y-%m-%dT%H:%M:%S.%N%z')]: \033[33mWARNING: \033[0m$@\n"
}

check_file() {
  if [[ ! -r  ${1} ]]; then
    log::err "can not find ${1}"
    exit 1
  fi
}

# get x509v3 subject alternative name from the old certificate
cert::get_subject_alt_name() {
  local cert=${1}.crt
  check_file "${cert}"
  local alt_name=$(openssl x509 -text -noout -in ${cert} | grep -A1 'Alternative' | tail -n1 | sed 's/[[:space:]]*Address//g')
  printf "${alt_name}\n"
}

# get subject from the old certificate
cert::get_subj() {
  local cert=${1}.crt
  check_file "${cert}"
  local subj=$(openssl x509 -text -noout -in ${cert}  | grep "Subject:" | sed 's/Subject:/\//g;s/\,/\//;s/[[:space:]]//g')
  printf "${subj}\n"
}

cert::backup_file() {
  local file=${1}
  if [[ ! -e ${file}.old-$(date +%Y%m%d) ]]; then
    cp -rp ${file} ${file}.old-$(date +%Y%m%d)
    log::info "backup ${file} to ${file}.old-$(date +%Y%m%d)"
  else
    log::warning "does not backup, ${file}.old-$(date +%Y%m%d) already exists"
  fi
}

# generate certificate whit client, server or peer
# Args:
#   $1 (the name of certificate)
#   $2 (the type of certificate, must be one of client, server, peer)
#   $3 (the subject of certificates)
#   $4 (the validity of certificates) (days)
#   $5 (the x509v3 subject alternative name of certificate when the type of certificate is server or peer)
cert::gen_cert() {
  local cert_name=${1}
  local cert_type=${2}
  local subj=${3}
  local cert_days=${4}
  local alt_name=${5}
  local cert=${cert_name}.crt
  local key=${cert_name}.key
  local csr=${cert_name}.csr
  local csr_conf="distinguished_name = dn\n[dn]\n[v3_ext]\nkeyUsage = critical, digitalSignature, keyEncipherment\n"

  check_file "${key}"
  check_file "${cert}"

  # backup certificate when certificate not in ${kubeconf_arr[@]}
  # kubeconf_arr=("controller-manager.crt" "scheduler.crt" "admin.crt" "kubelet.crt")
  # if [[ ! "${kubeconf_arr[@]}" =~ "${cert##*/}" ]]; then
  #   cert::backup_file "${cert}"
  # fi

  case "${cert_type}" in
    client)
      openssl req -new  -key ${key} -subj "${subj}" -reqexts v3_ext \
        -config <(printf "${csr_conf} extendedKeyUsage = clientAuth\n") -out ${csr}
      openssl x509 -in ${csr} -req -CA ${CA_CERT} -CAkey ${CA_KEY} -CAcreateserial -extensions v3_ext \
        -extfile <(printf "${csr_conf} extendedKeyUsage = clientAuth\n") -days ${cert_days} -out ${cert}
      log::info "generated ${cert}"
    ;;
    server)
      openssl req -new  -key ${key} -subj "${subj}" -reqexts v3_ext \
        -config <(printf "${csr_conf} extendedKeyUsage = serverAuth\nsubjectAltName = ${alt_name}\n") -out ${csr}
      openssl x509 -in ${csr} -req -CA ${CA_CERT} -CAkey ${CA_KEY} -CAcreateserial -extensions v3_ext \
        -extfile <(printf "${csr_conf} extendedKeyUsage = serverAuth\nsubjectAltName = ${alt_name}\n") -days ${cert_days} -out ${cert}
      log::info "generated ${cert}"
    ;;
    peer)
      openssl req -new  -key ${key} -subj "${subj}" -reqexts v3_ext \
        -config <(printf "${csr_conf} extendedKeyUsage = serverAuth, clientAuth\nsubjectAltName = ${alt_name}\n") -out ${csr}
      openssl x509 -in ${csr} -req -CA ${CA_CERT} -CAkey ${CA_KEY} -CAcreateserial -extensions v3_ext \
        -extfile <(printf "${csr_conf} extendedKeyUsage = serverAuth, clientAuth\nsubjectAltName = ${alt_name}\n") -days ${cert_days} -out ${cert}
      log::info "generated ${cert}"
    ;;
    *)
      log::err "unknow, unsupported etcd certs type: ${cert_type}, supported type: client, server, peer"
      exit 1
  esac

  rm -f ${csr}
}

cert::update_kubeconf() {
  local cert_name=${1}
  local kubeconf_file=${cert_name}.conf
  local cert=${cert_name}.crt
  local key=${cert_name}.key

  # generate  certificate
  check_file ${kubeconf_file}
  # get the key from the old kubeconf
  grep "client-key-data" ${kubeconf_file} | awk {'print$2'} | base64 -d > ${key}
  # get the old certificate from the old kubeconf
  grep "client-certificate-data" ${kubeconf_file} | awk {'print$2'} | base64 -d > ${cert}
  # get subject from the old certificate
  local subj=$(cert::get_subj ${cert_name})
  cert::gen_cert "${cert_name}" "client" "${subj}" "${CAER_DAYS}"
  # get certificate base64 code
  local cert_base64=$(base64 -w 0 ${cert})

  # backup kubeconf
  # cert::backup_file "${kubeconf_file}"

  # set certificate base64 code to kubeconf
  sed -i 's/client-certificate-data:.*/client-certificate-data: '${cert_base64}'/g' ${kubeconf_file}

  log::info "generated new ${kubeconf_file}"
  rm -f ${cert}
  rm -f ${key}

  # set config for kubectl
  if [[ ${cert_name##*/} == "admin" ]]; then
    mkdir -p ~/.kube
    cp -fp ${kubeconf_file} ~/.kube/config
    log::info "copy the admin.conf to ~/.kube/config for kubectl"
  fi
}

cert::update_etcd_cert() {
  PKI_PATH=${KUBE_PATH}/pki/etcd
  CA_CERT=${PKI_PATH}/ca.crt
  CA_KEY=${PKI_PATH}/ca.key

  check_file "${CA_CERT}"
  check_file "${CA_KEY}"

  # generate etcd server certificate
  # /etc/kubernetes/pki/etcd/server
  CART_NAME=${PKI_PATH}/server
  subject_alt_name=$(cert::get_subject_alt_name ${CART_NAME})
  cert::gen_cert "${CART_NAME}" "peer" "/CN=etcd-server" "${CAER_DAYS}" "${subject_alt_name}"

  # generate etcd peer certificate
  # /etc/kubernetes/pki/etcd/peer
  CART_NAME=${PKI_PATH}/peer
  subject_alt_name=$(cert::get_subject_alt_name ${CART_NAME})
  cert::gen_cert "${CART_NAME}" "peer" "/CN=etcd-peer" "${CAER_DAYS}" "${subject_alt_name}"

  # generate etcd healthcheck-client certificate
  # /etc/kubernetes/pki/etcd/healthcheck-client
  CART_NAME=${PKI_PATH}/healthcheck-client
  cert::gen_cert "${CART_NAME}" "client" "/O=system:masters/CN=kube-etcd-healthcheck-client" "${CAER_DAYS}"

  # generate apiserver-etcd-client certificate
  # /etc/kubernetes/pki/apiserver-etcd-client
  check_file "${CA_CERT}"
  check_file "${CA_KEY}"
  PKI_PATH=${KUBE_PATH}/pki
  CART_NAME=${PKI_PATH}/apiserver-etcd-client
  cert::gen_cert "${CART_NAME}" "client" "/O=system:masters/CN=kube-apiserver-etcd-client" "${CAER_DAYS}"

  # restart etcd
  docker ps | awk '/k8s_etcd/{print$1}' | xargs -r -I '{}' docker restart {} || true
  log::info "restarted etcd"
}

cert::update_master_cert() {
  PKI_PATH=${KUBE_PATH}/pki
  CA_CERT=${PKI_PATH}/ca.crt
  CA_KEY=${PKI_PATH}/ca.key

  check_file "${CA_CERT}"
  check_file "${CA_KEY}"

  # generate apiserver server certificate
  # /etc/kubernetes/pki/apiserver
  CART_NAME=${PKI_PATH}/apiserver
  subject_alt_name=$(cert::get_subject_alt_name ${CART_NAME})
  cert::gen_cert "${CART_NAME}" "server" "/CN=kube-apiserver" "${CAER_DAYS}" "${subject_alt_name}"

  # generate apiserver-kubelet-client certificate
  # /etc/kubernetes/pki/apiserver-kubelet-client
  CART_NAME=${PKI_PATH}/apiserver-kubelet-client
  cert::gen_cert "${CART_NAME}" "client" "/O=system:masters/CN=kube-apiserver-kubelet-client" "${CAER_DAYS}"

  # generate kubeconf for controller-manager,scheduler,kubectl and kubelet
  # /etc/kubernetes/controller-manager,scheduler,admin,kubelet.conf
  cert::update_kubeconf "${KUBE_PATH}/controller-manager"
  cert::update_kubeconf "${KUBE_PATH}/scheduler"
  cert::update_kubeconf "${KUBE_PATH}/admin"
  # check kubelet.conf
  # https://github.com/kubernetes/kubeadm/issues/1753
  set +e
  grep kubelet-client-current.pem /etc/kubernetes/kubelet.conf > /dev/null 2>&1
  kubelet_cert_auto_update=$?
  set -e
  if [[ "$kubelet_cert_auto_update" == "0" ]]; then
    log::warning "does not need to update kubelet.conf"
  else
    cert::update_kubeconf "${KUBE_PATH}/kubelet"
  fi

  # generate front-proxy-client certificate
  # use front-proxy-client ca
  CA_CERT=${PKI_PATH}/front-proxy-ca.crt
  CA_KEY=${PKI_PATH}/front-proxy-ca.key
  check_file "${CA_CERT}"
  check_file "${CA_KEY}"
  CART_NAME=${PKI_PATH}/front-proxy-client
  cert::gen_cert "${CART_NAME}" "client" "/CN=front-proxy-client" "${CAER_DAYS}"

  # restart apiserve, controller-manager, scheduler and kubelet
  docker ps | awk '/k8s_kube-apiserver/{print$1}' | xargs -r -I '{}' docker restart {} || true
  log::info "restarted kube-apiserver"
  docker ps | awk '/k8s_kube-controller-manager/{print$1}' | xargs -r -I '{}' docker restart {} || true
  log::info "restarted kube-controller-manager"
  docker ps | awk '/k8s_kube-scheduler/{print$1}' | xargs -r -I '{}' docker restart {} || true
  log::info "restarted kube-scheduler"
  systemctl restart kubelet
  log::info "restarted kubelet"
}

main() {
  local node_tpye=$1

  KUBE_PATH=/etc/kubernetes
  CAER_DAYS=3650

  # backup $KUBE_PATH to $KUBE_PATH.old-$(date +%Y%m%d)
  cert::backup_file "${KUBE_PATH}"

  case ${node_tpye} in
    etcd)
	  # update etcd certificates
      cert::update_etcd_cert
    ;;
    master)
	  # update master certificates and kubeconf
      cert::update_master_cert
    ;;
    all)
      # update etcd certificates
      cert::update_etcd_cert
      # update master certificates and kubeconf
      cert::update_master_cert
    ;;
    *)
      log::err "unknow, unsupported certs type: ${cert_type}, supported type: all, etcd, master"
      printf "Documentation: https://github.com/yuyicai/update-kube-cert
  example:
    '\033[32m./update-kubeadm-cert.sh all\033[0m' update all etcd certificates, master certificates and kubeconf
      /etc/kubernetes
      ├── admin.conf
      ├── controller-manager.conf
      ├── scheduler.conf
      ├── kubelet.conf
      └── pki
          ├── apiserver.crt
          ├── apiserver-etcd-client.crt
          ├── apiserver-kubelet-client.crt
          ├── front-proxy-client.crt
          └── etcd
              ├── healthcheck-client.crt
              ├── peer.crt
              └── server.crt

    '\033[32m./update-kubeadm-cert.sh etcd\033[0m' update only etcd certificates
      /etc/kubernetes
      └── pki
          ├── apiserver-etcd-client.crt
          └── etcd
              ├── healthcheck-client.crt
              ├── peer.crt
              └── server.crt

    '\033[32m./update-kubeadm-cert.sh master\033[0m' update only master certificates and kubeconf
      /etc/kubernetes
      ├── admin.conf
      ├── controller-manager.conf
      ├── scheduler.conf
      ├── kubelet.conf
      └── pki
          ├── apiserver.crt
          ├── apiserver-kubelet-client.crt
          └── front-proxy-client.crt
"
      exit 1
    esac
}

main "$@"
在主节点执行命令查看证书有效期
openssl x509 -in /etc/kubernetes/pki/apiserver.crt -noout -text | grep Not
            Not Before: Apr 22 15:05:11 2024 GMT
            Not After : Apr 20 15:05:11 2034 GMT

openssl x509 -in /etc/kubernetes/pki/apiserver-etcd-client.crt -noout -text |grep Not
            Not Before: Apr 22 15:05:11 2024 GMT
            Not After : Apr 20 15:05:11 2034 GMT

openssl x509 -in /etc/kubernetes/pki/front-proxy-ca.crt -noout -text |grep Not
            Not Before: Apr 22 14:09:36 2024 GMT
            Not After : Apr 20 14:14:36 2034 GMT


