前言

本章主要讲解下 Activity 的启动流程;
整体概念
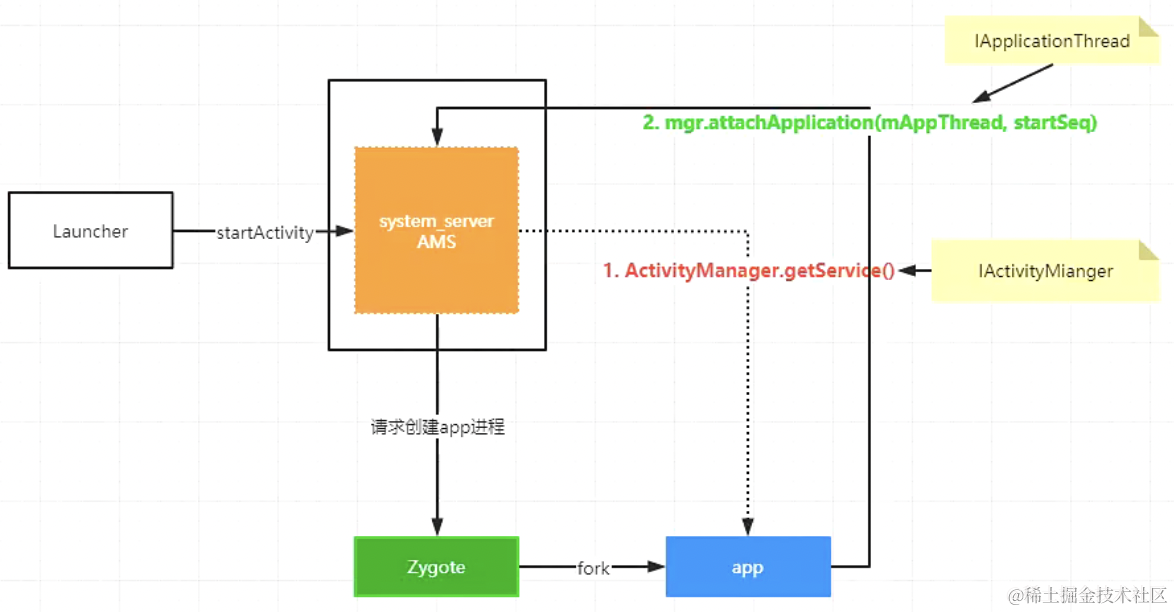
点击桌面图标,启动目标应用程序的 Activity,首先会跟 AMS 打交道,也就是 SystemServer 进程中启动的AMS,Launcher 进程和 SystemServer 进程中的 AMS 通信「一次跨进程通信」,AMS 会进行一系列的操作「验证Activity 的启动模式,上一个 Activity 怎么处理,有没有权限等等」验证完之后 就要启动这个 Activity,启动这个 Activity 有两种情况,一种是完全没有启动过也就是启动 Activity 所在的进程不存在,此时 AMS 就会向 Zygote 进程请求创建 Activity 所在的进程「一次跨进程通信,这里使用的是 socket 而不是 binder 」,Zygote 进程就会 fork 出 app 进程,fork 出 app 进程之后,就会调用 app 进程中 ActivityThread 的main 方法,main 方法中会 new ActivityThread 并调用 attach 方法,attach 方法中会调用attachApplication 方法,将 IApplicaionThread 传递给 AMS, 剩下的事情就是 AMS 和 app 进程之间的通信了。app 进程会通知 AMS,app 进程准备就绪「attachApplication 的过程」,AMS 启动目标 Activity;
Launcher 进程与 AMS 通信方式:Luancher 进程通过 ServiceManage r获取 SytemServer「系统服务」进程中 AMS 的代理 ActivityManagerServiceProxy 来和 AMS 进行通信;
app 进程与 AMS 通信方式:app 进程跟 AMS 比较好通信,因为 AMS 的 binder 服务是注册到了ServiceManager 中了,所以通过 getService(Context.ACTIVITY_SERVICE) 就可以获取到 AMS,所以 app 进程创建出来之后会跟 AMS 通信,而如果 AMS 要控制 app,那么 app 进程中就需要一个 binder 调用,也就是 IApplicationThread 接口;
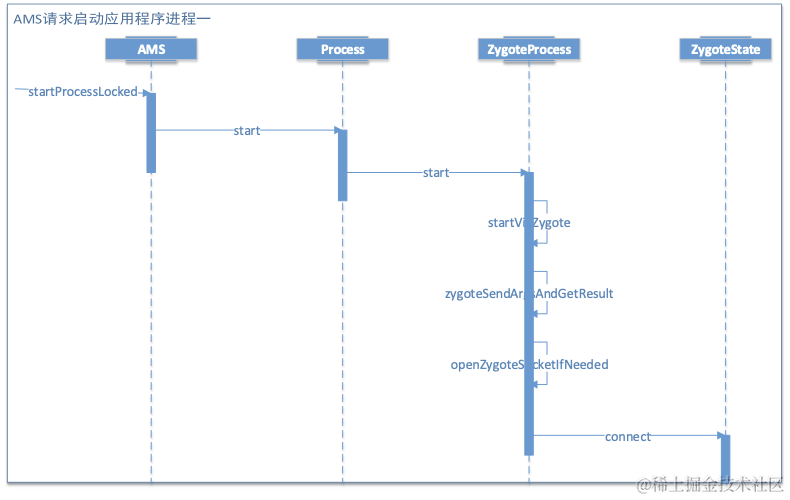
AMS 请求 Zygote 进程的流程
几个比较重要的类
Activity 启动过程中会涉及 6 个比较重要的类,对于插件化开发来说比较关键,我们先来梳理下:
ProcessRecord
一种数据结构,存储着应用程序启动一系列相关信息;
- 描述身份的数据
- ApplicationInfo info:AndroidManifest.xml 中定义的 Application 信息;
- boolean isolated:是不是 isolated 进程;
- int uid:进程uid;
- int userId:这个是 android 做的多用户系统 id,就像 windows 可以登录很多用户一样,android也希望可以实现类似的多用户
- String processName:进程名字,默认情况下是包名;
- UidRecord uidRecord:记录已经使用的uid;
- IApplicationThread thread:这个很重要,它是ApplicationThread的客户端,AMS就是通过这个对象给apk进程发送异步消息的(管理四大组件的消息),所以只有这个对象不为空的情况下,才代表apk进程可是使用了;
- int pid:进程的pid;
- String procStatFile:proc目录下每一个进程都有一个以pid命名的目录文件,这个目录下记载着进程的详细信息,这个目录及目录下的文件是内核创建的, proc是内核文件系统,proc就是process的缩写,涉及的目的就是导出进程内核信息;
- int[] gids:gid组;
- CompatibilityInfo compat : 兼容性信息;
- String requiredAbi : abi信息;
- String instructionSet : 指令集信息;
- 描述进程中组件的数据
- pkgList:进程中运行的包;
- ArraySet pkgDeps:进程运行依赖的包;
- ArrayList activities:进程启动的所有的activity组件记录表;
- ArraySet services:进程启动的所有的service组件记录表;
- ArraySet executingServices:正在运行(executing)是怎么定义的?首先需要明确的是系统是怎么控制组件的?发送消息给apk进程,apk进程处理消息,上报消息完成,这被定义为一个完整的执行过程,因此正在执行(executing)被定义为发送消息到上报完成这段时间;
- ArraySet connections:绑定service的客户端记录表;
- ArraySet receivers:广播接收器的记录表;
- ContentProviderRecord pubProviders:pub是publish(发布)的意思,ContentProvider需要安装然后把自己发布到系统(AMS)中后,才能使用,安装指的是apk进程加载ContentProvider子类、初始化、创建数据库等过程,发布是将ContentProvider的binder客户端注册到AMS中;
- ArrayList conProviders:使用ContentProvider的客户端记录表;
- BroadcastRecord curReceiver:当前进程正在执行的广播 在本节中以上组件信息只是做一个
简单的描述,以后单独分析组件管理的时候在详细介绍;
- 描述进程状态的数据
- int maxAdj:进程的adj上限(adjustment)Android杀进程机制,adj将进程划分成不同的层次,根据进程的优先级进行排序杀进程;
- int curRawAdj:当前正在计算的adj,这个值有可能大于maxAdj;
- int setRawAdj:上次计算的curRawAdj设置到lowmemorykiller系统后的adj;
- int curAdj:当前正在计算的adj,这是curRawAdj被maxAdj削平的值;
- int setAdj:上次计算的curAdj设置到lowmemorykiller系统后的adj;
- int verifiedAdj:setAdj校验后的值;
- int curSchedGroup:正在计算的调度组;
- int setSchedGroup:保存上次计算的调度组;
- int curProcState:正在计算的进程状态;
- int repProcState:发送给apk进程的状态;
- int setProcState:保存上次计算的进程状态;
- int pssProcState:pss进程状态;
- ProcessState baseProcessTracker:进程状态监测器;
- int adjSeq:计算adj的序列数;
- int lruSeq:lru序列数;
- IBinder forcingToForeground:强制将进程的状态设置为前台运行的IBinder,IBinder代表的是组件的ID,这个是整个android系统唯一;
- 和pss相关的数据
- long initialIdlePss:初始化pss;
- long lastPss:上次pss;
- long lastPss:上次pss;
- long lastSwapPss:上次SwapPss数据;
- long lastCachedPss:上次CachedPss数据;
- long lastCachedSwapPss:上次CachedSwapPss数据;
- 和时间相关的数据
- long lastActivityTime:上次使用时间;
- long lastPssTime:上次计算pss的时间;
- long nextPssTime:下次计算pss的时间;
- long lastStateTime:上次设置进程状态的时间;
- long lastWakeTime:持有wakelock的时长;
- long lastCpuTime:上次计算占用cpu的时长;
- long curCpuTime:当前最新占用cpu的时长;
- long lastRequestedGc:上次发送gc命令给apk进程的时间;
- long lastLowMemory:上次发送低内存消息给apk进程的时间;
- long lastProviderTime:上次进程中ContentProvider被使用的时间;
- long interactionEventTime:上次发送交互时间时间;
- long fgInteractionTime:变成前台的时间;
- crash和anr相关的数据
- IBinder.DeathRecipient deathRecipient:apk进程退出运行的话,会触发这个对象的binderDied()方法,来回收系统资源;
- boolean crashing:进程已经crash;
- Dialog crashDialog:crash对话框;
- boolean forceCrashReport:强制crash对话框显示;
- boolean notResponding:是否处于anr状态;
- Dialog anrDialog:anr显示对话框;
- Runnable crashHandler:crash回调;
- ActivityManager.ProcessErrorStateInfo crashingReport:crash报告的进程状态;
- ActivityManager.ProcessErrorStateInfo notRespondingReport:anr报告的进程状态;
- String waitingToKill:后台进程被kill原因;
- ComponentName errorReportReceiver:接收error信息的组件;
- 和 instrumentation 相关的数据 instrumentation 也可以说是 apk 的一个组件,如果我们提供的话,系统会默认使用 Instrumentation.java类,按照我们一般的理解,UI 线程控制 activity 的生命周期,是直接调用 Activity 类的方法,时间是这样子的,UI 线程调用的是 instrumentation 的方法,由它在调用 Activity涉及生命周期的方法,所有如果我们覆写了instrumentation 的这些方法,就可以了解所有的 Activity 的生命周期了;
- ComponentName instrumentationClass:AndroidManifest.xml中定义的instrumentation信息;
- ApplicationInfo instrumentationInfo:instrumentation应用信息;
- String instrumentationProfileFile:instrumentation配置文件;
- IInstrumentationWatcher instrumentationWatcher:instrumentation监测器;
- IUiAutomationConnection instrumentationUiAutomationConnection:UiAutomation连接器;
- ComponentName instrumentationResultClass:返回结果组件;
- 电源信息和调试信息
- BatteryStatsImpl mBatteryStats:电量信息;
- BatteryStatsImpl.Uid.Proc curProcBatteryStats:当前进程电量信息;
- boolean debugging:处于调试中;
- boolean waitedForDebugger:等待调试;
- Dialog waitDialog:等待对话框;
- String adjType:adj类型(或者说标示);
- int adjTypeCode:adj类型码(也是一种标示);
- Object adjSource:改变adj的组件记录表;
- int adjSourceProcState:影响adj的进程状态;
- Object adjTarget:改变adj的组件;
- String shortStringName:进程记录表的字符串显示;
- String stringName:进程记录表的字符串显示;
ActivityRecord
进程启动的所有的 Activity 组件记录表,一个 Activity 就会有一个 ActivityRecord 进行一一对应;
TaskRecord
记录 Activity 属于哪一个任务栈,内部维护着一个 ArrayList;ActivityRecord; 用来维护ActivityRecord;
ActivityStack
最近任务列表中的 Activity 都被存放在这个stack中,内部维护着一个 ArrayList;TaskRecord; 用来维护TaskRecord;
ActivityStackSupervisor
ActivityStack mHomeStack;管理的是 Launcher 相关的任务;
ActivityStack mFocusedStack;管理的是非 Launcher 相关的任务;
Instrumentation
无论是启动 Activity,创建 Activity,还是生命周期,都会通过它来控制;
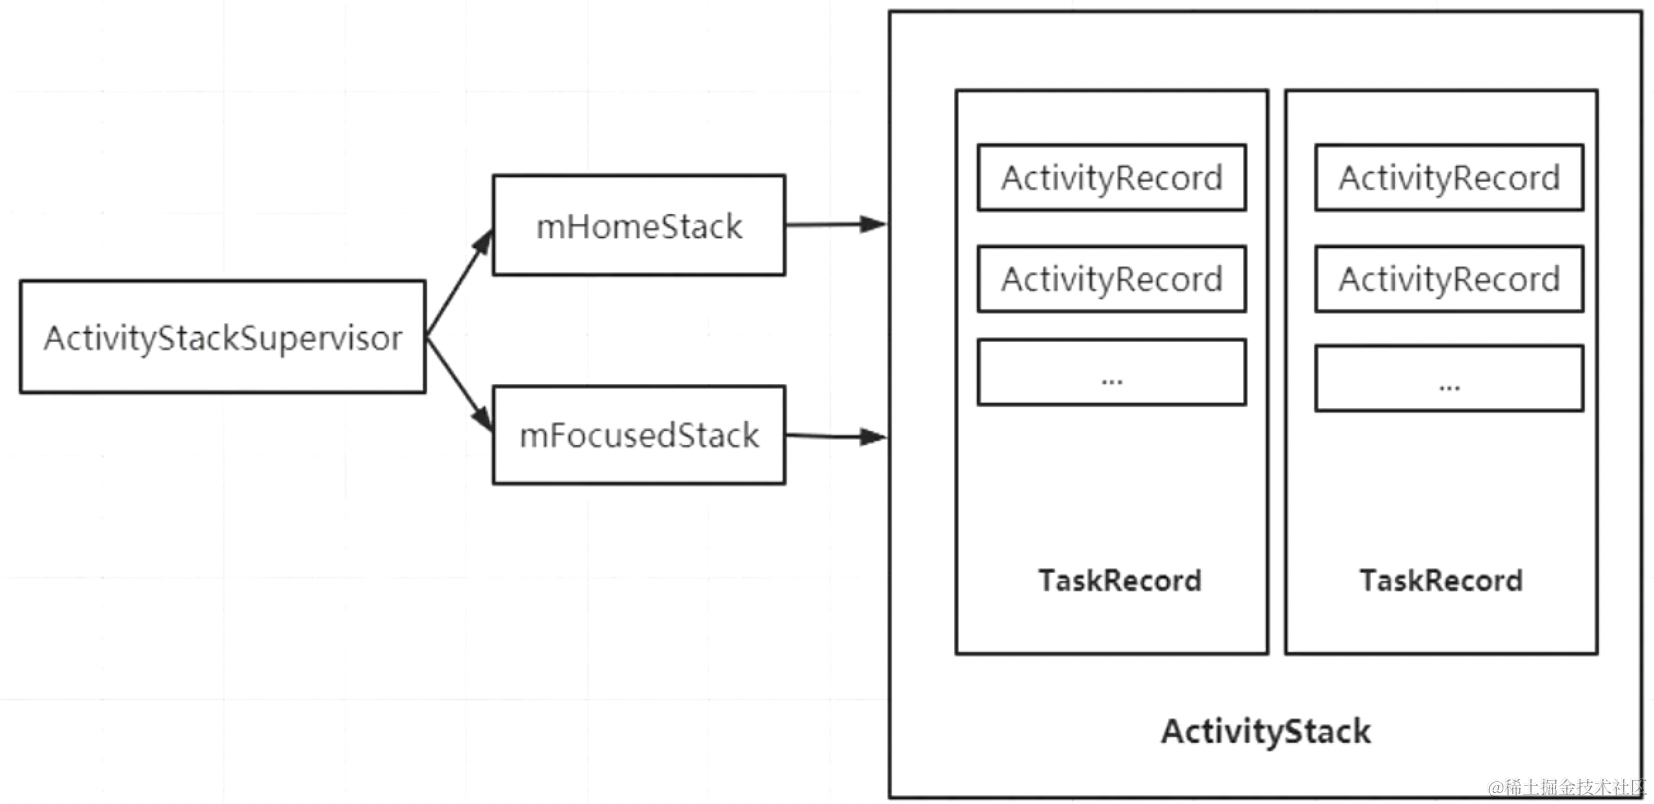
整体是这样的一个架构图
几个比较重要的进程间通信
启动流程会涉及到几个比较重要的进程间通信;
init 进程
几乎不包含 framework 的资源,主要用来解析 init.rc 然后创建各种服务进程,创建的最核心的进程就是Zygote 进程;
Zygote 进程
Zygote 进程,用来孵化 app 进程;
SystemServer进程
AMS 所在进程,也是 Zygote 孵化出来的第一个进程,俗称 Zygote 的大儿子,创建各种服务,加载 Android framework 所需要的资源,创建一个 context;
setSystemProcess;ServiceManager.addService(Context.ACTIVITY_SERVICE, this, true);添加到ServiceManager 中了,那么就可以获取这个服务的代理,从而和这个服务进行通信;
Launcher 进程
app 进程
Zygote进程 fork 出来的 app 进程;
startActivity 代码流程
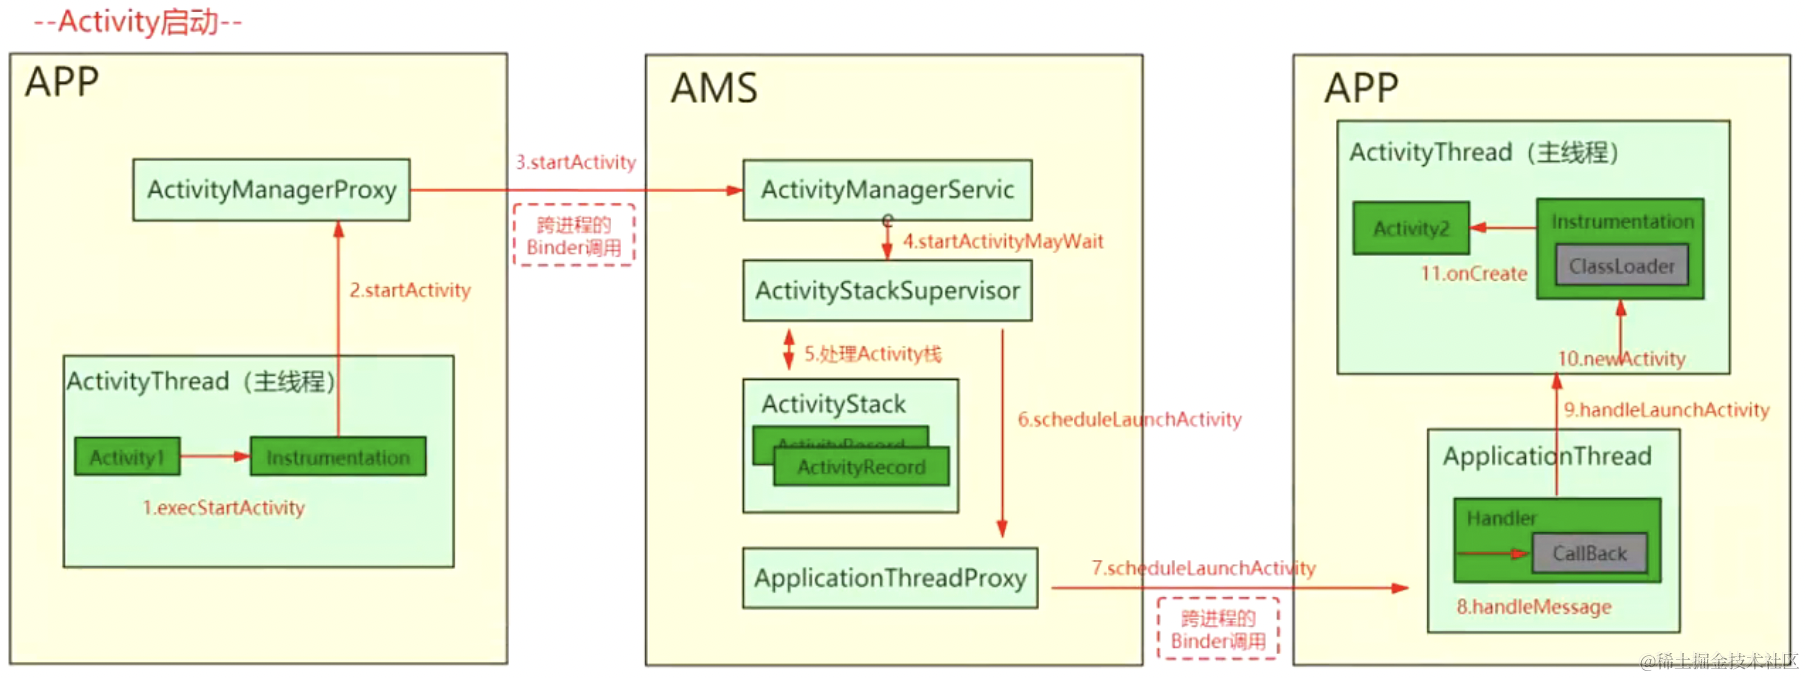
先来看一个整体的流程图,基于这个流程图进行代码的串联;
整体分为两大阶段,第一阶段是 Launcher 到 AMS 阶段,第二阶段是 AMS 到 ApplicationThread 阶段;
Launcher 到 AMS 阶段
这个阶段最终会调用到 startActivity 方法;
@Override
public void startActivity(Intent intent) {
    this.startActivity(intent, null);
}
这个方法调用到带 Bundle 参数的 startActivity 方法
public void startActivity(Intent intent, @Nullable Bundle options) {
    if (mIntent != null && mIntent.hasExtra(AutofillManager.EXTRA_RESTORE_SESSION_TOKEN)
            && mIntent.hasExtra(AutofillManager.EXTRA_RESTORE_CROSS_ACTIVITY)) {
        if (TextUtils.equals(getPackageName(),
                intent.resolveActivity(getPackageManager()).getPackageName())) {
            // Apply Autofill restore mechanism on the started activity by startActivity()
            final IBinder token =
                    mIntent.getIBinderExtra(AutofillManager.EXTRA_RESTORE_SESSION_TOKEN);
            // Remove restore ability from current activity
            mIntent.removeExtra(AutofillManager.EXTRA_RESTORE_SESSION_TOKEN);
            mIntent.removeExtra(AutofillManager.EXTRA_RESTORE_CROSS_ACTIVITY);
            // Put restore token
            intent.putExtra(AutofillManager.EXTRA_RESTORE_SESSION_TOKEN, token);
            intent.putExtra(AutofillManager.EXTRA_RESTORE_CROSS_ACTIVITY, true);
        }
    }
    if (options != null) {
        startActivityForResult(intent, -1, options);
    } else {
        // Note we want to go through this call for compatibility with
        // applications that may have overridden the method.
        startActivityForResult(intent, -1);
    }
}
最终调用到 startActivityForResult 方法,我们进入这个方法看下:
public void startActivityForResult(@RequiresPermission Intent intent, int requestCode,
        @Nullable Bundle options) {
    if (mParent == null) {
        options = transferSpringboardActivityOptions(options);
        // 最终执行的是 mInstrumentation 的 execStartActivity 方法
        Instrumentation.ActivityResult ar = mInstrumentation.execStartActivity(
                this, mMainThread.getApplicationThread(), mToken, this,
                intent, requestCode, options);
        if (ar != null) {
            mMainThread.sendActivityResult(
                mToken, mEmbeddedID, requestCode, ar.getResultCode(),
                ar.getResultData());
        }
        if (requestCode >= 0) {
            mStartedActivity = true;
        }

        cancelInputsAndStartExitTransition(options);
    } else {
        if (options != null) {
            mParent.startActivityFromChild(this, intent, requestCode, options);
        } else {
            mParent.startActivityFromChild(this, intent, requestCode);
        }
    }
}
最终执行的是 mInstrumentation 的 execStartActivity 方法;
/**
* @param who this 调用者上下文
* @param contextThread  mMainThread.getApplicationThread() App侧的 Binder 代理类
* @param token 用来区分是哪个 Activity 调用的
* @param target 目标 Activity 要启动的 Activity
* @param intent 意图
*/
public ActivityResult execStartActivity(
        Context who, IBinder contextThread, IBinder token, Activity target,
        Intent intent, int requestCode, Bundle options) {
    IApplicationThread whoThread = (IApplicationThread) contextThread;
    Uri referrer = target != null ? target.onProvideReferrer() : null;
    if (referrer != null) {
        intent.putExtra(Intent.EXTRA_REFERRER, referrer);
    }
    if (mActivityMonitors != null) {
        synchronized (mSync) {
            final int N = mActivityMonitors.size();
            for (int i=0; i<N; i++) {
                final ActivityMonitor am = mActivityMonitors.get(i);
                ActivityResult result = null;
                if (am.ignoreMatchingSpecificIntents()) {
                    result = am.onStartActivity(intent);
                }
                if (result != null) {
                    am.mHits++;
                    return result;
                } else if (am.match(who, null, intent)) {
                    am.mHits++;
                    if (am.isBlocking()) {
                        return requestCode >= 0 ? am.getResult() : null;
                    }
                    break;
                }
            }
        }
    }
    try {
        intent.migrateExtraStreamToClipData(who);
        intent.prepareToLeaveProcess(who);
        int result = ActivityTaskManager.getService().startActivity(whoThread,
                who.getOpPackageName(), who.getAttributionTag(), intent,
                intent.resolveTypeIfNeeded(who.getContentResolver()), token,
                target != null ? target.mEmbeddedID : null, requestCode, 0, null, options);
        checkStartActivityResult(result, intent);
    } catch (RemoteException e) {
        throw new RuntimeException("Failure from system", e);
    }
    return null;
}
这里最终调用到的时候 AMS 的 startActivity 这里发生了一次 Binder 跨进程通信;
ActivityTaskManager.getService().startActivity()
public static IActivityTaskManager getService() {
    return IActivityTaskManagerSingleton.get();
}

@UnsupportedAppUsage(trackingBug = 129726065)
private static final Singleton<IActivityTaskManager> IActivityTaskManagerSingleton =
        new Singleton<IActivityTaskManager>() {
            @Override
            protected IActivityTaskManager create() {
                // 这里发生了一次 跨进程 通信
                final IBinder b = ServiceManager.getService(Context.ACTIVITY_TASK_SERVICE);
                return IActivityTaskManager.Stub.asInterface(b);
            }
        };
到这里,第一阶段就结束了,剩下的就是第二阶段,AMS 是如何调用到 ApplicationThread 的,我们来一探究竟;
AMS 到 ApplicationThread 阶段
@Override
public int startActivity(IApplicationThread caller, String callingPackage,
        Intent intent, String resolvedType, IBinder resultTo, String resultWho, int requestCode,
        int startFlags, ProfilerInfo profilerInfo, Bundle bOptions) {
    return mActivityTaskManager.startActivity(caller, callingPackage, null, intent,
            resolvedType, resultTo, resultWho, requestCode, startFlags, profilerInfo, bOptions);
}
这里最终调用到的是 ActivityTaskManagerService 的 startActivity 方法
public final int startActivity(IApplicationThread caller, String callingPackage,
        String callingFeatureId, Intent intent, String resolvedType, IBinder resultTo,
        String resultWho, int requestCode, int startFlags, ProfilerInfo profilerInfo,
        Bundle bOptions) {
    return startActivityAsUser(caller, callingPackage, callingFeatureId, intent, resolvedType,
            resultTo, resultWho, requestCode, startFlags, profilerInfo, bOptions,
            UserHandle.getCallingUserId());
}
这个 startActivityAsUser 主要是多了一个 UserHandle.getCallingUserId() 参数,用来确定是谁调用过来的;
@Override
public int startActivityAsUser(IApplicationThread caller, String callingPackage,
        String callingFeatureId, Intent intent, String resolvedType, IBinder resultTo,
        String resultWho, int requestCode, int startFlags, ProfilerInfo profilerInfo,
        Bundle bOptions, int userId) {
    return startActivityAsUser(caller, callingPackage, callingFeatureId, intent, resolvedType,
            resultTo, resultWho, requestCode, startFlags, profilerInfo, bOptions, userId,
            true /*validateIncomingUser*/);
}
startActivityAsUser 会多了一个参数 validateIncomingUser 验证是否来自调用者
private int startActivityAsUser(IApplicationThread caller, String callingPackage,
        @Nullable String callingFeatureId, Intent intent, String resolvedType,
        IBinder resultTo, String resultWho, int requestCode, int startFlags,
        ProfilerInfo profilerInfo, Bundle bOptions, int userId, boolean validateIncomingUser) {
    assertPackageMatchesCallingUid(callingPackage);
    enforceNotIsolatedCaller("startActivityAsUser");
    // 检测目标用户
    userId = getActivityStartController().checkTargetUser(userId, validateIncomingUser,
            Binder.getCallingPid(), Binder.getCallingUid(), "startActivityAsUser");

    // 采用建造者模式,构建一系列启动 Activity 的参数
    // 这个 ActivityStartController 也是在 AMS 的构造方法中初始化的
    return getActivityStartController().obtainStarter(intent, "startActivityAsUser")
            .setCaller(caller)
            .setCallingPackage(callingPackage)
            .setCallingFeatureId(callingFeatureId)
            .setResolvedType(resolvedType)
            .setResultTo(resultTo)
            .setResultWho(resultWho)
            .setRequestCode(requestCode)
            .setStartFlags(startFlags)
            .setProfilerInfo(profilerInfo)
            .setActivityOptions(bOptions)
            .setUserId(userId)
            .execute();

}
检测之后,就会执行 start 流程;obtainStarter 主要是通过一个 工厂模式 来获取一个 ActivityStarter
ActivityStarter obtainStarter(Intent intent, String reason) {
    return mFactory.obtain().setIntent(intent).setReason(reason);
}
获取这个 ActivityStarter 之后,最终调用了它的 execute 方法,进行 Activity 的启动;
int execute() {
    try {
        if (mRequest.intent != null && mRequest.intent.hasFileDescriptors()) {
            throw new IllegalArgumentException("File descriptors passed in Intent");
        }

        final LaunchingState launchingState;
        synchronized (mService.mGlobalLock) {
            final ActivityRecord caller = ActivityRecord.forTokenLocked(mRequest.resultTo);
            final int callingUid = mRequest.realCallingUid == Request.DEFAULT_REAL_CALLING_UID
                    ?  Binder.getCallingUid() : mRequest.realCallingUid;
            launchingState = mSupervisor.getActivityMetricsLogger().notifyActivityLaunching(
                    mRequest.intent, caller, callingUid);
        }
        if (mRequest.activityInfo == null) {
            mRequest.resolveActivity(mSupervisor);
        }
        if (mRequest.intent != null) {
            String intentAction = mRequest.intent.getAction();
            String callingPackage = mRequest.callingPackage;
            if (intentAction != null && callingPackage != null
                    && (Intent.ACTION_REQUEST_SHUTDOWN.equals(intentAction)
                            || Intent.ACTION_SHUTDOWN.equals(intentAction)
                            || Intent.ACTION_REBOOT.equals(intentAction))) {
                ShutdownCheckPoints.recordCheckPoint(intentAction, callingPackage, null);
            }
        }

        int res;
        synchronized (mService.mGlobalLock) {
            final boolean globalConfigWillChange = mRequest.globalConfig != null
                    && mService.getGlobalConfiguration().diff(mRequest.globalConfig) != 0;
            final Task rootTask = mRootWindowContainer.getTopDisplayFocusedRootTask();
            if (rootTask != null) {
                rootTask.mConfigWillChange = globalConfigWillChange;
            }

            final long origId = Binder.clearCallingIdentity();

            res = resolveToHeavyWeightSwitcherIfNeeded();
            if (res != START_SUCCESS) {
                return res;
            }
            res = executeRequest(mRequest);

            Binder.restoreCallingIdentity(origId);

            if (globalConfigWillChange) {
                mService.mAmInternal.enforceCallingPermission(
                        android.Manifest.permission.CHANGE_CONFIGURATION,
                        "updateConfiguration()");
                if (rootTask != null) {
                    rootTask.mConfigWillChange = false;
                }
                ProtoLog.v(WM_DEBUG_CONFIGURATION,
                            "Updating to new configuration after starting activity.");

                mService.updateConfigurationLocked(mRequest.globalConfig, null, false);
            }
            mSupervisor.getActivityMetricsLogger().notifyActivityLaunched(launchingState, res,
                    newActivityCreated, mLastStartActivityRecord, originalOptions);
            if (mRequest.waitResult != null) {
                mRequest.waitResult.result = res;
                res = waitResultIfNeeded(mRequest.waitResult, mLastStartActivityRecord,
                        launchingState);
            }
            return getExternalResult(res);
        }
    } finally {
        onExecutionComplete();
    }
}
这里最终调用的是 executeRequest 方法;
这个 executeRequest 中,这个方法比较长,有几个比较关键的调用点;
private int executeRequest(Request request) {
    if (TextUtils.isEmpty(request.reason)) {
        throw new IllegalArgumentException("Need to specify a reason.");
    }
    mLastStartReason = request.reason;
    mLastStartActivityTimeMs = System.currentTimeMillis();
    mLastStartActivityRecord = null;

    final IApplicationThread caller = request.caller;
    Intent intent = request.intent;
    NeededUriGrants intentGrants = request.intentGrants;
    String resolvedType = request.resolvedType;
    ActivityInfo aInfo = request.activityInfo;
    ResolveInfo rInfo = request.resolveInfo;
    final IVoiceInteractionSession voiceSession = request.voiceSession;
    final IBinder resultTo = request.resultTo;
    String resultWho = request.resultWho;
    int requestCode = request.requestCode;
    int callingPid = request.callingPid;
    int callingUid = request.callingUid;
    String callingPackage = request.callingPackage;
    String callingFeatureId = request.callingFeatureId;
    final int realCallingPid = request.realCallingPid;
    final int realCallingUid = request.realCallingUid;
    final int startFlags = request.startFlags;
    final SafeActivityOptions options = request.activityOptions;
    Task inTask = request.inTask;

    int err = ActivityManager.START_SUCCESS;
    final Bundle verificationBundle =
            options != null ? options.popAppVerificationBundle() : null;

    WindowProcessController callerApp = null;
    if (caller != null) {
        callerApp = mService.getProcessController(caller);
        if (callerApp != null) {
            callingPid = callerApp.getPid();
            callingUid = callerApp.mInfo.uid;
        } else {
            Slog.w(TAG, "Unable to find app for caller " + caller + " (pid=" + callingPid
                    + ") when starting: " + intent.toString());
            err = ActivityManager.START_PERMISSION_DENIED;
        }
    }

    final int userId = aInfo != null && aInfo.applicationInfo != null
            ? UserHandle.getUserId(aInfo.applicationInfo.uid) : 0;
    if (err == ActivityManager.START_SUCCESS) {
        Slog.i(TAG, "START u" + userId + " {" + intent.toShortString(true, true, true, false)
                + "} from uid " + callingUid);
    }

    ActivityRecord sourceRecord = null;
    ActivityRecord resultRecord = null;
    if (resultTo != null) {
        sourceRecord = mRootWindowContainer.isInAnyTask(resultTo);
        if (DEBUG_RESULTS) {
            Slog.v(TAG_RESULTS, "Will send result to " + resultTo + " " + sourceRecord);
        }
        if (sourceRecord != null) {
            if (requestCode >= 0 && !sourceRecord.finishing) {
                resultRecord = sourceRecord;
            }
        }
    }

    final int launchFlags = intent.getFlags();
    if ((launchFlags & Intent.FLAG_ACTIVITY_FORWARD_RESULT) != 0 && sourceRecord != null) {
        // Transfer the result target from the source activity to the new one being started,
        // including any failures.
        if (requestCode >= 0) {
            SafeActivityOptions.abort(options);
            return ActivityManager.START_FORWARD_AND_REQUEST_CONFLICT;
        }
        resultRecord = sourceRecord.resultTo;
        if (resultRecord != null && !resultRecord.isInRootTaskLocked()) {
            resultRecord = null;
        }
        resultWho = sourceRecord.resultWho;
        requestCode = sourceRecord.requestCode;
        sourceRecord.resultTo = null;
        if (resultRecord != null) {
            resultRecord.removeResultsLocked(sourceRecord, resultWho, requestCode);
        }
        if (sourceRecord.launchedFromUid == callingUid) {
            callingPackage = sourceRecord.launchedFromPackage;
            callingFeatureId = sourceRecord.launchedFromFeatureId;
        }
    }

    if (err == ActivityManager.START_SUCCESS && intent.getComponent() == null) {
        err = ActivityManager.START_INTENT_NOT_RESOLVED;
    }

    if (err == ActivityManager.START_SUCCESS && aInfo == null) {
        err = ActivityManager.START_CLASS_NOT_FOUND;
    }

    if (err == ActivityManager.START_SUCCESS && sourceRecord != null
            && sourceRecord.getTask().voiceSession != null) {
        if ((launchFlags & FLAG_ACTIVITY_NEW_TASK) == 0
                && sourceRecord.info.applicationInfo.uid != aInfo.applicationInfo.uid) {
            try {
                intent.addCategory(Intent.CATEGORY_VOICE);
                if (!mService.getPackageManager().activitySupportsIntent(
                        intent.getComponent(), intent, resolvedType)) {
                    Slog.w(TAG, "Activity being started in current voice task does not support "
                            + "voice: " + intent);
                    err = ActivityManager.START_NOT_VOICE_COMPATIBLE;
                }
            } catch (RemoteException e) {
                Slog.w(TAG, "Failure checking voice capabilities", e);
                err = ActivityManager.START_NOT_VOICE_COMPATIBLE;
            }
        }
    }

    if (err == ActivityManager.START_SUCCESS && voiceSession != null) {
        try {
            if (!mService.getPackageManager().activitySupportsIntent(intent.getComponent(),
                    intent, resolvedType)) {
                Slog.w(TAG,
                        "Activity being started in new voice task does not support: " + intent);
                err = ActivityManager.START_NOT_VOICE_COMPATIBLE;
            }
        } catch (RemoteException e) {
            Slog.w(TAG, "Failure checking voice capabilities", e);
            err = ActivityManager.START_NOT_VOICE_COMPATIBLE;
        }
    }

    final Task resultRootTask = resultRecord == null
            ? null : resultRecord.getRootTask();

    if (err != START_SUCCESS) {
        if (resultRecord != null) {
            resultRecord.sendResult(INVALID_UID, resultWho, requestCode, RESULT_CANCELED,
                    null /* data */, null /* dataGrants */);
        }
        SafeActivityOptions.abort(options);
        return err;
    }
    // 校验当前应用是否有开启权限,普通开启肯定是有权限;
    boolean abort = !mSupervisor.checkStartAnyActivityPermission(intent, aInfo, resultWho,
            requestCode, callingPid, callingUid, callingPackage, callingFeatureId,
            request.ignoreTargetSecurity, inTask != null, callerApp, resultRecord,
            resultRootTask);
    abort |= !mService.mIntentFirewall.checkStartActivity(intent, callingUid,
            callingPid, resolvedType, aInfo.applicationInfo);
    abort |= !mService.getPermissionPolicyInternal().checkStartActivity(intent, callingUid,
            callingPackage);

    boolean restrictedBgActivity = false;
    if (!abort) {
        try {
            Trace.traceBegin(Trace.TRACE_TAG_WINDOW_MANAGER,
                    "shouldAbortBackgroundActivityStart");
            restrictedBgActivity = shouldAbortBackgroundActivityStart(callingUid,
                    callingPid, callingPackage, realCallingUid, realCallingPid, callerApp,
                    request.originatingPendingIntent, request.allowBackgroundActivityStart,
                    intent);
        } finally {
            Trace.traceEnd(Trace.TRACE_TAG_WINDOW_MANAGER);
        }
    }

    ActivityOptions checkedOptions = options != null
            ? options.getOptions(intent, aInfo, callerApp, mSupervisor) : null;
    if (request.allowPendingRemoteAnimationRegistryLookup) {
        checkedOptions = mService.getActivityStartController()
                .getPendingRemoteAnimationRegistry()
                .overrideOptionsIfNeeded(callingPackage, checkedOptions);
    }
    if (mService.mController != null) {
        try {
            Intent watchIntent = intent.cloneFilter();
            abort |= !mService.mController.activityStarting(watchIntent,
                    aInfo.applicationInfo.packageName);
        } catch (RemoteException e) {
            mService.mController = null;
        }
    }

    mInterceptor.setStates(userId, realCallingPid, realCallingUid, startFlags, callingPackage,
            callingFeatureId);
    if (mInterceptor.intercept(intent, rInfo, aInfo, resolvedType, inTask, callingPid,
            callingUid, checkedOptions)) {
        intent = mInterceptor.mIntent;
        rInfo = mInterceptor.mRInfo;
        aInfo = mInterceptor.mAInfo;
        resolvedType = mInterceptor.mResolvedType;
        inTask = mInterceptor.mInTask;
        callingPid = mInterceptor.mCallingPid;
        callingUid = mInterceptor.mCallingUid;
        checkedOptions = mInterceptor.mActivityOptions;

        intentGrants = null;
    }

    if (abort) {
        if (resultRecord != null) {
            resultRecord.sendResult(INVALID_UID, resultWho, requestCode, RESULT_CANCELED,
                    null /* data */, null /* dataGrants */);
        }
        ActivityOptions.abort(checkedOptions);
        return START_ABORTED;
    }

    if (aInfo != null) {
        if (mService.getPackageManagerInternalLocked().isPermissionsReviewRequired(
                aInfo.packageName, userId)) {
            final IIntentSender target = mService.getIntentSenderLocked(
                    ActivityManager.INTENT_SENDER_ACTIVITY, callingPackage, callingFeatureId,
                    callingUid, userId, null, null, 0, new Intent[]{intent},
                    new String[]{resolvedType}, PendingIntent.FLAG_CANCEL_CURRENT
                            | PendingIntent.FLAG_ONE_SHOT, null);

            Intent newIntent = new Intent(Intent.ACTION_REVIEW_PERMISSIONS);

            int flags = intent.getFlags();
            flags |= Intent.FLAG_ACTIVITY_EXCLUDE_FROM_RECENTS;

            if ((flags & (FLAG_ACTIVITY_NEW_TASK | FLAG_ACTIVITY_NEW_DOCUMENT)) != 0) {
                flags |= Intent.FLAG_ACTIVITY_MULTIPLE_TASK;
            }
            newIntent.setFlags(flags);

            newIntent.putExtra(Intent.EXTRA_PACKAGE_NAME, aInfo.packageName);
            newIntent.putExtra(Intent.EXTRA_INTENT, new IntentSender(target));
            if (resultRecord != null) {
                newIntent.putExtra(Intent.EXTRA_RESULT_NEEDED, true);
            }
            intent = newIntent;
            intentGrants = null;
            resolvedType = null;
            callingUid = realCallingUid;
            callingPid = realCallingPid;

            rInfo = mSupervisor.resolveIntent(intent, resolvedType, userId, 0,
                    computeResolveFilterUid(
                            callingUid, realCallingUid, request.filterCallingUid));
            aInfo = mSupervisor.resolveActivity(intent, rInfo, startFlags,
                    null /*profilerInfo*/);

            if (DEBUG_PERMISSIONS_REVIEW) {
                final Task focusedRootTask =
                        mRootWindowContainer.getTopDisplayFocusedRootTask();
                Slog.i(TAG, "START u" + userId + " {" + intent.toShortString(true, true,
                        true, false) + "} from uid " + callingUid + " on display "
                        + (focusedRootTask == null ? DEFAULT_DISPLAY
                                : focusedRootTask.getDisplayId()));
            }
        }
    }

    if (rInfo != null && rInfo.auxiliaryInfo != null) {
        intent = createLaunchIntent(rInfo.auxiliaryInfo, request.ephemeralIntent,
                callingPackage, callingFeatureId, verificationBundle, resolvedType, userId);
        resolvedType = null;
        callingUid = realCallingUid;
        callingPid = realCallingPid;

        intentGrants = null;

        aInfo = mSupervisor.resolveActivity(intent, rInfo, startFlags, null /*profilerInfo*/);
    }

    if (callerApp == null && realCallingPid > 0) {
        final WindowProcessController wpc = mService.mProcessMap.getProcess(realCallingPid);
        if (wpc != null) {
            callerApp = wpc;
        }
    }
    // 创建出我们的目标 ActivityRecord 对象,存入到传入数组[0]索引上
    // 到这里的时候,说明 Activity 是可以被启动的了
    final ActivityRecord r = new ActivityRecord.Builder(mService)
            .setCaller(callerApp)
            .setLaunchedFromPid(callingPid)
            .setLaunchedFromUid(callingUid)
            .setLaunchedFromPackage(callingPackage)
            .setLaunchedFromFeature(callingFeatureId)
            .setIntent(intent)
            .setResolvedType(resolvedType)
            .setActivityInfo(aInfo)
            .setConfiguration(mService.getGlobalConfiguration())
            .setResultTo(resultRecord)
            .setResultWho(resultWho)
            .setRequestCode(requestCode)
            .setComponentSpecified(request.componentSpecified)
            .setRootVoiceInteraction(voiceSession != null)
            .setActivityOptions(checkedOptions)
            .setSourceRecord(sourceRecord)
            .build();

    mLastStartActivityRecord = r;

    if (r.appTimeTracker == null && sourceRecord != null) {
        r.appTimeTracker = sourceRecord.appTimeTracker;
    }

    WindowProcessController homeProcess = mService.mHomeProcess;
    boolean isHomeProcess = homeProcess != null
            && aInfo.applicationInfo.uid == homeProcess.mUid;
    if (!restrictedBgActivity && !isHomeProcess) {
        mService.resumeAppSwitches();
    }
    //
    mLastStartActivityResult = startActivityUnchecked(r, sourceRecord, voiceSession,
            request.voiceInteractor, startFlags, true /* doResume */, checkedOptions, inTask,
            restrictedBgActivity, intentGrants);

    if (request.outActivity != null) {
        request.outActivity[0] = mLastStartActivityRecord;
    }

    return mLastStartActivityResult;
}
而这个方法最终调用到的是 startActivityUnchecked 方法;
private int startActivityUnchecked(final ActivityRecord r, ActivityRecord sourceRecord,
            IVoiceInteractionSession voiceSession, IVoiceInteractor voiceInteractor,
            int startFlags, boolean doResume, ActivityOptions options, Task inTask,
            boolean restrictedBgActivity, NeededUriGrants intentGrants) {
    // 省略部分代码

    try {
        mService.deferWindowLayout();
        // 调用到了 startActivityInner
        result = startActivityInner(r, sourceRecord, voiceSession, voiceInteractor,
                startFlags, doResume, options, inTask, restrictedBgActivity, intentGrants);
    }

}
这个方法最终调用到了 startActivityInner 方法;
int startActivityInner(final ActivityRecord r, ActivityRecord sourceRecord,
        IVoiceInteractionSession voiceSession, IVoiceInteractor voiceInteractor,
        int startFlags, boolean doResume, ActivityOptions options, Task inTask,
        boolean restrictedBgActivity, NeededUriGrants intentGrants) {
    // 省略部分代码
    // 根据启动 Intent 识别启动模式,如果是 startActivityForResult 并且启动模式是 NEW_TASK 的话,就会让 startActivity 启动单独的任务栈中
    setInitialState(r, options, inTask, doResume, startFlags, sourceRecord, voiceSession,
        voiceInteractor, restrictedBgActivity);
    // 判断启动模式,并且在mLaunchFlags上追加对应的标记
    computeLaunchingTaskFlags();


    final Task topRootTask = mPreferredTaskDisplayArea.getFocusedRootTask();
    if (topRootTask != null) {
        // 触发 onNewIntent 处理
        startResult = deliverToCurrentTopIfNeeded(topRootTask, intentGrants);
        if (startResult != START_SUCCESS) {
            return startResult;
        }
    }


    // 从这里开始 resume 我们的 MainActivity
    mRootWindowContainer.resumeFocusedTasksTopActivities(
        mTargetRootTask, mStartActivity, mOptions, mTransientLaunch);
}
这里最终调用到 resumeFocusedTasksTopActivities 方法来 resume 我们的 MainActivity
boolean resumeFocusedTasksTopActivities(
        Task targetRootTask, ActivityRecord target, ActivityOptions targetOptions,
        boolean deferPause) {
    // 省略部分代码


    boolean result = false;
    if (targetRootTask != null && (targetRootTask.isTopRootTaskInDisplayArea()
            || getTopDisplayFocusedRootTask() == targetRootTask)) {
        //
        result = targetRootTask.resumeTopActivityUncheckedLocked(target, targetOptions,
                deferPause);
    }
}
这个方法最终调用到 resumeTopActivityUncheckedLocked 方法;
boolean resumeTopActivityUncheckedLocked(ActivityRecord prev, ActivityOptions options,
        boolean deferPause) {
    // 省略部分代码


    if (isLeafTask()) {
        if (isFocusableAndVisible()) {
            //
            someActivityResumed = resumeTopActivityInnerLocked(prev, options, deferPause);
        }
    }
}
这个方法最终调用到 resumeTopActivityInnerLocked 方法;到这里就准备真正的启动我们的 Activity 了;
private boolean resumeTopActivityInnerLocked(ActivityRecord prev, ActivityOptions options,
        boolean deferPause) {
    // 省略部分代码

    // 将发起者置入 pause 状态,也就是 MainActivity 改成 onPause 状态
    boolean pausing = !deferPause && taskDisplayArea.pauseBackTasks(next);

    // 更新进程信息
    if (next.attachedToProcess()) {
        next.app.updateProcessInfo(false /* updateServiceConnectionActivities */,
                true /* activityChange */, false /* updateOomAdj */,
                false /* addPendingTopUid */);
    }
    // 最终走到这个调用
    mTaskSupervisor.startSpecificActivity(next, true, true);
}
这个方法最终调用到 startSpecificActivity 方法;启动具体的 Activity;
void startSpecificActivity(ActivityRecord r, boolean andResume, boolean checkConfig) {
    // Is this activity's application already running?
    final WindowProcessController wpc =
            mService.getProcessController(r.processName, r.info.applicationInfo.uid);

    boolean knownToBeDead = false;
    if (wpc != null && wpc.hasThread()) {
        try {
            // 进程已经创建,则执行这里
            realStartActivityLocked(r, wpc, andResume, checkConfig);
            return;
        } catch (RemoteException e) {
            Slog.w(TAG, "Exception when starting activity "
                    + r.intent.getComponent().flattenToShortString(), e);
        }

        knownToBeDead = true;
    }

    r.notifyUnknownVisibilityLaunchedForKeyguardTransition();

    final boolean isTop = andResume && r.isTopRunningActivity();
    // 进程未创建,则执行这里
    mService.startProcessAsync(r, knownToBeDead, isTop, isTop ? "top-activity" : "activity");
}
在这里分了两个流程,app 进程创建和 app 进程未创建;
app 进程未创建,执行 startProcessAsync 逻辑
void startProcessAsync(ActivityRecord activity, boolean knownToBeDead, boolean isTop,
        String hostingType) {
    try {
        final Message m = PooledLambda.obtainMessage(ActivityManagerInternal::startProcess,
                mAmInternal, activity.processName, activity.info.applicationInfo, knownToBeDead,
                isTop, hostingType, activity.intent.getComponent());
        mH.sendMessage(m);
    } finally {
        Trace.traceEnd(TRACE_TAG_WINDOW_MANAGER);
    }
}
ActivityManagerInternal 是抽象类,其实现类是 AMS 的内部类 LocalService;我们进入 LocalService 的 startProcess 方法;
public void startProcess(String processName, ApplicationInfo info, boolean knownToBeDead,
        boolean isTop, String hostingType, ComponentName hostingName) {
    try {
        synchronized (ActivityManagerService.this) {
            startProcessLocked(processName, info, knownToBeDead, 0 /* intentFlags */,
                    new HostingRecord(hostingType, hostingName, isTop),
                    ZYGOTE_POLICY_FLAG_LATENCY_SENSITIVE, false /* allowWhileBooting */,
                    false /* isolated */);
        }
    } finally {
        Trace.traceEnd(Trace.TRACE_TAG_ACTIVITY_MANAGER);
    }
}
最终调用到 startProcessLocked 方法,我们进入这个方法看下,这个方法最终调用到的是 ProcessList 的 startProcessLocked 方法;
ProcessRecord startProcessLocked(String processName, ApplicationInfo info,
        boolean knownToBeDead, int intentFlags, HostingRecord hostingRecord,
        int zygotePolicyFlags, boolean allowWhileBooting, boolean isolated, int isolatedUid,
        String abiOverride, String entryPoint, String[] entryPointArgs, Runnable crashHandler) {
   // 省略部分代码

   //
   final boolean success =
        startProcessLocked(app, hostingRecord, zygotePolicyFlags, abiOverride);

}
最终调用到的是 startProcessLocked
boolean startProcessLocked(ProcessRecord app, HostingRecord hostingRecord,
        int zygotePolicyFlags, boolean disableHiddenApiChecks, boolean disableTestApiChecks,
        String abiOverride) {
     // 省略部分代码

    // startProcessLocked
    return startProcessLocked(hostingRecord, entryPoint, app, uid, gids,
        runtimeFlags, zygotePolicyFlags, mountExternal, seInfo, requiredAbi,
        instructionSet, invokeWith, startTime);
}
boolean startProcessLocked(HostingRecord hostingRecord, String entryPoint, ProcessRecord app,
        int uid, int[] gids, int runtimeFlags, int zygotePolicyFlags, int mountExternal,
        String seInfo, String requiredAbi, String instructionSet, String invokeWith,
        long startTime) {
    // 省略部分代码

    // startProcess
    final Process.ProcessStartResult startResult = startProcess(hostingRecord,
        entryPoint, app,
        uid, gids, runtimeFlags, zygotePolicyFlags, mountExternal, seInfo,
        requiredAbi, instructionSet, invokeWith, startTime);
    handleProcessStartedLocked(app, startResult.pid, startResult.usingWrapper,
        startSeq, false);
}
最终调用到的时候 startProcess 方法;
private Process.ProcessStartResult startProcess(HostingRecord hostingRecord, String entryPoint,
        ProcessRecord app, int uid, int[] gids, int runtimeFlags, int zygotePolicyFlags,
        int mountExternal, String seInfo, String requiredAbi, String instructionSet,
        String invokeWith, long startTime) {
    // 省略部分代码

    //
    if (hostingRecord.usesWebviewZygote()) {
        startResult = startWebView(entryPoint,
                app.processName, uid, uid, gids, runtimeFlags, mountExternal,
                app.info.targetSdkVersion, seInfo, requiredAbi, instructionSet,
                app.info.dataDir, null, app.info.packageName,
                app.getDisabledCompatChanges(),
                new String[]{PROC_START_SEQ_IDENT + app.getStartSeq()});
    } else if (hostingRecord.usesAppZygote()) {
        final AppZygote appZygote = createAppZygoteForProcessIfNeeded(app);

        // We can't isolate app data and storage data as parent zygote already did that.
        startResult = appZygote.getProcess().start(entryPoint,
                app.processName, uid, uid, gids, runtimeFlags, mountExternal,
                app.info.targetSdkVersion, seInfo, requiredAbi, instructionSet,
                app.info.dataDir, null, app.info.packageName,
                /*zygotePolicyFlags=*/ ZYGOTE_POLICY_FLAG_EMPTY, isTopApp,
                app.getDisabledCompatChanges(), pkgDataInfoMap, allowlistedAppDataInfoMap,
                false, false,
                new String[]{PROC_START_SEQ_IDENT + app.getStartSeq()});
    } else {
        regularZygote = true;
        startResult = Process.start(entryPoint,
                app.processName, uid, uid, gids, runtimeFlags, mountExternal,
                app.info.targetSdkVersion, seInfo, requiredAbi, instructionSet,
                app.info.dataDir, invokeWith, app.info.packageName, zygotePolicyFlags,
                isTopApp, app.getDisabledCompatChanges(), pkgDataInfoMap,
                allowlistedAppDataInfoMap, bindMountAppsData, bindMountAppStorageDirs,
                new String[]{PROC_START_SEQ_IDENT + app.getStartSeq()});
    }
}
最终执行的是 Process.start 的逻辑;
public static ProcessStartResult start(@NonNull final String processClass,
                                       @Nullable final String niceName,
                                       int uid, int gid, @Nullable int[] gids,
                                       int runtimeFlags,
                                       int mountExternal,
                                       int targetSdkVersion,
                                       @Nullable String seInfo,
                                       @NonNull String abi,
                                       @Nullable String instructionSet,
                                       @Nullable String appDataDir,
                                       @Nullable String invokeWith,
                                       @Nullable String packageName,
                                       int zygotePolicyFlags,
                                       boolean isTopApp,
                                       @Nullable long[] disabledCompatChanges,
                                       @Nullable Map<String, Pair<String, Long>>
                                               pkgDataInfoMap,
                                       @Nullable Map<String, Pair<String, Long>>
                                               whitelistedDataInfoMap,
                                       boolean bindMountAppsData,
                                       boolean bindMountAppStorageDirs,
                                       @Nullable String[] zygoteArgs) {
    return ZYGOTE_PROCESS.start(processClass, niceName, uid, gid, gids,
                runtimeFlags, mountExternal, targetSdkVersion, seInfo,
                abi, instructionSet, appDataDir, invokeWith, packageName,
                zygotePolicyFlags, isTopApp, disabledCompatChanges,
                pkgDataInfoMap, whitelistedDataInfoMap, bindMountAppsData,
                bindMountAppStorageDirs, zygoteArgs);
}
这里最终调用的是 Zygote 的 start 方法;
public final Process.ProcessStartResult start(@NonNull final String processClass,
                                              final String niceName,
                                              int uid, int gid, @Nullable int[] gids,
                                              int runtimeFlags, int mountExternal,
                                              int targetSdkVersion,
                                              @Nullable String seInfo,
                                              @NonNull String abi,
                                              @Nullable String instructionSet,
                                              @Nullable String appDataDir,
                                              @Nullable String invokeWith,
                                              @Nullable String packageName,
                                              int zygotePolicyFlags,
                                              boolean isTopApp,
                                              @Nullable long[] disabledCompatChanges,
                                              @Nullable Map<String, Pair<String, Long>>
                                                      pkgDataInfoMap,
                                              @Nullable Map<String, Pair<String, Long>>
                                                      allowlistedDataInfoList,
                                              boolean bindMountAppsData,
                                              boolean bindMountAppStorageDirs,
                                              @Nullable String[] zygoteArgs) {
    try {
        return startViaZygote(processClass, niceName, uid, gid, gids,
                runtimeFlags, mountExternal, targetSdkVersion, seInfo,
                abi, instructionSet, appDataDir, invokeWith, /*startChildZygote=*/ false,
                packageName, zygotePolicyFlags, isTopApp, disabledCompatChanges,
                pkgDataInfoMap, allowlistedDataInfoList, bindMountAppsData,
                bindMountAppStorageDirs, zygoteArgs);
    } catch (ZygoteStartFailedEx ex) {}
}
这里调用的是 startViaZygote 方法;
private Process.ProcessStartResult startViaZygote(@NonNull final String processClass,
                                                  @Nullable final String niceName,
                                                  final int uid, final int gid,
                                                  @Nullable final int[] gids,
                                                  int runtimeFlags, int mountExternal,
                                                  int targetSdkVersion,
                                                  @Nullable String seInfo,
                                                  @NonNull String abi,
                                                  @Nullable String instructionSet,
                                                  @Nullable String appDataDir,
                                                  @Nullable String invokeWith,
                                                  boolean startChildZygote,
                                                  @Nullable String packageName,
                                                  int zygotePolicyFlags,
                                                  boolean isTopApp,
                                                  @Nullable long[] disabledCompatChanges,
                                                  @Nullable Map<String, Pair<String, Long>>
                                                          pkgDataInfoMap,
                                                  @Nullable Map<String, Pair<String, Long>>
                                                          allowlistedDataInfoList,
                                                  boolean bindMountAppsData,
                                                  boolean bindMountAppStorageDirs,
                                                  @Nullable String[] extraArgs)
                                                  throws ZygoteStartFailedEx {
    ArrayList<String> argsForZygote = new ArrayList<>();
    // 进行一系列的参数拼装;
    argsForZygote.add("--runtime-args");
    argsForZygote.add("--setuid=" + uid);
    argsForZygote.add("--setgid=" + gid);
    argsForZygote.add("--runtime-flags=" + runtimeFlags);
    if (mountExternal == Zygote.MOUNT_EXTERNAL_DEFAULT) {
        argsForZygote.add("--mount-external-default");
    } else if (mountExternal == Zygote.MOUNT_EXTERNAL_INSTALLER) {
        argsForZygote.add("--mount-external-installer");
    } else if (mountExternal == Zygote.MOUNT_EXTERNAL_PASS_THROUGH) {
        argsForZygote.add("--mount-external-pass-through");
    } else if (mountExternal == Zygote.MOUNT_EXTERNAL_ANDROID_WRITABLE) {
        argsForZygote.add("--mount-external-android-writable");
    }

    argsForZygote.add("--target-sdk-version=" + targetSdkVersion);

    // 省略部分代码

    synchronized(mLock) {
        return zygoteSendArgsAndGetResult(openZygoteSocketIfNeeded(abi),
                                          zygotePolicyFlags,
                                          argsForZygote);
    }
}
进行完参数拼装之后,最后调用到 zygoteSendArgsAndGetResult 来创建进程并回去创建的结果;
private Process.ProcessStartResult zygoteSendArgsAndGetResult(
        ZygoteState zygoteState, int zygotePolicyFlags, @NonNull ArrayList<String> args)
        throws ZygoteStartFailedEx {
    // 省略部分代码
    // 最终调用到这里;
    return attemptZygoteSendArgsAndGetResult(zygoteState, msgStr);
}
最终调用到 attemptZygoteSendArgsAndGetResult 方法;
private Process.ProcessStartResult attemptZygoteSendArgsAndGetResult(
        ZygoteState zygoteState, String msgStr) throws ZygoteStartFailedEx {
    try {
        final BufferedWriter zygoteWriter = zygoteState.mZygoteOutputWriter;
        final DataInputStream zygoteInputStream = zygoteState.mZygoteInputStream;
        // 通过 socket 的方式进行写入;
        zygoteWriter.write(msgStr);
        zygoteWriter.flush();

        Process.ProcessStartResult result = new Process.ProcessStartResult();
        result.pid = zygoteInputStream.readInt();
        result.usingWrapper = zygoteInputStream.readBoolean();

        if (result.pid < 0) {
            throw new ZygoteStartFailedEx("fork() failed");
        }

        return result;
    } catch (IOException ex) {
        zygoteState.close();
        Log.e(LOG_TAG, "IO Exception while communicating with Zygote - "
                + ex.toString());
        throw new ZygoteStartFailedEx(ex);
    }
}
拿到 result 之后,会通过前面调用的 openZygoteSocketIfNeeded 方法进行传递;
private ZygoteState openZygoteSocketIfNeeded(String abi) throws ZygoteStartFailedEx {
    try {
        attemptConnectionToPrimaryZygote();

        if (primaryZygoteState.matches(abi)) {
            return primaryZygoteState;
        }

        if (mZygoteSecondarySocketAddress != null) {
            // The primary zygote didn't match. Try the secondary.
            attemptConnectionToSecondaryZygote();

            if (secondaryZygoteState.matches(abi)) {
                return secondaryZygoteState;
            }
        }
    } catch (IOException ioe) {
        throw new ZygoteStartFailedEx("Error connecting to zygote", ioe);
    }

    throw new ZygoteStartFailedEx("Unsupported zygote ABI: " + abi);
}
这里调用的是 attemptConnectionToPrimaryZygote 进行链接
private void attemptConnectionToPrimaryZygote() throws IOException {
    if (primaryZygoteState == null || primaryZygoteState.isClosed()) {
        primaryZygoteState =
                ZygoteState.connect(mZygoteSocketAddress, mUsapPoolSocketAddress);

        maybeSetApiDenylistExemptions(primaryZygoteState, false);
        maybeSetHiddenApiAccessLogSampleRate(primaryZygoteState);
    }
}
最终调用到的时候 ZygoteState 的 connect 方法;
static ZygoteState connect(@NonNull LocalSocketAddress zygoteSocketAddress,
        @Nullable LocalSocketAddress usapSocketAddress)
        throws IOException {

    DataInputStream zygoteInputStream;
    BufferedWriter zygoteOutputWriter;
    final LocalSocket zygoteSessionSocket = new LocalSocket();

    if (zygoteSocketAddress == null) {
        throw new IllegalArgumentException("zygoteSocketAddress can't be null");
    }

    try {
        // 核心逻辑在这里,这里最终会调用到 ZygoteInit 里
        zygoteSessionSocket.connect(zygoteSocketAddress);
        zygoteInputStream = new DataInputStream(zygoteSessionSocket.getInputStream());
        zygoteOutputWriter =
                new BufferedWriter(
                        new OutputStreamWriter(zygoteSessionSocket.getOutputStream()),
                        Zygote.SOCKET_BUFFER_SIZE);
    } catch (IOException ex) {
        try {
            zygoteSessionSocket.close();
        } catch (IOException ignore) { }

        throw ex;
    }

    return new ZygoteState(zygoteSocketAddress, usapSocketAddress,
                           zygoteSessionSocket, zygoteInputStream, zygoteOutputWriter,
                           getAbiList(zygoteOutputWriter, zygoteInputStream));
}
核心逻辑在 zygoteSessionSocket.connect 这里,这里最终会调用到 ZygoteInit 中的 app_main.cpp 中的 main 方法;
如果是 Zygote 进程,则调用 ZygoteInit 启动 Zygote 进程;
如果是 app 进程,则调用 RuntimeInit 启动 app 进程;
ZygoteInit 中通过 ZygoteServer zygoteServer = new ZygoteServer(); 创建了一个 Zygote 服务器,然后 zygoteServer.registerServerSocket(socketName); 注册 socket,最终调用到 ActivityThread 的 main 方法;
到这里,Zygote 的创建流程也就走完了,我们接着拐回去看下 app 进程存在的时候,直接启动的逻辑;
进程创建,执行 realStartActivityLocked 方法
boolean realStartActivityLocked(ActivityRecord r, WindowProcessController proc,
        boolean andResume, boolean checkConfig) throws RemoteException {

    // 省略部分代码

    // 这里传递的就是 LaunchActiivtyItem
    final ClientTransaction clientTransaction = ClientTransaction.obtain(
        proc.getThread(), r.appToken);

    // 这里和 8.0 以前是不一样的,这里要关注下
    clientTransaction.addCallback(LaunchActivityItem.obtain(new Intent(r.intent),
        System.identityHashCode(r), r.info,
        // TODO: Have this take the merged configuration instead of separate global
        // and override configs.
        mergedConfiguration.getGlobalConfiguration(),
        mergedConfiguration.getOverrideConfiguration(), r.compat,
        r.launchedFromPackage, task.voiceInteractor, proc.getReportedProcState(),
        r.getSavedState(), r.getPersistentSavedState(), results, newIntents,
        r.takeOptions(), isTransitionForward,
        proc.createProfilerInfoIfNeeded(), r.assistToken, activityClientController,
        r.createFixedRotationAdjustmentsIfNeeded(), r.shareableActivityToken,
        r.getLaunchedFromBubble()));

    // 启动
    mService.getLifecycleManager().scheduleTransaction(clientTransaction);
}
会调用到 ClientLifeCycleManager 的 scheduleTransaction 方法
void scheduleTransaction(ClientTransaction transaction) throws RemoteException {
    // 这个就是拿到最终的
    final IApplicationThread client = transaction.getClient();
    transaction.schedule();
    if (!(client instanceof Binder)) {
        transaction.recycle();
    }
}
IApplicationThread这个的实现 就是我们的 ActivityThread;
mClient.scheduleTransaction(this); 最终调用到 ActivityThread.this.scheduleTransaction(transaction); 逻辑,因为 ActivityThread 继承ClientTransactionHandler,所以 scheduleTransaction 最终走到的是 ClientTransactionHandler 中的 scheduleTransaction 逻辑;
public void scheduleTransaction(ClientTransaction transaction) throws RemoteException {
    ActivityThread.this.scheduleTransaction(transaction);
}
我们进入其父类 ClientTransactionHandler 中的 scheduleTransaction 方法看下:
void scheduleTransaction(ClientTransaction transaction) {
    transaction.preExecute(this);
    sendMessage(ActivityThread.H.EXECUTE_TRANSACTION, transaction);
}
最终调用到 ActivityThread 的 mH 的 handleMessage 方法的 EXECUTE_TRANSACTION case
case EXECUTE_TRANSACTION:
    final ClientTransaction transaction = (ClientTransaction) msg.obj;
    mTransactionExecutor.execute(transaction);
    if (isSystem()) {
        transaction.recycle();
    }
    // TODO(lifecycler): Recycle locally scheduled transactions.
    break;
我们进入 TransactionExecutor 的 execute 方法看下:
public void execute(ClientTransaction transaction) {
    // 省略部分代码

    executeCallbacks(transaction);
}
public void executeCallbacks(ClientTransaction transaction) {
    // 省略部分代码

    final ClientTransactionItem item = callbacks.get(i);
    item.execute(mTransactionHandler, token, mPendingActions);
}
这里的 item 就是前面 addCallback 的时候传入的 LaunchActivityItem,我们进入其 execute 方法看下:
public void execute(ClientTransactionHandler client, IBinder token,
        PendingTransactionActions pendingActions) {
    Trace.traceBegin(TRACE_TAG_ACTIVITY_MANAGER, "activityStart");
    ActivityClientRecord r = client.getLaunchingActivity(token);
    // 处理 activity 的启动
    client.handleLaunchActivity(r, pendingActions, null /* customIntent */);
    Trace.traceEnd(TRACE_TAG_ACTIVITY_MANAGER);
}
最终调回去 ActivityThread 的 handleLaunchActivity
public Activity handleLaunchActivity(ActivityClientRecord r,
        PendingTransactionActions pendingActions, Intent customIntent) {

    // 完成 Activity 的启动;
    final Activity a = performLaunchActivity(r, customIntent);
}
activity = mInstrumentation.newActivity(cl, component.getClassName(), r.intent); 反射创建Activity;
mInstrumentation.callActivityOnCreate(activity, r.state, r.persistentState); 执行Activity的生命周期;
到这里 startActivity 的流程就结束了;
下一章预告
基于启动流程,如何 Hook Activity 的启动流程;
欢迎三连
来都来了,点个关注点个赞吧,你的支持是我最大的动力~~~


