1、文件上传
文件上传功能如下:
客户端使用ElementPlus上传文件
服务器使用 SpringMvc接收文件
1.1客户端代码
ElementPlus的<el-upload>可以非常方便的处理文件上传功能,即美观又强大。
传送门--》 upload组件文档
1.1.1、使用axios工具上传文件
<el-upload>默认是使用 XMLHttpRequest方式上传文件的,如果需要使用axios工具,有两种方式。
第一种:覆盖<el-upload>默认的 http-request行为
通过修改<el-upload>的http-request参数,允许自行实现上传文件的请求
<div >
        <el-upload
          ref="upload"
          action="/question/upload"
          :limit="1"
          :http-request="handleChange"
          accept=".xls,.xlsx"
          :auto-upload="true"
        >
        <template #trigger>
          <el-button type="primary">select file</el-button>
          </template>
        </el-upload>

</div>
上传函数
    handleChange(request) {
      // 这里的file是el-upload传递的文件对象
      // 参数示例: {"headers":{},"withCredentials":false,"file":
      // {"uid":1713089255886},"data":
      // {},"method":"post","filename":"file","action":"/file/upload"}

      const formData = new FormData();
      formData.append('file', request.file);
      axios.post('/file/upload', formData, {
        headers: {
          'Content-Type': 'multipart/form-data'
        }
      })
      .then(response => {
        // 处理响应
        console.log(response.data);
      })
      .catch(error => {
        // 处理错误
        console.error(error);
      });
}第二种:监听<el-upload>的on-change事件,自行实现上传文件的请求
<div style="float:left;padding-top:50px;">
  <el-upload
    ref="upload"
    action="/file/upload"
    :limit="1"
    :on-change="handleChange"
    accept=".xls,.xlsx"
    :auto-upload="false"
  >
  <template #trigger>
      <el-button type="primary">select file</el-button>
    </template>
  </el-upload>

</div>
上传函数
    handleChange(file) {
      // 这里的file是el-upload传递的文件对象
      const formData = new FormData();
      formData.append('file', file.raw);
      axios.post('/file/upload', formData, {
        headers: {
          'Content-Type': 'multipart/form-data'
        }
      })
      .then(response => {
        // 处理响应
        console.log(response.data);
      })
      .catch(error => {
        // 处理错误
        console.error(error);
      });
1.2、服务端代码
SpringMvc处理文件上传非常方便
    @PostMapping("/file/upload")
    public Response questionUploadAndReadExcel(@RequestParam("file") MultipartFile file) {
          // do sth with file
          return Response.success("ok");

    }
2、文件下载
2.1、客户端代码
使用<el-table>标签展示可供下载的文件列表
ElementPlus的<el-table>可以非常方便的展示文件列表,即美观又强大。
传送门--》table组件
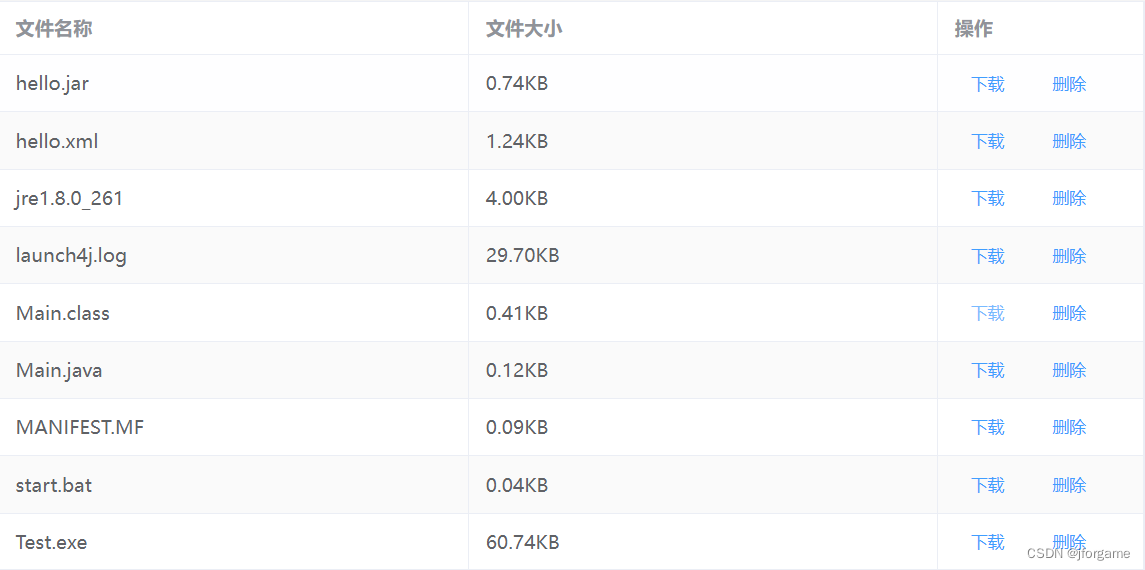
使用<el-table>展示数据
      <el-table class="down" :data="fileList" border stripe style="width: 100%;margin-top: 20px;">
            <el-table-column prop="name" label="文件名称"></el-table-column>
            <el-table-column prop="attachSize" label="文件大小">
             <template #default="scope">
                  <span v-if="scope.row.attachSize / 1024 / 1024 < 1">{{(scope.row.attachSize / 1024).toFixed(2) + 'KB'}}</span>
                  <span v-else>{{(scope.row.attachSize / 1024 / 1024).toFixed(2) + 'MB'}}</span>
              </template>
            </el-table-column>

            <el-table-column width="150px" label="操作">
                 <template #default="scope">
                    <el-button size="small" type="text">
                        <a @click="downloadFile(scope.row.name)" download="scope.row.name">下载</a>
                    </el-button>
                    <el-button size="small" type="text" @click="deleteHandle(scope.row.id)">删除</el-button>
                </template>
            </el-table-column>
        </el-table>
下载函数
点击超链接之后,动态构建<a>标签,并模拟点击。一个正确的url地址是类似这样的
http://127.0.0.1:5173/api/file/download/hello.xml downloadFile(name) {
// 动态构建<a>标签,并模拟点击
var url = '/file/download/'+name;
const a = document.createElement('a')
a.setAttribute('download', name)
a.setAttribute('target', '_blank')
a.setAttribute('href', url)
document.body.appendChild(a);
a.click()
}2.2、服务端代码
服务端使用SpringMVC提供文件下载,代码比较简单。
@Controller
@RequestMapping("/file")
public class FileController {

    String filePath = "E:\\demo";

    @RequestMapping("/download/{fileName}")
    public ResponseEntity<ByteArrayResource> downloadFile(@PathVariable("fileName") String fileName) throws IOException {
        // 读取文件内容,并将其转换为ByteArrayResource对象
        File file = new File(filePath + File.separator + fileName);
        byte[] fileContent = Files.readAllBytes(file.toPath());
        ByteArrayResource resource = new ByteArrayResource(fileContent);

        // 设置响应头,告诉浏览器文件的类型和下载方式
        HttpHeaders headers = new HttpHeaders();
        headers.add(HttpHeaders.CONTENT_DISPOSITION, "attachment; filename=" + file.getName());

        // 返回包含文件内容的ResponseEntity对象
        return ResponseEntity.ok()
                .headers(headers)
                .contentLength(fileContent.length)
                .contentType(MediaType.APPLICATION_OCTET_STREAM)
                .body(resource);
    }
}
需要注意的是,这样要选择@Controller注解,而不是@RestController注解。



![[通俗易懂:Linux标准输入/输出和重定向]Shell脚本之 > /dev/null 2>1命令详解](https://img-blog.csdnimg.cn/20201211150516784.png?x-oss-process=image/watermark,type_ZmFuZ3poZW5naGVpdGk,shadow_10,text_aHR0cHM6Ly9ibG9nLmNzZG4ubmV0L3FxXzQ0NDkxNzA5,size_16,color_FFFFFF,t_70)
