Angular CLI自身操作
显示版本
ng version
或
ng v
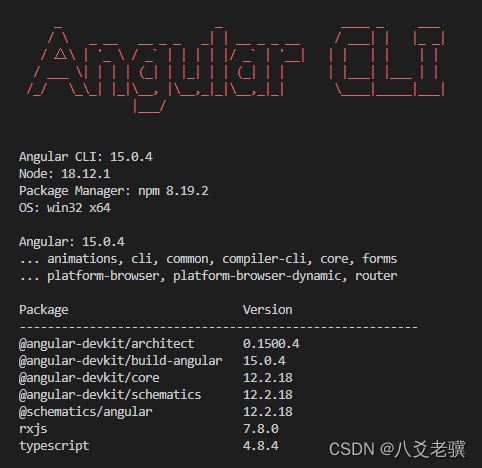
这条命令除了显示当前的cli的版本号,还显示LOGO,运行环境等内容:
显示帮助
ng --help
或
ng <sub cmd> --help
比如:
ng build --help
如果记不住命令,可随时查看帮助。--help标记列出所有可用命令。
命令行自动补全
ng completion
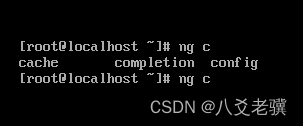
需要在bash环境下运行,Windows下的cmd和powershell都不行。运行完之后,重新进入bash就可以使用TAB键进行命令补全了。比如输入ng c,按下TAB后,等一会就会看到三个c开头的子命令:
创建项目
ng new [name]
或
ng n [name]
创建单项目
ng new 还会默认创建一个位于工作区根级的骨架应用,及其端到端测试项目。这个骨架是一个简单的 Welcome 应用,它可以运行,也很容易修改。这个根应用与工作区同名,其源文件位于工作区的 src/ 子文件夹中。
创建多项目
如果你打算在工作区中包含多个项目,可以在创建工作区时不要自动创建初始应用,并为工作区指定一个唯一的名字。下列命令用于创建一个包含全工作区级配置文件的工作区,但没有根应用。
ng new my-workspace --create-application false
然后,你可以使用工作区内唯一的名字来生成应用和库。
cd my-workspace
ng generate application my-first-app
显示命令帮助
ng new --help
如果对命令不熟,可以用此命令显示所有可用选项。
如何熟悉命令
ng new [name] --dry-run
加上--dry-run选项,控制台输出与交互跟去掉是一样的,只是不会创建任何东西,不会产生项目文件。可以加上这个选项后,来熟悉这个命令。
ng new --dry-run
? What name would you like to use for the new workspace and initial project? aa
? Would you like to add Angular routing? Yes
? Which stylesheet format would you like to use? SCSS [ https://sass-lang.com/documentation/syntax#scss ]
CREATE aa/angular.json (2854 bytes)
CREATE aa/package.json (1033 bytes)
CREATE aa/README.md (1056 bytes)
CREATE aa/tsconfig.json (901 bytes)
CREATE aa/.editorconfig (274 bytes)
CREATE aa/.gitignore (548 bytes)
CREATE aa/tsconfig.app.json (263 bytes)
CREATE aa/tsconfig.spec.json (273 bytes)
CREATE aa/.vscode/extensions.json (130 bytes)
CREATE aa/.vscode/launch.json (474 bytes)
CREATE aa/.vscode/tasks.json (938 bytes)
CREATE aa/src/favicon.ico (948 bytes)
CREATE aa/src/index.html (288 bytes)
CREATE aa/src/main.ts (214 bytes)
CREATE aa/src/styles.scss (80 bytes)
CREATE aa/src/assets/.gitkeep (0 bytes)
CREATE aa/src/app/app-routing.module.ts (245 bytes)
CREATE aa/src/app/app.module.ts (393 bytes)
CREATE aa/src/app/app.component.html (23115 bytes)
CREATE aa/src/app/app.component.spec.ts (1061 bytes)
CREATE aa/src/app/app.component.ts (207 bytes)
CREATE aa/src/app/app.component.scss (0 bytes)
自定义工作空间目录名
ng new --directory
默认情况下,ng new创建的目录与参数中给定的项目名称相同,可以用这个选项,指定不同的目录名称。比如创建叫做a的多项目空间,存放在目录test中。
ng new a --directory test --create-application false --force --skip-install

指定初始项目的生成选择器的前缀
ng new -p, --prefix
比如我们创建一个单一项目:
ng new a -p px --directory test --force --skip-install
打开app.component.ts,会发现@Component装饰器的selector为px-root:
import { Component } from '@angular/core';

@Component({
  selector: 'px-root',
  templateUrl: './app.component.html',
  styleUrls: ['./app.component.css']
})
export class AppComponent {
  title = 'a';
}
设置初始代码的格式
ng new -s, --inline-style 使用内联样式。
ng new -t, --inline-template 使用内联模板。
ng new 默认创建的项目代码是样式、模板、脚本分开的,有些简单的功能可以放在一个文件中,以减少项目的文件数量。比如执行:
ng new a -s true -t true --skip-install
生成的代码中少了app.component.html和app.component.css:

我们再打开app.component.ts看一下:
import { Component } from '@angular/core';

@Component({
  selector: 'app-root',
  template: `
    <!--The content below is only a placeholder and can be replaced.-->
    <div style="text-align:center" class="content">
      <h1>
        Welcome to {{title}}!
      </h1>
      <span style="display: block">{{ title }} app is running!</span>
      <img width="300" alt="Angular Logo" src="data:image/svg+xml;base64,PHN2ZyB4bWxucz0iaHR0cDovL3d3dy53My5vcmcvMjAwMC9zdmciIHZpZXdCb3g9IjAgMCAyNTAgMjUwIj4KICAgIDxwYXRoIGZpbGw9IiNERDAwMzEiIGQ9Ik0xMjUgMzBMMzEuOSA2My4ybDE0LjIgMTIzLjFMMTI1IDIzMGw3OC45LTQzLjcgMTQuMi0xMjMuMXoiIC8+CiAgICA8cGF0aCBmaWxsPSIjQzMwMDJGIiBkPSJNMTI1IDMwdjIyLjItLjFWMjMwbDc4LjktNDMuNyAxNC4yLTEyMy4xTDEyNSAzMHoiIC8+CiAgICA8cGF0aCAgZmlsbD0iI0ZGRkZGRiIgZD0iTTEyNSA1Mi4xTDY2LjggMTgyLjZoMjEuN2wxMS43LTI5LjJoNDkuNGwxMS43IDI5LjJIMTgzTDEyNSA1Mi4xem0xNyA4My4zaC0zNGwxNy00MC45IDE3IDQwLjl6IiAvPgogIDwvc3ZnPg==">
    </div>
    <h2>Here are some links to help you start: </h2>
    <ul>
      <li>
        <h2><a target="_blank" rel="noopener" href="https://angular.io/tutorial">Tour of Heroes</a></h2>
      </li>
      <li>
        <h2><a target="_blank" rel="noopener" href="https://angular.io/cli">CLI Documentation</a></h2>
      </li>
      <li>
        <h2><a target="_blank" rel="noopener" href="https://blog.angular.io/">Angular blog</a></h2>
      </li>
    </ul>

  `,
  styles: []
})
export class AppComponent {
  title = 'a';
}
对比前边示例,html内容和样式内容全部放到了.ts文件中。
学习Angular项目的结构
ng new --minimal
创建没有任何测试框架的工作空间。(仅用于学习目的。)
示例:
ng new a -s -t --skip-install --minimal
设置多项目工作空间的项目根目录
ng new --new-project-root
默认为projects,可以自定义,比如:
比如:
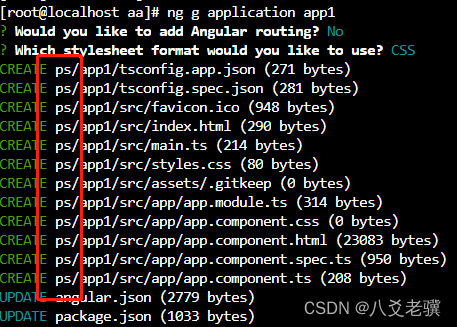
ng new aa --create-application false --new-project-root ps --skip-install
cd aa
ng g application app1
发现app1放到了aa/ps/下边了。
单项目添加路由
ng new --routing
带上这个选项,会在项目根目录下创建带路由的模块。
指定样式文件的扩展名/预处理器
ng new --style
可设置的值有:css|scss|sass|less。如果不指定的话,会在命令行出现选择菜单。
指定包管理器
ng new --package-manager
| 用于安装依赖项的包管理器。 | npm|yarn|pnpm|cnpm |
GIT操作
ng new -g, --skip-git
ng new --commit
Angular默认会创建git的本地库,可以选择跳过。如果使用了git,在修改代码后可以用--commit选项提交。不过正常情况下不需要用到这两个选项。
不使用交互界面
ng new --interactive
如果设为false,需要设置好相应的选项参数,否则会报错。
ng new --defaults
如果设为true,则所有选项使用默认值。
配置项目
ng config [json-path] [value]
这条命令不带参数时返回整个angular.json配置内容。如果带一个参数(参数为相应的配置项)则返回对应的值,如果带两个参数,则设置某个配置项的值。
比如设置某个项目选择器前缀:
ng config projects.app1.prefix bb
然后查看某个配置项的值:
ng config projects.app1.prefix
这条命令只是一个配置接口,配置内容涉及到整个Angular CLI的方方面面,也就是说所有的命令行选项都可以配置到文件中,从而不需要繁复地输入各种参数。
项目缓存
ng cache
运行ng build之后,会产生一个隐藏的.angular目录,构建的中间文件会放在这个目录下边,这个功能是为了提升下一次构建速度。不过同时也会增加磁盘的开销,可以根据自己的实际情况进行配置。
ng cache 有四个子命令:
- ng cache clean 删除已有的缓存。
- ng cache disable [aliases: off] 关闭缓存功能。
- ng cache enable [aliases: on] 启用缓存功能。
- ng cache info 显示缓存状态信息。
生成代码
ng generate <schematic>
ng generate的每个子命令下都有一个--dry-run选项,加上这个选项参数后,就可以学习命令如何使用,而不必产生一堆无用的垃圾文件。
应用外壳
ng generate app-shell
假如脚本比较大的话,为了避免页面加载的时候呈现白屏,可以生成一个外壳,客户会首页加载这个页面,可用此来提升用户体验。详情查看官方文档:https://angular.cn/guide/app-shell
生成常规代码
ng generate class [name] 生一个类。 class 可以缩写成cl。
ng generate enum [name] 生成一个枚举类型。enum可以缩写成e。
ng generate interface [name] [type] 生成一个接口类型。interface可以缩写成i。
生成模块
ng generate module [name] 创建模块,模块作为组件的容器。module可缩写成m。如果带局部导航,可以在生成模块的时候带--route选项增加路由有关的依赖。还可以--module选项,指定低级模块。
生成组件
ng generate component [name] 生成一个界面组件。component可以缩写成c。
组件需要放在模块中,默认放在应用程序的模块中。但对复杂点的项目,我们可能生成多个模块,那此时就要加上--module选项指定相应的模块名称。
生成指令
ng generate directive [name] 生成一个Angular指令。也就是模板中用符号插入一段逻辑代码,可以当成组件的属性一样使用。directive可以缩写成d。
指令示例:
import { Directive, Input, TemplateRef, ViewContainerRef } from '@angular/core';

/**
 * Add the template content to the DOM unless the condition is true.
 */
@Directive({ selector: '[appUnless]'})
export class UnlessDirective {
  private hasView = false;

  constructor(
    private templateRef: TemplateRef<any>,
    private viewContainer: ViewContainerRef) { }

  @Input() set appUnless(condition: boolean) {
    if (!condition && !this.hasView) {
      this.viewContainer.createEmbeddedView(this.templateRef);
      this.hasView = true;
    } else if (condition && this.hasView) {
      this.viewContainer.clear();
      this.hasView = false;
    }
  }
}
生成守护
ng generate guard [name] 缩写g。
实际上是生成一个服务,只不过用于访问控制。
生成拦截器
ng generate interceptor [name]
生成一个http代理程序,通过这个程序进行后端http请求的转发。
具体可以参考官方文档:
https://angular.cn/guide/http#write-an-interceptor
借助拦截机制,你可以声明一些拦截器,它们可以检查并转换从应用中发给服务器的 HTTP 请求。这些拦截器还可以在返回应用的途中检查和转换来自服务器的响应。多个拦截器构成了请求/响应处理器的双向链表。
拦截器可以用一种常规的、标准的方式对每一次 HTTP 的请求/响应任务执行从认证到记日志等很多种隐式任务。
生成应用程序和库
ng generate application [name] application 可以缩写成app。
多项目工作空间中生成应用程序。
ng generate library [name] library 可缩写成lib
多项目工作空间中生成库。
生成管道
ng generate pipe [name] pipe可缩写成p。
pipe相当于补助指令,它接在其它表达式后边,效果就像水管子一样,数据就像水,流经管道的每个节点。比如下边的示例,将输出结果设置成大写。
<!-- use parentheses in the third operand so the pipe applies to the whole expression -->
{{ (true ? 'true' : 'false') | uppercase }}
Angular 为典型的数据转换提供了内置的管道,包括国际化的转换(i18n),它使用本地化信息来格式化数据。数据格式化常用的内置管道如下:
-
DatePipe:根据本地环境中的规则格式化日期值。
-
UpperCasePipe:把文本全部转换成大写。
-
LowerCasePipe :把文本全部转换成小写。
-
CurrencyPipe :把数字转换成货币字符串,根据本地环境中的规则进行格式化。
-
DecimalPipe:把数字转换成带小数点的字符串,根据本地环境中的规则进行格式化。
-
PercentPipe :把数字转换成百分比字符串,根据本地环境中的规则进行格式化。
-
关于内置管道的完整列表,请参阅管道 API 文档。
-
要了解有关使用管道进行国际化 (i18n) 工作的更多信息,请参阅根据区域设置格式化数据。
你可以用此命令创建自定义管道。
ng generate resolver [name] resolver 可缩写成r。
resolver 用于处理路由中的参数。比如导航一个详细页,通常在列表页向详细页传递一个id,我们通过id来加载详细内容。resolver可以封装这个查询过程,在详细页里通过ActivatedRoute直接得到详细内容的对象。
比如实现了这么一个resolver:
@Injectable
({ providedIn: 'root' })
export class HeroResolver implements Resolve<Hero> {
    constructor(private service: HeroService) {}

    resolve(
        route: ActivatedRouteSnapshot,
        state: RouterStateSnapshot
    ): Observable<Hero>|Promise<Hero>|Hero {
        return this.service.getHero(route.paramMap.get('id'));
    }
}
接着我们注册一下这个解析器:
@NgModule
({
imports: [
    RouterModule.forRoot([
    {
        path: 'detail/:id',
        component: HeroDetailComponent,
        resolve: {hero: HeroResolver}
    }
    ])
],
exports: [RouterModule]
})
export class AppRoutingModule {}
然后,我们在组件类中就可以通过 ActivatedRoute得到Hero的实例:
@Component
({
    selector: "app-hero",
    templateUrl: "hero.component.html",
})
export class HeroComponent {

    constructor(private activatedRoute: ActivatedRoute) {}

    ngOnInit() {
        this.activatedRoute.data.subscribe(({ hero }) => {
        // do something with your resolved data ...
        })
    }

}
生成服务
ng generate service [name] 生成可注入的服务类。 service 可缩写成s。
前端加载优化
ng generate service-worker
生成一段脚本,用于管理客户端的缓存,节省带宽。具体可参考官方文档:https://angular.cn/guide/service-worker-intro
服务端性能优化
ng generate web-worker [name]
具体参考官方文档:https://angular.cn/guide/web-worker
查看Angular文档
ng doc <keyword> doc可缩写成d
比如查看pipe有关的内容:
ng d pipe
代码分析
ng lint [project]
如果没有安装相关的语法分析包,则运行命令的时候会安装eslint,安装完再次运行ng lint则会输出相应的语法建议。比如:
PS E:\projects\java-demo\angular\angular-tour-of-heroes> ng lint
Linting "angular-tour-of-heroes"...
E:\projects\java-demo\angular\angular-tour-of-heroes\src\app\hero-detail\hero-detail.component.ts
12:17 error Unexpected empty constructor @typescript-eslint/no-empty-function
14:3 error Lifecycle methods should not be empty @angular-eslint/no-empty-lifecycle-method
14:20 error Unexpected empty method 'ngOnInit' @typescript-eslint/no-empty-functionE:\projects\java-demo\angular\angular-tour-of-heroes\src\app\messages\messages.component.ts
13:3 error Lifecycle methods should not be empty @angular-eslint/no-empty-lifecycle-method
13:14 error Unexpected empty method 'ngOnInit' @typescript-eslint/no-empty-functionE:\projects\java-demo\angular\angular-tour-of-heroes\src\app\testr.resolver.ts
3:3 warning 'Router' is defined but never used @typescript-eslint/no-unused-vars
13:11 warning 'route' is defined but never used @typescript-eslint/no-unused-vars
13:42 warning 'state' is defined but never used @typescript-eslint/no-unused-vars✖ 8 problems (5 errors, 3 warnings)
Lint warnings found in the listed files.
Lint errors found in the listed files.
测试
白盒(单元)测试
ng test [project] 运行测试,test可以缩写成t。
Angular使用Karma框架进行单元测试。为了提升代码的健壮性,及开发效率,我们可以为自己的功能代码编写测试,这样在发布之前,通过机器测试找出可能存在的问题,而不一个一个页面人工去验证代码的正确性。
比如,某个管理数据的Service类,可能会进行频繁的修改,但修改之后可能会产生BUG,这时我们可以通过测试来检查代码的正确性:
describe('ValueService', () => {
  let service: ValueService;
  beforeEach(() => { service = new ValueService(); });

  it('#getValue should return real value', () => {
    expect(service.getValue()).toBe('real value');
  });

  it('#getObservableValue should return value from observable',
    (done: DoneFn) => {
    service.getObservableValue().subscribe(value => {
      expect(value).toBe('observable value');
      done();
    });
  });

  it('#getPromiseValue should return value from a promise',
    (done: DoneFn) => {
    service.getPromiseValue().then(value => {
      expect(value).toBe('promise value');
      done();
    });
  });
});
黑盒(功能)测试
ng e2e [project]
运行命令后,如果没有安装测试框架,则提示安装。安装完成后,再次运行该命令,则会弹出相应的测试软件。比如:

墨盒测试支持之前,要先编写测试脚本。比如,打开首页后,页面内容要包含app is running!这句话,则脚本这么写:
describe('My First Test', () => {
  it('Visits the initial project page', () => {
    cy.visit('/')
    cy.contains('app is running!')
  })
})
有关 Cypress 的用法参考:Writing Your First E2E Test | Cypress Documentation
国际化支持
ng extract-i18n [project]
如果应用需要支持多国语言,可以用这个命令创建翻译文件,具体用法参考官方文档:https://angular.cn/guide/i18n-overview
升级项目
以下两条命令按照命令行提示操作即可。不过,当中可能会有版本冲突的问题,并不是十分好用。
添加依赖包
ng add <collection>
升级依赖包
ng update [packages..]
调试运行
ng run <target>
指定架构运行应用程序。执行ng run --help可以看到有效的运行架构。有时需要服务端渲染的时候,需要在服务器运行某个架构以提供客户端渲染服务。
ng run --help
ng run <target>Runs an Architect target with an optional custom builder configuration defined in your project.
Arguments:
target The Architect target to run.
[string] [required] [choices: "angular-tour-of-heroes:build", "angular-tour-of-heroes:build:development", "angular-tour-of-heroes:build:production", "angular-tour-of-heroes:ct", "angular-tour-of-heroes:ct:development", "angular-tour-of-heroes:cypress-open", "angular-tour-of-heroes:cypress-run", "angular-tour-of-heroes:cypress-run:production", "angular-tour-of-heroes:e2e", "angular-tour-of-heroes:e2e:production", "angular-tour-of-heroes:extract-i18n", "angular-tour-of-heroes:lint", "angular-tour-of-heroes:serve", "angular-tour-of-heroes:serve:development", "angular-tour-of-heroes:serve:production", "angular-tour-of-heroes:test"]
Options:
--help Shows a help message for this command in the console.
ng serve [project]
热加载的方式运行应用程序。serve可以缩写成s。一般用在开发阶段。
构建打包
ng build [project] 编译成js。build可缩写成b。
部署
ng deploy [project]
将程序发布到这些地方:
Amazon S3
Firebase
Netlify
NPM
GitHub Pages
同时需要安装相应的依赖:
Amazon S3: ng add @jefiozie/ngx-aws-deploy
Firebase: ng add @angular/fire
Netlify: ng add @netlify-builder/deploy
NPM: ng add ngx-deploy-npm
GitHub Pages: ng add angular-cli-ghpages
