环境搭建
编译器安装
1、编译器下载地址

2、打开命令行模式,输入go version

ide安装
ide下载地址
依赖管理
goproxy
1、goproxy代理地址
// 阿里云
https://mirrors.aliyun.com/goproxy
// 微软
https://goproxy.io
// 七牛
https://goproxy.cn
2、ide配置goproxy

gopath

go mod
1、创建包管理项目
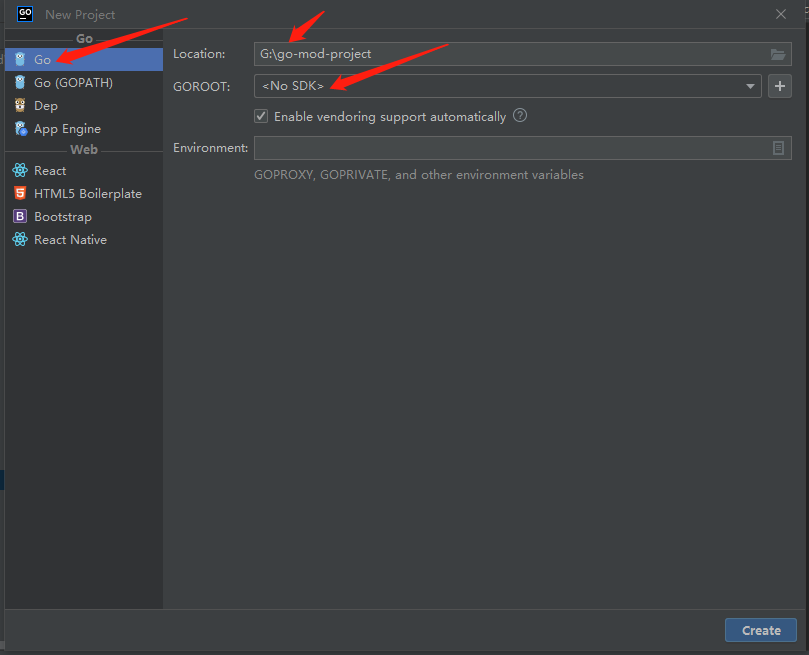
- goland-ide新版本,创建go mod项目,File > New > Project > Go
- goland-ide旧版本,创建go mod项目,File > New > Project > Go modules(vgo)
2、实例教程
package main

import "github.com/gin-gonic/gin"

func main() {
	r := gin.Default()
	r.GET("/ping", func(c *gin.Context) {
		c.JSON(200, gin.H{
			"message": "pong",
		})
	})
	r.Run() // listen and serve on 0.0.0.0:8080 (for windows "localhost:8080")
}
执行go run main.go后,go.mod文件内容
module go-quick-start-guide

go 1.14

require github.com/gin-gonic/gin v1.7.7
gopath文件夹内容

go-基础-教程
标准库文档
Golang标准库文档
跨平台编译
1、编译
Windows下编译Linux平台的64位可执行程序
SET CGO_ENABLED=0
SET GOOS=linux
SET GOARCH=amd64
go build main.go
Mac下编译Linux平台的64位可执行程序
CGO_ENABLED=0 GOOS=linux GOARCH=amd64 go build main.go2、实例教程
背景:业务需求,要处理历史数据,本地写好脚本,然后打包到生产环境运行
(1)go build编译Linux平台的64位可执行程序
(2)登录linux服务器,使用“rz”命令上传Linux平台的64位可执行程序
(3)chmod赋予文件可执行权限,然后运行
常见问题
![]()
解决问题
go build打包脚本时,GOOS变量和GOARCH变量没有设置正确,导致在linux服务器上无法运行
数据类型
1、数字类型
2、字符串类型
3、布尔型
4、派生类型:指针、数组、切片、结构体、map、函数、管道、接口
变量-crud
1、变量定义
- 第一种方法:指定变量类型,如果变量没有初始化,则变量默认为零值
// 声明变量
var variable_name type
// 初始化变量
variable_name = value- 第二种方法:编译器根据值自行判定变量类型
var variable_name = value- 第三种方法:使用
:=声明变量并初始化(推荐)
variable_name := value2、实例教程
package main

import (
	"fmt"
	"runtime"
	"unsafe"
)

func main() {

	// 变量定义
	// 第一种,指定变量类型,如果没有初始化,则变量默认为零值
	var teacherName string
	teacherName = "zhang"
	fmt.Printf("teacherName:%s\n", teacherName)

	// 第二种,编译器根据值自行判定变量类型
	var studentName = "li"
	fmt.Printf("studentName:%s\n", studentName)

	// 第三种,使用` :=` 声明变量并初始化
	parentName := "wang"
	fmt.Printf("parentName:%s\n", parentName)

	// 变量占用内存
	// output: string:16
	fmt.Printf("string:%v\n", unsafe.Sizeof(teacherName))
	var num int32
	// output: int32:4
	fmt.Printf("int32:%v\n", unsafe.Sizeof(num))
	var count int
	// output: cpu:amd64, int:8
	// 64位cpu下int是8个字节,32位cpu下int是4个字节
	fmt.Printf("cpu:%v, int:%v\n", runtime.GOARCH, unsafe.Sizeof(count))
}
3、知识点
- 变量已经使用 var 声明过了,再使用
:=声明变量,就产生编译错误 - 指定变量类型,如果没有初始化,则变量默认为零值
- 整型 int 、浮点型 float 默认值为0
- 布尔类型默认值为false
- 字符串类型默认值为""
- 其他类型默认值为nil
变量-权限
1、基础知识
go语言是根据首字母的大小写来确定是否可以跨包访问。如果首字母大写,则可以被其他的包访问;如果首字母小写,则只能在本包中使用
2、实例教程
config.go
package config

import "time"

var (
	// other package can not access this variable
	teacherName = "zhang"
	// other package can access this variable
	StudentName = "li"
)

// other package can not access this struct
type config struct {
	id   int64
	name string
}

// other package can access this struct
type Activity struct {
	Id        int64
	Name      string
	StartTime *time.Time
	EndTime   *time.Time
}

// other package can not access this function
func getConfig() (c *config) {
	return
}

// other package can access this function
func ReadConfig() (activity *Activity) {
	return
}
main.go
package main

import (
	"fmt"
	"go-quick-start-guide/go-tutorial/go-variable/go-variable-permission/config"
)

func main() {

	fmt.Printf("studentName:%s\n", config.StudentName)
	fmt.Printf("activity:%+v\n", config.ReadConfig())
}
常量
1、常量定义
- 省略type时,表示编译器根据值自行判定变量类型
const variable_name [type] = value2、类型定义
类型定义是在底层类型的基础上创建全新的类型,但二者并不能相互赋值,只能类型转换
type NewType BaseType3、iota
(1)iota只能在常量的表达式中使用
(2)每次 const 出现时,都会让 iota 初始化为0
type RoleType int

const (
	TeacherRole RoleType = iota + 1 // 1
	StudentRole                     // 2
	ParentRole                      // 3
)
4、实例教程
package main

import "fmt"

type RoleType int

const (
	TeacherRole RoleType = iota + 1 // 1
	StudentRole                     // 2
	ParentRole                      // 3
)

func main() {

	fmt.Printf("teacherRole:%v\n", TeacherRole)
	fmt.Printf("studentRole:%v\n", StudentRole)
	fmt.Printf("parentRole:%v\n", ParentRole)

	var teacherRole int
	// RoleType是在int类型上定义的新数据类型,但二者并不能相互赋值,只能类型转换
	teacherRole = int(TeacherRole)
	fmt.Printf("teacherRole:%v\n", teacherRole)
}
类型转换
1、底层结构相同的两个类型之间互转
(1)type定义的新数据类型和原数据类型互转。
(2)同一数据类型,精度不同。低精度转为高精度是安全的,高精度转为低精度会丢失精度。
package main

import "fmt"

type RoleType int

const (
	TeacherRole RoleType = iota + 1 // 1
	StudentRole                     // 2
	ParentRole                      // 3
)

func main() {

        // RoleType是在int类型上定义的新数据类型,但二者并不能相互赋值,只能类型转换
	var teacherRole int
	teacherRole = int(TeacherRole)
	fmt.Printf("teacherRole:%v\n", teacherRole)

	// 同一数据类型,精度不同
	timeUnix := time.Now().UnixNano() / 1e6
	// output: timeUnix:1650252338922,type:int64,int32(timeUnix):984897258,type:int32
	fmt.Printf("timeUnix:%v,type:%T,int32(timeUnix):%v,type:%T\n", timeUnix, timeUnix, int32(timeUnix), int32(timeUnix))
}
2、底层结构不相同的两个类型之间互转
(1)string与int互相转换:strconv包提供了简单数据类型之间的类型转换功能
package main

import (
	"fmt"
	"strconv"
)

func main() {

	// string和int类型互相转换
	// string转成int
	roomId := "2312"
	if id, err := strconv.Atoi(roomId); err != nil {
		fmt.Printf("string to int fail,roomId:%v,err:%v\n", roomId, err)
	} else {
		// output: string to int success,id:2312,type:int
		fmt.Printf("string to int success,id:%v,type:%T\n", id, id)
	}
	// string转成int64
	if id, err := strconv.ParseInt(roomId, 10, 64); err != nil {
		fmt.Printf("string to int64 fail,roomId:%v,err:%v\n", roomId, err)
	} else {
		// output: string to int64 success,id:2312,type:int64
		fmt.Printf("string to int64 success,id:%v,type:%T\n", id, id)
	}
	// int转成string
	var userId int = 125432
	// output: int to string,id:125432,type:string
	fmt.Printf("int to string,id:%v,type:%T\n", strconv.Itoa(userId), strconv.Itoa(userId))
	// int64转成string
	var cardId int64 = 3454345
	// output: int to string,id:3454345,type:string
	fmt.Printf("int to string,id:%v,type:%T\n", strconv.FormatInt(cardId, 10), strconv.FormatInt(cardId, 10))
}
指针
指针变量指向变量的内存地址
指针变量定义格式
第一种方法:使用“*type”声明指针变量
var variable_name *type第二种方法:使用“&variable_name”取变量的地址
var variable_name type
ptr := &variable_name
使用“*指针变量”访问对应内存地址所存储的变量值
value := *variable_name 实例教程
代码示例:
package main

import "fmt"

func main() {

	teacherName := "张三"
	// 声明指针变量
	var ptr *string

	// &表示取一个变量的地址
	ptr = &teacherName

	fmt.Printf("teacherName变量的地址是: %x\n", &teacherName )

	fmt.Printf("ptr变量的指针地址: %x\n", ptr)

	// 使用 *指针变量,可取出对应内存地址所存储的变量值
	fmt.Printf("ptr变量储存的变量值: %s\n", *ptr)
}
输出结果:
teacherName变量的地址是: c0000381f0
ptr变量的指针地址: c0000381f0
ptr变量储存的变量值: 张三
普通指针类型、unsafe.Pointer、uintptr之间的关系
uintptr:用于指针运算, uintptr 无法持有对象,不可以访问变量值普通指针类型:指向变量的内存地址,可以访问变量值,但不能进行指针运算unsafe.Pointer:通用指针类型。起桥梁作用,可以让任意类型的指针实现相互转换。例如,普通指针类型不能直接转换成uintptr,可以把普通指针类型转换成unsafe.Pointer,unsafe.Pointer再转换成uintptr。
数组-crud
1、数组定义
size:数组元素的个数type:数组元素的类型
第一种方法:声明数组并初始化
var variable_name = [size]type{element0, element1...elementn}第二种方法:使用:= 声明数组并初始化
variable_name := [size]type{element0, element1...elementn}第三种,使用 ... 代替数组的长度,编译器会根据元素个数自行推断数组的长度
variable_name := [...]type{element0, element1...elementn}2、数组的遍历
index:数组元素的下标value:数组元素的下标对应的数值
for index,value := range variable_name {
	函数体
}
3、实例教程
package main

import "fmt"

func main() {

	// 声明并初始化数组
	names := [3]string{"zhang", "li", "wang"}

	// 遍历数组
	for i, _ := range names {
		fmt.Printf("index:%v,value:%v\n", i, names[i])
	}
}
数组-字节数组
实例教程
package main

import (
	"encoding/binary"
	"fmt"
	"sync/atomic"
	"time"
)

var orderIdCounter = uint32(time.Now().UnixNano())

type OrderId string

func main() {

	// int类型与byte转换时,只能将int类型最低八位二进制的数据转换为字节数据
	var userId int32 = 2254
	// | 00000000 | 00000000 | 00001000 | 11001110 |
	// | value=0  | value=0  | value=8  | value=206|
	toByte := byte(userId)
	// output: userId toByte:206
	fmt.Printf("userId toByte:%v\n", toByte)
	toByte = byte(userId >> 8)
	// output: userId >> 8 toByte:8
	fmt.Printf("userId >> 8 toByte:%v\n", toByte)
	toByte = byte(userId >> 16)
	// output: userId >> 16 toByte:0
	fmt.Printf("userId >> 16 toByte:%v\n", toByte)

	// 大端模式:高位字节存放在内存的低地址,低位字节存放在内存的高地址
	var userIdByte [4]byte
	binary.BigEndian.PutUint32(userIdByte[:], uint32(userId))
	// output: Big-Endian userIdByte:[0 0 8 206]
	fmt.Printf("BigEndian userIdByte:%v\n", userIdByte)

	// 小端模式:高位字节存放在内存的高地址,低位字节存放在内存的低地址
	binary.LittleEndian.PutUint32(userIdByte[:], uint32(userId))
	// output: LittleEndian userIdByte:[206 8 0 0]
	fmt.Printf("LittleEndian userIdByte:%v\n", userIdByte)

	orderId := generateOrderId(userId)
	fmt.Printf("generateOrderId:%x\n", orderId)
	uId := orderId.getUserId()
	fmt.Printf("getUserId:%v\n", uId)
}

func generateOrderId(userId int32) OrderId {
	var orderIdByte [12]byte
	// timestamp, 4 bytes, big endian
	binary.BigEndian.PutUint32(orderIdByte[0:4], uint32(time.Now().Unix()))
	// userId, 4 bytes, big endian
	binary.BigEndian.PutUint32(orderIdByte[4:8], uint32(userId))
	// increment, 4 bytes, big endian
	i := atomic.AddUint32(&orderIdCounter, 1)
	binary.BigEndian.PutUint32(orderIdByte[8:12], i)
	return OrderId(orderIdByte[:])
}

func (orderId *OrderId) getUserId() int32 {
	userIdByte := []byte(*orderId)[4:8]
	return int32(uint32(userIdByte[0])<<24 | uint32(userIdByte[1])<<16 | uint32(userIdByte[2])<<8 | uint32(userIdByte[3]))
}
切片-crud
数组的长度不可改变,切片是长度可变的数组。切片是引用类型,对应的是引用拷贝。
1、切片底层原理
- Data:指向底层数组的指针
- Len:切片的长度,len() 方法获取切片长度
- Cap:切片的容量, cap() 方法获取切片容量
type Slice struct {
	Data unsafe.Pointer
	Len  int
	Cap  int
}
2、切片定义格式
第一种方法:切片只声明而没有初始化,那么这个切片的默认值为nil
var variable_name []type第二种方法:使用 make 函数来创建切片
- 使用make创建切片时,len是切片的长度,是必填参数,cap是切片的容量,是可选参数
variable_name := make([]type, len, cap)第三种方法:切片声明并初始化
variable_name :=[]type{element0, element1...elementn}3、切片追加元素
append() 方法可以为切片追加一个元素
ids := make([]int, 0)
ids = append(ids, 1)
4、访问切片指定位置元素
切片是动态数组,可以通过下标来访问切片中指定元素
index:切片元素的下标
value := variable_name[index]5、遍历切片的元素
- index:切片元素的下标
- value:切片元素的下标对应的值
for index,value := range variable_name {
	函数体
}
for-range遍历切片的原理
参考编译器源代码:https://github.com/golang/gofrontend
// The loop we generate:
//   for_temp := range
//   len_temp := len(for_temp)
//   for index_temp = 0; index_temp < len_temp; index_temp++ {
//           value_temp = for_temp[index_temp]
//           index = index_temp
//           value = value_temp
//           original body
//   }
原理解释:先对要遍历的切片做一个引用拷贝,获取切片长度,然后使用常规for循环进行遍历,如果for-range中接收index和value的话,则会对index和value进行一次赋值
6、切片截断或删除切片元素
(1)切片截断
// 将 slice_name 中从下标 start 到 end-1 下的元素创建为一个新的切片
slice_name := slice_name[start:end]
(2)删除切片元素
ids := make([]int, 0)
// 切片删除元素
// 切片删除第一个元素
ids = ids[1:]
// 切片删除最后一个元素
ids = ids[:len(ids)-1]
// 切片删除中间某个元素
deleteIndex := 4
ids = append(ids[:deleteIndex], ids[deleteIndex+1:]...)
7、实例教程
package main

import "fmt"

func main() {
	ids := make([]int, 0)

	// 切片添加元素
	// 切片添加单个元素
	ids = append(ids, 1)
	// 切片添加多个元素
	ids = append(ids, 2, 3, 4)
	// 切片添加另一个切片中的元素
	numbers := []int{5, 6, 7, 8, 9, 10, 11, 12}
	ids = append(ids, numbers...)

	// 切片删除元素
	// 切片删除第一个元素
	ids = ids[1:]
	// 切片删除最后一个元素
	ids = ids[:len(ids)-1]
	// 切片删除中间某个元素
	deleteIndex := 4
	ids = append(ids[:deleteIndex], ids[deleteIndex+1:]...)

	// 切片修改元素
	updateIndex := 3
	updateValue := 20
	ids[updateIndex] = updateValue

	// 遍历切片元素
	for i, v := range ids {
		fmt.Printf("index:%v,value:%v\n", i, v)
	}

	// 切片拷贝
	userIds := make([]int, len(ids))
	copy(userIds, ids)
	fmt.Printf("source data:%v, destination data:%v", ids, userIds)
}
输出结果:
index:0,value:2
index:1,value:3
index:2,value:4
index:3,value:20
index:4,value:7
index:5,value:8
index:6,value:9
index:7,value:10
index:8,value:11
source data:[2 3 4 20 7 8 9 10 11], destination data:[2 3 4 20 7 8 9 10 11]
切片-append
实例教程
package main

import "fmt"

func main() {

	loadFromDataBase := []int{1, 2, 3, 4, 5, 6}

	// wrong usage
	userIds := make([]int, len(loadFromDataBase))
	userIds = append(userIds, loadFromDataBase...)
	// output: userIds:[0 0 0 0 0 0 1 2 3 4 5 6],expected len:6,virtual len:12
	fmt.Printf("userIds:%v,expected len:%v,virtual len:%v\n", userIds, len(loadFromDataBase), len(userIds))

	// correct usage
	ids := make([]int, 0)
	ids = append(ids, loadFromDataBase...)
	// ids:[1 2 3 4 5 6],expected len:6,virtual len:6
	fmt.Printf("ids:%v,expected len:%v,virtual len:%v\n", ids, len(loadFromDataBase), len(ids))

	// correct usage
	uIds := make([]int, len(loadFromDataBase))
	for i, _ := range loadFromDataBase {
		uIds[i] = loadFromDataBase[i]
	}
	// ids:[1 2 3 4 5 6],expected len:6,virtual len:6
	fmt.Printf("uIds:%v,expected len:%v,virtual len:%v\n", uIds, len(loadFromDataBase), len(uIds))
}
思考一下
提问:将[]int{1, 2, 3, 4, 5, 6}逐个添加到userIds切片中,明明只有6个元素,怎么到userIds切片就变成12个元素了,到底是哪个环节出问题了?
解答:userIds := make([]int, len(loadFromDataBase)),申请6个元素大小的内存空间并初始化为默认值。append方法是往userIds len长度的后面追加元素,即userIds[6] = 1、userIds[7] = 2,而不是往dataList的第一个位置追加元素,不正确使用make方法和append方法,可能会导致内存加倍。
正确用法
(1)ids := make([]int, 0),然后使用append方法追加元素
(2)uIds := make([]int, len(loadFromDataBase)),然后for循环依次赋值
切片-反射
实例教程
package main

import (
	"fmt"
	"reflect"
)

func main() {

	names := []string{"zhang", "li", "wang"}
	v := reflect.ValueOf(names)
	t := reflect.TypeOf(names)
	if t.Kind() == reflect.Slice {
		if v.IsNil() {
			return
		}
		// slice value
		fmt.Printf("names:%v\n", v.Interface())
		// traverse slice element
		for i := 0; i < v.Len(); i++ {
			fmt.Printf("index:%v,value:%v\n", i, v.Index(i))
		}
	}
}
切片-指针运算
实例教程
package main

import (
	"fmt"
	"unsafe"
)

type people struct {
	Name string
}

func main() {

	names := []string{"zhang", "li", "wang"}
	// output: names element type:*string
	fmt.Printf("names element type:%T\n", &names[0])
	for i := 0; i < len(names); i++ {
		value := (*string)(unsafe.Pointer(uintptr(unsafe.Pointer(&names[0])) + uintptr(i)*unsafe.Sizeof(names[0])))
		fmt.Printf("index:%v,value:%v\n", i, *value)
	}

	peoples := make([]*people, 0)
	peoples = append(peoples, &people{Name: "zhang"}, &people{Name: "li"}, &people{Name: "wang"})
	// output: peoples element type:**main.people
	fmt.Printf("peoples element type:%T\n", &peoples[0])
	for i := 0; i < len(peoples); i++ {
		value := (**people)(unsafe.Pointer(uintptr(unsafe.Pointer(&peoples[0])) + uintptr(i)*unsafe.Sizeof(peoples[0])))
		// *value will panic
		fmt.Printf("index:%v,value:%+v\n", i, **value)
	}
}
切片-内存泄漏
实例教程
package main

import (
	"fmt"
	"runtime"
)

var peoples = make([]*people, 0)

type people struct {
	Name string
}

func main() {

	peoples = append(peoples, &people{Name: "zhang"}, &people{Name: "li"}, &people{Name: "wang"})
	// output: peoples len:3,cap:4
	fmt.Printf("peoples len:%v,cap:%v\n", len(peoples), cap(peoples))
	// 切片是全局变量时,执行删除操作后,被删除的元素在底层数组还是存在的,只是对切片peoples不可见,这就导致内存的泄漏
	deleteIndex := 2
	deleteAddr := &peoples[deleteIndex]
	fmt.Printf("delete data::%+v\n", peoples[2])
	// peoples[deleteIndex] = nil can solve memory leak
	peoples = append(peoples[:deleteIndex], peoples[deleteIndex+1:]...)
	runtime.GC()
	fmt.Printf("access delete data:%+v\n", **deleteAddr)
}
切片-打印输出
实例教程
package main

import (
	"fmt"
	"time"
)

// Order 订单信息
type Order struct {
	UserId     int64     // 用户id
	ProductId  int64     // 商品id
	Count      int64     // 购买的商品数量
	CreateTime time.Time // 创建时间
	UpdateTime time.Time // 修改时间
}

func main() {

	orders := make([]*Order, 0)
	orders = append(orders, &Order{
		UserId:     12,
		ProductId:  34,
		Count:      2,
		CreateTime: time.Now(),
		UpdateTime: time.Now(),
	}, &Order{
		UserId:     12,
		ProductId:  34,
		Count:      2,
		CreateTime: time.Now(),
		UpdateTime: time.Now(),
	})
	// 打印输出切片结构体指针时,只有一种方法,那就是遍历切片结构体指针,逐个打印输出
	printSliceData(orders)
}

func printSliceData(orders []*Order) {
	for _, v := range orders {
		fmt.Printf("value:%+v\n", v)
	}
}
切片-函数参数
实例教程
package main

import "fmt"

func main() {

	ids := []int{1, 2, 3, 4, 5, 6}
	fmt.Printf("ids:%v\n", ids)
	sliceOp(ids)
	// output: after append element 7,ids:[1 2 3 4 5 6]
	fmt.Printf("after sliceOp,append element 7,ids:%v\n", ids)
	sliceOpByPointer(&ids)
	fmt.Printf("after sliceOpByPointer,append element 8,ids:%v\n", ids)
}

func sliceOp(data []int) {
	data = append(data, 7)
}

func sliceOpByPointer(data *[]int) {
	*data = append(*data, 8)
}
思考一下
提问:sliceOp函数中,往切片追加元素7,函数返回后,切片ids却找不到元素7,切片是引用拷贝,没问题啊?
解答:切片有三个字段:指向底层数组的指针Data字段、切片的长度Len字段、切片的容量Cap字段。Len字段和Cap字段是int类型的,对应值拷贝。在sliceOp函数中append元素,即修改切片data的Len字段和Cap字段,但是不会影响到切片ids的Len字段和Cap字段。
正确用法
函数参数由[]int改为*[]int,函数内部修改了Len字段和Cap字段,也会影响到原先切片的Len字段和Cap字段
切片-扩容
实例教程
package main

import "fmt"

func main() {

	ids := []int{1, 2, 3, 4, 5}
	userIds := ids
	fmt.Printf("before append element,ids:%v,len:%v,cap:%v\n", ids, len(ids), cap(ids))
	fmt.Printf("before append element,userIds:%v,len:%v,cap:%v\n", userIds, len(userIds), cap(userIds))

	ids = append(ids, 6)
	// 超过切片容量时,当原切片长度小于1024时,新切片的容量会直接翻倍
	// 切片扩容,就会创建新的数组,故切片ids和切片userIds不再共用同一个底层数组
	fmt.Printf("after append element,ids:%v,len:%v,cap:%v\n", ids, len(ids), cap(ids))
	fmt.Printf("after append element,userIds:%v,len:%v,cap:%v\n", userIds, len(userIds), cap(userIds))

	// 超过切片容量时,当原切片的容量大于等于1024时,新切片的容量会增加25%
	idList := make([]int, 0)
	for i := 0; i < 1024; i++ {
		idList = append(idList, i)
	}
	fmt.Printf("before append element,idList len:%v,cap:%v\n", len(idList), cap(idList))
	idList = append(idList, 1024)
	fmt.Printf("after append element,idList len:%v,cap:%v\n", len(idList), cap(idList))
}
知识点
超过切片容量时,当原切片长度小于1024时,新切片容量会直接翻倍,当原切片的容量大于等于1024时,新切片的容量会增加25%。切片扩容,就会创建新的数组,不会再共用原先切片的底层数组。
结构体-crud
1、结构体定义
type structName struct {
   member1 type
   ...
   membern type
}
2、结构体变量
方法一:初始化结构体变量,并赋值
variableName := structName { key1: value1, key2: value2..., keyn: valuen}方法二:new()初始化结构体变量,new()方法返回值是结构体指针
variableName := new(structName)3、实例教程
package main

import (
	"fmt"
	"time"
)

type Activity struct {
	Name        string            // 活动名称
	Blacklist   []int64           // 黑名单用户
	StartTime   *time.Time        // 活动开始时间
	EndTime     *time.Time        // 活动结束时间
	UserDetails map[int]*UserInfo // 参与用户信息
}

type UserInfo struct {
	Name  string // 用户名称
	Level int64  // 用户等级
}

func main() {

	// 初始化结构体变量并赋值
	activity := &Activity{
		Name:      "活动",
		Blacklist: []int64{1, 2, 3, 4},
	}
	fmt.Printf("activity:%+v\n", activity)

	// new()初始化结构体成员为默认值,返回值是结构体指针
	info := new(Activity)
	info.Name = "活动"
	// nil切片可以使用append
	info.Blacklist = append(info.Blacklist, 2, 3)
	// map=nil时直接使用会panic
	if info.UserDetails == nil {
		info.UserDetails = make(map[int]*UserInfo)
	}
	info.UserDetails[3] = &UserInfo{
		Name:  "名字",
		Level: 2,
	}
	fmt.Printf("info:%+v\n", info)

	// 函数内部定义结构体并初始化
	lotteryActivity := struct {
		name string
		rate float32
	}{"活动", 0.6}
	fmt.Printf("lotteryActivity:%+v\n", lotteryActivity)
}
4、知识点
new()初始化结构体成员为默认值,返回结构体指针。结构体内部含有切片成员时,nil切片可以直接使用append方法。结构体内部含有map成员时,必须使用make()为map成员分配内存才可以使用。
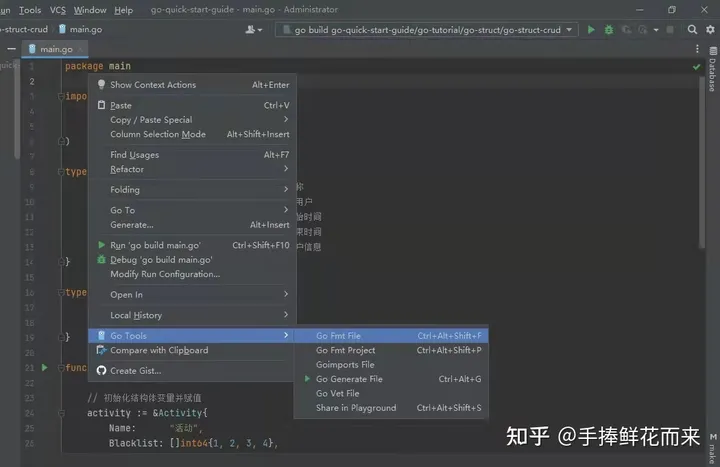
5、小技巧
使用go tools的go fmt file格式化结构体,即结构体成员名称左对齐、类型左对齐、注释左对齐
type Activity struct {
	Name        string            // 活动名称
	Blacklist   []int64           // 黑名单用户
	StartTime   *time.Time        // 活动开始时间
	EndTime     *time.Time        // 活动结束时间
	UserDetails map[int]*UserInfo // 参与用户信息
}
结构体-嵌入
实例教程
package main

import (
	"encoding/json"
	"fmt"
)

type Activity struct {
	Id   int64  // 活动id
	Name string // 活动名称
	Url  string // 活动背景图
	Desc string // 活动介绍
}

type LotteryActivity struct {
	Activity
	Rate    float32 // 抽中概率
	PrizeId int64   // 奖品id
	Count   int64   // 奖品数量
}

func main() {

	// go has no inheritance, it is just composition
	lotteryActivity := &LotteryActivity{
		Activity: Activity{
			Name: "活动名称",
			Desc: "活动介绍",
		},
		Rate:    0.3,
		PrizeId: 14,
		Count:   1,
	}
	// output: lotteryActivity:&{Activity:{Id:0 Name:活动名称 Url: Desc:活动介绍} Rate:0.3 PrizeId:14 Count:1}
	fmt.Printf("lotteryActivity:%+v\n", lotteryActivity)
	lottery, _ := json.Marshal(lotteryActivity)
	// output: lotteryActivity to json:{"Id":0,"Name":"活动名称","Url":"","Desc":"活动介绍","Rate":0.3,"PrizeId":14,"Count":1}
	fmt.Printf("lotteryActivity to json:%v\n", string(lottery))
}
结构体-标签
1、实例教程
package main

import (
	"encoding/json"
	"fmt"
	"time"
)

// LotteryActivity omitempty作用是在结构体转为json时,当该字段的值为该字段类型的零值时,忽略该字段
type LotteryActivity struct {
	ActivityId         int64      `json:"activity_id"`           // 活动id
	PrizeId            int64      `json:"prize_id"`              // 奖品id
	LotterySpendCoins  int64      `json:"lottery_spend_coins"`   // 抽奖花费金币数
	LotteryWinningRate float32    `json:"lottery_winning_rate"`  // 抽中的概率
	CreateTime         *time.Time `json:"create_time,omitempty"` // 创建时间
	UpdateTime         *time.Time `json:"update_time,omitempty"` // 修改时间
}

func main() {

	lotteryActivity := &LotteryActivity{
		ActivityId:         12,
		PrizeId:            13,
		LotterySpendCoins:  100,
		LotteryWinningRate: 0.3,
	}
	fmt.Printf("lotteryActivity:%+v\n", lotteryActivity)
	lottery, _ := json.Marshal(lotteryActivity)
	// output: lotteryActivity to json:{"activity_id":12,"prize_id":13,"lottery_spend_coins":100,"lottery_winning_rate":0.3}
	fmt.Printf("lotteryActivity to json:%s\n", string(lottery))
}
2、知识点
结构体字段命名,常采用驼峰式命名,如ActivityId。前后端交互、数据库数据存储,常采用下划线式命名,如activity_id。使用json tag标签即可实现驼峰式命名和下划线式命名相互转换。json标签中,omitempty作用是在结构体转为json时,当该字段的值为该字段类型的零值时,忽略该字段。
结构体-反射
实例教程
package main

import (
	"fmt"
	"reflect"
)

// LotteryActivity 抽奖活动
type LotteryActivity struct {
	ActivityId         int64   `json:"activity_id"`          // 活动id
	PrizeId            int64   `json:"prize_id"`             // 奖品id
	LotterySpendCoins  int64   `json:"lottery_spend_coins"`  // 抽奖花费金币数
	LotteryWinningRate float32 `json:"lottery_winning_rate"` // 抽中的概率
}

func main() {

	lotteryActivity := &LotteryActivity{
		ActivityId:         12,
		PrizeId:            23,
		LotterySpendCoins:  245,
		LotteryWinningRate: 0.2,
	}
	fmt.Printf("lotteryActivity:%+v\n", lotteryActivity)
	structReflectHandle(lotteryActivity)
}

func structReflectHandle(reflectData interface{}) {
	v := reflect.ValueOf(reflectData)
	t := reflect.TypeOf(reflectData)
	if v.Kind() == reflect.Ptr {
		v = v.Elem()
		t = t.Elem()
	}
	if v.Kind() == reflect.Struct {
		for i := 0; i < v.NumField(); i++ {
			fv := v.Field(i)
			ft := t.Field(i).Tag
			fmt.Printf("index:%v,value:%v,tag:%s\n", i, fv.Interface(), ft.Get("json"))
		}
	}
}
结构体-指针运算
实例教程
package main

import (
	"fmt"
	"time"
	"unsafe"
)

type Order struct {
	UserId     int64     // 用户id
	ProductId  int64     // 商品id
	Count      int64     // 购买的商品数量
	CreateTime time.Time // 创建时间
	UpdateTime time.Time // 修改时间
}

func main() {

	order := &Order{
		UserId:    12,
		ProductId: 34,
		Count:     2,
	}
	fmt.Printf("order:%+v\n", order)
	fmt.Printf("UserId:%v\n", *(*int64)(unsafe.Pointer(uintptr(unsafe.Pointer(order)) + unsafe.Offsetof(order.UserId))))
	fmt.Printf("ProductId:%v\n", *(*int64)(unsafe.Pointer(uintptr(unsafe.Pointer(order)) + unsafe.Offsetof(order.ProductId))))
	fmt.Printf("Count:%v\n", *(*int64)(unsafe.Pointer(uintptr(unsafe.Pointer(order)) + unsafe.Offsetof(order.Count))))
}
结构体-空结构体
实例教程
package main

import (
	"fmt"
	"unsafe"
)

func main() {

	// struct{}表示空结构体,不包含任何成员变量
	// struct{}{}表示这个变量的类型是struct{},其值是{},struct{}{}变量不占用内存
	// output: struct{}{}:0
	fmt.Printf("struct{}{}:%v\n", unsafe.Sizeof(struct{}{}))

	// go语言没有内置函数set,但是可以通过内置函数map来实现
	userIds := []int64{12, 23, 12, 35, 34, 65, 36}
	set := make(map[int64]struct{})
	for _, v := range userIds {
		set[v] = struct{}{}
	}
	fmt.Printf("set:%v\n", set)
}
结构体-方法
实例教程
package main

import "fmt"

type Order struct {
	UserId     int64     // 用户id
	ProductId  int64     // 商品id
	Count      int64     // 购买的商品数量
}

type OrderService struct {
}

func (OrderService) createOrder(order *Order) {
	fmt.Printf("order:%+v", order)
}

func (OrderService) payOrder(order *Order) {
	fmt.Printf("order:%+v", order)
}

func main()  {
	order := &Order{
		UserId:    12,
		ProductId: 234,
		Count:     1,
	}
	orderService := new(OrderService)
	orderService.createOrder(order)
}
map-crud
1、map定义
方法一:定义map变量,默认值为nil,但nil map不能直接使用
var variable_name map[key_type]value_type方法二:使用make()定义map变量并分配内存空间
variable_name := make(map[key_type]value_type)2、增删改查
(1)增加或更新key-value
variable_name["key"] = value(2)删除key
delete(variable_name, "key")(3)查询key-value
// ok=true,表示map集合中有这个key
val, ok := variable_name["key"]
(4)遍历
for i, v := range variable_name {
	fmt.Printf("key:%v,value:%+v\n", i, v)
}
3、实例教程
package main

import "fmt"

type Users struct {
	Id    int64
	Name  string
	Level int64
	Pic   string
	Desc  string
}

func main() {

	details := make(map[int64]*Users)
	details[2345] = &Users{
		Id:    2345,
		Name:  "zhang",
		Level: 2,
	}
	details[4567] = &Users{
		Id:    4567,
		Name:  "li",
		Level: 1,
	}
	if val, ok := details[2345]; ok {
		fmt.Printf("userId:2345,detail:%+v\n", val)
	}
	for i, v := range details {
		fmt.Printf("key:%v,value:%+v\n", i, v)
	}
}
map-容量
1、为什么map集合容量总是2的n次幂?
hash冲突解决-链地址法:取模运算,即hash(key) % capacity
当capacity是2的n次幂时,hash(key) % capacity = hash(key) & (capacity)
例如,hash(key)=18,capacity=16,hash(key) % capacity = 2,10010 & 01111 = 00010(十进制=2)
在计算机中直接求余效率不如位运算,当map集合容量总是2的n次幂,可以加快hash计算
函数-crud
1、函数定义
- go语言函数允许有多个返回值
func function_name( [parameter list] ) ( [return_types] ){
}
2、实例教程
package main

import (
	"fmt"
)

type Order struct {
	UserId    int64 // 用户id
	ProductId int64 // 商品id
	Count     int64 // 购买的商品数量
}

func main() {
	orders, err := getOrders()
	if err != nil {
		fmt.Printf("getOrders fail, err:%s", err.Error())
	} else {
		printSliceData(orders)
	}
}

func getOrders() (orders []*Order, err error) {
	orders = make([]*Order, 0)
	orders = append(orders, &Order{
		UserId:    12,
		ProductId: 14,
		Count:     3,
	})
	orders = append(orders, &Order{
		UserId:    15,
		ProductId: 17,
		Count:     3,
	})
	return
}

func printSliceData(orderList []*Order) {
	for _, v := range orderList {
		fmt.Printf("order:%+v\n", v)
	}
}
函数-测试函数
1、测试函数
(1)文件命名规范为xxx_test.go
(2)测试函数
- 性能测试函数
func BenchmarkXxx(b *testing.B) {
	for i := 0; i < b.N; i++ {
	}
}- 单元测试函数
func TestXxx(t *testing.T) {
}
(3)执行测试函数
- 执行单元测试函数:go test -v
- 执行性能测试函数:go test -bench="."
2、实例教程
package go_func_test

import (
	"encoding/json"
	jsoniter "github.com/json-iterator/go"
	"testing"
	"time"
)

type Activity struct {
	Name      string     `json:"name"`       // 活动名称
	Desc      string     `json:"desc"`       // 活动介绍
	Pic       string     `json:"pic"`        // 活动背景图
	BlackList []int64    `json:"black_list"` // 黑名单用户
	StartTime *time.Time `json:"start_time"` // 活动开始时间
	EndTime   *time.Time `json:"end_time"`   // 活动结束时间
}

var (
	activityStruct = &Activity{
		Name:      "活动名称",
		Desc:      "活动介绍",
		Pic:       "活动背景图",
		BlackList: []int64{2, 3, 4, 5},
	}
	activityJson = []byte(`{"name":"活动名称", "desc":"活动介绍","pic":"活动背景图","black_list":[2, 3, 4, 5]}`)
)

// 使用 json-iterator 序列化库
func TestJsoniterUnmarshal(t *testing.T) {
	activity := new(Activity)
	err := jsoniter.ConfigCompatibleWithStandardLibrary.Unmarshal(activityJson, activity)
	if err != nil {
		t.Errorf("jsonIterator.Unmarshal fail,err:%v\n", err)
	} else {
		t.Logf("activity:%+v\n", activity)
	}
}

// 使用 json-iterator 序列化库
func BenchmarkJsoniterMarshal(b *testing.B) {
	b.ResetTimer()
	for i := 0; i < b.N; i++ {
		_, err := jsoniter.ConfigCompatibleWithStandardLibrary.Marshal(activityStruct)
		if err != nil {
			b.Errorf("jsonIterator.Marshal fail,err:%v\n", err)
		}
	}
}

// 使用 json-iterator 序列化库
func BenchmarkJsoniterUnmarshal(b *testing.B) {
	activity := new(Activity)
	b.ResetTimer()
	for i := 0; i < b.N; i++ {
		err := jsoniter.ConfigCompatibleWithStandardLibrary.Unmarshal(activityJson, activity)
		if err != nil {
			b.Errorf("jsonIterator.Unmarshal fail,err:%v\n", err)
		}
	}
}

// 使用 goland-json 序列化库
func TestJsonUnmarshal(t *testing.T) {
	activity := new(Activity)
	err := json.Unmarshal(activityJson, activity)
	if err != nil {
		t.Errorf("jsonIterator.Unmarshal fail,err:%v\n", err)
	} else {
		t.Logf("activity:%+v\n", activity)
	}
}

// 使用 goland-json 序列化库
func BenchmarkJsonMarshal(b *testing.B) {
	b.ResetTimer()
	for i := 0; i < b.N; i++ {
		_, err := json.Marshal(activityStruct)
		if err != nil {
			b.Errorf("json.Marshal fail,err:%v\n", err)
		}
	}
}

// 使用 goland-json 序列化库
func BenchmarkJsonUnmarshal(b *testing.B) {
	activity := new(Activity)
	b.ResetTimer()
	for i := 0; i < b.N; i++ {
		err := json.Unmarshal(activityJson, activity)
		if err != nil {
			b.Errorf("json.Unmarshal fail,err:%v\n", err)
		}
	}
}
执行单元测试函数
PS G:\goland\go-quick-start-guide\go-tutorial\go-func\go-func-test> go test -v
=== RUN   TestJsoniterUnmarshal
    TestJsoniterUnmarshal: json_test.go:36: activity:&{Name:活动名称 Desc:活动介绍 Pic:活动背景图 BlackList:[2 3 4 5] StartTime:<nil> EndTime:<nil>}
--- PASS: TestJsoniterUnmarshal (0.00s)
=== RUN   TestJsonUnmarshal
    TestJsonUnmarshal: json_test.go:70: activity:&{Name:活动名称 Desc:活动介绍 Pic:活动背景图 BlackList:[2 3 4 5] StartTime:<nil> EndTime:<nil>}
--- PASS: TestJsonUnmarshal (0.00s)
PASS
ok      go-quick-start-guide/go-tutorial/go-func/go-func-test   0.798s
执行性能测试函数
PS G:\goland\go-quick-start-guide\go-tutorial\go-func\go-func-test> go test -bench="."
goos: windows
goarch: amd64
pkg: go-quick-start-guide/go-tutorial/go-func/go-func-test
BenchmarkJsoniterMarshal-4        395286              2958 ns/op
BenchmarkJsoniterUnmarshal-4      500860              2452 ns/op
BenchmarkJsonMarshal-4            387691              2864 ns/op
BenchmarkJsonUnmarshal-4          100155             14236 ns/op
PASS
ok      go-quick-start-guide/go-tutorial/go-func/go-func-test   6.814s
分析性能测试函数输出结果
(1)json-iterator 序列化性能和 goland-json 差不多
(2)json-iterator 反序列化性能远远超过 goland-json
函数-defer
1、基础教程
(1)defer语句执行时机:会在函数最后执行,但在return之前
在java语言中,try-catch-finally语句可以处理异常错误,即finally语句内的代码一定会执行的。在go语言中,不管函数内的代码发生各种异常,defer语句内的代码一定会执行的。
(2)defer语句应用场景:释放锁、关闭数据库连接、关闭文件流、错误恢复
2、实例教程
package main

import (
	"fmt"
)

type OrderStatus int

const (
	paymentUnpaid     OrderStatus = iota + 1 // 未支付
	paymentInProgress                        // 支付中
	paymentSuccess                           // 支付成功
	paymentFailed                            // 支付失败
)

type Order struct {
	UserId     int64       // 用户id
	ProductId  int64       // 商品id
	Count      int64       // 购买的商品数量
	Status     OrderStatus // 订单支付状态
}

func main() {

	// 多个defer语句,按后进先出的方式执行
	multipleDefer()
	// defer、return、返回值三者的执行顺序:先给返回值赋值,后执行defer语句,最后return退出函数
	order := executionOrder()
	fmt.Printf("executionOrder:%+v\n", order)
}

// 多个defer语句,按后进先出的方式执行
func multipleDefer() {
	// 延迟释放锁
	defer releaseLock()
	// 延迟关闭数据库连接
	defer closeDatabaseConnection()
	// 延迟关闭文件流
	defer closeFileStream()
}

// defer、return、返回值三者的执行顺序:先给返回值赋值,后执行defer语句,最后return退出函数
func executionOrder() (order *Order) {
	order = &Order{
		UserId:    12,
		ProductId: 15,
		Count:     2,
	}
	defer func() {
		// 后执行defer语句,因为order是结构体指针,这个status = 3会直接影响到返回值,故此时返回值中status = 3
		order.Status = paymentSuccess
		fmt.Printf("updateOrderStatus:%+v\n", order)
	}()
	// 先给返回值赋值,此时返回值order字段中status = 0
	return order
}

// 释放锁
func releaseLock() {
	fmt.Println("releaseLock")
}

// 关闭数据库连接
func closeDatabaseConnection() {
	fmt.Println("closeDatabaseConnection")
}

// 关闭文件流
func closeFileStream() {
	fmt.Println("closeFileStream")
}
函数-panic/recover
1、基础教程
(1)panic:可用 err error 返回程序执行过程中异常信息,但是有些异常信息,我们希望程序应当终止。例如,程序启动过程中,如果http监听绑定端口失败,这个程序应当panic,即终止进程。
(2)recover:数组越界、nil map put/get data等问题,会导致panic的,这个panic会一直往上抛出,如果没有哪个地方捕获这个异常,即整个进程会挂掉的。我们希望由于用户编程导致的意外panic,不要影响程序的运行,即不要挂掉进程,就需要用到recover错误恢复,recover的使用必须写在defer语句中。
2、实例教程
package main

import (
	"fmt"
	"net/http"
	"runtime/debug"
	"time"
)

type Activity struct {
	Name        string            // 活动名称
	Blacklist   []int64           // 黑名单用户
	StartTime   *time.Time        // 活动开始时间
	EndTime     *time.Time        // 活动结束时间
	UserDetails map[int]*UserInfo // 参与用户信息
}

type UserInfo struct {
	Name  string // 用户名称
	Level int64  // 用户等级
}

func main() {
	// defer+recover
	activityHandle()
	// panic when http.ListenAndServe err
	err := http.ListenAndServe("127.0.0.1:8088", nil)
	if err != nil {
		panic(err)
	}
}

func activityHandle() (activity *Activity) {
	defer func() {
		if err := recover(); err != nil {
			fmt.Printf("err:%s\n", string(debug.Stack()))
		}
	}()
	activity = &Activity{
		Name:      "活动名称",
		Blacklist: []int64{1, 3, 4, 5},
	}
	// nil map put data will panic
	activity.UserDetails[12] = &UserInfo{
		Name:  "用户名字",
		Level: 1,
	}
	return
}
输出结果
err:goroutine 1 [running]:
runtime/debug.Stack(0x0, 0x0, 0x0)
        G:/goland/go-sdk/go1.14/src/runtime/debug/stack.go:24 +0xa8
main.main.func1()
        G:/goland/go-quick-start-guide/go-tutorial/go-func/go-func-recover/main.go:25 +0x6a
panic(0x4e50c0, 0x5110e0)
        G:/goland/go-sdk/go1.14/src/runtime/panic.go:973 +0x3dc
main.activityHandle(0xc0000d0000)
        G:/goland/go-quick-start-guide/go-tutorial/go-func/go-func-recover/main.go:37 +0x1c9
main.main()
        G:/goland/go-quick-start-guide/go-tutorial/go-func/go-func-recover/main.go:28 +0x51
函数-闭包
1、基础知识
(1)匿名函数:没有函数名的函数
- 第一种:定义匿名函数,然后调用
// 匿名函数
sumFunc := func(a, b int) int {
	return a + b
}
// 调用匿名函数
fmt.Printf("sum:%v", sumFunc(1, 3))- 第二种:定义匿名函数并调用
sum := func(a, b int) int {
		return a + b
	}(1, 3)
fmt.Printf("sum:%v\n", sum)
(2)闭包:匿名函数+上下文
函数getIncId返回值是一个函数,没有函数名,即返回值是一个匿名函数。匿名函数内部又和外部变量i有联系,即变量i是该匿名函数的上下文。
func getIncId() func() int {
	i := 0
	return func() int {
		i++
		return i
	}
}
匿名函数nextId依次调用输出1、2、3,匿名函数的上下文即变量i,在匿名函数的作用相当于全局变量。匿名函数nextId2依次调用输出1、2、3,而不是在匿名函数nextId的基础上输出4、5、6。匿名函数nextId和匿名函数nextId2都会维护自己的上下文即变量i。
// 闭包 = 匿名函数 + 上下文
nextId := getIncId()
fmt.Println(nextId()) // output: 1
fmt.Println(nextId()) // output: 2
fmt.Println(nextId()) // output: 3
nextId2 := getIncId()
fmt.Println(nextId2()) // output: 1
(3)闭包的作用:实现包装功能,常用作middlware
功能:在充值RechargeHandler之前校验accessToken
如何实现:实现一个包装函数,比如GetHttpHandler函数,统一在包装函数内部实现公共功能,比如校验用户ip、校验用户accessToken、记录业务HttpHandler函数耗时等,业务HttpHandler函数作为参数形式传给包装函数即可。
type WrapHttpFunc struct {
	HttpFunc         func(http.ResponseWriter, *http.Request)
	CheckAccessToken bool
}

func RechargeHandler(w http.ResponseWriter, r *http.Request) {
}

func CheckAccessToken(w http.ResponseWriter, r *http.Request) (ok bool, err error) {
	return
}

func GetHttpHandler(wrapHttpFunc *WrapHttpFunc) func(w http.ResponseWriter, r *http.Request) {
	return func(w http.ResponseWriter, r *http.Request) {
		if wrapHttpFunc.CheckAccessToken {
			ok, err := CheckAccessToken(w, r)
			if !ok {
				fmt.Printf("CheckAccessToken err:%s", err.Error())
				w.Write([]byte(err.Error()))
			}
		}
		wrapHttpFunc.HttpFunc(w, r)
	}
}

func main() {

	// wrapping functions and creating middleware
	http.HandleFunc("/recharge", GetHttpHandler(&WrapHttpFunc{
		HttpFunc:         RechargeHandler,
		CheckAccessToken: true,
	}))
	if err := http.ListenAndServe(":8088", nil); err != nil {
		panic(err)
	}
}
2、实例教程
package main

import (
	"fmt"
	"net/http"
)

type WrapHttpFunc struct {
	HttpFunc         func(http.ResponseWriter, *http.Request)
	CheckAccessToken bool
}

func getIncId() func() int {
	i := 0
	return func() int {
		i++
		return i
	}
}

func main() {

	// 匿名函数
	sumFunc := func(a, b int) int {
		return a + b
	}
	// 调用匿名函数
	fmt.Printf("sum:%v\n", sumFunc(1, 3))

	// 闭包 = 匿名函数 + 上下文
	nextId := getIncId()
	fmt.Println(nextId()) // output: 1
	fmt.Println(nextId()) // output: 2
	fmt.Println(nextId()) // output: 3
	nextId2 := getIncId()
	fmt.Println(nextId2()) // output: 1

	// wrapping functions and creating middleware
	http.HandleFunc("/recharge", GetHttpHandler(&WrapHttpFunc{
		HttpFunc:         RechargeHandler,
		CheckAccessToken: true,
	}))
	if err := http.ListenAndServe(":8088", nil); err != nil {
		panic(err)
	}
}

func RechargeHandler(w http.ResponseWriter, r *http.Request) {
}

func CheckAccessToken(w http.ResponseWriter, r *http.Request) (ok bool, err error) {
	return
}

func GetHttpHandler(wrapHttpFunc *WrapHttpFunc) func(w http.ResponseWriter, r *http.Request) {
	return func(w http.ResponseWriter, r *http.Request) {
		if wrapHttpFunc.CheckAccessToken {
			ok, err := CheckAccessToken(w, r)
			if !ok {
				fmt.Printf("CheckAccessToken err:%s", err.Error())
				w.Write([]byte(err.Error()))
			}
		}
		wrapHttpFunc.HttpFunc(w, r)
	}
}
包-导入
1、点操作(尽量不要用)
某个包导入之后,在调用这个包的函数时,可以省略包名
package main

import (
	. "fmt"
)

func main() {
	Println("point operation")
}
2、别名操作
给包起个别名
package main

import (
	jsoniter "github.com/json-iterator/go"
)

type ResponseBody struct {
	Code    int         `json:"code"`
	Message interface{} `json:"message,omitempty"`
	Body    interface{} `json:"body,omitempty"`
}

func main() {
	jsoniter.ConfigCompatibleWithStandardLibrary.Marshal(&ResponseBody{Code: 123})
}
3、下划线操作
不直接使用包里的函数,而是调用该包里面的init函数
config.go
package config

import "fmt"

func init() {
	fmt.Println("config init")
}
main.go
package main

import (
	_ "go-quick-start-guide/go-tutorial/go-package/underscore/config"
)

// output: config init
func main() {
}
接口-crud
1、接口定义
type interfaceName interface {
        methodName1 [returnType]
        ...
        methodNamen [returnType]
}
2、实现接口
type interfaceName interface {
	methodName1 [returnType]
}

type structName struct {

}

func (variableName structName) methodName1 [returnType] {

}
3、实例教程
package main

import "fmt"

type Order struct {
	UserId     int64     // 用户id
	ProductId  int64     // 商品id
	Count      int64     // 购买的商品数量
}

type OrderService interface {
	// 创建订单
	createOrder(order *Order) (err error)
	// 支付订单
	payOrder(order *Order) (err error)
	// 回滚订单
	rollbackOrder(order *Order) (err error)
}

type TaoBaoOrderService struct {
}

func (TaoBaoOrderService) createOrder(order *Order) (err error) {
	fmt.Printf("taoBao createOrder:%+v\n", order)
	return
}

func (TaoBaoOrderService) payOrder(order *Order) (err error) {
	fmt.Printf("taoBao payOrder:%+v\n", order)
	return
}

func (TaoBaoOrderService) rollbackOrder(order *Order) (err error) {
	fmt.Printf("taoBao rollbackOrder:%+v\n", order)
	return
}

type JingDongOrderService struct {
}

func (JingDongOrderService) createOrder(order *Order) (err error) {
	fmt.Printf("jingDong createOrder:%+v\n", order)
	return
}

func (JingDongOrderService) payOrder(order *Order) (err error) {
	fmt.Printf("jingDong payOrder:%+v\n", order)
	return
}

func (JingDongOrderService) rollbackOrder(order *Order) (err error) {
	fmt.Printf("jingDong rollbackOrder:%+v\n", order)
	return
}

func main()  {
	order := &Order{
		UserId:    12,
		ProductId: 234,
		Count:     1,
	}
	var orderService OrderService
	orderService = new(TaoBaoOrderService)
	orderService.createOrder(order)
	orderService = new(JingDongOrderService)
	orderService.createOrder(order)
}
接口-空接口
1、基础知识
(1)空接口是一个没有任何方法的接口,go语言中任何数据类型都实现了空接口。空接口作为函数的参数,可以接受任意类型的参数。
package main

import "fmt"

func main() {
	userId := 2343
	// output: type:int,data:2343
	print(userId)
	userName := "zhang"
	// output: type:string,data:zhang
	print(userName)
}

func print(data interface{}) {
	fmt.Printf("type:%T,data:%v\n", data, data)
}
(2)类型断言:v, ok := x.(T),将接口类型的值(x),转成类型(T)
package main

import "fmt"

type RechargeActivity struct {
}

type LotteryActivity struct {
}

func main() {

	activityConfig := make(map[int]interface{})
	activityConfig[123] = &RechargeActivity{}
	if rechargeActivity, ok := activityConfig[123].(*RechargeActivity); ok {
		fmt.Printf("rechargeActivity:%+v\n", rechargeActivity)
	}
	activityConfig[456] = &LotteryActivity{}
	if lotteryActivity, ok := activityConfig[456].(*LotteryActivity); ok {
		fmt.Printf("rechargeActivity:%+v\n", lotteryActivity)
	}
}
协程-crud
1、开启协程
go funtionName(params)积分抽奖:扣除积分 -> 抽奖 -> 异步派发礼物
package main

func main() {
	pointsDraw()
}

// 积分抽奖
func pointsDraw() {
	deductPoints()
	lottery()
	// 异步派发礼物
	go giftExclusion()
}

// 扣除积分
func deductPoints() {
}

// 抽奖
func lottery() {
}

// 礼物派发
func giftExclusion() {
}
(1)一个程序启动时,主函数运行在main goroutine中。main函数结束时即main goroutine结束时,所有的goroutine都会结束。
只输出main goroutine over,并没有输出log print,因为main goroutine结束时,所有的goroutine都会结束
package main

import (
	"fmt"
	"time"
)

func main() {
	go print("log print")
	fmt.Println("main goroutine over")
}

func print(log string) {
	time.Sleep(1 * time.Second)
	fmt.Println(log)
}
协程-多协程同步
1、等待多个协程-sync.WaitGroup
(1)主协程通过Add方法设置等待协程的数量
(2)每个等待协程运行结束时调用Done方法
(3)主协程调用Wait方法阻塞程序,直到所有等待协程都完成任务
package main

import (
	"fmt"
	"sync"
)

func main() {
	var wg sync.WaitGroup
	// 主协程通过Add方法设置等待协程的数量
	wg.Add(3)
	// 每个等待协程运行结束时调用Done方法
	go queryMetricsA(&wg)
	go queryMetricsB(&wg)
	go queryMetricsC(&wg)
	// 主协程调用Wait方法阻塞程序,直到所有等待协程都完成任务
	wg.Wait()
	combineMetrics()
}

// 查询指标A
func queryMetricsA(wg *sync.WaitGroup) {
	defer wg.Done()
	fmt.Println("queryMetricsA")
}

// 查询指标B
func queryMetricsB(wg *sync.WaitGroup) {
	defer wg.Done()
	fmt.Println("queryMetricsB")
}

// 查询指标C
func queryMetricsC(wg *sync.WaitGroup) {
	defer wg.Done()
	fmt.Println("queryMetricsC")
}

// 组合指标数据
func combineMetrics() {
	fmt.Println("combineMetrics")
}
管道-crud
1、创建管道
(1)创建无缓冲管道
无缓冲管道:往 channel 写入数据的 goroutine 会被阻塞住,直到有其他 goroutine 消费了 channel 里的数据。
channelName := make(chan type)(2)创建有缓冲管道
有缓冲管道:当 channel 里的元素总数不大于这个可缓冲容量,往 channel 写入数据的 goroutine 就不会被阻塞住。
channelName := make(chan type, size)2、写入数据
channelName <- value(1)向已关闭的 channel 中写入数据会 panic
package main

// panic: send on closed channel
func main() {
	data := make(chan int)
	close(data)
	data <- 123
}
3、读取数据
// 第一种
value := <- channelName
// 第二种,ok为false时表示管道已关闭
value, ok := <- channelName
(1)从已关闭的 channel 读取消息,若消息均已读出,则会读到类型的零值
package main

import (
	"fmt"
	"sync"
)

func main() {
	var wg sync.WaitGroup
	wg.Add(2)
	data := make(chan int)
	go write(data, 123, &wg)
	// output: channel open,read channel:123
	go read(data, &wg)
	wg.Wait()
	close(data)
	wg.Add(1)
	// output: channel closed,read channel:0
	go read(data, &wg)
	wg.Wait()
}

func write(data chan int, value int, wg *sync.WaitGroup) {
	defer wg.Done()
	data <- value
}

func read(data chan int, wg *sync.WaitGroup) {
	defer wg.Done()
	if value, ok := <-data; ok {
		fmt.Printf("channel open,read channel:%v\n", value)
	} else {
		fmt.Printf("channel closed,read channel:%v\n", value)
	}
}
4、关闭管道
close(channelName)(1)重复关闭同一个 channel 会 panic
package main

// panic: close of closed channel
func main() {
	data := make(chan int)
	close(data)
	close(data)
}
5、range 遍历
for-range会一直从 channel 中读取数据,直到 channel closed 循环才会结束
package main

import (
	"fmt"
	"sync"
)

func main() {
	var wg sync.WaitGroup
	wg.Add(2)
	data := make(chan int, 10)
	go writeMsg(&wg, data, 123, 456, 789)
	go readMsg(&wg, data)
	wg.Wait()
}

func writeMsg(wg *sync.WaitGroup, data chan int, values ...int) {
	defer wg.Done()
	for i, _ := range values {
		data <- values[i]
	}
	close(data)
}

func readMsg(wg *sync.WaitGroup, data chan int) {
	defer wg.Done()
	for v := range data {
		fmt.Printf("channel open,read channel:%v\n", v)
	}
}
管道-select
1、使用规则
(1)每个 case 表达式中都只能包含操作管道的表达式。
(2)如果有多个 case 表达式都可以运行,select 会随机选出一个执行。
(3)如果没有 case 表达式可以运行,若有 default 子句,则执行该语句。若没有 default 子句,select 将阻塞,直到某个 case 可以运行。
package main

import "fmt"

func main() {
	ch1 := make(chan int, 1)
	ch1 <- 123
	ch2 := make(chan int, 1)
	ch2 <- 456
	select {
	case v1 := <-ch1:
		fmt.Printf("read from ch1,data:%v\n", v1)
	case v2 := <-ch2:
		fmt.Printf("read from ch2,data:%v\n", v2)
	default:
		fmt.Println("default")
	}
}
2、超时控制
函数 getConfig 内部起个 goroutine 去异步获取抽奖活动配置信息,函数 getConfig 会返回一个管道给调用方。“获取活动配置信息”可能因为某些情况导致耗时很长,故加入超时控制。函数 getConfigWithTimeOut 使用 select 语句去监听“数据管道”和“超时管道”。当超时后,直接返回空数据即可。
package main

import (
	"errors"
	"fmt"
	"time"
)

type LotteryActivity struct {
	ActivityId         int64      `json:"activity_id"`           // 活动id
	PrizeId            int64      `json:"prize_id"`              // 奖品id
	LotterySpendCoins  int64      `json:"lottery_spend_coins"`   // 抽奖花费金币数
	LotteryWinningRate float32    `json:"lottery_winning_rate"`  // 抽中的概率
	CreateTime         *time.Time `json:"create_time,omitempty"` // 创建时间
	UpdateTime         *time.Time `json:"update_time,omitempty"` // 修改时间
}

func main() {
	lotteryActivity, err := getConfigWithTimeOut(1 * time.Second)
	if err != nil {
		fmt.Printf("getConfigWithTimeOut err:%s\n", err.Error())
	} else {
		fmt.Printf("getConfigWithTimeOut value:%+v\n", lotteryActivity)
	}
}

func getConfigWithTimeOut(timeout time.Duration) (lotteryActivity *LotteryActivity, err error) {
	config := getConfig()
	select {
	case lotteryActivity = <-config:
		return
	case <-time.After(timeout):
		return nil, errors.New("timeout")
	}
	return
}

func getConfig() (config chan *LotteryActivity) {
	config = make(chan *LotteryActivity, 1)
	go func() {
		time.Sleep(2 * time.Second)
		config <- &LotteryActivity{
			ActivityId: 123,
			PrizeId:    456,
		}
	}()
	return
}
管道-协程池
并发-sync.Map
1、map并发问题
多协程同时 read 和 write ,会出现 fatal error: concurrent map read and map write
package main

// fatal error: concurrent map read and map write
func main() {
	data := make(map[int]int)
	// read
	go func() {
		for {
			_ = data[123]
		}
	}()
	// write
	go func() {
		for {
			data[456] = 456
		}
	}()
	// block main goroutine
	for {
	}
}
2、sync.Map使用
(1)初始化:nil map 直接使用会 panic ,而 sync.Map 无须初始化,直接声明即可。
(2)crud:Store 方法存储、Load 方法获取、Delete 方法删除、Range 方法遍历。Range 方法回调函数会返回键值对 ,回调函数返回值为 true 时表示继续遍历,为 false 时表示停止遍历。
package main

import (
	"fmt"
	"sync"
)

func main() {

	var data sync.Map
	// write
	data.Store(123, 123)
	data.Store(456, 456)
	// read
	if v, ok := data.Load(456); ok {
		fmt.Printf("read value:%v\n", v)
	}
	// for-range
	data.Range(func(key, value interface{}) bool {
		fmt.Printf("key:%v,value:%v\n", key, value)
		return true
	})
	// delete
	data.Delete(123)
}
并发-sync.Once
sync.Once 能够保证函数只执行一次
1、读取配置文件
(1)文件目录树
拓展知识点:Windows下如何使用tree命令生成目录树
go-concurrency-sync-once
    ├─config
    │      config.go
    │      config.toml
    │
    └─main
            main.go
(2)编码开发
config.toml:配置 mongo 和 etcd 数据库
[mongo]
url = "mongodb://username:password@127.0.0.1:27017"
maxPoolSize = 50
[etcd]
endpoints = ["localhost:2379"]
dialTimeout = 3
config.go:toml 配置文件,可用 toml.DecodeFile 去读取
package config

import (
	"fmt"
	"github.com/BurntSushi/toml"
	"sync"
)

var (
	conf *Config
	once sync.Once
)

type Config struct {
	Mongo *MongoConfig
	Etcd  *EtcdConfig
}

type MongoConfig struct {
	Url         string
	MaxPoolSize int64
}

type EtcdConfig struct {
	Endpoints   []string
	DialTimeout int
}

func GetConfig() *Config {
	once.Do(func() {
		conf = new(Config)
		if _, err := toml.DecodeFile("../config/config.toml", conf); err != nil {
			fmt.Printf("decode config file fail, err:%s", err.Error())
		} else {
			fmt.Printf("mongo config:%+v,etcd config:%+v\n", conf.Mongo, conf.Etcd)
		}
	})
	return conf
}
main.go:起10个协程去读取配置文件,验证 toml.DecodeFile 被执行的次数
package main

import (
	"go-quick-start-guide/go-tutorial/go-concurrency/go-concurrency-sync-once/config"
	"sync"
)

func main() {
	var wg sync.WaitGroup
	wg.Add(10)
	for i := 0; i < 10; i++ {
		go func() {
			defer wg.Done()
			config.GetConfig()
		}()
	}
	wg.Wait()
}
(3)运行验证
toml.DecodeFile 读取配置文件的路径是 "../config/config.toml",运行代码时工作目录必须是main包,否则报错 open ../config/config.toml: The system cannot find the path specified
toml.DecodeFile("../config/config.toml", conf)第一种方法:go run main.go,默认的工作目录是 main.go 所在的包
PS G:\goland\go-quick-start-guide\go-tutorial\go-concurrency\go-concurrency-sync-once\main> go run main.go
mongo config:&{Url:mongodb://username:password@127.0.0.1:27017 MaxPoolSize:50},etcd config:&{Endpoints:[localhost:2379] DialTimeout:3}
第二种方法:配置 working directory 为 main 包路径

三个点...作用
(1)函数变长参数
package main

import "fmt"

func main() {

	print(123, 456, 789)
}

func print(ids ...interface{}) {
	for i, _ := range ids {
		fmt.Println(ids[i])
	}
}
(2)将切片打散成一个个元素
package main

func main() {

	id := make([]int, 0)
	userIds := []int{123, 456, 789}
	id = append(id, userIds...)
}
(3)使用...代替数组的长度,编译器会根据元素个数自行推断数组的长度
package main

import "fmt"

func main() {

	ids := [...]int{12, 34, 56, 78, 90, 13, 15, 17, 19, 24, 26, 28, 30, 32}
	// output: type:[14]int,len:14
	fmt.Printf("type:%T,len:%v", ids, len(ids))
}
go-基础-实战
快速排序
1、基本原理
(1)核心思想
每次排序都会选一个基准数,小于基准数的放在左子序列,大于等于基准数的放在右子序列。
原始序列:{13, 15, 8, 54, 23}
step1:随机选一个基准数15,则其左子序列{13, 8},右子序列{54, 23}
step2.1:序列{13, 8}随机选一个基准数8,则其左子序列{},右子序列{13}
step2.2:序列{54, 23}随机选一个基准数23,则其左子序列{},右子序列{54}
当子序列包含的元素个数小于等于1时停止循环,排序工作已经完成
(2)编码思路
如何将待排序序列重新组合成“左子序列 + 基准数 + 右子序列”?
随机从待排序序列中选一个基准数,然后 for 循环遍历待排序序列,如果当前元素的值小于基准数,就将该元素放在左子序列。那究竟是放在左子序列的哪个位置上?这肯定涉及到元素交换,所以要维护一个索引 i,如果当前元素的值小于基准数,就和索引 i 位置上的元素互换位置。
待排序序列:{13, 67, 25, 18, 45, 23, 35, 30},固定选最后一个元素即30为基准数,索引 i 初始值为0,索引 j 为 for 循环遍历当前元素所在的索引。
step1:遍历第一个元素13,比基准数30小,与索引 i 元素互换位置,然后 i++、j++

step2:遍历第二个元素67,比基准数30大,i 保持不变、j++

step3:遍历第三个元素25,比基准数30小,与索引 i 元素互换位置,然后 i++、j++

step4:遍历第四个元素18,比基准数30小,与索引 i 元素互换位置,然后 i++、j++
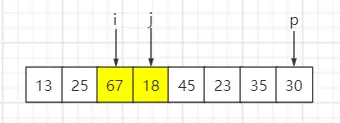
step5:遍历第五个元素45,比基准数30大,i 保持不变、j++
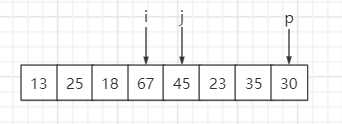
step6:遍历第六个元素23,比基准数30小,与索引 i 元素互换位置,然后 i++、j++

step7:遍历第七个元素35,比基准数30大,i 保持不变、j++
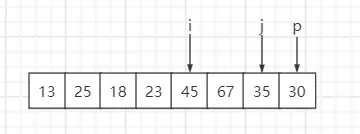
step8:遍历到基准数时,p 与 i 元素互换

最终结果:索引 i 元素值为30,左子序列小于基准数30,右子序列大于等于基准数30。
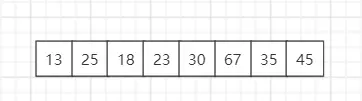
序列{13, 15, 8, 54, 23, 25, 17, 11, 78, 89, 67, 56, 54, 34, 97, 15}经过第一轮排序后就变成
{13, 8, 11, 15, 23, 25, 17, 15, 78, 89, 67, 56, 54, 34, 97, 54},其中基准数15所在的索引是3。
比基准数15(索引为3)小的都在左子序列,符合预期。
package main

import "fmt"

func main() {
	data := []int{13, 15, 8, 54, 23, 25, 17, 11, 78, 89, 67, 56, 54, 34, 97, 15}
	fmt.Printf("before sort:%v\n", data)
	sort(data)
	// after sort:[13 8 11 15 23 25 17 15 78 89 67 56 54 34 97 54]
	fmt.Printf("after sort:%v\n", data)
}

func sort(data []int) {
	if len(data) <= 1 {
		return
	}
	i := 0
	for j := 0; j <= len(data)-1; j++ {
		if data[j] < data[len(data)-1] {
			temp := data[i]
			data[i] = data[j]
			data[j] = temp
			i++
		}
	}
	temp := data[len(data)-1]
	data[len(data)-1] = data[i]
	data[i] = temp
	// i value:3
	fmt.Printf("i value:%v\n", i)
}
代码实现中固定选最后一个元素为基准数,那如何实现随机选一个元素为基准数?
思路:rand.Seed 在 “0-len(data)-1”之间随机产生一个值,然后将该位置上的元素和最后一个元素交换位置。
package main

import (
	"fmt"
	"math/rand"
	"time"
)

func main() {
	data := []int{13, 15, 8, 54, 23, 25, 17, 11, 78, 89, 67, 56, 54, 34, 97, 15}
	fmt.Printf("before sort:%v\n", data)
	random(data)
	sort(data)
	// after sort:[13 15 8 15 23 25 17 11 34 54 67 56 54 78 97 89]
	fmt.Printf("after sort:%v\n", data)
}

func sort(data []int) {
	if len(data) <= 1 {
		return
	}
	i := 0
	for j := 0; j <= len(data)-1; j++ {
		if data[j] < data[len(data)-1] {
			temp := data[i]
			data[i] = data[j]
			data[j] = temp
			i++
		}
	}
	temp := data[len(data)-1]
	data[len(data)-1] = data[i]
	data[i] = temp
	// i value:9
	fmt.Printf("i value:%v\n", i)
}

func random(data []int) {
	rand.Seed(time.Now().UnixNano())
	p := rand.Intn(len(data) - 1)
	fmt.Printf("random value:%v\n", p)
	temp := data[len(data)-1]
	data[len(data)-1] = data[p]
	data[p] = temp
}
2、代码实现
package main

import (
	"fmt"
	"math/rand"
	"time"
)

func main() {
	data := []int{13, 15, 8, 54, 23, 25, 17, 11, 78, 89, 67, 56, 54, 34, 97, 15}
	fmt.Printf("before sort:%v\n", data)
	quickSort(data, 0, len(data)-1)
	fmt.Printf("after sort:%v\n", data)
}

func randomizedPartition(data []int, low, high int) int {
	rand.Seed(time.Now().UnixNano())
	p := rand.Intn(high-low) + low
	temp := data[high]
	data[high] = data[p]
	data[p] = temp
	return partition(data, low, high)
}

func partition(data []int, low, high int) int {
	pivot := data[high]
	i := low
	for j := low; j < high; j++ {
		if data[j] <= pivot {
			temp := data[i]
			data[i] = data[j]
			data[j] = temp
			i++
		}
	}
	data[high] = data[i]
	data[i] = pivot
	return i
}

func quickSort(data []int, low, high int) {
	if high > low {
		p := randomizedPartition(data, low, high)
		// quickSort(data, low, p) incorrect, will cause stack overflow
		quickSort(data, low, p-1)
		quickSort(data, p+1, high)
	}
}
3、时间复杂度
平均时间复杂度:O( nlog_{2}n )
最好时间复杂度:O( nlog_{2}n )
最坏时间复杂度:O( n^{2} ),选的基准数只能将序列分为一个元素与其他元素两部分,这时的快速排序退化为冒泡排序
最坏时间复杂度情况:
(1)分区函数每次选取的基准数为序列最小元素。
(2)分区函数每次选取的基准数为序列最大元素。
具体案例:序列已经正序或逆序排好,选的基准数每次都是序列第一个元素或最后一个元素。
4、稳定性
(1)什么是排序算法的稳定性?
大小相同的两个值在排序之前和排序之后的先后顺序不变
序列{13, 67, 25, 67,18},排序之后能保证原序列第一个67一定在原序列第二个67的前面,就是稳定的排序算法。
(2)排序算法稳定性的作用?
A{V1:500, V2:300}、B{V1:400, V2:300}、C{V1:300, V2:200}
需求:先按V1降序排序,再按V2降序排序
预期排序结果:A{V1:500, V2:300}、B{V1:400, V2:300}、C{V1:300, V2:200}
使用快速排序算法进行排序(先说结论,快速排序是不稳定的)
先按V1降序排序:A{V1:500, V2:300}、B{V1:400, V2:300}、C{V1:300, V2:200}
再按V2降序排序,有两种可能结果,因为A和B的V2值相等。
第一种:A{V1:500, V2:300}、B{V1:400, V2:300}、C{V1:300, V2:200}
第二种:B{V1:400, V2:300}、A{V1:500, V2:300}、C{V1:300, V2:200}
(3)快速排序算法是不稳定的
待排序序列:{15, 13, 15},选最后一个元素即15为基准数,索引 i 初始值为0,索引 j 为 for 循环遍历当前元素所在的索引。
step1:遍历第一个元素15,大于等于基准数15,i 保持不变、j++

step2:遍历第一个元素13,比基准数15小,与索引 i 元素互换位置,然后 i++、j++
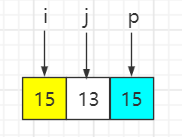
step3:遍历到基准数时,p 与 i 元素互换

最终结果:大小相同的两个元素15在排序之前和排序之后的先后顺序已经发生变化
堆排序
1、基本原理
(1)堆的存储
什么是完全二叉树?
满足两个条件:(1)前n-1层为满的(2)最后一层从左往右是连续的
案例分析:不是完全二叉树,当节点13移动到节点17的左子节点时才是完全二叉树。
堆是完全二叉树,可以用数组去存储二叉树节点。假设二叉树中某个节点在数组中的索引值为 n,那其左子节点在数组中的索引值为 2n+1,右子节点在数组中的索引值为 2n+2。
如何推导?
完全二叉树,第 l 层第一个节点索引值为 2^{l-1}-1 ,最后一个节点索引值为 2^{l}-2
左子节点在数组中的索引值 = 父节点在数组中的索引值 + 同一层父节点后面的元素个数 + 同一层父节点前面的元素个数 \times2 + 1
同一层父节点后面的元素个数 = 2^{l}-2-n
同一层父节点前面的元素个数 \times2 = 2\times[n-(2^{l-1}-1)]
故左子节点索引值 = n+(2^{l}-2-n)+2\times[n-(2^{l-1}-1)]+1=2n+1
(2)堆的性质
最大堆:每个节点的值都大于或等于它的左右子节点的值。
最小堆:每个节点的值都小于或等于它的左右子节点的值。
案例分析:节点40小于右子节点45,故二叉树不是最大堆。

(3)堆排序
思考:堆排序是如何将待排序序列有序化的?
第一步,将待排序序列构造成最大堆,取出最大值,与数组的倒数第一个元素交换位置。第二步,再次构造成最大堆,取出最大值,与数组的倒数第二个元素交换位置,以此类推完成接下来的操作。
第一个目标:如何将无序序列构造成最大堆?
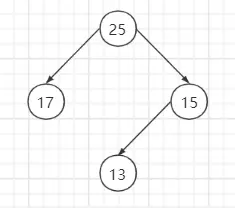
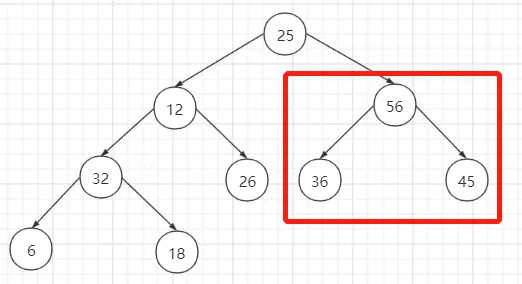
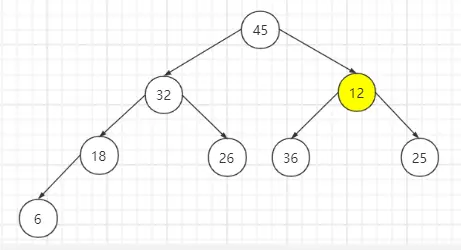
案例分析:待排序序列{25, 12, 45, 18, 26, 36, 56, 6, 32}

从最后一个非叶子节点开始调整,如果子节点的值比该节点大,就交换位置。
step1:对非叶子节点18调整,右子节点32比它大,故交换位置。

step2:对非叶子节点45调整,右子节点56比它大,故交换位置。
step3:对非叶子节点12调整,左子节点32比它大,故交换位置。交换位置后就发现节点12的右子节点比它大,这不符合最大堆的性质,所以对节点12继续调整。

交换位置后,对节点12继续调整。

step4:对非叶子节点25调整,右子节点56比它大,故交换位置。交换位置后就发现节点25的右子节点比它大,这不符合最大堆的性质,所以对节点25继续调整。

交换位置后,对节点25继续调整。
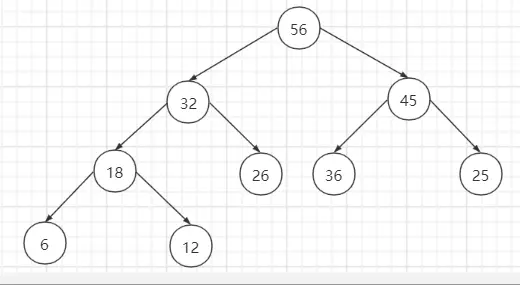
总结:从最后一个非叶子节点开始调整,一直到根节点。当发生元素位置交换后,记得判断子节点局部是否满足最大堆的性质,如果不满足就递归从上到下调整到满足为止。
第二个目标:从最大堆中取出最大值后,如何再次构造成最大堆?
第一次从最大堆中取出最大值后,就和数组的倒数第一个元素交换位置,交换位置后如何再次构造成最大堆?
step1:最大值56和数组倒数第一个元素交换位置

step2:根节点即节点12从上到下递归调整到满足最大堆性质。
右子节点45比节点12大,故交换位置。
节点12的左子节点比它大,故交换位置。

总结:从最大堆取出最大值并与数组中倒数第n个元素交换位置后,将根节点从上到下调整到满足最大堆性质为止。
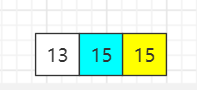
2、代码实现
package main

import "fmt"

func main() {
	data := []int{13, 15, 8, 54, 23, 25, 17, 11, 78, 89, 67, 56, 54, 34, 97, 15}
	fmt.Printf("before sort:%v\n", data)
	heapSort(data)
	// after sort:[8 11 13 15 15 17 23 25 34 54 54 56 67 78 89 97]
	fmt.Printf("after sort:%v\n", data)
}

func heapSort(data []int) {
	for i := len(data)/2 - 1; i >= 0; i-- {
		constructHeap(data, i, len(data))
	}
	// 97 89 56 78 67 54 34 15 54 23 15 25 13 8 17 11
	fmt.Printf("constructHeap:%v\n", data)
	for i := 0; i < len(data)-1; i++ {
		swapAndAdjustHeap(data, len(data)-i)
	}
}

func constructHeap(data []int, parent int, size int) {
	left := 2*parent + 1
	right := 2*parent + 2
	if left >= size {
		return
	}
	temp := data[left]
	index := left
	if right < size && data[left] < data[right] {
		temp = data[right]
		index = right
	}
	if data[parent] < temp {
		data[index] = data[parent]
		data[parent] = temp
		constructHeap(data, index, size)
	}
}

func swapAndAdjustHeap(data []int, size int) {
	temp := data[size-1]
	data[size-1] = data[0]
	data[0] = temp
	constructHeap(data, 0, size-1)
}
go-进阶-教程
context-WithTimeout
1、基础知识
(1)创建超时上下文
ctx, cancel := context.WithTimeout(context.Background(), timeout*time.Second)(2)超时则取消执行
defer cancel()验证 defer cancel() 是否能超时取消执行
创建订单函数 createOrder 超时控制方式调用 rpcCreateOrder ,函数 rpcCreateOrder 是个死循环,每隔一秒钟就打印日志。运行代码,打开浏览器访问 http://localhost:8080/createOrder ,查看 goland 控制台日志输出。创建订单函数 createOrder 超时后,运行 rpcCreateOrder 函数的 goroutine 还在继续打印输出日志,并没有取消执行。
分析原因:调用 cancel() 函数,仅仅是把管道关闭了,即 ctx.Done() 能够读取到数据。如果想要超时取消 goroutine 的执行,应该在 goroutine 中校验 context 是否取消了,如果是就 return。
package main

import (
	"context"
	"fmt"
	"net/http"
	"time"
)

type Order struct {
	OrderId    int64     // 订单id
	UserId     int64     // 用户id
	ProductId  int64     // 商品id
	Count      int64     // 购买的商品数量
	CreateTime time.Time // 创建时间
	UpdateTime time.Time // 修改时间
}

func main() {
	http.HandleFunc("/createOrder", createOrder)
	if err := http.ListenAndServe(":8080", nil); err != nil {
		panic(err)
	}
}

// 创建订单
func createOrder(w http.ResponseWriter, r *http.Request) {
	var errCh = make(chan error)
	ctx, cancel := context.WithTimeout(context.Background(), 1*time.Second)
	defer cancel()
	order := new(Order)
	go func() {
		err := rpcCreateOrder(ctx, order)
		select {
		case errCh <- err:
		default:
			return
		}
	}()
	select {
	case <-ctx.Done():
		fmt.Printf("createOrder ctx err: %s\n", ctx.Err())
		w.Write([]byte("createOrder ctx err"))
	case err := <-errCh:
		fmt.Printf("createOrdererr: %s\n", err.Error())
		if err != nil {
			w.Write([]byte("createOrder err"))
		} else {
			w.Write([]byte("createOrder value"))
		}
	}
	return
}

// infinite loop
func rpcCreateOrder(ctx context.Context, order *Order) (err error) {
	for i := 0; ; i++ {
		time.Sleep(1 * time.Second)
		fmt.Printf("count:%v,rpcCreateOrder\n", i)
	}
	return
}
2、超时控制
(1)第一种风格:在被调用方实现超时控制
获取用户订单函数 getOrder 调用 rpcGetOrder 函数,rpcGetOrder 函数侧做超时控制
(2)第二种风格:在调用方实现超时控制
创建订单函数 createOrder 调用 rpcCreateOrder 函数,createOrder 函数侧做超时控制
package main

import (
	"context"
	"fmt"
	"time"
)

type Order struct {
	OrderId    int64     // 订单id
	UserId     int64     // 用户id
	ProductId  int64     // 商品id
	Count      int64     // 购买的商品数量
	CreateTime time.Time // 创建时间
	UpdateTime time.Time // 修改时间
}

func main() {
	// 获取用户订单信息
	getOrder(15)
	// 创建订单
	createOrder(&Order{})
}

// 获取用户订单信息
func getOrder(orderId int64) {
	ctx, cancel := context.WithTimeout(context.Background(), 3*time.Second)
	defer cancel()
	order, err := rpcGetOrder(ctx, orderId)
	if err != nil {
		fmt.Printf("rpcGetOrders fail,err:%s\n", err.Error())
		return
	}
	fmt.Printf("rpcGetOrders res:%+v\n", order)
	return
}

// 创建订单
func createOrder(order *Order) {
	var errCh = make(chan error)
	ctx, cancel := context.WithTimeout(context.Background(), 1*time.Second)
	defer cancel()
	go func() {
		err := rpcCreateOrder(ctx, order)
		select {
		case errCh <- err:
		default:
			return
		}
	}()
	select {
	case <-ctx.Done():
		fmt.Printf("createOrder ctx err: %s\n", ctx.Err())
		return
	case err := <-errCh:
		fmt.Printf("createOrder res:%v\n", err)
		return
	}
	return
}

// rpc 获取用户订单信息
func rpcGetOrder(ctx context.Context, orderId int64) (order *Order, err error) {
	ch := make(chan *Order)
	go func() {
		order = &Order{
			OrderId:   orderId,
			UserId:    12,
			ProductId: 34,
			Count:     2,
		}
		select {
		case ch <- order:
		default:
			return
		}
	}()
	select {
	case <-ctx.Done():
		return nil, ctx.Err()
	case result := <-ch:
		return result, nil
	}
	return
}

// rpc 创建订单
func rpcCreateOrder(ctx context.Context, order *Order) (err error) {
	// 订单id幂等校验
	// 商品库存校验
	time.Sleep(2 * time.Second)
	return
}
定时任务-cron
1、cron表达式
Field name   | Mandatory? | Allowed values  | Allowed special characters
----------   | ---------- | --------------  | --------------------------
Seconds      | Yes        | 0-59            | * / , -
Minutes      | Yes        | 0-59            | * / , -
Hours        | Yes        | 0-23            | * / , -
Day of month | Yes        | 1-31            | * / , - ?
Month        | Yes        | 1-12 or JAN-DEC | * / , -
Day of week  | Yes        | 0-6 or SUN-SAT  | * / , - ?
(1)* :表示匹配该域的任意值。假如在 Minutes 域使用, 即表示每分钟都会触发一次
(2)/:表示起始时间开始触发,然后每隔固定时间触发一次。假如在 Minutes 域使用5/20,则表示5分钟触发一次,而25(5+20),45(5+20+20)分钟分别触发一次
(3),:表示列出枚举值。假如在 Minutes 域使用5,20,则表示在5和20分钟分别触发一次
(4)-:表示范围。假如在 Minutes 域使用5-20,表示从5分到20分钟每分钟触发一次
2、实例教程
每隔1分钟执行一次,正确的cron表达式是"0 */1 * * * ?"
如果写成"* */1 * * * ?",能实现每隔1分钟执行一次吗?
1分钟0秒匹配这个表达式,1分钟1秒也能匹配这个表达式,所以实现不了每隔1分钟执行一次
package main

import (
	"github.com/robfig/cron"
	"log"
	"net/http"
)

func main() {
	runJob()
	mux := http.NewServeMux()
	if err := http.ListenAndServe(":8080", mux); err != nil {
		panic(err)
	}
}

func runJob() {
	c := cron.New()
	// 每隔5秒执行一次
	c.AddFunc("*/5 * * * * ?", func() {
		log.Println("execute every 5 seconds")
	})
	// 每隔1分钟执行一次
	c.AddFunc("0 */1 * * * ?", func() {
		log.Println("execute every 1 minute")
	})
	// 每天1点执行一次
	c.AddFunc("0 0 1 * * ?", func() {
		log.Println("execute once a day at 1:00 a.m.")
	})
	c.Start()
}
http-crud
1、注册处理器
第一种方法(推荐)
func HandleFunc(pattern string, handler func(http.ResponseWriter, *http.Request))
函数格式为 func(http.ResponseWriter, *http.Request)
package main

import "net/http"

func main() {
	http.HandleFunc("/createOrder", createOrder)
}

// 创建订单
func createOrder(w http.ResponseWriter, r *http.Request) {
}
第二种方法
func Handle(pattern string, handler Handler)

type Handler interface {
    ServeHTTP(ResponseWriter, *Request)
}
自定义结构体,实现 Handler 接口
package main

import (
	"net/http"
)

type GetOrderHandle struct {
}

func main() {
	http.Handle("/getOrder", &GetOrderHandle{})
}

func (getOrderHandle *GetOrderHandle) ServeHTTP(w http.ResponseWriter, r *http.Request) {
}
2、启动服务
handler参数为 nil 时,会使用 DefaultServeMux 。
func ListenAndServe(addr string, handler Handler) error
(1)第一种方法:使用 DefaultServeMux (尽量不要用)
package main

import "net/http"

func main() {
	http.HandleFunc("/createOrder", createOrder)
	if err := http.ListenAndServe(":8080", nil); err != nil {
		panic(err)
	}
}

// 创建订单
func createOrder(w http.ResponseWriter, r *http.Request) {
}
尽量不要用 DefaultServeMux 的理由
DefaultServeMux 存储在全局变量中,而且首字母是大写,所以任何包都可以访问它并注册路由,包括您的应用程序导入的任何第三方包。 如果其中一个第三方软件包遭到破坏,就可以使用 DefaultServeMux 将恶意处理程序暴露给 Web。
// DefaultServeMux is the default ServeMux used by Serve.
var DefaultServeMux = &defaultServeMux

var defaultServeMux ServeMux
(2)第二种方法:使用 http.NewServeMux() (推荐)
package main

import "net/http"

func main() {
	mux := http.NewServeMux()
	mux.HandleFunc("/createOrder", createOrder)
	if err := http.ListenAndServe(":8080", mux); err != nil {
		panic(err)
	}
}

// 创建订单
func createOrder(w http.ResponseWriter, r *http.Request) {
}
推荐使用 http.NewServeMux() 的理由
mux 是 main 包下 main 函数的一个局部变量
3、获取请求参数
(1)获取 post 请求参数
POST http://localhost:8080/createOrder
{
    "order_id":123,
    "user_id":456
}
GetPostBody:校验 r.Method 、ioutil.ReadAll 读取字节流、json-iterator 反序列化
package main

import (
	"errors"
	"fmt"
	jsoniter "github.com/json-iterator/go"
	"io/ioutil"
	"net/http"
	"strings"
)

type Order struct {
	OrderId   int64 `json:"order_id"`   // 订单id
	UserId    int64 `json:"user_id"`    // 用户id
	ProductId int64 `json:"product_id"` // 商品id
	Count     int64 `json:"count"`      // 购买的商品数量
}

func main() {
	mux := http.NewServeMux()
	mux.HandleFunc("/createOrder", createOrder)
	if err := http.ListenAndServe(":8080", mux); err != nil {
		panic(err)
	}
}

// 创建订单
func createOrder(w http.ResponseWriter, r *http.Request) {
	order := new(Order)
	err := GetPostBody(r, order)
	if err != nil {
		fmt.Printf("getPostBody err:%s\n", err.Error())
		w.Write([]byte(err.Error()))
		return
	}
	fmt.Printf("getPostBody value:%v\n", order)
	res, _ := jsoniter.ConfigCompatibleWithStandardLibrary.Marshal(order)
	w.Write(res)
	return
}

func GetPostBody(r *http.Request, params interface{}) (err error) {
	if strings.ToLower(r.Method) != "post" {
		return errors.New("http method err")
	}
	bodyByte, err := ioutil.ReadAll(r.Body)
	if err != nil {
		return
	}
	return jsoniter.ConfigCompatibleWithStandardLibrary.Unmarshal(bodyByte, params)
}
(2)获取 get 请求参数
http://localhost:8080/getPageList?page=1&size=10第一种方法
GetUrlParams 函数通过 r.URL.Query() 把参数保存在 map[string]string。
第二种方法(推荐)
调用 r.ParseForm() 后通过 r.Form.Get 获取对应的数据。当缺少某个必填参数时,返回报错。
package main

import (
	"fmt"
	jsoniter "github.com/json-iterator/go"
	"net/http"
	"strconv"
	"strings"
)

type PageReq struct {
	Page int `json:"page"` // 第几页
	Size int `json:"size"` // 一页多少条
}

func main() {
	mux := http.NewServeMux()
	mux.HandleFunc("/getPageList", getPageList)
	if err := http.ListenAndServe(":8080", mux); err != nil {
		panic(err)
	}
}

func getPageList(w http.ResponseWriter, r *http.Request) {

	if strings.ToLower(r.Method) != "get" {
		w.Write([]byte("http method err"))
		return
	}

	// 第一种方法
	result := GetUrlParams(r)
	fmt.Printf("getUrlParams:%v\n", result)

	// 第二种方法
	params := new(PageReq)
	r.ParseForm()
	pageString := r.Form.Get("page")
	sizeString := r.Form.Get("size")
	if page, err := strconv.Atoi(pageString); err == nil {
		params.Page = page
	} else {
		w.Write([]byte("missing required parameter page"))
		return
	}
	if size, err := strconv.Atoi(sizeString); err == nil {
		params.Size = size
	} else {
		w.Write([]byte("missing required parameter size"))
		return
	}
	fmt.Printf("params:%+v\n", params)

	res, _ := jsoniter.ConfigCompatibleWithStandardLibrary.Marshal(result)
	w.Write(res)
	return
}

func GetUrlParams(r *http.Request) (result map[string]string) {
	result = make(map[string]string)
	keys := r.URL.Query()
	for k, v := range keys {
		result[k] = v[0]
	}
	return
}
4、请求响应
状态码、提示信息、数据
type ResponseBody struct {
	Code    int         `json:"code"`
	Message interface{} `json:"message,omitempty"`
	Body    interface{} `json:"body,omitempty"`
}
WriteResponseBody 函数通过 w.Write 写入 ResponseBody 序列化后的字节数组
package main

import (
	jsoniter "github.com/json-iterator/go"
	"net/http"
)

const (
	OK = 0
)

type ResponseBody struct {
	Code    int         `json:"code"`
	Message interface{} `json:"message,omitempty"`
	Body    interface{} `json:"body,omitempty"`
}

type Order struct {
	OrderId   int64 `json:"order_id"`   // 订单id
	UserId    int64 `json:"user_id"`    // 用户id
	ProductId int64 `json:"product_id"` // 商品id
	Count     int64 `json:"count"`      // 购买的商品数量
}

func main() {
	mux := http.NewServeMux()
	mux.HandleFunc("/getPageList", getPageList)
	if err := http.ListenAndServe(":8080", mux); err != nil {
		panic(err)
	}
}

func getPageList(w http.ResponseWriter, r *http.Request) {
	WriteSuccessResponseBody(w, &Order{
		OrderId:   123,
		UserId:    456,
		ProductId: 789,
		Count:     2,
	})
}

func WriteResponseBody(w http.ResponseWriter, code int, message, body interface{}) {
	responseBody := &ResponseBody{
		Code:    code,
		Message: message,
		Body:    body,
	}
	resByte, _ := jsoniter.ConfigCompatibleWithStandardLibrary.Marshal(responseBody)
	w.Write(resByte)
}

func WriteSuccessResponseBody(w http.ResponseWriter, body interface{}) {
	WriteResponseBody(w, OK, "OK", body)
}
5、http middware
GetHttpHandler 函数,统一在包装函数内实现公共功能,比如校验用户 ip、校验用户 accessToken、记录业务 HttpHandler 函数耗时等,业务 HttpHandler 函数作为参数形式传给包装函数。
package main

import (
	"fmt"
	"net/http"
)

type WrapHttpFunc struct {
	HttpFunc         func(http.ResponseWriter, *http.Request)
	CheckAccessToken bool
}

func main() {
	mux := http.NewServeMux()
	mux.HandleFunc("/recharge", GetHttpHandler(&WrapHttpFunc{
		HttpFunc:         RechargeHandler,
		CheckAccessToken: true,
	}))
	if err := http.ListenAndServe(":8080", mux); err != nil {
		panic(err)
	}
}

func RechargeHandler(w http.ResponseWriter, r *http.Request) {
}

func CheckAccessToken(w http.ResponseWriter, r *http.Request) (ok bool, err error) {
	return
}

func GetHttpHandler(wrapHttpFunc *WrapHttpFunc) func(w http.ResponseWriter, r *http.Request) {
	return func(w http.ResponseWriter, r *http.Request) {
		if wrapHttpFunc.CheckAccessToken {
			ok, err := CheckAccessToken(w, r)
			if !ok {
				fmt.Printf("CheckAccessToken err:%s", err.Error())
				w.Write([]byte(err.Error()))
			}
		}
		wrapHttpFunc.HttpFunc(w, r)
	}
}
性能优化-pprof
1、基础知识
运行代码,浏览器访问 http://localhost:8080/debug/pprof/
package main

import (
	"net/http"
	"net/http/pprof"
)

func main() {
	mux := http.NewServeMux()
	// register pprof handlers
	mux.HandleFunc("/debug/pprof/", pprof.Index)
	mux.HandleFunc("/debug/pprof/cmdline", pprof.Cmdline)
	mux.HandleFunc("/debug/pprof/profile", pprof.Profile)
	mux.HandleFunc("/debug/pprof/symbol", pprof.Symbol)
	mux.HandleFunc("/debug/pprof/trace", pprof.Trace)
	if err := http.ListenAndServe(":8080", mux); err != nil {
		panic(err)
	}
}
2、cpu分析
生成 cpu profile 文件,启动 pprof web ui
D:\goland\code\go-quick-start-guide>go tool pprof -http=:8081 http://localhost:8080/debug/pprof/profile?seconds=30
Fetching profile over HTTP from http://localhost:8080/debug/pprof/profile?seconds=30
Saved profile in C:\Users\Administrator\pprof\pprof.samples.cpu.002.pb.gz
Serving web UI on http://localhost:8081
常见问题
PS D:\goland\code\go-quick-start-guide> go tool pprof -http=:8081 http://localhost:8080/debug/pprof/profile?seconds=30
Fetching profile over HTTP from http://localhost:8080/debug/pprof/profile?seconds=30
Saved profile in C:\Users\Administrator\pprof\pprof.samples.cpu.001.pb.gz
Serving web UI on http://localhost:8081
Failed to execute dot. Is Graphviz installed?
exec: "dot": executable file not found in %PATH%
解决问题:下载安装 graphviz ,手动配置环境变量或者在安装过程中勾选“add Graphviz to the system PATH for all users”
验证 graphviz 是否安装成功,goland idea terminal 输入“dot -version”
PS D:\goland\code\go-quick-start-guide> dot -version
dot : 无法将“dot”项识别为 cmdlet、函数、脚本文件或可运行程序的名称。请检查名称的拼写,如果包括路径,请确保路径正确,然后再试一次。
所在位置 行:1 字符: 1
+ dot -version
+ ~~~
    + CategoryInfo          : ObjectNotFound: (dot:String) [], CommandNotFoundException
    + FullyQualifiedErrorId : CommandNotFoundException
解决问题:goland idea terminal 默认用的是 powershell ,更换 powershell 为 cmd
更换步骤:File -> Settings -> Enter 'Terminal' in search -> Shell path
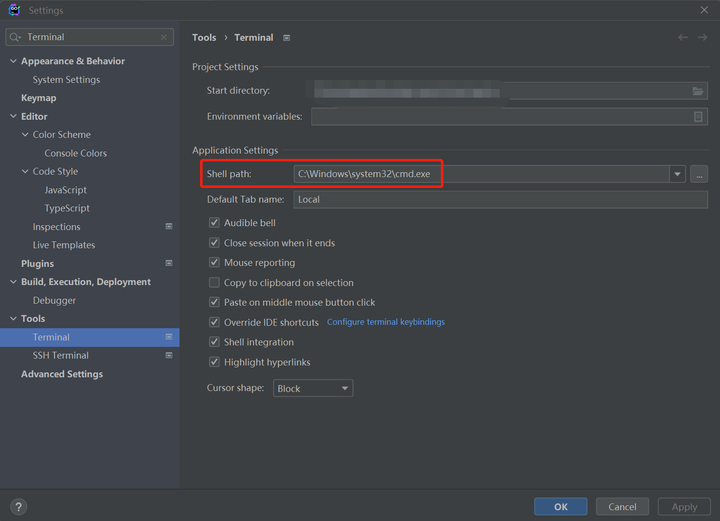
3、自动profile
背景:有人值守的情况下,如果 cpu 飙升,那可以通过指定路径手动下载 cpu profile 文件,然后用工具对 cpu profile 文件进行分析。那无人值守的情况下如何应对?半夜出现 cpu 飙升,如何保存现场,即如何产生 cpu profile 文件?
思路1:持续性采样,即指定间隔时间内会产生一个 cpu profile 文件。优化思路就是自动 cpu profile 开关接入配置中心。有人值守的情况下,关闭自动 cpu profile 功能,无人值守的情况下,打开自动 cpu profile 功能。
package main

import (
	"github.com/robfig/cron"
	"log"
	"net/http"
	"net/http/pprof"
	"os"
	runtimePprof "runtime/pprof"
	"time"
)

func main() {
	runJob()
	mux := http.NewServeMux()
	// register pprof handlers
	mux.HandleFunc("/debug/pprof/", pprof.Index)
	mux.HandleFunc("/debug/pprof/cmdline", pprof.Cmdline)
	mux.HandleFunc("/debug/pprof/profile", pprof.Profile)
	mux.HandleFunc("/debug/pprof/symbol", pprof.Symbol)
	mux.HandleFunc("/debug/pprof/trace", pprof.Trace)
	if err := http.ListenAndServe(":8080", mux); err != nil {
		panic(err)
	}
}

func runJob() {
	c := cron.New()
	// 每隔5分钟执行一次
	c.AddFunc("0 */5 * * * ?", func() {
		ContinueProfile()
	})
	// 每隔2秒执行一次
	c.AddFunc("*/2 * * * * ?", func() {
		bigMap()
	})
	c.Start()
}

func ContinueProfile() {
	path := time.Now().Format("20060102150405") + ".pprof"
	log.Printf("profile path:%s\n", path)
	fp, err := os.Create(path)
	defer fp.Close()
	if err != nil {
		log.Printf("os.Create err:%s", err.Error())
		return
	}
	runtimePprof.StartCPUProfile(fp)
	<-time.After(30 * time.Second)
	defer runtimePprof.StopCPUProfile()
}

func bigMap() {
	data := make(map[int]int)
	for i := 0; i < 100000; i++ {
		data[i] = i
	}
}
对指定间隔时间自动生成的 cpu profile 文件进行分析
D:\goland\code\go-quick-start-guide\go-tutorial\go-http\go-http-pprof\continue_profile>go tool pprof 20220501224200.pprof
Type: cpu
Time: May 1, 2022 at 10:42pm (CST)
Duration: 221.32ms, Total samples = 0
No samples were found with the default sample value type.
Try "sample_index" command to analyze different sample values.
Entering interactive mode (type "help" for commands, "o" for options)
(pprof) top
Showing nodes accounting for 0, 0% of 0 total
      flat  flat%   sum%        cum   cum%
(pprof)
出现问题:Duration: 221.32ms, Total samples = 0
分析问题:手动下载 cpu profile 时,设置seconds=30,即 Duration: 30s 左右。现在指定时间间隔自动下载 cpu profile 的 Duration 值不符合预期。
解决问题:增加代码 <-time.After(30 * time.Second)
runtimePprof.StartCPUProfile(fp)
<-time.After(30 * time.Second)
defer runtimePprof.StopCPUProfile()
最终结果:go tool pprof xxx.pprof ,可增加“-http=:8081”选项,自动打开 web ui。
D:\goland\code\go-quick-start-guide\go-tutorial\go-http\go-http-pprof\continue_profile>go tool pprof 20220502105800.pprof
Type: cpu
Time: May 2, 2022 at 10:58am (CST)
Duration: 30.10s, Total samples = 110ms ( 0.37%)
Entering interactive mode (type "help" for commands, "o" for options)
(pprof) top
Showing nodes accounting for 110ms, 100% of 110ms total
Showing top 10 nodes out of 34
      flat  flat%   sum%        cum   cum%
      30ms 27.27% 27.27%       30ms 27.27%  runtime.stdcall1
      10ms  9.09% 36.36%       20ms 18.18%  github.com/robfig/cron.(*Cron).run
      10ms  9.09% 45.45%       10ms  9.09%  runtime.evacuate_fast64
      10ms  9.09% 54.55%       10ms  9.09%  runtime.netpoll
      10ms  9.09% 63.64%       10ms  9.09%  runtime.releasep
      10ms  9.09% 72.73%       10ms  9.09%  runtime.runqempty
      10ms  9.09% 81.82%       10ms  9.09%  runtime.runtimer
      10ms  9.09% 90.91%       10ms  9.09%  runtime.selectgo
      10ms  9.09%   100%       10ms  9.09%  runtime/pprof.(*profMap).lookup
         0     0%   100%       10ms  9.09%  github.com/robfig/cron.(*Cron).runWithRecovery
(pprof)
思路2:条件性采样,即超过阈值后触发采样动作,可使用第三方开源的自动采样库 Holmes
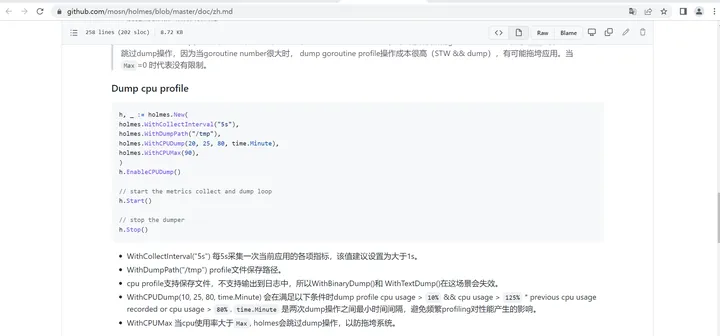
package main

import (
	"mosn.io/holmes"
	"net/http"
	"net/http/pprof"
	"time"
)

func main() {
	ConditionalProfile()
	mux := http.NewServeMux()
	// register pprof handlers
	mux.HandleFunc("/debug/pprof/", pprof.Index)
	mux.HandleFunc("/debug/pprof/cmdline", pprof.Cmdline)
	mux.HandleFunc("/debug/pprof/profile", pprof.Profile)
	mux.HandleFunc("/debug/pprof/symbol", pprof.Symbol)
	mux.HandleFunc("/debug/pprof/trace", pprof.Trace)
	if err := http.ListenAndServe(":8080", mux); err != nil {
		panic(err)
	}
}

func ConditionalProfile() {
	h, _ := holmes.New(
		holmes.WithCollectInterval("5s"),
		holmes.WithDumpPath("/tmp"),
		holmes.WithCPUDump(20, 25, 80, time.Minute),
		holmes.WithCPUMax(90),
	)
	h.EnableCPUDump()
	// start the metrics collect and dump loop
	h.Start()
}
日志-seelog
1、配置文件-seelog.xml
format="%Date(2006-01-02 15:04:05.999) [%LEV] %File:%Line:%FuncShort %Msg%n" 配置日志输出格式。
2022-04-29 21:43:08.774 [INF] main.go:54:createOrder getPostBody value:&{OrderId:123 UserId:456 ProductId:0 Count:0}datepattern="2006010215",表示一个日志文件保存一个小时的日志。maxrolls="168",表示最多可以有168个日志文件存在。综合两个配置,即保留七天的日志文件。
<seelog type="asynctimer" minlevel="info" maxlevel="error" asyncinterval="1000">
    <outputs formatid="main">
        <console />
        <rollingfile type="date" filename="../../logs/main.log" datepattern="2006010215" maxrolls="168" fullname="true"/>
    </outputs>
    <formats>
        <format id="main" format="%Date(2006-01-02 15:04:05.999) [%LEV] %File:%Line:%FuncShort  %Msg%n"/>
    </formats>
</seelog>
2、读取配置
package main

import (
	log "github.com/cihub/seelog"
)

func main() {
	defer log.Flush()
	logger, err := log.LoggerFromConfigAsFile("../config/seelog.xml")
	if err != nil {
		panic(err.Error())
	}
	log.ReplaceLogger(logger)
}
3、实例教程
package main

import (
	"errors"
	log "github.com/cihub/seelog"
	jsoniter "github.com/json-iterator/go"
	"io/ioutil"
	"net/http"
	"strings"
)

const (
	OK    = 0
	ERR0R = 1
)

type ResponseBody struct {
	Code    int         `json:"code"`
	Message interface{} `json:"message,omitempty"`
	Body    interface{} `json:"body,omitempty"`
}

type Order struct {
	OrderId   int64 `json:"order_id"`   // 订单id
	UserId    int64 `json:"user_id"`    // 用户id
	ProductId int64 `json:"product_id"` // 商品id
	Count     int64 `json:"count"`      // 购买的商品数量
}

func main() {
	defer log.Flush()
	logger, err := log.LoggerFromConfigAsFile("../config/seelog.xml")
	if err != nil {
		panic(err.Error())
	}
	log.ReplaceLogger(logger)
	mux := http.NewServeMux()
	mux.HandleFunc("/createOrder", createOrder)
	if err := http.ListenAndServe(":8080", mux); err != nil {
		panic(err)
	}
}

// 创建订单
func createOrder(w http.ResponseWriter, r *http.Request) {
	order := new(Order)
	err := GetPostBody(r, order)
	if err != nil {
		log.Errorf("getPostBody err:%s\n", err.Error())
		WriteResponseBody(w, ERR0R, err.Error(), err.Error())
		return
	}
	log.Infof("getPostBody value:%+v\n", order)
	WriteSuccessResponseBody(w, order)
}

func GetPostBody(r *http.Request, params interface{}) (err error) {
	if strings.ToLower(r.Method) != "post" {
		return errors.New("http method err")
	}
	bodyByte, err := ioutil.ReadAll(r.Body)
	if err != nil {
		return
	}
	return jsoniter.ConfigCompatibleWithStandardLibrary.Unmarshal(bodyByte, params)
}

func WriteResponseBody(w http.ResponseWriter, code int, message, body interface{}) {
	responseBody := &ResponseBody{
		Code:    code,
		Message: message,
		Body:    body,
	}
	resByte, _ := jsoniter.ConfigCompatibleWithStandardLibrary.Marshal(responseBody)
	w.Write(resByte)
}

func WriteSuccessResponseBody(w http.ResponseWriter, body interface{}) {
	WriteResponseBody(w, OK, "OK", body)
}
配置文件-toml
1、基础知识
(1)表是键值对的集合,格式:[table]
[database] 配置数据库,ports = [ 8000, 8001, 8002 ] 配置多个端口,即数组格式。
[database]
server = "192.168.1.1"
ports = [ 8000, 8001, 8002 ]
connection_max = 5000
enabled = true
[database] 对应的结构体,当结构体中的成员名称和 [database] 中属性名称不一致时,比如 ConnMax 和 connection_max,可用 toml 标签实现映射。
type TomlConfig struct {
	Database *DatabaseConfig
}

type DatabaseConfig struct {
	Server  string
	Ports   []int
	ConnMax int `toml:"connection_max"`
	Enabled bool
}
(2)子表:[table.childtable] 格式通过点分隔键来定义的表中的子表
[servers]

[servers.alpha]
ip = "10.0.0.1"
dc = "eqdc10"

[servers.beta]
ip = "10.0.0.2"
dc = "eqdc10"
[servers] 对应的结构体,使用 map 集合保存。
type TomlConfig struct {
	Servers  map[string]*ServerConfig
}

type ServerConfig struct {
	IP string
	DC string
}
2、实例教程
config.toml
# https://github.com/toml-lang/toml

title = "TOML Example"

[owner]
name = "Tom Preston-Werner"
dob = 1979-05-27T07:32:00-08:00 # First class dates

[database]
server = "192.168.1.1"
ports = [ 8000, 8001, 8002 ]
connection_max = 5000
enabled = true

[servers]

# Indentation (tabs and/or spaces) is allowed but not required
[servers.alpha]
ip = "10.0.0.1"
dc = "eqdc10"

[servers.beta]
ip = "10.0.0.2"
dc = "eqdc10"

[clients]
data = [ ["gamma", "delta"], [1, 2] ]

# Line breaks are OK when inside arrays
hosts = [
    "alpha",
    "omega"
]
config.go
package config

import (
	"fmt"
	"github.com/BurntSushi/toml"
	"sync"
	"time"
)

var (
	conf *TomlConfig
	once sync.Once
)

type TomlConfig struct {
	Title    string
	Owner    *OwnerConfig
	Database *DatabaseConfig
	Servers  map[string]*ServerConfig
	Clients  *ClientsConfig
}

type OwnerConfig struct {
	Name string
	DOB  time.Time
}

type DatabaseConfig struct {
	Server  string
	Ports   []int
	ConnMax int `toml:"connection_max"`
	Enabled bool
}

type ServerConfig struct {
	IP string
	DC string
}

type ClientsConfig struct {
	Data  [][]interface{}
	Hosts []string
}

func GetConfig() *TomlConfig {
	once.Do(func() {
		conf = new(TomlConfig)
		if _, err := toml.DecodeFile("../config/config.toml", conf); err != nil {
			fmt.Printf("decode config file fail, err:%s\n", err.Error())
		}
	})
	return conf
}
main.go
package main

import (
	"fmt"
	"go-quick-start-guide/go-tutorial/go-toml/config"
)

func main() {
	conf := config.GetConfig()
	fmt.Printf("config:%+v", conf)
}