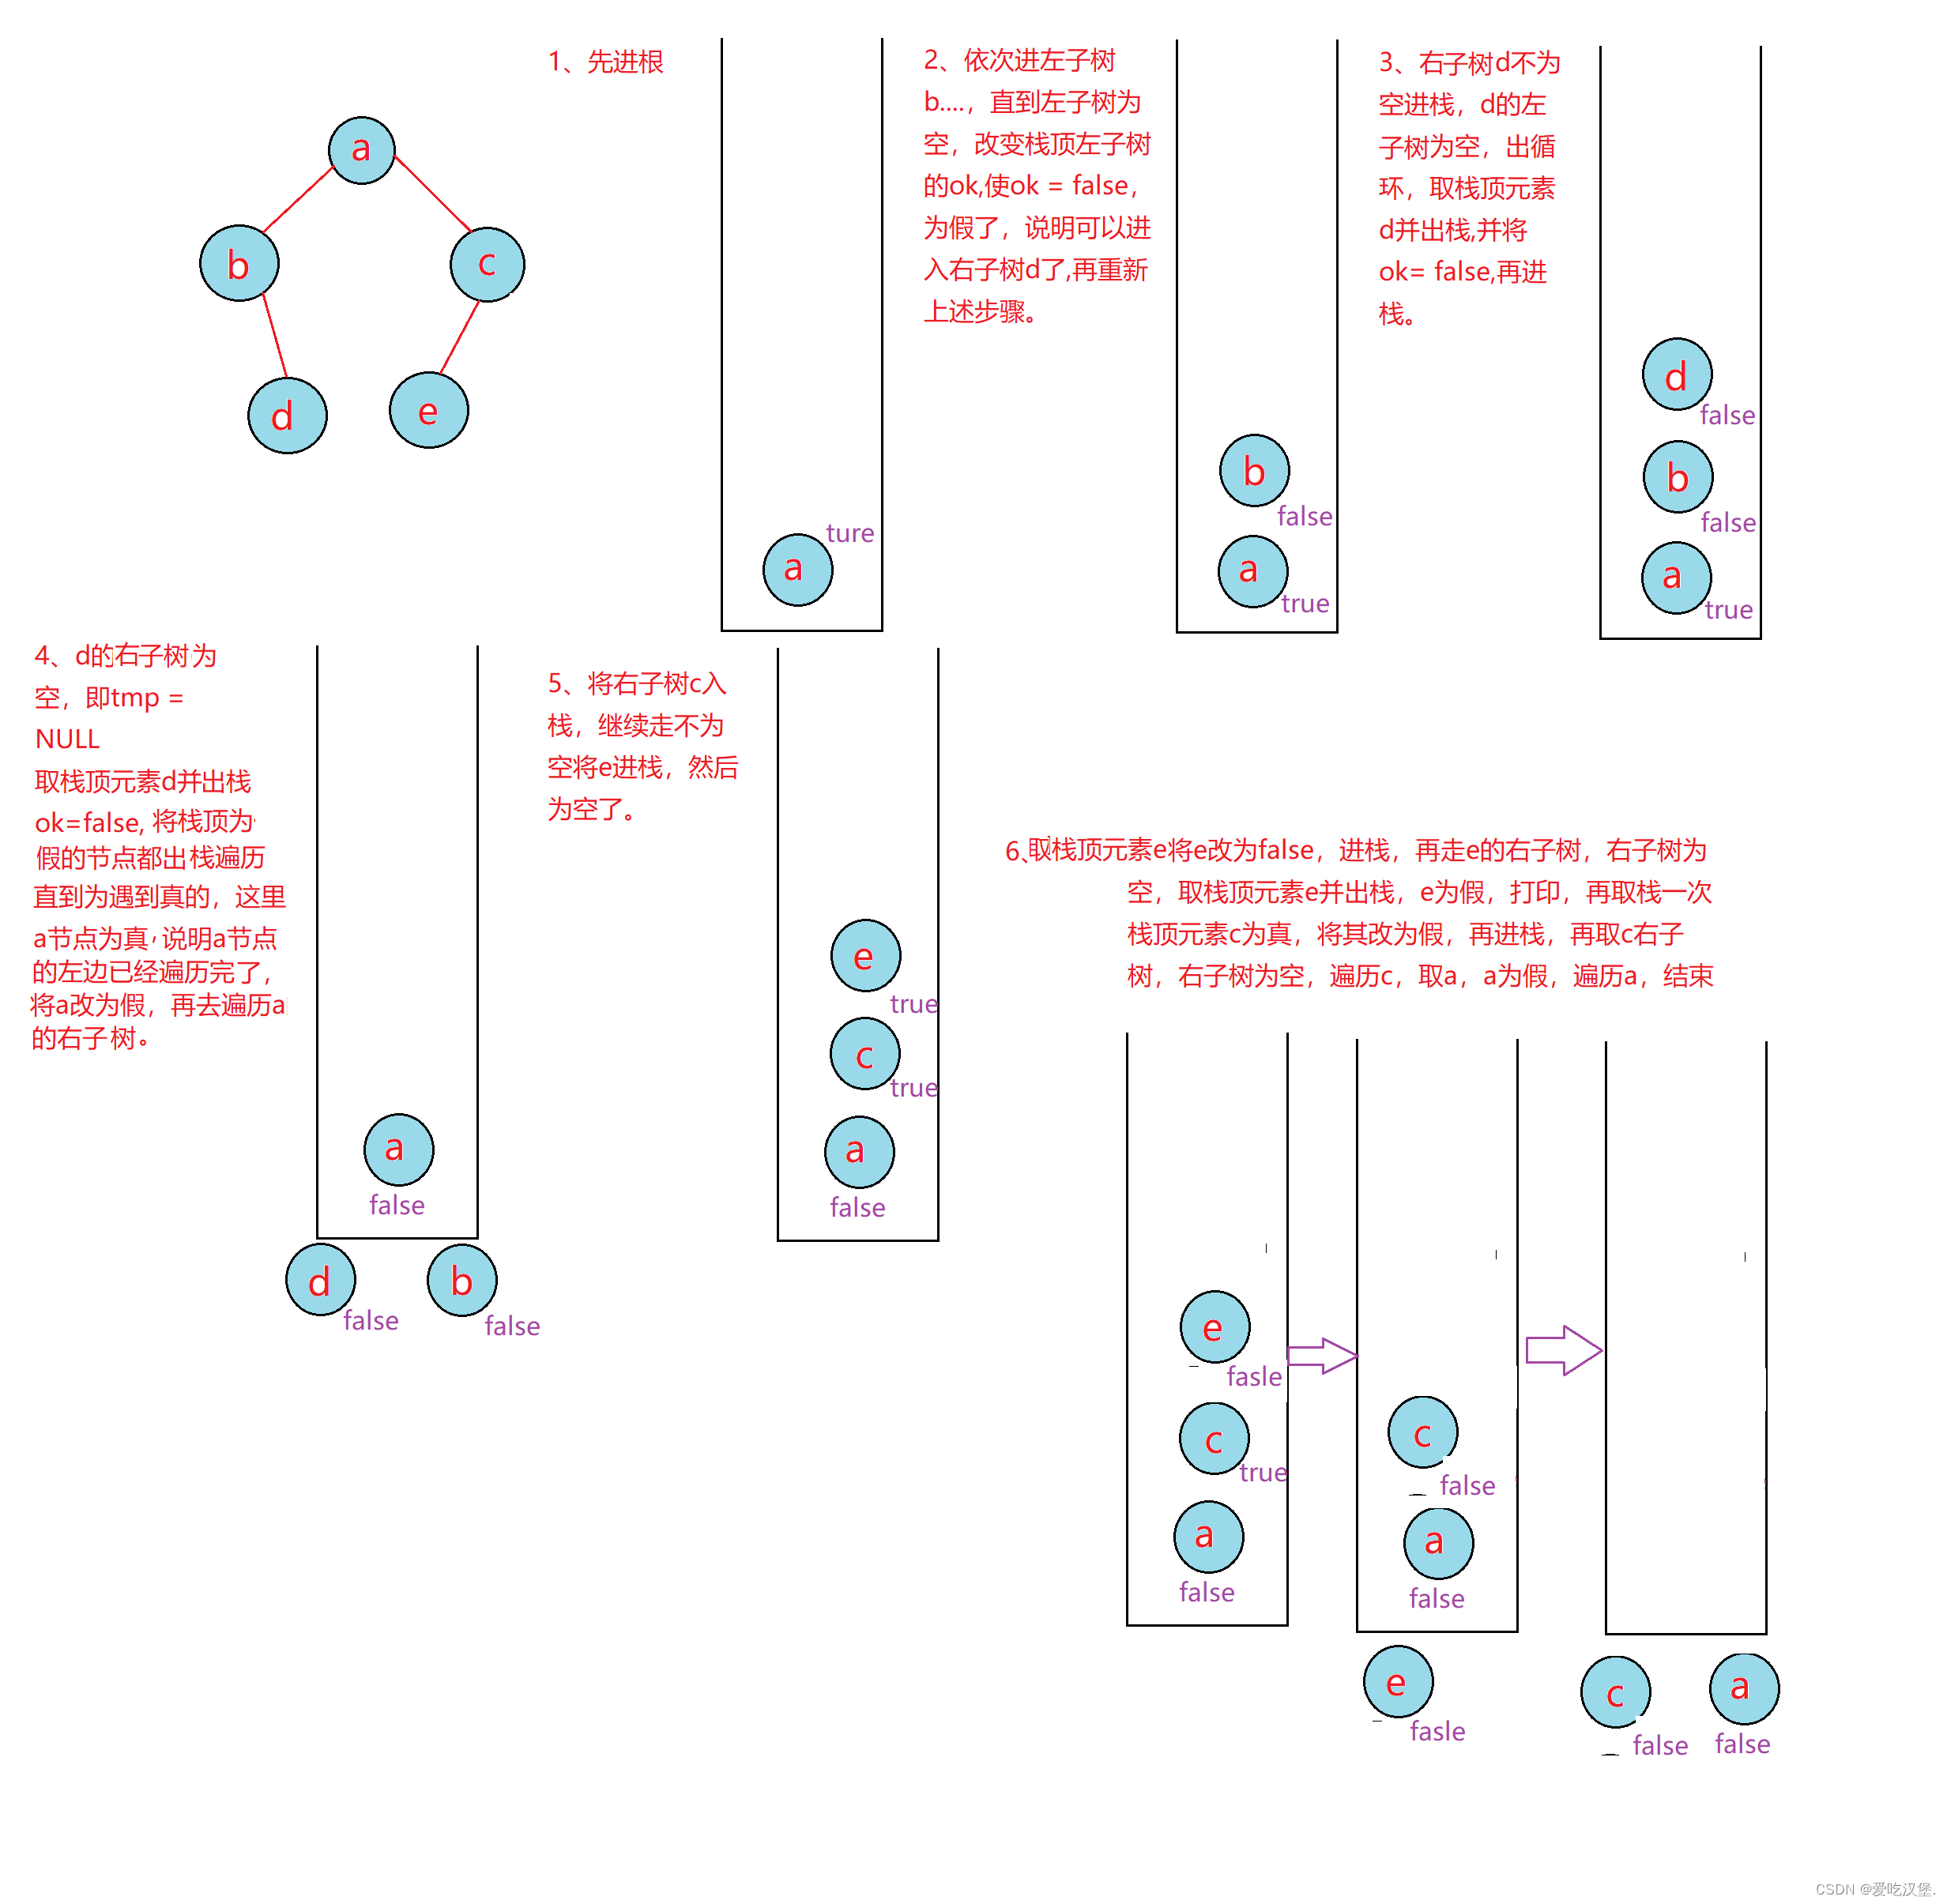
提示:文章写完后,目录可以自动生成,如何生成可参考右边的帮助文档
文章目录
- 前言
- 一、OpenCV是什么?
- 二、OpenCV 源码编译
- 1.前期准备
- 1.1 源码下载
- 1.2 cmake安装
- 1.3 vscode 安装
- 1.4 git 安装
- 1.5 mingw安装
- 2.源码编译
- 2.1 打开cmake
- 2.2 去掉不需要的编译模块
- 2.3 解决完所有的报错,再次点击generate 按钮
- 2.4 命令生成install 文件
- 3.2 Policy CMP0148 is not set: The FindPythonInterp and FindPythonLibs modules
- 3.3 Couldn't download files from the Internet.
- 3.4 CONFIGURATION IS NOT SUPPORTED: validate setupvars script in install
- 3.5 No modules has been found: G:/OpenCV/455/opencv_contrib-4.5.5
- 3.6 make 编译出现
- 4. 编译测试
- 4.1 配置OpenCV 库
- 4.2 测试代码
- 4.3 测试效果
- 总结
前言
提示:这里可以添加本文要记录的大概内容:
OpenCV是一款免费开源的计算机视觉算法库,在实际使用的时候,需要移植到不同的平台。在这记录下源码编译的过程。
提示:以下是本篇文章正文内容,下面案例可供参考
一、OpenCV是什么?
示例:pandas 是基于NumPy 的一种工具,该工具是为了解决数据分析任务而创建的。
二、OpenCV 源码编译
1.前期准备
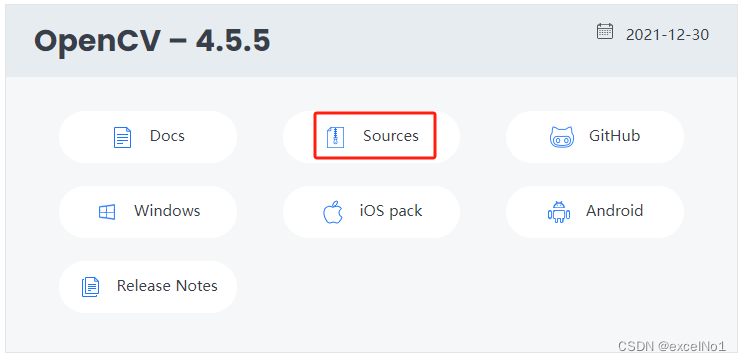
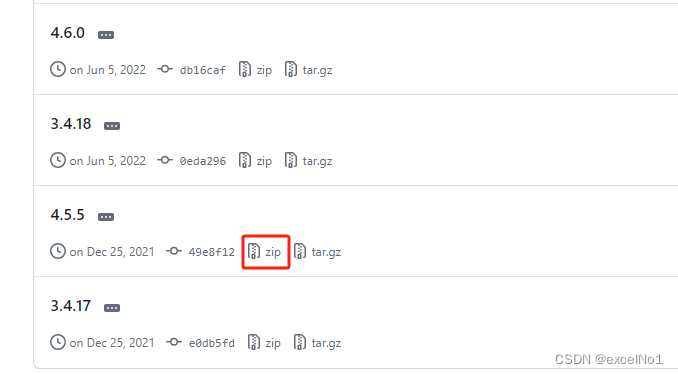
1.1 源码下载
https://opencv.org/releases/OpenCV源码
https://github.com/opencv/opencv_contrib/tags opencv_contrib4.5.5地址
1.2 cmake安装
1.3 vscode 安装
1.4 git 安装
1.5 mingw安装
2.源码编译
2.1 打开cmake
设置OpenCV 的路径和编译之后存放的路径

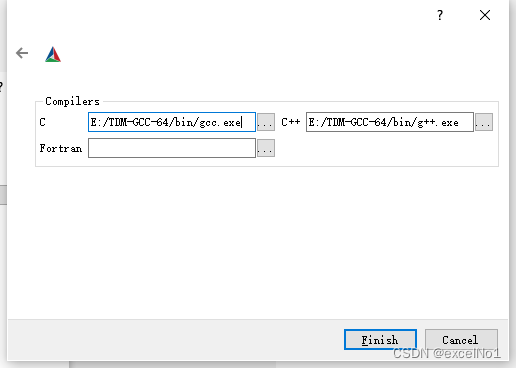
点击configure 按钮,选择平台对应的编译器

设置编译器的路径
2.2 去掉不需要的编译模块
去掉python部分

去掉java 部分

去掉test

添加opencv_contrib 路径

2.3 解决完所有的报错,再次点击generate 按钮

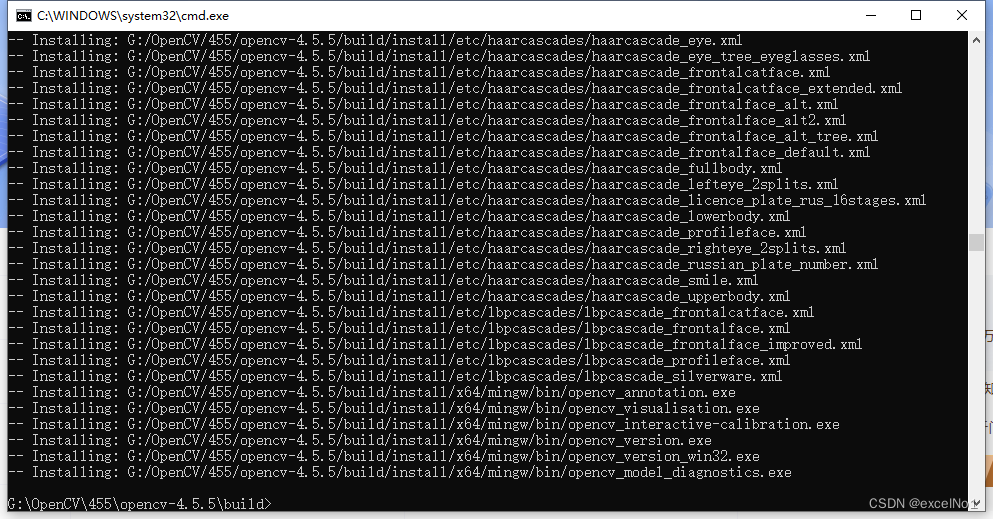
2.4 命令生成install 文件
cd build
minGW32-make -j 4

minGW32-make install
## 3. 问题汇总
### 3.1 Policy CMP0148 is not set: The FindPythonInterp and FindPythonLibs modules

```c
CMake Warning (dev) at cmake/OpenCVUtils.cmake:144 (find_package):
  Policy CMP0148 is not set: The FindPythonInterp and FindPythonLibs modules
  are removed.  Run "cmake --help-policy CMP0148" for policy details.  Use
  the cmake_policy command to set the policy and suppress this warning.

Call Stack (most recent call first):
  cmake/OpenCVDetectPython.cmake:64 (find_host_package)
  cmake/OpenCVDetectPython.cmake:286 (find_python)
  CMakeLists.txt:660 (include)
This warning is for project developers.  Use -Wno-dev to suppress it.

解决办法:在CMakeLists.txt 里面添加以下代码

```c
if(POLICY CMP0148)
  cmake_policy(SET CMP0148 OLD)  # CMake 3.13+: option() honors normal variables.
endif()
3.2 Policy CMP0148 is not set: The FindPythonInterp and FindPythonLibs modules
Found PythonInterp: E:/python389/python.exe (found suitable version "3.8.9", minimum required is "3.2")
CMake Warning (dev) at cmake/OpenCVDetectPython.cmake:140 (find_package):
  Policy CMP0148 is not set: The FindPythonInterp and FindPythonLibs modules
  are removed.  Run "cmake --help-policy CMP0148" for policy details.  Use
  the cmake_policy command to set the policy and suppress this warning.

Call Stack (most recent call first):
  cmake/OpenCVDetectPython.cmake:286 (find_python)
  CMakeLists.txt:660 (include)
This warning is for project developers.  Use -Wno-dev to suppress it.
解决办法:同上
3.3 Couldn’t download files from the Internet.
FFMPEG: Downloading opencv_videoio_ffmpeg.dll from https://raw.githubusercontent.com/opencv/opencv_3rdparty/fbac408a47977ee4265f39e7659d33f1dfef5216/ffmpeg/opencv_videoio_ffmpeg.dll
Try 1 failed

=======================================================================
  Couldn't download files from the Internet.
  Please check the Internet access on this host.
=======================================================================

CMake Warning at cmake/OpenCVDownload.cmake:248 (message):
  FFMPEG: Download failed: 6;"Couldn't resolve host name"

  For details please refer to the download log file:

  G:/OpenCV/490_0/opencv/build/CMakeDownloadLog.txt

Call Stack (most recent call first):
  3rdparty/ffmpeg/ffmpeg.cmake:20 (ocv_download)
  modules/videoio/cmake/detect_ffmpeg.cmake:17 (download_win_ffmpeg)
  modules/videoio/cmake/init.cmake:7 (include)
  modules/videoio/cmake/init.cmake:11 (add_backend)
  cmake/OpenCVModule.cmake:298 (include)
  cmake/OpenCVModule.cmake:361 (_add_modules_1)
  cmake/OpenCVModule.cmake:408 (ocv_glob_modules)
  CMakeLists.txt:1032 (ocv_register_modules)
科学上网,将需要的文件下载下来;类似其他报错误,也是对应将文件下载下来即可。
3.4 CONFIGURATION IS NOT SUPPORTED: validate setupvars script in install
Processing WORLD modules... DONE
Excluding from source files list: <BUILD>/modules/world/layers/layers_common.rvv.cpp
CMake Warning at cmake/OpenCVGenSetupVars.cmake:54 (message):
  CONFIGURATION IS NOT SUPPORTED: validate setupvars script in install
  directory
Call Stack (most recent call first):
  CMakeLists.txt:1039 (include)
解决办法:OPENCV_GENERATE_SETUPVARS,去除勾选
3.5 No modules has been found: G:/OpenCV/455/opencv_contrib-4.5.5
VTK is not found. Please set -DVTK_DIR in CMake to VTK build directory, or to VTK install subdirectory with VTKConfig.cmake file
CMake Error at cmake/OpenCVModule.cmake:274 (message):
  No modules has been found: G:/OpenCV/455/opencv_contrib-4.5.5
Call Stack (most recent call first):
  cmake/OpenCVModule.cmake:356 (_glob_locations)
  cmake/OpenCVModule.cmake:385 (ocv_glob_modules)
  CMakeLists.txt:931 (ocv_register_modules)
解决办法:路径一定要选到 opencv_contrib/modules 这里。
3.6 make 编译出现

说明源码被加密,需要解密。
4. 编译测试
4.1 配置OpenCV 库
打开vscode ,打开测试文件夹。
创建 .vscode文件夹,创建c_cpp_properties.json 、launch.json、task.json文件

c_cpp_properties.json
{
    "configurations": [
        {
            "name": "win",
            "includePath": [
                "${workspaceFolder}/**",
                "C:/software/opencv3/opencv/build/x64/mingw/include",
                "C:/software/opencv3/opencv/build/x64/mingw/install/include/opencv2",
                "C:/software/opencv3/opencv/build/x64/mingw/install/include"
            ],
            "defines": [],
            "compilerPath": "C:/software/mingw64/bin/g++.exe",
            "cStandard": "c11",
            "cppStandard": "c++17",
            "intelliSenseMode": "${default}"
        }
    ],
    "version": 4
}
launch.json
{

    "version": "0.2.0",
    "configurations": [
        {
            "name": "opencv debuge",
            "type": "cppdbg",
            "request": "launch",
            "program": "${workspaceFolder}//Debugger//${fileBasenameNoExtension}.exe",
            //上面这个Debugger是我自己定义的,为了方便放置生成的exe文件
            "args": [],
            "stopAtEntry": false, //这里如果为 false,则说明调试直接运行。(反之则停止)
            "cwd": "${workspaceFolder}",
            "environment": [],
            "externalConsole": true,//是否调用外部cmd
            "MIMode": "gdb",
            "miDebuggerPath": "C:/software/mingw64/bin/gdb.exe",//自己进行设置
            "setupCommands": [
                {
                    "description": "为 gdb 启用整齐打印",
                    "text": "-enable-pretty-printing",
                    "ignoreFailures": false
                }
            ],
            "preLaunchTask": "opencv3.5.2"
        }
    ]
}
task.json
{
    "version": "2.0.0",
    "tasks": [
        {
            "type": "shell",
            "label": "opencv3.5.2",
            "command": "C:/software/mingw64/bin/g++.exe",
            "args": [
                "-g",
                "${file}",
                "-o",
                "${workspaceFolder}//Debugger//${fileBasenameNoExtension}.exe",
                //上面这个Debugger是我自己定义的,为了方便放置生成的exe文件
                "C:/software/opencv3/opencv/build/x64/mingw/bin/libopencv_world3416.dll",
                "-I",
                "C:/software/opencv3/opencv/build/x64/mingw/install/include",
                "-I",
                "C:/software/opencv3/opencv/build/x64/mingw/install/include/opencv2",
            ],
            "options": {
                "cwd": "C:/software/mingw64/bin"
            },
            "problemMatcher": [
                "$gcc"
            ],
            "group": {
                "kind": "build",
                "isDefault": true
            }
        }
    ]
}
4.2 测试代码
#include <opencv2/opencv.hpp>
#include <opencv2/highgui.hpp>
#include <iostream>
using namespace cv;
uisng namespace std;
int main()
{
    string imgpath ="/path/to/img.jpg"
    Mat img=imread(imgpath);
    imshow("image",img);
    waitKey();
    return 0;
}

4.3 测试效果

总结
记录下window10 下编译OpenCV+opencv_contrib 的过程,也给有需要的朋友一些经验。
![[ESP32]:基于HTTP实现百度AI识图](https://img-blog.csdnimg.cn/direct/72bed8619792476ab2cfebf1175d5222.png#pic_center)


![通信网络设计[PTA]](https://img-blog.csdnimg.cn/direct/c8852131f5a046deb8043fa80301016b.png)

![[ C++ ] STL---仿函数与priority_queue](https://img-blog.csdnimg.cn/direct/cd695fba8d0c4b74ae22eadb7d858cf1.gif)