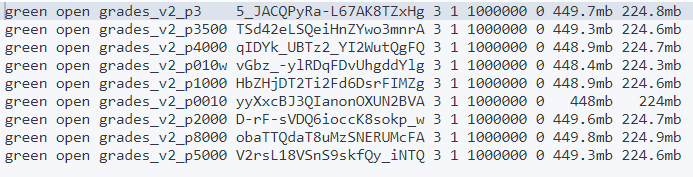
目录
1. 前言
2. 实验分析
2.1 导入包
2.2 决策树模型构建及树模型的可视化展示
2.3 概率估计
2.4 绘制决策边界
2.5 决策树的正则化(剪枝)
2.6 对数据敏感
2.7 回归任务
2.8 对比树的深度对结果的影响
2.9 剪枝
1. 前言
本文主要分析了决策树的分类和回归任务,对比一系列的剪枝的策略对结果的影响,数据对于决策树结果的影响。
介绍使用graphaviz这个决策树可视化工具
2. 实验分析
2.1 导入包
#1.导入包
import os
import numpy as np
import matplotlib
%matplotlib inline
import matplotlib.pyplot as plt
plt.rcParams['axes.labelsize'] = 14
plt.rcParams['xtick.labelsize'] = 12
plt.rcParams['ytick.labelsize'] = 12
import warnings
warnings.filterwarnings('ignore')
2.2 决策树模型构建及树模型的可视化展示
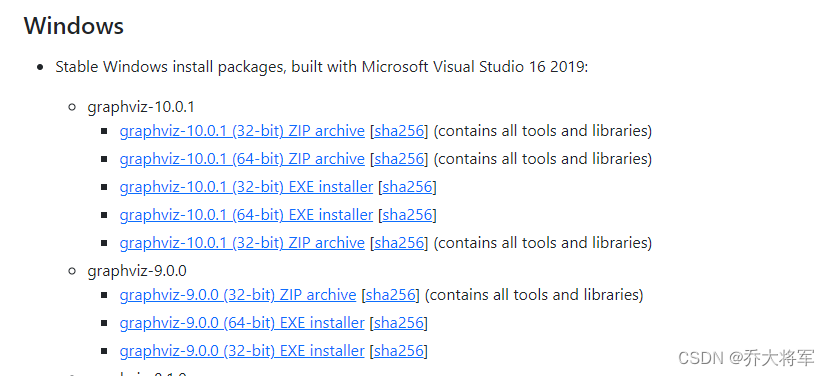
下载安装包:https://graphviz.gitlab.io/_pages/Download/Download_windows.html
 选择一款安装,注意安装时要配置环境变量
注意这里使用的是鸢尾花数据集,选择花瓣长和宽两个特征
#2.建立树模型
from sklearn.datasets import load_iris
from sklearn.tree import DecisionTreeClassifier
iris = load_iris()
X = iris.data[:,2:] # petal legth and width
y = iris.target
tree_clf = DecisionTreeClassifier(max_depth=2)
tree_clf.fit(X,y)
#3.树模型的可视化展示
from sklearn.tree import export_graphviz
export_graphviz(
tree_clf,
out_file='iris_tree.dot',
feature_names=iris.feature_names[2:],
class_names=iris.target_names,
rounded=True,
filled=True
)然后就可以使用graphviz包中的dot.命令工具将此文件转换为各种格式的如pdf,png,如 dot -Tpng iris_tree.png -o iris_tree.png
可以去文件系统查看,也可以用python展示
from IPython.display import Image
Image(filename='iris_tree.png',width=400,height=400)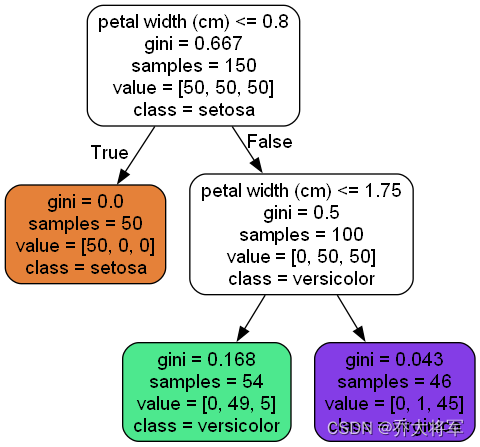
分析:value表示每个节点所有样本中各个类别的样本数,用花瓣宽<=0.8和<=1.75 作为根节点划分,叶子节点表示分类结果,结果执行少数服从多数策略,gini指数随着分类进行在减小。
2.3 概率估计
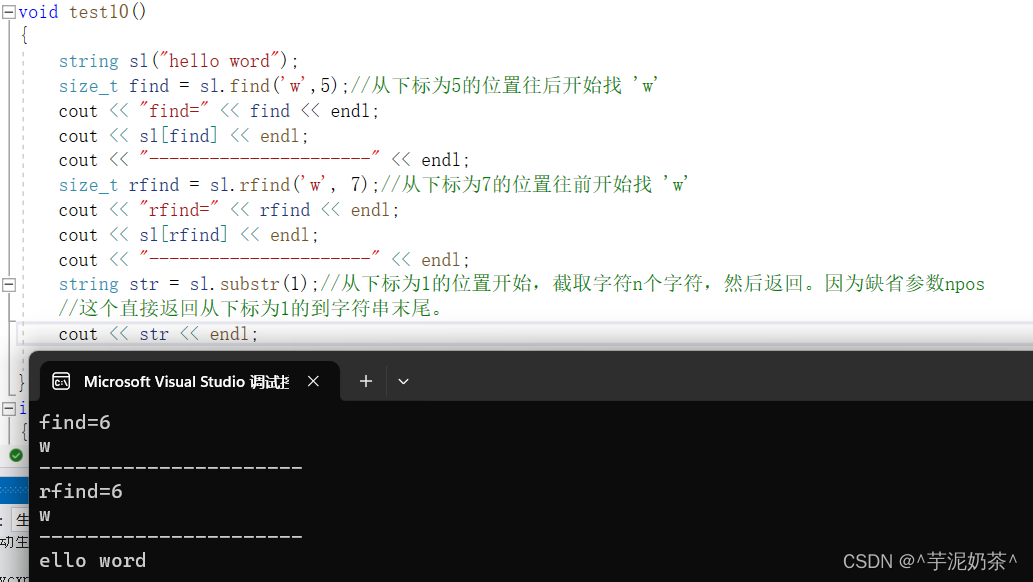
估计类概率 输入数据为:花瓣长5厘米,宽1.5厘米的花。相应节点是深度为2的左节点,因此决策树因输出以下概率:
iris-Setosa为0%(0/54)
iris-Versicolor为90.7%(49/54)
iris-Virginica为9.3%(5/54)
#4.概率估计
print(tree_clf.predict_proba([[5,1.5]]))
print(tree_clf.predict([[5,1.5]]))![]()
![]()
2.4 绘制决策边界
#5.绘制决策边界
from matplotlib.colors import ListedColormap

def plot_decision_boundary(clf,X,y,axes=[0,7.5,0,3],iris=True,legend=False,plot_training=True):
    #找两个特征 x1 x2
    x1s = np.linspace(axes[0],axes[1],100)
    x2s = np.linspace(axes[2],axes[3],100)
    #构建棋盘
    x1,x2 = np.meshgrid(x1s,x2s)
    #在棋盘中构建待测试数据
    X_new = np.c_[x1.ravel(),x2.ravel()]
    #将预测值算出来
    y_pred = clf.predict(X_new).reshape(x1.shape)
    #选择颜色
    custom_cmap = ListedColormap(['#fafab0','#9898ff','#a0faa0'])
    #绘制并填充不同的区域
    plt.contourf(x1,x2,y_pred,alpha=0.3,cmap=custom_cmap)

    if not iris:
        custom_cmap2 = ListedColormap(['#7d7d58','#4c4c7f','#507d50'])
        plt.contourf(x1,x2,y_pred,alpha=0.8,cmap=custom_cmap2)

    #可以把训练数据展示出来
    if plot_training:
        plt.plot(X[:,0][y==0],X[:,1][y==0],'yo',label='Iris-Setosa')
        plt.plot(X[:,0][y==1],X[:,1][y==1],'bs',label='Iris-Versicolor')
        plt.plot(X[:,0][y==2],X[:,1][y==2],'g^',label='Iris-Virginica')
    if iris:
        plt.xlabel('Petal length',fontsize = 14)
        plt.ylabel('Petal width',fontsize = 14)

    else:
        plt.xlabel(r'$x_1$',fontsize=18)
        plt.ylabel(r'$x_2$',fontsize=18)
    if legend:
        plt.legend(loc='lower right',fontsize=14)

plt.figure(figsize=(8,4))
plot_decision_boundary(tree_clf,X,y)
plt.plot([2.45,2.45],[0,3],'k-',linewidth=2)
plt.plot([2.45,7.5],[1.75,1.75],'k--',linewidth=2)
plt.plot([4.95,4.95],[0,1.75],'k:',linewidth=2)
plt.plot([4.85,4.85],[1.75,3],'k:',linewidth=2)
plt.text(1.40,1.0,'Depth=0',fontsize=15)
plt.text(3.2,1.80,'Depth=1',fontsize=13)
plt.text(4.05,0.5,'(Depth=2)',fontsize=11)
plt.title('Decision Tree decision boundareies')

plt.show()
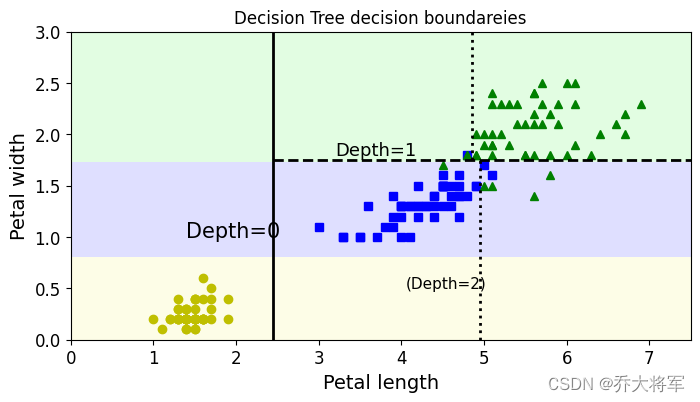
可以看出三种不同颜色的代表分类结果,Depth=0可看作第一刀切分,Depth=1,2 看作第二刀,三刀,把数据集切分。
2.5 决策树的正则化(剪枝)
决策树的正则化
DecisionTreeClassifier类还具有一些其他的参数类似地限制了决策树的形状
min-samples_split(节点在分割之前必须具有的样本数)
min-samples_leaf(叶子节点必须具有的最小样本数)
max-leaf_nodes(叶子节点的最大数量)
max_features(在每个节点处评估用于拆分的最大特征数)
max_depth(树的最大深度)
#6.决策树正则化
from sklearn.datasets import make_moons
X,y = make_moons(n_samples=100,noise=0.25,random_state=53)
plt.plot(X[:,0],X[:,1],"b.")
tree_clf1 = DecisionTreeClassifier(random_state=42)
tree_clf2 = DecisionTreeClassifier(random_state=42,min_samples_leaf=4)
tree_clf1.fit(X,y)
tree_clf2.fit(X,y)
plt.figure(figsize=(12,4))
plt.subplot(121)
plot_decision_boundary(tree_clf1,X,y,axes=[-1.5,2.5,-1,1.5],iris=False)
plt.title('no restriction')
plt.subplot(122)
plot_decision_boundary(tree_clf2,X,y,axes=[-1.5,2.5,-1,1.5],iris=False)
plt.title('min_samples_leaf={}'.format(tree_clf2.min_samples_leaf))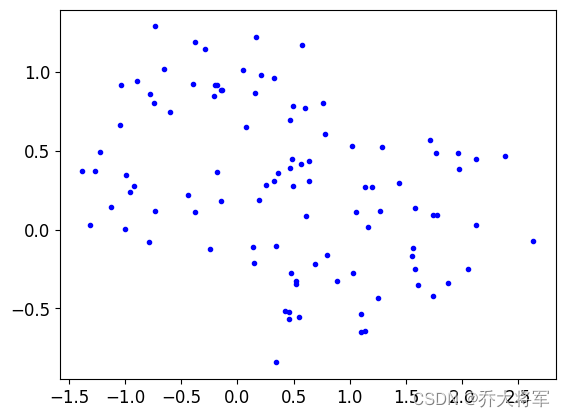

可以看出在没有加限制条件之前,分类器要考虑每个点,模型变得复杂,容易过拟合。其他的一些参数读者可以自行尝试。
2.6 对数据敏感
决策树对于数据是很敏感的
#6.对数据敏感
np.random.seed(6)
Xs = np.random.rand(100,2) - 0.5
ys = (Xs[:,0] > 0).astype(np.float32) * 2

angle = np.pi /4
rotation_matrix = np.array([[np.cos(angle),-np.sin(angle)],[np.sin(angle),np.cos(angle)]])
Xsr = Xs.dot(rotation_matrix)

tree_clf_s = DecisionTreeClassifier(random_state=42)
tree_clf_sr = DecisionTreeClassifier(random_state=42)
tree_clf_s.fit(Xs,ys)
tree_clf_sr.fit(Xsr,ys)

plt.figure(figsize=(11,4))
plt.subplot(121)
plot_decision_boundary(tree_clf_s,Xs,ys,axes=[-0.7,0.7,-0.7,0.7],iris=False)
plt.title('Sensitivity to training set rotation')

plt.subplot(122)
plot_decision_boundary(tree_clf_sr,Xsr,ys,axes=[-0.7,0.7,-0.7,0.7],iris=False)
plt.title('Sensitivity to training set rotation')

plt.show()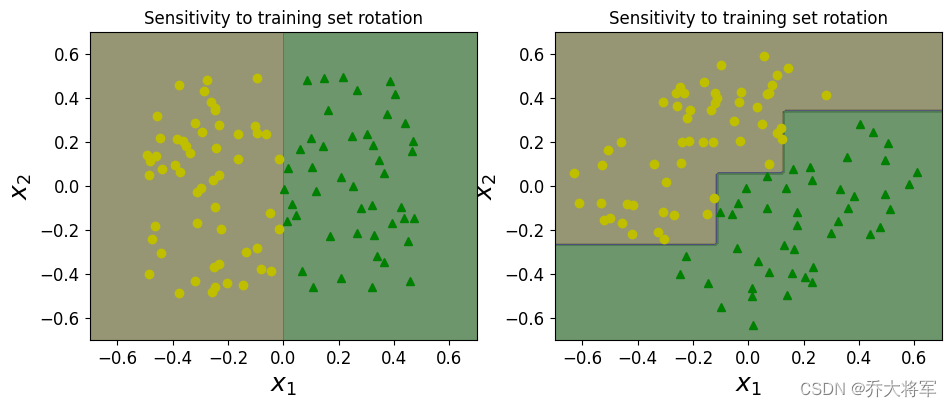
这里是把数据又旋转了45度,然而决策边界并没有也旋转45度,却是变复杂了。可以看出,对于复杂的数据,决策树是很敏感的。
2.7 回归任务
#7.回归任务
np.random.seed(42)
m = 200
X = np.random.rand(m,1)
y = 4 * (X-0.5)**2
y = y + np.random.randn(m,1) /10
plt.plot(X,y,'b.')
from sklearn.tree import DecisionTreeRegressor
tree_reg = DecisionTreeRegressor(max_depth=2)
tree_reg.fit(X,y)
from sklearn.tree import export_graphviz
export_graphviz(
    tree_reg,
    out_file='regression_tree.dot',
    feature_names=['X1'],
    rounded=True,
    filled=True
)
from IPython.display import Image
Image(filename='regression_tree.png',width=400,height=400)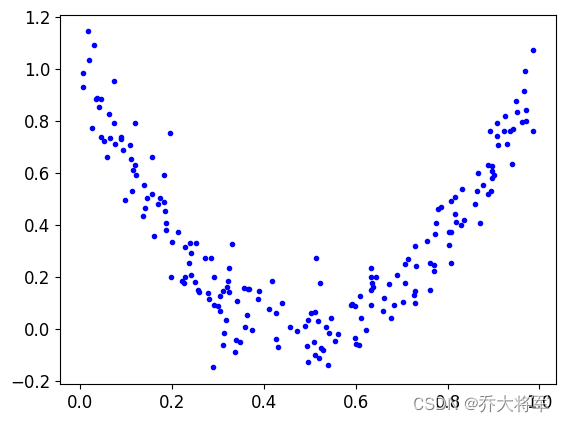

回归任务,这里的衡量标准就变成了均方误差。
2.8 对比树的深度对结果的影响
#8.对比树的深度对结果的影响
from sklearn.tree import DecisionTreeRegressor
tree_reg1 = DecisionTreeRegressor(random_state=42,max_depth=2)
tree_reg2 = DecisionTreeRegressor(random_state=42,max_depth=3)
tree_reg1.fit(X,y)
tree_reg2.fit(X,y)

def plot_regression_predictions(tree_reg,X,y,axes=[0,1,-0.2,1],ylabel='$y$'):
    x1 = np.linspace(axes[0],axes[1],500).reshape(-1,1)
    y_pred = tree_reg.predict(x1)
    plt.axis(axes)
    plt.xlabel('$X_1$',fontsize =18)
    if ylabel:
        plt.ylabel(ylabel,fontsize = 18,rotation=0)
    plt.plot(X,y,'b.')
    plt.plot(x1,y_pred,'r.-',linewidth=2,label=r'$\hat{y}$')


plt.figure(figsize=(11,4))
plt.subplot(121)

plot_regression_predictions(tree_reg1,X,y)
for split,style in ((0.1973,'k-'),(0.0917,'k--'),(0.7718,'k--')):
    plt.plot([split,split],[-0.2,1],style,linewidth = 2)
plt.text(0.21,0.65,'Depth=0',fontsize= 15)
plt.text(0.01,0.2,'Depth=1',fontsize= 13)
plt.text(0.65,0.8,'Depth=0',fontsize= 13)
plt.legend(loc='upper center',fontsize = 18)
plt.title('max_depth=2',fontsize=14)
plt.subplot(122)
plot_regression_predictions(tree_reg2,X,y)
for split,style in ((0.1973,'k-'),(0.0917,'k--'),(0.7718,'k--')):
    plt.plot([split,split],[-0.2,1],style,linewidth = 2)
for split in (0.0458,0.1298,0.2873,0.9040):
    plt.plot([split,split],[-0.2,1],linewidth = 1)
plt.text(0.3,0.5,'Depth=2',fontsize= 13)
plt.title('max_depth=3',fontsize=14)

plt.show()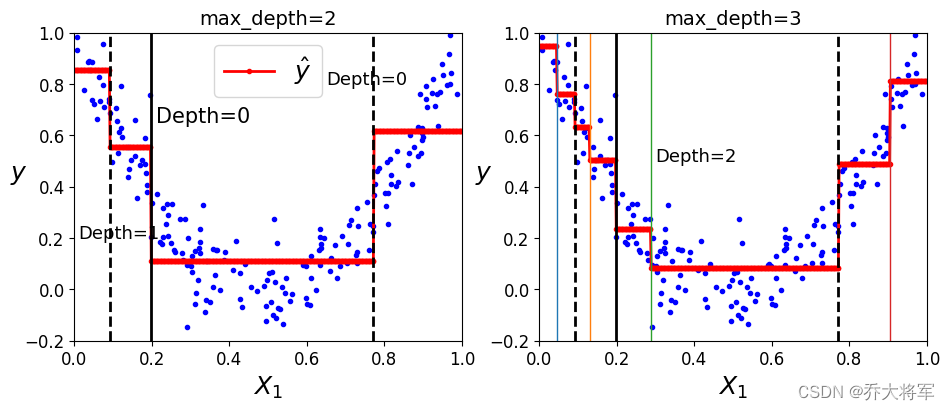
不同的树的深度,对于结果产生极大的影响
2.9 剪枝
#9.加一些限制
tree_reg1 = DecisionTreeRegressor(random_state=42)
tree_reg2 = DecisionTreeRegressor(random_state=42,min_samples_leaf=10)
tree_reg1.fit(X,y)
tree_reg2.fit(X,y)

x1 = np.linspace(0,1,500).reshape(-1,1)
y_pred1 = tree_reg1.predict(x1)
y_pred2 = tree_reg2.predict(x1)

plt.figure(figsize=(11,4))

plt.subplot(121)
plt.plot(X,y,'b.')
plt.plot(x1,y_pred1,'r.-',linewidth=2,label=r'$\hat{y}$')
plt.axis([0,1,-0.2,1.1])
plt.xlabel('$x_1$',fontsize=18)
plt.ylabel('$y$',fontsize=18,rotation=0)
plt.legend(loc='upper center',fontsize =18)
plt.title('No restrctions',fontsize =14)

plt.subplot(122)
plt.plot(X,y,'b.')
plt.plot(x1,y_pred2,'r.-',linewidth=2,label=r'$\hat{y}$')
plt.axis([0,1,-0.2,1.1])
plt.xlabel('$x_1$',fontsize=18)
plt.ylabel('$y$',fontsize=18,rotation=0)
plt.legend(loc='upper center',fontsize =18)
plt.title('min_samples_leaf={}'.format(tree_reg2.min_samples_leaf),fontsize =14)

plt.show()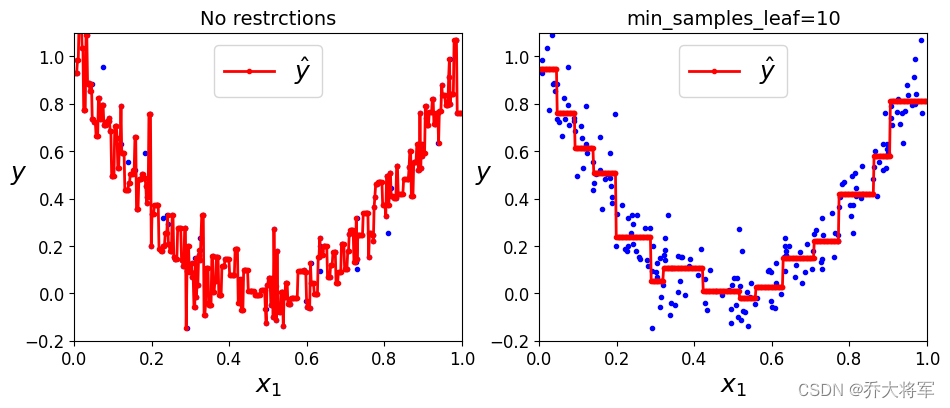
一目了然。
![XSS漏洞--概念、类型、实战--分析与详解[结合靶场pikachu]](https://img-blog.csdnimg.cn/direct/27d9ed9fb00641fab2e1722f4414a685.png)