四,驱动的注册
1,struct device_driver结构体
/**
* struct device_driver - The basic device driver structure
* @name:    Name of the device driver.
* @bus:    The bus which the device of this driver belongs to.
* @owner:    The module owner.
* @mod_name:    Used for built-in modules.
* @suppress_bind_attrs: Disables bind/unbind via sysfs.
* @probe_type:    Type of the probe (synchronous or asynchronous) to use.
* @of_match_table: The open firmware table.
* @acpi_match_table: The ACPI match table.
* @probe:    Called to query the existence of a specific device,
*        whether this driver can work with it, and bind the driver
*        to a specific device.
* @sync_state:    Called to sync device state to software state after all the
*        state tracking consumers linked to this device (present at
*        the time of late_initcall) have successfully bound to a
*        driver. If the device has no consumers, this function will
*        be called at late_initcall_sync level. If the device has
*        consumers that are never bound to a driver, this function
*        will never get called until they do.
* @remove:    Called when the device is removed from the system to
*        unbind a device from this driver.
* @shutdown:    Called at shut-down time to quiesce the device.
* @suspend:    Called to put the device to sleep mode. Usually to a
*        low power state.
* @resume:    Called to bring a device from sleep mode.
* @groups:    Default attributes that get created by the driver core
*        automatically.
* @dev_groups:    Additional attributes attached to device instance once the
*        it is bound to the driver.
* @pm:        Power management operations of the device which matched
*        this driver.
* @coredump:    Called when sysfs entry is written to. The device driver
*        is expected to call the dev_coredump API resulting in a
*        uevent.
* @p:        Driver core's private data, no one other than the driver
*        core can touch this.
*
* The device driver-model tracks all of the drivers known to the system.
* The main reason for this tracking is to enable the driver core to match
* up drivers with new devices. Once drivers are known objects within the
* system, however, a number of other things become possible. Device drivers
* can export information and configuration variables that are independent
* of any specific device.
*/
struct device_driver {
    const char        *name; //该driver的名称
    struct bus_type        *bus; //该driver所驱动设备的总线

    struct module        *owner;
    const char        *mod_name;    /* used for built-in modules */

    bool suppress_bind_attrs;    /* disables bind/unbind via sysfs */ /* 在kernel中,bind/unbind是从用户空间手动的为driver绑定/解绑定指定的设备的机制 */
    enum probe_type probe_type;

    const struct of_device_id    *of_match_table;
    const struct acpi_device_id    *acpi_match_table;

    int (*probe) (struct device *dev); /* probe、remove,这两个接口函数用于实现driver逻辑的开始和结束。Driver是一段软件code,因此会有开始和结束两个代码逻辑,就像PC程序,会有一个main函数,main函数的开始就是开始,return的地方就是结束。而内核driver却有其特殊性:在设备模型的结构下,只有driver和device同时存在时,才需要开始执行driver的代码逻辑。这也是probe和remove两个接口名称的由来:检测到了设备和移除了设备(就是为热拔插起的!) */
    void (*sync_state)(struct device *dev);
    int (*remove) (struct device *dev);
    void (*shutdown) (struct device *dev); //电源管理相关
    int (*suspend) (struct device *dev, pm_message_t state);
    int (*resume) (struct device *dev);
    const struct attribute_group **groups; /* 默认的attribute,在driver注册到内核时,内核设备模型部分的代码(driver/base/driver.c)会自动将这些attribute添加到sysfs中 */
    const struct attribute_group **dev_groups;

    const struct dev_pm_ops *pm;
    void (*coredump) (struct device *dev);

    struct driver_private *p; //driver core的私有数据指针,其它模块不能访问

    ANDROID_KABI_RESERVE(1);
    ANDROID_KABI_RESERVE(2);
    ANDROID_KABI_RESERVE(3);
    ANDROID_KABI_RESERVE(4);
};
driver的私有数据driver_private:
struct driver_private {
struct kobject kobj; //该数据结构对应的struct kobject,代表自身
struct klist klist_devices; //该driver驱动的所有设备的链表
struct klist_node knode_bus; //用来挂接到bus的driver list
struct module_kobject *mkobj;
struct device_driver *driver; //回指到本结构体
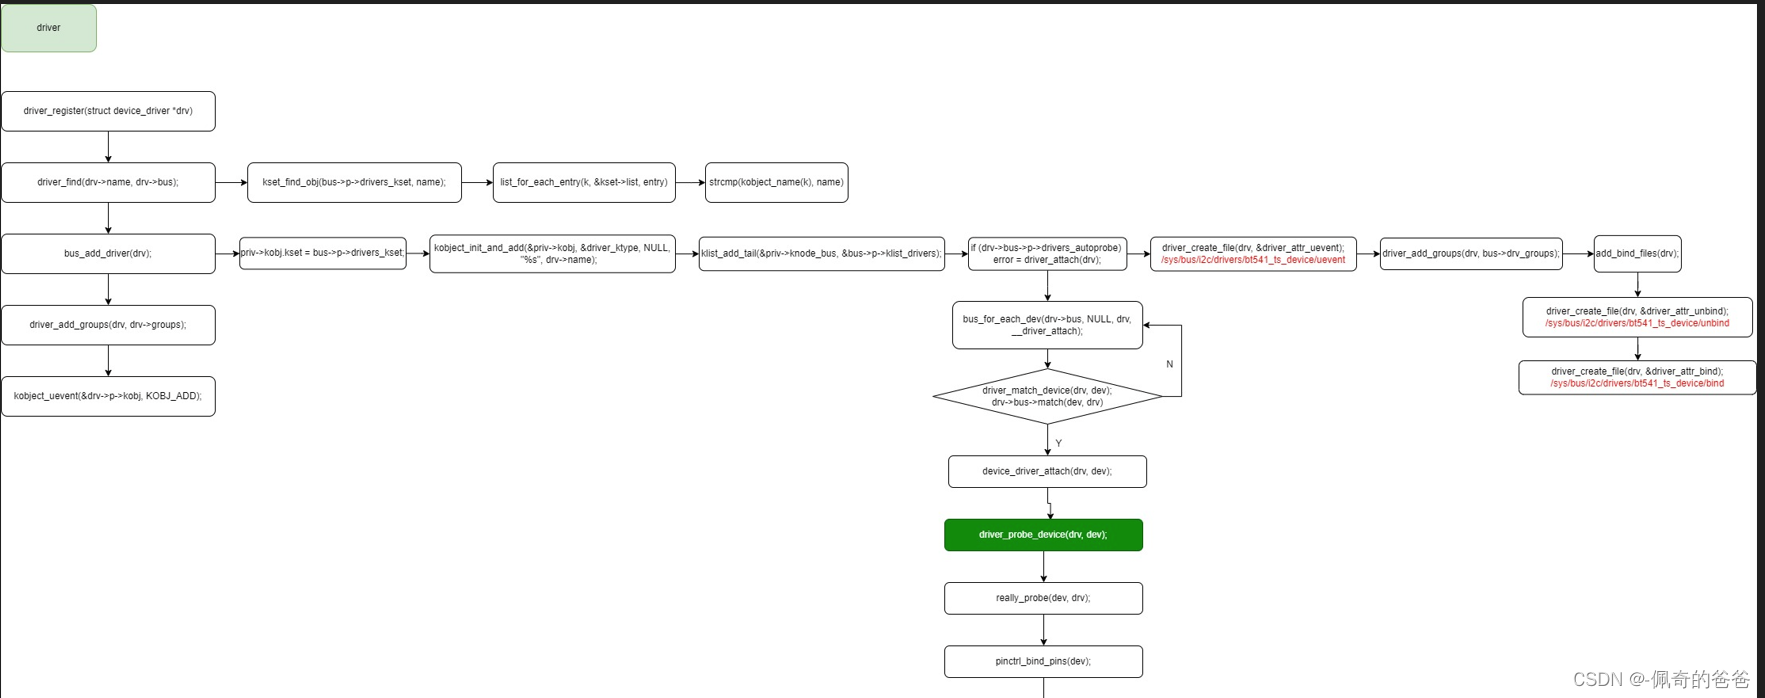
};2,driver_register()流程
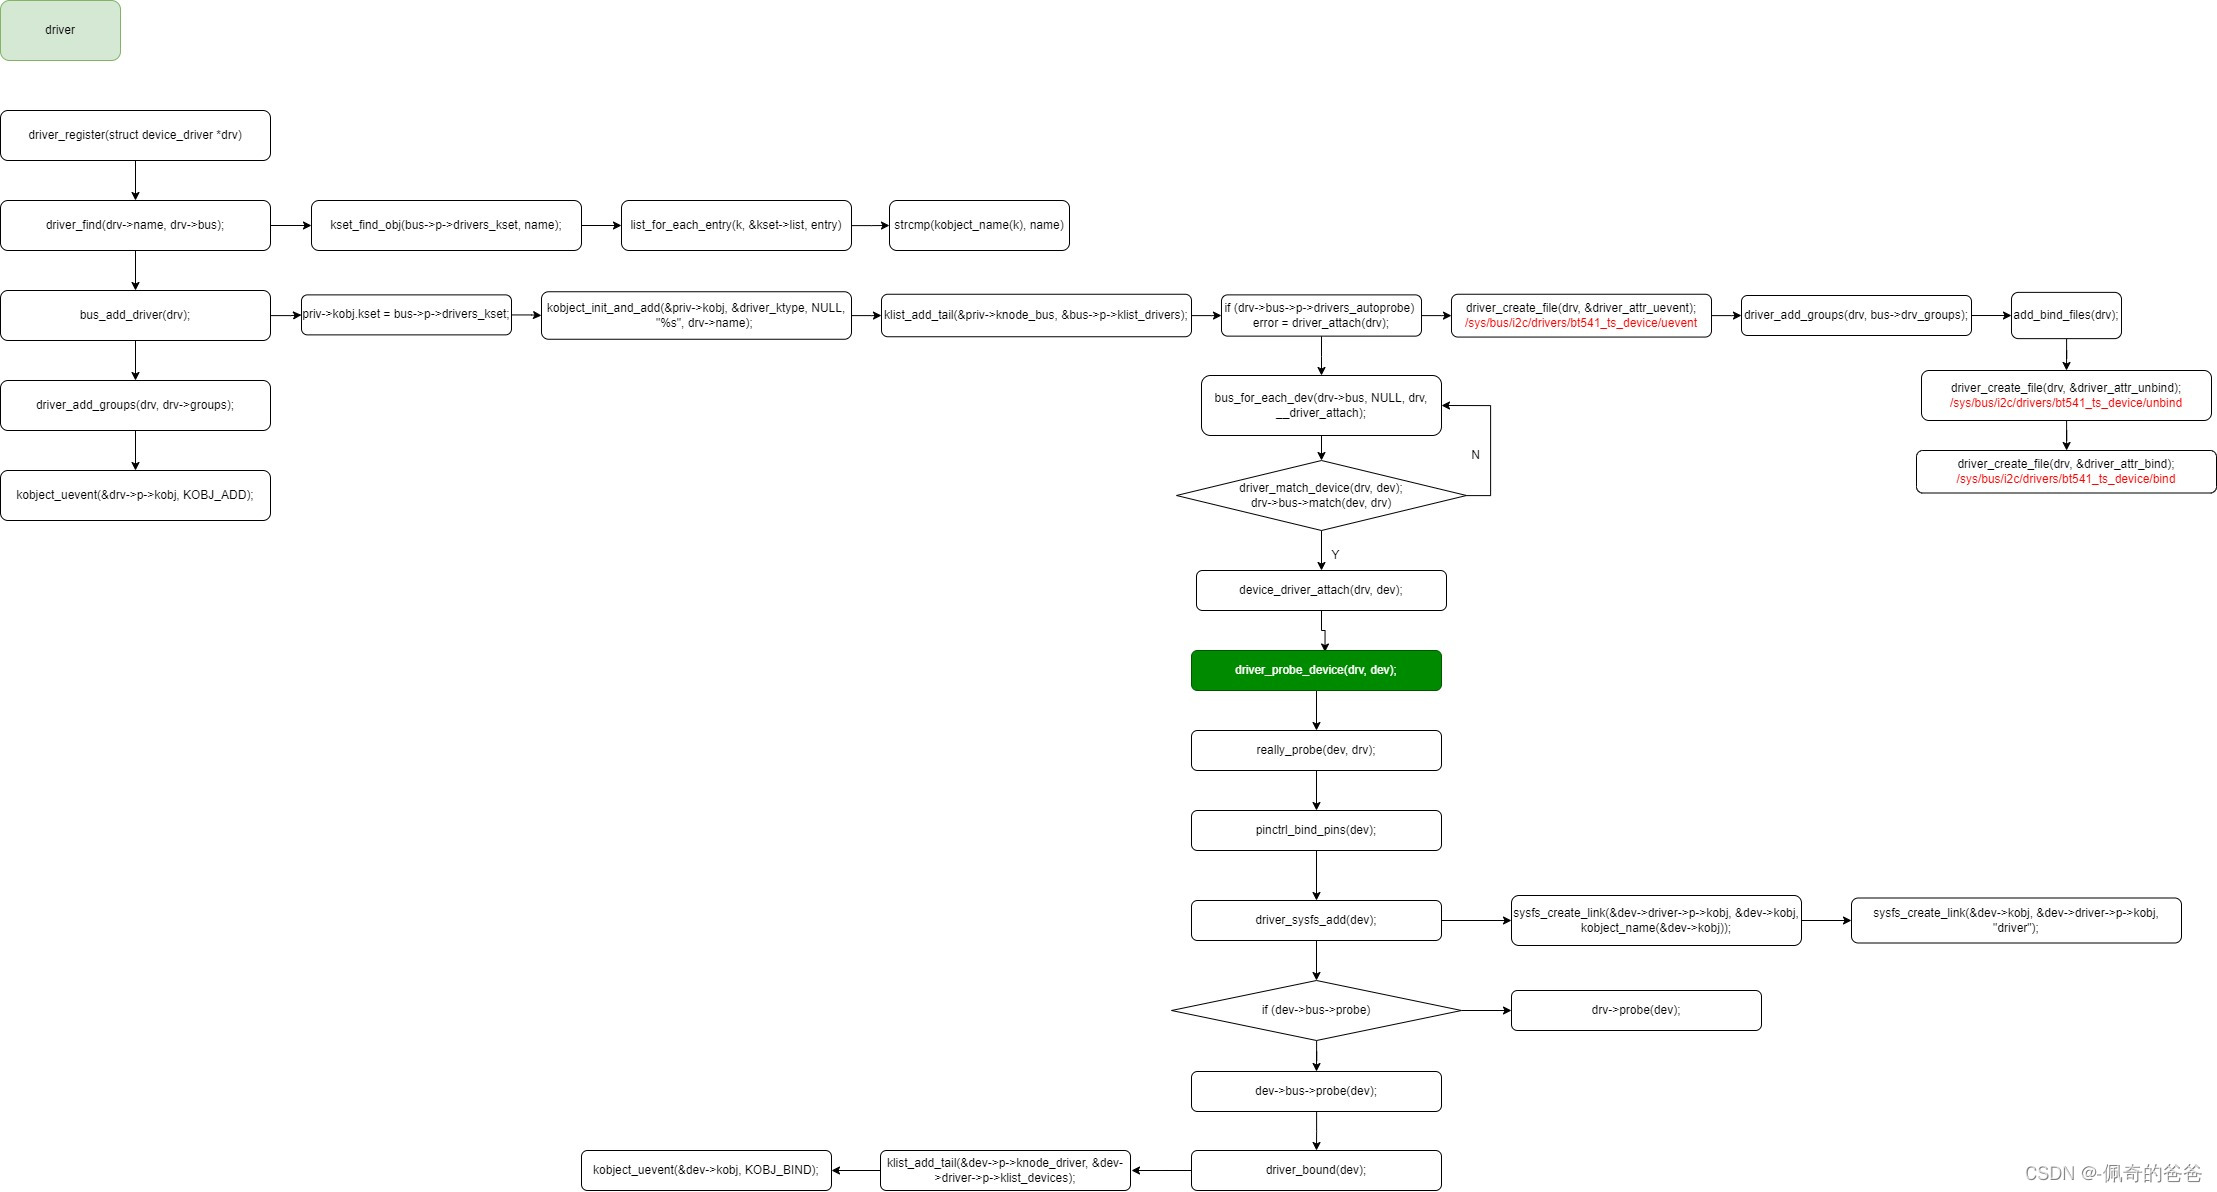
清晰分解图:
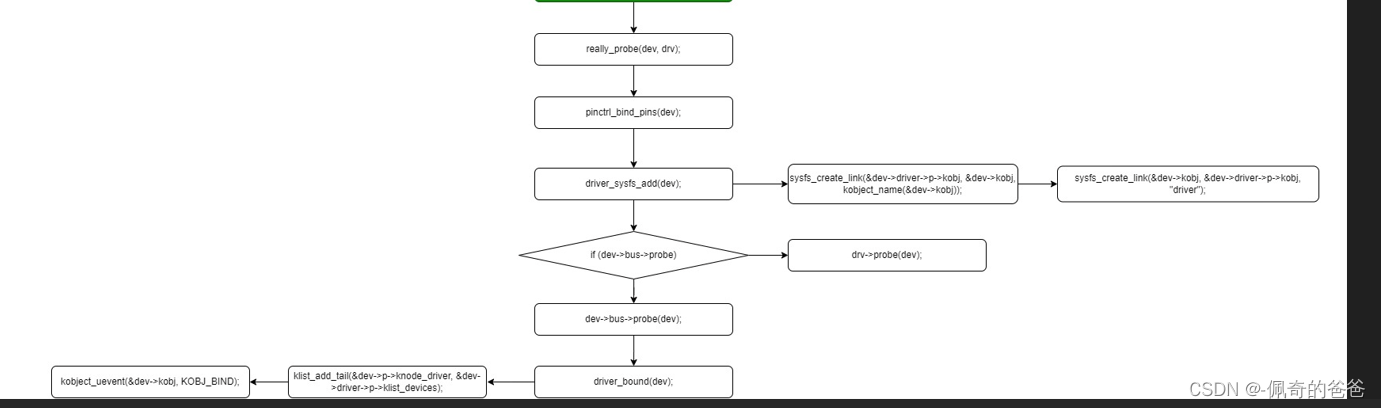
3,关键代码流程分析
/* driver_register */
int driver_register(struct device_driver *drv)
{
    int ret;
    struct device_driver *other;

    if (!drv->bus->p) {
        pr_err("Driver '%s' was unable to register with bus_type '%s' because the bus was not initialized.\n",
               drv->name, drv->bus->name);
        return -EINVAL; //如果bus未被初始化退出注册driver
    }

    if ((drv->bus->probe && drv->probe) ||
        (drv->bus->remove && drv->remove) ||
        (drv->bus->shutdown && drv->shutdown)) //driver和bus的同名操作函数如果同时存在,会出现警告,并且会优先选用bus的
        pr_warn("Driver '%s' needs updating - please use "
            "bus_type methods\n", drv->name);

    other = driver_find(drv->name, drv->bus); //进入bus的driver链表,确认该driver是否已经注册
    if (other) {
        pr_err("Error: Driver '%s' is already registered, "
            "aborting...\n", drv->name); //该driver已经被注册,退出
        return -EBUSY;
    }

    ret = bus_add_driver(drv); //如果没有被注册,就把该driver加入所在bus
    if (ret)
        return ret;
    ret = driver_add_groups(drv, drv->groups); //创建attribute文件
    if (ret) {
        bus_remove_driver(drv);
        return ret;
    }
    kobject_uevent(&drv->p->kobj, KOBJ_ADD); //该driver已被成功注册,发出KOBJ_ADD uevent

    return ret;
}
/* driver_find */
struct device_driver *driver_find(const char *name, struct bus_type *bus)
{
    struct kobject *k = kset_find_obj(bus->p->drivers_kset, name); /* bus->p->drivers_kset代表bus下的driver目录,此处会遍历kset->list,该list中包含了所有的挂接到该bus上的driver的kobject,然后通过比较driver内嵌的kobj名字,就是通过kset与kobj之间的关系来查找 */
    struct driver_private *priv;

    if (k) {
        /* Drop reference added by kset_find_obj() */
        kobject_put(k); //减少kobject的引用计数
        priv = to_driver(k);
        return priv->driver; //如果找到同名的kobj就返回该driver
    }
    return NULL;
}
/* kset_find_obj */
struct kobject *kset_find_obj(struct kset *kset, const char *name)
{
    struct kobject *k;
    struct kobject *ret = NULL;

    spin_lock(&kset->list_lock);

    list_for_each_entry(k, &kset->list, entry) { //遍历kset->list链表,取出其中的每一个kobj
        if (kobject_name(k) && !strcmp(kobject_name(k), name)) { //比较取出的kobj的名字跟指定的kobj的名字是否一致
            ret = kobject_get_unless_zero(k); //找到匹配的kobj把该driver的kobj引用计数+1并返回
            break;
        }
    }

    spin_unlock(&kset->list_lock);
    return ret;
}
/* bus_add_driver */
int bus_add_driver(struct device_driver *drv)
{
    struct bus_type *bus;
    struct driver_private *priv;
    int error = 0;

    bus = bus_get(drv->bus); //取得其所在bus的指针
    if (!bus)
        return -EINVAL;

    pr_debug("bus: '%s': add driver %s\n", bus->name, drv->name);

    priv = kzalloc(sizeof(*priv), GFP_KERNEL); //开始初始化这个driver的私有成员
    if (!priv) {
        error = -ENOMEM;
        goto out_put_bus;
    }
    klist_init(&priv->klist_devices, NULL, NULL);
    priv->driver = drv; //回指到本结构体
    drv->p = priv; //给driver的私有数据赋值
    priv->kobj.kset = bus->p->drivers_kset; //本driver的kobject属于bus的drivers_kset
    error = kobject_init_and_add(&priv->kobj, &driver_ktype, NULL,
                     "%s", drv->name); //初始化driver的kobject并在sysfs中创建目录结构
    if (error)
        goto out_unregister;

    klist_add_tail(&priv->knode_bus, &bus->p->klist_drivers); //将该driver挂接在bus的drivers list
    if (drv->bus->p->drivers_autoprobe) {
        error = driver_attach(drv); //如果device与driver自动probe的flag为真,那么到bus的devices上去匹配设备
        if (error)
            goto out_del_list;
    }
    module_add_driver(drv->owner, drv);

    error = driver_create_file(drv, &driver_attr_uevent); //创建uevent attribute, /sys/bus/platform/drivers/gpio-keys/uevent
    if (error) {
        printk(KERN_ERR "%s: uevent attr (%s) failed\n",
            __func__, drv->name);
    }
    error = driver_add_groups(drv, bus->drv_groups); //创建默认的drv_groups attributes
    if (error) {
        /* How the hell do we get out of this pickle? Give up */
        printk(KERN_ERR "%s: driver_create_groups(%s) failed\n",
            __func__, drv->name);
    }

    if (!drv->suppress_bind_attrs) {
        error = add_bind_files(drv); /* 创建手动device与driver的bind/unbind的文件节点, /sys/bus/platform/drivers/gpio-keys/bind, /sys/bus/platform/drivers/gpio-keys/unbind */
        if (error) {
            /* Ditto */
            printk(KERN_ERR "%s: add_bind_files(%s) failed\n",
                __func__, drv->name);
        }
    }

    return 0;

out_del_list:
    klist_del(&priv->knode_bus);
out_unregister:
    kobject_put(&priv->kobj);
    /* drv->p is freed in driver_release()  */
    drv->p = NULL;
out_put_bus:
    bus_put(bus);
    return error;
}
/* driver_attach */
int driver_attach(struct device_driver *drv)
{
    return bus_for_each_dev(drv->bus, NULL, drv, __driver_attach); /* 遍历bus的设备链表找到合适的设备就调用__driver_attach,NULL表示从头开始遍历 */
}
/* bus_for_each_dev */
int bus_for_each_dev(struct bus_type *bus, struct device *start,
             void *data, int (*fn)(struct device *, void *))
{
    struct klist_iter i;
    struct device *dev;
    int error = 0;

    if (!bus || !bus->p)
        return -EINVAL;

    klist_iter_init_node(&bus->p->klist_devices, &i,
                 (start ? &start->p->knode_bus : NULL)); //进入bus的devices链表
    while (!error && (dev = next_device(&i))) //设备存在则调用fn即__driver_attach进行匹配
        error = fn(dev, data);
    klist_iter_exit(&i);
    return error;
}
/* __driver_attach */
static int __driver_attach(struct device *dev, void *data)
{
    struct device_driver *drv = data;
    bool async = false;
    int ret;

    /*
     * Lock device and try to bind to it. We drop the error
     * here and always return 0, because we need to keep trying
     * to bind to devices and some drivers will return an error
     * simply if it didn't support the device.
     *
     * driver_probe_device() will spit a warning if there
     * is an error.
     */

    ret = driver_match_device(drv, dev); /* bus的match存在就用bus的,否则就直接匹配成功,match通常实现为首先扫描driver支持的id设备表,如果为NULL就用名字进行匹配 */
    if (ret == 0) {
        /* no match */
        return 0;
    } else if (ret == -EPROBE_DEFER) {
        dev_dbg(dev, "Device match requests probe deferral\n");
        driver_deferred_probe_add(dev);
        /*
         * Driver could not match with device, but may match with
         * another device on the bus.
         */
        return 0;
    } else if (ret < 0) {
        dev_dbg(dev, "Bus failed to match device: %d\n", ret);
        return ret;
    } /* ret > 0 means positive match */

    if (driver_allows_async_probing(drv)) {
        /*
         * Instead of probing the device synchronously we will
         * probe it asynchronously to allow for more parallelism.
         *
         * We only take the device lock here in order to guarantee
         * that the dev->driver and async_driver fields are protected
         */
        dev_dbg(dev, "probing driver %s asynchronously\n", drv->name);
        device_lock(dev);
        if (!dev->driver) {
            get_device(dev);
            dev->p->async_driver = drv;
            async = true;
        }
        device_unlock(dev);
        if (async)
            async_schedule_dev(__driver_attach_async_helper, dev);
        return 0;
    }

    device_driver_attach(drv, dev); //匹配成功,将driver与device绑定

    return 0;
}
/* device_driver_attach */
int device_driver_attach(struct device_driver *drv, struct device *dev)
{
    int ret = 0;

    __device_driver_lock(dev, dev->parent);

    /*
     * If device has been removed or someone has already successfully
     * bound a driver before us just skip the driver probe call.
     */
    if (!dev->p->dead && !dev->driver)
        ret = driver_probe_device(drv, dev); //driver与device绑定操作跟之前device注册流程中的一致,后面不再分析

    __device_driver_unlock(dev, dev->parent);

    return ret;
}
总结一下,driver的注册,主要涉及将自身挂接到bus的driver链表,并将匹配到的设备加入自己的device链表,并且将匹配到的 device的driver成员初始化为该driver,私有属性的driver节点也挂到driver的设备链表下,其中匹配函数是利用利用bus的 match函数,该函数通常判断如果driver有id表,就查表匹配,如果没有就用driver和device名字匹配。bus的probe优先级始终高于driver的。另外注意一点driver是没有总的起始端点的,driver不是 可具体描述的事物。
五,class
1,class概述
在设备模型中,Bus、Device、Device driver等等,都比较好理解,因为它们对应了实实在在的东西,所有的逻辑都是围绕着这些实体展开的。而本文所要描述的Class就有些不同了,因为它是虚拟出来的,只是为了抽象设备的共性。
举个例子,一些年龄相仿、需要获取的知识相似的人,聚在一起学习,就构成了一个班级(Class)。这个班级可以有自己的名称(如295),但如果离开构成它的学生(device),它就没有任何存在意义。另外,班级存在的最大意义是什么呢?是由老师讲授的每一个课程!因为老师只需要讲一遍,一个班的学生都可以听到。不然的话(例如每个学生都在家学习),就要为每人请一个老师,讲授一遍。而讲的内容,大多是一样的,这就是极大的浪费。
设备模型中的Class所提供的功能也一样了,例如一些相似的device(学生),需要向用户空间提供相似的接口(课程),如果每个设备的驱动都实现一遍的话,就会导致内核有大量的冗余代码,这就是极大的浪费。所以,Class说了,我帮你们实现吧,你们会用就行了。
2,struct class结构体
msm_kernel\include\linux\device\class.h
/**
* struct class - device classes
* @name:    Name of the class.
* @owner:    The module owner.
* @class_groups: Default attributes of this class.
* @dev_groups:    Default attributes of the devices that belong to the class.
* @dev_kobj:    The kobject that represents this class and links it into the hierarchy.
* @dev_uevent:    Called when a device is added, removed from this class, or a
*        few other things that generate uevents to add the environment
*        variables.
* @devnode:    Callback to provide the devtmpfs.
* @class_release: Called to release this class.
* @dev_release: Called to release the device.
* @shutdown_pre: Called at shut-down time before driver shutdown.
* @ns_type:    Callbacks so sysfs can detemine namespaces.
* @namespace:    Namespace of the device belongs to this class.
* @get_ownership: Allows class to specify uid/gid of the sysfs directories
*        for the devices belonging to the class. Usually tied to
*        device's namespace.
* @pm:        The default device power management operations of this class.
* @p:        The private data of the driver core, no one other than the
*        driver core can touch this.
*
* A class is a higher-level view of a device that abstracts out low-level
* implementation details. Drivers may see a SCSI disk or an ATA disk, but,
* at the class level, they are all simply disks. Classes allow user space
* to work with devices based on what they do, rather than how they are
* connected or how they work.
*/
struct class {
    const char        *name; //class的名称,会在“/sys/class/”目录下体现
    struct module        *owner; //class所属的模块,虽然class是涉及一类设备,但也是由相应的模块注册的。比如usb类就是由usb模块注册的

    const struct attribute_group    **class_groups; /* 该class的默认attribute,会在class注册到内核时,自动在“/sys/class/xxx_class”下创建对应的attribute文件 */
    const struct attribute_group    **dev_groups; /* 该class下每个设备的attribute,会在设备注册到内核时,自动在该设备的sysfs目录下创建对应的attribute文件 */
    struct kobject            *dev_kobj; /* 表示该class下的设备在/sys/dev/下的目录,现在一般有char和block两个,如果dev_kobj为NULL,则默认选择char */

    int (*dev_uevent)(struct device *dev, struct kobj_uevent_env *env); /* 当该class下有设备发生变化时,会调用class的uevent回调函数 */
    char *(*devnode)(struct device *dev, umode_t *mode);

    void (*class_release)(struct class *class); //用于release自身的回调函数
    void (*dev_release)(struct device *dev); /* 用于release class内设备的回调函数。在device_release接口中,会依次检查Device、Device Type以及Device所在的class,是否注册release接口,如果有则调用相应的release接口release设备指针 */

    int (*shutdown_pre)(struct device *dev);

    const struct kobj_ns_type_operations *ns_type;
    const void *(*namespace)(struct device *dev);

    void (*get_ownership)(struct device *dev, kuid_t *uid, kgid_t *gid);

    const struct dev_pm_ops *pm;

    struct subsys_private *p; //私有数据,和struct bus_type中的subsys_private一致

    ANDROID_KABI_RESERVE(1);
    ANDROID_KABI_RESERVE(2);
    ANDROID_KABI_RESERVE(3);
    ANDROID_KABI_RESERVE(4);
};
struct class_interface:
struct class_interface是这样的一个结构:它允许class driver在class下有设备添加或移除的时候,调用预先设置好的回调函数(add_dev和remove_dev)。那调用它们做什么呢?想做什么都行(例如修改设备的名称),由具体的class driver实现。
该结构的定义如下:
struct class_interface {
struct list_head node;
struct class *class;
int (*add_dev) (struct device *, struct class_interface *);
void (*remove_dev) (struct device *, struct class_interface *);
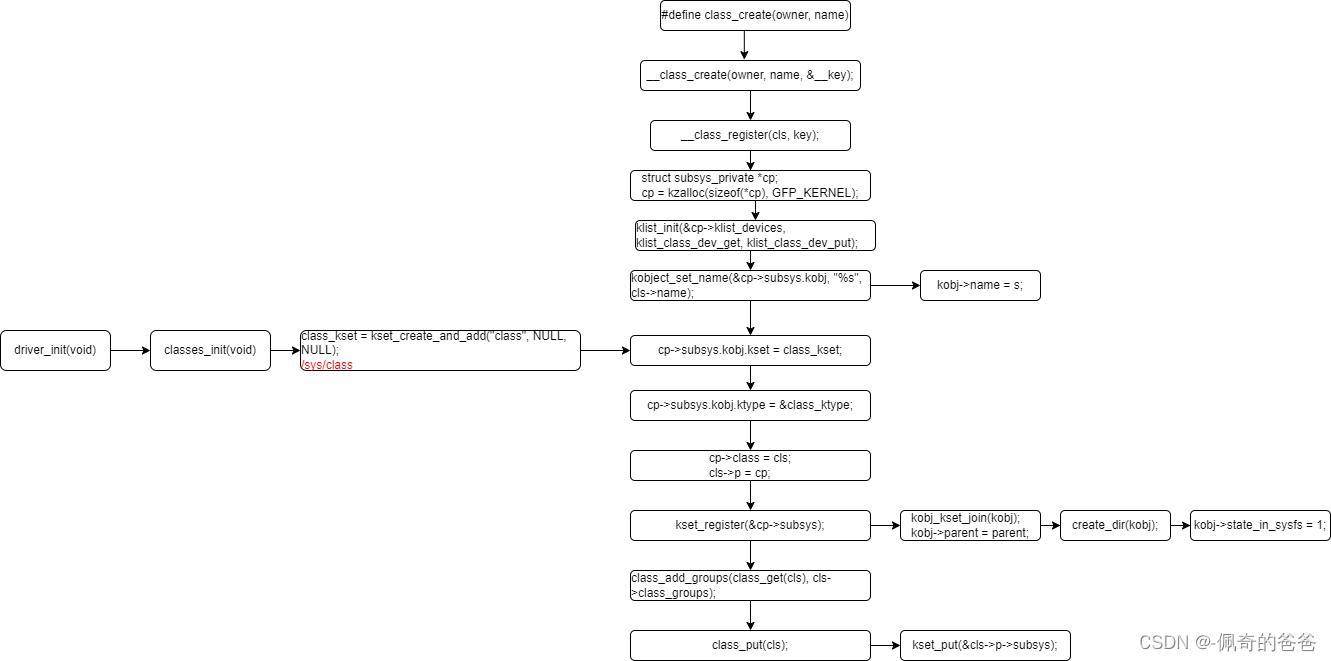
};3,class创建流程
4,device注册时,和class有关的动作
4.1 调用device_add_class_symlinks接口,创建device与class之间的各种符号链接
static int device_add_class_symlinks(struct device *dev)
{
    struct device_node *of_node = dev_of_node(dev);
    int error;

    if (of_node) {
        error = sysfs_create_link(&dev->kobj, of_node_kobj(of_node), "of_node");
        if (error)
            dev_warn(dev, "Error %d creating of_node link\n",error);
        /* An error here doesn't warrant bringing down the device */
    }

    if (!dev->class)
        return 0;

    error = sysfs_create_link(&dev->kobj,
                  &dev->class->p->subsys.kobj,
                  "subsystem"); /* 在该设备所在的sysfs目录创建到该设备所在的class目录的链接,链接名字为subsystem eg: /sys/devices/platform/soc/994000.qcom,qup_uart/tty/ttyMSM0/sussystem -> ../../../../../../class/tty ; /sys/devices/platform/soc/99c000.qcom,qup_uart/tty/ttyHS0/subsystem -> ../../../../../../class/tty */
    if (error)
        goto out_devnode;

    if (dev->parent && device_is_not_partition(dev)) {
        error = sysfs_create_link(&dev->kobj, &dev->parent->kobj,
                      "device");
        if (error)
            goto out_subsys;
    }

#ifdef CONFIG_BLOCK
    /* /sys/block has directories and does not need symlinks */
    if (sysfs_deprecated && dev->class == &block_class)
        return 0;
#endif

    /* link in the class directory pointing to the device */
    error = sysfs_create_link(&dev->class->p->subsys.kobj,
                  &dev->kobj, dev_name(dev)); /* 在该设备所在的class目录创建到该设备所在目录的链接,链接名字为设备的名字,eg: /sys/class/tty/ttyMSM0 -> ../../devices/platform/soc/994000.qcom,qup_uart/tty/ttyMSM0 ; /sys/class/tty/ttyHS0 -> ../../devices/platform/soc/99c000.qcom,qup_uart/tty/ttyHS0 */
    if (error)
        goto out_device;

    return 0;

out_device:
    sysfs_remove_link(&dev->kobj, "device");

out_subsys:
    sysfs_remove_link(&dev->kobj, "subsystem");
out_devnode:
    sysfs_remove_link(&dev->kobj, "of_node");
    return error;
}
4.2 调用device_add_attrs,添加由class指定的attributes(class->dev_attrs)
static int device_add_attrs(struct device *dev)
->
    struct class *class = dev->class;
        if (class) {
        error = device_add_groups(dev, class->dev_groups);
        if (error)
            return error;
    }
4.3 如果存在对应该class的add_dev回调函数,调用该回调函数
    struct class_interface *class_intf;

    if (dev->class) {
        mutex_lock(&dev->class->p->mutex);
        /* tie the class to the device */
        klist_add_tail(&dev->p->knode_class,
                   &dev->class->p->klist_devices);


        /* notify any interfaces that the device is here */
        list_for_each_entry(class_intf,
                    &dev->class->p->interfaces, node)
            if (class_intf->add_dev)
                class_intf->add_dev(dev, class_intf);
        mutex_unlock(&dev->class->p->mutex);
    }
5,应用示例
5.1 使用class_create()创建一个class,并在class中创建一个设备
struct class *sec_class;
struct device *factory_ts_dev;

sec_class = class_create(THIS_MODULE, "tsp");

factory_ts_dev = device_create(sec_class, NULL, 0, info, "tsp");
if (unlikely(!factory_ts_dev)) {
        dev_err(&info->client->dev, "Failed to create factory dev\n");
        ret = -ENODEV;
        goto err_create_device;
}

ret = sysfs_create_group(&factory_ts_dev->kobj, &ts_attr_group);
if (unlikely(ret)) {
    dev_err(&info->client->dev, "Failed to create ts sysfs group\n");
    goto err_create_sysfs;
}
5.2 使用device_register()在已存在的class目录创建一个设备
info->dev.class = sec_class;
info->dev.parent = &info->client->dev;
info->dev.release = bt541_registered_release;

dev_set_name(&info->dev, "tsp_%d", 1);
dev_set_drvdata(&info->dev, info);

ret = device_register(&info->dev);
if (ret) {
    dev_err(&info->client->dev,
        "%s: Failed to register device\n",
        __func__);
}

ret = device_create_bin_file(&info->dev, &attr_data);
if (ret < 0) {
    dev_err(&info->client->dev,
            "%s: Failed to create sysfs bin file\n",
            __func__);
}
show result info:
lynkco:/sys/class/tsp # ls -l //链接到实际的device
total 0
lrwxrwxrwx 1 root root 0 2023-09-11 15:00 tsp -> ../../devices/virtual/tsp/tsp
lrwxrwxrwx 1 root root 0 2023-09-11 15:00 tsp_1 -> ../../devices/platform/soc/984000.i2c/i2c-2/2-0020/tsp/tsp_1
lynkco:/sys/class/tsp/tsp # ls -l
total 0
-rw-rw-r-- 1 root root 4096 2023-09-11 15:40 bigobject_off
--w--w---- 1 vendor_tcmd system 4096 2023-09-11 13:09 cmd
-r--r----- 1 vendor_tcmd system 4096 2023-09-11 13:09 cmd_result
-r--r--r-- 1 root root 4096 2023-09-11 15:40 cmd_status
-rw-rw-r-- 1 root root 4096 2023-09-11 15:40 easy_wakeup_gesture
lrwxrwxrwx 1 root root 0 2023-09-11 15:40 input -> ../../../platform/soc/984000.i2c/i2c-2/2-0020/input/input12
drwxr-xr-x 2 root root 0 2023-09-11 15:40 power
-r--r----- 1 vendor_tcmd system 4096 2023-09-11 13:09 raw_data
-r--r----- 1 vendor_tcmd system 4096 2023-09-11 13:09 short_data
lrwxrwxrwx 1 root root 0 2023-09-11 15:40 subsystem -> ../../../../class/tsp
-rw-r--r-- 1 root root 4096 2023-09-11 15:40 uevent
lynkco:/sys/class/tsp/tsp_1 # ls -l
total 0
-rw-rw-r-- 1 root root 0 2023-09-11 15:40 data
lrwxrwxrwx 1 root root 0 2023-09-11 15:40 device -> ../../../2-0020
drwxr-xr-x 2 root root 0 2023-09-11 15:40 power
lrwxrwxrwx 1 root root 0 2023-09-11 15:40 subsystem -> ../../../../../../../../class/tsp
-rw-r--r-- 1 root root 4096 2023-09-11 15:40 uevent
六,通过实例来看bus/device/device_driver/class在sysfs中的关系
1,device,/sys/devices/platform/soc/soc:gpio_keys
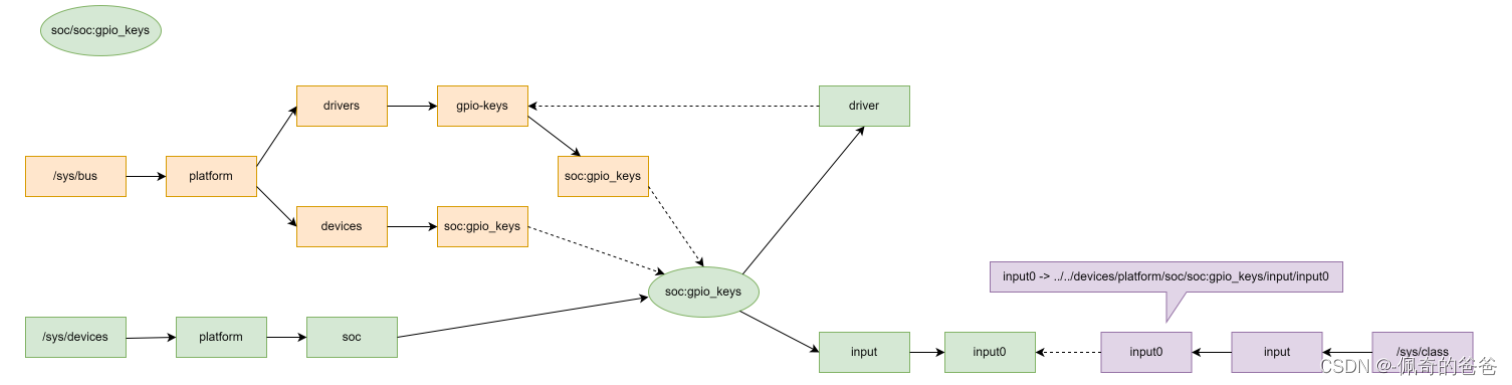
虚线表示软连接。
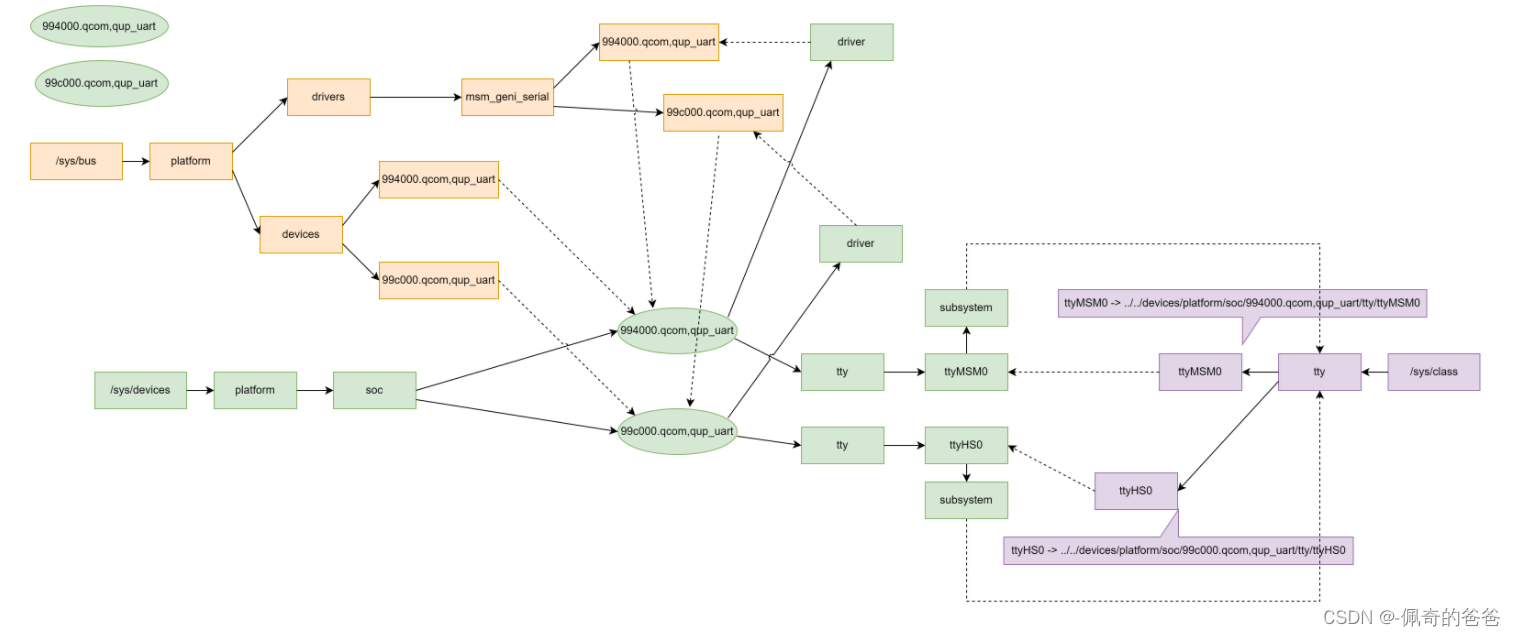
2,device,/sys/devices/platform/soc/994000.qcom,qup_uart
device,/sys/devices/platform/soc/99c000.qcom,qup_uart
参考链接:
Linux设备模型(5)_device和device driver
【Linux内核|驱动模型】bus/class/device/driver - 知乎
Linux的设备驱动模型 - 知乎
https://www.cnblogs.com/bcfx/articles/2915120.html