组件通讯
组件是一个独立的单元,默认情况下组件只能自己使用自己的数据。在组件化过程中,我们将一个完整的功能拆分成多个组件,便于更好的完成整个应用的功能。
Props
- 组件本来是封闭的,要接受外部数据应该可以通过Props来实现
- props的作用:接受传递给组件的数据
- 传递数据:给组件标签添加属性
- 接收数据:函数组件通过参数Props接收数据,类组件通过this.props接收数据
函数组件通讯
函数组件
若子组件是函数组件,父组件和子组件之间进行通信的时候,父函数使用属性传递参数,子函数使用函数方法接收props即可。
类组件接收
类组件接收,通过this.props进行访问
import React, {Component} from "react";
import ReactDom from 'react-dom'
import Demo from './Demo'
class App extends Component{
   render(){
       return(
       <div>
           <h1>我是APP组件</h1>
           <Demo car="litter yellow car" money={100}></Demo>
       </div>
   )}
}

ReactDom.render(<App />,document.getElementById('root'))
import {Component} from "react";

export default class Demo extends Component{
    render() {
        const {car,money} = this.props
        return (
            <div>
                <h1>我是Demo组件</h1>
                <p>{car}</p>
                <p>{money}</p>
            </div>
        )
    }
}
props特点
- 可以给组件传递任意类型的数据
- props是只读的,不允许修改props的数据,单项数据流
- 注意:在组件中使用的时候,需要把props传递给super(),否则构造函数无法获取到props
import React, {Component} from "react";
import ReactDom from 'react-dom'
import Demo from './Demo'
class App extends Component{
    state={
        money:100
    }
   render(){
       return(
       <div>
           <h1>我是APP组件</h1>
           <button onClick={this.buy}>购买物品</button>
           <Demo
            name="zs"
            money={this.state.money}
            flag={true}
            fn={()=>{
                console.log('fn函数')
            }}
            list={[1,2,3]}
            user={{name:'zs',age:1}}
           ></Demo>
       </div>
   )}
    buy = () => {
        this.setState(prevState => ({
            money: prevState.money - 10
        }));
    }

}

ReactDom.render(<App />,document.getElementById('root'))
// 函数组件
export default function Demo(props){
    console.log(props)
    return(
        <div>
            <h3>我是DEMO组件</h3>
            <div>金钱{props.money}</div>
        </div>
    )
}
单项数据流,只能由父亲修改子组件参数,子组件只能接收父亲传过来的值,但是子组件不能反向修改父亲的值。
Props特点
- 可以给组件传递任意类型的数据
- props是制度的,不允许修改props的数据,单向数据流
- 注意:在类组件中使用的时候,需要吧props传递给super(),否则构造函数无法访问到props
class Hello extends React.Component{
  constructor(props){
    super(props)
  }
  render(){
    return <div>接收到的数据:{
      this.props.age
    }</div>
  }
}
组件之间的三种通讯
父传子
- 副组件提供传递的state数据
- 给足子组件标签添加属性,值为state中的数据
- 子组件中通过props接受副组件中传递的数据
副组件提供数据并且传递给子组件
import React, {Component} from "react";
import ReactDom from 'react-dom'
import Demo from './Demo'
class App extends Component{
    state={
        lastName:''
    }
   render(){
       return(
       <div>
           <h1>我是APP组件</h1>
            <div>
                配偶:<input type="text" placeholder="请输入配偶的名字" onChange={this.handleChange}/>
            </div>
           <Demo name={this.state.lastName}></Demo>
       </div>
   )
    }
    handleChange = (event) => {
        this.setState({
            lastName: event.target.value,
        });
    };
}

ReactDom.render(<App />,document.getElementById('root'))
子组件
// 函数组件
export default function Demo(props){
    console.log(props)
    return(
        <div>
            <h3>我是DEMO组件</h3>
            <div>金钱{props.name}</div>
        </div>
    )
}
子传父
思路:利用回调函数,父组件提供回掉,子组件调用,将要传递的数据作为回调函数的参数。
- 副组件提供一个回调函数(用于接收数据)
- 将该函数作为属性的值,传递给子组件
- 子组件通过Props调用回调函数
- 将子组件函数作为参数传递给回调函数
父组件提供函数并且传递给字符串
import React, {Component} from "react";
import ReactDom from 'react-dom'
import Demo from './Demo'
class App extends Component{
    state={
        lastName:'',
        childen:''
    }
   render(){
       return(
       <div>
           <h1>我是APP组件</h1>
            <div>
                配偶:<input type="text" placeholder="请输入配偶的名字" onChange={this.handleChange}/>
            </div>
           <div>
               子组件传递数据:{this.state.childen}
           </div>
           <Demo name={this.state.lastName} changeName={this.changeName}></Demo>

       </div>
   )
    }
    handleChange = (event) => {
        this.setState({
            lastName: event.target.value,
        });
    };

    changeName = (name)=>{
        console.log('fater accept',name)
        this.setState({childen:name})
    }
}

ReactDom.render(<App />,document.getElementById('root'))
子组件代码
// 函数组件
import {Component} from "react";
export default class Demo extends Component{
    state = {
        wife:'',
    }
    render() {
        return(
            <div>
                <h3>我是DEMO组件</h3>
                <div>金钱{this.props.name}</div>
                <div>
                    配偶的名字:<input type="text" value={this.state.wifi} onChange={this.handleChange}/>
                </div>
            </div>
        )
    }
    handleChange = (e)=>{
        this.setState({wife:e.target.value})
        // 传递给父组件
        this.props.changeName(e.target.value)
    }
}
// export default function Demo(props){
//
//     console.log(props)
//     return(
//         <div>
//             <h3>我是DEMO组件</h3>
//             <div>金钱{props.name}</div>
//             <div>
//                 配偶的名字:<input type="text"/>
//             </div>
//         </div>
//     )
// }
自己做的一个小Demo
思路:父亲给孩子钱,孩子小费多少钱,然后返还给给父亲多少钱
在这个小Demo中父亲会使用input给孩子钱,孩子在接受到父亲给的钱后去超市花钱然后再找零给父亲。
import React, {Component} from "react";
import ReactDom from 'react-dom'
import Demo from './Demo'
class App extends Component{
    state={
        money:'',
        remain:''
    }
   render(){
       return(
       <div>
           <h1>我是APP组件父亲组件</h1>
           给你:<input type="text" onChange={this.handletext}/>
           应该还给我:{this.state.remain}
           <Demo givemoney = {this.state.money} remainmoney={this.remainmoney}></Demo>
       </div>
   )
    }
    handletext = (e)=>{
        this.setState({
            money:e.target.value
        })
    };
    remainmoney = (speedmoneys)=>{
        this.setState({
            remain:this.state.money-speedmoneys
        })
    }
}

ReactDom.render(<App />,document.getElementById('root'))
// 函数组件
import {Component} from "react";
export default class Demo extends Component{
    state = {
        money: '',
        speedmoneys:''
    }
    render() {
        return(
            <div>
                <h3>我是DEMO组件</h3>
                <p>我收到了:{this.props.givemoney}</p>
                我花了:<input type="text" onChange={this.speedmoney}/>
            </div>
        )
    }
    speedmoney = (e)=>{
        this.setState({
            speedmoneys:e.target.value
        })
        this.props.remainmoney(e.target.value)
    }
}
兄弟父子
兄弟组件通讯(没有)
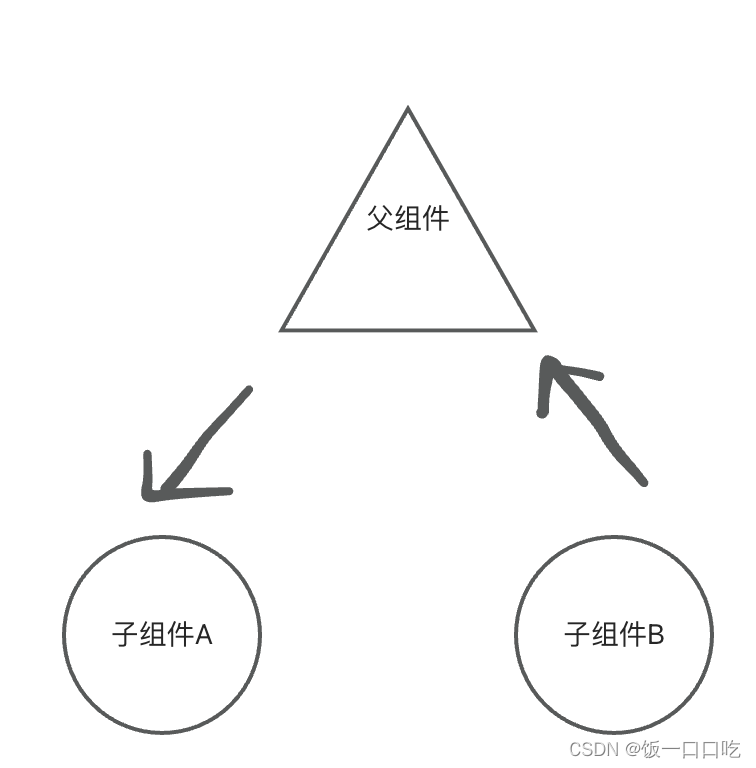
- 将共享状态提升到最近的公共组件中,由公共父组件管理这个状态
- 思想:状态提升
- 公共组件的职责:
- 提供共享状态
- 提供共享状态的方法
- 要通讯的子组件只需通过props接收状态或操作状态的方法
状态提升前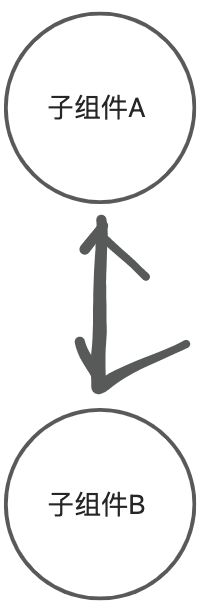
提升状态之后
context组建通讯
import React from 'react';
import ReactDOM from 'react-dom/client';
import Father from './Father';

//1.创建组件
//2.使用Provider组件包裹根元素,Provider组件就是最大的根元素

const {Provider,Consumer}  = React.createContext()

const root = ReactDOM.createRoot(document.getElementById('root'));
class App extends React.Component {
  state={
    color:'red'
  }
  render() {
    return (
      <Provider value={this.state.color}>
  <div>
  <h1>我是APP组件</h1>
  <Father color = {this.state.color}/>
  </div>
  <Consumer>
  {
    (value)=>{
      return <h1 style={{color:value}}>我是Custom组件</h1>
      }
      }
  </Consumer>
  </Provider>
);
}
}
root.render(<App />);
React使用Consumer进行数据共享,直接使用React.createContext进行创建两个包,使用Provide进行数据展示,然后使用Consumer进行数据共享。
但是数据共享过程中Consumer里面需要用到函数进行引用,使用函数引用的方法才可以进行Consumer设置
使用Childer父传子
import React from 'react';
import ReactDOM from 'react-dom/client';
import Header from './head';
import Dialog from './Dialog';


const root = ReactDOM.createRoot(document.getElementById('root'));
class App extends React.Component {
  render() {
    return (
       <div>
           <h1>children属性</h1>
           <Header>首页</Header>
           <Header>登陆</Header>
           <Dialog title={<h1>温馨提示</h1>}>
               <input type="text"/>
               <button>登陆</button>
               <button>注册</button>
           </Dialog>
       </div>
    );
  }
}
root.render(<App />);
childer可以穿入任意元素,例如button,input等,这里我定义了一个Dialog的组件
import React, {Component} from 'react';

class Dialog extends Component {
    render() {
        return (
            <div>
                <h1>Children属性</h1>
                {this.props.title}  {/* 这里是渲染title */}
                {this.props.children}  {/* 这里是渲染input */}
            </div>
        );
    }
}

export default Dialog;
可以看到我的接收参数只有两个一个是title一个是childern
我的children直接获取父亲节点传过来的所有结构
Props校验
目的:校验接受的props的数据类型,增加组件的健壮性
对于组件来说,props是外来的,无法保证组件使用者传入什么格式的数据
如果传入数据格式不对,可能会导致组件内部报错。
组件的使用者不能明确知道报错原因
import React from 'react';
import ReactDOM from 'react-dom/client';
import Header from './head';
import Dialog from './Dialog';


const root = ReactDOM.createRoot(document.getElementById('root'));
class App extends React.Component {
  render() {
    return (
       <div>
           <h1>children属性</h1>
           <Header>首页</Header>
           <Header>登陆</Header>
           <Dialog title={<h1>温馨提示</h1>} list={[1,2,3,4]}>
               <input type="text"/>
               <button>登陆</button>
               <button>注册</button>
           </Dialog>
       </div>
    );
  }
}
root.render(<App />);
import React, {Component} from 'react';
import PropTypes from "prop-types";
class Dialog extends Component {
    render() {
        return (
            <div>
                <h1>Children属性</h1>
                {this.props.title}  {/* 这里是渲染title */}
                {this.props.children}  {/* 这里是渲染input */}
                <ul>
                    {
                        this.props.list.map((item)=>(
                            <li key={item}>{item}</li>
                        ))
                    }
                </ul>
            </div>
        );
    }
}

// 增加校验规则
Dialog.propTypes = {
    title: PropTypes.string,
    list: PropTypes.array
}
export default Dialog;
约束规则:
1.常见类型:array,bool,func,number,object
2.React元素类型:element
3.必填项:isRequired
4.特定的结构对象:shape({})
// 增加校验规则
Dialog.propTypes = {
    title: PropTypes.string.isRequired,
    list: PropTypes.array
}
默认属性
在未传入Props时生效,有默认属性
Dialog.defaultProps={
  pageSize:10
}
在使用组件的时候用户不传入该值,给予默认值设置
