一、网站架构和Servlet技术体系架构
1.网站架构
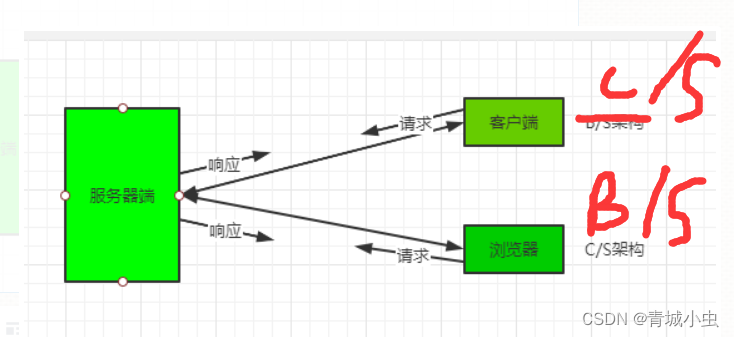
现在的网站架构分为 B/S架构和C/S的架构两种。
这种“B/S”结构有很多好处,维护和升级方式更简单,客户端是浏览器,基本不需要维护,只需要维护升级服务器端就可以,
C/S结构是一种软件系统体系结构,也是生活中很常见的。这种结构是将需要处理的业务合理地分配到客户端和服务器端,这样可以大大降低通信成本,但是升级维护相对困难。
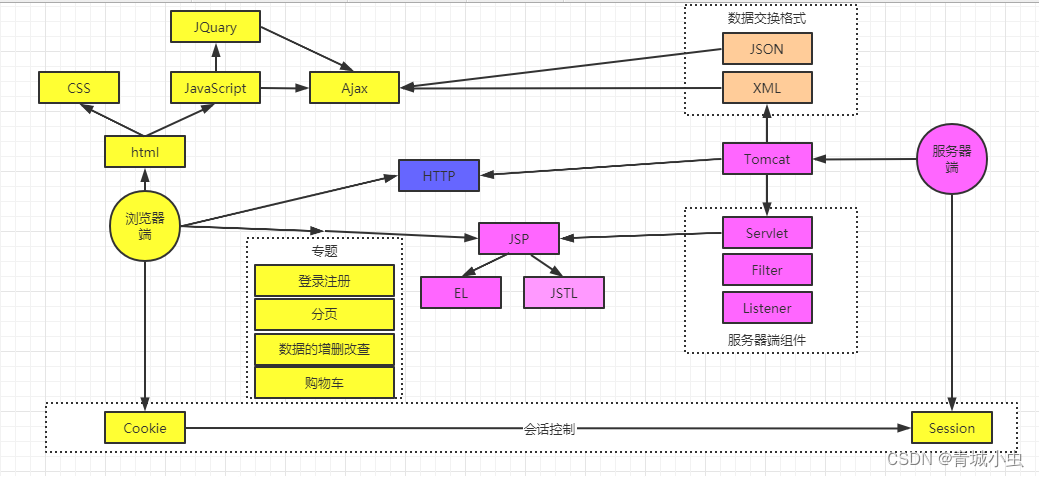
2.技术体系
二、tomcat实现静态资源访问
1.创建项目
.在webapps中创建问价夹,比如myweb(这个文件夹就是我们的项目)
.创建WEB-INF文件夹,用于存放项目的核心内容
.创建classes文件夹,用于存放.class文件
.创建lib,存放jar包
.创建web.xml,项目配置文件(到ROOT项目下的WEB-INF复制过来即可)
.将网页xxx.html复制到myweb项目中,与WEB-INF在同级。
2.启动tomcat,访问项目
在浏览器当中输入:http://localhost:8080/myweb/myfirst.html
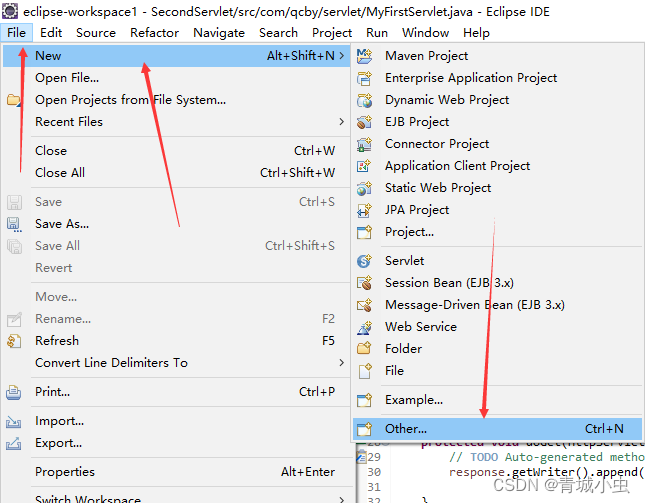
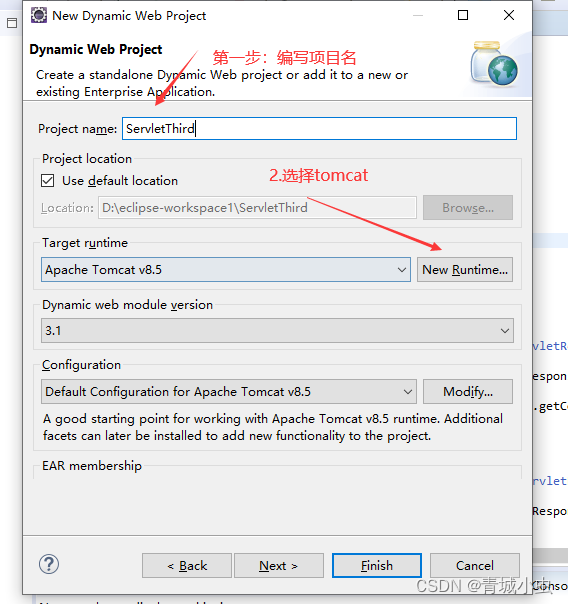
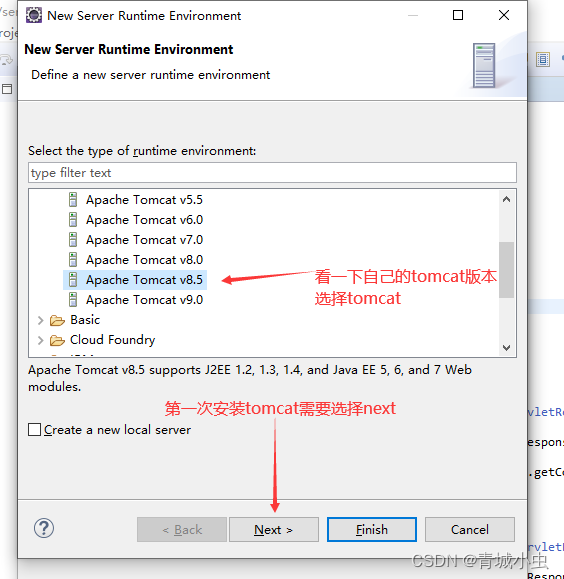
三、创建第一个servlet项目

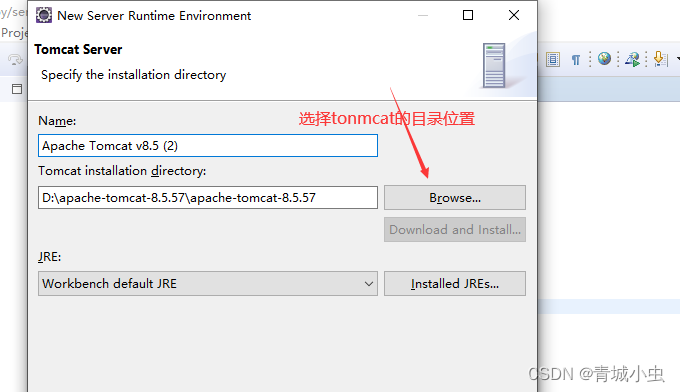
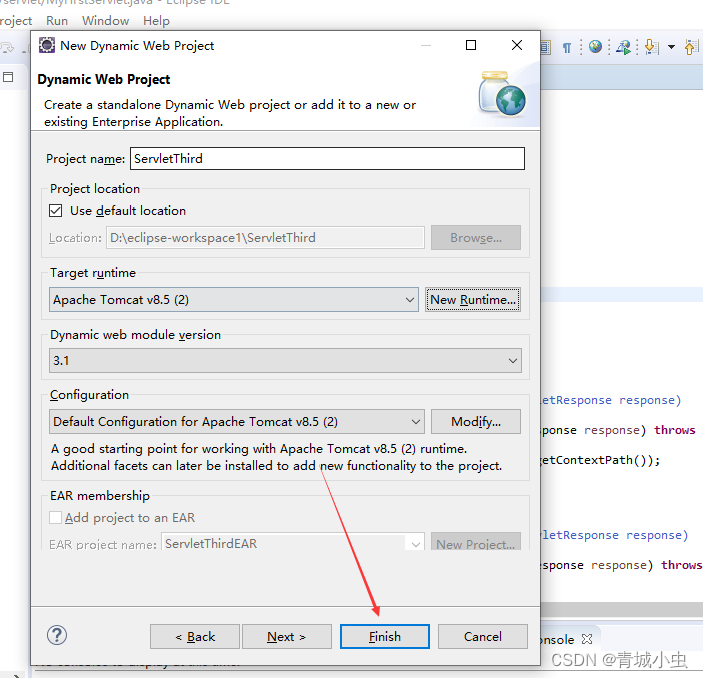
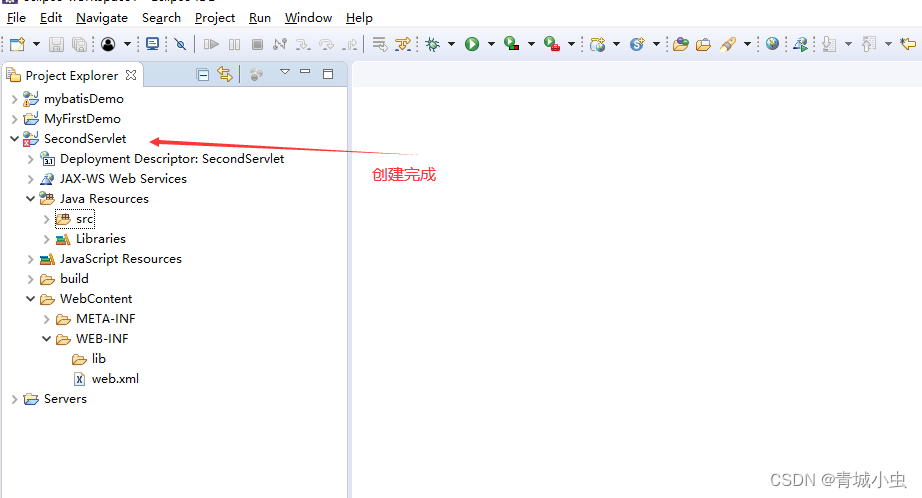
四、创建Servlet
1.什么是Servlet
Servlet(Server Applet),全称Java Servlet,未有中文译文。是用Java编写的服务器端程序。其主要功能在于交互式地浏览和修改数据,生成动态Web内容。狭义的Servlet是指Java语言实现的一个接口,广义的Servlet是指任何实现了这个Servlet接口的类, 一般情况下,人们将Servlet理解为后者。
广义
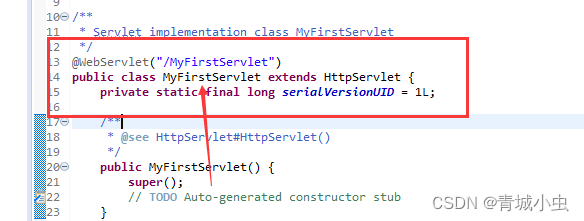
狭义

2.编写第一个Servlet
①:编写Servlet
- 实现servlet接口
- 重写5个主要方法
- 在servlet()方法中编写输出语句


②:部署配置访问servlet
- 将写好的servlet程序编译成.class文件

- 将.class文件放置到WEB-INF下边的classes文件当中去

- 配置web.xml
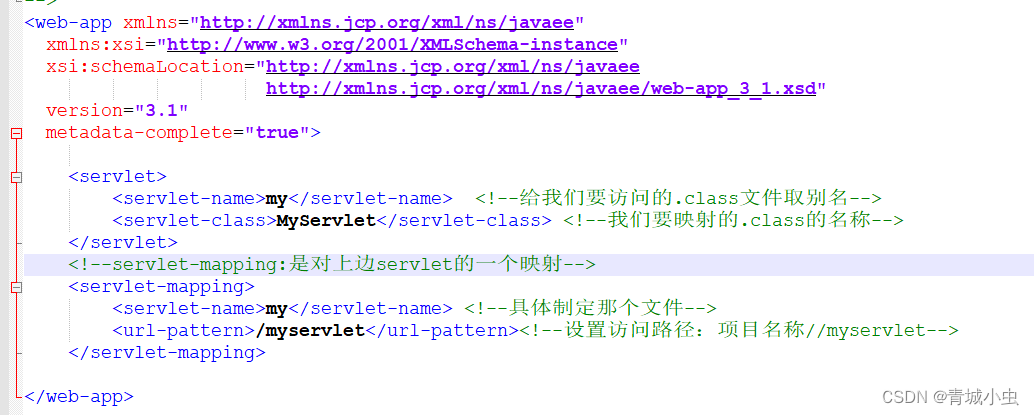
- 启动tomcat并完成访问
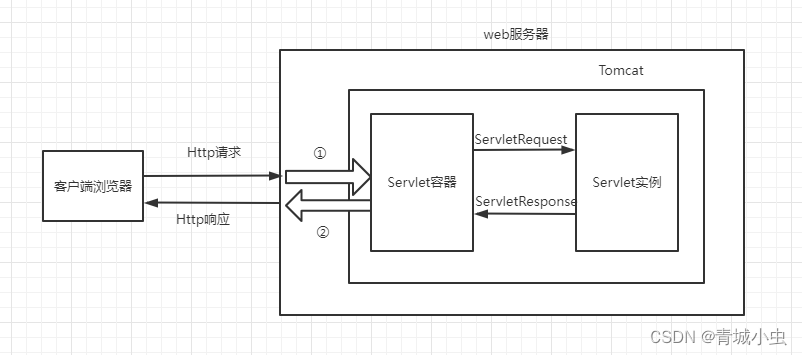
访问路径:http://localhost:8080/myweb/myservlet

五、Http协议
1.认识url
url被称为统一资源定位符,用来表示从互联网上得到的资源位置和访问这些资源的方法。
他的表示方法一般为:
<协议>://<主机>:<端口>/<路径>
如下我们启动一个servlet程序,来看一下我们的url表示:
http://localhost:8080/BuyechengServlet/login.html
大家可以看到我们采用的是我们这里采用的是 http协议
localhost:代表的是我们本机的IP地址
8080:代表我们的端口号
BuyechengServlet/login.html :代表的是我们的路径。
协议部分 确定了我们的浏览器怎样向浏览器发送请求,以及服务器应该怎样反馈我们的请求,除了HTTP协议以外还有FTP协议和DNS协议等。
主机部分 一般是我们的ip地址,localhost指的我们本地的IP地址,也可以用127.0.0.1来代替。当然这个部分使用的最多的还是域名的方式,比如www.baidu.com等等都属于域名。我们在计算机网络当中是通过ip地址来进行寻址的,那么就需要把域名解析成ip地址,解析的工具就是我们上课节说的DNS服务器。
端口部分 一般采用的是80端口号,而我们上边所使用的的8080端口号,是tomcat默认的端口号。
端口号的存在是为了我们相关的进程能够有及时的从计算机网卡当中拿到属于自己的数据。每一个进程都有一个属于自己的端口号,且不能重复。每一个到达网卡的数据都必须带有响应的端口号,以便能够请求响应的进程。
路径部分 的主要作用是起到资源定位的作用,定位相关的资源,以便于我们能够及时的处理资源。
2.超文本传输协议http
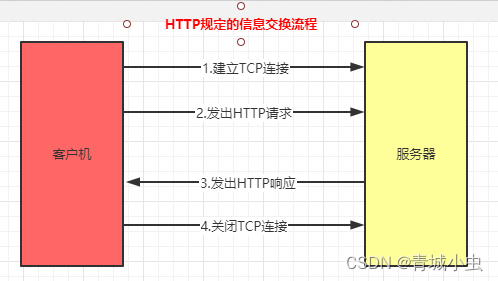
超文本传输协议(http),是关于在网络上如何传输超级文本(既HTML文档)的协议。http规定了Web(广域网)基本运作过程,以及浏览器和web服务器之间的通信细节。HTTP规定Web的基本运作过程是基于客户/服务器的通信模式,客户端主动发起HTTP请求,服务器端主动接受HTTP请求,在返回响应的http响应结果。
3.http协议的请求和相应
①.HTTP请求格式
一个http请求一般由一下三部分组成
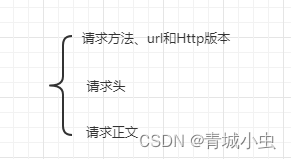
- 请求方式、url和Http版本
HTTP的请求方式有很多种,这里只讲解两种,既get和post
GET:
1.通过Url传递参数,Url与参数之间用?隔开,多个参数用&隔开,也是表单的默认提交方式。
2.Get传送的数据量较小,这主要是因为收到url长度的限制
3.Get会将数据显示到URL当中不安全
4.Get一般用于直接获取数据,提高查询速度
POST:
1.post的数据在请求主体内,所以相比安全
2.post对上传数据的大小无限制
3.post适用于增删改操作
- 请求头
Accept-Encoding: gzip, deflate, br    #浏览器所用的语言
Host: www.baidu.com                   #远程主机
Cookie:                               # cookie
User-Agent:                           #浏览器类型
- 请求正文
wd=csdn&rsv_spt=1&rsv_iqid=0xcc9c81290004bde9&issp=1
②.HTTP响应格式
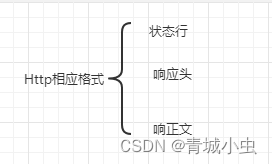
- 状态
200:响应成功
400:错误的请求,客户发送的HTTP请求不正确
404:文件不存在,访问的url地址不对
405:服务器不支持客户的请求方式
500:服务器内部错误
- 响应头
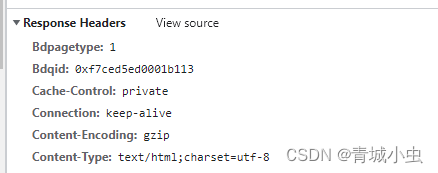
- 响应正文
<html>
    <head>
        <title>qcby</title>
    </head>
    <body>
         <h1>qcby</h1>
    </body>
</html>
4.无状态的http协议
当用户访问web应用时,在许多情况下,web服务器必须能够跟踪用户的状态。比如许多用户在购物网站上购物,Web服务器为每个用户配置了虚拟的购物车。当某个用户请求将一件商品放入购物车时,web服务器必须根据发出请求的用户身份,找到客户的购物车,将商品放入其中。之所以能够完成这样的操作不是因为http协议拥有能够记录用户身份的功能。HTTP是无状态的协议。所谓的无状态,是指当浏览器与服务器之间进行基于http协议进行通信时,HTTP没有提供服务器持续跟踪特定浏览器端的规范。 上诉操作之所以能完成是因为http的会话管理机制。
会话: 双方都带有对方的标记,通讯的时候根据带着的标记进行识别。这个会话跟打电话原理一样的,双方手机网卡记录对方标记,每次带着标记通话,两端都存着好多电话号码就跟存了好多标记一样。
六、servlet核心接口和类
在Servlet体系中,除了实现servlet接口,还可以通过继承GenericServlet或HttpServlet类实现编写
1.Servlet接口
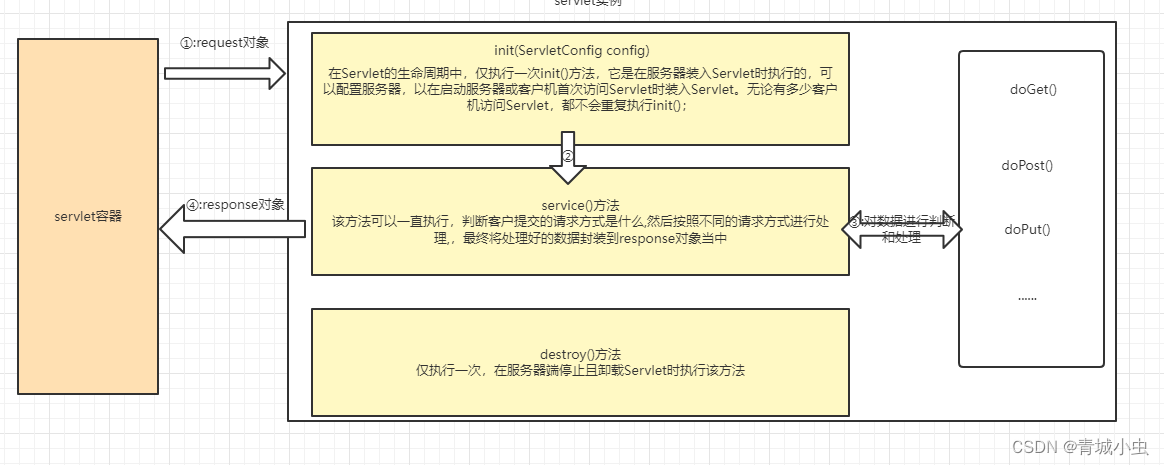
servlet接口是整个servlet的核心。它是所有Servlet类必须直接或者间接实现的一个接口,其内部需要实现的5个方法分别关乎着我们servlet的生命周期和业务实现。
init(... )  当Servlet第一次被请求时,Servlet容器就会开始调用这个方法来初始化一个Servlet对象出来
service(...)  每当请求Servlet时,Servlet容器就会调用这个方法
destroy(...) 当要销毁Servlet时,Servlet容器就会调用这个方法
getServletInfo( ...) 这个方法会返回Servlet的一段描述,可以返回一段字符串。
getServletConfig(... )这个方法会返回由Servlet容器传给init( )方法的ServletConfig对象。
2.servlet的生命周期
由于servlet本身没有main()方法,不能独立运行,他的运行完全由Servlet容器来进行控制和调度。Servlet 生命周期可被定义为从创建直到毁灭的整个过程。
 @WebServlet(value="/s01")
public class Servlet01 implements Servlet{

	@Override
	public void init(ServletConfig config) throws ServletException {
		// TODO Auto-generated method stub
		System.out.println("初始化时调用");
	}

	@Override
	public ServletConfig getServletConfig() {
		// TODO Auto-generated method stub
		return null;
	}

	@Override
	public void service(ServletRequest req, ServletResponse res) throws ServletException, IOException {
		// TODO Auto-generated method stub
		System.out.println("开启服务时调用");
	}

	@Override
	public String getServletInfo() {
		// TODO Auto-generated method stub
		return null;
	}

	@Override
	public void destroy() {
		// TODO Auto-generated method stub
		System.out.println("销毁时调用");
	}

}
3.GenericServlet抽象类
GenericServlet实现了servlet接口,并且实现了init()和destroy()方法,简化了我们的开发流程
①:实现GenericServlet

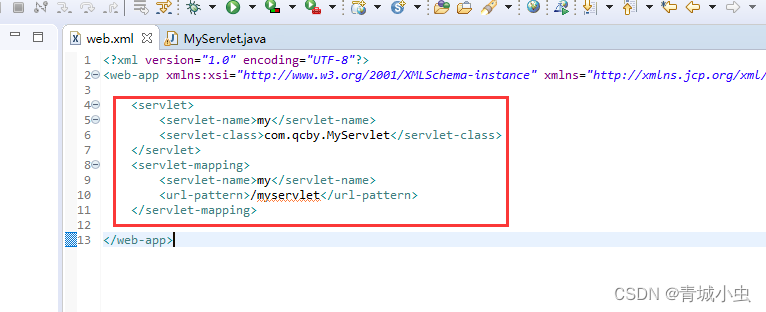
②:配置web.xml,完成对程序的访问
4.HttpServlet类
HttpServlet是继承了GenericServlet类,这是一个抽象类。因为我们的请求一般都是Http请求,为了匹配Http请求,于是就有了HttpServlet。为了能够更加方便的处理来自浏览器的数据和将数据写会到浏览器,HttpServlet类引用了HttpServletRequst和HttpServletResponse两个类来处理和相应数据。
①:实现HttpServlet

②:配置web.xml,完成对程序的访问

用get的方式进行访问

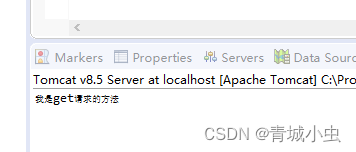
用post的方式进行访问


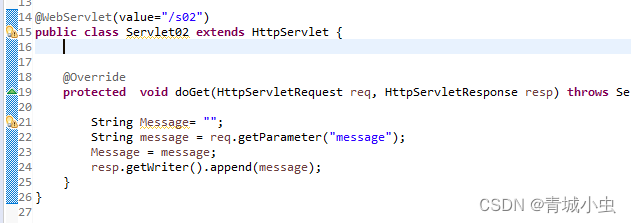
5.Servlet线程安全问题
①:线程安全问题
当我们访问servlet的时候,我们需要执行实例化操作,创建一个servlet对象。而我们tomcat容器可以让多个线程并发访问Servlet,如果在方法当中对成员变量做修改,就会出现线程安全问题。

https://note.youdao.com/s/BpR4V2nD
②:如何保证线程安全
- synchronized :这种方式会大量的造成线程堵塞

- 实现SingleThreadModel接口
servlet实现SingleThreadModel接口后,每个线程都会创建servlet实例,这样每个客户端就不存在线程资源共享资源的问题,但是servlet响应客户端请求效率太低,所以淘汰。

- 尽可能使用局部变量
七、servlet的两种配置访问方式
1.Servlet使用Web.xml配置
<?xml version="1.0" encoding="UTF-8"?>
<web-app xmlns:xsi="http://www.w3.org/2001/XMLSchema-instance"
    	xmlns="http://xmlns.jcp.org/xml/ns/javaee"
            xsi:schemaLocation="http://xmlns.jcp.org/xml/ns/javaee http://xmlns.jcp.org/xml/ns/javaee/web-app_3_1.xsd"
            id="WebApp_ID" version="3.1">

	<servlet>
		<servlet-name>my</servlet-name>
		<servlet-class>com.qcby.MyServlet</servlet-class>
		<!-- 启动的优先级,数字越小越先启动 -->
		<load-on-startup>1</load-on-startup>
	</servlet>
	<servlet-mapping>
		<servlet-name>my</servlet-name>
		<url-pattern>/myservlet</url-pattern>
	</servlet-mapping>

	<servlet>
		<servlet-name>second</servlet-name>
		<servlet-class>com.qcby.SecondServlet</servlet-class>
	</servlet>
	<servlet-mapping>
		<servlet-name>second</servlet-name>
		<url-pattern>/second</url-pattern>
	</servlet-mapping>
</web-app>
①:url-pattern定义的匹配规则说明

②:load-on-startupt

2.Servlet使用注解配置(推荐)
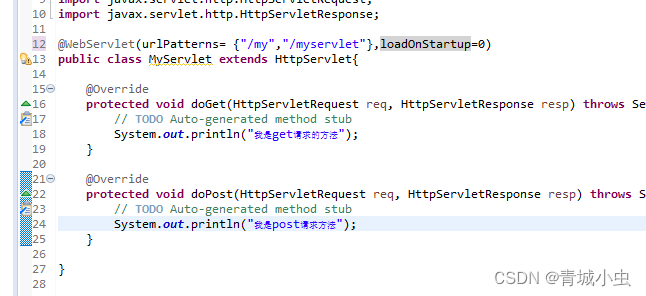
@WebServlet注解常用属性
- name:Servlet文件的名称(可选)
- value:配置url路径,可以配置多个
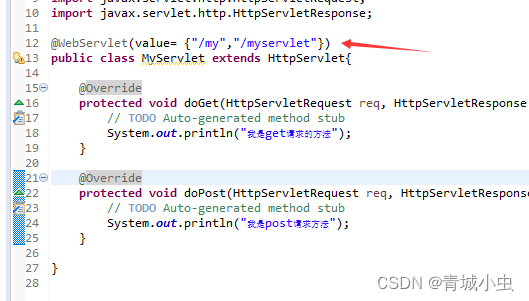
- urlPatterns: 配置url路径,和value作用一样,不能同时使用
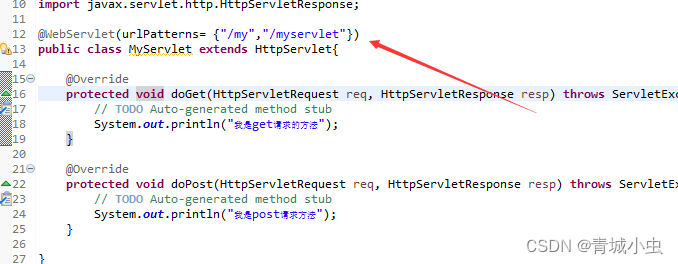
- loadOnStartup: 配置servlet的创建时机
八、servlet应用【重点】
1.request对象
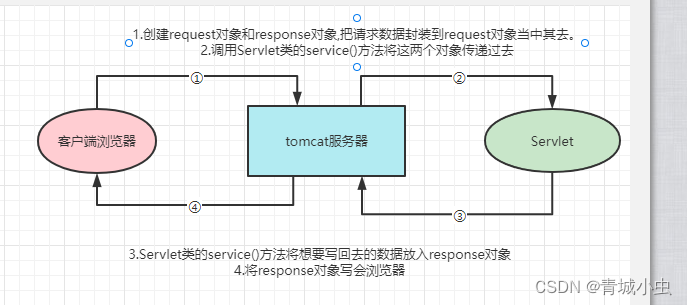
当客户端向服务器端发送请求时,服务器为本次请求创建request对象,并在调用Servlet的service方法时,将该对象传递给service方法。Request对象中封装了客户端发送过来的所有的请求数据。

①:doGet()方法接收request数据
- 编写html
<!DOCTYPE html>
<html>
<head>
<meta charset="UTF-8">
<title>Insert title here</title>
</head>
<body>
	<form action="/SecondServlet/regist" method="get">
		用户名:<input type="text" name="username"/>
		密码:<input type="text" name="password"/>
		<input type="submit" value="注册">
	</form>
</body>
</html>
- 编写doGet()方法
@WebServlet("/regist")
public class RegistServlet  extends HttpServlet{

	@Override
	protected void doGet(HttpServletRequest req, HttpServletResponse resp) throws ServletException, IOException {
		// TODO Auto-generated method stub
		String username = req.getParameter("username");
		String password = req.getParameter("password");

		System.out.println(username + " " + password);
	}
}
②:doPost()方法接收request数据
- 编写html
<!DOCTYPE html>
<html>
<head>
<meta charset="UTF-8">
<title>Insert title here</title>
</head>
<body>
	<form action="/SecondServlet/regist" method="post">
		用户名:<input type="text" name="username"/>
		密码:<input type="text" name="password"/>
		<input type="submit" value="注册">
	</form>
</body>
</html>
- 编写doPost()方法
@WebServlet("/regist")
public class RegistServlet  extends HttpServlet{


	@Override
	protected void doPost(HttpServletRequest req, HttpServletResponse resp) throws ServletException, IOException {
		// TODO Auto-generated method stub
		String username = req.getParameter("username");
		String password = req.getParameter("password");

		System.out.println(username + " " + password + "dopost");
	}

}
③:请求乱码问题
由于request是接收来自用户的请求,服务器会根据编码格式将请求转换。服务器端默认的编码格式为ISO-8859-1(此编码不支持中文),而我们用户浏览器默认是utf-8的编码格式,所以往往会产生乱码。要想解决乱码问题,需要设置request当中的编码格式,告诉服务器以何种形式来解析数据。或者在接收到乱码以后,通过何种编码格式进行还原
方式一:
request.setCharacterEncoding("UTF-8");
该方法只针对POST有效(必须在接收数据之前设定)
方式二:
new String(request.getParameter(name).getBytes("ISO-8859-1"),"UTF-8"));
借助String对象的方法,该种方式对任何请求有效,都是通用的。
Tomcat8以后的get请求时不会出现乱码的。
④:转发请求【重点】
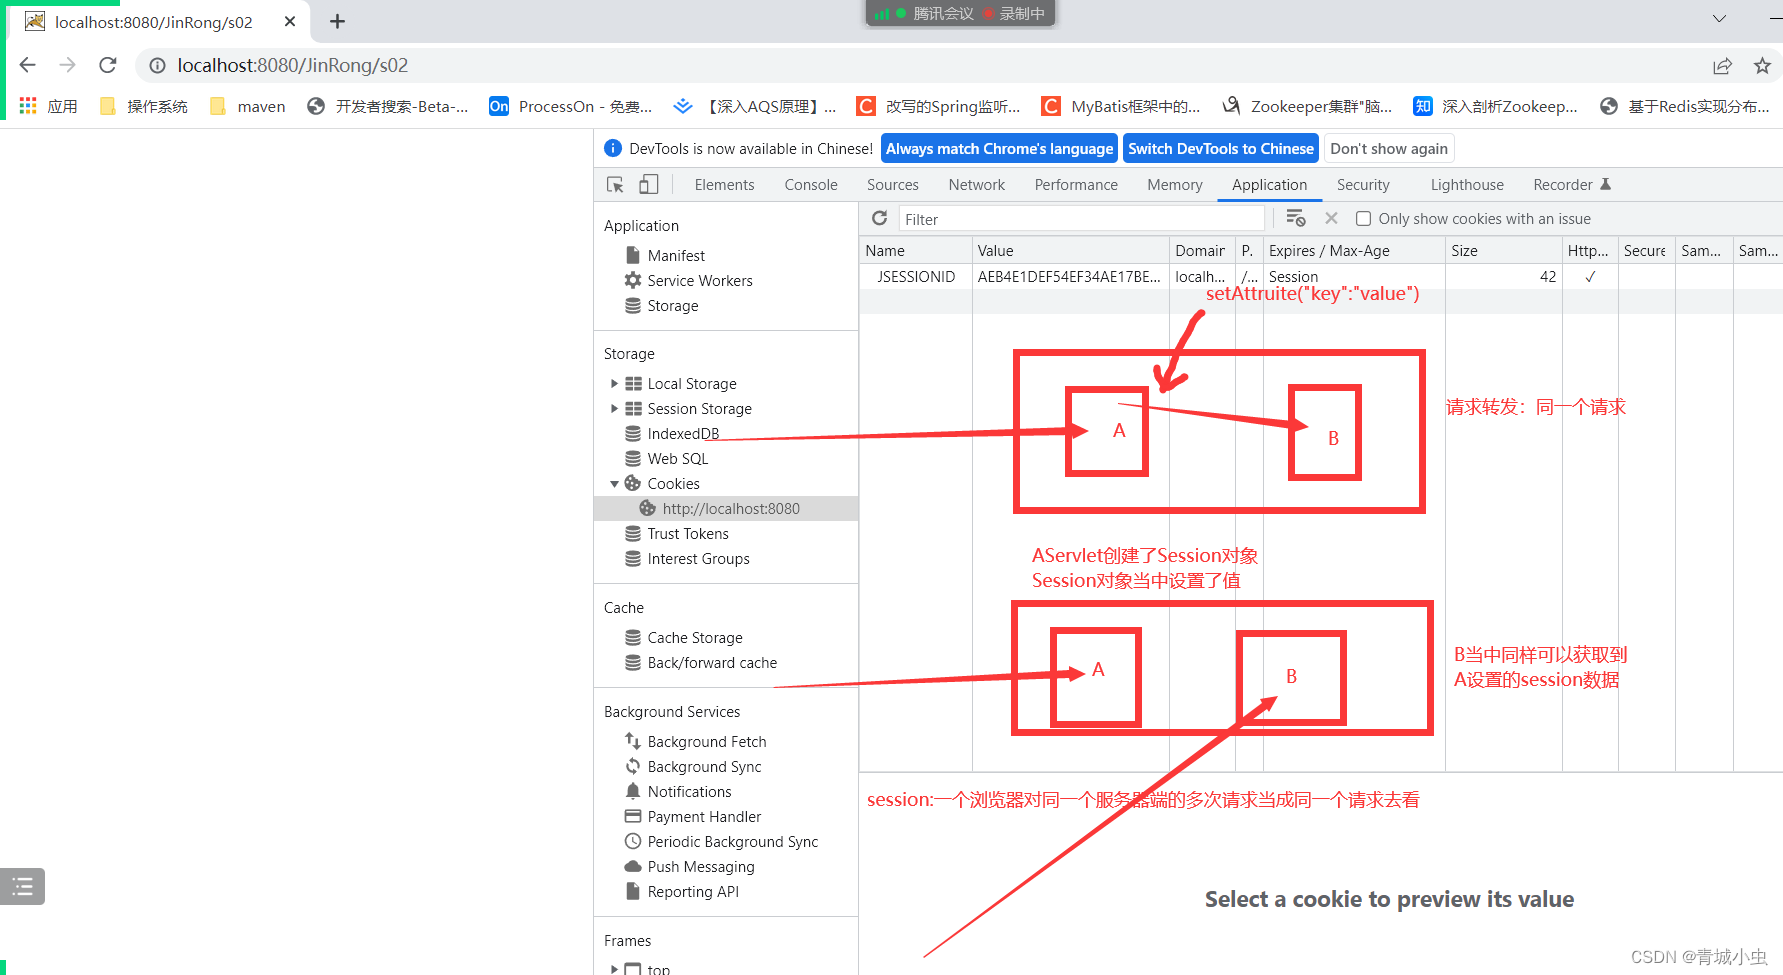
请求转发是一种服务器行为,当客户端请求到达后,服务器进行转发,此时会将请求对象进行保存,地址栏中的url地址不会发生改变,得到相应后,服务器端会将请求发送给客户端,从始至终只有一个请求发出。
request.getRequestDispatcher(url).forward(request, response);
具体实现,定义两个servlet
/**
 *
 * @author lenovo
 *         请求转发跳转
 *                 可以让服务器端跳转到客户端(或者指定的(Servlet)
 *           特点:
 *     1.服务器端行为
 *     2.地址栏不会发生改变
 *     3.从始至终都是一个请求
 *     4.request当中的数据在servlet程序中共享
 */
@WebServlet(value="/s01")
public class Servlet01 extends HttpServlet{
	@Override
	protected void doGet(HttpServletRequest req, HttpServletResponse resp) throws ServletException, IOException {
		// TODO Auto-generated method stub
		String username  = req.getParameter("username");
		String password = req.getParameter("password");
		System.out.println("s01="+username + " " + password);
		// 请求跳转到Servlet02
		//req.getRequestDispatcher("s02").forward(req, resp);
		//请求发送到html页面
		req.getRequestDispatcher("RegistServlet.html").forward(req, resp);

	}
}
@WebServlet(value="/s02")
public class Servlet02 extends HttpServlet{
      @Override
    protected void doGet(HttpServletRequest req, HttpServletResponse resp) throws ServletException, IOException {
    	// TODO Auto-generated method stub
    	  String username  = req.getParameter("username");
  		String password = req.getParameter("password");
  		System.out.println("s02=" + username + " " + password);
    }
}
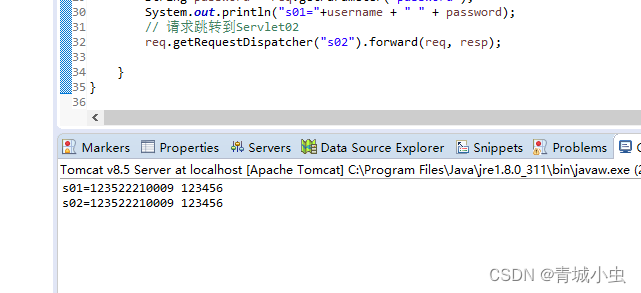
运行起来我们发现s01和s02都会输出,且只是请求了一次

⑤:request作用域[重点]
request表示一个请求,只要发出一个请求就会创建一个request对象,他的作用域:仅在当前请求中有效。
用处:常用于服务器间同一请求不同页面之间的参数传递,常用于表单的控制值传递。
常用的方法

使用方式:给Servlet传值
@WebServlet("/s03")
public class Servlet03 extends HttpServlet{

	@Override
	protected void doGet(HttpServletRequest req, HttpServletResponse resp) throws ServletException, IOException {
		// TODO Auto-generated method stub
		System.out.println("我是03");
		req.setAttribute("user", "qcby");
    	req.setAttribute("age", 18);
    	req.getRequestDispatcher("s04").forward(req, resp);
	}
}
@WebServlet("/s04")
public class Servlet04 extends HttpServlet{
      @Override
    protected void doGet(HttpServletRequest req, HttpServletResponse resp) throws ServletException, IOException {
    	// TODO Auto-generated method stub
    	System.out.println("我是04");
    	System.out.println(req.getAttribute("user"));
    	System.out.println(req.getAttribute("age"));
    }
}
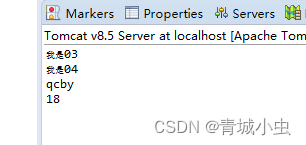
访问:http://localhost:8080/SecondServlet/s03
2.response对象
①:response的主要方法

getWriter()
@WebServlet("/regist")
public class RegistServlet  extends HttpServlet{
	@Override
	protected void doPost(HttpServletRequest req, HttpServletResponse resp) throws ServletException, IOException {
		PrintWriter printWriter = resp.getWriter();
		printWriter.print("success");
	}
}
getOutputStream()
@WebServlet("/regist")
public class RegistServlet  extends HttpServlet{
	@Override
	protected void doPost(HttpServletRequest req, HttpServletResponse resp) throws ServletException, IOException {
		// TODO Auto-generated method stub
		// PrintWriter writer = resp.getWriter();
		// writer.print("success");
		ServletOutputStream stream  = resp.getOutputStream();
		stream.write("Success".getBytes());
	}
}
html
<!DOCTYPE html>
<html>
<head>
<meta charset="UTF-8">
<title>Insert title here</title>
</head>
<body>
	<form action="/SecondServlet/regist" method="post">
		用户名:<input type="text" name="username"/>
		密码:<input type="text" name="password"/>
		<input type="submit" value="注册">
	</form>
</body>
</html>

②:响应乱码问题
浏览器与服务器传输中文数据会乱码,原因就是服务器响应数据默认采用iso-8859-1码表,浏览器默认采用utf-8码表,所以就会乱码。
要解决该乱码只能在服务器端告诉服务器使用一种能够支持中文的编码格式,比如UTF-8
response.setCharacterEncoding("UTF-8");
此时还只是完成了一半的工作,要保证数据的正确显示,还要指定客户端的编码方式
response.setHeader("content-type", "text/html;charset=UTF-8");
两端指定编码后,乱码就解决了,一句话:保证发送端和接收端的编码一致
以上两句话可以简化为一句话,同时指定客户端和服务器端
response.setContentType("text/html;charset=utf-8");
案例
@WebServlet(value="/s01")
public class Servlet01 extends HttpServlet{
	@Override
	protected void doGet(HttpServletRequest req, HttpServletResponse response) throws ServletException, IOException {
		// TODO Auto-generated method stub
		response.setContentType("text/html;charset=utf-8");
		PrintWriter writer = response.getWriter();
		writer.append("<h1>你好</h1>");
	}
}
@WebServlet(value="/s01")
public class Servlet01 extends HttpServlet{
	@Override
	protected void doGet(HttpServletRequest req, HttpServletResponse response) throws ServletException, IOException {
		// TODO Auto-generated method stub
		response.setContentType("text/html;charset=utf-8");
		ServletOutputStream outputStream = response.getOutputStream();
		outputStream.write("<h1>你好</h1>".getBytes());

	}
}
③:重定向
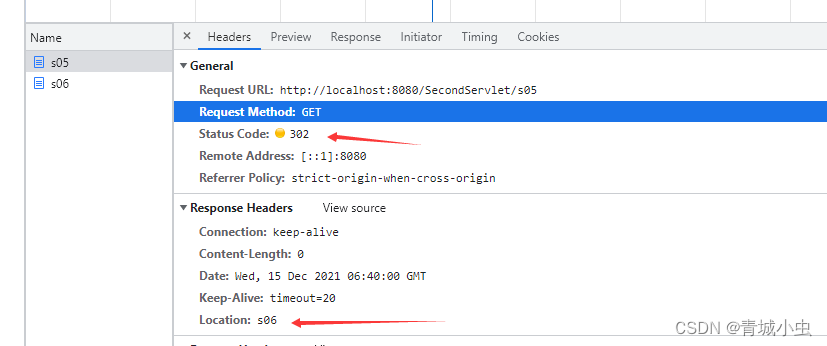
重定向是一种服务器指导,客户端行为。客户端发出第一个请求,被服务器接收处理后,服务器会给客户端一个响应(一个新的地址),当客户端接收到新的请求后,会立刻马上根据服务器发送来的地址发起第二次请求。服务器接收请求并完成响应,重定向完成。
从上述描述中可以看出重定向存在两次请求,并且是客户端行为:
response.sendRedirect(url);
案例
@WebServlet("/s05")
public class Servlet05 extends HttpServlet{
	@Override
	protected void doGet(HttpServletRequest req, HttpServletResponse response) throws ServletException, IOException {
		// TODO Auto-generated method stub
		System.out.println("我是s05");
		// 重定向到s06
		response.sendRedirect("s06");
	}
}
@WebServlet("/s06")
public class Servlet06 extends HttpServlet{
	@Override
	protected void doGet(HttpServletRequest req, HttpServletResponse resp) throws ServletException, IOException {
		// TODO Auto-generated method stub
		System.out.println("我是s06");
	}
}
我们进行请求
当我们输入:http://localhost:8080/SecondServlet/s05,我们会返现地址栏会发生改变

打开f12我们会发现我们访问了s05和s06,并且s05页面的状态是302,目标地址是s06
3.请求转发和重定向的区别

重定向到百度
@WebServlet("/s05")
public class Servlet05 extends HttpServlet{
	@Override
	protected void doGet(HttpServletRequest req, HttpServletResponse response) throws ServletException, IOException {
		// TODO Auto-generated method stub
		System.out.println("我是s05");

		// 重定向到s06
		response.sendRedirect("http://www.baidu.com");
	}
}
九、状态管理
1.现有问题
- Http是无状态的,不能保存每次提交的信息
- 如果用户发来一个新的请求,服务器无法知道它是否与上次请求是否有联系.
- 对于那么需要提交多次信息才能完成的操作,比如购物,就很有问题
2.概念
- 将浏览器和web服务器之间多次交互当成一个整体来处理,并且将多次交互所涉及的数据(即状态)保存先来。
3.状态管理分类
- 客户端状态管理:将状态保存在客户端。代表性技术就是Cookie技术
- 服务器状态管理: 将状态保存在服务端,代表性技术就是Session技术
十、Cookie的使用
1.什么是cookie
Cookie是服务器发送到用户浏览器并保持在本地的一小块信息,他会在浏览器下次向服务器发起请求时被携带并发送到服务器上。通常,它用于告知服务端两个请求是否来自同一浏览器。

2.cookie的基本操作
@WebServlet("/cs")
public class CookieServlet extends HttpServlet{
	@Override
	protected void doGet(HttpServletRequest req, HttpServletResponse resp) throws ServletException, IOException {
		//1.服务端创建cookie对象
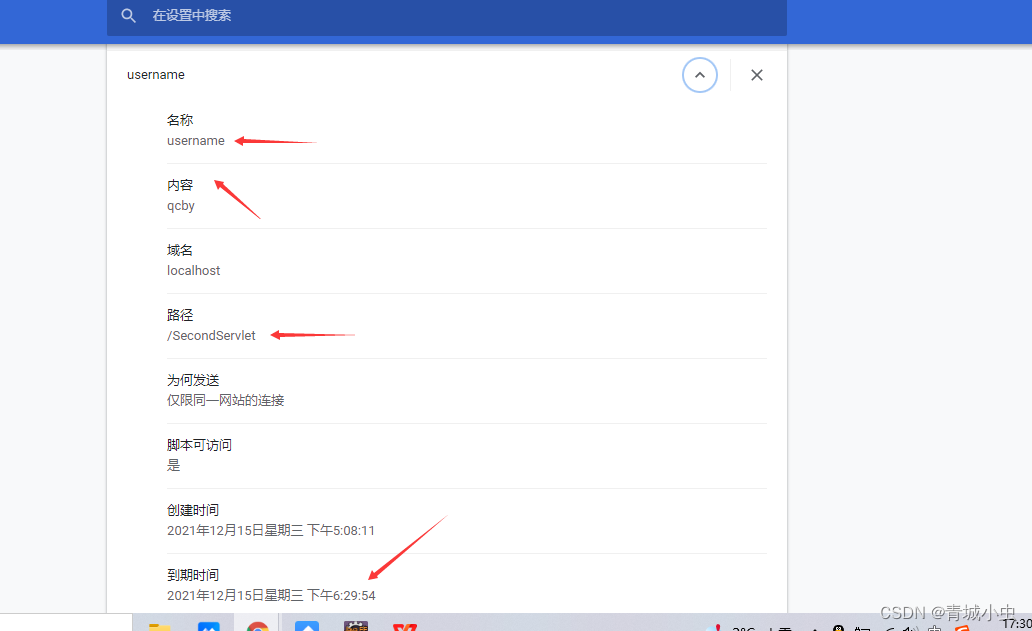
		Cookie cookie = new Cookie("username", "qcby");
       //2.设置cookie有效期 1 小时
      cookie.setMaxAge(60*60);  // 存储数据有三种方式:>0有效期,单位秒;=0浏览器关闭;<0 临时存储,默认为-1
		//3.将cookie响应给客户端
		resp.addCookie(cookie);
	}
}
访问:http://localhost:8080/SecondServlet/cs
查看cookie
我们可以在chrome浏览器的设置—>隐私设置和安全性中找到查看Cookie和网站数据


3.cookie的获取
浏览器jquary获取cookie
function getCookie(cname){
    var name = cname + "=";
    var ca = document.cookie.split(';');
    for(var i=0; i<ca.length; i++) {
        var c = ca[i].trim();
        if (c.indexOf(name)==0) { return c.substring(name.length,c.length); }
    }
    return "";
}
服务器获取cookie的值
@WebServlet("/getCookie")
public class GetCookieServlet extends HttpServlet {
	@Override
	protected void doGet(HttpServletRequest req, HttpServletResponse resp) throws ServletException, IOException {
		// 通过request对象获取所有的cookie
		Cookie[] cookies = req.getCookies();
		// 通过for循环遍历cookie
		if (cookies != null) {
			for (Cookie cookie : cookies) {
				System.out.println(cookie.getName() + " " + cookie.getValue());
			}
		}
	}
}
4.Cookie的编码和解码
cookie默认不支持中文,只能包含ASCII码。所以cookie需要对Uncode字符进行编码,否则会出现乱码
①:创建带有中文的cookie
@WebServlet("/cs")
public class CookieServlet extends HttpServlet{
	@Override
	protected void doGet(HttpServletRequest req, HttpServletResponse resp) throws ServletException, IOException {
		//1.服务端创建cookie对象
		Cookie cookie = new Cookie(
				URLEncoder.encode("姓名","UTF-8"),
				URLEncoder.encode("张三","UTF-8")
				);
	        //2.设置cookie有效期 1 小时
	        cookie.setMaxAge(60*60);
		//3.将cookie响应给客户端
		resp.addCookie(cookie);
	}
}
②:解码带有中文的cookie
@WebServlet("/getCookie")
public class GetCookieServlet extends HttpServlet {
	@Override
	protected void doGet(HttpServletRequest req, HttpServletResponse resp) throws ServletException, IOException {
		// 通过request对象获取所有的cookie
		Cookie[] cookies = req.getCookies();
		// 通过for循环遍历cookie
		if (cookies != null) {
			for (Cookie cookie : cookies) {
				System.out.println(URLDecoder.decode(cookie.getName(),"UTF-8")+" " + URLDecoder.decode(cookie.getValue(),"UTF-8"));
			}
		}
	}
}
5.cookie的优缺点
优点:
- 可配置到期规则
- 简单性:cookie是一种包含文本轻量结构,包含简单的键值对
- 数据持久性:cookie默认在过期之前可以一直保存在客户端浏览器上
缺点:
- 大小受限制:大多数浏览器对cookie的大小有限制,分别是4k和8k字节
- 用户配置为禁用:有些用户禁用了浏览器或者客户端设备接收cookie的能力,因此限制了这一功能
- 潜在的安全风险:Cookie可能被篡改
十一、Session对象(重点)
1.Session概述
- Session用于记录用户的状态。Session是指在一段时间之内,单个客户端与Web服务端的一连串的交互过程。
- 在一个Session中,客户可能会多次请求访问各种不同的服务器资源。
2.Session原理
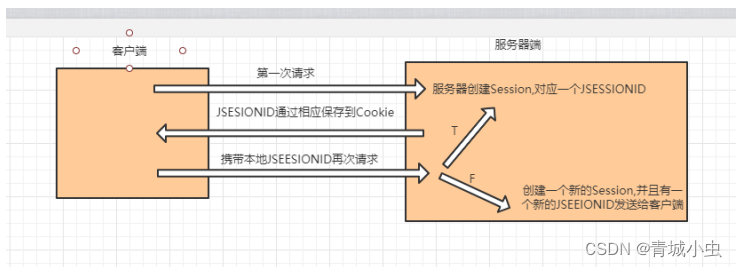
- 服务器会为每一次会话分配一个Session对象
- 同一浏览器发起的多次请求,同属于一次会话(Session)
- 首次使用Session时,服务器会自动创建session,并创建Cookie存储SessionId发送回客户端
3.Session的使用
①:获取session
@WebServlet("/ss")
public class CookieServlet extends HttpServlet{
	@Override
	protected void doGet(HttpServletRequest req, HttpServletResponse resp) throws ServletException, IOException {
		// 1. 通过request对象获取Session对象
		HttpSession session = req.getSession();
		// 获取sessionid
		System.out.println(session.getId());
	}
}
我们使用浏览器对网站进行访问,我们会发现打印

在浏览器当中会有

当我们关闭浏览器,重新打开访问项目我们会发现session变了

②:Session保存数据
setAttribute(“key”, value)保存数据到session中
session.setAttribute("key", value); //以键值对的形式存储在session当中
③:Session获取数据
getAttribute(“key”)获取session中的数据
session.getAttribute("key"); // 通过String类型的key访问Object类型的value
④:Session移除数据
removeAttribute(“key”)从session中删除数据
session.removeAttribute("key"); // 通过key值删除session中的值
4.Session的生命周期
- 开始:第一次使用到session的请求产生则创建session
- 结束
*浏览器关闭
*session超时失效
session.setMaxInactiveInterval(interval)
*手动销毁失效
session.invalidate();
*服务器关闭
5.浏览器禁用Cookie后使用Session解决方案
浏览器在默认情况下,会使用cookie的方式将sessionID发送给服务器,如果用户禁用Cookie,则sessionID不会被浏览器保存,此时浏览器可以使用URL重写这样的方式发送sessionID
①:URL重写
浏览器在访问服务器上的某个地址时,不在使用原来的地址,而是使用经过该写的地址(在原来的地址上边加上sessionID)
②:实现URL重写
response.encodeRedirectURL(url)
@WebServlet("/ss")
public class SetSession extends HttpServlet{

	@Override
	protected void doGet(HttpServletRequest request, HttpServletResponse response) throws ServletException, IOException {
		// TODO Auto-generated method stub
		HttpSession session = request.getSession();
		// 重写 URL 追加 SessionID
		String newUrl = response.encodeRedirectURL("/SecondServlet/gs");
		System.out.println(newUrl);
		response.sendRedirect(newUrl);  //重定向到我们要跳转页servlet
	}
}
@WebServlet("/gs")
public class GetSession extends HttpServlet{

	@Override
	protected void doGet(HttpServletRequest req, HttpServletResponse resp) throws ServletException, IOException {
		// TODO Auto-generated method stub
		// 1. 通过request对象获取Session对象
		HttpSession session = req.getSession();
		// 获取sessionid
		System.out.println(session.getId());
	}
}
输出

实际情况是我们在url上边加上了sessionID

十二、ServletContext对象
1.ServletContext概述
每一个web程序都有且仅有一个servletContext对象,又称Application对象,从名称当中可知,该对象与应用程序有关。在WEB容器启动时,会为每一个应用程序创建一个ServletContext对象。
该对象有两大作用:
第一:作为域对象来共享数据,此数据在整个应用程序中共享;
第二:该对象中保存了当前应用程序相关信息。例如可以通过getServletInfo()方法获取当前服务器信息,getRealPath()获取资源的真实路径等。
2.ServletContext对象获取
获取servletContext对象的途径有很多。比如:
①.通过request对象获取
ServletContext servletContext = req.getServletContext();
②.通过session对象获取
ServletContext servletContext = request.getSession().getServletContext();
③.通过servletConfig对象获取,在Servlet标准中提供了ServletConfig方法
ServletContext servletContext = getServletConfig().getServletContext();
④.直接获取 Servlet类中提供了直接获取ServletContext对象的方法
ServletContext servletContext = getServletContext();
基本使用
@WebServlet("/SC")
public class ServletCon extends HttpServlet{

	@Override
	protected void doGet(HttpServletRequest request, HttpServletResponse resp) throws ServletException, IOException {
		ServletContext servletContext = getServletContext();
		//常用方法
		//获取当前服务器的版本信息
		String ServletInfo = servletContext.getServerInfo();
		System.out.println("服务器当前的版本信息:" + ServletInfo);
		//获取项目的真实路径
		String realPath = servletContext.getRealPath("/");
		System.out.println("获取项目的真实路径:" + realPath);
	}
}
3.ServletContext域对象
ServletContext也可以当做域对象来使用,通过ServletContext中存取数据,可以使得整个应用程序共享某些数据。当然不建议存放过多数据,因为ServletContext中的数据一旦存储进去没有手动移除会将一直保存。
@WebServlet("/SC")
public class ServletCon extends HttpServlet{

	@Override
	protected void doGet(HttpServletRequest request, HttpServletResponse resp) throws ServletException, IOException {
		ServletContext servletContext = getServletContext();
		// 设置域对象
		servletContext.setAttribute("name", "张三");
		// 获取域对象
		String name = (String) servletContext.getAttribute("name");
		System.out.println(name);
		// 移除域对象
		servletContext.removeAttribute("name");
	}
}
总结:Servlet三大作用域
1.request域对象
在一次请求中有效。请求转发有效,重定向失败
2.session域对象
在一次会话中有效。请求转发和重定向都有效,session销毁后失效
3.servletContext域对象
在整个应用程序中有效。服务器关闭销毁。
十三、过滤器【重点】
过滤器是处于客户端与服务器资源之前的一道过滤技术
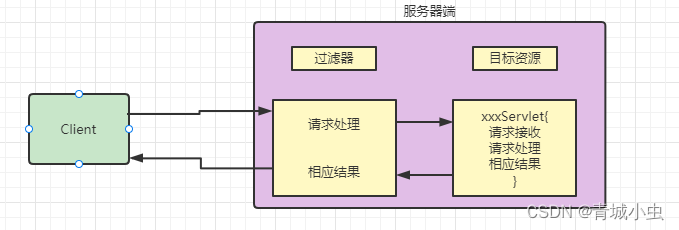
1.过滤器作用
过滤器执行在Servlet之前,客户端发送请求时,会先经过过滤器Filter,在到达目标Servlet当中。从而实现一些特殊的功能。例如实现URL级别的权限访问控制、过滤敏感词汇、压缩响应信息等一些高级功能。
2.编写过滤器
- 编写java类实现Filter接口
- 在doFilter方法中编写拦截逻辑
- 设置拦截器
拦截器代码
@WebFilter("/tage")  //设置拦截的目标,也及时该目标的访问地址
public class MyFilter implements Filter{
	// 初始化方法
	@Override
	public void init(FilterConfig filterConfig) throws ServletException {
		// TODO Auto-generated method stub

	}

	@Override
	public void doFilter(ServletRequest request, ServletResponse response, FilterChain chain)
			throws IOException, ServletException {
		System.out.println("执行拦截器");
		// 让请求继续执行到拦截的servlet当中去
		chain.doFilter(request, response);
  		//执行完毕返回
		System.out.println("执行完毕返回");
	}

	//效果方法
	@Override
	public void destroy() {
		// TODO Auto-generated method stub

	}

}
目标代码
@WebServlet("/tage")
public class TageServlet extends HttpServlet{

	@Override
	protected void doGet(HttpServletRequest req, HttpServletResponse resp) throws ServletException, IOException {

		System.out.println("我是目标servlet");

	}

}
html访问
<!DOCTYPE html>
<html>
<head>
<meta charset="UTF-8">
<title>Insert title here</title>
</head>
<body>
	<form action="/ServletTest/tage" method="get">
		<input type="submit" value="登录"/>
	</form>
</body>
</html>
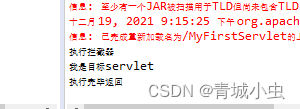
3.在web.xml中配置过滤器
过滤器代码
public class MyFilter implements Filter{

	@Override
	public void init(FilterConfig filterConfig) throws ServletException {
		// TODO Auto-generated method stub

	}

	@Override
	public void doFilter(ServletRequest request, ServletResponse response, FilterChain chain)
			throws IOException, ServletException {

		System.out.println("我执行啦 ");
		//继续执行剩下的过滤器
        chain.doFilter(request, response);  //让目标资源执行,放行

	}

	@Override
	public void destroy() {
		// TODO Auto-generated method stub

	}
}
xml当中的配置
<!--配置过滤器-->
   <filter>
       <filter-name>myFilter</filter-name>
       <!-- 过滤器类全名 -->
       <filter-class>com.qcby.MyFilter</filter-class>
   </filter>

   <!--映射过滤器-->
   <filter-mapping>
       <filter-name>myFilter</filter-name>
       	<!--拦截规则 -->
       <!--“/*”表示拦截所有的请求 -->
       <url-pattern>/*</url-pattern>
   </filter-mapping>
4.关于拦截路径
拦截器的拦截路径通常有三种方式
    精确匹配拦截:比如/index.jsp  /tage
    后置匹配拦截:比如*.html   *.jsp
    通配符拦截匹配/* 表示拦截所有。注意过滤器不能使用 / 匹配
5.过滤器链和优先级
客户端对服务器请求后,服务器在调用Servlet之前会调用一组过滤器(多个过滤器),那么这组过滤器就称为一组过滤链。
每个过滤器都有特定的功能,当一个过滤器的doFilter()方法被被调用后,Web服务器会创建一个代表Filter链的FilterChain对象传递该方法。在doFilter方法中,开发人员如果调用了FilterChain对象的doFilter()方法,则Web服务器会检查FilterChain对象中是否还有filter,如果有,则调用第2个filter,如果没有,则调用目标资源。

在一个web应用当中,可以开发编写多个Filter,这些Filter组合起来称为一个Filter链。
优先级:
    1.如果为注解的话,是按照全类程序的字符串顺序决定作用顺序
    2.如果是web.xml,按照filter-mapping注册顺序,从上到下
    3.web.xml配置高于注解方式
    4.如果注解和web.xml同时配置,会造成多个过滤对象,造成多次过滤
6.过滤器典型应用
①:乱码处理—dopost的乱码处理
拦截器
@WebFilter(value="/login")
public class EncodingFilter implements Filter{

	@Override
	public void init(FilterConfig filterConfig) throws ServletException {


	}

	@Override
	public void doFilter(ServletRequest request, ServletResponse response, FilterChain chain)
			throws IOException, ServletException {
		request.setCharacterEncoding("UTF-8");
		response.setContentType("text/html;charset=utf-8");
		System.out.println("----------");
		chain.doFilter(request, response);  //让目标资源执行,放行
	}

	@Override
	public void destroy() {


	}

}
登录servlet
 @WebServlet("/login")
public class Login extends HttpServlet{

	@Override
	protected void doPost(HttpServletRequest request, HttpServletResponse response) throws ServletException, IOException {

		String username = request.getParameter("username");
		String password = request.getParameter("password");

		System.out.println(username + " " + password);


	}

}
html页面
	<form action="/ServletTest/login" method="post">
		用户名:<input type="text" name="username"/><br/>
		密码:<input type="text" name="password"/><br/>
		<input type="submit" value="登录"/>
	</form>
②:权限验证
首先是关于登录:登录完成之后设置sessionid
<!DOCTYPE html>
<html>
<head>
<meta charset="UTF-8">
<title>Insert title here</title>
<script src="https://cdn.staticfile.org/jquery/1.10.2/jquery.min.js"></script>
</head>
<body>
	用户名:<input type="text" name="username"/><br/>
		密码:<input type="text" name="password"/><br/>
		<input type="submit" value="登录" onclick ="get()"/>
</body>
<script>
	function get(){
		var username = $("#username").val();
		var password = $("#password").val();
		$.ajax({
			type:'post',  // 提交的类型 get--->doGet /  post---->doPost
			url:"/ServletTest/login", // url:统一资源定位符
			data:{"username":username,"password":password}, // 传输的数据
			success:function(data){ // 数据接收
				console.log(data);
				if(data.code=="200"){
					window.location.href = "/ServletTest/content.html";
				}
			}
		})
	}
</script>
</html>
servlet
		// TODO Auto-generated method stub
		String username = request.getParameter("username");
		String password = request.getParameter("password");

		System.out.println(username + " " + password);

		//登录成功以后,讲登录信息防伪session当中
		HttpSession session = request.getSession();
		session.setAttribute("name", session.getId());
		System.out.println(session.getAttribute("name"));

		response.setContentType("text/json;charset=UTF-8");
		response.setCharacterEncoding("utf-8");
		//登录成功以后向前台返回数据
		String json = "{\"code\":\"200\",\"message\":\"成功\"}";
		response.getWriter().append(json);
并跳转到content页面当中
<!DOCTYPE html>
<html>
<head>
<meta charset="UTF-8">
<title>Insert title here</title>
<script src="https://cdn.staticfile.org/jquery/1.10.2/jquery.min.js"></script>
</head>
<body onload="get()">
	<!-- 数据显示位置 -->
    <div id="inf"></div>
</body>
<script>
	function get(){
		$.ajax({
			type:'get',  // 提交的类型 get--->doGet /  post---->doPost
			url:"/ServletTest/target", // url:统一资源定位符
			data:{}, // 传输的数据
			success:function(data){ // 数据接收
				console.log(data);
				viewList(data);
			}
		})
	}
	function viewList(data){
		  var html = '<table border="1">';
		  html += '<tr>';
		 	  html += '<th>id</th>';
		 	  html += '<th>姓名</th>';
			  html += '<th>性别</th>';
			  html += '<th>年龄</th>';
		  html += '</tr>';
		  for(var i = 0;i<data.length;i++){
			  html += '<tr>';
			  html += '<td >' +data[i].id+ '</td>';
			  html += '<td >' +data[i].name+ '</td>';
			  html += '<td >' +data[i].sex+ '</td>';
			  html += '<td >' +data[i].age+ '</td>';
			  html += '</tr>';
		  }
		  html += '</table>';
		  $("#inf").empty().append(html);
	}
</script>
</html>
servlet
@WebServlet("/target")
public class MyServlet extends HttpServlet{
	@Override
	protected void doGet(HttpServletRequest req, HttpServletResponse resp) throws ServletException, IOException {
		// TODO Auto-generated method stub
		resp.setContentType("text/json;charset=UTF-8");
		resp.setCharacterEncoding("utf-8");
		String json = "\r\n" +
				"[\r\n" +
				"	{\"id\":\"1\",\"name\":\"张三\",\"sex\":\"男\",\"age\":\"18\"},\r\n" +
				"	{\"id\":\"2\",\"name\":\"里斯\",\"sex\":\"男\",\"age\":\"18\"},\r\n" +
				"	{\"id\":\"3\",\"name\":\"王五\",\"sex\":\"男\",\"age\":\"18\"},\r\n" +
				"	{\"id\":\"4\",\"name\":\"李留\",\"sex\":\"男\",\"age\":\"18\"}\r\n" +
				"]";
		resp.getWriter().append(json);
	}
}
关于权限验证:当我们直接打开content.html页面的时候我们不能直接获取数据
@WebFilter("/target")
public class CheakFilter implements Filter{

	@Override
	public void init(FilterConfig filterConfig) throws ServletException {
		// TODO Auto-generated method stub

	}

	@Override
	public void doFilter(ServletRequest request, ServletResponse response, FilterChain chain)
			throws IOException, ServletException {
		// 如果登录过那么久跳转到MyServlet当中去,如果没有就跳转到登录
		// 向下转型
		HttpServletRequest request2 = (HttpServletRequest)request;
		HttpServletResponse response2 = (HttpServletResponse) response;
		//创建session对象
		HttpSession session = request2.getSession();
		String name = (String) session.getAttribute("name");
		if (name !=null) {
			chain.doFilter(request, response);
		}else {
			System.out.println("请先登录....");
			response2.sendRedirect(request2.getContextPath() + "/login.html");
		}

	}

	@Override
	public void destroy() {
		// TODO Auto-generated method stub

	}

}
