目录
一 . 创建Spring项目
二 . Bean 对象存放到 Spring
三 . 从Spring中读到Bean
经过前⾯的学习我们已经知道了,Spring 就是⼀个包含了众多⼯具⽅法的 IoC 容器。既然是容器那么 它就具备两个最基本的功能:
- 将对象存储到容器(Spring)中;
- 从容器中将对象取出来
在Java语言中,对象也叫做 Bean , 所以后边再遇到对象就以 Bean 著称
在了解Spring的使用之前,我们先解决一个问题,就是如何创建一个Spring项目
一 . 创建Spring项目
接下来使⽤ Maven ⽅式来创建⼀个 Spring 项⽬,创建 Spring 项⽬和 Servlet 类似,总共分为以下 3
步:
- 创建⼀个普通 Maven 项⽬。
- 添加 Spring 框架⽀持(spring-context、spring-beans)。
- 添加启动类。
1.1 创建一个Maven项目
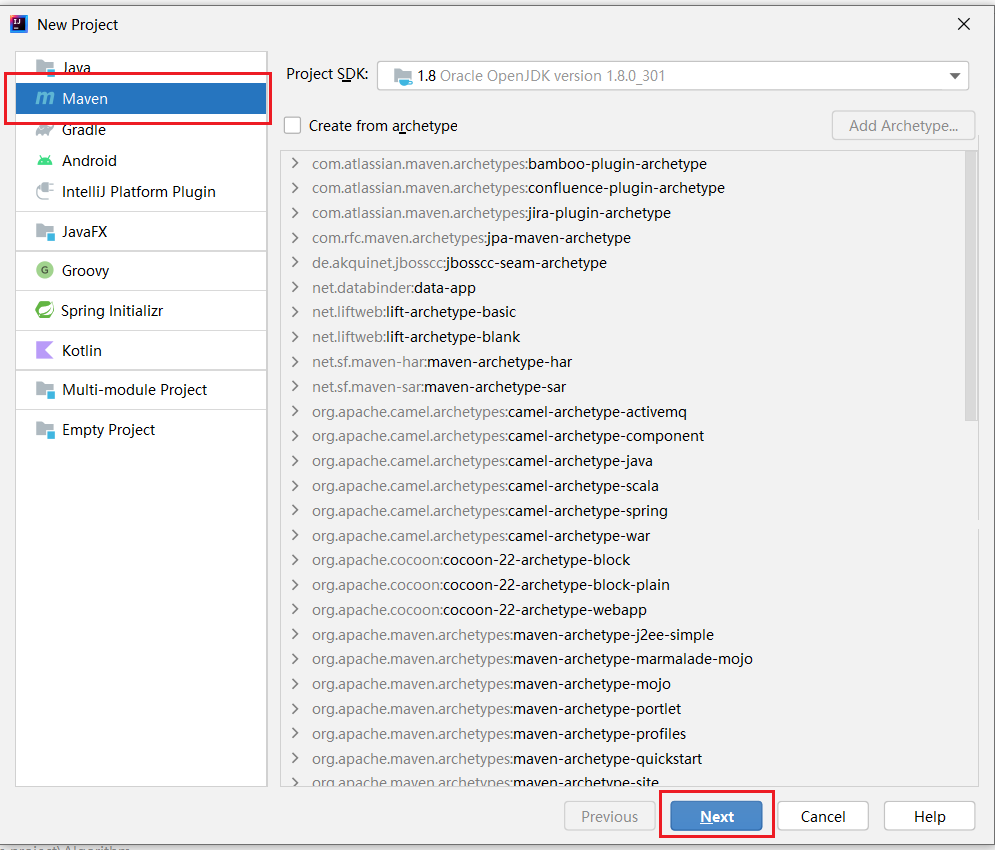
接着点击下一步
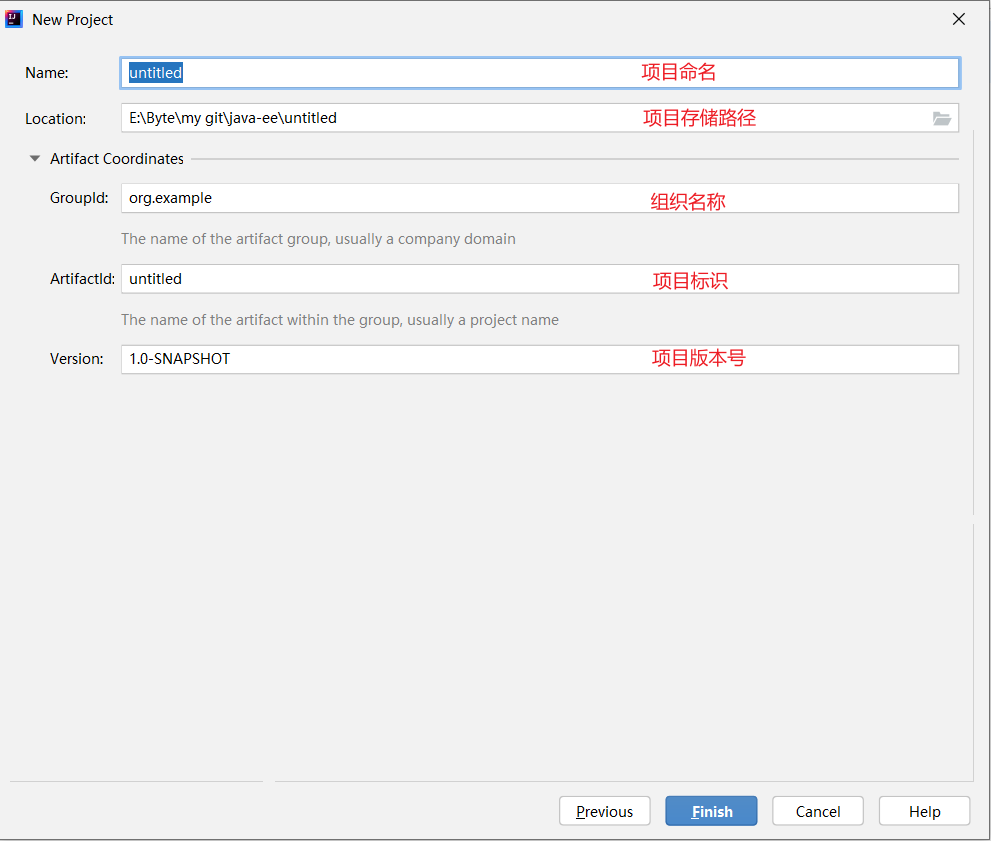
此处创建的项目存储路径内不能有中文 , 完成后点击 finish
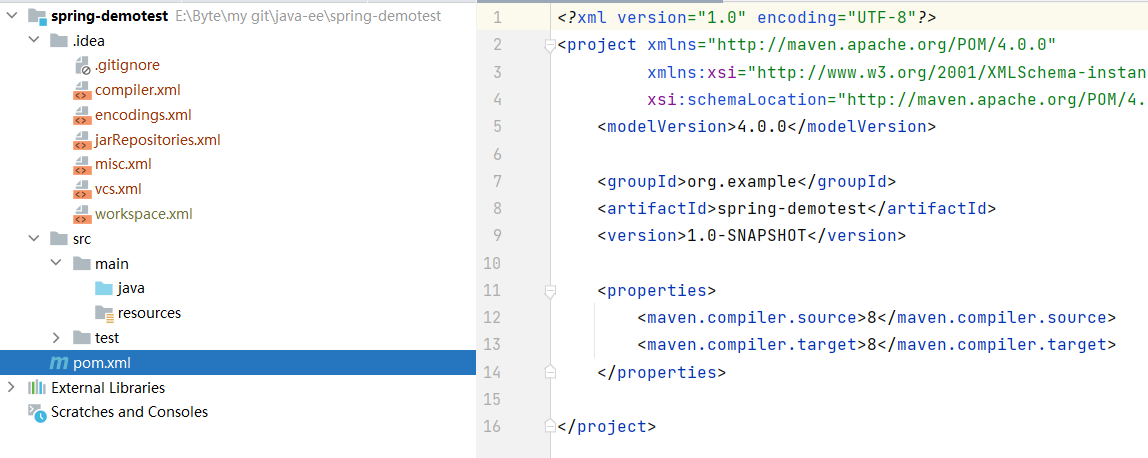
可以观察到 Maven 项目已经初始化好了,接下来我们需要添加 Spring 的依赖 ,但是在添加之前 ,我们需要检查一下 Maven的相关配置,需要设置两个配置文件的国内源配置
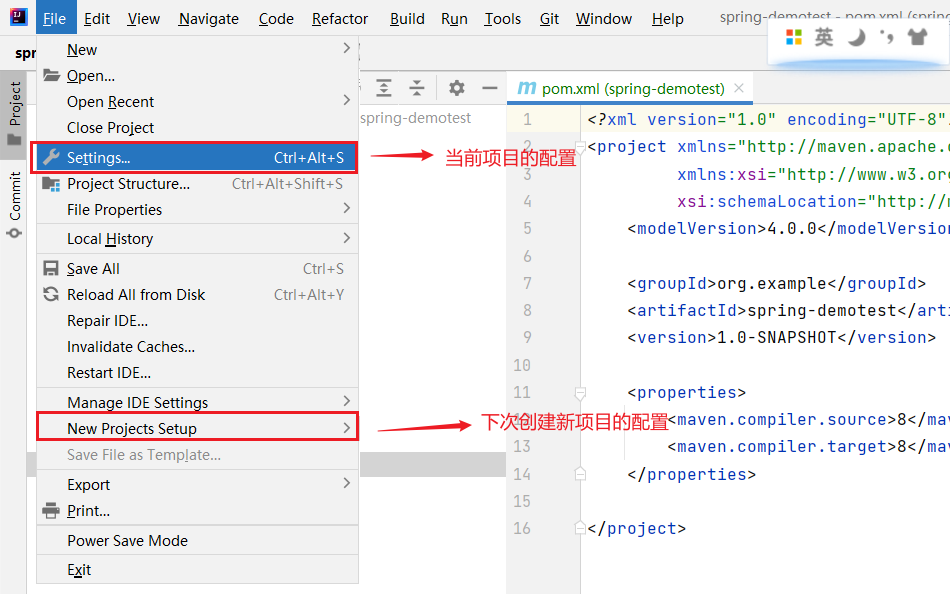
- 检查当前项目的配置
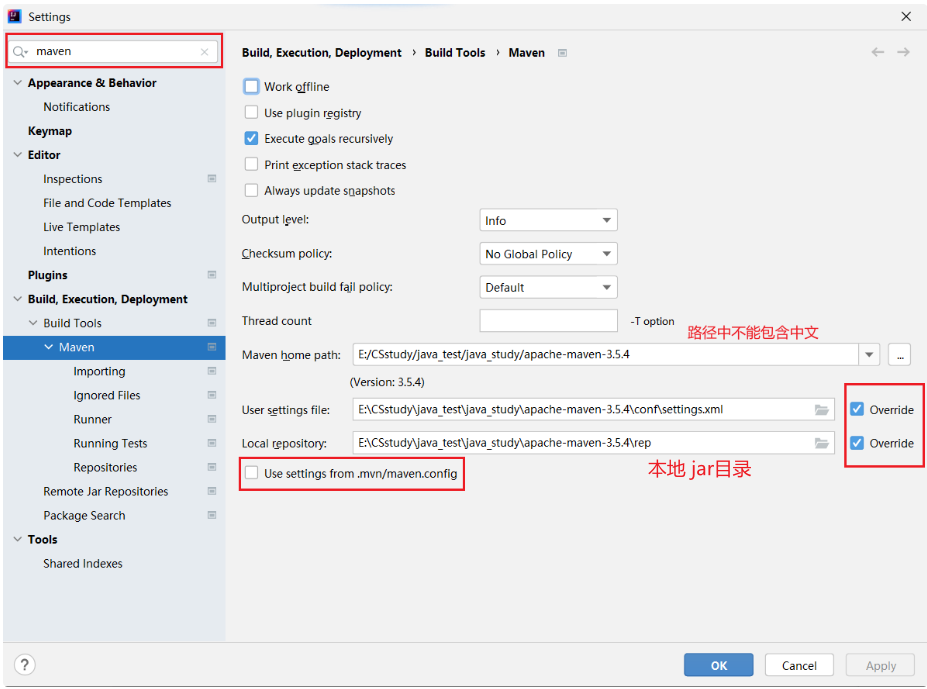
检查项⼀共有两个:
- 确认右边的两个勾已经选中,如果没有请点击选中。
- 检查 User Settings file 的 settings.xml ⽂件是否存在:
a. 如果不存在,复制下⾯配置了国内源的 settings.xml ⽂件,放到 User Settings file ⽬录下。
b. 如果存在,检查 settings.xml 是否配置了国内源。
正确的国内源的配置如下:
在Maven的存储路径下找到 conf / settings.xml , 修改其中的内容为
<settings xmlns="http://maven.apache.org/SETTINGS/1.1.0" xmlns:xsi="htt
p://www.w3.org/2001/XMLSchema-instance"
 xsi:schemaLocation="http://maven.apache.org/SETTINGS/1.1.0 http://maven.
apache.org/xsd/settings-1.1.0.xsd">
<localRepository>本地远程仓库路径</localRepository>
 <mirrors>
 <mirror>
 <id>alimaven</id>
 <name>aliyun maven</name>
 <url>http://maven.aliyun.com/nexus/content/groups/public/</url>
 <mirrorOf>central</mirrorOf>
 </mirror>
 </mirrors>
</settings>
配置完成之后,删除本地的 jar 目录中的所有文件 , 重新下载 jar 包

1.2 添加Spring的依赖
pom.xml 中添加 Spring 的依赖 , 此处添加 Spring-context 依赖即可。
 <dependencies>
        <!-- https://mvnrepository.com/artifact/org.springframework/spring-context -->
        <dependency>
            <groupId>org.springframework</groupId>
            <artifactId>spring-context</artifactId>
            <version>5.3.26</version>
        </dependency>

    </dependencies>
1.3 创建启动类

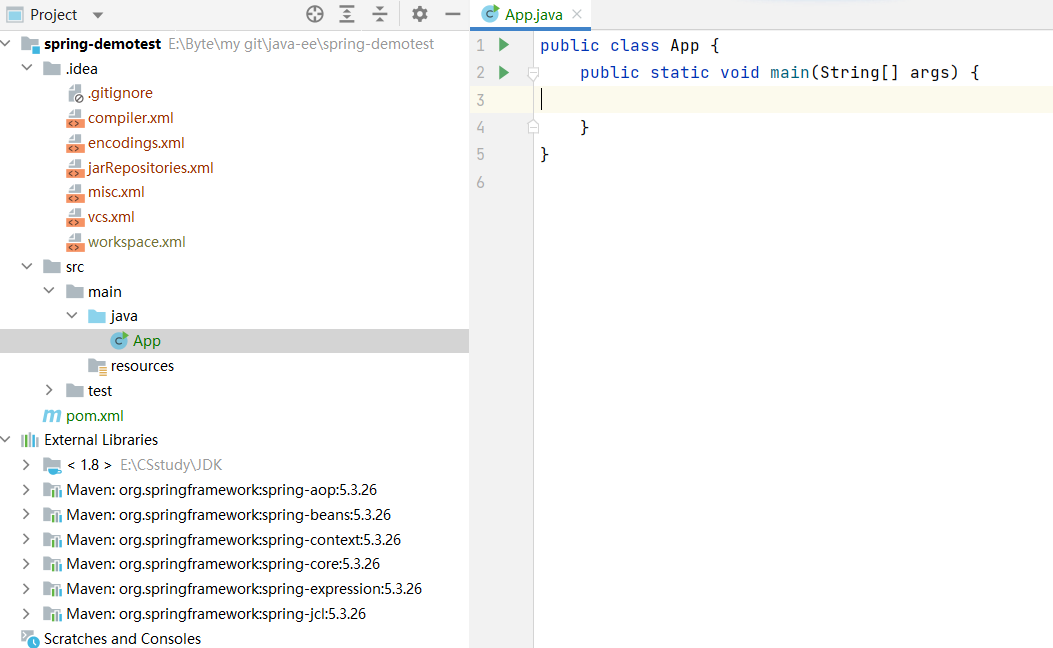
创建完启动类之后,观察项目中是否爆红,以及项目的 libraries 中是否存在导入的相关依赖,如果所有都没问题,则说明 Spring 项目创建成功。
二 . Bean 对象存放到 Spring
在Java当中,一个对象如果被使用多次,那么就可以被称之为 Bean ,
- 创建一个 Bean
public class Student {
    public   void sayHi(){
        System.out.println("Hello Student!");
    }
}- 将 Bean 注册到容器
在创建好的项目下 resources 的根目录下,创建一个 spring-config.xml 配置文件 ,如下图所示:

Spring中的配置文件为固定格式, 无需记忆,直接填入即可
<?xml version="1.0" encoding="UTF-8"?>
<beans xmlns="http://www.springframework.org/schema/beans"
       xmlns:xsi="http://www.w3.org/2001/XMLSchema-instance"
       xmlns:content="http://www.springframework.org/schema/context"
       xsi:schemaLocation="http://www.springframework.org/schema/beans http://www.springframework.org/schema/beans/spring-beans.xsd http://www.springframework.org/schema/context https://www.springframework.org/schema/context/spring-context.xsd">
    <content:component-scan base-package="com.bit.service"></content:component-scan>
</beans>
下面进行对象的注入,需要注入几个对象,就新建几个<bean></bean>

其中的 class 指的是 bean 的路径,我们将 Student 放置在 com.spring.demo下方 ,所以前边需要加上包名
三 . 从Spring中读到Bean
- 得到 Spring (上下文)对象

此时可以查看 ApplicationContext 的继承关系,可以发现 ClassPathXmlApplication 是 ApplicationContext 的一个实现子类

同时,与ClassPathXmlApplication同级的 FileSystemXmlApplicationContext 也可以用来获取上下文对象,但是这个类需要指定从磁盘中的路径来获取,此处不再演示。
- 从Spring中获取到 Bean对象

上述两个的 名称 与 id 必须保持一致 ,此时我们的代码就书写好了,下面我们来使用 Bean
import com.spring.demo.Student;
import org.springframework.context.ApplicationContext;
import org.springframework.context.support.ClassPathXmlApplicationContext;

public class App {
    public static void main(String[] args) {
        //  1 . 得到 spring
        ApplicationContext context = new ClassPathXmlApplicationContext("spring-config.xml");
        // 2. 从 Spring 容器中获取到 Bean 对象
        Student student = (Student) context.getBean("student");
        // 3. 使用 Bean 对象
        student.sayHi();
    }
}
运行结果如下,说明 Bean 的存取成功

除了使用 ApplicaitonContext 的方法来获取 Spring 的上下文 ,我们也可以使用 BeanFactory 的方式来获取 Spring 的上下文,用来存储和管理 Bean
- 使用 BeanFactory 来实现上述操作
import com.spring.demo.Student;
import org.springframework.beans.factory.BeanFactory;
import org.springframework.beans.factory.xml.XmlBeanFactory;
import org.springframework.core.io.ClassPathResource;
public class App2 {
    public static void main(String[] args) {
        // 1. 得到 Spring 上下文对象
        BeanFactory beanFactory = new XmlBeanFactory(new ClassPathResource("spring-config.xml"));
        //2. 从 Spring 容器中获取 bean 对象
        Student student = (Student) beanFactory.getBean("student");
        //3. 使用 Bean
        student.sayHi();
    }
}
那么使用着两种方法有哪些不同之处呢 ?
下面我们通过新建一个teacher类来演示:
package com.spring.demo;

public class Teacher {
    public Teacher() {
        System.out.println("do teacher init");
    }
    public void sayHi() {
        System.out.println("hi teacher");
    }
}
修改 Student 类如下:
package com.spring.demo;

public class Student {
    public Student(){
        System.out.println("do student init");
    }
    public void sayHi(){
        System.out.println("Hello Student!");
    }
}
将两者注入 Spring 容器中 :

执行 applicationContext 的打印结果:

分析:
将 xml 中的所有对象存储到 spring 容器中, 比较费内存,一次性加载, 之后的读取就会非常快 。
执行 BeanFactory 的打印结果:

分析: 懒加载 ,只有调用 getBean 才会去加载对应的 Bean , 特征是节省内存,调用时才会加载初始化 Bean 到 Spring 中 ,所以效率不高
两者之间的继承关系如下:

ApplicationContext 和 BeanFactory 效果是⼀样的,ApplicationContext 属于 BeanFactory 的⼦ 类,它们的区别如下。
继承关系和功能⽅⾯来说
- Spring 容器有两个顶级的接⼝:BeanFactory 和 ApplicationContext。其中 BeanFactory 提供了基础的访问容器的能⼒,⽽ ApplicationContext 属于 BeanFactory 的⼦类,它除了继承了 BeanFactory 的所有功能之外,它还拥有独特的特性, 还添加了对国际化⽀持、资源访问⽀持、以及事件传播等⽅⾯的⽀持。
- 从性能⽅⾯来说:ApplicationContext 是一次性将所有的对象加载到Bean 容器当中,比较费内存,但是一次性加载之后后续的读取就会非常快,而 BeanFactory 属于懒加载,只有调用 getBean 时才会去加载对应的 Bean , 特征是节省内存, 但是效率不高。
下面使用 ApplicationContext 来讲解 Spring 中获取 Bean 的三种方式:
- 通过名称来获取
Student student = (Student) context.getBean("student");- 通过类型来获取
Student student = context.getBean(Student.class);当通过类型来获取时, 如果 Spring 中的一个类型存储了多个实例,那么使用类型来获取 Bean 就会报错。

- 通过名称+类型进行获取
Student student = context.getBean("stu",Student.class); // 根据名称+类型存储对象总结:
本文主要讲解了 如何创建 Spring项目,已经如何将Bean对象存放到 Spring和从Spring中来读到 Bean,从而使用Bean等相关操作 , 下一篇我们来讲解 Spring中如何更加简单的读取读取和存储对象。


![[职场] 会计学专业学什么 #其他#知识分享#职场发展](https://img-blog.csdnimg.cn/img_convert/8b7b90170669d1244af867a4e03cf6d5.jpeg)
