文章目录
- 前言
- 准备工作
- 增量式以及位置式PID
- 电机闭环
- 电磁采样
- 舵机闭环
- 合并
- 效果
前言
准备18届的负压电磁,趁现在考试延期赶紧把车子给调了。
现在速度就只能提到1.5m,再往上调就有点打滑了,只能等后面逐飞把负压电机的做出来了之后看能不能让车子抓地更好,再往上调调。
硬件的主板目前使用逐飞的STC母板,电感排布为左中右。
准备工作
在实现这些电磁循迹之前,有必要进行一模块调试,分别是电机转速闭环、电磁采样,最后舵机闭环。
我个人感觉写寻迹小车也是一个比较大的工程项目,调试起来非常费时间,如果一下子写整个模块然后进行调试的话反而调试过程中会非常困难,推荐大家一个问题一个问题逐一解决之后,再合并。
增量式以及位置式PID
原理就不讲了,直接放我用的代码和结构体参数定义。
float PID_Control_Inc(PID* pid, int flag) // 增量式PID
{
    float inc = 0;

    pid->ek = pid->SetValue - pid->ActualValue;

    inc = pid->KP * (pid->ek - pid->ek_1) + pid->KI * pid->ek
          + pid->KD * (pid->ek - 2 * pid->ek_1 + pid->ek_2);

    pid->ek_2 = pid->ek_1; //存储误差
    pid->ek_1 = pid->ek; //存储误差

    if(flag == 1)
    {
        if(inc > pid->PIDmax)
            inc = pid->PIDmax;
        if(inc < pid->PIDmin)
            inc = pid->PIDmin;
    }
    pid->PIDout = inc;
    return pid->PIDout;
}
float PID_Control_Pos(PID* pid, int flag) // 位置式PID
{
    float Pos = 0;

    pid->ek = pid->SetValue - pid->ActualValue;
    pid->ek_sum += pid->ek;

    if(pid->ek_sum > pid->Sum_max)
        pid->ek_sum = pid->Sum_max;
    if(pid->ek_sum < pid->Sum_min)
        pid->ek_sum = pid->Sum_min;

    Pos = pid->KP * pid->ek + pid->KI * pid->ek_sum + pid->KD * (pid->ek - pid->ek_1);

    pid->ek_2 = pid->ek_1; //存储误差
    pid->ek_1 = pid->ek; //存储误差

    // 积分限幅
    if(flag == 1)
    {
        if(Pos > pid->PIDmax)
            Pos = pid->PIDmax;
        if(Pos < pid->PIDmin)
            Pos = pid->PIDmin;
    }
    pid->PIDout = Pos;

    return pid->PIDout;
}
typedef struct // PID结构体定义
{
    float32 SetValue; // 期望值 参考值
    float32 ActualValue; // 实际值
    float32 KP; // 比例因子
    float32 KI; // 积分因子
    float32 KD; // 微分因子
    float32 ek; // 本级误差
    float32 ek_1; // 上一次
    float32 ek_2; // 上上次
    float32 ek_sum; // 误差累积

    float32 Sum_max; // 误差累和上限
    float32 Sum_min; // 误差累和下限
    float32 PIDmax; // max limit
    float32 PIDmin; // min limit

    float32 PIDout; // output
}PID;
需知P因子能够增大响应速度但可能引起震荡,I因子能够消除静差但响应速度慢,可能引起震荡,D因子用于消除抖动。
因此对于转速的闭环采用PI控制,而对于舵机闭环则采用PD控制。
电机闭环
为了实现电机闭环,需结合编码器将转速信号转为脉冲信号,然后经MCU进行数据处理后反算为实际速度。
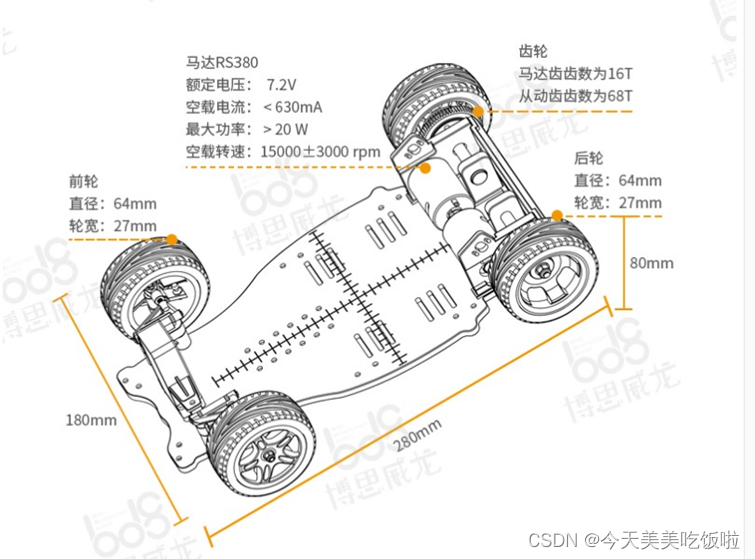
这里我采用的是龙邱的512线带方向输出的编码器,编码器同轴的齿轮齿数为31T,与车模后轮同轴的齿轮齿数为68T,我使用的是C车模,后轮直径为64mm。
根据机械传动公式,假设读取编码器脉冲个数的频率为500Hz,因此将可以计算出由编码器脉冲数转换为实际运行速度(米每秒)的比例系数
P
u
l
s
e
2
M
P
S
=
1
512
×
31
68
×
1
0
−
3
×
π
×
500
=
0.0895
Pulse2MPS=\frac{1}{512}\times \frac{31}{68}\times 10^{-3} \times \pi \times 500=0.0895
Pulse2MPS=5121×6831×10−3×π×500=0.0895
接下来就可以结合PID算法进行实际的转速闭环了。
再实际的小车应用中,光靠舵机闭环打角循迹是不行的,结合左右轮差速能够实改善转向性能。因此在进行转速闭环的同时,也需要对两个轮子同时进行闭环调试。
首先定义左右轮结构体变量。
extern PID pid_motor_L = {0}; // 左轮
extern PID pid_motor_R = {0}; // 右轮
然后使能定时器Timer1,并以500Hz的频率进入中断后读取速度。
void TIM1_Isr interrupt 3()
{
    float inc_L = 0.0;
    float inc_R = 0.0;
    float temp_L = 0.0;
    float temp_R = 0.0;
	float speed_goal = 1.5 * 60; // 后轮速度,米每分

	temp_L = ctimer_count_read(Encoder_L) * Pulse2MPM; // 左右轮当前速度
    temp_R = ctimer_count_read(Encoder_R) * Pulse2MPM;

    ctimer_count_clean(Encoder_L); // 编码器清零
    ctimer_count_clean(Encoder_R);

    if(DIR_Encoder_L == 1)
        pid_motor_L.ActualValue = temp_L;
    else
        pid_motor_L.ActualValue = (-1) * temp_L;
    if(DIR_Encoder_R == 0)
        pid_motor_R.ActualValue = temp_R;
    else
        pid_motor_R.ActualValue = (-1) * temp_R;

	pid_motor_L.SetValue = speed_goal ; // 差速
	pid_motor_R.SetValue = speed_goal ;
	inc_L = PID_Control_Inc(&pid_motor_L, 1);
	inc_R = PID_Control_Inc(&pid_motor_R, 1);

	duty_L += inc_L;
	duty_R += inc_R;

	if(duty_L > Motor_UpperLimit)
		duty_L = Motor_UpperLimit;
	if(duty_L < Motor_LowerLimit)
		duty_L = Motor_LowerLimit;

	if(duty_R > Motor_UpperLimit)
		duty_R = Motor_UpperLimit;
	if(duty_R < Motor_LowerLimit)
		duty_R = Motor_LowerLimit;

	DIR_1 = 0;
	pwm_duty(Motor_L, duty_L);
	DIR_2 = 0;
	pwm_duty(Motor_R, duty_R);
}
电磁采样
电磁采样原理略。
但需要注意,在采样到电磁值以后,需要首先将电磁前瞻对称放在赛道中心线上,即左右电感对称,中间电感在中心线上,然后旋拧电位器使左右电磁值相同并且小于中间电磁值,采样以后,需进行滤波以消除大幅度的扰动,并且进行归一化以适应赛道的变化。
对于三电感排布,记从左到右的电感分别为1、2、3,电磁值分别记为Lres、Mres、Rres。注意到电感到赛道中心线的距离与采样到的电磁值之间的关系是非线性变化的。为了让其线性化,对采样到的电磁值取倒以后,再1、2,2、3进行差比和。即
e
r
r
o
r
1
=
1
/
L
r
e
s
−
1
/
M
r
e
s
1
/
L
r
e
s
+
1
/
M
r
e
s
,
e
r
r
o
r
2
=
1
/
M
r
e
s
−
1
/
R
r
e
s
1
/
M
r
e
s
+
1
/
R
r
e
s
error_1=\frac{1/Lres-1/Mres}{1/Lres+1/Mres}, error_2=\frac{1/Mres-1/Rres}{1/Mres+1/Rres}
error1=1/Lres+1/Mres1/Lres−1/Mres,error2=1/Mres+1/Rres1/Mres−1/Rres。
然后得到最后能够用于舵机闭环的误差
e
r
r
o
r
=
e
r
r
o
r
1
+
e
r
r
o
r
2
e
r
r
o
r
1
−
e
r
r
o
r
2
error=\frac{error_1+error_2}{error_1-error_2}
error=error1−error2error1+error2。
滤波的方法有很多,均值滤波就能够达到很好的效果。归一化方法就是数学建模中常用的极大极小归一化法,但我们不能预先知道能够采集到的电磁值最大值最小值有多大,因此可以默认最大值为3600,最小为0.
// sample
    L[0] = adc_once(ADC_P00, ADC_12BIT);
    L[1] = adc_once(ADC_P00, ADC_12BIT);
    L[2] = adc_once(ADC_P00, ADC_12BIT);
    L[3] = adc_once(ADC_P00, ADC_12BIT);
    L[4] = adc_once(ADC_P00, ADC_12BIT);

    R[0] = adc_once(ADC_P06, ADC_12BIT);
    R[1] = adc_once(ADC_P06, ADC_12BIT);
    R[2] = adc_once(ADC_P06, ADC_12BIT);
    R[3] = adc_once(ADC_P06, ADC_12BIT);
    R[4] = adc_once(ADC_P06, ADC_12BIT);

	M[0] = adc_once(ADC_P13, ADC_12BIT);
	M[1] = adc_once(ADC_P13, ADC_12BIT);
	M[2] = adc_once(ADC_P13, ADC_12BIT);
	M[3] = adc_once(ADC_P13, ADC_12BIT);
	M[4] = adc_once(ADC_P13, ADC_12BIT);

    // get sum
    Sum_L  = L[0] + L[1] + L[2] + L[3] + L[4];
    Sum_R  = R[0] + R[1] + R[2] + R[3] + R[4];
	Sum_M  = M[0] + M[1] + M[2] + M[3] + M[4];

    // normalize and mean filter
    Lres =  (Sum_L - adc_min)  * 1000.0 / (adc_max - adc_min) / 5;
    Rres =  (Sum_R - adc_min)  * 1000.0 / (adc_max - adc_min) / 5;
	Mres =  (Sum_M - adc_min)  * 1000.0 / (adc_max - adc_min) / 5;

	error1 = (1.0 / Lres - 1.0 / Mres) / (1.0 / Lres + 1.0 / Mres);
	error2 = (1.0 / Mres - 1.0 / Rres) / (1.0 / Mres + 1.0 / Rres);
	error = (error1 + error2) / (error1 + error2);
舵机闭环
舵机打角的原理略。
在这里给大家提个醒,在进行调试之间,最好事先把两个前轮的机械结构弄对称。并且先给舵机一个50Hz较低脉宽的PWM,找到舵机的中间值,因为在出场之前,舵机可能没有调整它的中间位置。
定义舵机PID变量,并进行PD控制。
void TIM1_Isr interrupt 3()
{
	pid_steer.ActualValue = error;
    temp = PID_Control_Pos(&pid_steer, 1);

    duty_steer = Middle + 1.0 * (uint16)(temp);

	if(duty_steer > Left) // 舵机限幅
		duty_steer = Left;
	if(duty_steer < Right) // 舵机限幅
		duty_steer = Right;

	pwm_duty(PWMB_CH1_P74, duty_steer);
}
合并
uint16 const Middle = 800;
uint16 const Left = 880;
uint16 const Right = 720;

float adc_data_L[5], adc_data_R[5],adc_data_M[5]= {0};
float adc_max = 3600;
float adc_min = 0;
float error1,error2, error = 0;

uint16 duty_steer;
uint16 duty_L = 1500;
uint16 duty_R = 1500;
uint8 flag_fork=0; // 三叉标志
uint8 flag_R_circ_pre,flag_R_circ_in,flag_R_circ_out=0; // 右环岛
uint8 flag_L_circ_pre,flag_L_circ_in,flag_L_circ_out=0; // 左环岛
uint8 flag_trackout = 0;
uint8 Debug = 0;
uint8 test = 0;
float32 L[5], R[5], M[5]= {0}; // 存储以滤波
float32 Lres, Rres, Mres = 0; // 滤波结果,真正用于计算
float32 speed_goal = 1.5 * 60;

void TM1_Isr() interrupt 3
{

    static uint16 count_led = 0; // 中断计数用于点灯
    static uint16 count_sample = 0;  // 中断计数用于滤波
	static uint16 count_delay_fork=0; // 三叉判断延时
    static uint16 count_delay_R_circ_pre = 0; // 预圆环延时计数
	static uint16 count_delay_R_circ_in = 0; // 入环延时
	static uint16 count_delay_R_circ_out = 0;
	static uint16 count_delay_L_circ_pre = 0; // 预圆环延时计数
	static uint16 count_delay_L_circ_in = 0; // 入环延时
	static uint16 count_delay_L_circ_out=0;
    static uint16 count = 0;

    float inc_L = 0.0;
    float inc_R = 0.0;
    float temp_L = 0.0;
    float temp_R = 0.0;
    float temp = 0;
    float dif_rate = 0; // 正常行驶差速系数
	float speed_rate=0;
    float Sum_L, Sum_R, Sum_LM, Sum_RM, Sum_M= 0;


	P42 = 1;
    flag_trackout = 0;

    count_led++;
    if(count_led >= 0.5 * TIM1_ISR_F)
    {
        count_led = 0;
        LED_toggle; // 用于调试,防止中断崩
    }
    // 速度
    temp_L = ctimer_count_read(Encoder_L) * Pulse2MPM; // 左右轮当前速度
    temp_R = ctimer_count_read(Encoder_R) * Pulse2MPM;

    ctimer_count_clean(Encoder_L); // 编码器清零
    ctimer_count_clean(Encoder_R);

    if(DIR_Encoder_L == 1)
        pid_motor_L.ActualValue = temp_L;
    else
        pid_motor_L.ActualValue = (-1) * temp_L;
    if(DIR_Encoder_R == 0)
        pid_motor_R.ActualValue = temp_R;
    else
        pid_motor_R.ActualValue = (-1) * temp_R;

	// sample
    L[0] = adc_once(ADC_P00, ADC_12BIT);
    L[1] = adc_once(ADC_P00, ADC_12BIT);
    L[2] = adc_once(ADC_P00, ADC_12BIT);
    L[3] = adc_once(ADC_P00, ADC_12BIT);
    L[4] = adc_once(ADC_P00, ADC_12BIT);

    R[0] = adc_once(ADC_P06, ADC_12BIT);
    R[1] = adc_once(ADC_P06, ADC_12BIT);
    R[2] = adc_once(ADC_P06, ADC_12BIT);
    R[3] = adc_once(ADC_P06, ADC_12BIT);
    R[4] = adc_once(ADC_P06, ADC_12BIT);

	M[0] = adc_once(ADC_P13, ADC_12BIT);
	M[1] = adc_once(ADC_P13, ADC_12BIT);
	M[2] = adc_once(ADC_P13, ADC_12BIT);
	M[3] = adc_once(ADC_P13, ADC_12BIT);
	M[4] = adc_once(ADC_P13, ADC_12BIT);

    // get sum
    Sum_L  = L[0] + L[1] + L[2] + L[3] + L[4];
    Sum_R  = R[0] + R[1] + R[2] + R[3] + R[4];
	Sum_M  = M[0] + M[1] + M[2] + M[3] + M[4];

    // normalize and mean filter
    Lres =  (Sum_L - adc_min)  * 1000.0 / (adc_max - adc_min) / 5;
    Rres =  (Sum_R - adc_min)  * 1000.0 / (adc_max - adc_min) / 5;
	Mres =  (Sum_M - adc_min)  * 1000.0 / (adc_max - adc_min) / 5;

    if(!test)
    {
		error1 = (1.0 / Lres - 1.0 / Mres) / (1.0 / Lres + 1.0 / Mres);
		error2 = (1.0 / Mres - 1.0 / Rres) / (1.0 / Mres + 1.0 / Rres);
		error = (error1 + error2) / (error1 + error2);

        pid_steer.KP = 20 + fabs(error)*fabs(error) *10;

		if(pid_steer.KP > 200)
            pid_steer.KP = 200;

        dif_rate = 0.001 + fabs(error) / 1000;
        if(dif_rate >= 0.003)
            dif_rate = 0.003;

		speed_rate = 0.9 + 0.1 / fabs(error) / fabs(error);
		if(speed_rate > 1.1)
			speed_rate = 1.1;

        pid_steer.ActualValue = error;
        temp = PID_Control_Pos(&pid_steer, 1);

		if((!flag_R_circ_in) && (!flag_L_circ_in) && (!flag_fork))
			duty_steer = Middle + 1.0 * (uint16)(temp);

        if(duty_steer > Left) // 舵机限幅
            duty_steer = Left;
        if(duty_steer < Right) // 舵机限幅
            duty_steer = Right;

        // 速度差速控制
        if(Debug)
            dif_rate = 0;

        pid_motor_L.SetValue = speed_rate*speed_goal * (1 - dif_rate * temp) ; // 差速
        pid_motor_R.SetValue = speed_rate*speed_goal * (1 + dif_rate * temp) ;

        inc_L = PID_Control_Inc(&pid_motor_L, 1);
        inc_R = PID_Control_Inc(&pid_motor_R, 1);

        duty_L += inc_L;
        duty_R += inc_R;

        if(duty_L > Motor_UpperLimit)
            duty_L = Motor_UpperLimit;
        if(duty_L < Motor_LowerLimit)
            duty_L = Motor_LowerLimit;

        if(duty_R > Motor_UpperLimit)
            duty_R = Motor_UpperLimit;
        if(duty_R < Motor_LowerLimit)
            duty_R = Motor_LowerLimit;

        // out of track
        if((Rres < 80 && Lres < 80) && (!Debug))
        {

            DIR_1 = 1;
            pwm_duty(Motor_L, 0);
            DIR_2 = 1;
            pwm_duty(Motor_R, 0);
            flag_trackout = 1;
        }
        else
        {
            pwm_duty(PWMB_CH1_P74, duty_steer);
            DIR_1 = 0;
            pwm_duty(Motor_L, duty_L);
            DIR_2 = 0;
            pwm_duty(Motor_R, duty_R);
        }
    }
    P42 = 0;
需注意,在编写代码的时候务必要注意中断的执行时间。可以在进中断给一个IO口置1,出中断给IO置0。外接示波器读高电平时间。如果高电平的时间远大于低电平时间,那就要考虑降低一下中断频率了。
效果
三电感电磁循迹小车

