0 编译结果
先放上编译结果:
 图1 QGIS3.22 启动界面
 图2 QGIS3.22 操作界面
1 前言
因一些主观、客观原因,一年多没更新博客了,提笔继续。
这是笔者编译的第三个版本QGIS,本次编译原因有四:
(1) 出于个人对QGIS的喜爱,这是最重要的。
(2)新换了一台设备,开发环境改变。
(3) 想了解最新的QGIS特性(截止本博文撰写当日,QGIS已发布3.28版本,3.22是最新的长期稳定版)。

(4)笔者以前编译的都是32位版本,本次编译64位版本也是为了兑现在上一篇相关博文《QGIS编译—QGIS3.10.6 + Qt5.11.2 + VS2015 —32位版本》中“前言”部分的第3点承诺。
2 特别说明
1. 编译环境&&软件版本:
(1)Windows 10 64位 专业版
(2)Visual Studio Community 2019(社区版)
(3)CMake-3.23.2 64位
(4)Cygwin 64位
(5)OSGeo4W 64位
(6)Qt-5.15.3 64位(通过OSGeo4W 下载)
(7)QGIS-3.22.4 源码
2. 关于QT:
本次编译使用的QT依赖项来源于OSGeo4W下载,读者也可以通过单独下载安装QT-5.15.3,并完成相关配置,得到QT环境。
3. 关于OSGeo4W和Cygwin下载:
(1)安装OSGeo4W和Cygwin的过程相似,都会伴随依赖项的下载安装。
(2)凡是还没下载的依赖项,OSGeo4W和Cygwin中都需要选择install;对于已下载的依赖项,在OSGeo4W和Cygwin中都显示为keep,无需再下载。
(3)OSGeo4W和Cygwin中下载依赖项是增量式的,比如你已经安装了OSGeo4W和Cygwin,但是后期编译过程中发现少了东西(例如iconv、gdal等),可以重复OSGeo4W和Cygwin的安装过程,而已下载的依赖项不会被清除。
3 编译过程
1. 软件准备:
(1)操作系统:Windows 10 64位 专业版(旗舰版、家庭版等其他版本也可)
(2)其他软件下载:
| 工具包 | 下载地址 |
|---|---|
| QGIS 3.22.4 源码 | https://github.com/qgis/QGIS/releases/tag/final-3_22_4 |
| CMake 3.23.2(64位) | https://cmake.org/files/ |
| Cygwin(64位) | https://cygwin.com/install.html |
| OSGeo4W (64位) | https://www.qgis.org/en/site/forusers/download.html |
| QT 5.15.3(64位) | 在OSGeo4W 中搜索qgis-dev下载 |
2. 开始编译:
(1)QGIS源码解压到非中文、无空格路径下;
(2)安装Cygwin的同时下载安装flex、bison,过程如下:
 图4 下载Cygwin
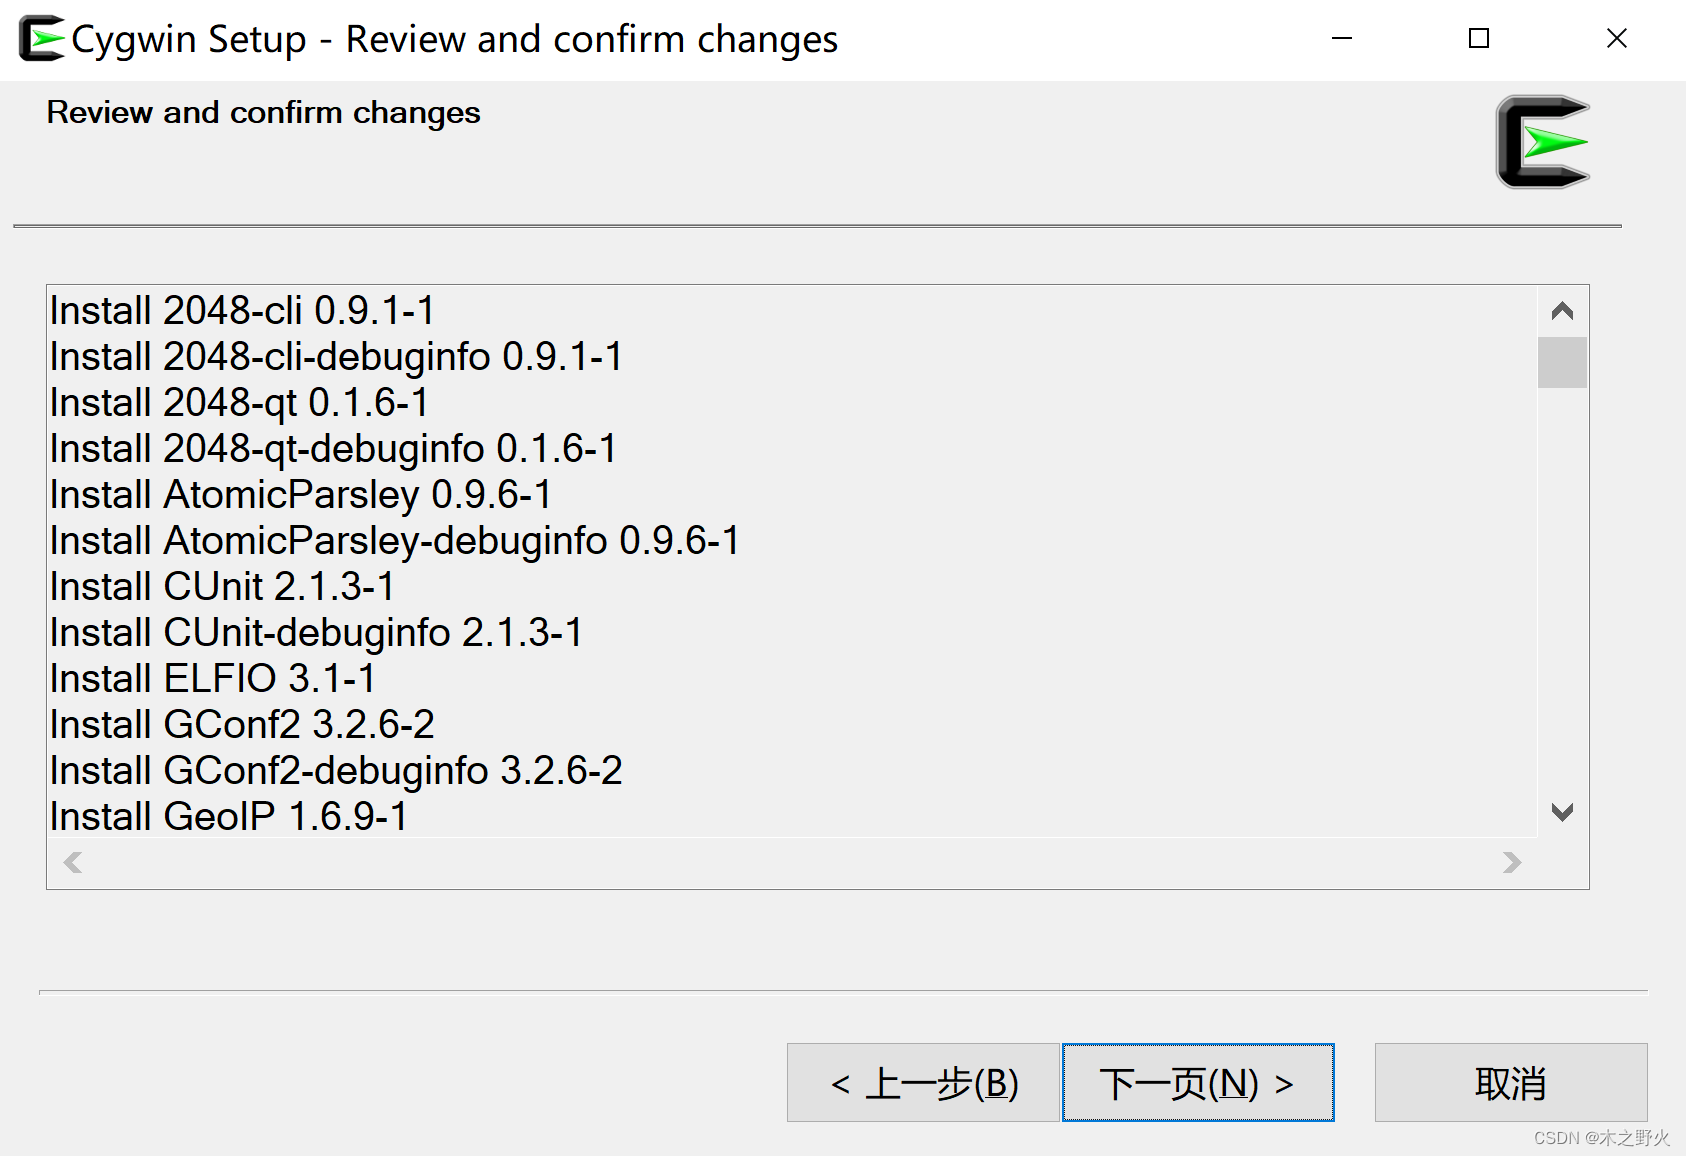 图5 Cygwin安装过程
 图6 Cygwin安装过程
 图7 Cygwin安装过程
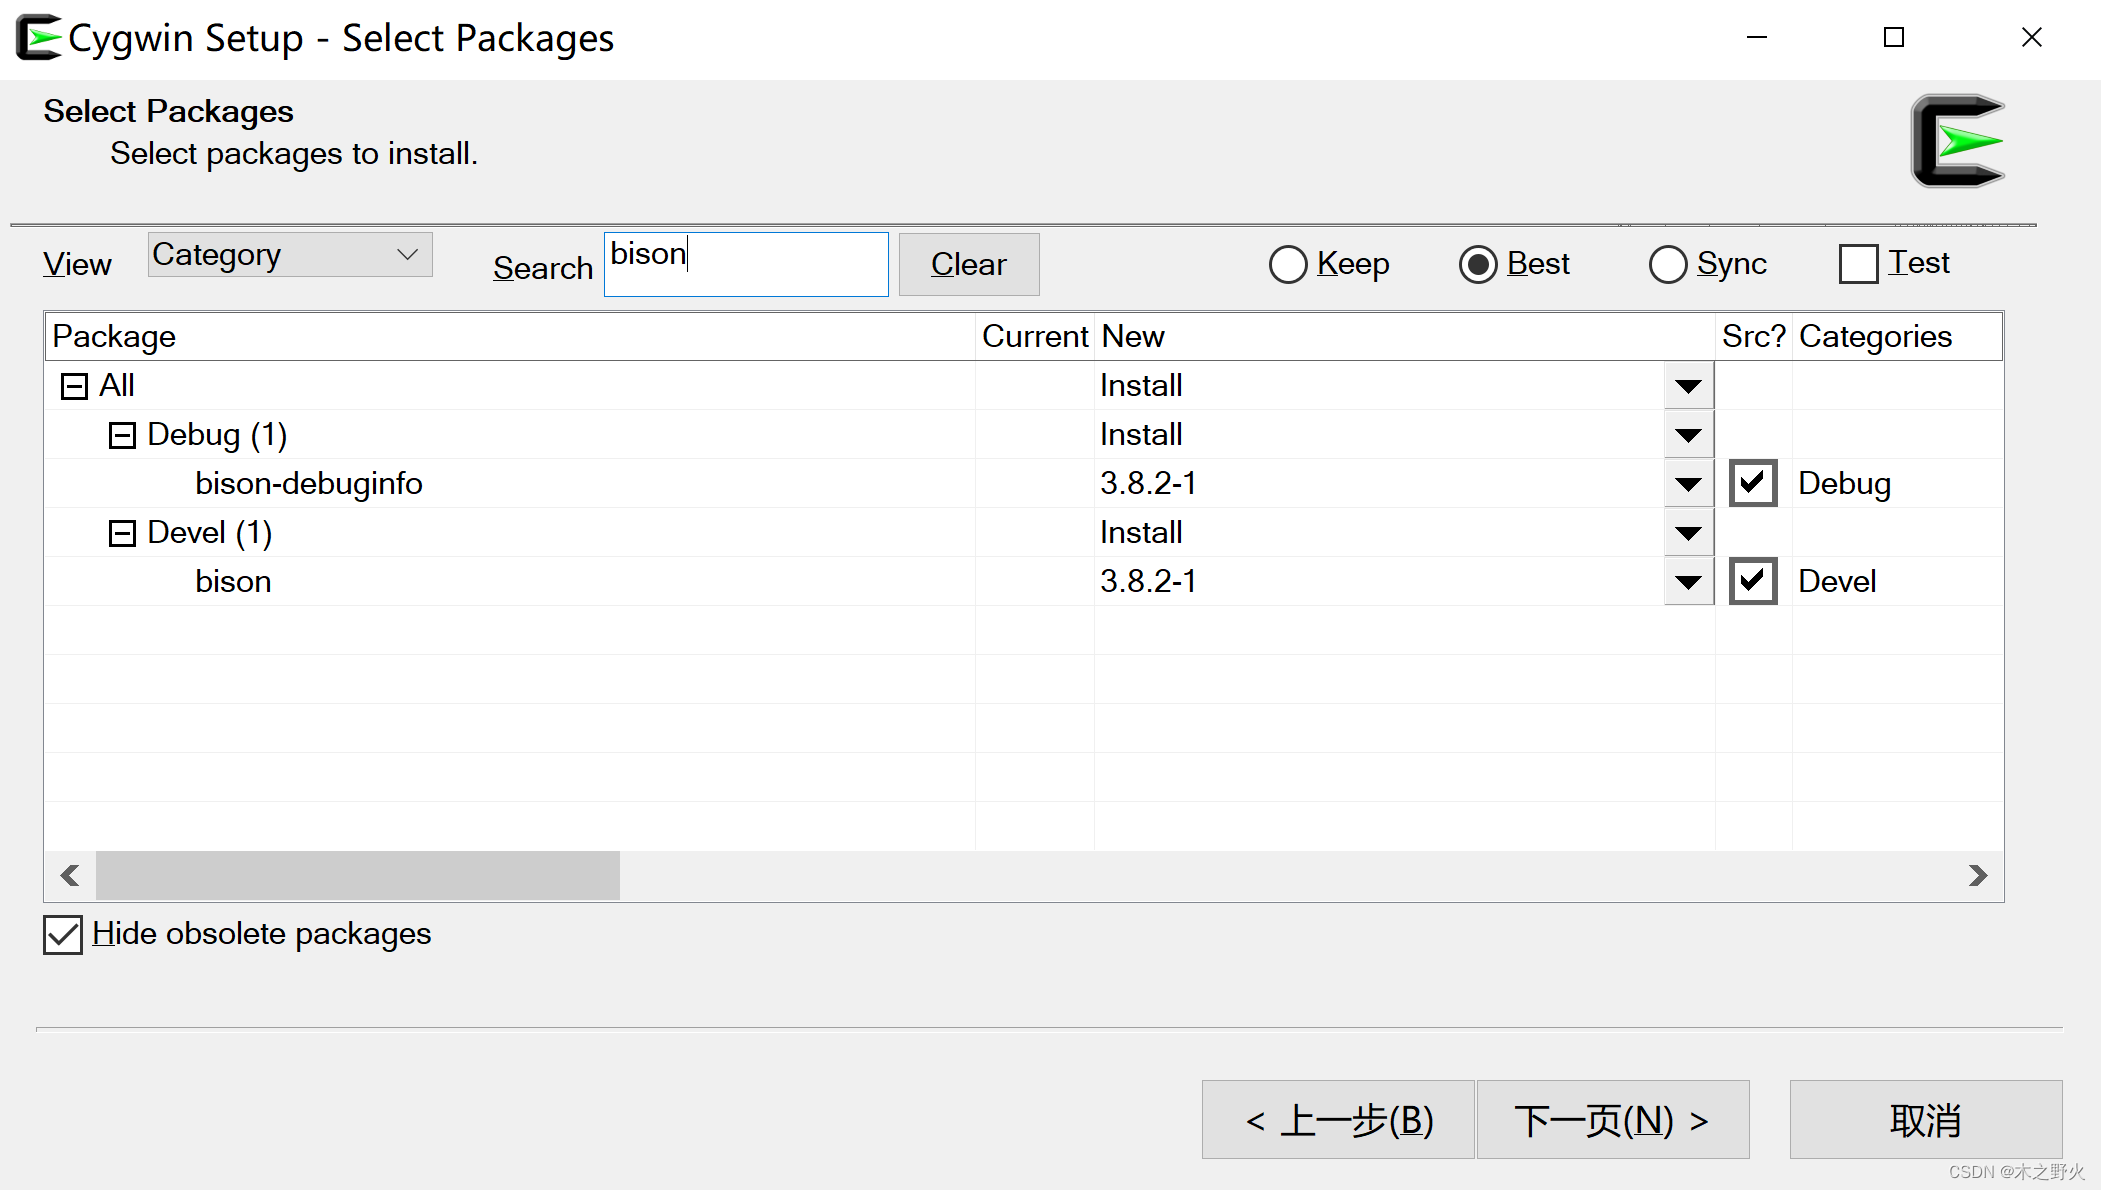 图8 Cygwin安装过程
 图9 Cygwin安装过程
 图10 Cygwin安装过程
(3)安装OSGeo4W 的同时下载安装qgis-dev包,过程如下:
 图11 下载OSGeo4W
 图12 OSGeo4W安装过程
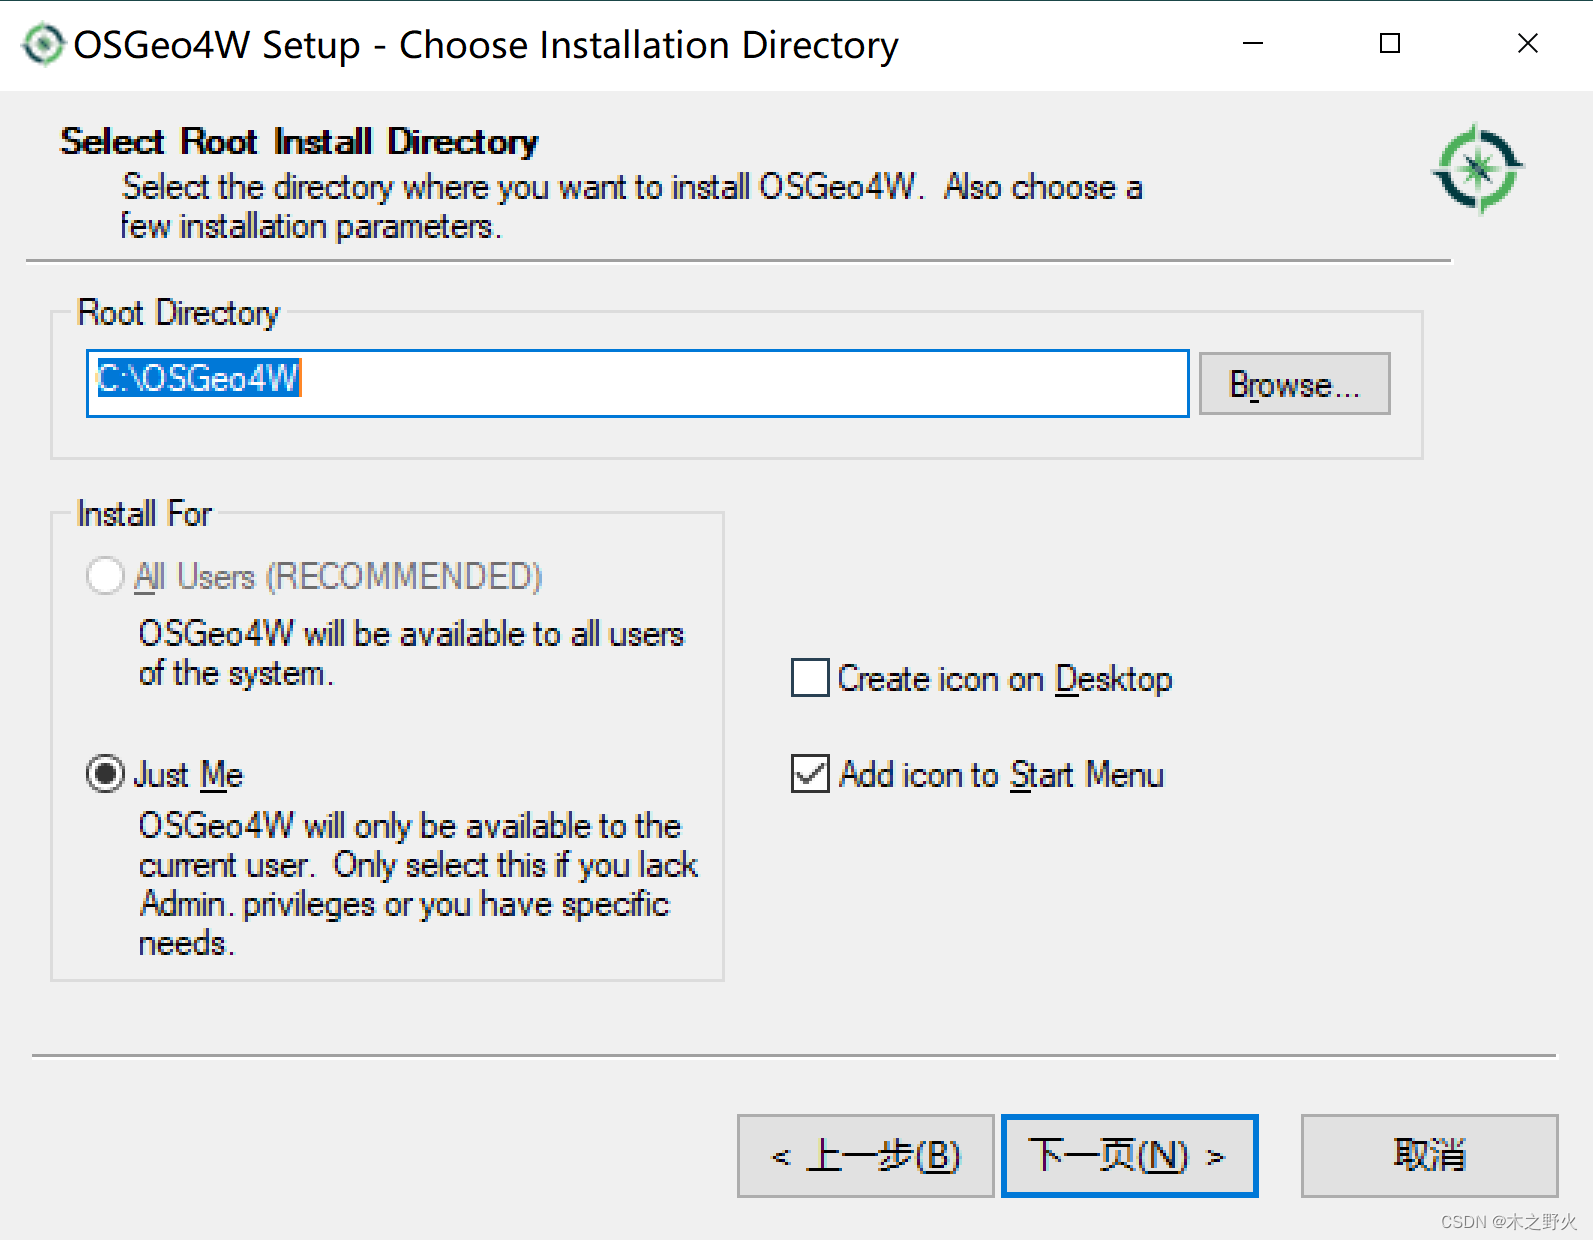 图13 OSGeo4W安装过程
图14 OSGeo4W安装过程
图13 OSGeo4W安装过程
图14 OSGeo4W安装过程
 图15 OSGeo4W安装过程
 图16 OSGeo4W安装过程
 图17 OSGeo4W安装过程
 图18 OSGeo4W安装过程
 图19 OSGeo4W安装过程
 图20 OSGeo4W安装过程
(4)配置环境变量:
下载完成后,将Cygwin和OSGeo4W及其下载的依赖库添加到系统的环境变量。假设都装在C盘,则在系统变量Path里添加以下内容: C:\cygwin\bin;C:\cygwin\lib;C:\OSGeo4W\bin;C:\OSGeo4W\include;C:\OSGeo4W\lib;
(5)使环境变量生效:
完成上述配置后,启动命令行,输入:echo %path%,回车即可使得配置的环境变量立即生效,而不用注销或重启。
(6)从2个地方修改QGIS源码:
1)源码根路径下,打开“CMakeLists.txt”,找到所有的“CMAKE_CXX_FLAGS”,在后面添加“/MP /utf-8”,如下图所示。其目的有二,一是加快编译速度,二是解决无法识别字符的问题;
 图21 修改源码的根路径下的CMakeLists.txt
2)源码根路径下,找到“ms-windows\osgeo4w”,找到“msvc-env.bat”,右键“编辑”打开,修改若干内容,分别如下图所示:
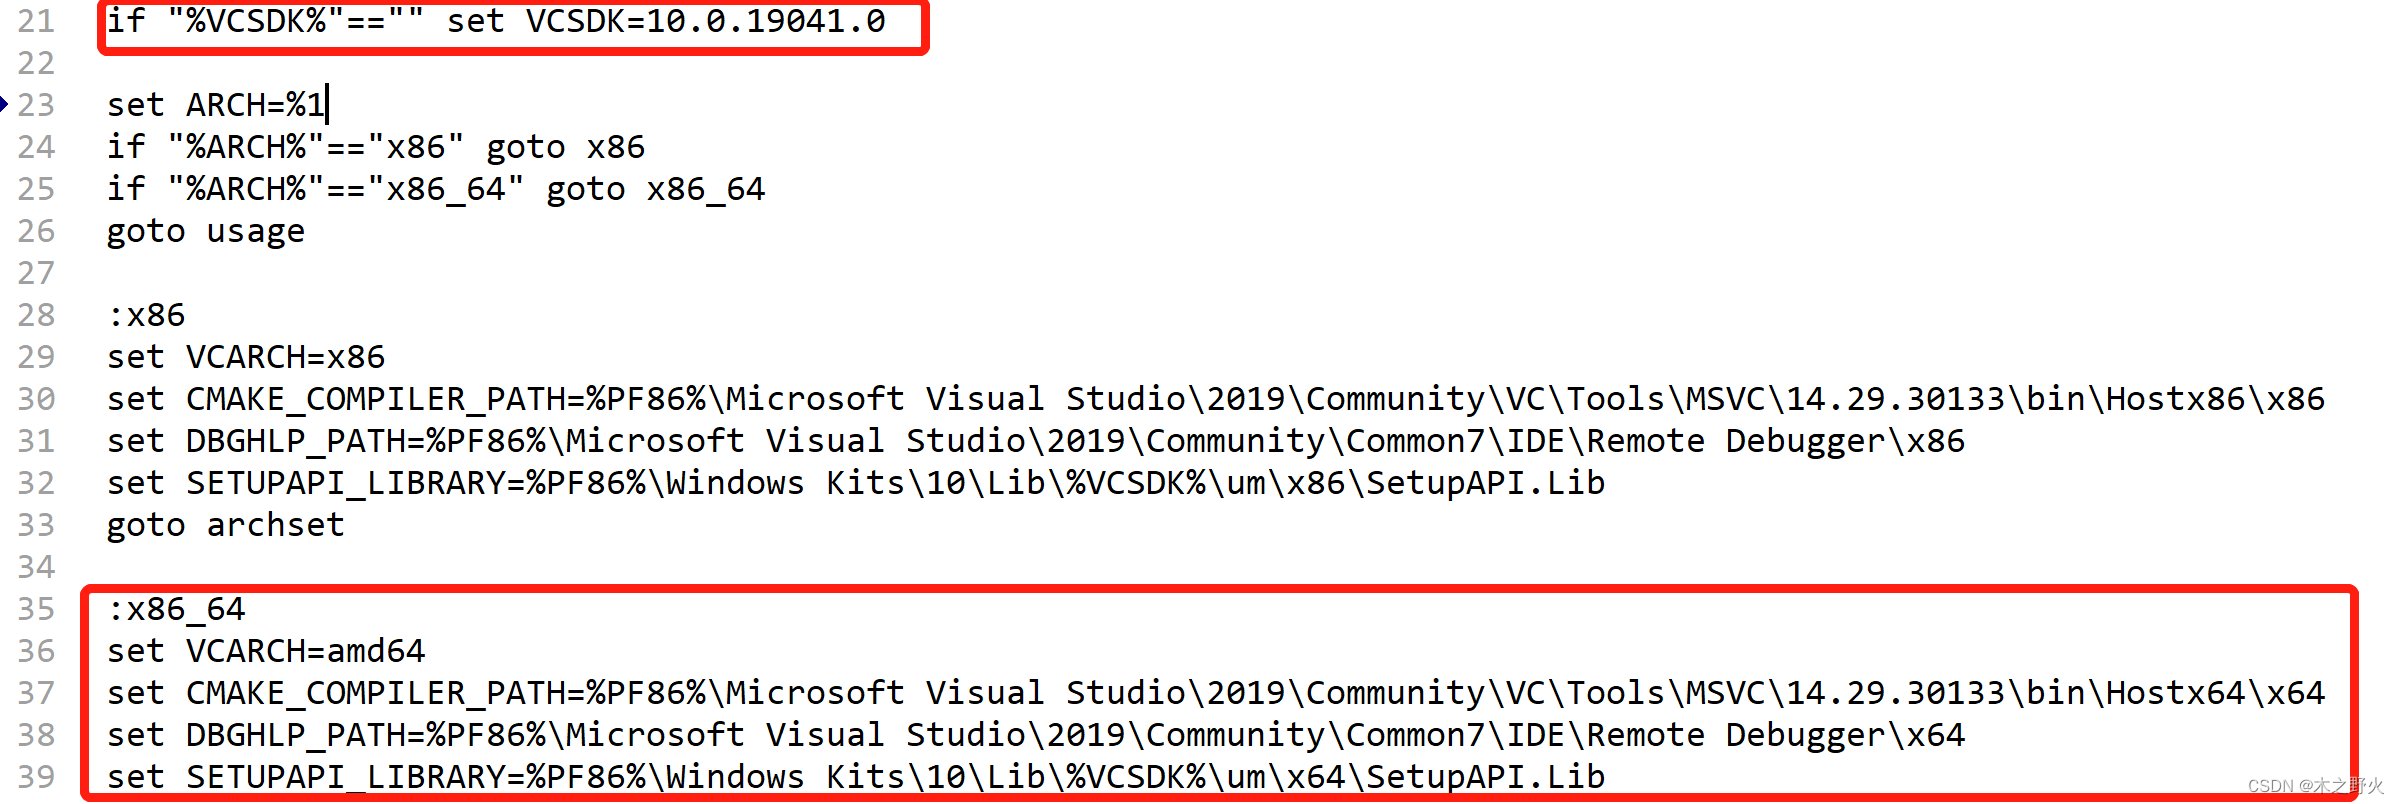 图22 修改msvc-env.bat,其中VCSDK对应Windows版本号
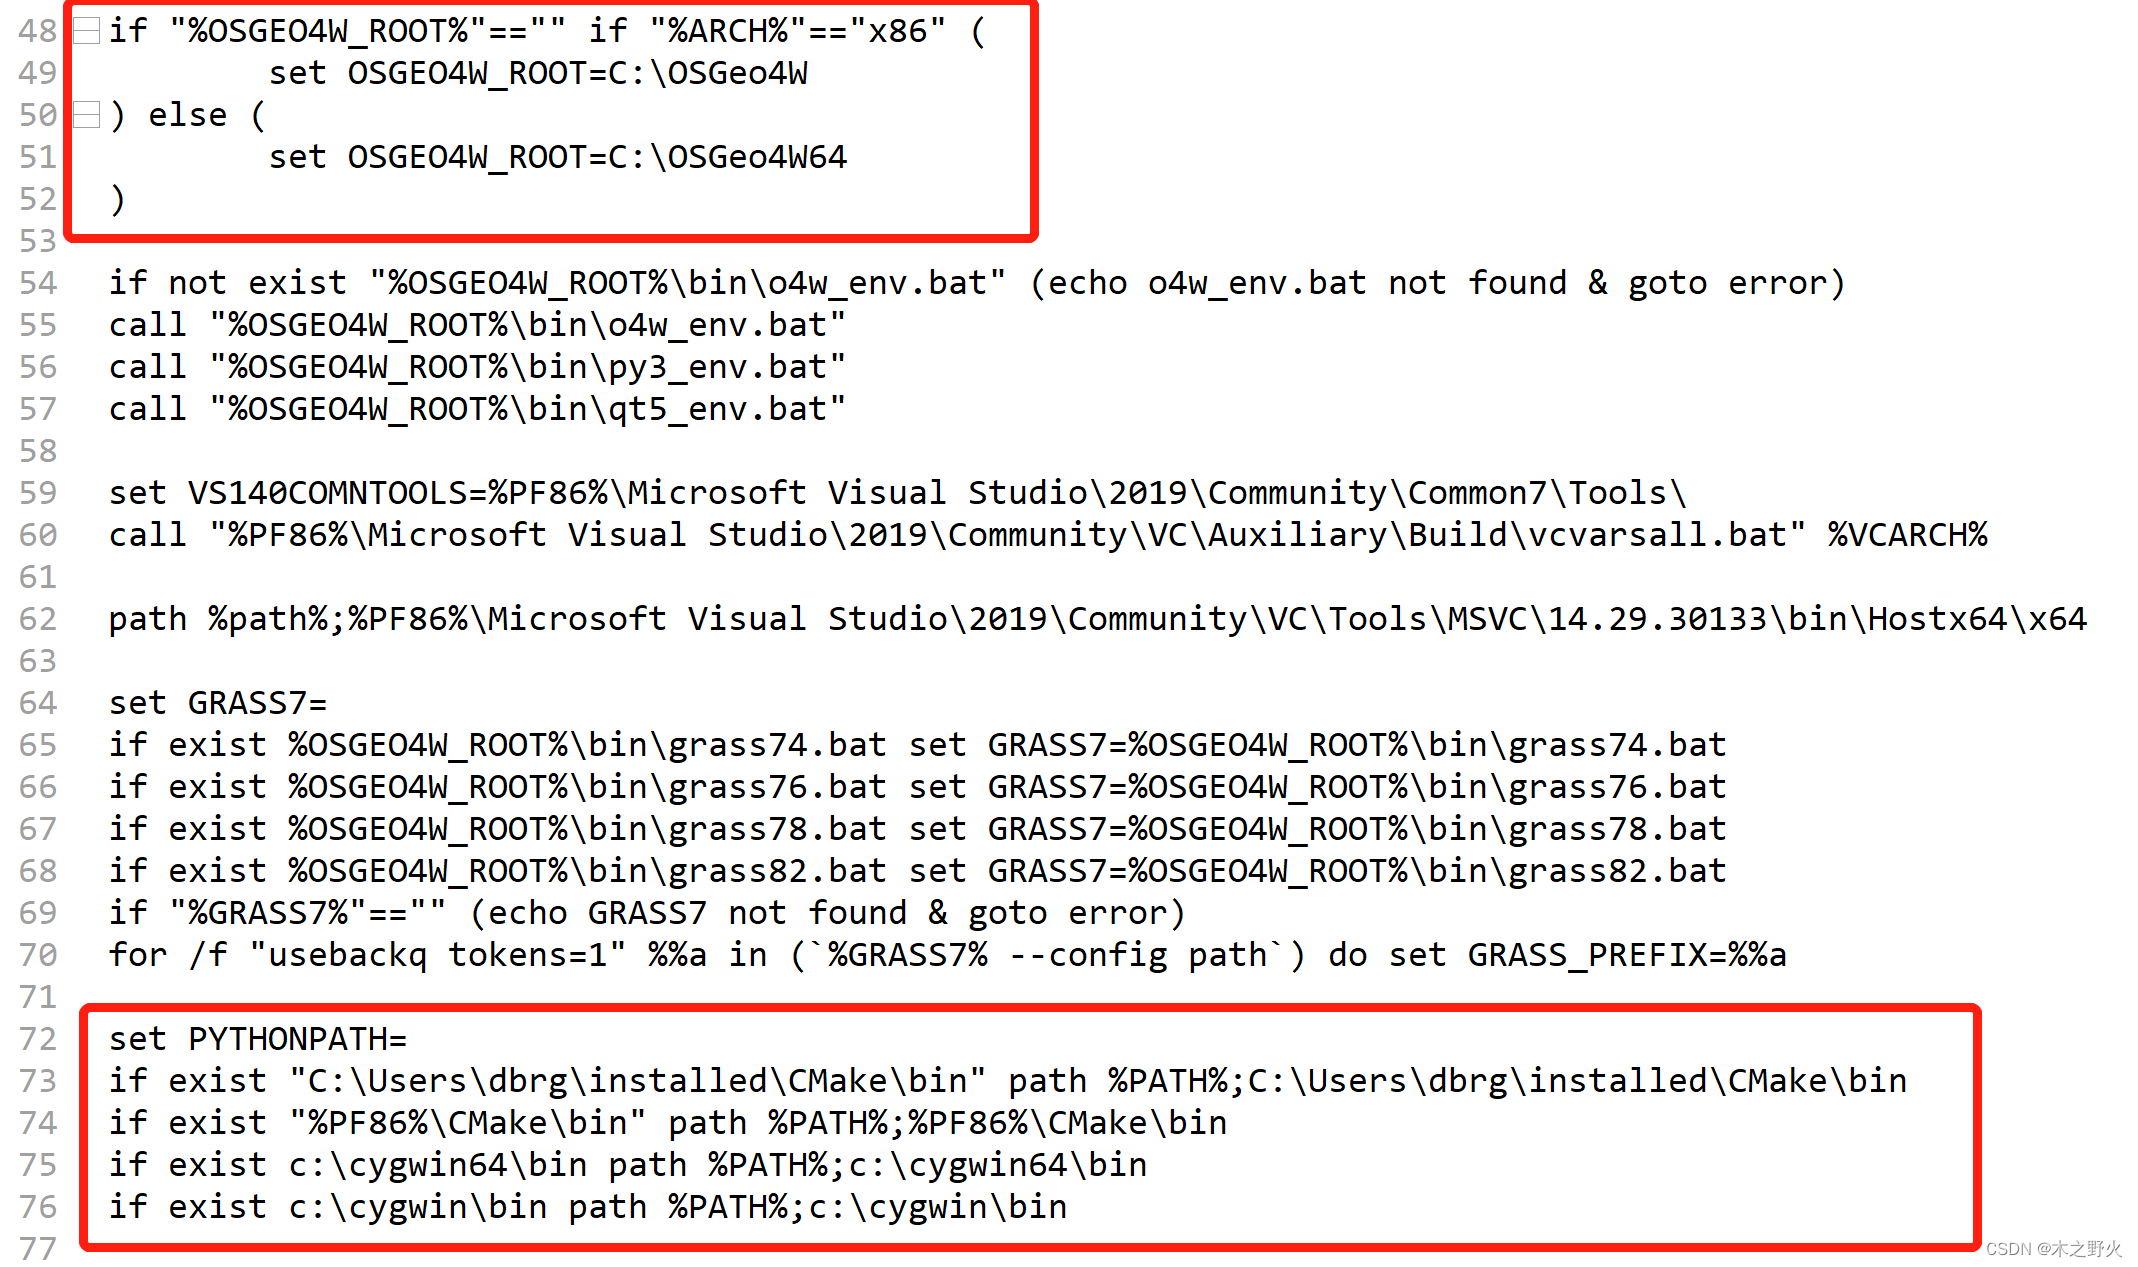 图23 修改msvc-env.bat,本图主要涉及OSGeo4W、Cygwin、CMake的安装位置
3)源码根路径下,找到“src\providers\mdal”,打开“CMakeLists.txt”,找到第19行“find_package(LibXml2)”,在下面添加一行“find_package(Threads)”,如下图所示:
 图24 修改msvc-env.bat,“src\providers\mdal\CMakeLists.txt”中增加一行
(7)创建批处理文件:start_compile.bat,右键-编辑,里面内容如下:
@echo off
set VS150COMNTOOLS=C:\Program Files (x86)\Microsoft Visual Studio\2019\Community\Common7\Tools\
call "C:\Program Files (x86)\Microsoft Visual Studio\2019\Community\VC\Auxiliary\Build\vcvarsall.bat" x64

set INCLUDE=%INCLUDE%;C:\Program Files (x86)\Windows Kits\10\Include
set LIB=%LIB%;C:\Program Files (x86)\Windows Kits\10\Lib

set OSGEO4W_ROOT=C:\OSGeo4W
call "%OSGEO4W_ROOT%\bin\o4w_env.bat"
SET PYTHONHOME=%OSGEO4W_ROOT%\apps\Python39
SET PYTHONPATH=%PYTHONHOME%;%PYTHONHOME%\Scripts
set PYTHON_EXECUTABLE=%PYTHONHOME%/python3.exe
PATH %PYTHONPATH%;%PATH%


path %OSGEO4W_ROOT%\apps\Qt5\bin;%PATH%

set QT_PLUGIN_PATH=%OSGEO4W_ROOT%\apps\Qt5\plugins
set O4W_QT_PREFIX=%OSGEO4W_ROOT:\=/%/apps/Qt5
set O4W_QT_BINARIES=%OSGEO4W_ROOT:\=/%/apps/Qt5/bin
set O4W_QT_PLUGINS=%OSGEO4W_ROOT:\=/%/apps/Qt5/plugins
set O4W_QT_LIBRARIES=%OSGEO4W_ROOT:\=/%/apps/Qt5/lib
set O4W_QT_TRANSLATIONS=%OSGEO4W_ROOT:\=/%/apps/Qt5/translations
set O4W_QT_HEADERS=%OSGEO4W_ROOT:\=/%/apps/Qt5/include
set O4W_QT_DOC=%OSGEO4W_ROOT:\=/%/apps/Qt5/doc

set O4W_ROOT=%OSGEO4W_ROOT:\=/%
set LIB_DIR=%O4W_ROOT%
path %path%;C:\Program Files (x86)\Microsoft Visual Studio\2019\Community\VC\Tools\MSVC\14.29.30133\bin\Hostx64\x64
path %PATH%;C:\OSGeo4W\apps\Qt5\bin;C:\cygwin64\bin
@set GRASS_PREFIX=C:\OSGeo4W\apps\grass\grass82
@set INCLUDE=%INCLUDE%;%OSGEO4W_ROOT%\include
@set LIB=%LIB%;%OSGEO4W_ROOT%\lib;%OSGEO4W_ROOT%\lib
set LIB=%LIB%;%OSGEO4W_ROOT%\apps\Qt5\lib;%OSGEO4W_ROOT%\lib
set INCLUDE=%INCLUDE%;%OSGEO4W_ROOT%\apps\Qt5\include;%OSGEO4W_ROOT%\include

call "C:\Users\dbrg\installed\CMake\bin\cmake-gui.exe"
(8)CMake配置与源码构建:
1)以管理员身份启动cmd命令行,切换到上述start_compile.bat路径下,回车运行start_compile.bat,如图所示:
 图25 cmd中运行start_compile.bat
2)弹出CMake的图形化界面。
 图26 CMake图形化界面
3)“Where is the source code”一栏选择QGIS源码文件夹,“Where to build the binaries”一栏选择生成vs工程的目标路径。
6)点击“Configure”,在弹出对话框选择“Visual Studio 16 2019”,点击“finish”。
7)如果前面的配置没有问题,configure将顺利完成;笔者遇到一个报错,提示没找到gdal,解决方案是手动配置gdal的头文件和lib库路径,如下图所示:
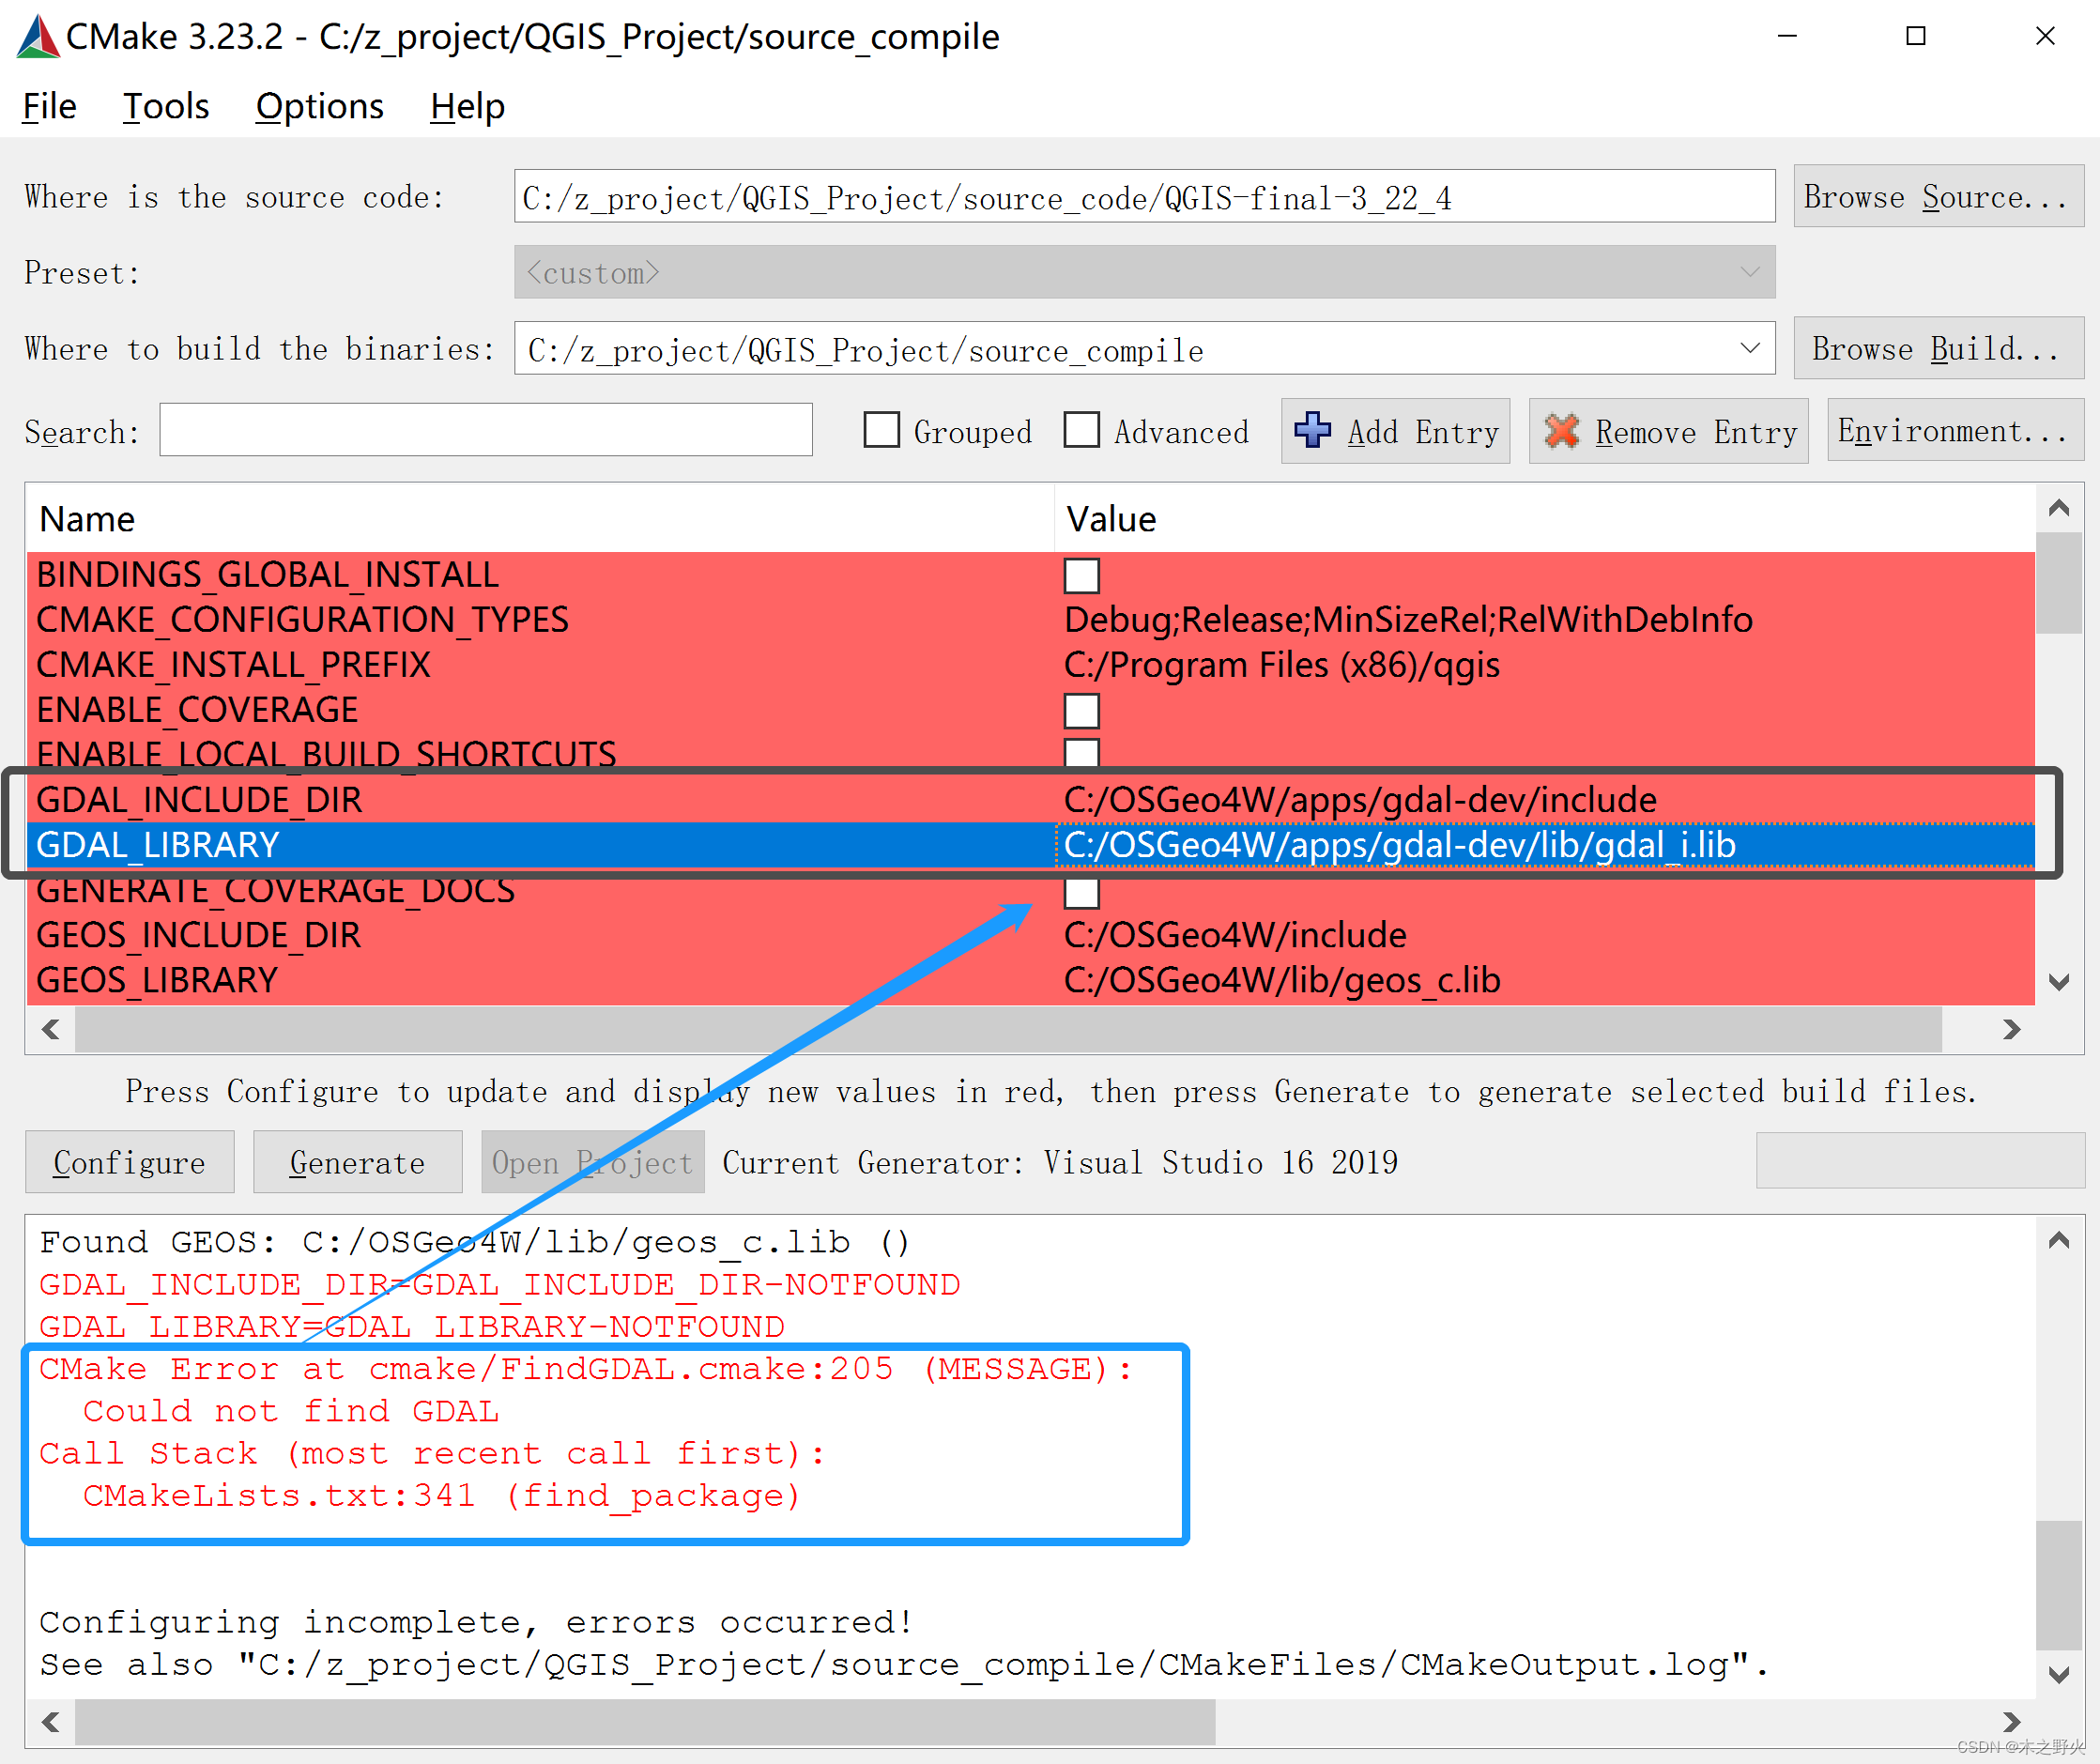 图27 CMake “Configure”报错及解决
同时,取消勾选“WITH_BINDINGS”和“BUILD_TESTING”,其他不变,再次点击“configure”,不再报错。
 图28 CMake “Configure”成功
8)点击“Generate”,如果前面的配置没有问题,generate将顺利完成。
9)点击“Open Project”,打开生成的VS工程,可以看到一共有405个工程,如下图所示:
 图29 CMake “Open Project”打开VS工程
10)编译模式选择“RelWithDebInfo”,如下图所示:
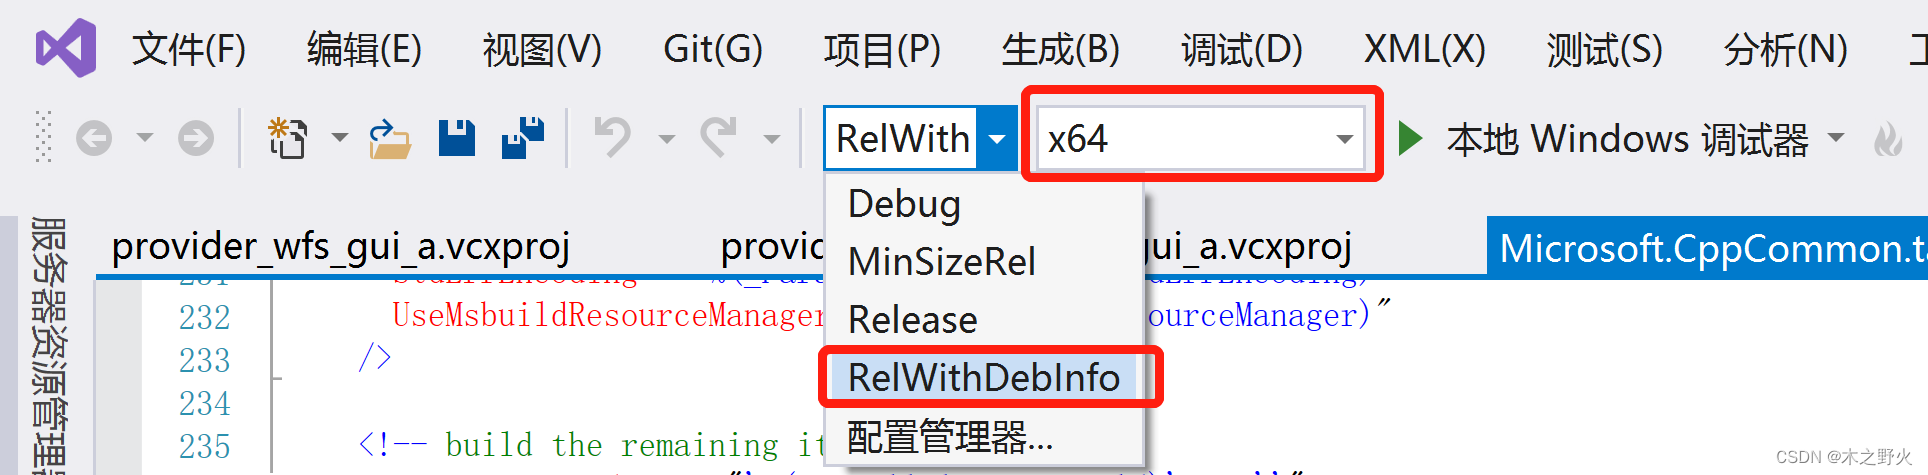 图30 编译模式选择“RelWithDebInfo”
11)将qgis设置为启动项。
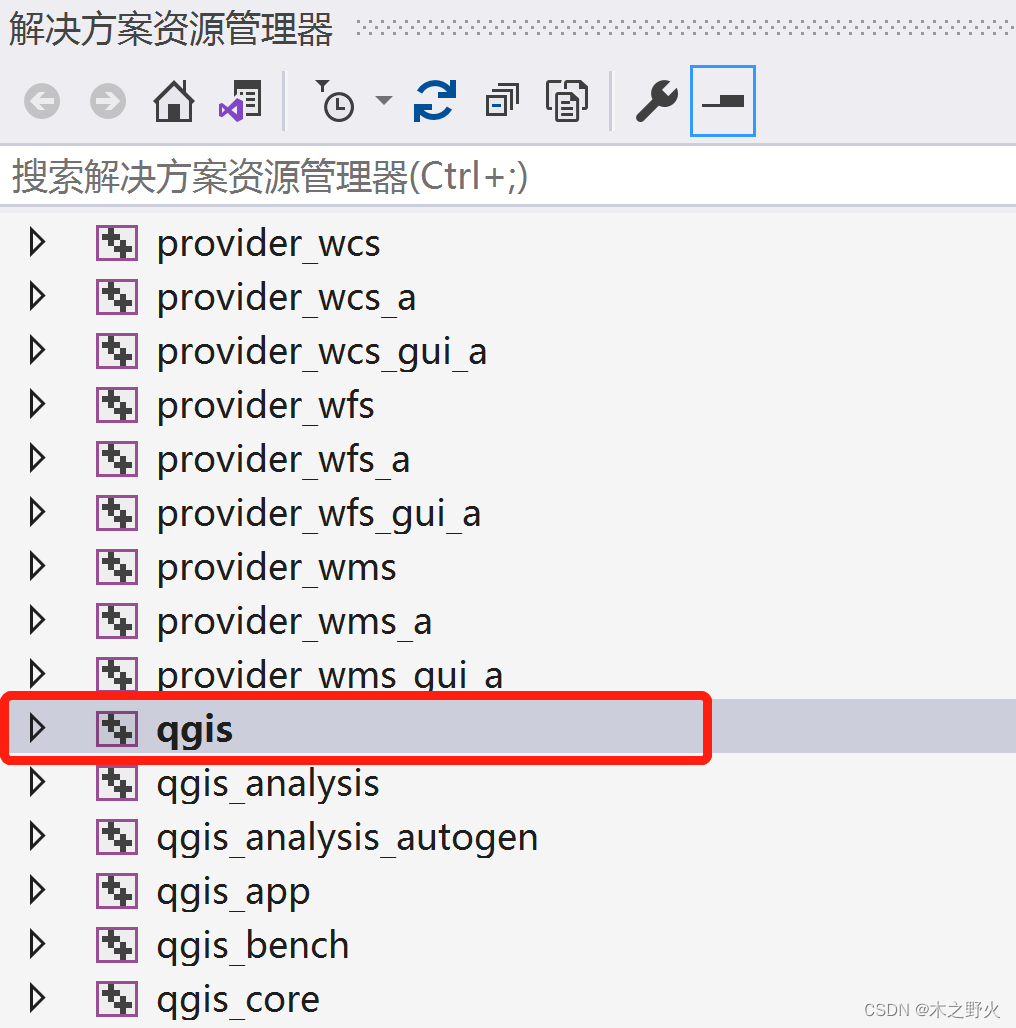 图31 设置qgis为启动项
按照“qgis_core”、“qgis_analysis”、“qgis_app”、“qgis_gui”、“ALL_BUILD”的顺序编译,不出意外的话将顺利完成。
12)将“C:\cygwin64\bin”、“C:\OSGeo4W\bin”和“C:\OSGeo4W\apps\Qt5\bin”路径下所有dll文件,拷贝到“%构建目录%\output\bin\RelWithDebInfo”下,即“qgis.exe”所在目录下。其中,%构建目录%是指CMake的“Where to build the binaries”指向的目录。
13)点击“本地Windows调试器”,QGIS正常启动,证明QGIS源码编译成功。
图1 QGIS3.22 启动界面
图2 QGIS3.22 操作界面