ffmpeg本身不支持vp8,vp9;若要支持,则需要自己事先编译好vpx库,然后在ffmpeg中显式支持vpx库。
windows下采用mingw编译器编译vpx;本人采取的是MSYS2,并且本人编译vpx和ffmpeg时,编译的都是静态库,故而在编译vpx和ffmpeg的时候,需要指定编译器。
在MSYS2的安装目录下,找到文件,msys2_shell.cmd,打开,在第一行加入vs2017环境变量的调用,如下所示:

call "D:\Program Files (x86)\Microsoft Visual Studio\2017\Enterprise\VC\Auxiliary\Build\vcvars64.bat"
然后启动msys2,进入到libvpx的解压缩目录,本人采取的版本是libvpx-1.12.0,首先执行./configure --help,可以看到支持的target如下:
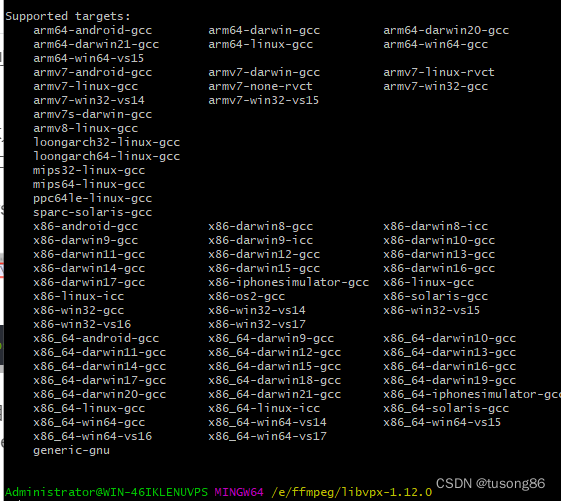
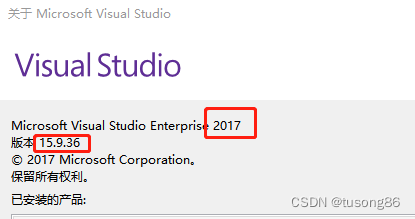
本人是vs2017,64位静态库编译,选择的target是x86_64-win64-vs15,注意,这地方不能选择x86_64-win64-vs17,可以到vs2017中查看版本信息,如下所示,版本中的第一个字段值是15.
然后执行./configure --target=x86_64-win64-vs15 --enable-static-msvcrt,生成Makefile文件,接着执行make和make install。
编译的成果物目录如下,有Debug和Release
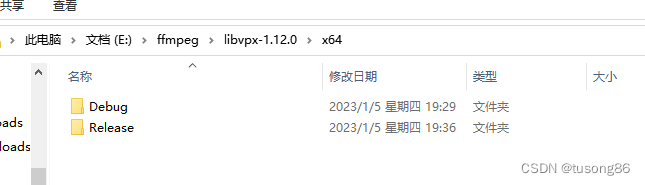
很遗憾,本人未能找到只编译Release成果物的配置方式,导致编译时间比较长。
make install的时候,只会安装Release的库。
接着是编译配置ffmpeg了,命令如下:
./configure --toolchain=msvc --arch=x86_64 --disable-debug --enable-gpl --enable-libfreetype --enable-libfontconfig --enable-libx264 --extra-cflags=-I/usr/local/x264/include --extra-ldflags='-LIBPATH:/usr/local/x264/lib' --prefix=/home/ffmpeg_x264_vpx_freetype_fontconfig_static --enable-libvpx --enable-encoder=libvpx_vp8 --enable-encoder=libvpx_vp9 --enable-decoder=vp8 --enable-decoder=vp9 --enable-parser=vp8 --enable-parser=vp9
最后本人写了一个例子,录制桌面视频,编码格式是VP9。
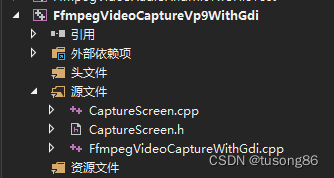
其中CaptureScreen.h的内容如下:
#ifndef _CCAPTURE_SCREEN_HH
#define _CCAPTURE_SCREEN_HH

#include<time.h>
#include <d3d9.h>
#include <stdio.h>
#include <stdlib.h>
#include <stdarg.h>
#include <windows.h>

#include <tchar.h>
#include <winbase.h>
#include <winreg.h>
#include <Strsafe.h>


//
// ---抓屏类----
//
class CCaptureScreen
{
public:
	CCaptureScreen(void);
	~CCaptureScreen(void);

public:
	/*-----------定义外部调用函数-----------*/
	int Init(int&, int&);//初始化
	BYTE* CaptureImage(); //抓取屏幕

private:
	/*-----------定义内部调用函数-----------*/
	void* CaptureScreenFrame(int, int, int, int);//抓屏
	HCURSOR FetchCursorHandle(); //获取鼠标光标

private:
	/*-----------定义私有变量-----------*/
	int m_width;
	int m_height;
	UINT   wLineLen;
	DWORD  dwSize;
	DWORD  wColSize;

	//设备句柄
	HDC hScreenDC;
	HDC hMemDC;
	//图像RGB内存缓存
	PRGBTRIPLE m_hdib;
	//位图头信息结构体
	BITMAPINFO pbi;

	HBITMAP hbm;
	//鼠标光标
	HCURSOR m_hSavedCursor;


};

#endif //--_CCAPTURE_SCREEN_HH
CaptureScreen.cpp的内容如下:
//#include "stdafx.h"
#include "CaptureScreen.h"

CCaptureScreen::CCaptureScreen(void)
{
	m_hdib = NULL;
	m_hSavedCursor = NULL;
	hScreenDC = NULL;
	hMemDC = NULL;
	hbm = NULL;
	m_width = 1920;
	m_height = 1080;
	FetchCursorHandle();
}
//
// 释放资源
//
CCaptureScreen::~CCaptureScreen(void)
{
	DeleteObject(hbm);
	if (m_hdib){

		free(m_hdib);
		m_hdib = NULL;
	}
	if (hScreenDC){

		::ReleaseDC(NULL, hScreenDC);
	}
	if (hMemDC) {

		DeleteDC(hMemDC);
	}
	if (hbm)
	{
		DeleteObject(hbm);
	}
}

//
// 初始化
//
int CCaptureScreen::Init(int& src_VideoWidth, int& src_VideoHeight)
{
	hScreenDC = ::GetDC(GetDesktopWindow());
	if (hScreenDC == NULL) return 0;

	int m_nMaxxScreen = GetDeviceCaps(hScreenDC, HORZRES);
	int m_nMaxyScreen = GetDeviceCaps(hScreenDC, VERTRES);

	hMemDC = ::CreateCompatibleDC(hScreenDC);
	if (hMemDC == NULL) return 0;

	m_width = m_nMaxxScreen;
	m_height = m_nMaxyScreen;

	if (!m_hdib){
		m_hdib = (PRGBTRIPLE)malloc(m_width * m_height * 3);//24位图像大小
	}
	//位图头信息结构体
	pbi.bmiHeader.biSize = sizeof(BITMAPINFOHEADER);
	pbi.bmiHeader.biWidth = m_width;
	pbi.bmiHeader.biHeight = m_height;
	pbi.bmiHeader.biPlanes = 1;
	pbi.bmiHeader.biBitCount = 24;
	pbi.bmiHeader.biCompression = BI_RGB;

	src_VideoWidth = m_width;
	src_VideoHeight = m_height;

	hbm = CreateCompatibleBitmap(hScreenDC, m_width, m_height);
	SelectObject(hMemDC, hbm);

	wLineLen = ((m_width * 24 + 31) & 0xffffffe0) / 8;
	wColSize = sizeof(RGBQUAD)* ((24 <= 8) ? 1 << 24 : 0);
	dwSize = (DWORD)(UINT)wLineLen * (DWORD)(UINT)m_height;

	return 1;
}

//抓取屏幕数据
BYTE* CCaptureScreen::CaptureImage()
{

	VOID*  alpbi = CaptureScreenFrame(0, 0, m_width, m_height);
	return (BYTE*)(alpbi);
}

void* CCaptureScreen::CaptureScreenFrame(int left, int top, int width, int height)
{

	if (hbm == NULL || hMemDC == NULL || hScreenDC == NULL) return NULL;

	BitBlt(hMemDC, 0, 0, width, height, hScreenDC, left, top, SRCCOPY);
	/*-------------------------捕获鼠标-------------------------------*/
	{
		POINT xPoint;
		GetCursorPos(&xPoint);
		HCURSOR hcur = FetchCursorHandle();
		xPoint.x -= left;
		xPoint.y -= top;

		ICONINFO iconinfo;
		BOOL ret;
		ret = GetIconInfo(hcur, &iconinfo);
		if (ret){
			xPoint.x -= iconinfo.xHotspot;
			xPoint.y -= iconinfo.yHotspot;

			if (iconinfo.hbmMask) DeleteObject(iconinfo.hbmMask);
			if (iconinfo.hbmColor) DeleteObject(iconinfo.hbmColor);
		}
		/*画鼠标*/
		::DrawIcon(hMemDC, xPoint.x, xPoint.y, hcur);
	}
	//动态分配的内存
	PRGBTRIPLE hdib = m_hdib;
	if (!hdib)
		return hdib;

	GetDIBits(hMemDC, hbm, 0, m_height, hdib, (LPBITMAPINFO)&pbi, DIB_RGB_COLORS);
	return hdib;
}

//
// 获取窗体鼠标光标
//
HCURSOR CCaptureScreen::FetchCursorHandle()
{
	if (m_hSavedCursor == NULL)
	{
		m_hSavedCursor = GetCursor();
	}
	return m_hSavedCursor;
}
FfmpegVideoCaptureWithGdi.cpp的内容如下:
// RecordingScreen.cpp : 定义控制台应用程序的入口点。
//

//#include "stdafx.h"
#include "CaptureScreen.h"
extern "C"
{
#include <libavutil/opt.h>
#include <libavutil/mathematics.h>
#include <libavutil\time.h>
#include <libavformat/avformat.h>
#include <libswscale/swscale.h>
#include <libswresample/swresample.h>
#include <libavutil/imgutils.h>
#include <libavcodec/avcodec.h>
#include <libavdevice\avdevice.h>

#pragma comment(lib, "avcodec.lib")
#pragma comment(lib, "avformat.lib")
#pragma comment(lib, "avutil.lib")
#pragma comment(lib, "avdevice.lib")
#pragma comment(lib, "avfilter.lib")
#pragma comment(lib, "postproc.lib")
#pragma comment(lib, "swresample.lib")
#pragma comment(lib, "swscale.lib")


}
//#include <ipp.h>
#include <chrono>

//signed int Bgr2YuvI420(const BYTE* srcBgr, int image_width, int image_height, BYTE* dstYuvI420)
//{
//	IppStatus ipp_status;
//
//	int srcStep = image_width * 3;
//	int dstYStep = image_width;
//	int dstCbCrStep = image_width;
//	IppiSize roiSize = { image_width, image_height };
//
//	const Ipp8u* pSrc = (Ipp8u*)srcBgr;
//
//	Ipp8u *pDstY = (Ipp8u*)dstYuvI420;
//	Ipp8u *pDstU = (Ipp8u*)&dstYuvI420[image_width * image_height];
//	Ipp8u *pDstV = (Ipp8u*)&dstYuvI420[image_width * image_height * 5 / 4];
//	Ipp8u *pDst[3];
//	pDst[0] = pDstY;
//	pDst[1] = pDstU;
//	pDst[2] = pDstV;
//	int dstStep[3] = { image_width, image_width / 2, image_width / 2 };
//
//	ipp_status = ippiBGRToYCbCr420_8u_C3P3R(pSrc, srcStep, pDst, dstStep, roiSize);
//
//	return ipp_status;
//}


unsigned char clip_value(unsigned char x, unsigned char min_val, unsigned char  max_val) {
	if (x > max_val) {
		return max_val;
	}
	else if (x < min_val) {
		return min_val;
	}
	else {
		return x;
	}
}

//RGB to YUV420
bool RGB24_TO_YUV420(unsigned char *RgbBuf, int w, int h, unsigned char *yuvBuf)
{
	unsigned char*ptrY, *ptrU, *ptrV, *ptrRGB;
	memset(yuvBuf, 0, w*h * 3 / 2);
	ptrY = yuvBuf;
	ptrU = yuvBuf + w * h;
	ptrV = ptrU + (w*h * 1 / 4);
	unsigned char y, u, v, r, g, b;
	for (int j = h - 1; j >= 0; j--) {
		ptrRGB = RgbBuf + w * j * 3;
		for (int i = 0; i < w; i++) {

			b = *(ptrRGB++);
			g = *(ptrRGB++);
			r = *(ptrRGB++);


			y = (unsigned char)((66 * r + 129 * g + 25 * b + 128) >> 8) + 16;
			u = (unsigned char)((-38 * r - 74 * g + 112 * b + 128) >> 8) + 128;
			v = (unsigned char)((112 * r - 94 * g - 18 * b + 128) >> 8) + 128;
			*(ptrY++) = clip_value(y, 0, 255);
			if (j % 2 == 0 && i % 2 == 0) {
				*(ptrU++) = clip_value(u, 0, 255);
			}
			else {
				if (i % 2 == 0) {
					*(ptrV++) = clip_value(v, 0, 255);
				}
			}
		}
	}
	return true;
}

extern const AVOutputFormat ff_mp4_muxer;

DWORD WINAPI ScreenCapThreadProc(LPVOID lpParam)
{
	CCaptureScreen* ccs = new CCaptureScreen();
	int width = 0;
	int height = 0;

	ccs->Init(width, height);

	AVFormatContext* avFormCtx_Out;
	AVCodecContext*  avCodecCtx_Out;
	AVCodec*  avCodec;
	AVStream* avStream;
	AVFrame* frame;
	AVPacket* packet;

	int frameRate = 10;
	int ret = 0;
	const char* filename = "out.mp4";

	/*
	AVOutputFormat ff_mp4_muxer = {
	.name = "mp4",
	.long_name = NULL_IF_CONFIG_SMALL("MP4 (MPEG-4 Part 14)"),
	.mime_type = "video/mp4",
	.extensions = "mp4",
	.priv_data_size = sizeof(MOVMuxContext),
	.audio_codec = AV_CODEC_ID_AAC,
	.video_codec = CONFIG_LIBX264_ENCODER ?
						 AV_CODEC_ID_H264 : AV_CODEC_ID_MPEG4,
	.init = mov_init,
	.write_header = mov_write_header,
	.write_packet = mov_write_packet,
	.write_trailer = mov_write_trailer,
	.deinit = mov_free,
	.flags = AVFMT_GLOBALHEADER | AVFMT_ALLOW_FLUSH | AVFMT_TS_NEGATIVE,
	.codec_tag = mp4_codec_tags_list,
	.check_bitstream = mov_check_bitstream,
	.priv_class = &mp4_muxer_class,
	};
	*/
	/*AVOutputFormat ff_mp4_muxer;
	ff_mp4_muxer.video_codec = AV_CODEC_ID_VP9;
	ff_mp4_muxer.audio_codec = AV_CODEC_ID_AAC;
	ff_mp4_muxer.name = "mp4";
	ff_mp4_muxer.long_name = "MP4 (MPEG-4 Part 14)";
	ff_mp4_muxer.extensions = "mp4";*/


	ret = avformat_alloc_output_context2(&avFormCtx_Out, NULL, NULL, filename);
	if (ret < 0)
	{
		printf("Init avformat object is faild! \n");
		return 0;
	}
	//AVOutputFormat * poformat = (AVOutputFormat *)avFormCtx_Out->oformat;
	//poformat->video_codec = AV_CODEC_ID_VP9;

	//avCodec = (AVCodec *)avcodec_find_encoder(avFormCtx_Out->oformat->video_codec);
	avCodec = (AVCodec *)avcodec_find_encoder(AV_CODEC_ID_VP9);
	if (!avCodec)
	{
		printf("Init avCodec object is faild! \n");
		return 0;
	}

	avCodecCtx_Out = avcodec_alloc_context3(avCodec);
	if (!avCodecCtx_Out)
	{
		printf("Init avCodecCtx_Out object is faild! \n");
		return 0;
	}
	avStream = avformat_new_stream(avFormCtx_Out, avCodec);
	if (!avStream)
	{
		printf("Init avStream object is faild! \n");
		return 0;
	}

	avCodecCtx_Out->flags |= AV_CODEC_FLAG_QSCALE;
	avCodecCtx_Out->bit_rate = 4000000;
	avCodecCtx_Out->rc_min_rate = 4000000;
	avCodecCtx_Out->rc_max_rate = 4000000;
	avCodecCtx_Out->bit_rate_tolerance = 4000000;
	avCodecCtx_Out->time_base.den = frameRate;
	avCodecCtx_Out->time_base.num = 1;

	avCodecCtx_Out->width = width;
	avCodecCtx_Out->height = height;
	//pH264Encoder->pCodecCtx->frame_number = 1;
	avCodecCtx_Out->gop_size = 12;
	avCodecCtx_Out->max_b_frames = 0;
	avCodecCtx_Out->thread_count = 4;
	avCodecCtx_Out->pix_fmt = AV_PIX_FMT_YUV420P;
	avCodecCtx_Out->codec_id = AV_CODEC_ID_VP9;
	avCodecCtx_Out->codec_type = AVMEDIA_TYPE_VIDEO;

	av_opt_set(avCodecCtx_Out->priv_data, "b-pyramid", "none", 0);
	av_opt_set(avCodecCtx_Out->priv_data, "preset", "superfast", 0);
	//av_opt_set(avCodecCtx_Out->priv_data, "tune", "zerolatency", 0);

	if (avFormCtx_Out->oformat->flags & AVFMT_GLOBALHEADER)
		avCodecCtx_Out->flags |= AV_CODEC_FLAG_GLOBAL_HEADER;

	ret = avcodec_open2(avCodecCtx_Out, avCodec, NULL);
	if (ret < 0)
	{
		printf("Open avcodec is faild! \n");
		return 0;
	}

	avcodec_parameters_from_context(avStream->codecpar, avCodecCtx_Out);
	if (!(avFormCtx_Out->oformat->flags & AVFMT_NOFILE))
	{
		ret = avio_open(&avFormCtx_Out->pb, filename, AVIO_FLAG_WRITE);
		if (ret < 0)
		{
			printf("Open file is faild! \n");
			return 0;
		}
	}
	ret = avformat_write_header(avFormCtx_Out, NULL);
	if (ret < 0)
	{
		printf("write header is faild! \n");
		return 0;
	}

	frame = av_frame_alloc();
	if (!frame)
	{
		printf("Init frame is faild! \n");
		return 0;
	}
	frame->format = AV_PIX_FMT_YUV420P;
	frame->width = width;
	frame->height = height;

	LONG64 frameSize = av_image_get_buffer_size(AV_PIX_FMT_YUV420P, 1920, 1080, 1);
	BYTE* outbuffer = new BYTE[frameSize];

	ret = av_image_fill_arrays(frame->data,
		frame->linesize,
		outbuffer,
		AV_PIX_FMT_YUV420P,
		1920,
		1080, 1);

	if (ret < 0)
	{
		printf("av_image_fill_arrays is faild! \n");
		return 0;
	}
	packet = av_packet_alloc();
	//av_init_packet(packet);
	if (!packet)
	{
		printf("packet is faild! \n");
		return 0;
	}

	int frameNumber = 0;
	int got_packet = 0;

	DWORD dwBeginTime = ::GetTickCount();
	for (;;)
	{
		BYTE* frameimage = ccs->CaptureImage();

		RGB24_TO_YUV420(frameimage, width, height, outbuffer);

		DWORD dwCurrentTime2 = ::GetTickCount();
		DWORD dwLastTime = dwCurrentTime2 - dwBeginTime;

		frame->pkt_dts = frame->pts = av_rescale_q_rnd(frameNumber, avCodecCtx_Out->time_base, avStream->time_base, (AVRounding)(AV_ROUND_NEAR_INF | AV_ROUND_PASS_MINMAX));
		frame->pkt_duration = 0;
		frame->pkt_pos = -1;


		//frame->pkt_dts = frame->pts = av_rescale_q_rnd(frameNumber, avCodecCtx_Out->time_base, avStream->time_base, (AVRounding)(AV_ROUND_NEAR_INF | AV_ROUND_PASS_MINMAX));
		//frame->pkt_duration = 0;
		//frame->pkt_pos = -1;

		ret = avcodec_send_frame(avCodecCtx_Out, frame);
		if (ret < 0)
			continue;

		ret = avcodec_receive_packet(avCodecCtx_Out, packet);
		if (ret < 0)
			continue;

		static DWORD dwInitTime = ::GetTickCount();
		if (packet->size > 0)
		{
			//av_packet_rescale_ts(packet, avCodecCtx_Out->time_base, avStream->time_base);
			av_write_frame(avFormCtx_Out, packet);
			frameNumber++;
			printf("录入第%d帧....\n", frameNumber);
		}

		DWORD dwCurrentTime = ::GetTickCount();
		if (dwCurrentTime - dwInitTime > 60 * 1000)
		{
			break;
		}

		int dwPassedMillSeconds = dwCurrentTime - dwBeginTime;
		int dwDiff = frameNumber * 100 - dwPassedMillSeconds;
		if (dwDiff > 0)
		{
			Sleep(dwDiff);
		}
	}
	av_write_trailer(avFormCtx_Out);
	avformat_free_context(avFormCtx_Out);
	avcodec_close(avCodecCtx_Out);
	avcodec_free_context(&avCodecCtx_Out);
	av_free(avCodec);
	av_packet_free(&packet);
	av_frame_free(&frame);
	return 0;
}


int _tmain(int argc, _TCHAR* argv[])
{
	//av_register_all();
	//avformat_network_init();
	avdevice_register_all();


	HANDLE hThread = CreateThread(NULL, 0, ScreenCapThreadProc, 0, 0, NULL);
	WaitForSingleObject(hThread, INFINITE);
	return 0;
}
最后出来的是VP9格式的视频。