前言
mongodb:为了在node应用中与MongoDB交互,开发者需要使用MongoDB的驱动程序,所以安装的mongodb就是其驱动程序;
mongoose: 是一个用于 MongoDB 的对象建模工具,提供了一个丰富的查询语言和许多其他功能,以帮助开发者更方便地使用 MongoDB,可以理解为MongoDB插件/工具。
一般来说,对于大多数 MongoDB 的操作,使用 mongoose 已经足够了
服务端工程目录示例:
--server		// 根目录
	--model
  	--main.js // 数据对象模型model
	--routes
  	--user.js	//	路由(接口)文件
	--db.js			//	连接 MongoDB 数据库
	--server.js	// 	入口文件,连接数据库,启动服务,挂载路由
如何在中创建一个用户“表”(集合),并且实现添加和查询
在MongoDB中,术语“表”对应的是集合(Collection)。创建一个集合并不需要显式操作,因为当你向一个不存在的集合中插入文档时,MongoDB会自动创建这个集合。
1.连接服务器
const mongoose = require('mongoose');

// 连接数据库函数
async function connect() {
  try {
    await mongoose.connect('mongodb://127.0.0.1:27017/mydatabase', {
      useNewUrlParser: true,
      useUnifiedTopology: true,
    });
    console.log('Connected to MongoDB');
  } catch (error) {
    console.error('Error connecting to MongoDB:', error);
    throw error; // 抛出错误以便在调用处被捕获
  }
}

module.exports = { connect };
2.创建一个Mongoose Schema对象
const mongoose = require("mongoose");

// 用户Schema
const userSchema = new mongoose.Schema({
  name: { type: String, required: true },
  email: { type: String, unique: true, required: true },
  password: { type: String, required: true },
});

// 创建User Model
const User = mongoose.model("User", userSchema);

module.exports = { User };
上面的代码:创建一个Mongoose Schema对象,它是对MongoDB集合中存储的文档结构的一种描述或模式定义。参数传入一个对象来定义文档的结构。
在这个例子中:
- name、email 和 password 是我们定义的字段(或键),它们代表了文档可能具有的属性。
- 对于每个字段,我们指定了其类型,如 String、Number、Date 等。这里 name 和 password 都被指定为 String 类型。
- 对于 email 字段,我们不仅指定了类型为 String,还添加了一个选项 unique: true,这意味着MongoDB会确保该集合中的所有文档的 email 字段值都是唯一的,即不会有重复的电子邮件地址。
通过定义这样一个Schema,Mongoose会在插入、更新文档时自动进行数据类型检查和约束验证,以保证数据库中数据的一致性和完整性。后续通过 mongoose.model('User', userSchema) 可以基于此Schema创建Model,进而执行查询、插入、更新和删除等数据库操作。
3.user相关接口编写
// usersRoutes.js
const express = require("express");
const { User } = require("../model/main"); // 确保路径正确指向db.js文件

const router = express.Router();

// 用户保存接口
router.post("/", async (req, res) => {
  try {
    const newUser = new User(req.body);
    await newUser.save();
    res.status(201).json({ message: "User created!", user: newUser });
  } catch (error) {
    console.error("Error creating user:", error);
    res
      .status(500)
      .json({ error: "An error occurred while creating the user." });
  }
});

// 查询单个用户或所有用户接口
router.get("/:id?", async (req, res) => {
  try {
    if (req.params.id) {
      const userId = req.params.id;
      const user = await User.findById(userId);
      if (!user) {
        return res.status(404).json({ message: "User not found." });
      }
      res.json(user);
    } else {
      const users = await User.find();
      res.json(users);
    }
  } catch (error) {
    console.error("Error fetching user(s):", error);
    res
      .status(500)
      .json({ error: "An error occurred while fetching the user(s)." });
  }
});

module.exports = router;
4.编写服务启动文件, 并挂在用户路由
// server.js
const express = require('express');
const bodyParser = require('body-parser');
const cors = require('cors');
const { connect } = require('./db'); // 确保路径正确指向db.js文件

const app = express();
app.use(cors());
app.use(bodyParser.json());

// 在服务器启动前先连接数据库
async function startServer() {
  try {
    await connect();
    console.log('Connected to MongoDB');

    // 挂载用户路由到 /api/users
    const usersRoutes = require('./routes/user');
    app.use('/api/users', usersRoutes);

    // 启动服务器
    const PORT = process.env.PORT || 3000;
    app.listen(PORT, () => {
      console.log(`Server is running on port ${PORT}`);
    });
  } catch (error) {
    console.error('Error connecting to MongoDB:', error);
  }
}

startServer();
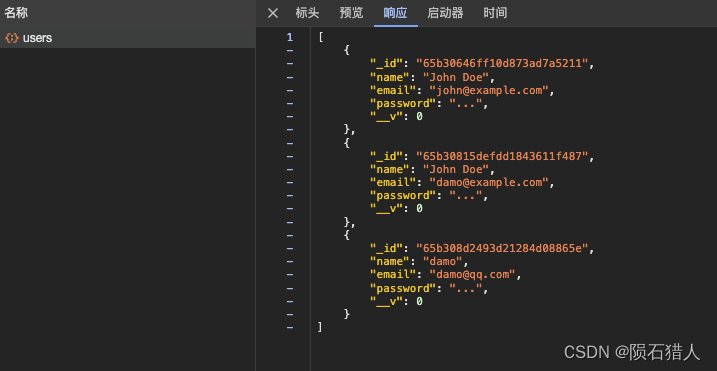
5.启动服务,在前端工程中调用接口,获取到用户数据
在服务端工程的终端下:启动服务:node server.js
前端工程调用查询:
