vue2状态管理Vuex
Vuex 是一个专为 Vue.js应用程序开发的状态管理模式。它使用集中式存储管理应用的所有组件的状态,以及规则保证状态只能按照规定的方式进行修改。
State(状态):Vuex 使用单一状态树,即一个对象包含全部的应用层级状态。这个状态树对应着一个应用中的所有状态。Getters(获取器):Getters 允许你在模板中计算状态。相当于组件中的计算属性。可以对 state 中的数据进行处理和过滤。Mutations(变更):Mutations 是 Vuex 修改状态的唯一方式,它们是同步事务。每个 mutation 都有一个字符串类型的事件类型 (type) 和 一个回调函数,该回调函数接受 state 作为其第一个参数。Actions(动作):Actions 类似于 Mutations,不同之处在于它们是异步的。Actions 提交 Mutations 来修改状态。Actions 可以包含任意异步操作。modules(模块):Vuex 允许将 store 分割成模块,每个模块都有自己的 state、mutations、actions、getters。
辅助函数:便于在组件中使用 Vuex 的功能
mapState: 将 store 中的 state 映射为组件的计算属性。mapGetters: 将 store 中的 getters 映射为组件的计算属性。mapMutations: 将 store 中的 mutations 映射为组件的方法。mapActions: 将 store 中的 actions 映射为组件的方法。
1、创建vue2项目
安装脚手架:
npm install -g @vue/cli
创建vue2项目:vue create vue2_myapp
(输入完命令后选择vue2)
2、安装Vuex依赖
在项目中使用npm或者yarn安装Vuex。
npm install vuex
或yarn add vuex
或npm install vuex@^3.5.0 --save(指定版本使用)
3、在src目录下创建store目录,在下面创建js用于存储Vuex(命名通常为index.js或者store.js)
// store.js
import Vue from 'vue';
import Vuex from 'vuex';
import modulesA from './modules/modulesA'

Vue.use(Vuex);

export default new Vuex.Store({
  state: {
    //存储公共数据
    count: 100,
  },
  mutations: {
    // 定义修改state数据的方法
    increment(state) {
      state.count++;
    },
    decrement(state) {
      state.count--;
    },
  },
  actions: {
    // 使用异步的方式来触发mutations中的方法进行提交

  },
  getters: {
    // 获取状态的方法
    getCount: (state) => state.count,
  },
  modules: {
    // 注册拆分的模块
    a:{
      //namespaced: true,//可以直接在modulesA配置在中
      ...modulesA
    }
  }
});
当项目比较复杂时,可以在src/store下增加module,将数据拆成模块,下面举一个moduleA示例
// moduleA.js
import Vue from 'vue';
import Vuex from 'vuex';

Vue.use(Vuex);

//注意此处是导出一个模块不是new一个新vuex
export default{
  namespaced: true,
  state: {
    //存储公共数据
    countA: 200,
  },
  mutations: {
    // 定义修改state数据的方法
    incrementA(state) {
      state.countA++;
    },
    decrementA(state) {
      state.countA--;
    },
  },
  actions: {
    // 使用异步的方式来触发mutations中的方法进行提交
    incrementAsyncA({ commit }) {
      // 模拟一个异步操作,例如从 API 获取数据
      setTimeout(() => {
        commit('incrementA');
      }, 1000);
    },
  },
  getters: {
    // 获取状态的方法
    getCountA: (state) => state.countA,
  },
};
4、在main.js中引入store
import Vue from 'vue'
import App from './App.vue'
import store from './store/store';//引入store

Vue.config.productionTip = false

new Vue({
  render: h => h(App),
  store,//注册store
}).$mount('#app')
5、在组件中使用
<template>
  <div>
    <h2>Root Module</h2>
    <p>
      Count from Root Module:
      <!-- 显示方式一:通过计算属性获取getter -->
      {{ rootCount }} ||
      <!-- 显示方式二:直接获取state中的值 -->
      {{ $store.state.count }} ||
      <!-- 显示方式三:通过...mapState(['count'])直接使用count -->
      {{ count }}
    </p>
    <button @click="incrementRoot">增加模块 A 计数</button>
    <button @click="decrementRoot">减少模块 A 计数</button>

    <h2>Module A</h2>
    <p>
      Count from Module A:
      <!-- 显示方式一:通过计算属性获取getter,需要配置namespaced -->
      {{ moduleACount }} ||
      <!-- 显示方式二:通过在store中注册的模块直接使用modulesA的值 -->
      {{ $store.state.a.countA }}
    </p>
    <button @click="incrementModuleA">增加模块 A 计数</button>
    <button @click="decrementModuleA">减少模块 A 计数</button>

    <button @click="incrementModuleAAsync">异步增加模块 A 计数</button>
  </div>
</template>

<script>
import { mapState,mapMutations,mapActions } from 'vuex';

export default {
  computed: {
    // 1、使用mapState方式获取数据
    // mapState使用方式一
    ...mapState(['count']),
    // mapState使用方式二
    ...mapState({
      rootCountMapState: 'count', // 将根模块的 'getCount' 映射为 'rootCount'
      moduleACount: 'a/getCountA', // 将模块 'a' 的 'getCountA' 映射为 'moduleACount'
    }),
    // 2、使用 mapGetters 辅助函数将模块中的 getters 映射到组件的计算属性
    rootCount() {
      return this.$store.getters.getCount;
    },
    moduleACount() {
      return this.$store.getters['a/getCountA'];
    },
  },
  methods: {
    // 1、使用mapMutations获取mutations模块方式一
    ...mapMutations({
      incrementRoot: 'increment', // 将根模块的 'increment' 映射为 'incrementRoot'
      decrementRoot: 'decrement', // 将根模块的 'decrement' 映射为 'decrementRoot'
      incrementModuleA: 'a/incrementA', // 将模块 'a' 的 'incrementA' 映射为 'incrementModuleA'
      decrementModuleA: 'a/decrementA', // 将模块 'a' 的 'decrementA' 映射为 'decrementModuleA'
    }),
    ...mapActions({
      incrementModuleAAsync: 'a/incrementAsyncA', // 将 'a/incrementAsyncA' 映射为 'incrementModuleAAsync'
    }),
    // 使用 mapMutations 辅助函数将模块中的 mutations 映射到组件的方法二
    incrementRoot() {
      this.$store.commit('increment');
    },
    decrementRoot() {
      this.$store.commit('decrement');
    },
    incrementModuleA() {
      this.$store.commit('a/incrementA');
    },
    decrementModuleA() {
      this.$store.commit('a/decrementA');
    },
  },
};
</script>
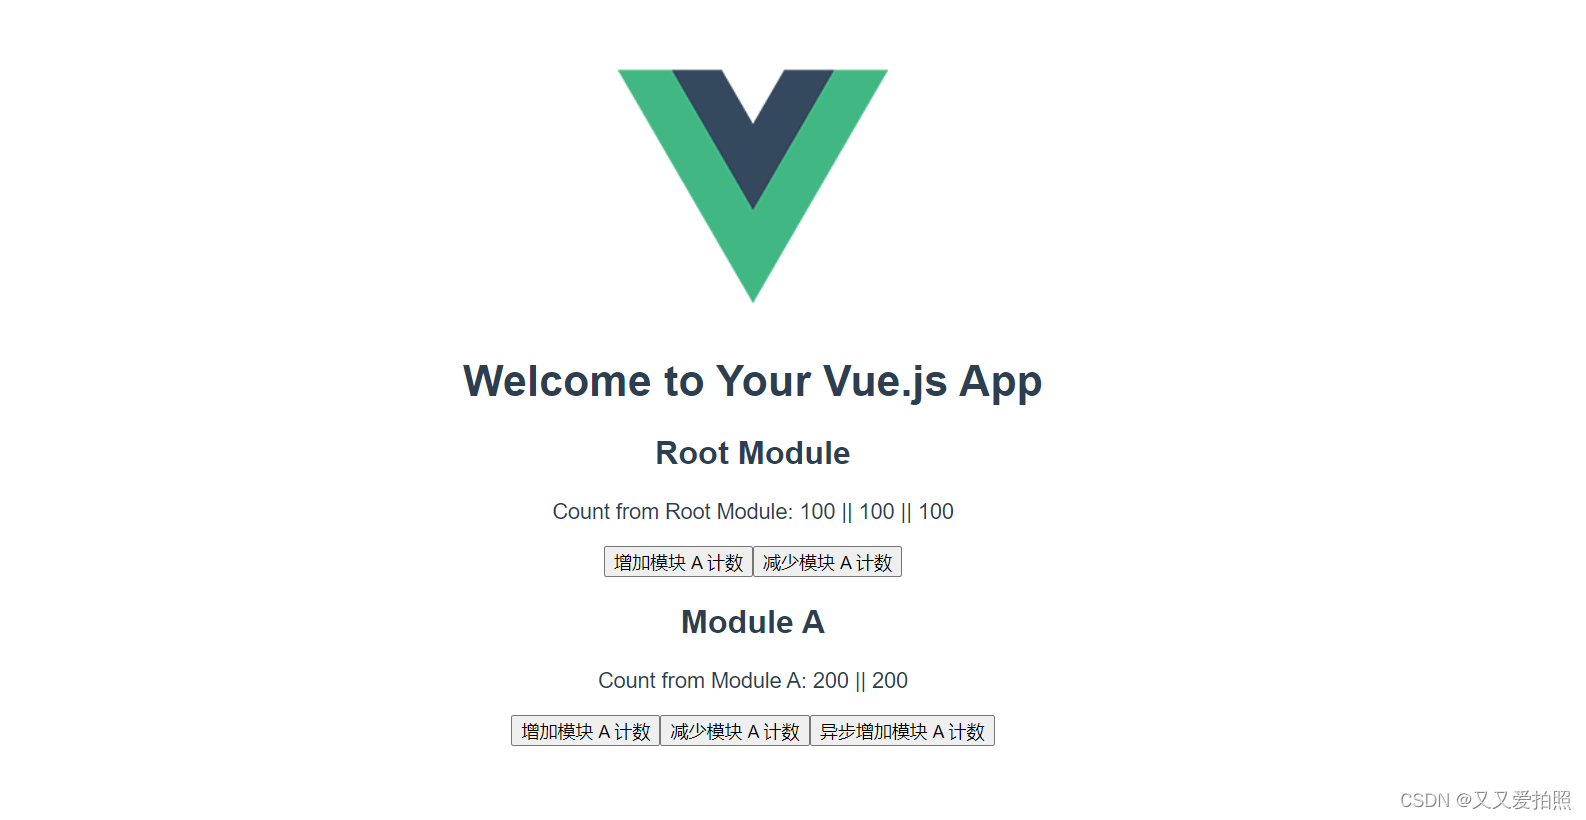
示例效果图:
vue3状态管理Pinia
State(状态): 在 Store 中定义的数据,即应用程序的状态。状态可以是基本类型、对象、数组等。Actions(操作): 在 Store 中定义的用于操作状态的函数。Actions 可以是同步或异步的,通过 this,你可以直接修改状态。如果 actions 返回一个 Promise,Pinia 将等待 Promise 完成,然后再继续执行其他代码。Getter(获取器):获取器允许你从状态中派生出一些衍生数据,类似于计算属性。通过 getters,你可以在不直接修改状态的情况下获取和处理状态的数据。
1、创建项目(参见上面vue2,输入命令后选择vue3即可)
2、安装pinia
npm install pinia
或yarn add pinia
3、在main.js中引入
import { createApp } from 'vue'
import App from './App.vue'
import { createPinia } from 'pinia';

const app = createApp(App);

app.use(createPinia());
app.mount('#app')
4、在src下创建store/index.js
import { defineStore } from 'pinia';

export const useExampleStore = defineStore('example', {
  state: () => ({
    counter: 100,
  }),
  actions: {
    increment() {
      this.counter++;
      console.log(this.counter);
    },
    decrement() {
      this.counter--;
    },
  },
});
5、在组件中通过setup()使用,下面列举了五种改变state数据的方式。
<!-- src/components/ExampleComponent.vue -->
<template>
  <div>
    <p>Counter: {{ exampleStore.counter }}</p>
    <button @click="increment">Increment</button>
    <button @click="decrement">Decrement</button>
  </div>
</template>

<script setup>
import { useExampleStore } from '../store/index';

// 组合式
const exampleStore = useExampleStore();

const increment=()=>{
  // 方式一:在store的action中操作
  exampleStore.increment();
  // 方式二:直接在应用的组件中改变
  // exampleStore.counter++;
  // 方式三:使用$patch整体覆盖
  // exampleStore.$patch({
  //   counter:105
  // })
  // 方式四:使用$patch改变
  // exampleStore.$patch((state)=>{
  //   if(state.counter){
  //     state.counter++;
  //   }
  // })
  // 方式五:使用$state覆盖
  // exampleStore.$state ={
  //   counter:122
  // }
}
const decrement=()=>{
  // exampleStore.decrement();
  exampleStore.counter--;
}

// 选项式
// export default {
//   setup() {
//     const exampleStore = useExampleStore();
//     return {
//       exampleStore,
//       increment: exampleStore.increment,
//       decrement: exampleStore.decrement,
//     };
//   }
// };
</script>
示例效果图:

Pinia与VueX区别:
- Vuex 为vue2打造的,Pinia为vue3打造的
- Pinia没有mutations,直接通过actions进行同步和异步操作,异步需要返回一个promise
- Pinia 没有modules,设计更为分散,每个组件可以拥有自己的 Store。
- Vuex 组件通过 mapState、mapMutations、mapActions 等辅助函数来访问存储库中的数据和操作。pinia通过setup 函数来引入和使用 Store,并通过 Store 的实例访问状态和操作。
- Vuex 对 TypeScript 有良好的支持,但类型推断可能有时候会感觉有点繁琐。Pinia 是使用 TypeScript 编写的,提供了更好的 TypeScript 支持,可以更轻松地推断和利用类型信息。
- vuex做数据持久化使用插件
vuex-persistedstate,Pinia做数据持久化使用pinia-plugin-persist
react状态管理Redux
Provider:把父组件传递进来的store对象放入react 上下文中,这样connect组件就可以从上下文中获取到store对象combineReducer:store.state进行分片管理,每个reducer管理state中的一部分。由于createStore只接受一个reducer,所以采用该方法生成一个最终的reducer中间件(Middleware):中间件是一个位于动作派发和 Reducer 之间的拦截层。它允许你在动作被派发到 Reducer 之前执行额外的逻辑。State:整个 Redux 应用程序的状态,它是只读的。状态的更新是通过触发动作来创建新的状态,而不是直接修改原有状态。action:更新state的状态时用。dispatch:触发store修改state的命令,是createStore返回对象的一个方法connect:从react上下文中取出store对象,订阅store.state的变化,当store state变化时调用自身的方法重新生成connect组件的state,被包装组件便会被重新渲染。不会感知到store的存在,dispatch在这里也是非必须的。
connect的4个内置组件: 状态mapStateToProps、动作mapDispatchToProps、属性合并mergeProps和 配置项options异步中间件:redux没有直接提供执行异步操作的方法,需要手动集成中间件,最常用异步实现的中间件有redux-thunk、redux-saga
1、搭建react+ts项目
npm install -g create-react-app
npx create-react-app my-react-ts-app --template typescript
2、安装redux
npm install redux react-redux
3、在src下创建如下结构
src/
– – store/
– – – – index.ts
– – – – reducers/
– – – – – – index.ts
– – – – – – counterReducer.ts
// src/store/index.ts
import { configureStore } from '@reduxjs/toolkit';
import rootReducer from './reducers';

const store = configureStore({
  reducer: rootReducer
});

export default store;
// src/store/reducers/index.ts
// combineReducers 用于将多个 reducer 组合成一个根 reducer
import { combineReducers } from 'redux';
import counterReducer from './counterReducer';

const rootReducer = combineReducers({
  counter: counterReducer,
  // 添加其他 reducer...
});

export default rootReducer;
// src/store/reducers/counterReducer.ts

// 从Redux中导入Action类型,用于定义动作对象
import { Action } from 'redux';

// 定义动作类型的常量,以避免拼写错误
const INCREMENT = 'INCREMENT';
const DECREMENT = 'DECREMENT';

// Action Creators: 返回动作对象的函数
export const increment = (): Action => ({ type: INCREMENT });
export const decrement = (): Action => ({ type: DECREMENT });

// Reducer函数:根据派发的动作更新状态
const counterReducer = (state = 0, action: Action): number => {
  switch (action.type) {
    case INCREMENT:
      // 当派发INCREMENT动作时,将当前状态加1
      return state + 1;
    case DECREMENT:
      // 当派发DECREMENT动作时,将当前状态减1
      return state - 1;
    case 'INCREMENTFIXED':
      return state + 5;
    default:
      // 如果动作类型不被识别,则返回当前状态
      return state;
  }
};

// 将counterReducer作为模块的默认导出
export default counterReducer;
4、在index.tsx中引入
import React from 'react';
import ReactDOM from 'react-dom/client';
import './index.css';
import App from './App';
import reportWebVitals from './reportWebVitals';
//引入redux
import { Provider } from 'react-redux';
import store from './store';

const root = ReactDOM.createRoot(
  document.getElementById('root') as HTMLElement
);
root.render(
  <React.StrictMode>
    <Provider store={store}>
      <App />
    </Provider>
  </React.StrictMode>

);

reportWebVitals();
5、在components中创建Counter.tsx
// src/components/Counter.tsx
import React from 'react';
import { connect } from 'react-redux';
import { increment, decrement } from '../store/reducers/counterReducer';

interface CounterProps {
  count: number;
  increment: () => void;
  decrement: () => void;
}

const Counter: React.FC<CounterProps> = ({ count, increment, decrement }) => {
  return (
    <div>
      <p>Count: {count}</p>
      <button onClick={increment}>Increment</button>
      <button onClick={decrement}>Decrement</button>
    </div>
  );
};

// 中间件mapStateToProps 函数将 Redux store 的状态映射到组件的属性。
const mapStateToProps = (state: { counter: number }) => ({
  count: state.counter,
});

// 中间件mapDispatchToProps 对象将动作创建函数映射到组件的属性。
const mapDispatchToProps = {
  increment,
  decrement
};

// connect 函数将组件连接到 Redux store,并将 mapStateToProps 和 mapDispatchToProps 的结果传递给组件
export default connect(mapStateToProps, mapDispatchToProps)(Counter);
示例效果图:





![[设计模式Java实现附plantuml源码~创建型] 对象的克隆~原型模式](https://img-blog.csdnimg.cn/direct/2473c30ed78045959184631275c0a1bb.png)


