KNN
整体思路
- 加载数据集CIFAR10并随机展示部分数据
- 构建KNearestNeighbor分类器,计算测试集每张图片的每个像素点与训练集每张图片的每个像素点的距离。
- 将图片转化为数组。在测试集使用compute_distances_one_loop,compute_distances_no_loops,compute_distances_two_loops三种方法计算距离矩阵和欧氏距离
- 交叉验证选择最优K值在验证集计算准确率
加载CIFAR10数据集
#下载并加载数据集
from cs231n.data_utils import load_CIFAR10
cifar10_dir = 'cs231n/datasets/cifar-10-batches-py'
#初始化
try:
   del X_train, y_train
   del X_test, y_test
   print('Clear previously loaded data.')
# 加载数据集
X_train, y_train, X_test, y_test = load_CIFAR10(cifar10_dir)
# 打印数据集大小和维度
print('Training data shape: ', X_train.shape)
print('Training labels shape: ', y_train.shape)
print('Test data shape: ', X_test.shape)
print('Test labels shape: ', y_test.shape)
展示图片
# 图片类别
classes = ['plane', 'car', 'bird', 'cat', 'deer', 'dog', 'frog', 'horse', 'ship', 'truck']
num_classes = len(classes)
# 每个类别展示七张照片
samples_per_class = 7
for y, cls in enumerate(classes):
    idxs = np.flatnonzero(y_train == y)
    idxs = np.random.choice(idxs, samples_per_class, replace=False)
    for i, idx in enumerate(idxs):
        plt_idx = i * num_classes + y + 1
        plt.subplot(samples_per_class, num_classes, plt_idx)
        plt.imshow(X_train[idx].astype('uint8'))
        plt.axis('off')
        if i == 0:
            plt.title(cls)
plt.show()
构建模型
欧式距离也称欧几里得距离,衡量的是多维空间中两个点之间的 绝对距离 。
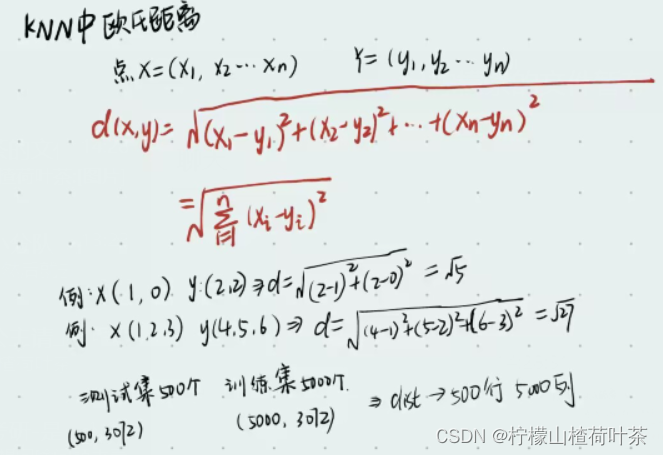
compute_distances_two_loops
#距离计算如下:
import numpy as np
X= np.arange(20)
print(X)    #输出[ 0  1  2  3  4  5  6  7  8  9 10 11 12 13 14 15 16 17 18 19]
X=np.reshape(X,(5,4))
print(X)
'''
[[ 0  1  2  3]
 [ 4  5  6  7]
 [ 8  9 10 11]
 [12 13 14 15]
 [16 17 18 19]]
'''
X_train = np.arange(16)
print(X_train)      #输出[ 0  1  2  3  4  5  6  7  8  9 10 11 12 13 14 15]
X_train=np.reshape(X_train,(4,4))
print(X_train)
'''
[[ 0  1  2  3]
 [ 4  5  6  7]
 [ 8  9 10 11]
 [12 13 14 15]]
'''

num_test = X.shape[0]
print(num_test)     #输出5
num_train = X_train.shape[0]
print(num_train)        #输出4
dists = np.zeros((num_test, num_train))
for i in range(num_test):
    for j in range(num_train):
        dists[i,j] = np.sqrt(np.sum((X[i]-X_train[j])*(X[i]-X_train[j])))
        '''
        [[ 0.  8. 16. 24.]
         [ 8.  0.  8. 16.]
         [16.  8.  0.  8.]
         [24. 16.  8.  0.]
         [32. 24. 16.  8.]]
        '''
print(dists)
所以在k_nearest_neighbor.py中完成compute_distances_two_loops函数如下:
    def compute_distances_two_loops(self, X):
        """
        Compute the distance between each test point in X and each training point
        in self.X_train using a nested loop over both the training data and the
        test data.

        Inputs:
        - X: A numpy array of shape (num_test, D) containing test data.

        Returns:
        - dists: A numpy array of shape (num_test, num_train) where dists[i, j]
          is the Euclidean distance between the ith test point and the jth training
          point.
        """
        #X.shape[0]读取数组行数
        num_test = X.shape[0]
        num_train = self.X_train.shape[0]
        dists = np.zeros((num_test, num_train))
        for i in range(num_test):
            for j in range(num_train):
                #####################################################################
                # TODO:                                                             #
                # Compute the l2 distance between the ith test point and the jth    #
                # training point, and store the result in dists[i, j]. You should   #
                # not use a loop over dimension, nor use np.linalg.norm().          #
                #####################################################################
                # *****START OF YOUR CODE (DO NOT DELETE/MODIFY THIS LINE)*****

                dists[i,j] = np.sqrt(np.sum((X[i]-self.X_train[j])*(X[i]-self.X_train[j])))

                # *****END OF YOUR CODE (DO NOT DELETE/MODIFY THIS LINE)*****
        return dists
compute_distances_one_loops
计算如下
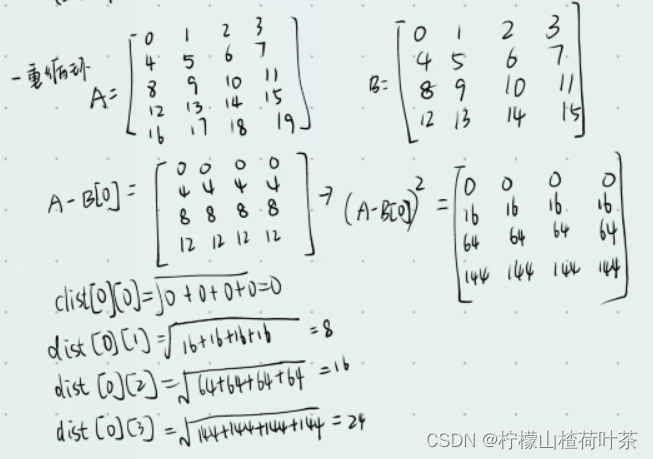
#距离计算如下
import numpy as np
X= np.arange(20)
print(X)    #输出[ 0  1  2  3  4  5  6  7  8  9 10 11 12 13 14 15 16 17 18 19]
X=np.reshape(X,(5,4))
print(X)
X_train = np.arange(16)
'''
[[ 0  1  2  3]
 [ 4  5  6  7]
 [ 8  9 10 11]
 [12 13 14 15]
 [16 17 18 19]]
'''
print(X[0])
print(X_train)      #输出[ 0  1  2  3  4  5  6  7  8  9 10 11 12 13 14 15]
X_train=np.reshape(X_train,(4,4))
print(X_train)
'''
[[ 0  1  2  3]
 [ 4  5  6  7]
 [ 8  9 10 11]
 [12 13 14 15]]
'''
print(X_train-X[0])
'''
[[ 0  0  0  0]
 [ 4  4  4  4]
 [ 8  8  8  8]
 [12 12 12 12]]
'''
for i in range(num_test):
    #axis为1是压缩列,即将每一行的元素相加,将矩阵压缩为一
    print(np.sum((X_train-X[i])*(X_train-X[i]),axis=1))

'''
[  0  64 256 576]
[ 64   0  64 256]
[256  64   0  64]
[576 256  64   0]
[1024  576  256   64]
'''
所以在k_nearest_neighbor.py中完成compute_distances_one_loops函数如下:
    def compute_distances_one_loop(self, X):
        """
        Compute the distance between each test point in X and each training point
        in self.X_train using a single loop over the test data.

        Input / Output: Same as compute_distances_two_loops
        """
        num_test = X.shape[0]
        num_train = self.X_train.shape[0]
        dists = np.zeros((num_test, num_train))
        for i in range(num_test):
            #######################################################################
            # TODO:                                                               #
            # Compute the l2 distance between the ith test point and all training #
            # points, and store the result in dists[i, :].                        #
            # Do not use np.linalg.norm().                                        #
            #######################################################################
            # *****START OF YOUR CODE (DO NOT DELETE/MODIFY THIS LINE)*****

            dists[i]=np.sqrt(np.sum((X_train-X[i])*(X_train-X[i]),axis=1)).reshape(1,num_train)

            # *****END OF YOUR CODE (DO NOT DELETE/MODIFY THIS LINE)*****
        return dists
compute_distances_no_loops

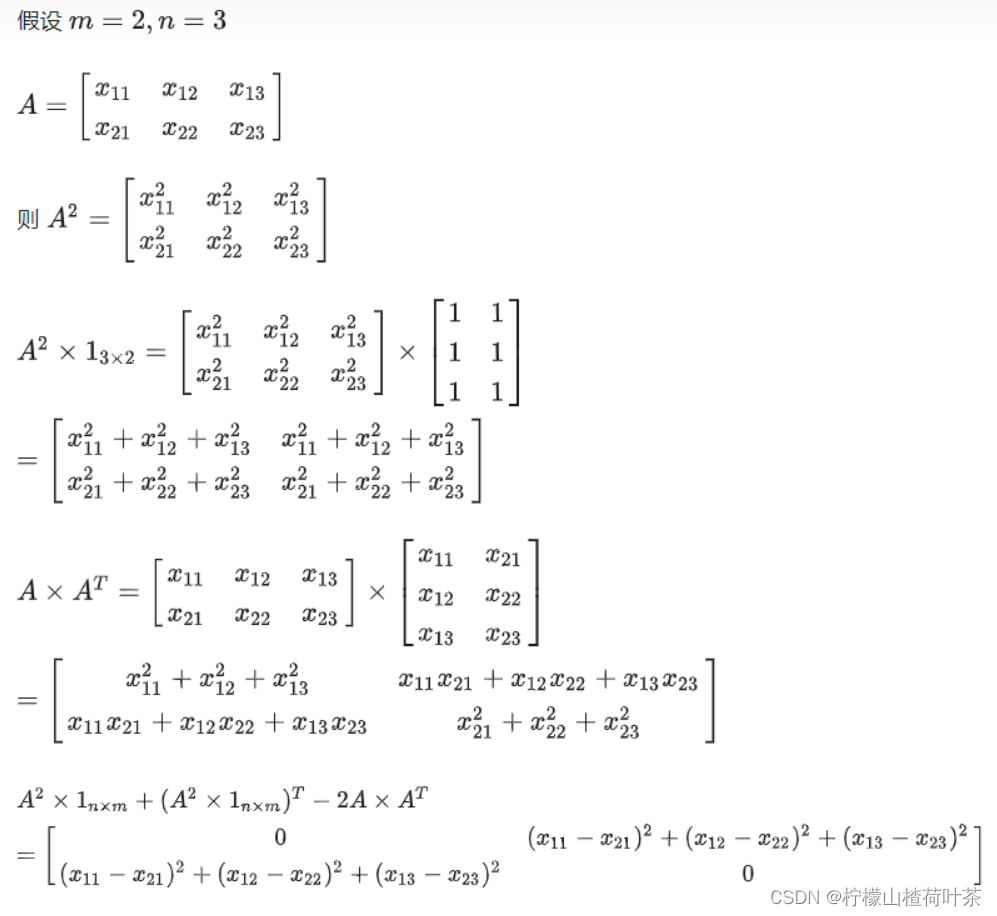

(推导过程来自知乎)
#距离计算如下
import numpy as np
X= np.arange(20)
print(X)    #输出[ 0  1  2  3  4  5  6  7  8  9 10 11 12 13 14 15 16 17 18 19]
X=np.reshape(X,(5,4))
print(X)
X_train = np.arange(16)
'''
[[ 0  1  2  3]
 [ 4  5  6  7]
 [ 8  9 10 11]
 [12 13 14 15]
 [16 17 18 19]]
'''
print(X[0])
print(X_train)      #输出[ 0  1  2  3  4  5  6  7  8  9 10 11 12 13 14 15]
X_train=np.reshape(X_train,(4,4))
print(X_train)
'''
[[ 0  1  2  3]
 [ 4  5  6  7]
 [ 8  9 10 11]
 [12 13 14 15]]
'''
num_test = X.shape[0]
num_train = X_train.shape[0]

dists=np.sqrt(np.matmul(X**2, np.ones((4, num_train))) + np.transpose(np.matmul(X_train**2, np.ones((4, 5)))) - 2*np.matmul(X, np.transpose(X_train)))
print(dists)
'''
[[ 0.  8. 16. 24.]
 [ 8.  0.  8. 16.]
 [16.  8.  0.  8.]
 [24. 16.  8.  0.]
 [32. 24. 16.  8.]]
'''
所以在k_nearest_neighbor.py中完成compute_distances_no_1oops函数如下:
def compute_distances_no_loops(self, X):
        """
        Compute the distance between each test point in X and each training point
        in self.X_train using no explicit loops.

        Input / Output: Same as compute_distances_two_loops
        """
        num_test = X.shape[0]
        num_train = self.X_train.shape[0]
        dists = np.zeros((num_test, num_train))
        #########################################################################
        # TODO:                                                                 #
        # Compute the l2 distance between all test points and all training      #
        # points without using any explicit loops, and store the result in      #
        # dists.                                                                #
        #                                                                       #
        # You should implement this function using only basic array operations; #
        # in particular you should not use functions from scipy,                #
        # nor use np.linalg.norm().                                             #
        #                                                                       #
        # HINT: Try to formulate the l2 distance using matrix multiplication    #
        #       and two broadcast sums.                                         #
        #########################################################################
        # *****START OF YOUR CODE (DO NOT DELETE/MODIFY THIS LINE)*****

        dists= np.sqrt(np.matmul(X**2, np.ones((self.X_train.shape[1], num_train))) + np.transpose(np.matmul(self.X_train**2, np.ones((self.X_train.shape[1], num_test)))) - 2*np.matmul(X, np.transpose(self.X_train)))

        # *****END OF YOUR CODE (DO NOT DELETE/MODIFY THIS LINE)*****
        return dists
对比三种方法对欧氏距离的求解速度
def time_function(f, *args):
    """
    Call a function f with args and return the time (in seconds) that it took to execute.
    """
    import time
    tic = time.time()
    f(*args)
    toc = time.time()
    return toc - tic

two_loop_time = time_function(classifier.compute_distances_two_loops, X_test)
print('Two loop version took %f seconds' % two_loop_time)

one_loop_time = time_function(classifier.compute_distances_one_loop, X_test)
print('One loop version took %f seconds' % one_loop_time)

no_loop_time = time_function(classifier.compute_distances_no_loops, X_test)
print('No loop version took %f seconds' % no_loop_time)
k折交叉验证
num_folds = 5
k_choices = [1, 3, 5, 8, 10, 12, 15, 20, 50, 100]

X_train_folds = []
y_train_folds = []

################################################################################
# TODO:                                                                        #
# Split up the training data into folds. After splitting, X_train_folds and    #
# y_train_folds should each be lists of length num_folds, where                #
# y_train_folds[i] is the label vector for the points in X_train_folds[i].     #
# Hint: Look up the numpy array_split function.                                #
################################################################################
# *****START OF YOUR CODE (DO NOT DELETE/MODIFY THIS LINE)*****
X_train_folds = np.array_split(X_train, num_folds)
y_train_folds = np.array_split(y_train, num_folds)
# *****END OF YOUR CODE (DO NOT DELETE/MODIFY THIS LINE)*****

# A dictionary holding the accuracies for different values of k that we find
# when running cross-validation. After running cross-validation,
# k_to_accuracies[k] should be a list of length num_folds giving the different
# accuracy values that we found when using that value of k.
k_to_accuracies = {}


################################################################################
# TODO:                                                                        #
# Perform k-fold cross validation to find the best value of k. For each        #
# possible value of k, run the k-nearest-neighbor algorithm num_folds times,   #
# where in each case you use all but one of the folds as training data and the #
# last fold as a validation set. Store the accuracies for all fold and all     #
# values of k in the k_to_accuracies dictionary.                               #
################################################################################
# *****START OF YOUR CODE (DO NOT DELETE/MODIFY THIS LINE)*****

from sklearn import datasets
from sklearn.model_selection import KFold


kf = KFold(n_splits=5,shuffle=True)
for k in k_choices:
  acc = []
  #k_to_accuracies初始化
  k_to_accuracies[k]=np.zeros(num_folds)
  for train_index,test_index in kf.split(X_train):     # 将数据划分为k折
    train_data=X_train[train_index]   # 选取的训练集数据下标
    train_data_y=y_train[train_index]
    test=X_train[test_index]          # 选取的测试集数据下标
    test_y=y_train[test_index]
    classifier=KNearestNeighbor()
    classifier.train(train_data,train_data_y)
    # 计算距离矩阵
    dists=classifier.compute_distances_no_loops(test)
    #预测
    ypred=classifier.predict_labels(dists,k=k)
    #计算准确率
    num_correct=np.mean(ypred==test_y)
    acc.append(num_correct)
  k_to_accuracies[k] = acc
# *****END OF YOUR CODE (DO NOT DELETE/MODIFY THIS LINE)*****

# Print out the computed accuracies
for k in sorted(k_to_accuracies):
    for accuracy in k_to_accuracies[k]:
        print('k = %d, accuracy = %f' % (k, accuracy))
然后选取最优k=8在测试集进行验证求准确率
best_k = 8

classifier = KNearestNeighbor()
classifier.train(X_train, y_train)
y_test_pred = classifier.predict(X_test, k=best_k)

# Compute and display the accuracy
num_correct = np.sum(y_test_pred == y_test)
accuracy = float(num_correct) / num_test
print('Got %d / %d correct => accuracy: %f' % (num_correct, num_test, accuracy))
主要解决问题
-
三种方法计算欧氏距离(公式推导如上)
-
k折交叉验证数据不随机问题:
shuffle:分割之前是否对数据进行洗牌(默认True)
random_state:随机种子 当种子固定时,可以实现实验复现,方便调节参数
只有当shuffle=True时,random_state才起作用。- shuffle和random_state均不设置,即默认为shuffle=True,重新分配前会重新洗牌,则两次运行结果不同
- 设置random_state,那么默认shuffle=True,根据新的种子点,每次的运行结果是相同的
- 如果仅设置shuffle=True 那么每次划分之前都要洗牌 多次运行结果不同
num_test, accuracy))
# 主要解决问题

 - [ ] 三种方法计算欧氏距离(公式推导如上)


 - [ ] k折交叉验证数据不随机问题:

  shuffle:分割之前是否对数据进行洗牌(默认True)
  random_state:随机种子 当种子固定时,可以实现实验复现,方便调节参数
  只有当shuffle=True时,random_state才起作用。

  1. shuffle和random_state均不设置,即默认为shuffle=True,重新分配前会重新洗牌,则两次运行结果不同
  2. 设置random_state,那么默认shuffle=True,根据新的种子点,每次的运行结果是相同的
  3. 如果仅设置shuffle=True 那么每次划分之前都要洗牌 多次运行结果不同
(解决方案来自CSDN)
