这样一个简单的mobile robot模型
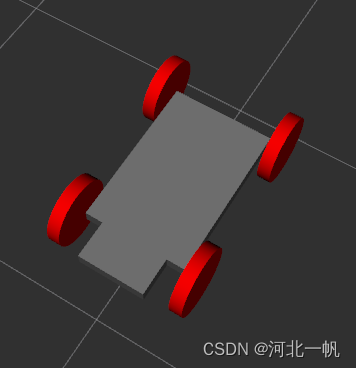
首先写xacro文件,创建 link joint transmission
<?xml version="1.0"?>
<robot xmlns:xacro="http://www.ros.org/wiki/xacro" name="whill_modelc" >

    <xacro:property name="PI" value="3.1415926"/>

    <link name="base_link">
        <visual>
            <geometry>
                <sphere radius="0.001" />
            </geometry>
        </visual>
    </link>

    <link name="base_floor">
        <visual>
            <geometry>
                <box size="0.600 0.400 0.050"/>
            </geometry>
            <material name="grey">
                <color rgba="0.5 0.5 0.5 1.0"/>
            </material>
        </visual>

        <collision>
            <geometry>
                <box size="0.600 0.400 0.050"/>
            </geometry>
        </collision>

        <inertial>
            <origin xyz="0 0 0" rpy="0 0 0" />
            <mass value="40" />
            <inertia ixx="1.0"  ixy="0.0"   ixz="0.0"
                                iyy="1.0"   iyz="0.0"
                                            izz="1.0" />
        </inertial>
    </link>

    <joint name="base_body_joint" type="fixed">
        <parent link="base_link" />
        <child link="base_floor" />
        <origin xyz="0.3 0 0.0" rpy="0 0 0"/>
    </joint>


    <link name="footrest_link">
        <collision>
            <geometry>
                <box size="0.250 0.260 0.050"/>
            </geometry>
        </collision>
        <visual>
            <geometry>
                <box size="0.250 0.260 0.050"/>
            </geometry>
            <material name="grey">
                <color rgba="0.5 0.5 0.5 1.0"/>
            </material>
        </visual>
        <inertial>
            <origin xyz="0 0 0" rpy="0 0 0" />
            <mass value="1" />
            <inertia ixx="1.0"  ixy="0.0"   ixz="0.0"
                                iyy="1.0"   iyz="0.0"
                                            izz="1.0" />
        </inertial>
    </link>

    <joint name="footrest_joint" type="fixed">
        <parent link="base_floor" />
        <child link="footrest_link" />
        <origin xyz="0.320 0 0" rpy="0 0 0"/>
    </joint>

    <link name="left_wheel_link">
        <visual>
            <geometry>
                <cylinder length="0.05" radius="0.1325"/>
            </geometry>
            <origin xyz="0.0 0.0 0.0" rpy="0.0 0.0 0.0" />
            <material name="black" />
        </visual>

        <collision>
            <geometry>
                <cylinder length="0.05" radius="0.1325"/>
            </geometry>
            <origin xyz="0.0 0.0 0.0" rpy="0.0 0.0 0.0" />
        </collision>

        <inertial>
            <mass value="0.500"/>
            <inertia ixx="0.0013541667" ixy="0" ixz="0" iyy="0.0013541667" iyz="0" izz="0.0025"/>
        </inertial>
    </link>


    <joint name="leftWheel" type="continuous">
        <parent link="base_floor" />
        <child link="left_wheel_link" />
        <origin xyz="-0.3 0.245 0" rpy="${-PI / 2} 0.0 0.0" />
        <axis xyz="0 0 1" />
    </joint>


    <link name="right_wheel_link">
        <visual>
            <geometry>
                <cylinder length="0.05" radius="0.1325"/>
            </geometry>
            <origin xyz="0 0 0" rpy="0 0 0" />
            <material name="black" />
        </visual>
        <collision>
            <geometry>
                <cylinder length="0.05" radius="0.1325"/>
            </geometry>
            <origin xyz="0 0 0" rpy="0.0 0.0 0.0" />
        </collision>

        <inertial>
            <mass value="0.500"/>
            <inertia ixx="0.0013541667" ixy="0" ixz="0" iyy="0.0013541667" iyz="0" izz="0.0025"/>
        </inertial>
    </link>

    <joint name="rightWheel" type="continuous">
        <parent link="base_floor" />
        <child link="right_wheel_link" />
        <origin xyz="-0.3 -0.245 0" rpy="${-PI / 2} 0.0 0.0" />
        <axis xyz="0 0 1" />
    </joint>


    <link name="frontwheel_left">
        <collision>
            <geometry>
                <cylinder length="0.05" radius="0.1325"/>
            </geometry>
        </collision>

        <visual>
            <geometry>
                <cylinder length="0.05" radius="0.1325"/>
            </geometry>
            <material name="black" />
        </visual>

        <inertial>
            <origin xyz="0 0 0" rpy="0 0 0" />
            <mass value="1.0" />
            <inertia ixx="1.0"  ixy="0.0"   ixz="0.0"
                                iyy="1.0"   iyz="0.0"
                                            izz="1.0" />
        </inertial>
    </link>

    <joint name="frontwheel_left_joint" type="fixed">
        <parent link="base_floor" />
        <child link="frontwheel_left" />
        <origin xyz="0.3 -0.245 0" rpy="1.57 0 0" />
        <axis xyz="0 0 1" />
    </joint>


    <link name="frontwheel_right">
        <collision>
            <geometry>
                <cylinder length="0.05" radius="0.1325"/>
            </geometry>
        </collision>

        <visual>
            <geometry>
                <cylinder length="0.05" radius="0.1325"/>
            </geometry>
            <material name="black" />
        </visual>

        <inertial>
            <origin xyz="0 0 0" rpy="0 0 0" />
            <mass value="1.0" />
            <inertia ixx="1.0"  ixy="0.0"   ixz="0.0"
                                iyy="1.0"   iyz="0.0"
                                            izz="1.0" />
        </inertial>
    </link>

    <joint name="frontwheel_right_joint" type="fixed">
        <parent link="base_floor" />
        <child link="frontwheel_right"/>
        <origin xyz="0.3 0.245 0" rpy="1.57 0 0" />
        <axis xyz="0 0 -1" />
    </joint>


    <!-- ===============  Transmission =============== -->

    <transmission name="right_wheel_trans">
        <type>transmission_interface/SimpleTransmission</type>
        <joint name="rightWheel">
            <hardwareInterface>hardware_interface/VelocityJointInterface</hardwareInterface>
        </joint>
        <actuator name="right_wheel_motor">
            <hardwareInterface>hardware_interface/VelocityJointInterface</hardwareInterface>
            <mechanicalReduction>30</mechanicalReduction>
        </actuator>
    </transmission>

    <transmission name="left_wheel_trans">
        <type>transmission_interface/SimpleTransmission</type>
        <joint name="leftWheel">
            <hardwareInterface>hardware_interface/VelocityJointInterface</hardwareInterface>
        </joint>
        <actuator name="left_wheel_motor">
            <hardwareInterface>hardware_interface/VelocityJointInterface</hardwareInterface>
            <mechanicalReduction>30</mechanicalReduction>
        </actuator>
    </transmission>

    <gazebo reference="base_floor">
        <selfCollide>true</selfCollide>
        <mu1 value="0.05" />
        <mu2 value="0.05" />
    </gazebo>

    <gazebo reference="sensor_arm_link">
        <selfCollide>true</selfCollide>
        <mu1 value="0.05" />
        <mu2 value="0.05" />
    </gazebo>

    <gazebo reference="rearwheel_right">
        <selfCollide>true</selfCollide>
        <mu1 value="1.0" />
        <mu2 value="1.0" />
    </gazebo>

    <gazebo reference="rearwheel_left">
        <selfCollide>true</selfCollide>
        <mu1 value="1.0" />
        <mu2 value="1.0" />
    </gazebo>

    <gazebo reference="frontwheel_right">
        <selfCollide>true</selfCollide>
        <mu1 value="0.0" />
        <mu2 value="0.0" />
    </gazebo>

    <gazebo reference="frontwheel_left">
        <selfCollide>true</selfCollide>
        <mu1 value="0.0" />
        <mu2 value="0.0" />
    </gazebo>

</robot>
创建xcaro模型时,下面几个地方要注意:
(1)
车轮是一个cylinder link,
<link name="right_wheel_link">
        <visual>
            <geometry>
                <cylinder length="0.05" radius="0.1325"/>
            </geometry>
            <origin xyz="0 0 0" rpy="0 0 0" />
            <material name="black" />
        </visual>
        <collision>
            <geometry>
                <cylinder length="0.05" radius="0.1325"/>
            </geometry>
            <origin xyz="0 0 0" rpy="0.0 0.0 0.0" />
</collision>link的局部坐标系原点在这个物体的形心,右手坐标系。
<joint name="rightWheel" type="continuous">
        <parent link="base_floor" />
        <child link="right_wheel_link" />
        <origin xyz="-0.3 -0.245 0" rpy="${-PI / 2} 0.0 0.0" />
        <axis xyz="0 0 1" />
    </joint>
车轮在跟父link连接的时候,放在父link局部坐标系中-0.3 -0.245 0这个位置,然后绕child link自己的X轴转-90度(rpy=-pi/2 0 0),也就是这样转下来,原来的z轴转到原来的y轴位置
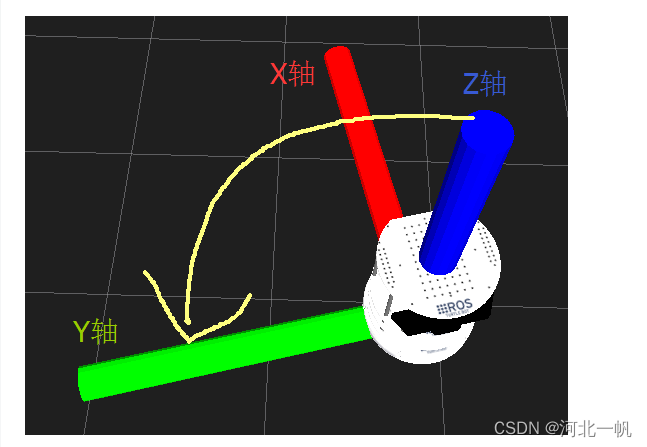
<axis xyz="0 0 1" />这句话的意思是,这个物体绕自己的z轴旋转(注意z轴已经有刚才的 rpy命令移动了) 。
注意左右车轮的z轴正向要是一致的,否则会出现,你给往前走的指令,robot旋转,你给旋转的指令,robot反而向前走直线!
transmission是给车轮绑定一个gazebo中的电机
然后在transmission下面加入一个双轮差速控制器
<gazebo>
        <plugin name="differential_drive_controller" filename="libgazebo_ros_diff_drive.so">
            <rosDebugLevel>Debug</rosDebugLevel>
            <publishWheelTF>true</publishWheelTF>
            <robotNamespace>/</robotNamespace>
            <publishTf>1</publishTf>
            <publishWheelJointState>true</publishWheelJointState>
            <alwaysOn>true</alwaysOn>
            <updateRate>100.0</updateRate>
            <legacyMode>true</legacyMode>
            <leftJoint>leftWheel</leftJoint> <!-- 左轮 -->
            <rightJoint>rightWheel</rightJoint> <!-- 右轮 -->
            <wheelSeparation>0.49</wheelSeparation> <!-- 车轮间距 -->
            <wheelDiameter>0.265</wheelDiameter> <!-- 车轮直径 -->
            <broadcastTF>false</broadcastTF>
            <wheelTorque>30</wheelTorque>
            <wheelAcceleration>1.8</wheelAcceleration>
            <commandTopic>cmd_vel</commandTopic> <!-- 运动控制话题 -->
            <odometryFrame>odom</odometryFrame>
            <odometryTopic>odom</odometryTopic> <!-- 里程计话题 -->
            <robotBaseFrame>base_link</robotBaseFrame> <!-- 根坐标系 -->
        </plugin>
    </gazebo>
在给双轮差速器发送控制指令的时候,topic是robotNamespace+commandTopic,具体来说,robotNamespace是 / ,commandTopic是 cmd_vel,那就要发送 /cmd_vel,如果robotNamespace是 /robot,那就要发送 /robot/cmd_vel
下一步写luanch文件
<launch>

  <!-- these are the arguments you can pass this launch file, for example paused:=true -->
  <arg name="paused" default="false"/>
  <arg name="use_sim_time" default="true"/>
  <arg name="gui" default="true"/>
  <arg name="headless" default="false"/>
  <arg name="debug" default="false"/>

  <!-- We resume the logic in empty_world.launch -->
  <include file="$(find gazebo_ros)/launch/empty_world.launch">
    <arg name="debug" value="$(arg debug)" />
    <arg name="gui" value="$(arg gui)" />
    <arg name="paused" value="$(arg paused)"/>
    <arg name="use_sim_time" value="$(arg use_sim_time)"/>
    <arg name="headless" value="$(arg headless)"/>
  </include>

  <!-- Load the URDF into the ROS Parameter Server -->
  <param name="robot_description" command="$(find xacro)/xacro '$(find ros_whill)/xacro/modelc.xacro'" />


  <!-- Run a python script to the send a service call to gazebo_ros to spawn a URDF robot -->
  <node name="urdf_spawner" pkg="gazebo_ros" type="spawn_model" respawn="false" output="screen"
  args="-urdf -model whill_modelc -param robot_description"/>

  <!-- 运行joint_state_publisher节点,发布机器人的关节状态  -->
  <node name="joint_state_publisher" pkg="joint_state_publisher" type="joint_state_publisher" />

  <!-- 运行robot_state_publisher节点,发布tf  -->
  <node name="robot_state_publisher" pkg="robot_state_publisher" type="robot_state_publisher">
    <remap from="/joint_states" to="/whill_modelc/joint_states" />
  </node>


</launch>
用rqt发送控制指令,rviz可视化,rviz可视化的时候,注意 Fixed Frame是odom

不然就会看到,robot在rviz中不动,odom坐标系在往后退


![[Error]连接iPhone调试时提示Failed to prepare the device for development.](https://img-blog.csdnimg.cn/direct/8faa77347a35461b84c12294f506be30.png)