目录
一、Hello驱动
一、Hello驱动

1.1、APP 打开的文件在内核中如何表示
open函数原型:
int open(const char *pathname, int flags, mode_t mode);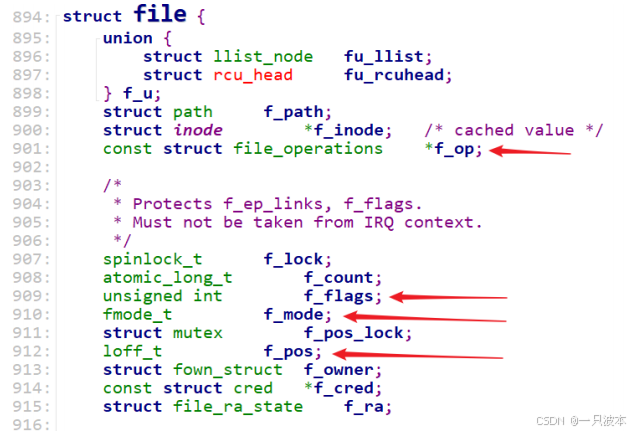
1.2、打开字符设备节点时,内核中也有对应的 struct file

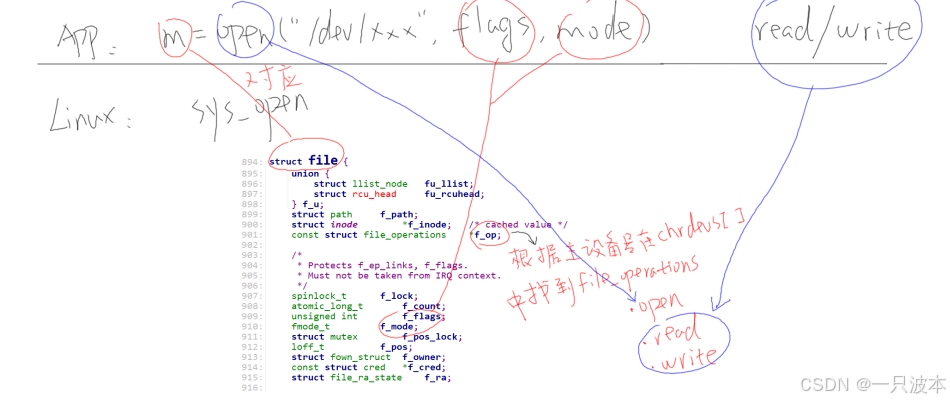
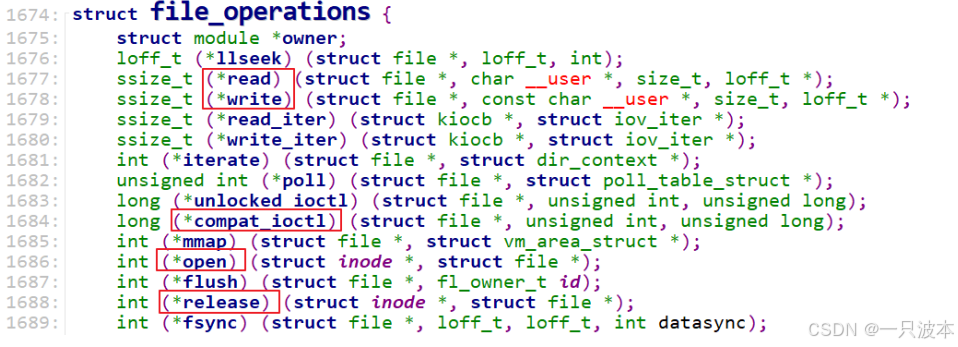
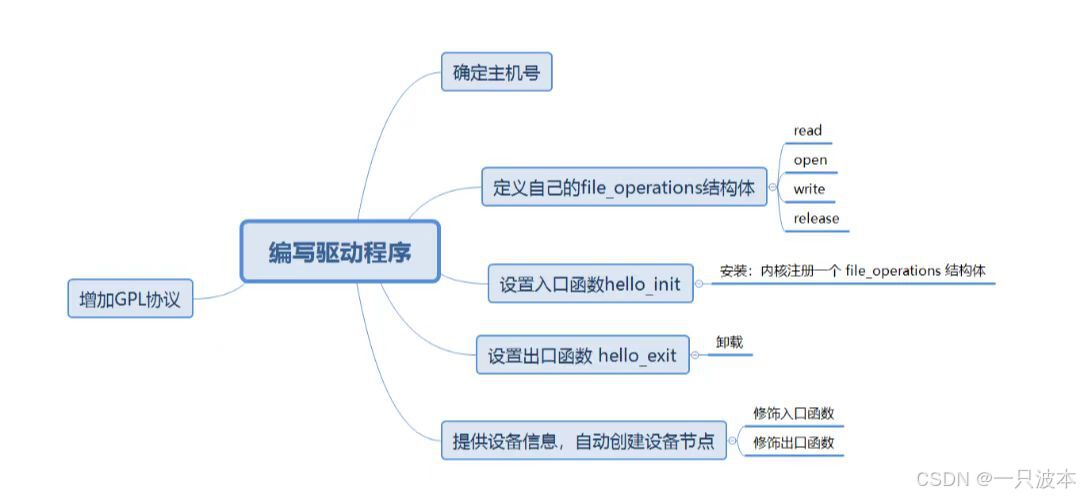
1.3、如何编写驱动程序

注意:后面根据这一步骤编写驱动:
demo1:
二、编写程序
2.1、Demo1(简单实现打印信息)
第七步自动创建节点,后面会先不在驱动程序中创建设备节点,先完成前面6步,再手动创建!
2.1.1、hello_drv.c
#include <linux/mm.h>
#include <linux/module.h>
#include <linux/miscdevice.h>
#include <linux/slab.h>
#include <linux/vmalloc.h>
#include <linux/mman.h>
#include <linux/random.h>
#include <linux/init.h>
#include <linux/raw.h>
#include <linux/tty.h>
#include <linux/capability.h>
#include <linux/ptrace.h>
#include <linux/device.h>
#include <linux/highmem.h>
#include <linux/backing-dev.h>
#include <linux/shmem_fs.h>
#include <linux/splice.h>
#include <linux/pfn.h>
#include <linux/export.h>
#include <linux/io.h>
#include <linux/uio.h>

#include <linux/uaccess.h>


static int major;//保存主设备号

static int hello_open (struct inode *node, struct file *filp)
{
    printk("%s %s %d\n", __FILE__, __FUNCTION__, __LINE__);
    return 0;
}
static ssize_t hello_read (struct file *filp, char __user *buf, size_t size, loff_t *offset)
{
    printk("%s %s %d\n", __FILE__, __FUNCTION__, __LINE__);
    return size;
}

static ssize_t hello_write(struct file *filp, const char __user *buf, size_t size, loff_t *offset)
{
    printk("%s %s %d\n", __FILE__, __FUNCTION__, __LINE__);
    return size;
}

static int hello_close (struct inode *node, struct file *filp)
{
    printk("%s %s %d\n", __FILE__, __FUNCTION__, __LINE__);
    return 0;
}

/* 1. create file_operations 创建结构体*/
static const struct file_operations hello_drv = {
    .owner      = THIS_MODULE,
	.read		= hello_read,
	.write		= hello_write,
	.open		= hello_open,
    .release    = hello_close,
};


/* 2. register_chrdev */

/* 3. entry function 入口函数 */
static int hello_init(void)
{
   major = register_chrdev(0, "100ask_hello", &hello_drv);
   return 0;
}


/* 4. exit function 出口函数 */
static void hello_exit(void)
{
    unregister_chrdev(major, "100ask_hello");
}


module_init(hello_init);
module_exit(hello_exit);
MODULE_LICENSE("GPL");//遵循GPL
2.1.2、编写测试程序
hello_test.c:
写: ./hello_test /dev/xxx 100ask
读: ./hello_test /dev/xxx
#include <sys/types.h>
#include <sys/stat.h>
#include <fcntl.h>
#include <unistd.h>
#include <stdio.h>
#include <string.h>

/* 写: ./hello_test /dev/xxx 100ask
 * 读: ./hello_test /dev/xxx
 */
int main(int argc, char **argv)
{
    int fd;
    int len;
    char buf[100];

    if (argc < 2)
    {
        printf("Usage: \n");
        printf("%s <dev> [string]\n", argv[0]);
        return -1;
    }

    // open
    fd = open(argv[1], O_RDWR);
    if (fd < 0)
    {
        printf("can not open file %s\n", argv[1]);
        return -1;
    }

    if (argc == 3)
    {
        // write
        len = write(fd, argv[2], strlen(argv[2])+1);
        printf("write ret = %d\n", len);
    }
    else
    {
        // read
        len = read(fd, buf, 100);
        buf[99] = '\0';
        printf("read str : %s\n", buf);
    }

    // close
    close(fd);
    return 0;
}
2.1.3、测试
Makefile:
KERN_DIR = /home/book/100ask_imx6ull-sdk/Linux-4.9.88
all:
make -C $(KERN_DIR) M=`pwd` modules
$(CROSS_COMPILE)gcc -o hello_test hello_test.cclean:
make -C $(KERN_DIR) M=`pwd` modules clean
rm -rf modules.order
rm -f hello_testobj-m += hello_drv.o
Ubuntu:①make ②cp *.ko hello_test ~/nfs_rootfs/
①mount -t nfs -o nolock,vers=3 192.168.5.11:/home/book/nfs_rootfs /mnt (挂载)
insmod hello_drv.ko
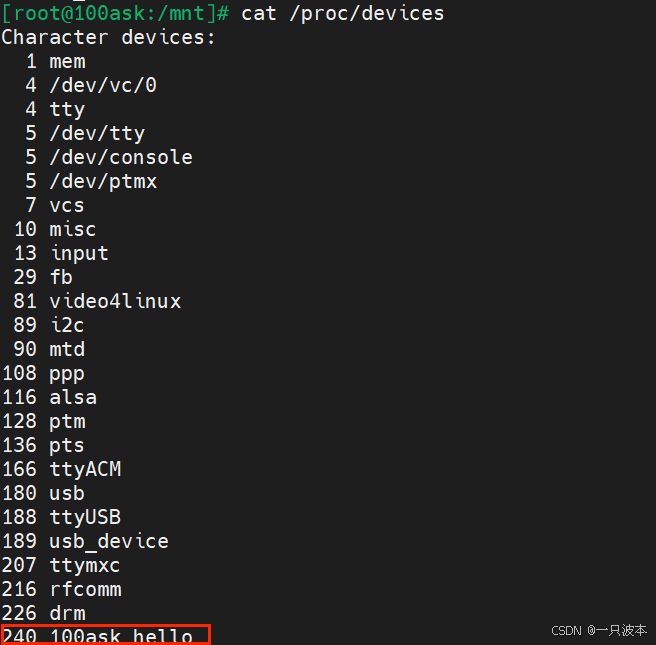
mknod /dev/xyz c 240 0 ——xyz(设备节点名称,自己设备即可)

rmmod hello_drv.ko
2.2、Demo2(自动生成设备节点)
A. ./hello_drv_test -w wiki.100ask.net // 把字符串“wiki.100ask.net”发给驱动程序B. ./hello_drv_test -r // 把驱动中保存的字符串读回来
2.2.1、hello_drv.c
#include <linux/module.h>

#include <linux/fs.h>
#include <linux/errno.h>
#include <linux/miscdevice.h>
#include <linux/kernel.h>
#include <linux/major.h>
#include <linux/mutex.h>
#include <linux/proc_fs.h>
#include <linux/seq_file.h>
#include <linux/stat.h>
#include <linux/init.h>
#include <linux/device.h>
#include <linux/tty.h>
#include <linux/kmod.h>
#include <linux/gfp.h>

/* 1. 确定主设备号                                                                 */
static int major = 0;
static char kernel_buf[1024];
static struct class *hello_class;


#define MIN(a, b) (a < b ? a : b)

/* 3. 实现对应的open/read/write等函数,填入file_operations结构体                   */
static ssize_t hello_drv_read (struct file *file, char __user *buf, size_t size, loff_t *offset)
{
	int err;
	printk("%s %s line %d\n", __FILE__, __FUNCTION__, __LINE__);
	err = copy_to_user(buf, kernel_buf, MIN(1024, size));
	return MIN(1024, size);
}

static ssize_t hello_drv_write (struct file *file, const char __user *buf, size_t size, loff_t *offset)
{
	int err;
	printk("%s %s line %d\n", __FILE__, __FUNCTION__, __LINE__);
	err = copy_from_user(kernel_buf, buf, MIN(1024, size));
	return MIN(1024, size);
}

static int hello_drv_open (struct inode *node, struct file *file)
{
	printk("%s %s line %d\n", __FILE__, __FUNCTION__, __LINE__);
	return 0;
}

static int hello_drv_close (struct inode *node, struct file *file)
{
	printk("%s %s line %d\n", __FILE__, __FUNCTION__, __LINE__);
	return 0;
}

/* 2. 定义自己的file_operations结构体                                              */
static struct file_operations hello_drv = {
	.owner	 = THIS_MODULE,
	.open    = hello_drv_open,
	.read    = hello_drv_read,
	.write   = hello_drv_write,
	.release = hello_drv_close,
};

/* 4. 把file_operations结构体告诉内核:注册驱动程序                                */
/* 5. 谁来注册驱动程序啊?得有一个入口函数:安装驱动程序时,就会去调用这个入口函数 */
static int __init hello_init(void)
{
	int err;

	printk("%s %s line %d\n", __FILE__, __FUNCTION__, __LINE__);
	major = register_chrdev(0, "hello", &hello_drv);  /* /dev/hello */


	hello_class = class_create(THIS_MODULE, "hello_class");
	err = PTR_ERR(hello_class);
	if (IS_ERR(hello_class)) {
		printk("%s %s line %d\n", __FILE__, __FUNCTION__, __LINE__);
		unregister_chrdev(major, "hello");
		return -1;
	}

     /* /dev/hello 自动创建设备节点*/
	device_create(hello_class, NULL, MKDEV(major, 0), NULL, "hello");


	return 0;
}

/* 6. 有入口函数就应该有出口函数:卸载驱动程序时,就会去调用这个出口函数           */
static void __exit hello_exit(void)
{
	printk("%s %s line %d\n", __FILE__, __FUNCTION__, __LINE__);
    //删除设备节点
	device_destroy(hello_class, MKDEV(major, 0));
	class_destroy(hello_class);
	unregister_chrdev(major, "hello");
}


/* 7. 其他完善:提供设备信息,自动创建设备节点                                     */

module_init(hello_init);
module_exit(hello_exit);

MODULE_LICENSE("GPL");
阅读一个驱动程序,从它的入口函数开始,hello_init就是入口函数。它的主要工作就是向内核注册一个 file_operations 结构体:hello_drv, 这就是字符设备驱动程序的核心。
file_operations 结构体 hello_drv 定义,里面提供了 open/read/write/release 成员,应用程序调用 open/read/write/close 时就会导致这些成员函数被调用。
file_operations 结构体 hello_drv 中的成员函数都比较简单,大多数只是打印而已。要注意的是,驱动程序和应用程序之间传递数据要使用 copy_from_user/copy_to_user 函数。
2.2.2、编写测试程序
使用说明:
hello_drv_test -w abc(写)
hello_drv_test -r (读)
#include <sys/types.h>
#include <sys/stat.h>
#include <fcntl.h>
#include <unistd.h>
#include <stdio.h>
#include <string.h>

/*
 * ./hello_drv_test -w abc
 * ./hello_drv_test -r
 */
int main(int argc, char **argv)
{
	int fd;
	char buf[1024];
	int len;

	/* 1. 判断参数 */
	if (argc < 2)
	{
		printf("Usage: %s -w <string>\n", argv[0]);
		printf("       %s -r\n", argv[0]);
		return -1;
	}

	/* 2. 打开文件 */
	fd = open("/dev/hello", O_RDWR);
	if (fd == -1)
	{
		printf("can not open file /dev/hello\n");
		return -1;
	}

	/* 3. 写文件或读文件 */
	if ((0 == strcmp(argv[1], "-w")) && (argc == 3))
	{
		len = strlen(argv[2]) + 1;
		len = len < 1024 ? len : 1024;
		write(fd, argv[2], len);
	}
	else
	{
		len = read(fd, buf, 1024);
		buf[1023] = '\0';
		printf("APP read : %s\n", buf);
	}

	close(fd);

	return 0;
}
2.2.3、测试
Makefile和上面Demo一样!
上机测试:
Ubuntu和上面一致!
ARM开发板:
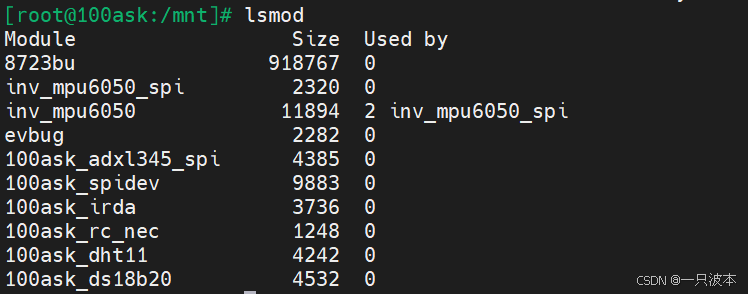
insmod hello_drv.ko(安装驱动)
 驱动自动生成设备节点:
![]()

rmmod hello_drv.ko
到此,学习驱动开发的开端——Hello驱动我们就完成了,希望对一起入门驱动的大佬们有帮助,觉得有帮助的可以三连!


![[[nodiscard]] 使用说明](https://i-blog.csdnimg.cn/direct/542cd6c40ac24ee3849f3248d322f77a.png)
