目录
一、回顾以及本篇博客内容概述
二、代码解析
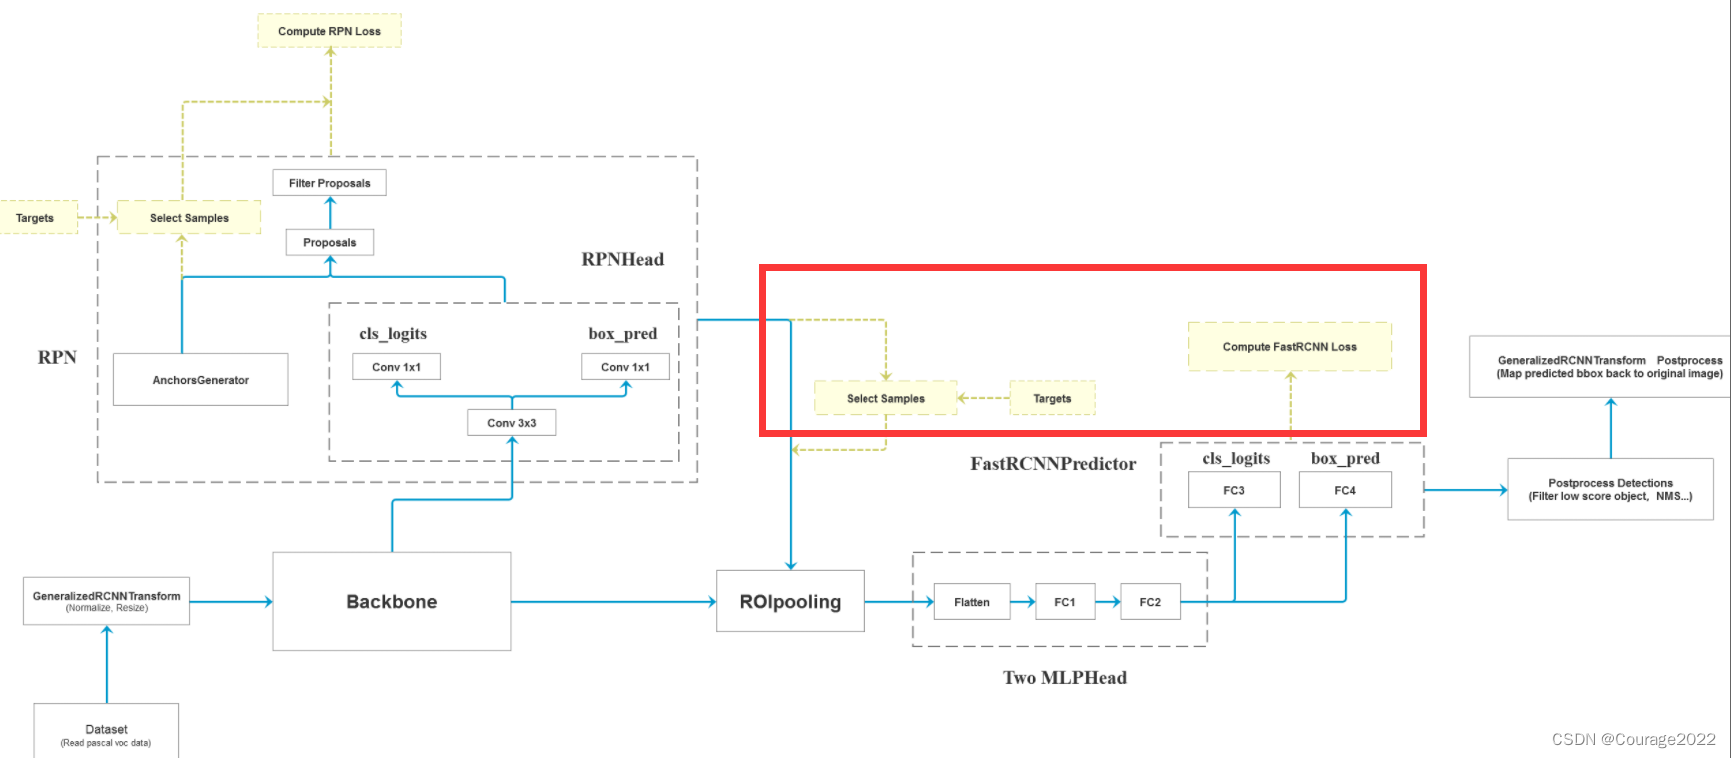
2.1 ROIHead类(承接上篇博客的2.1节)
2.1.1 初始化函数 __init__回顾
2.1.2 正向传播forward回顾及预测结果后处理
2.1.3 postprocess_detections
2.2 FasterRCNNBase类前向传播过程
2.3 GeneralizedRCNNTransform类(transform.py)
2.3.1 postprocess方法
2.3.2 resize_boxes
一、回顾以及本篇博客内容概述
上篇博客我们讲述了如何选择计算FastRCNN部分损失的样本以及如何计算FastRCNN部分的损失,本篇博客我们将讲述关于非训练模式后处理的部分。
二、代码解析
2.1 ROIHead类(承接上篇博客的2.1节)
2.1.1 初始化函数 __init__回顾
    def __init__(self,
                 box_roi_pool,   # Multi-scale RoIAlign pooling
                 box_head,       # TwoMLPHead
                 box_predictor,  # FastRCNNPredictor
                 # Faster R-CNN training
                 fg_iou_thresh, bg_iou_thresh,  # default: 0.5, 0.5
                 batch_size_per_image, positive_fraction,  # default: 512, 0.25
                 bbox_reg_weights,  # None
                 # Faster R-CNN inference
                 score_thresh,        # default: 0.05
                 nms_thresh,          # default: 0.5
                 detection_per_img):  # default: 100
        super(RoIHeads, self).__init__()

		#计算IoU的方法
        self.box_similarity = box_ops.box_iou
        # assign ground-truth boxes for each proposal
		#将proposal划分为正负样本中
        self.proposal_matcher = det_utils.Matcher(
            fg_iou_thresh,  # default: 0.5
            bg_iou_thresh,  # default: 0.5
            allow_low_quality_matches=False)

		#对于划分的正负样本进行采样
        self.fg_bg_sampler = det_utils.BalancedPositiveNegativeSampler(
            batch_size_per_image,  # default: 512
            positive_fraction)     # default: 0.25

        if bbox_reg_weights is None:
            bbox_reg_weights = (10., 10., 5., 5.)
        self.box_coder = det_utils.BoxCoder(bbox_reg_weights)

        self.box_roi_pool = box_roi_pool    # Multi-scale RoIAlign pooling
        self.box_head = box_head            # TwoMLPHead
        self.box_predictor = box_predictor  # FastRCNNPredictor

        self.score_thresh = score_thresh  # default: 0.05
        self.nms_thresh = nms_thresh      # default: 0.5
        self.detection_per_img = detection_per_img  # default: 100
简单的对我们2.2.1节的参数进行了类内初始化。
        self.proposal_matcher = det_utils.Matcher(
            fg_iou_thresh,  # default: 0.5
            bg_iou_thresh,  # default: 0.5
            allow_low_quality_matches=False)
这个是将proposal划分到正负样本中。
self.fg_bg_sampler = det_utils.BalancedPositiveNegativeSampler(
            batch_size_per_image,  # default: 512
            positive_fraction)     # default: 0.25
这个是将正负样本进行采样。
2.1.2 正向传播forward回顾及预测结果后处理
	#参数:features特征图,proposals框体的坐标,image_shapes图片经过预处理后的大小,targets真实目标的标注信息
    def forward(self,
                features,       # type: Dict[str, Tensor]
                proposals,      # type: List[Tensor]
                image_shapes,   # type: List[Tuple[int, int]]
                targets=None    # type: Optional[List[Dict[str, Tensor]]]
                ):
        # type: (...) -> Tuple[List[Dict[str, Tensor]], Dict[str, Tensor]]
        """
        Arguments:
            features (List[Tensor])
            proposals (List[Tensor[N, 4]])
            image_shapes (List[Tuple[H, W]])
            targets (List[Dict])
        """

        # 检查targets的数据类型是否正确
        if targets is not None:
            for t in targets:
                floating_point_types = (torch.float, torch.double, torch.half)
                assert t["boxes"].dtype in floating_point_types, "target boxes must of float type"
                assert t["labels"].dtype == torch.int64, "target labels must of int64 type"

        if self.training:
            # 划分正负样本,统计对应gt的标签以及边界框回归信息
			#在我们的rpn输出时会提供2000个proposal,但在我们的训练过程中我们只需要从中采样512个就够了
            proposals, labels, regression_targets = self.select_training_samples(proposals, targets)
		#不是训练模式生成1000个proposal rpn_post_nms_top_n_test=1000
	    else:
            labels = None
            regression_targets = None

        # 将采集样本通过Multi-scale RoIAlign pooling层
        # box_features_shape: [num_proposals, channel, height, width]
		#这里的box_roi_pool就是我们所说的ros_alain 通过它就能将我们的proposal处理到我们所指定的大小当中
		#features由于我们在多个特征层上预测,因此features有五个预测特征层
		#box_features 1024 256 7 7   两张图片,一张照片512个proposal,每一个proposal经过ros_alain后得到一个256 7 7大小的特征矩阵
        box_features = self.box_roi_pool(features, proposals, image_shapes)

        # 通过roi_pooling后的两层全连接层 TwoMLPHead
        # box_features_shape: [num_proposals, representation_size] 1024 1024
        box_features = self.box_head(box_features)

        # 接着分别预测目标类别和边界框回归参数 1024 21   1024 84
        class_logits, box_regression = self.box_predictor(box_features)

		#空列表空字典
        result = torch.jit.annotate(List[Dict[str, torch.Tensor]], [])
        losses = {}
		#训练模式记录,计算fastrcnn部分的损失
        if self.training:
            assert labels is not None and regression_targets is not None
            loss_classifier, loss_box_reg = fastrcnn_loss(
                class_logits, box_regression, labels, regression_targets)
            losses = {
                "loss_classifier": loss_classifier,
                "loss_box_reg": loss_box_reg
            }
		#验证模式对预测结果进行后处理
		#验证模式不会进行正负样本划分及采样过程,预测过程中直接使用rpn所有的proposal进行预测,预测的时候rpn只会提供1000个proposal
        else:
            boxes, scores, labels = self.postprocess_detections(class_logits, box_regression, proposals, image_shapes)
            num_images = len(boxes)
            for i in range(num_images):
                result.append(
                    {
                        "boxes": boxes[i],
                        "labels": labels[i],
                        "scores": scores[i],
                    }
                )

        return result, losses
这里的参数:
@features:特征图,经过backbone模块后得到的部分
@proposals:RPN生成的proposals
@image_shapes:在预处理之后图像所得到的shape,即经过等比例缩放后的图片的高度宽度大小。不是打包成batch的大小!
@targets:真实目标的标注信息
if self.training: # 划分正负样本,统计对应gt的标签以及边界框回归信息 #在我们的rpn输出时会提供2000个proposal,但在我们的训练过程中我们只需要从中采样512个就够了 proposals, labels, regression_targets = self.select_training_samples(proposals, targets) #不是训练模式生成1000个proposal rpn_post_nms_top_n_test=1000 else: labels = None regression_targets = None如果是训练模式,我们用select_training_samples方法选取我们使用的样本,我们回忆一下,在RPN输出时会提供2000个proposal,但我们在训练过程中只需要采样512个样本就够了,因此在训练过程中我们会进一步采样;如果不是训练模式(验证模式),RPN只会生成1000个proposal。
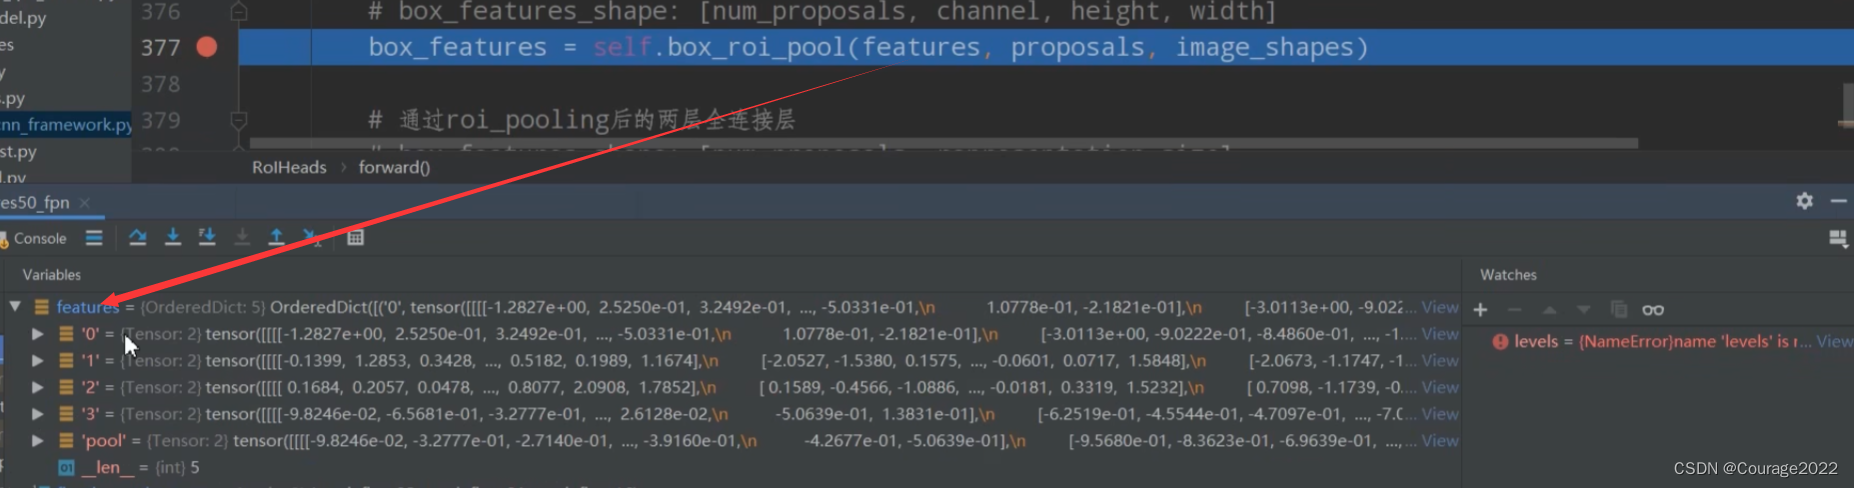
# 将采集样本通过Multi-scale RoIAlign pooling层 # box_features_shape: [num_proposals, channel, height, width] #这里的box_roi_pool就是我们所说的ros_alain 通过它就能将我们的proposal处理到我们所指定的大小当中 #features由于我们在多个特征层上预测,因此features有五个预测特征层 #box_features 1024 256 7 7 两张图片,一张照片512个proposal,每一个proposal经过ros_alain后得到一个256 7 7大小的特征矩阵 box_features = self.box_roi_pool(features, proposals, image_shapes)将我们的features, proposals, image_shapes传给box_roi_pool,这里的box_roi_pool就是我们说的ROIAlign,通过这个函数可以将我们的proposal处理到指定的大小当中。
这里的features是通过backbone所得到的特征矩阵features。(FPN结构5个特征层)
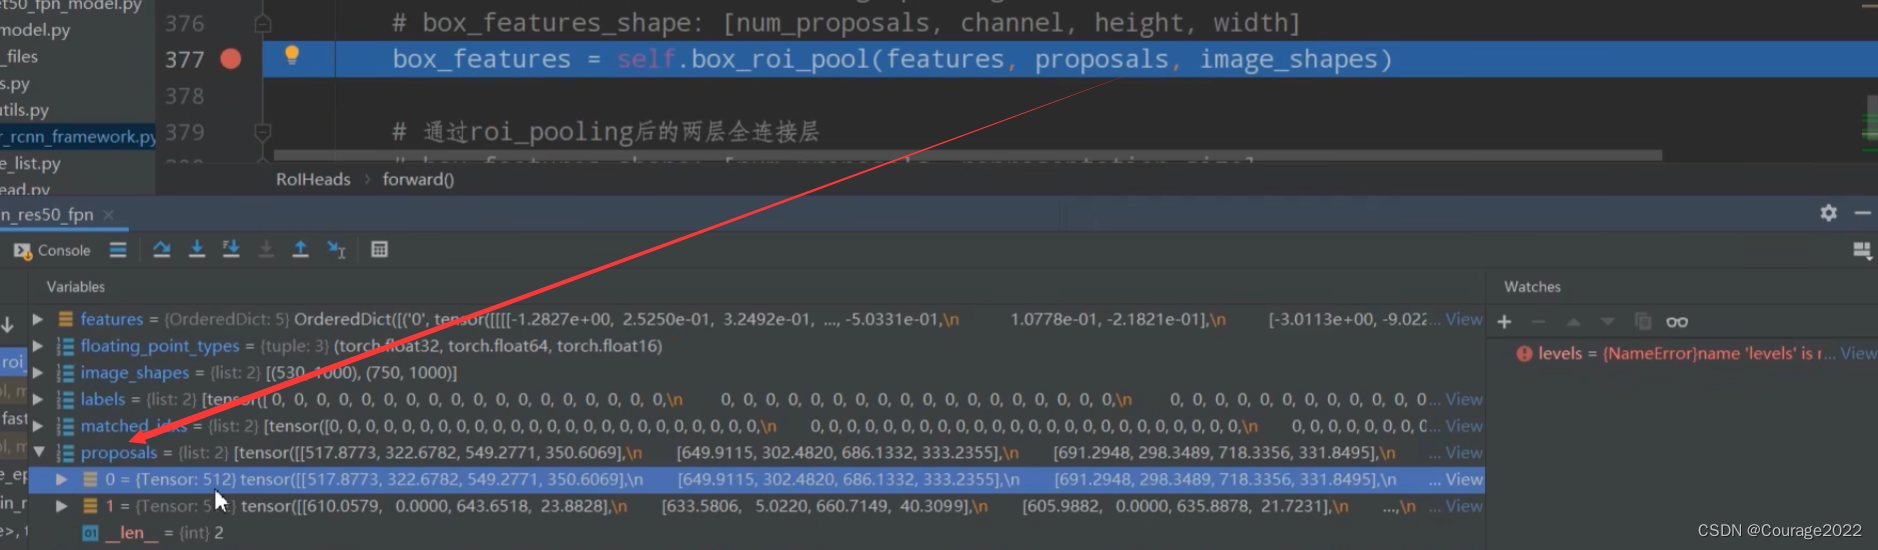
这里的proposals是经过筛选之后对于每张图片只保留了512个proposal。
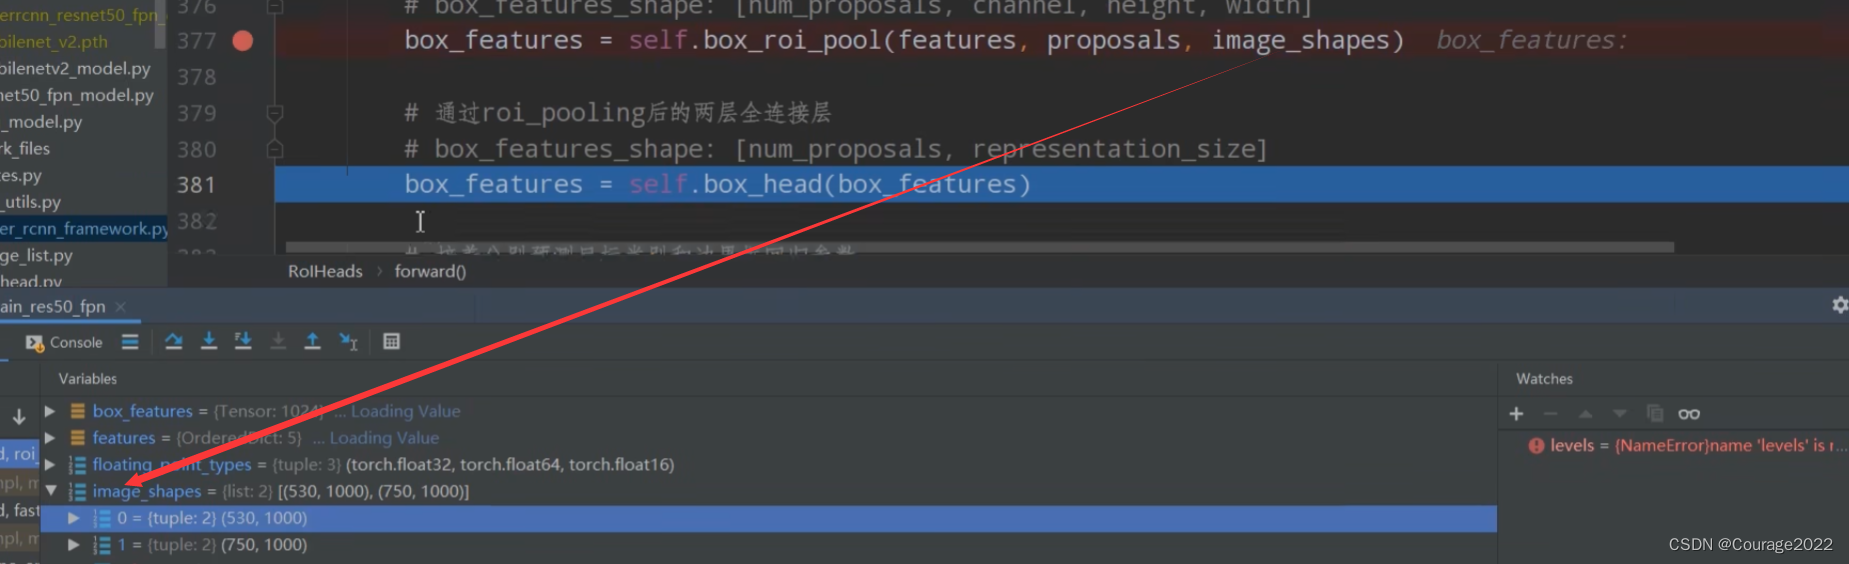
这里的image_shapes是每张图片缩放之后对应的尺寸。
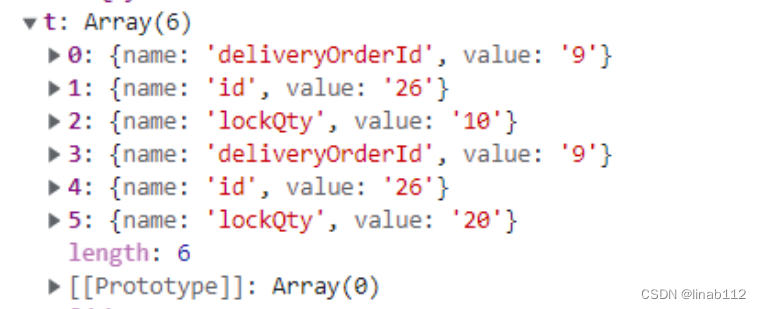
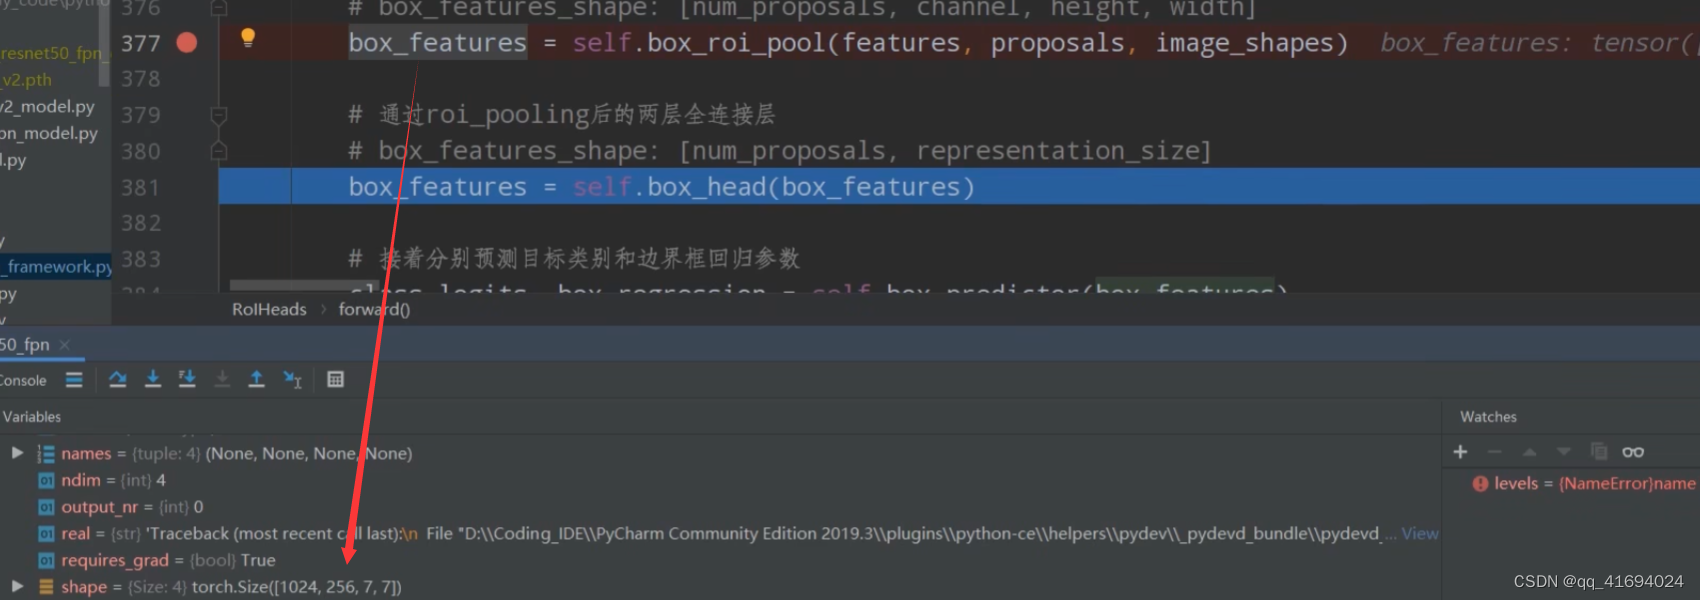
我们得到的box_features如下:
1024对应着两张图片,一张图片中含有512个proposal。每个proposal经过RoIAlign后变成256*7*7大小的特征矩阵了。
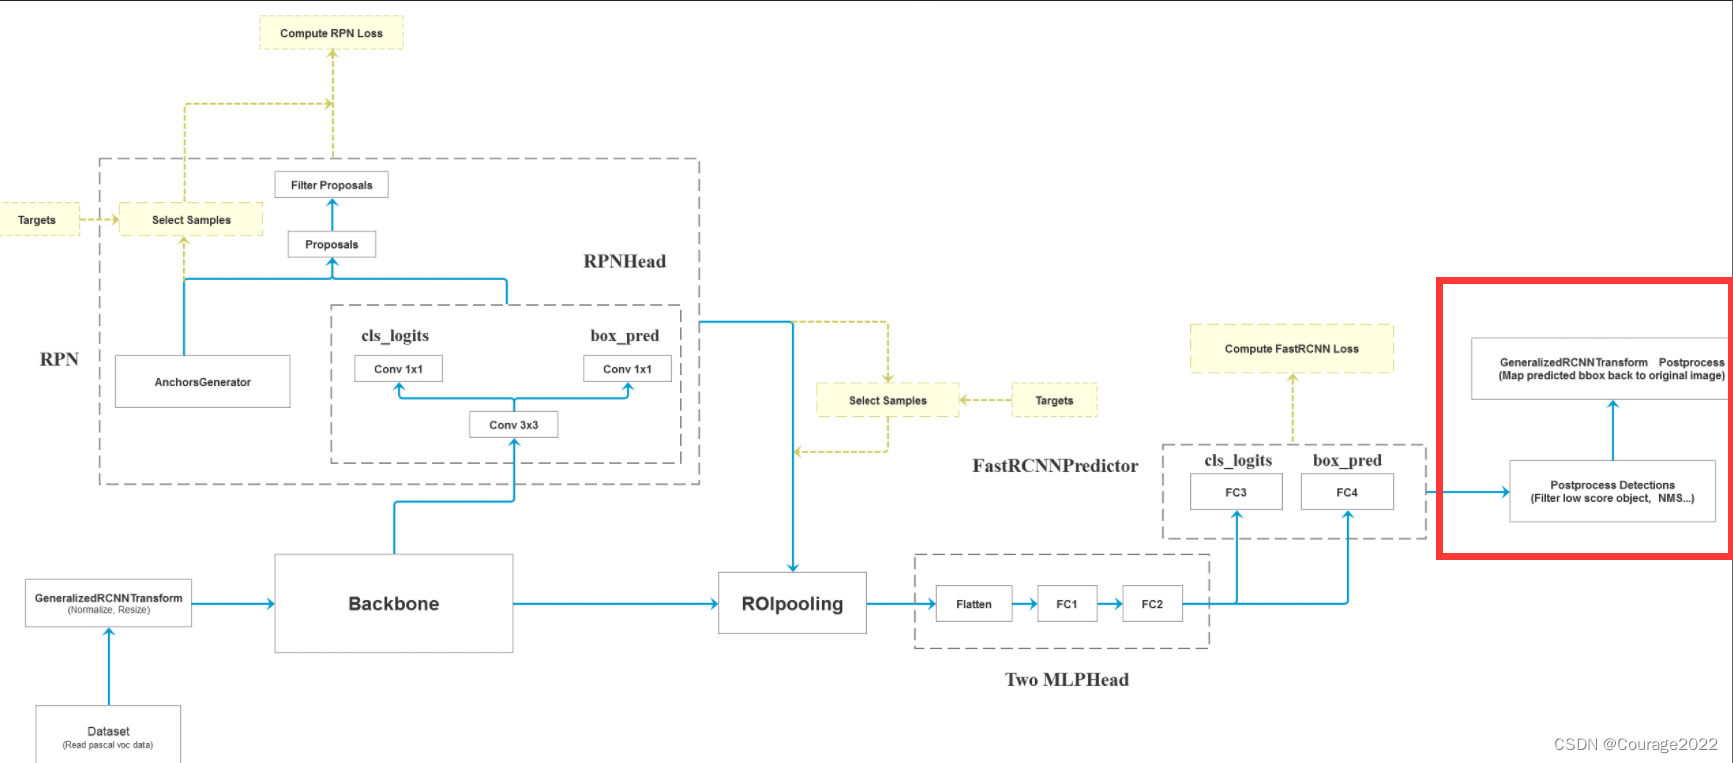
        # 通过roi_pooling后的两层全连接层 TwoMLPHead
        # box_features_shape: [num_proposals, representation_size] 1024 1024
        box_features = self.box_head(box_features)
这里的BoxHead对应的图中Two MLPHead部分。
现在我们的box_features是1024*1024的。
我们再将我们所得的box_features传给box_predictor。对应图中的FastRCNNPreDictor部分。
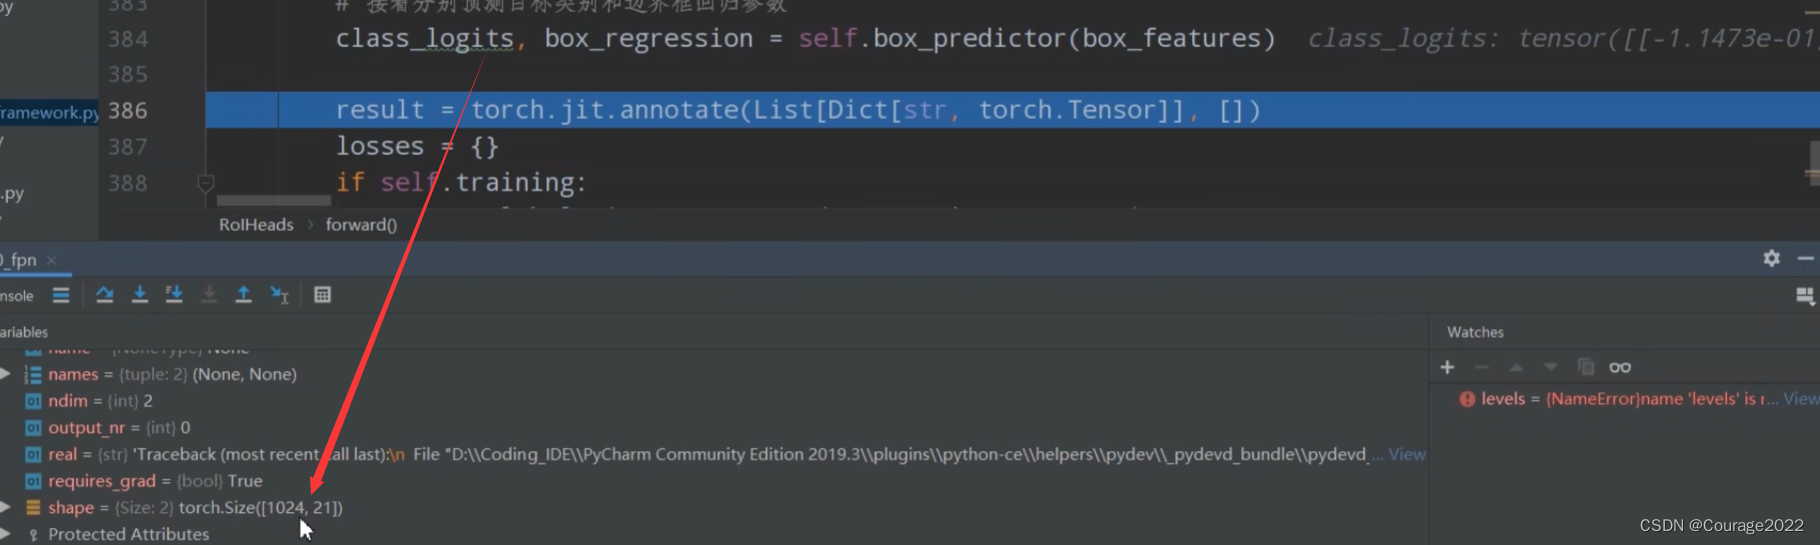
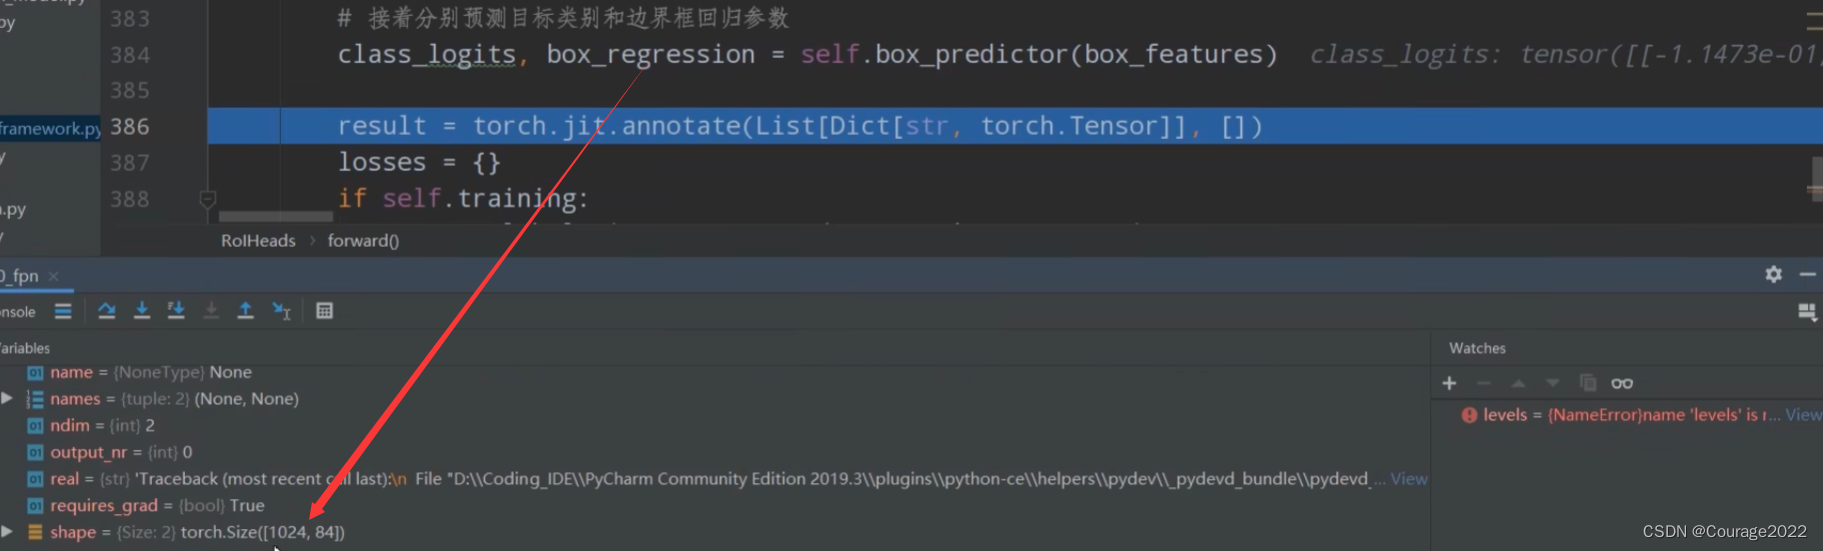
        # 接着分别预测目标类别和边界框回归参数 1024 21   1024 84
        class_logits, box_regression = self.box_predictor(box_features)
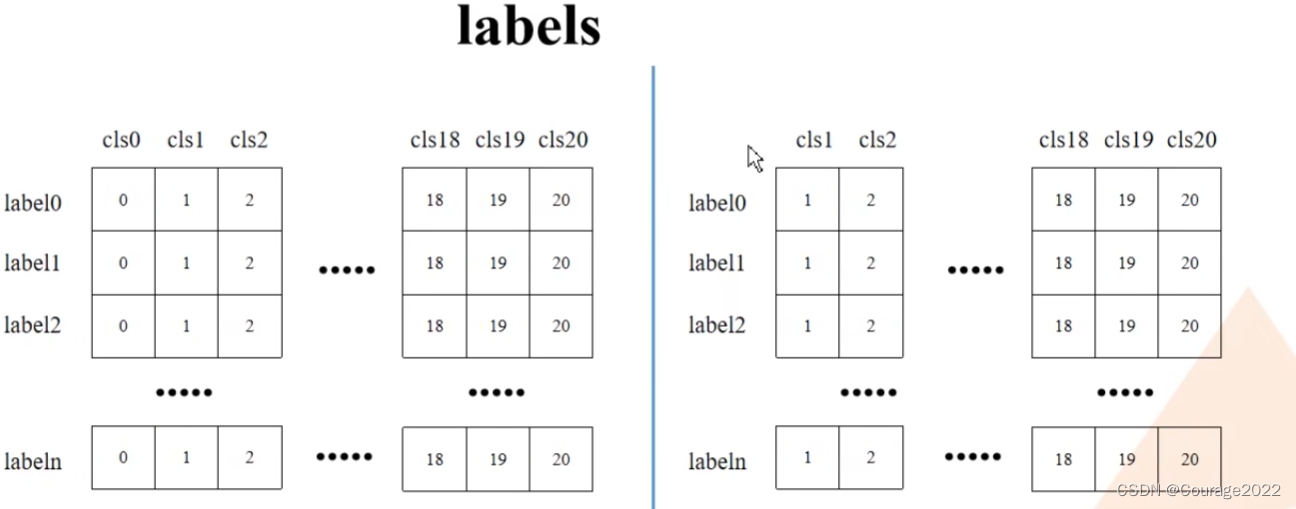
对于每个proposal,都会预测21种类别的概率。
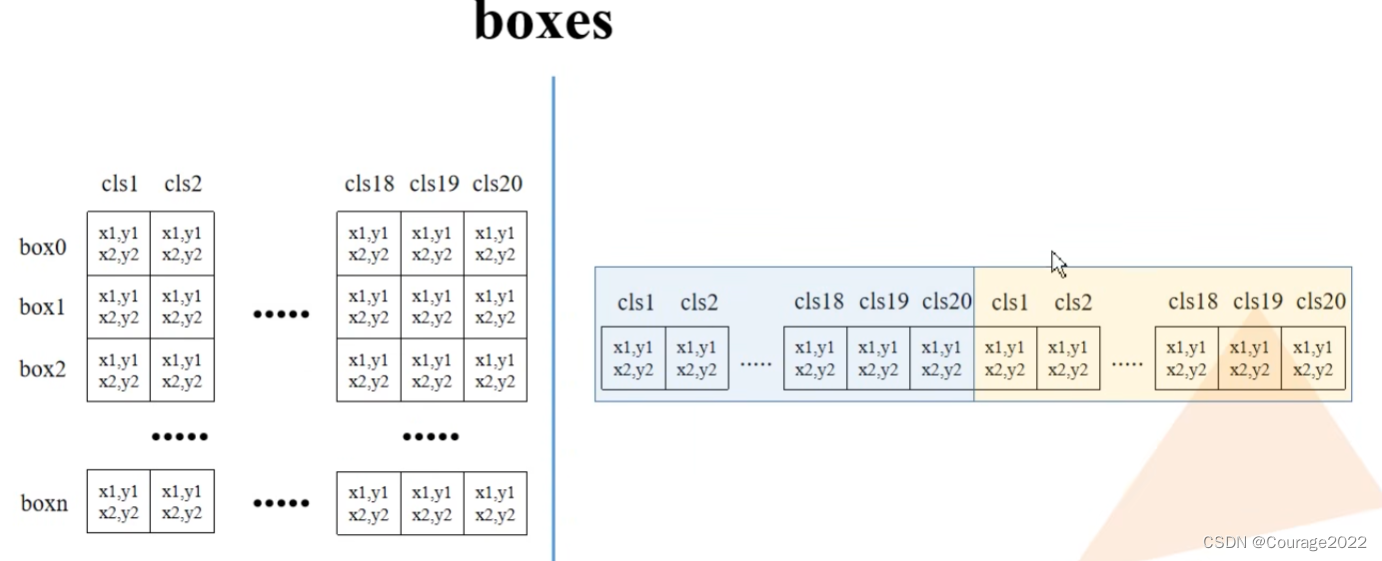
对于每个proposal,都会预测21种类别每个类别的四个坐标参数。
我们定义了空列表和空字典:
		#空列表空字典
        result = torch.jit.annotate(List[Dict[str, torch.Tensor]], [])
        losses = {}
对于训练模式下计算fastrcnn部分的损失。
        if self.training:
            assert labels is not None and regression_targets is not None
            loss_classifier, loss_box_reg = fastrcnn_loss(
                class_logits, box_regression, labels, regression_targets)
            losses = {
                "loss_classifier": loss_classifier,
                "loss_box_reg": loss_box_reg
对于验证模式下,对于预测的结果进行后处理:
		#验证模式对预测结果进行后处理
		#验证模式不会进行正负样本划分及采样过程,预测过程中直接使用rpn所有的proposal进行预测,预测的时候rpn只会提供1000个proposal
        else:
            boxes, scores, labels = self.postprocess_detections(class_logits, box_regression, proposals, image_shapes)
            num_images = len(boxes)
            for i in range(num_images):
                result.append(
                    {
                        "boxes": boxes[i],
                        "labels": labels[i],
                        "scores": scores[i],
                    }
                )
-------------------------------------------------------------------------------------------------------------------------
接着上篇博客,我们来介绍select_training_samples这个方法。
            # 划分正负样本,统计对应gt的标签以及边界框回归信息
			#在我们的rpn输出时会提供2000个proposal,但在我们的训练过程中我们只需要从中采样512个就够了
            proposals, labels, regression_targets = self.select_training_samples(proposals, targets)
这里传入的参数:
@proposals:经过RPN模块处理后的proposal。
@targets:人工标注的真实的groungtruth信息。
我们得到了如下信息:
proposals:经过抽取后的正负样本的集合(512 * 2)
labels:获取对应正负样本的真实类别信息(512 * 2)
regression_targets:对应着真实的框体信息
我们进行了RPN生成的样本进行了正负样本的划分以及采样,对采样的样本计算相对于gtbox的回归参数。
-------------------------------------------------------------------------------------------------------------------------
		#训练模式记录,计算fastrcnn部分的损失
        if self.training:
            assert labels is not None and regression_targets is not None
            loss_classifier, loss_box_reg = fastrcnn_loss(
                class_logits, box_regression, labels, regression_targets)
            losses = {
                "loss_classifier": loss_classifier,
                "loss_box_reg": loss_box_reg
            }
计算Fastrcnn损失部分:
这里我们传入的参数:
@class_logits:预测目标类别信息(
)
@box_regression:预测目标边界框信息(
)
@labels:筛选出来的proposal对应的类别信息
@regression_targets:真实的目标边界框(
-------------------------------------------------------------------------------------------------------------------------
最后,在验证模式下,对预测结果进行后处理:同样需要注意的是,在预测的情况下我们无需对正负样本进行划分以及采样,因此在预测过程中我们直接使用RPN提供的所有proposal来进行预测,此外,在预测过程中,RPN只会为我们产生1000个proposal。
#验证模式对预测结果进行后处理 #验证模式不会进行正负样本划分及采样过程,预测过程中直接使用rpn所有的proposal进行预测,预测的时候rpn只会提供1000个proposal else: boxes, scores, labels = self.postprocess_detections(class_logits, box_regression, proposals, image_shapes) num_images = len(boxes) for i in range(num_images): result.append( { "boxes": boxes[i], "labels": labels[i], "scores": scores[i], } )传入的参数为:(2.1.3节)
class_logits:经过Two MLPHead全连接层后预测的类别分数
box_regression:经过Two MLPHead全连接层后预测的目标类别边界框
proposals:RPN为我们提供的proposal
image_shapes:图像预处理过程中缩放后的高度和宽度

2.1.3 postprocess_detections
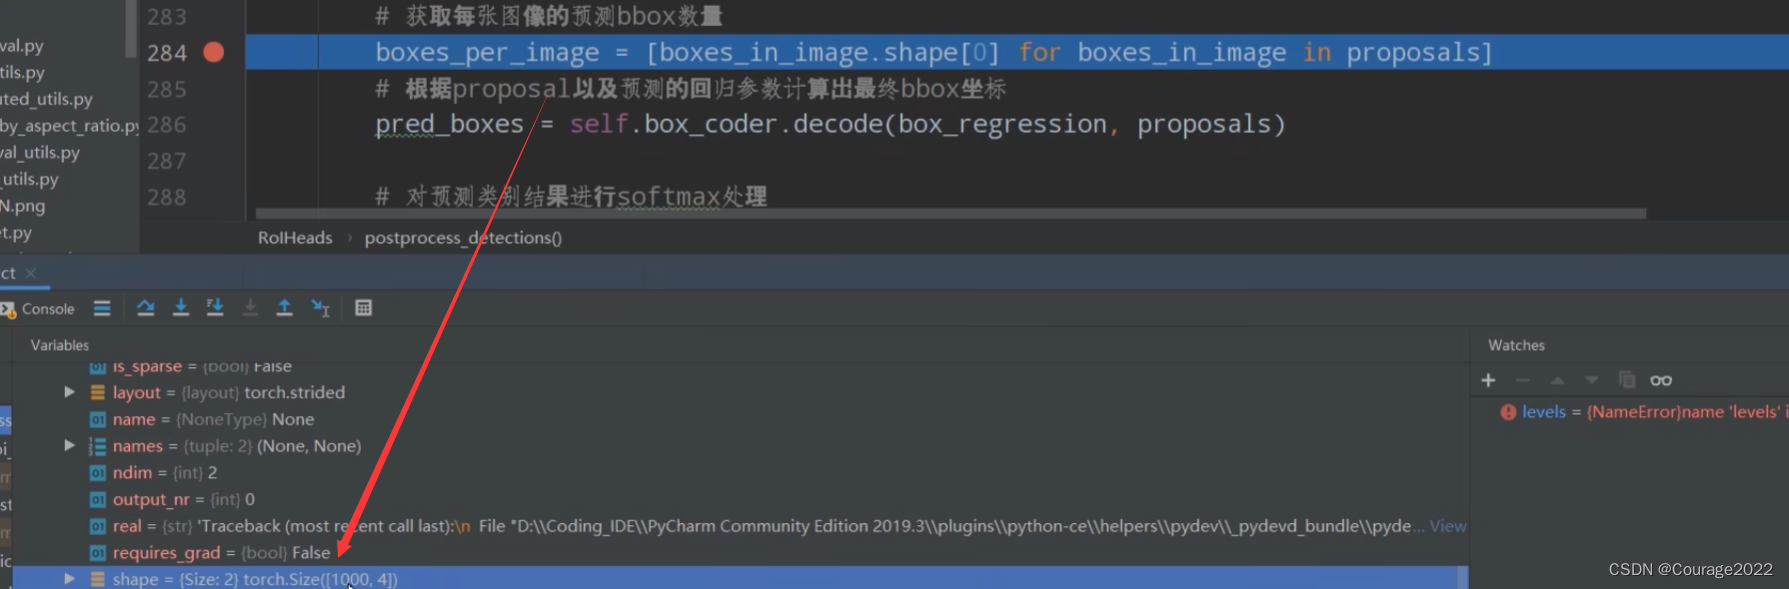
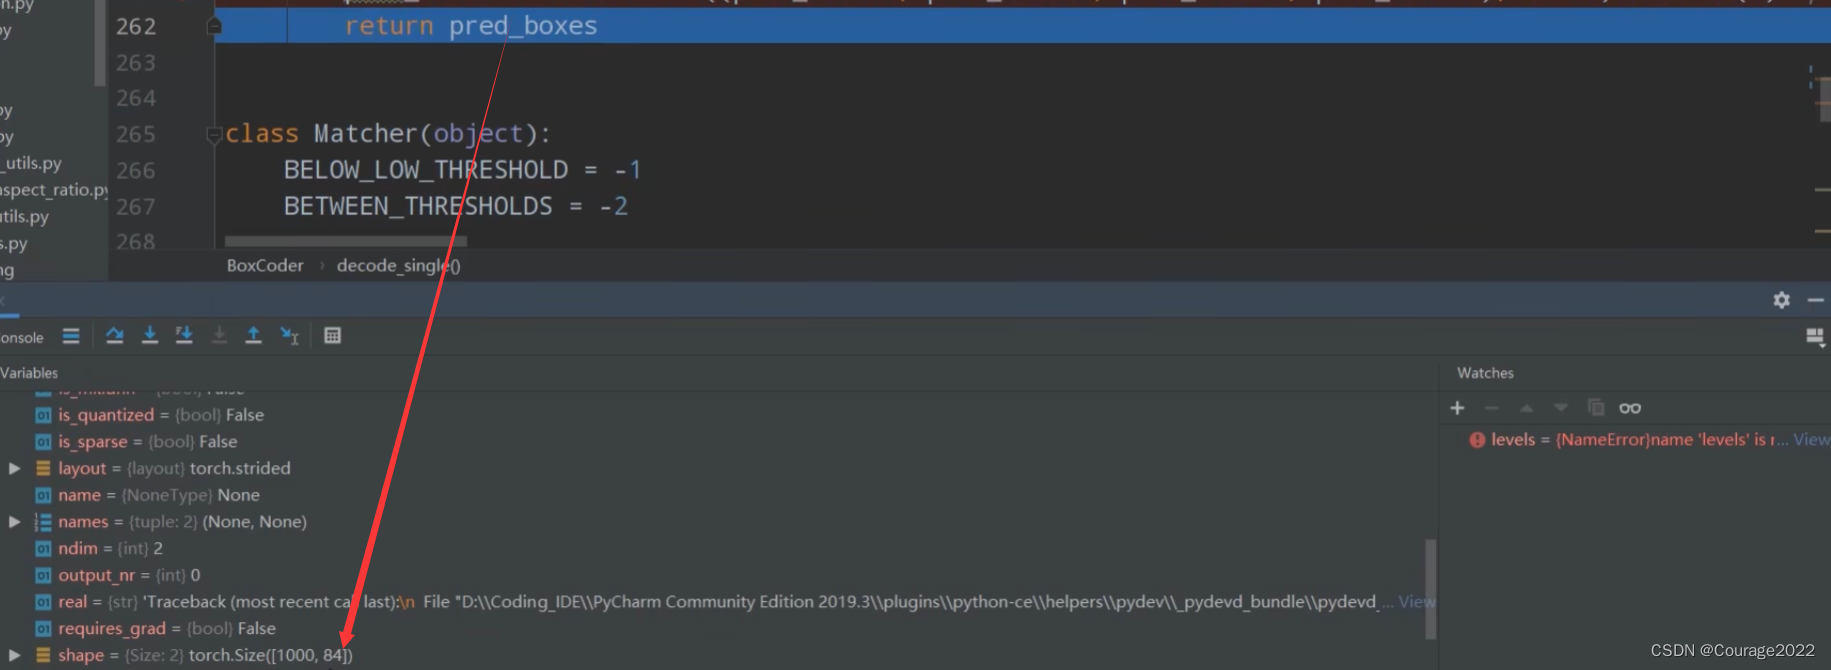
	#class_logits 网络对于每个proposal的预测关于每个类别的score信息
	#box_regression 网络对于每个proposal预测针对每个类别的目标回归参数
	#proposals rpn为我们提供的proposal
    def postprocess_detections(self,
                               class_logits,    # type: Tensor
                               box_regression,  # type: Tensor
                               proposals,       # type: List[Tensor]
                               image_shapes     # type: List[Tuple[int, int]]
                               ):
        # type: (...) -> Tuple[List[Tensor], List[Tensor], List[Tensor]]
        """
        对网络的预测数据进行后处理,包括
        (1)根据proposal以及预测的回归参数计算出最终bbox坐标
        (2)对预测类别结果进行softmax处理
        (3)裁剪预测的boxes信息,将越界的坐标调整到图片边界上
        (4)移除所有背景信息
        (5)移除低概率目标
        (6)移除小尺寸目标
        (7)执行nms处理,并按scores进行排序
        (8)根据scores排序返回前topk个目标
        Args:
            class_logits: 网络预测类别概率信息
            box_regression: 网络预测的边界框回归参数
            proposals: rpn输出的proposal
            image_shapes: 打包成batch前每张图像的宽高

        Returns:

        """
        device = class_logits.device
        # 预测目标类别数
        num_classes = class_logits.shape[-1]

        # 获取每张图像的预测bbox数量 boxes_in_image  (1000,4)
        boxes_per_image = [boxes_in_image.shape[0] for boxes_in_image in proposals]

        # 根据proposal以及预测的回归参数计算出最终bbox坐标
		# 1000*84 1000个proposal
		# 1000 * 21 * 4
        pred_boxes = self.box_coder.decode(box_regression, proposals)

        # 对预测类别结果进行softmax处理
		# class_logits 是10000*21的
        pred_scores = F.softmax(class_logits, -1)

        # split boxes and scores per image
        # 根据每张图像的预测bbox数量分割结果
        pred_boxes_list = pred_boxes.split(boxes_per_image, 0)
        pred_scores_list = pred_scores.split(boxes_per_image, 0)

        all_boxes = []
        all_scores = []
        all_labels = []
        # 遍历每张图像预测信息
		#pred_boxes_list 最终的目标边界框
		#pred_scores_list 目标边界框对于每个类别的score
        for boxes, scores, image_shape in zip(pred_boxes_list, pred_scores_list, image_shapes):
            # 裁剪预测的boxes信息,将越界的坐标调整到图片边界上
            boxes = box_ops.clip_boxes_to_image(boxes, image_shape)

            # create labels for each prediction
            labels = torch.arange(num_classes, device=device)
            labels = labels.view(1, -1).expand_as(scores)

            # remove prediction with the background label
            # 移除索引为0的所有信息(0代表背景)
            boxes = boxes[:, 1:]
            scores = scores[:, 1:]
            labels = labels[:, 1:]

            # batch everything, by making every class prediction be a separate instance
            boxes = boxes.reshape(-1, 4)
            scores = scores.reshape(-1)
            labels = labels.reshape(-1)

            # remove low scoring boxes
            # 移除低概率目标,self.scores_thresh=0.05
            # gt: Computes input > other element-wise.
            # inds = torch.nonzero(torch.gt(scores, self.score_thresh)).squeeze(1)
            inds = torch.where(torch.gt(scores, self.score_thresh))[0]
            boxes, scores, labels = boxes[inds], scores[inds], labels[inds]

            # remove empty boxes
            # 移除小目标
            keep = box_ops.remove_small_boxes(boxes, min_size=1.)
            boxes, scores, labels = boxes[keep], scores[keep], labels[keep]

            # non-maximun suppression, independently done per class
            # 执行nms处理,执行后的结果会按照scores从大到小进行排序返回
            keep = box_ops.batched_nms(boxes, scores, labels, self.nms_thresh)

            # keep only topk scoring predictions
            # 获取scores排在前topk个预测目标
            keep = keep[:self.detection_per_img]
            boxes, scores, labels = boxes[keep], scores[keep], labels[keep]

            all_boxes.append(boxes)
            all_scores.append(scores)
            all_labels.append(labels)

        return all_boxes, all_scores, all_labels
我们逐行看一下它是如何实现注释的功能的:我们调试预测脚本predict.py
在预测时我们只传入了一张图片,因此它只有一张图片的proposal信息且proposal的数量为1000。
这里代表RPN为我们提供了1000个proposal。
pred_boxes = self.box_coder.decode(box_regression, proposals)利用预测的边界框回归参数和proposal得到最终显示在预测图片的框体坐标信息。(讲过不再讲)
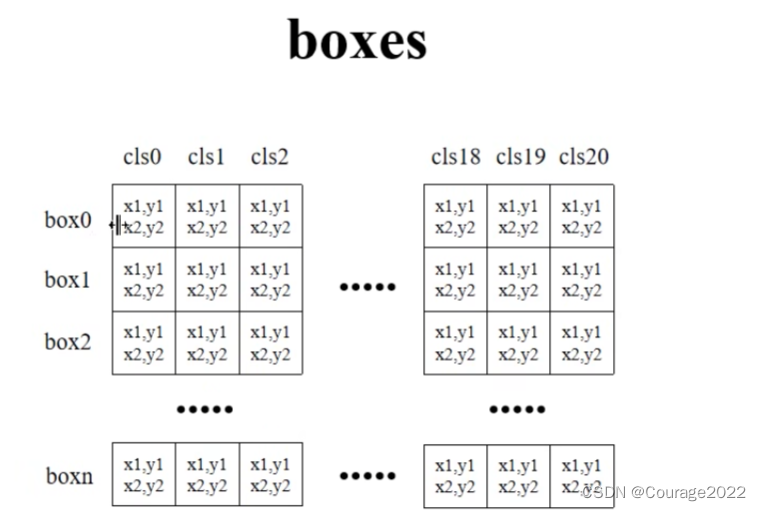
得到的pred_boxes 的shape为
的,1000对应着1000个proposal,21对应着每个proposal的21种预测类别挨个类别的窗体信息。
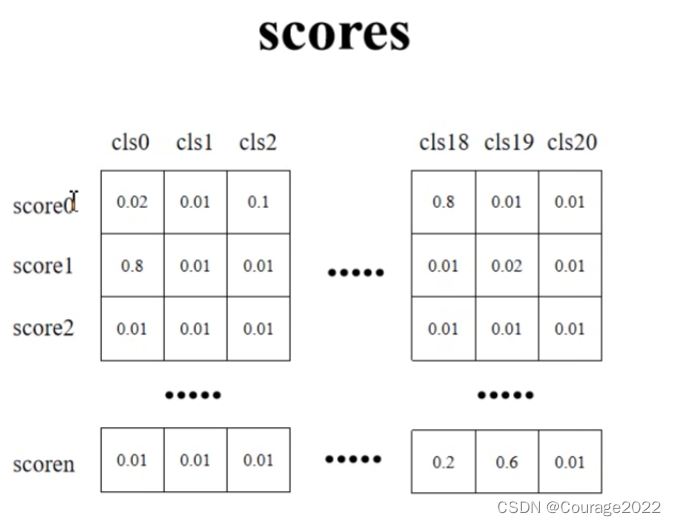
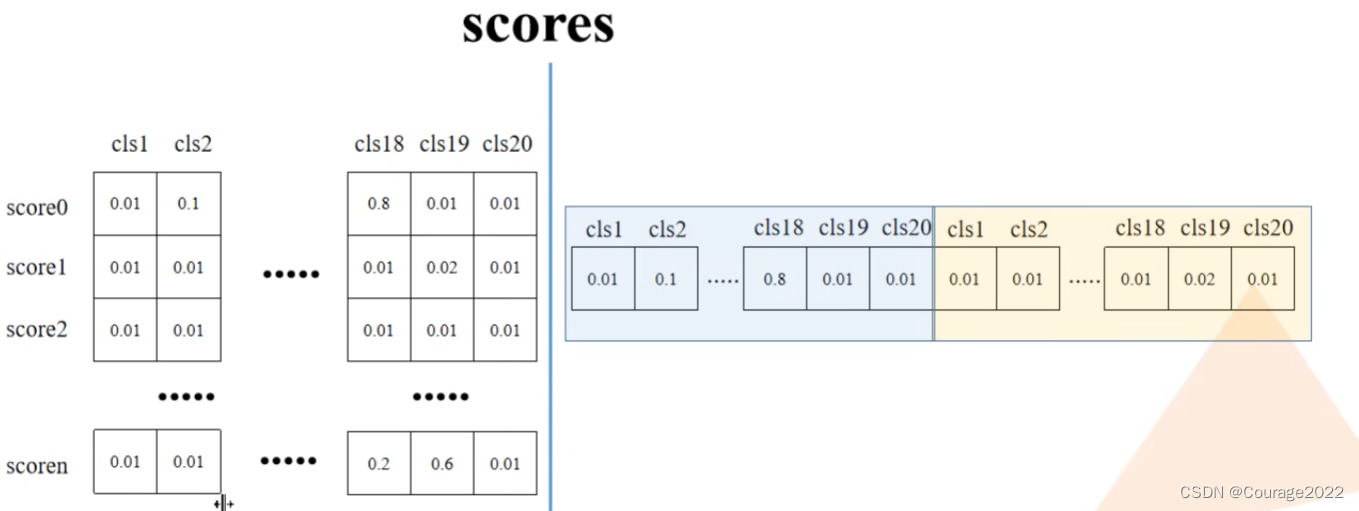
接下来对我们预测的class_logits(每个proposal对应的每个类别分数)做softmax处理。
pred_scores = F.softmax(class_logits, -1)
我们对每张图片预测的边界框信息pred_boxes_list(最终的目标边界框参数)、pred_scores_list(每个目标边界框针对于每个类别的score)、image_shapes(每张图片的原始的shape)。
# 裁剪预测的boxes信息,将越界的坐标调整到图片边界上
boxes = box_ops.clip_boxes_to_image(boxes, image_shape)
def clip_boxes_to_image(boxes, size): # type: (Tensor, Tuple[int, int]) -> Tensor """ Clip boxes so that they lie inside an image of size `size`. 裁剪预测的boxes信息,将越界的坐标调整到图片边界上 Arguments: boxes (Tensor[N, 4]): boxes in (x1, y1, x2, y2) format size (Tuple[height, width]): size of the image Returns: clipped_boxes (Tensor[N, 4]) """ dim = boxes.dim() boxes_x = boxes[..., 0::2] # x1, x2 boxes_y = boxes[..., 1::2] # y1, y2 height, width = size if torchvision._is_tracing(): boxes_x = torch.max(boxes_x, torch.tensor(0, dtype=boxes.dtype, device=boxes.device)) boxes_x = torch.min(boxes_x, torch.tensor(width, dtype=boxes.dtype, device=boxes.device)) boxes_y = torch.max(boxes_y, torch.tensor(0, dtype=boxes.dtype, device=boxes.device)) boxes_y = torch.min(boxes_y, torch.tensor(height, dtype=boxes.dtype, device=boxes.device)) else: boxes_x = boxes_x.clamp(min=0, max=width) # 限制x坐标范围在[0,width]之间 boxes_y = boxes_y.clamp(min=0, max=height) # 限制y坐标范围在[0,height]之间 clipped_boxes = torch.stack((boxes_x, boxes_y), dim=dim) return clipped_boxes.reshape(boxes.shape)在这个方法中,我们提取出每个box(最终的目标边界框)的x信息,y信息。将我们传入的image_shape分成高度和宽度。进入else部分,通过clamp方法设置x,y信息的上下限,即限制x坐标范围在[0,width]之间、限制y坐标范围在[0,height]之间。
针对每个box,我们都预测了21个类别的四个坐标信息(类别0对应着背景没什么意义)。
针对每个box,我们都预测了21个类别的类别分数。
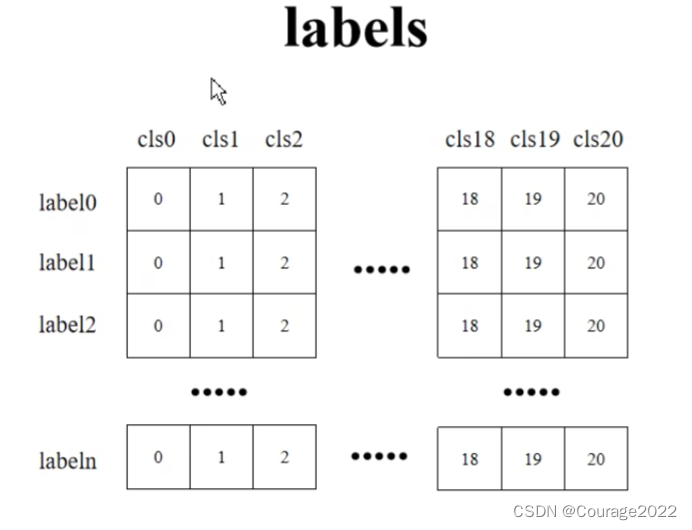
            # create labels for each prediction
            labels = torch.arange(num_classes, device=device)
            labels = labels.view(1, -1).expand_as(scores)
这里我们根据num_classes的数量创建了labels,让其shape扩充到score相同:
            # 移除索引为0的所有信息(0代表背景)
            boxes = boxes[:, 1:]
            scores = scores[:, 1:]
            labels = labels[:, 1:]
用切片的方法去除索引为0的位置的信息。如下所示:
            # batch everything, by making every class prediction be a separate instance
            boxes = boxes.reshape(-1, 4)
            scores = scores.reshape(-1)
            labels = labels.reshape(-1)
接下来我们寻找scores从中寻找大于我们的阈值self.score_thresh = 0.05,也就是寻找网络预测概率大于5%的所有预测信息:
inds = torch.where(torch.gt(scores, self.score_thresh))[0]也就是说对于scores的每个元素都去判断一下,找到大于5%的部分的索引:
boxes, scores, labels = boxes[inds], scores[inds], labels[inds]取出这部分索引所对应的boxes, scores, labels信息:
boxes:最终的框体信息(经过筛选的对应score大于self.score_thresh的部分)
scores:目标分数(经过筛选的对应score大于self.score_thresh的部分)
labels:labels索引
再通过remove_small_boxes移除小目标:
# 移除小目标
keep = box_ops.remove_small_boxes(boxes, min_size=1.)
boxes, scores, labels = boxes[keep], scores[keep], labels[keep]
def remove_small_boxes(boxes, min_size): # type: (Tensor, float) -> Tensor """ Remove boxes which contains at least one side smaller than min_size. 移除宽高小于指定阈值的索引 Arguments: boxes (Tensor[N, 4]): boxes in (x1, y1, x2, y2) format min_size (float): minimum size Returns: keep (Tensor[K]): indices of the boxes that have both sides larger than min_size """ ws, hs = boxes[:, 2] - boxes[:, 0], boxes[:, 3] - boxes[:, 1] # 预测boxes的宽和高 # keep = (ws >= min_size) & (hs >= min_size) # 当满足宽,高都大于给定阈值时为True keep = torch.logical_and(torch.ge(ws, min_size), torch.ge(hs, min_size)) # nonzero(): Returns a tensor containing the indices of all non-zero elements of input # keep = keep.nonzero().squeeze(1) keep = torch.where(keep)[0] return keep我们得到每个box的宽度ws,高度hs信息。
得到一个蒙版:宽度要大于我们指定的min_size且高度大于我们指定的min_size。
现在我们还要对其进行nms处理,执行后的结果会按照scores从大到小进行排序返回:
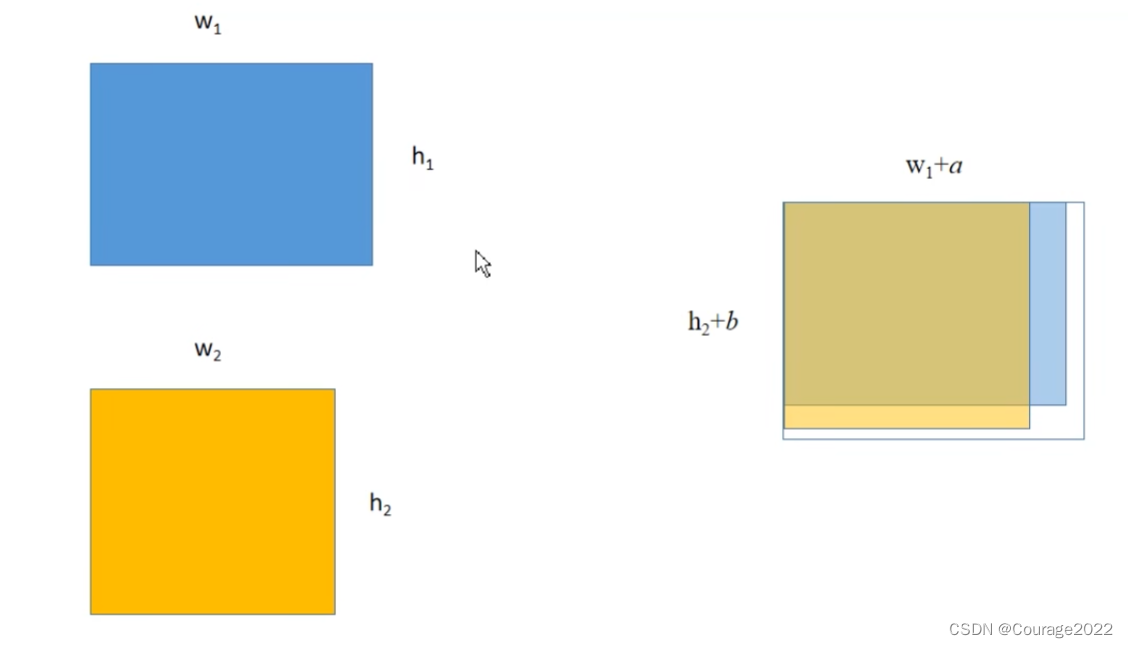
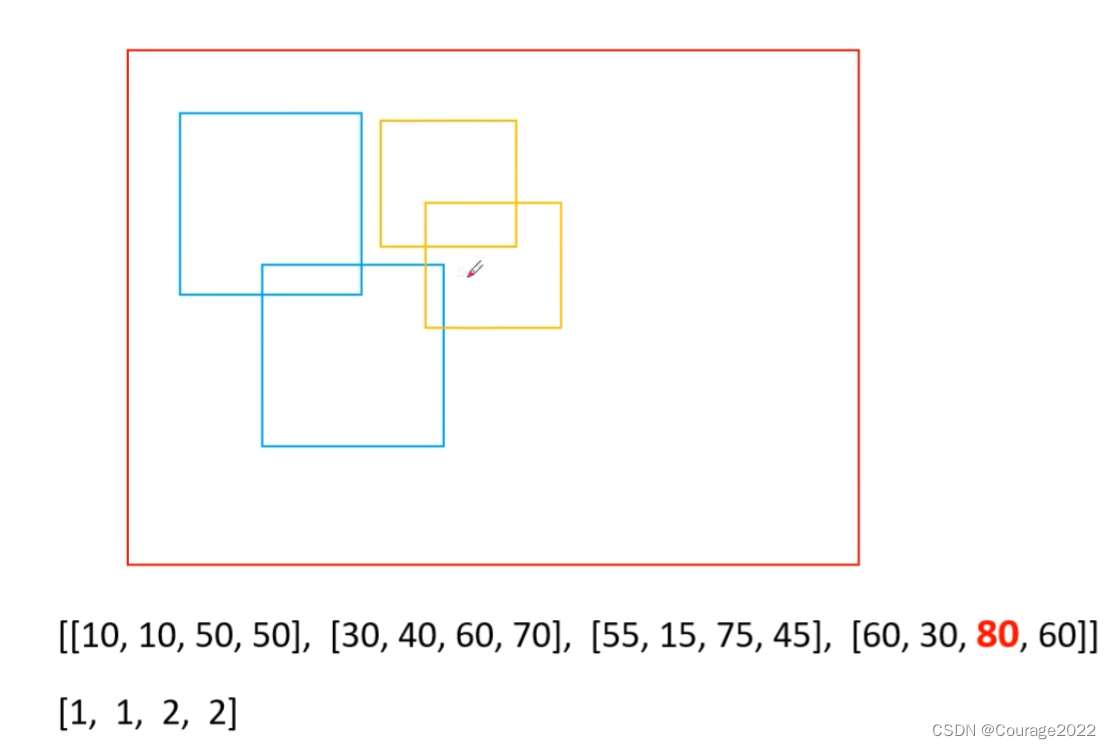
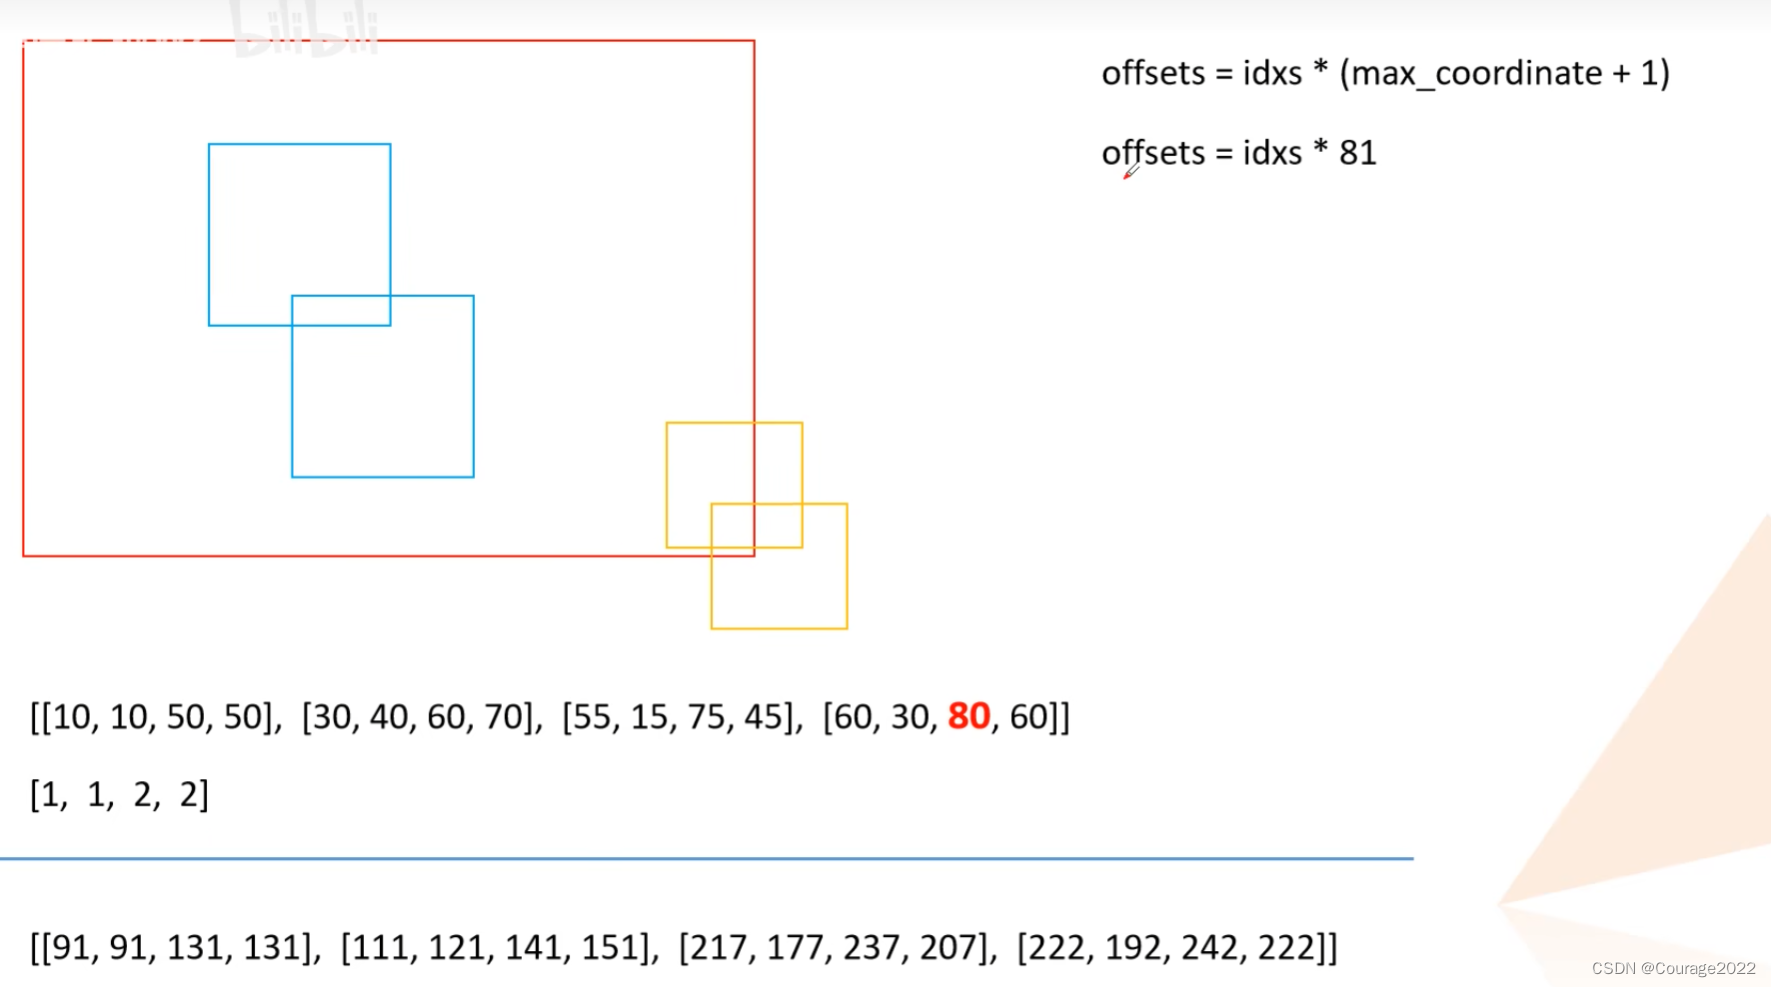
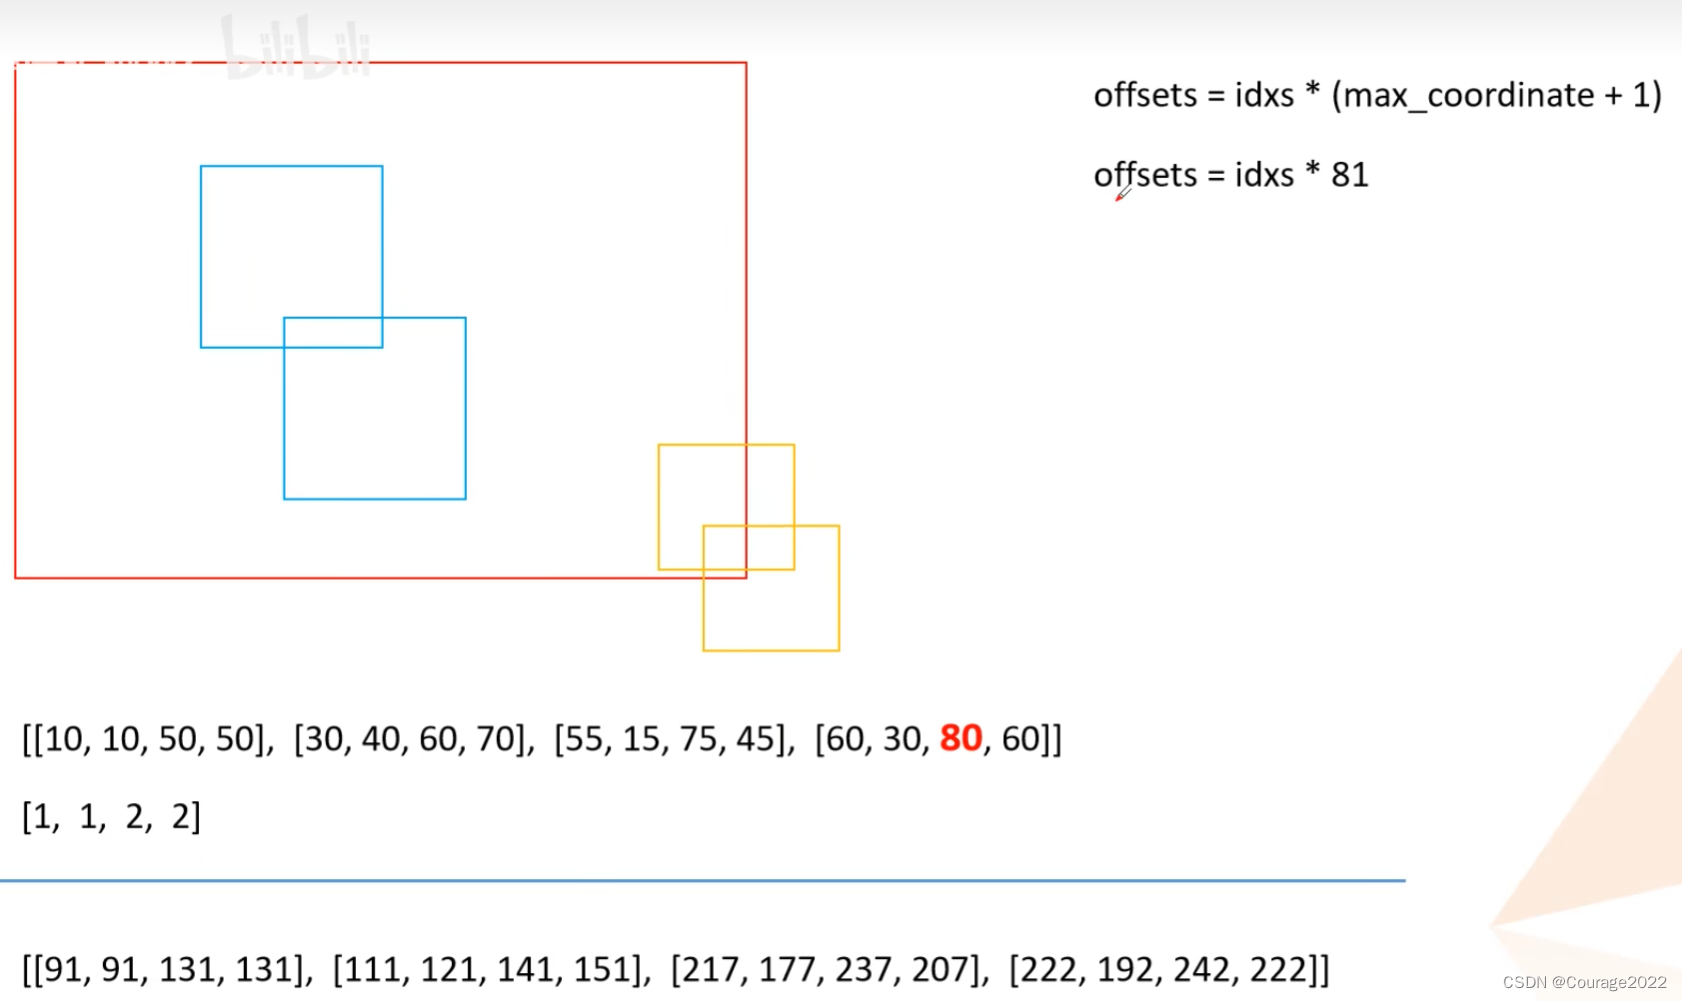
keep = box_ops.batched_nms(boxes, scores, labels, self.nms_thresh)def batched_nms(boxes, scores, idxs, iou_threshold): # type: (Tensor, Tensor, Tensor, float) -> Tensor """ Performs non-maximum suppression in a batched fashion. Each index value correspond to a category, and NMS will not be applied between elements of different categories. Parameters ---------- boxes : Tensor[N, 4] boxes where NMS will be performed. They are expected to be in (x1, y1, x2, y2) format scores : Tensor[N] scores for each one of the boxes idxs : Tensor[N] indices of the categories for each one of the boxes. iou_threshold : float discards all overlapping boxes with IoU < iou_threshold Returns ------- keep : Tensor int64 tensor with the indices of the elements that have been kept by NMS, sorted in decreasing order of scores """ if boxes.numel() == 0: return torch.empty((0,), dtype=torch.int64, device=boxes.device) # strategy: in order to perform NMS independently per class. # we add an offset to all the boxes. The offset is dependent # only on the class idx, and is large enough so that boxes # from different classes do not overlap # 获取所有boxes中最大的坐标值(xmin, ymin, xmax, ymax) max_coordinate = boxes.max() # to(): Performs Tensor dtype and/or device conversion # 为每一个类别/每一层生成一个很大的偏移量 # 这里的to只是让生成tensor的dytpe和device与boxes保持一致 offsets = idxs.to(boxes) * (max_coordinate + 1) # boxes加上对应层的偏移量后,保证不同类别/层之间boxes不会有重合的现象 boxes_for_nms = boxes + offsets[:, None] keep = nms(boxes_for_nms, scores, iou_threshold) return keep这里解释一下:假设这四个是我们最终得到的目标边界框,这两个蓝色对应相同label,这两个蓝色对应着相同label。我们看到两个类别目标边界框是有重合的。
我们这里得到的max_coordinate值为80,offset如下图:
通过这么处理后我们发现所有类别的边界框已经被分开了,这样就能对所有类别进行nms处理。nms处理官方做了一个封装我们无从得知,最后得到的是一个keep蒙版,对应着所有需要保留的box的索引信息,且是按照分数从大到小排序的。
# 获取scores排在前topk个预测目标 keep = keep[:self.detection_per_img] boxes, scores, labels = boxes[keep], scores[keep], labels[keep]获取前self.detection_per_img=100个目标,若没超过100个则取预测的所有目标,得到最终的boxes, scores, labels信息返回给上层调用。


2.2 FasterRCNNBase类前向传播过程
	#注意:这里输入的images的大小都是不同的。后面会进行预处理将这些图片放入同样大小的tensor中打包成一个batch
	#正向传播过程 params :预测的图片,为List[Tensor]型
	#image和target我们再word上面有标注
    def forward(self, images, targets=None):
        # type: (List[Tensor], Optional[List[Dict[str, Tensor]]]) -> Tuple[Dict[str, Tensor], List[Dict[str, Tensor]]]
        """
        Arguments:
            images (list[Tensor]): images to be processed
            targets (list[Dict[Tensor]]): ground-truth boxes present in the image (optional)

        Returns:
            result (list[BoxList] or dict[Tensor]): the output from the model.
                During training, it returns a dict[Tensor] which contains the losses.
                During testing, it returns list[BoxList] contains additional fields
                like `scores`, `labels` and `mask` (for Mask R-CNN models).

        """
		#判断是否是训练模式,若是训练模式一定要有targets,若targets为空,抛出异常
        if self.training and targets is None:
            raise ValueError("In training mode, targets should be passed")

		#检查标注框是否有错误
        if self.training:
            assert targets is not None
            for target in targets:         # 进一步判断传入的target的boxes参数是否符合规定
                boxes = target["boxes"]
				#判断boxes是不是torch.Tensor的格式
                if isinstance(boxes, torch.Tensor):
					#shape对应的目标有几个,毕竟一个目标就对应一个边界框嘛
					#box的第一个维度是N表示图像中有几个边界框 第二个维度是4(xminxmax..)
					#即如果最后一个维度!=4也要报错
                    if len(boxes.shape) != 2 or boxes.shape[-1] != 4:
                        raise ValueError("Expected target boxes to be a tensor"
                                         "of shape [N, 4], got {:}.".format(
                                          boxes.shape))
                else:
                    raise ValueError("Expected target boxes to be of type "
                                     "Tensor, got {:}.".format(type(boxes)))


		#存储每张图片的原始尺寸 定义是个List类型 每个list又是个元组类型 元组里面存放着图片的长宽
		original_image_sizes = torch.jit.annotate(List[Tuple[int, int]], [])

        for img in images:
			#对每张图片取得最后两个元素,再pytorch中维度的排列为[channel,height,width]
            val = img.shape[-2:]
            assert len(val) == 2  # 防止输入的是个一维向量
            original_image_sizes.append((val[0], val[1]))
        # original_image_sizes = [img.shape[-2:] for img in images]

		#GeneralizedRCNNTransform 函数 png的第二步(标准化处理、resize大小)
		#现在的image和targets才是真正的batch 我们在输入之前都是一张张尺寸大小不一样的图片,我们这样是没有办法打包成一个batch输入到gpu中进行运算的
        images, targets = self.transform(images, targets)  # 对图像进行预处理

        # print(images.tensors.shape)
        features = self.backbone(images.tensors)  # 将图像输入backbone得到特征图
		#判断特征图是否是tensor类型的,对于上面的图片是img和target型的 但是我们经过backbone后就得到了一个个的特征图(仅有图)
        if isinstance(features, torch.Tensor):  # 若只在一层特征层上预测,将feature放入有序字典中,并编号为‘0’
			#将特征图加入有序字典 key=0
            features = OrderedDict([('0', features)])  # 若在多层特征层上预测,传入的就是一个有序字典

        # 将特征层以及标注target信息传入rpn中
        # proposals: List[Tensor], Tensor_shape: [num_proposals, 4],是一个绝对坐标
        # 每个proposals是绝对坐标,且为(x1, y1, x2, y2)格式
		#proposal是一个list大小为2(batch_size)是2 每个元素是个tensor,对于每个list而言是个tensor 2000*4 2000代表rpn生成有2000个proposal
        proposals, proposal_losses = self.rpn(images, features, targets)

        # 将rpn生成的数据以及标注target信息传入fast rcnn后半部分
        detections, detector_losses = self.roi_heads(features, proposals, images.image_sizes, targets)
我们通过上述的roi_head类得到了预测的结果以及roi的损失。
最后我们将预测尺度进行后处理返回到原始图像的尺度上:
        # 对网络的预测结果进行后处理(主要将bboxes还原到原图像尺度上)
        detections = self.transform.postprocess(detections, images.image_sizes, original_image_sizes)

        losses = {}
        losses.update(detector_losses)
        losses.update(proposal_losses)

        if torch.jit.is_scripting():
            if not self._has_warned:
                warnings.warn("RCNN always returns a (Losses, Detections) tuple in scripting")
                self._has_warned = True
            return losses, detections
        else:
            return self.eager_outputs(losses, detections)
这里传入的参数:
@result:网络预测的结果,包含有目标边界框预测信息、每个目标的标签值及所对应的概率
@image_shapes:在预处理缩放后的图像尺度
@original_image_sizes:图像的原始尺度这里的传出detections的result变量中的box信息就对应原尺度的信息。
最终执行这行代码:
return self.eager_outputs(losses, detections)def eager_outputs(self, losses, detections): # type: (Dict[str, Tensor], List[Dict[str, Tensor]]) -> Union[Dict[str, Tensor], List[Dict[str, Tensor]]] if self.training: return losses return detections如果是训练模式只返回损失,如果是非训练模式传入目标检测信息。
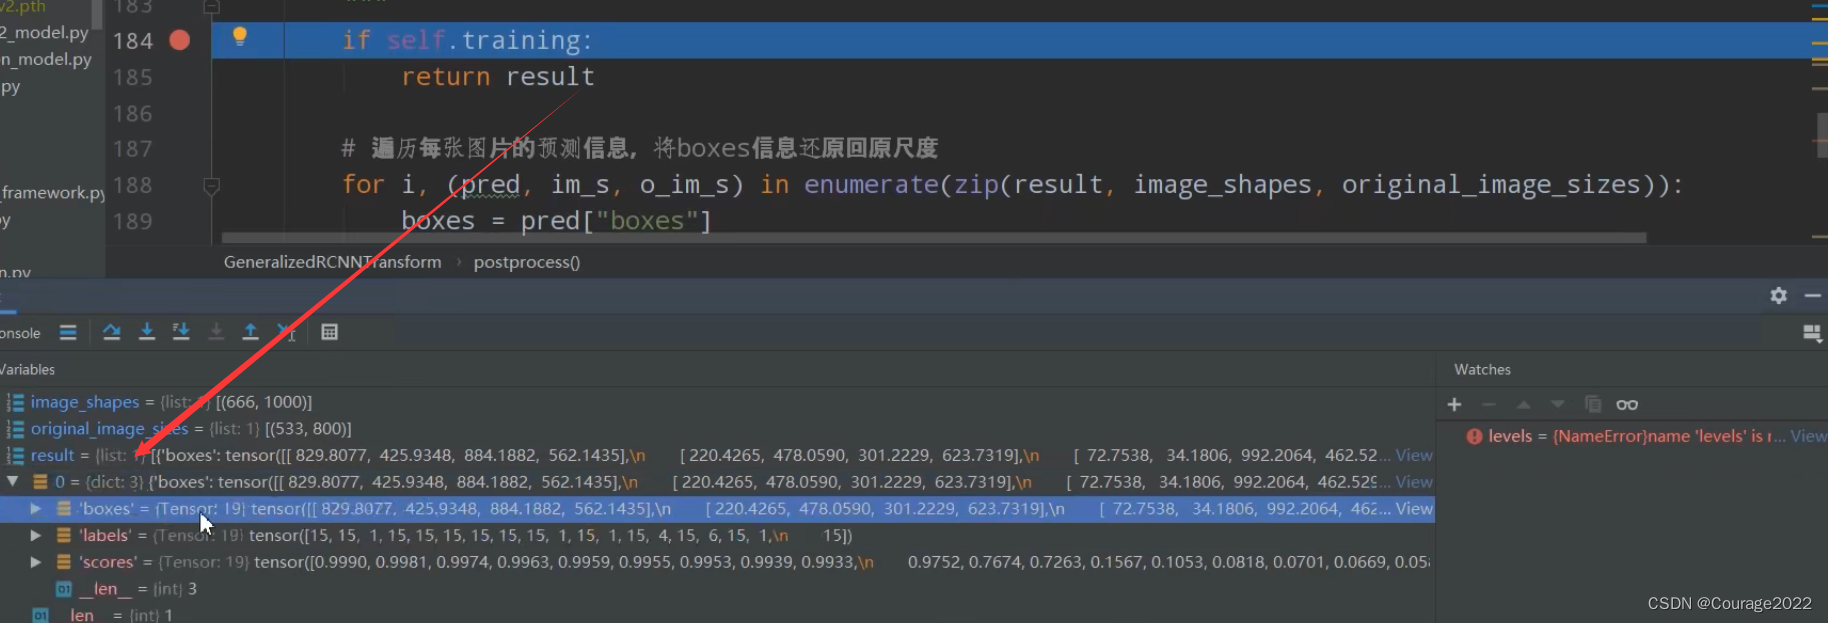
对于这张图片我们的网络发现了19个目标,boxes对应预测每个目标的框体信息,labels对应预测信息所述的类别索引,scores对应的目标的分数。
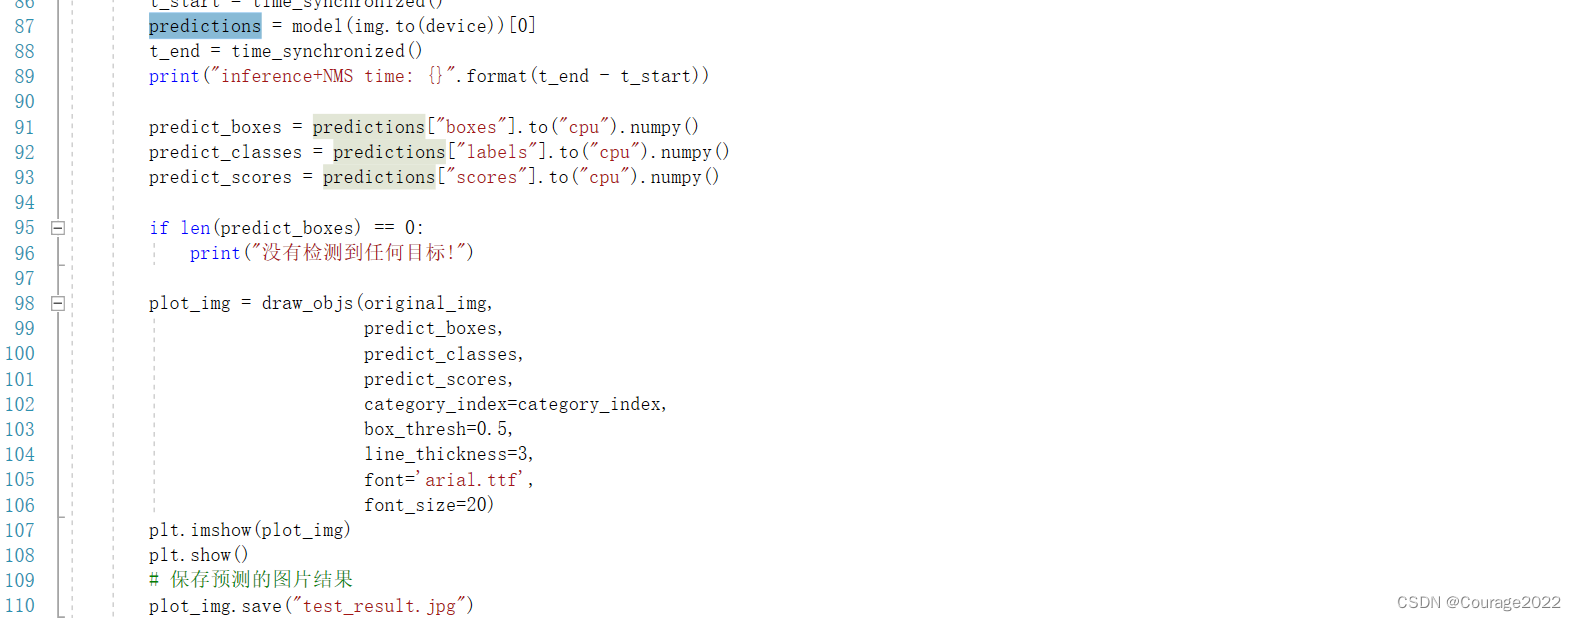
对于predict.py,到此我们执行到这一行了。
此时,就可以将其box、类别、分数信息调出来。
        predict_boxes = predictions["boxes"].to("cpu").numpy()
        predict_classes = predictions["labels"].to("cpu").numpy()
        predict_scores = predictions["scores"].to("cpu").numpy()
通过draw_box方法画出我们的预测结果。
完结撒花。
2.3 GeneralizedRCNNTransform类(transform.py)
2.3.1 postprocess方法
	#对网络的预测结果进行后处理(主要将bboxes还原到原图像尺度上)
	#result : 是网络的最终预测结果 包括bndbox信息及每个bndbox对应的位置信息,标签值以及对应的概率
	#image_shapes :将图像经过resize之后的每一个图像的高度和宽度
	#original_image_sizes :每张图片在缩放前的高度和宽度
    def postprocess(self,
                    result,                # type: List[Dict[str, Tensor]]
                    image_shapes,          # type: List[Tuple[int, int]]
                    original_image_sizes   # type: List[Tuple[int, int]]
                    ):
        # type: (...) -> List[Dict[str, Tensor]]
        """
        对网络的预测结果进行后处理(主要将bboxes还原到原图像尺度上)
        Args:
            result: list(dict), 网络的预测结果, len(result) == batch_size
            image_shapes: list(torch.Size), 图像预处理缩放后的尺寸, len(image_shapes) == batch_size
            original_image_sizes: list(torch.Size), 图像的原始尺寸, len(original_image_sizes) == batch_size

        Returns:

        """
        if self.training:
            return result

		#i是对应的索引,(pred, im_s, o_im_s)对应result, image_shapes, original_image_sizes
        # 遍历每张图片的预测信息,将boxes信息还原回原尺度
		# im_s 缩放后的图像尺度 o_im_s图像原始尺度
        for i, (pred, im_s, o_im_s) in enumerate(zip(result, image_shapes, original_image_sizes)):
            boxes = pred["boxes"]
            boxes = resize_boxes(boxes, im_s, o_im_s)  # 将bboxes缩放回原图像尺度上
            result[i]["boxes"] = boxes
        return result
这里传入的参数:
@result:网络预测的结果,包含有目标边界框预测信息、每个目标的标签值及所对应的概率
@image_shapes:在预处理缩放后的图像尺度
@original_image_sizes:图像的原始尺度if self.training: return result在训练模式下无需进行任何操作。
#i是对应的索引,(pred, im_s, o_im_s)对应result, image_shapes, original_image_sizes # 遍历每张图片的预测信息,将boxes信息还原回原尺度 # im_s 缩放后的图像尺度 o_im_s图像原始尺度 for i, (pred, im_s, o_im_s) in enumerate(zip(result, image_shapes, original_image_sizes)): boxes = pred["boxes"] boxes = resize_boxes(boxes, im_s, o_im_s) # 将bboxes缩放回原图像尺度上 result[i]["boxes"] = boxes return result非训练模式(验证/预测)下,我们遍历图像的预测结果、当前尺度、原尺度,将目标边界框坐标信息拿出来,再用resize_boxes方法将bboxes缩放回原图像尺度上。(2.3.2节)
2.3.2 resize_boxes
def resize_boxes(boxes, original_size, new_size):
    # type: (Tensor, List[int], List[int]) -> Tensor
    """
    将boxes参数根据图像的缩放情况进行相应缩放

    Arguments:
        original_size: 图像缩放前的尺寸
        new_size: 图像缩放后的尺寸
    """
	#将原来图片的尺寸和现在图片的尺寸转换为tensor格式
    ratios = [
        torch.tensor(s, dtype=torch.float32, device=boxes.device) /
        torch.tensor(s_orig, dtype=torch.float32, device=boxes.device)
        for s, s_orig in zip(new_size, original_size)
    ]
    ratios_height, ratios_width = ratios
    # Removes a tensor dimension, boxes [minibatch, 4]
    # Returns a tuple of all slices along a given dimension, already without it.
	#将边界框按索引值为1的方向展开
	# [minibatch, 4] 当前图片有几个box信息  他们的坐标
    xmin, ymin, xmax, ymax = boxes.unbind(1)
    xmin = xmin * ratios_width
    xmax = xmax * ratios_width
    ymin = ymin * ratios_height
    ymax = ymax * ratios_height
    return torch.stack((xmin, ymin, xmax, ymax), dim=1)
之前说过,不再赘述!