pycharm-qt5-基础篇1
- 一: QT5介绍
- 1> 主要的特性
- 2> pycharm 外部工具及功能
- 1. Qt Designer
- 2. PyUic
- 3> PyUrcc
- 二: pycharm QT5 环境搭建
- 1> 虚拟环境搭建
- 2> 安装 pyqt5、pyqt5-tools
- 3> 将QT工具添加到环境变量
- 4> 配置PyCharm
- 三: QT5 demo
- 四: pyinstaller 打包
- 1> pyinstaller -h
- 2> 参数介绍
- 3> 打包.exe
- 五:pycharm-qt5-designer1
一: QT5介绍
QT是用来进行用户图形界面设计的程序框架,它是跨平台的,不论在Windows、Linux还是Mac OS下面都能够运行,而且代码是基于 C++编写的,表达形式丰富多样,而且开发效率非常高;
Qt 5也继续提供了本地C++强大的功能来完成更好的用户体验,也提供了对OpenGL/OpenGL ES图形加速的完全支持。
Qt 5.0版本发布了完整的SDK,覆盖了Windows、Mac OS X以及Linux。这表明Qt 5.0版本发布的内容包括:Qt 5框架、IDE(Qt Creator)、示例以及文档。
1> 主要的特性
| 特性 | 概述 |
|---|---|
| 令人惊奇的图像处理和表现能力 | 别是在特定的环境下,例如:嵌入式和 移动设备上。Qt Quick 2提供了基于Open GL的场景视图,一个粒子系统以及一些渲染特效的集合。Qt Multimedia和Qt GraphicalEffects更加促进了这些特性 |
| 开发者的生产力和灵活性 | 使得JavaScript和QML成为一等公民,同时也继续保留了以C++作为基础以及对Qt Widget的支持。附加的Qt WebKit2使得HTML5的开发者更加轻松。 |
| 跨平台的可移植性 | 由于Qt的核心模块和附加模块使用了新的结构,以及QPA的合并,使得OS开发者的开发工作更加容易了。最终的目标就是使得Qt可以在所有的环境下运行。下一步的工作就是在iOS和Android上提供完整的Qt支持 |
| 开 放式的开发以及开放式的管理确保了更加广泛的开发者开发和测试Qt 5 | Qt 5包含如下模块:核心模块:Qt Core,Qt GUI,Qt Multimedia,Qt Netword,Qt Qml,Qt Quick,QtSQL,Qt Test,Qt WebKit,Qt WebKit Widgets,Qt Widgets。附加模块:Qt D-Bus,Qt Graphical Effects,Qt ImageFormats,Qt OpenGL,Qt Print Support,Qt Declarative,Qt Script,Qt Script Tools,Qt SVG,Qt XML,Qt XML Patterns。 |
2> pycharm 外部工具及功能
pycharm 通常:Qtdesigner、PyUic、PyUrcc
1. Qt Designer
Qt Creator中的工具,用于为Qt小部件设计和构建图形用户界面(GUI)。您可以在视觉编辑器(s所见即所得)中撰写和自定义您的小部件或者对话,并使用不同的样式和分辨率进行测试。
Qt Designer可以作为独立工具使用,Qt设计器的两个版本仅在功能上有所不同,例如资源文件的使用以及如何在设计和编译模式中切换。
使用Qt Designer创建的小部件和Form与编程代码无缝集成,使用Qt的信号与插槽机制,以便您可以轻松地将行为分配给图形元素。
Qt Designer中设置的所有属性都可以在代码中动态更改。此外,小部件升级和自定义插件等特性允许您在Qt Creator中使用自己的组件
注意:你可以选择使用Qt-Quick进行用户界面设计,而不是使用小部件。这是一种更容易编写多种应用程序的方法。它实现了完全可定制的外观,触摸反应的元素,平滑的动画过渡,由opengl图形加速的力量支持
- Qt designer,即 Qt设计师,是一个强大、灵活的可视化GUI 设计工具,可以帮助我们加快开发PyQt程序的速度。Qt designer是专门用来制作PyQt程序中U界面的工具,它生成的UI界面是一个后缀为.ui的文件。该文件使用起来非常简单,可以通过命令将.ui文件转换成.py格式的文件,并被其他Python文件引用;也可以像上节搭建环境一样,配置工具,直接操作,不过其本质,都是运行对应的工具转换程序实现的。
Qt designer符合MVC(模型—视图一控制器)设计模式,做到了显示和业务逻辑的分离。
优点:
| 优点 | 概述 |
|---|---|
| 1 | 使用简单,通过拖曳和点击就可以完成复杂的界面设计,而且还可以随时预览查看效果图。 |
| 2 | 转换Python文件方便。Qt designer可以将设计好的用户界面保存为.ui文件,其实是XML格式的文本文件。为了在 PyQt中使用.ui文件,可以通过 pyuic5命令将.ui文件转换为.py文件件,然后将.py文件引入到自定义的Python代码中。 |
2. PyUic
作用: 利用pyuic将ui文件转换为py文件
命令格式: pyuic5 -o destination.py source.ui
其中:
-o是操作参数,表示要生成一个文件
destination.py是要生成的.py文件
source.ui是在此之前用QtCreator生成的包含UI设计的.ui文件
3> PyUrcc
- 作用
将资源文件转换成py文件,并在主程序引入 - 资源文件编写说明
新建resource.qrc,代码如下:
二: pycharm QT5 环境搭建
QT5各组件版本要求比较乱,安装资源包时会冲突,因此QT5会单独创建python虚拟环境进行搭建及开发
1> 虚拟环境搭建
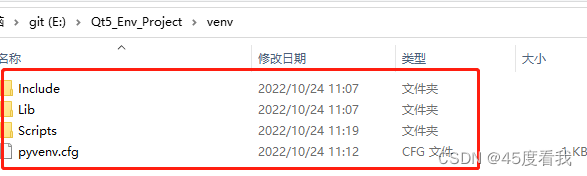
- 在新建路径下E:\Qt5_Env_Project 在pycharm 的Terminal 窗口下python -m venv venv出现如下文件目录
- cd 到 venv\Scripts 下 ;启动虚拟环境activate.bat,推出虚拟环境deactivate.bat,以下操作都在虚拟环境下操作
2> 安装 pyqt5、pyqt5-tools
pip install pyqt5 -i https://pypi.douban.com/simple/
pip install pyqt5-tools -i https://pypi.douban.com/simple/
3> 将QT工具添加到环境变量
电脑->右键选择属性->高级系统设置->环境变量->系统变量->path->新建
E:\Qt5_Env_Project\venv\Lib\site-packages\qt5_applications\Qt\bin
4> 配置PyCharm
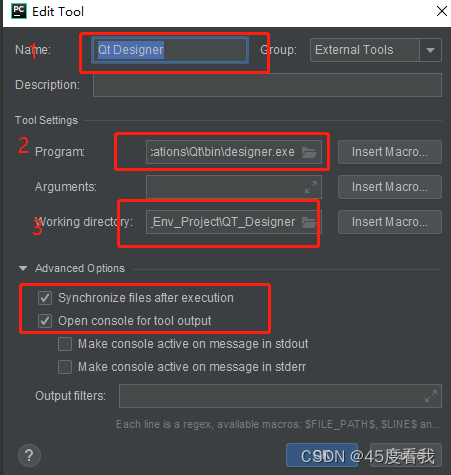
Qtdesigner、PyUic、PyUrcc 均在打开File->settings->Tools->External Tools配置
- Qt Designer
Name:Qt Designer
program:designer.exe的安装路径(比如E:\Qt5_Env_Project\venv\Lib\site-packages\qt5_applications\Qt\bin\designer.exe)
parameter:不填
Working directory: $FileDir$
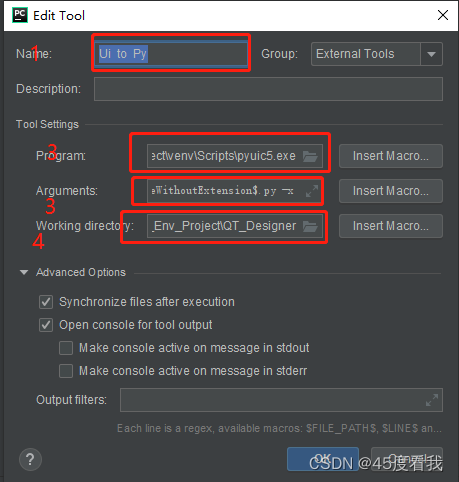
2. Ui to Py
Name:pyuic5
Program:pyuic5.exe的安装路径(比如我的D:\job\gs\venv\my_pyqt\Scripts\pyuic5.exe)
Arguments:$FileName$ -o $FileNameWithoutExtension$.py
Working directory:$FileDir$
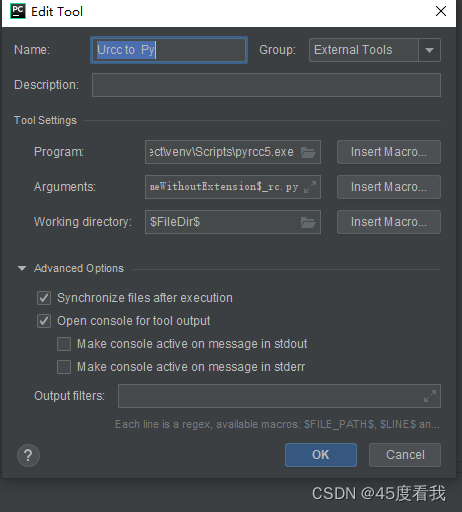
- Urcc to Py
Name:pyrcc
Program:pyrcc5.exe的安装路径(比如我的D:\job\gs\venv\my_pyqt\Scripts\pyrcc5.exe)
Arguments:$FileName$ -o $FileNameWithoutExtension$_rc.py
Working directory:$FileDir$
三: QT5 demo
-
Qt Designer 新建
Tools->External Tools->QtDesigner
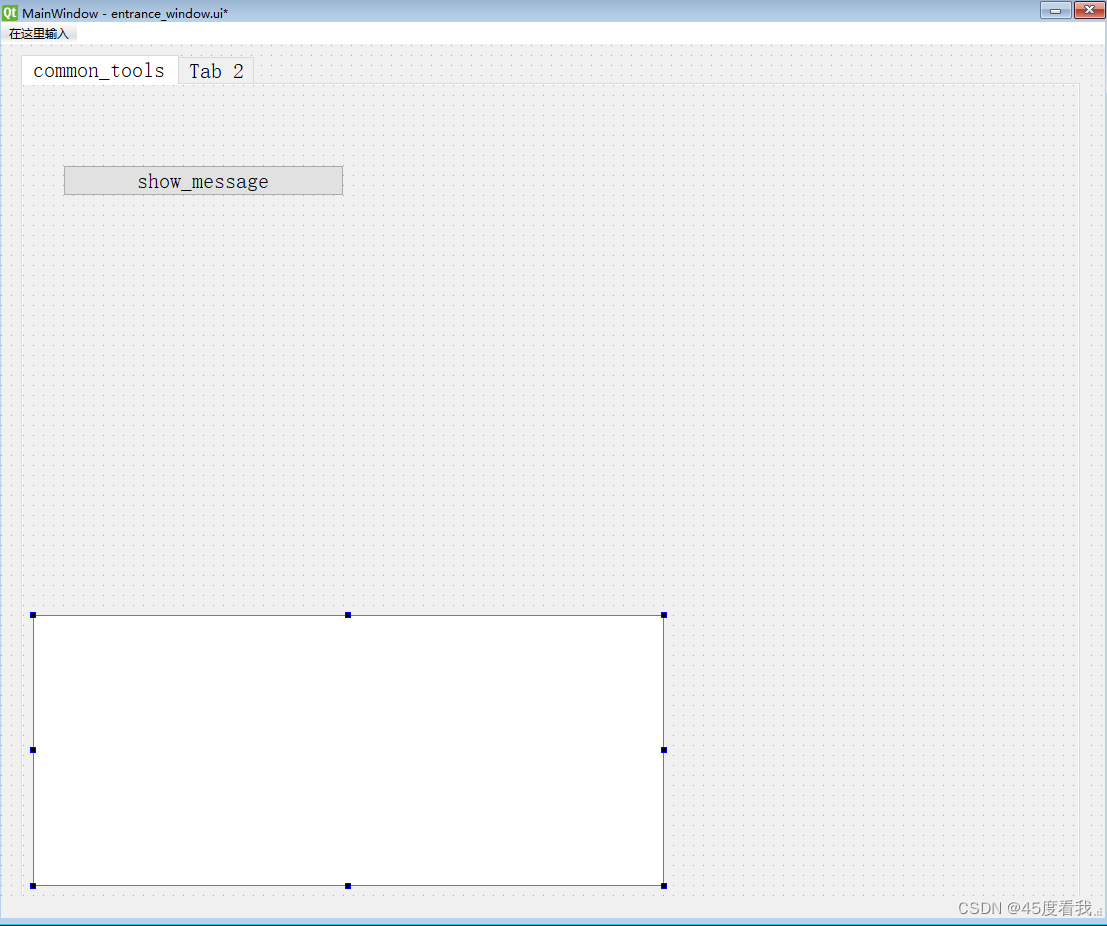
-
ui-entrance_window.ui文件转换成py文件entrance_window.py
-
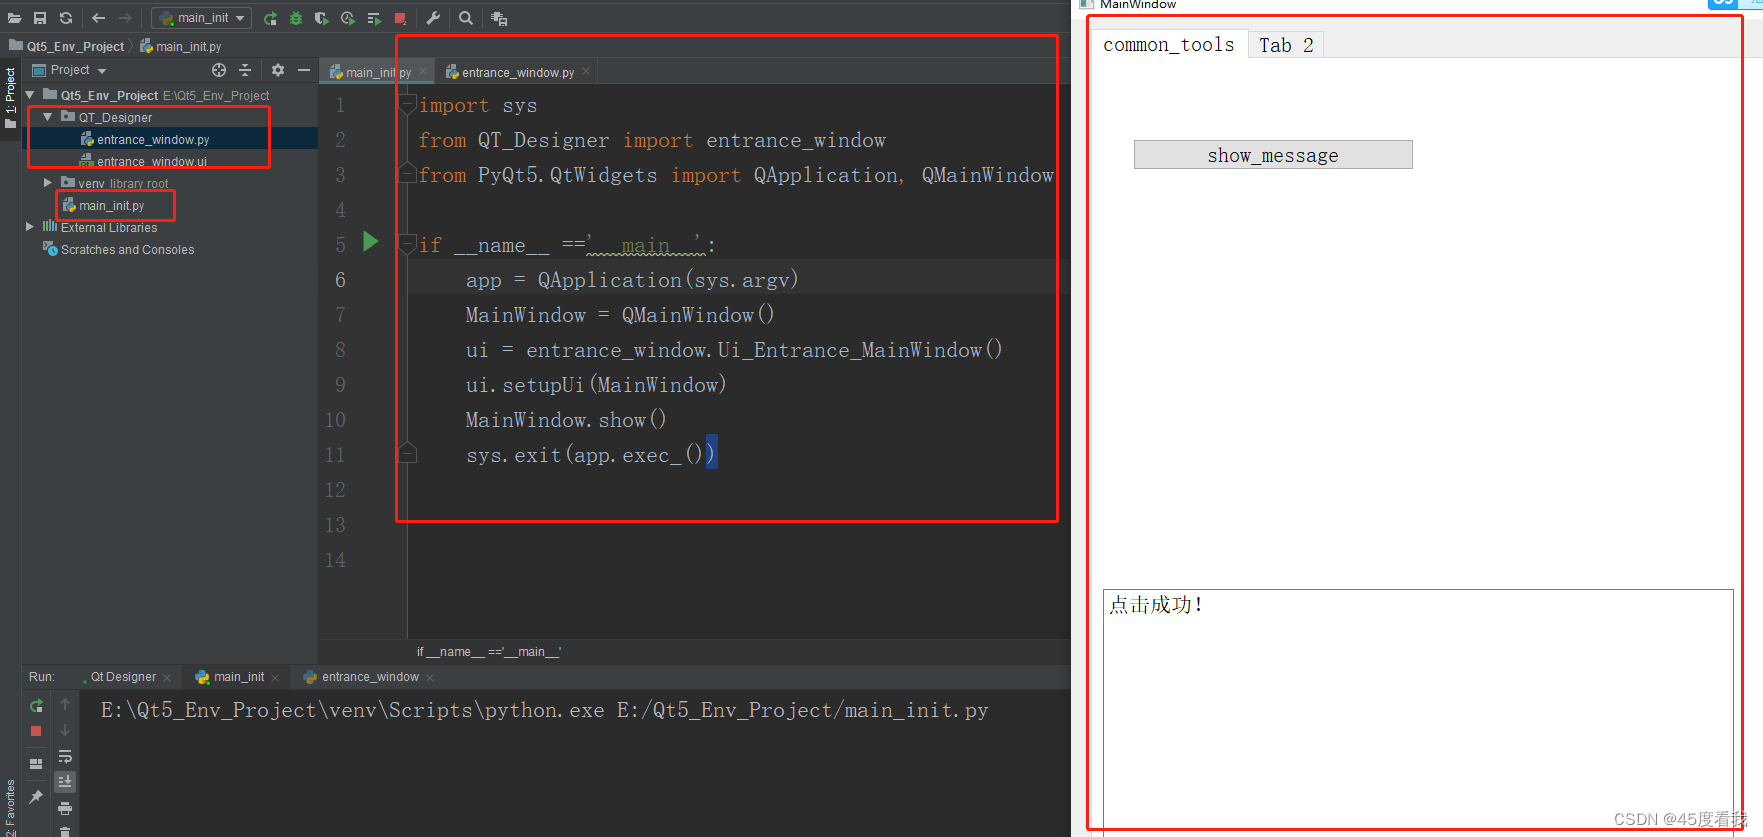
新建main函数调用
import sys
from QT_Designer import entrance_window
from PyQt5.QtWidgets import QApplication, QMainWindow

if __name__ =='__main__':
    app = QApplication(sys.argv)
    MainWindow = QMainWindow()
    ui = entrance_window.Ui_Entrance_MainWindow()
    ui.setupUi(MainWindow)
    MainWindow.show()
    sys.exit(app.exec_())
entrance_window.py
转成py文件内容,
# -*- coding: utf-8 -*-

# Form implementation generated from reading ui file 'entrance_window.ui'
#
# Created by: PyQt5 UI code generator 5.15.4
#
# WARNING: Any manual changes made to this file will be lost when pyuic5 is
# run again.  Do not edit this file unless you know what you are doing.


from PyQt5 import QtCore, QtGui, QtWidgets


class Ui_Entrance_MainWindow(object):
    def setupUi(self, Entrance_MainWindow):
        Entrance_MainWindow.setObjectName("Entrance_MainWindow")
        Entrance_MainWindow.resize(1104, 896)
        self.centralwidget = QtWidgets.QWidget(Entrance_MainWindow)
        self.centralwidget.setObjectName("centralwidget")
        self.tabWidget_tools = QtWidgets.QTabWidget(self.centralwidget)
        self.tabWidget_tools.setGeometry(QtCore.QRect(20, 10, 1061, 851))
        font = QtGui.QFont()
        font.setPointSize(16)
        font.setItalic(False)
        self.tabWidget_tools.setFont(font)
        self.tabWidget_tools.setObjectName("tabWidget_tools")
        self.tab = QtWidgets.QWidget()
        self.tab.setObjectName("tab")
        self.pushButton = QtWidgets.QPushButton(self.tab)
        self.pushButton.setGeometry(QtCore.QRect(40, 80, 281, 31))
        self.pushButton.setObjectName("pushButton")
        self.textEdit = QtWidgets.QTextEdit(self.tab)
        self.textEdit.setGeometry(QtCore.QRect(10, 530, 631, 271))
        self.textEdit.setObjectName("textEdit")
        self.tabWidget_tools.addTab(self.tab, "")
        self.tab_2 = QtWidgets.QWidget()
        self.tab_2.setObjectName("tab_2")
        self.tabWidget_tools.addTab(self.tab_2, "")
        Entrance_MainWindow.setCentralWidget(self.centralwidget)
        self.menubar = QtWidgets.QMenuBar(Entrance_MainWindow)
        self.menubar.setGeometry(QtCore.QRect(0, 0, 1104, 23))
        self.menubar.setObjectName("menubar")
        Entrance_MainWindow.setMenuBar(self.menubar)
        self.statusbar = QtWidgets.QStatusBar(Entrance_MainWindow)
        self.statusbar.setObjectName("statusbar")
        Entrance_MainWindow.setStatusBar(self.statusbar)

        self.retranslateUi(Entrance_MainWindow)
        self.tabWidget_tools.setCurrentIndex(0)
        self.pushButton.clicked.connect(self.Line_Edit_show)
        QtCore.QMetaObject.connectSlotsByName(Entrance_MainWindow)

    def retranslateUi(self, Entrance_MainWindow):
        _translate = QtCore.QCoreApplication.translate
        Entrance_MainWindow.setWindowTitle(_translate("Entrance_MainWindow", "MainWindow"))
        self.pushButton.setText(_translate("Entrance_MainWindow", "show_message"))
        self.tabWidget_tools.setTabText(self.tabWidget_tools.indexOf(self.tab), _translate("Entrance_MainWindow", "common_tools"))
        self.tabWidget_tools.setTabText(self.tabWidget_tools.indexOf(self.tab_2), _translate("Entrance_MainWindow", "Tab 2"))

    def Line_Edit_show(self):
        self.textEdit.setText('点击成功!')

if __name__ == "__main__":
    import sys
    app = QtWidgets.QApplication(sys.argv)
    Entrance_MainWindow = QtWidgets.QMainWindow()
    ui = Ui_Entrance_MainWindow()
    ui.setupUi(Entrance_MainWindow)
    Entrance_MainWindow.show()
    sys.exit(app.exec_())
===================
其中添加的信号
self.pushButton.clicked.connect(self.Line_Edit_show)
及其简单调用方法:
def Line_Edit_show(self):
     self.textEdit.setText('点击成功!')
四: pyinstaller 打包
1> pyinstaller -h
usage: pyinstaller [-h] [-v] [-D] [-F] [--specpath DIR] [-n NAME]
                   [--add-data <SRC;DEST or SRC:DEST>]
                   [--add-binary <SRC;DEST or SRC:DEST>] [-p DIR]
                   [--hidden-import MODULENAME]
                   [--collect-submodules MODULENAME]
                   [--collect-data MODULENAME] [--collect-binaries MODULENAME]
                   [--collect-all MODULENAME] [--copy-metadata PACKAGENAME]
                   [--recursive-copy-metadata PACKAGENAME]
                   [--additional-hooks-dir HOOKSPATH]
                   [--runtime-hook RUNTIME_HOOKS] [--exclude-module EXCLUDES]
                   [--key KEY] [--splash IMAGE_FILE]
                   [-d {all,imports,bootloader,noarchive}]
                   [--python-option PYTHON_OPTION] [-s] [--noupx]
                   [--upx-exclude FILE] [-c] [-w]
                   [-i <FILE.ico or FILE.exe,ID or FILE.icns or Image or "NONE">]
                   [--disable-windowed-traceback] [--version-file FILE]
                   [-m <FILE or XML>] [--no-embed-manifest] [-r RESOURCE]
                   [--uac-admin] [--uac-uiaccess] [--win-private-assemblies]
                   [--win-no-prefer-redirects] [--argv-emulation]
                   [--osx-bundle-identifier BUNDLE_IDENTIFIER]
                   [--target-architecture ARCH] [--codesign-identity IDENTITY]
                   [--osx-entitlements-file FILENAME] [--runtime-tmpdir PATH]
                   [--bootloader-ignore-signals] [--distpath DIR]
                   [--workpath WORKPATH] [-y] [--upx-dir UPX_DIR] [-a]
                   [--clean] [--log-level LEVEL]
                   scriptname [scriptname ...]

positional arguments:
  scriptname            Name of scriptfiles to be processed or exactly one
                        .spec file. If a .spec file is specified, most options
                        are unnecessary and are ignored.

optional arguments:
  -h, --help            show this help message and exit
  -v, --version         Show program version info and exit.
  --distpath DIR        Where to put the bundled app (default: ./dist)
  --workpath WORKPATH   Where to put all the temporary work files, .log, .pyz
                        and etc. (default: ./build)
  -y, --noconfirm       Replace output directory (default:
                        SPECPATH\dist\SPECNAME) without asking for
                        confirmation
  --upx-dir UPX_DIR     Path to UPX utility (default: search the execution
                        path)
  -a, --ascii           Do not include unicode encoding support (default:
                        included if available)
  --clean               Clean PyInstaller cache and remove temporary files
                        before building.
  --log-level LEVEL     Amount of detail in build-time console messages. LEVEL
                        may be one of TRACE, DEBUG, INFO, WARN, ERROR,
                        CRITICAL (default: INFO).

What to generate:
  -D, --onedir          Create a one-folder bundle containing an executable
                        (default)
  -F, --onefile         Create a one-file bundled executable.
  --specpath DIR        Folder to store the generated spec file (default:
                        current directory)
  -n NAME, --name NAME  Name to assign to the bundled app and spec file
                        (default: first script's basename)

What to bundle, where to search:
  --add-data <SRC;DEST or SRC:DEST>
                        Additional non-binary files or folders to be added to
                        the executable. The path separator is platform
                        specific, ``os.pathsep`` (which is ``;`` on Windows
                        and ``:`` on most unix systems) is used. This option
                        can be used multiple times.
  --add-binary <SRC;DEST or SRC:DEST>
                        Additional binary files to be added to the executable.
                        See the ``--add-data`` option for more details. This
                        option can be used multiple times.
  -p DIR, --paths DIR   A path to search for imports (like using PYTHONPATH).
                        Multiple paths are allowed, separated by ``';'``, or
                        use this option multiple times. Equivalent to
                        supplying the ``pathex`` argument in the spec file.
  --hidden-import MODULENAME, --hiddenimport MODULENAME
                        Name an import not visible in the code of the
                        script(s). This option can be used multiple times.
  --collect-submodules MODULENAME
                        Collect all submodules from the specified package or
                        module. This option can be used multiple times.
  --collect-data MODULENAME, --collect-datas MODULENAME
                        Collect all data from the specified package or module.
                        This option can be used multiple times.
  --collect-binaries MODULENAME
                        Collect all binaries from the specified package or
                        module. This option can be used multiple times.
  --collect-all MODULENAME
                        Collect all submodules, data files, and binaries from
                        the specified package or module. This option can be
                        used multiple times.
  --copy-metadata PACKAGENAME
                        Copy metadata for the specified package. This option
                        can be used multiple times.
  --recursive-copy-metadata PACKAGENAME
                        Copy metadata for the specified package and all its
                        dependencies. This option can be used multiple times.
  --additional-hooks-dir HOOKSPATH
                        An additional path to search for hooks. This option
                        can be used multiple times.
  --runtime-hook RUNTIME_HOOKS
                        Path to a custom runtime hook file. A runtime hook is
                        code that is bundled with the executable and is
                        executed before any other code or module to set up
                        special features of the runtime environment. This
                        option can be used multiple times.
  --exclude-module EXCLUDES
                        Optional module or package (the Python name, not the
                        path name) that will be ignored (as though it was not
                        found). This option can be used multiple times.
  --key KEY             The key used to encrypt Python bytecode.
  --splash IMAGE_FILE   (EXPERIMENTAL) Add an splash screen with the image
                        IMAGE_FILE to the application. The splash screen can
                        display progress updates while unpacking.

How to generate:
  -d {all,imports,bootloader,noarchive}, --debug {all,imports,bootloader,noarchive}
                        Provide assistance with debugging a frozen
                        application. This argument may be provided multiple
                        times to select several of the following options.

                        - all: All three of the following options.

                        - imports: specify the -v option to the underlying
                          Python interpreter, causing it to print a message
                          each time a module is initialized, showing the
                          place (filename or built-in module) from which it
                          is loaded. See
                          https://docs.python.org/3/using/cmdline.html#id4.

                        - bootloader: tell the bootloader to issue progress
                          messages while initializing and starting the
                          bundled app. Used to diagnose problems with
                          missing imports.

                        - noarchive: instead of storing all frozen Python
                          source files as an archive inside the resulting
                          executable, store them as files in the resulting
                          output directory.

  --python-option PYTHON_OPTION
                        Specify a command-line option to pass to the Python
                        interpreter at runtime. Currently supports "v"
                        (equivalent to "--debug imports"), "u", and "W
                        <warning control>".
  -s, --strip           Apply a symbol-table strip to the executable and
                        shared libs (not recommended for Windows)
  --noupx               Do not use UPX even if it is available (works
                        differently between Windows and *nix)
  --upx-exclude FILE    Prevent a binary from being compressed when using upx.
                        This is typically used if upx corrupts certain
                        binaries during compression. FILE is the filename of
                        the binary without path. This option can be used
                        multiple times.

Windows and Mac OS X specific options:
  -c, --console, --nowindowed
                        Open a console window for standard i/o (default). On
                        Windows this option has no effect if the first script
                        is a '.pyw' file.
  -w, --windowed, --noconsole
                        Windows and Mac OS X: do not provide a console window
                        for standard i/o. On Mac OS this also triggers
                        building a Mac OS .app bundle. On Windows this option
                        is automatically set if the first script is a '.pyw'
                        file. This option is ignored on *NIX systems.
  -i <FILE.ico or FILE.exe,ID or FILE.icns or Image or "NONE">, --icon <FILE.ico or FILE.exe,ID or FILE.icns or Image or "NONE">
                        FILE.ico: apply the icon to a Windows executable.
                        FILE.exe,ID: extract the icon with ID from an exe.
                        FILE.icns: apply the icon to the .app bundle on Mac
                        OS. If an image file is entered that isn't in the
                        platform format (ico on Windows, icns on Mac),
                        PyInstaller tries to use Pillow to translate the icon
                        into the correct format (if Pillow is installed). Use
                        "NONE" to not apply any icon, thereby making the OS
                        show some default (default: apply PyInstaller's icon).
                        This option can be used multiple times.
  --disable-windowed-traceback
                        Disable traceback dump of unhandled exception in
                        windowed (noconsole) mode (Windows and macOS only),
                        and instead display a message that this feature is
                        disabled.

Windows specific options:
  --version-file FILE   Add a version resource from FILE to the exe.
  -m <FILE or XML>, --manifest <FILE or XML>
                        Add manifest FILE or XML to the exe.
  --no-embed-manifest   Generate an external .exe.manifest file instead of
                        embedding the manifest into the exe. Applicable only
                        to onedir mode; in onefile mode, the manifest is
                        always embedded, regardless of this option.
  -r RESOURCE, --resource RESOURCE
                        Add or update a resource to a Windows executable. The
                        RESOURCE is one to four items,
                        FILE[,TYPE[,NAME[,LANGUAGE]]]. FILE can be a data file
                        or an exe/dll. For data files, at least TYPE and NAME
                        must be specified. LANGUAGE defaults to 0 or may be
                        specified as wildcard * to update all resources of the
                        given TYPE and NAME. For exe/dll files, all resources
                        from FILE will be added/updated to the final
                        executable if TYPE, NAME and LANGUAGE are omitted or
                        specified as wildcard *. This option can be used
                        multiple times.
  --uac-admin           Using this option creates a Manifest that will request
                        elevation upon application start.
  --uac-uiaccess        Using this option allows an elevated application to
                        work with Remote Desktop.

Windows Side-by-side Assembly searching options (advanced):
  --win-private-assemblies
                        Any Shared Assemblies bundled into the application
                        will be changed into Private Assemblies. This means
                        the exact versions of these assemblies will always be
                        used, and any newer versions installed on user
                        machines at the system level will be ignored.
  --win-no-prefer-redirects
                        While searching for Shared or Private Assemblies to
                        bundle into the application, PyInstaller will prefer
                        not to follow policies that redirect to newer
                        versions, and will try to bundle the exact versions of
                        the assembly.

Mac OS specific options:
  --argv-emulation      Enable argv emulation for macOS app bundles. If
                        enabled, the initial open document/URL event is
                        processed by the bootloader and the passed file paths
                        or URLs are appended to sys.argv.
  --osx-bundle-identifier BUNDLE_IDENTIFIER
                        Mac OS .app bundle identifier is used as the default
                        unique program name for code signing purposes. The
                        usual form is a hierarchical name in reverse DNS
                        notation. For example:
                        com.mycompany.department.appname (default: first
                        script's basename)
  --target-architecture ARCH, --target-arch ARCH
                        Target architecture (macOS only; valid values: x86_64,
                        arm64, universal2). Enables switching between
                        universal2 and single-arch version of frozen
                        application (provided python installation supports the
                        target architecture). If not target architecture is
                        not specified, the current running architecture is
                        targeted.
  --codesign-identity IDENTITY
                        Code signing identity (macOS only). Use the provided
                        identity to sign collected binaries and generated
                        executable. If signing identity is not provided, ad-
                        hoc signing is performed instead.
  --osx-entitlements-file FILENAME
                        Entitlements file to use when code-signing the
                        collected binaries (macOS only).

Rarely used special options:
  --runtime-tmpdir PATH
                        Where to extract libraries and support files in
                        `onefile`-mode. If this option is given, the
                        bootloader will ignore any temp-folder location
                        defined by the run-time OS. The ``_MEIxxxxxx``-folder
                        will be created here. Please use this option only if
                        you know what you are doing.
  --bootloader-ignore-signals
                        Tell the bootloader to ignore signals rather than
                        forwarding them to the child process. Useful in
                        situations where for example a supervisor process
                        signals both the bootloader and the child (e.g., via a
                        process group) to avoid signalling the child twice.
2> 参数介绍
| 选项 | 说明 |
|---|---|
| -F | 打包一个exe文件 |
| -D | 打包多个文件,在dist中生成很多依赖文件 |
| -d | 产生debug版本的可执行文件 |
| -w | 程序启动不打开命令行 |
3> 打包.exe
pyinstaller.exe -F -w E:\Qt5_Env_Project\main_init.py
终端运行:pyinstaller.exe -F -w main.py。其中main.py是你的主程序入口,此时会生成main.spec文件。
终端运行:pyinstaller.exe -F -w main.spec。pyinstaller.exe 同级目录下 dist目录下出现exe文件,这个mian.exe文件就是我们需要的可执行程序。
五:pycharm-qt5-designer1
https://blog.csdn.net/weixin_42914706/article/details/127494463