文章目录
- 1、EnvironmentAware 接口作用
- 2、实际应用
- 3、代码演示
- 1)基本配置准备
- 2)增加属性配置文件 application.properties
- 3)增加配置类实现 EnvironmentAware 接口
- 4、编写 main 方法的类 SpringTest.java
- 5、运行 main 方法查看结果
1、EnvironmentAware 接口作用
EnvironmentAware 接口是 spring 的 context 包中的一个接口,实现该接口可以在 spring 框架启动过程中将指定属性文件中的内容加载进来(比如 *.properties)。
2、实际应用
平时我们 java 项目工程有很多属性文件配置的关键内容,比如redis ,mysql,nacos 等以 key-value 形式的配置文件,也有多种方式可以加载属性文件的内容,比如 Properties 类、其他自定义的类等。
今天介绍的 EnvironmentAware 接口,需要定义的类实现此接口,然后重写下面的方法就可以将配置文件内容在 spring 框架加载过程中加载进来:
public void setEnvironment(Environment environment)
3、代码演示
1)基本配置准备
就演示一个接口,我就直接采用 javaSE 中最简单的启动 main 方法进行了。
使用 eclipse 创建一个 java project,然后新建一个 lib 包,将 spring 相关的几个包引进来,因为要使用注解的形式,所以需要引进 aop 和 expression 的包,图示:
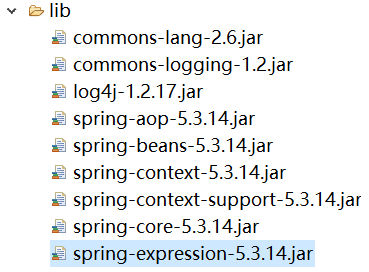
然后将 lib 下的包点击右键进行“build path” -> “add to build path” 中
2)增加属性配置文件 application.properties
这里我就新建一个 config 文件夹,然后新建 application.properties 文件,内容如下:
author_name1=taishangcode1
author_name2=taishangcode2
3)增加配置类实现 EnvironmentAware 接口
package com.taishangcode;

import org.springframework.context.EnvironmentAware;
import org.springframework.context.annotation.Configuration;
import org.springframework.context.annotation.PropertySource;
import org.springframework.core.env.Environment;

@Configuration
@PropertySource(encoding = "UTF-8",value = {"config/application.properties"})
public class CommonProperty implements EnvironmentAware {

	public String authorNname1 = "";
	public static String authorNname2 = "";

	@Override
	public void setEnvironment(Environment environment) {
		authorNname1 = environment.getProperty("author_name1", "");
		authorNname2 = environment.getProperty("author_name2", "");
		System.out.println("第 1 次获取到作者1的姓名是:"+authorNname1);
		System.out.println("第 1 次获取到作者2的姓名是:"+authorNname2);
	}

	public String getAuthorNname1() {
		return authorNname1;
	}
}
4、编写 main 方法的类 SpringTest.java
package com.taishangcode;

import org.springframework.context.annotation.AnnotationConfigApplicationContext;

public class SpringTest {
	@SuppressWarnings("resource")
	public static void main(String[] args) {
		System.out.println("[框架 spring 开始启动...]");
		AnnotationConfigApplicationContext ac = new AnnotationConfigApplicationContext(CommonProperty.class);
		System.out.println("[框架 spring 启动完毕!!!]");
		System.out.println("第 2 次获取到作者1的姓名是:"+ac.getEnvironment().getProperty("author_name1"));
		System.out.println("第 2 次获取到作者2的姓名是:"+ac.getEnvironment().getProperty("author_name2"));
		CommonProperty cp = new CommonProperty();
		System.out.println("第 3 次获取到作者1的姓名是:"+cp.getAuthorNname1());
		System.out.println("第 3 次获取到作者1的姓名是:"+CommonProperty.authorNname2);
	}
}
5、运行 main 方法查看结果
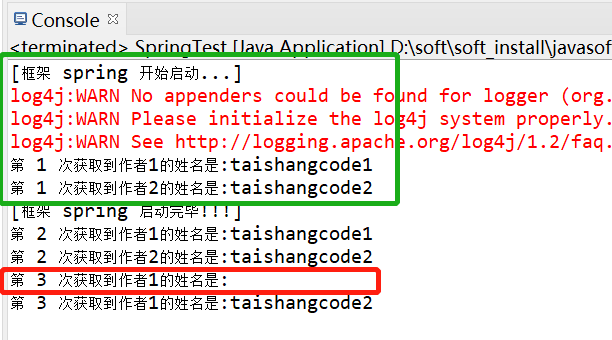
大家注意 3 种不同情况获取两个不同属性(一个定义为了静态属性)的结果情况。
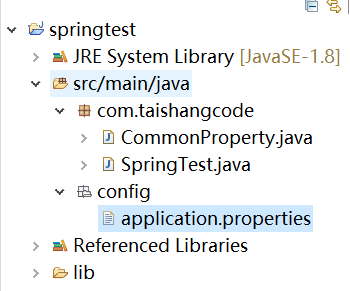
最后附上项目最终结构:






![写作历时一个月,长达8000字的年终总结——[2022年终总结]不要怕,请勇敢的向前走](https://img-blog.csdnimg.cn/img_convert/521792c93ed164bdb60b45bef8593c80.png)
