本文为《从零打造项目》系列第二篇文章,首发于个人网站。
《从零打造项目》系列文章
比MyBatis Generator更强大的代码生成器
SpringBoot项目基础设施搭建
前言
准确点说,这不是《从零打造项目》系列的第一篇文章,模版代码生成的那个项目讲解算是第一篇,当时就打算做一套项目脚手架,为后续进行项目练习做准备。因时间及个人经验问题,一直拖到现在才继续实施该计划,希望这次能顺利完成。
每个项目中都会有一些共用的代码,我们称之为项目的基础设施,随拿随用。本文主要介绍 SpringBoot 项目中的一些基础设施,后续还会详细介绍 SpringBoot 分别结合 Mybatis、MybatisPlus、JPA 这三种 ORM 框架进行项目搭建,加深大家对项目的掌握能力。
因内容篇幅过长,本来这些基础设施代码应该分布在未来的三篇文章中,被提取出来,专门写一篇文章来介绍。
SpringBoot项目基础代码
引入依赖
<parent>
  <groupId>org.springframework.boot</groupId>
  <artifactId>spring-boot-starter-parent</artifactId>
  <version>2.6.3</version>
</parent>

<properties>
  <java.version>1.8</java.version>
  <fastjson.version>1.2.73</fastjson.version>
  <hutool.version>5.5.1</hutool.version>
  <mysql.version>8.0.19</mysql.version>
  <mybatis.version>2.1.4</mybatis.version>
  <mapper.version>4.1.5</mapper.version>
  <org.mapstruct.version>1.4.2.Final</org.mapstruct.version>
  <org.projectlombok.version>1.18.20</org.projectlombok.version>
</properties>

<dependencies>
  <dependency>
    <groupId>org.springframework.boot</groupId>
    <artifactId>spring-boot-starter-web</artifactId>
  </dependency>
  <dependency>
    <groupId>org.springframework.boot</groupId>
    <artifactId>spring-boot-starter-aop</artifactId>
  </dependency>
  <dependency>
    <groupId>org.springframework.boot</groupId>
    <artifactId>spring-boot-starter-security</artifactId>
  </dependency>
  <dependency>
    <groupId>org.springframework.boot</groupId>
    <artifactId>spring-boot-starter-validation</artifactId>
  </dependency>
  <dependency>
    <groupId>com.alibaba</groupId>
    <artifactId>fastjson</artifactId>
    <version>${fastjson.version}</version>
  </dependency>
  <dependency>
    <groupId>cn.hutool</groupId>
    <artifactId>hutool-all</artifactId>
    <version>${hutool.version}</version>
  </dependency>
  <dependency>
    <groupId>org.projectlombok</groupId>
    <artifactId>lombok</artifactId>
    <version>${org.projectlombok.version}</version>
    <optional>true</optional>
  </dependency>
  <dependency>
    <groupId>org.springframework.boot</groupId>
    <artifactId>spring-boot-starter-test</artifactId>
    <scope>test</scope>
  </dependency>
  <dependency>
    <groupId>mysql</groupId>
    <artifactId>mysql-connector-java</artifactId>
    <version>${mysql.version}</version>
    <scope>runtime</scope>
  </dependency>
  <dependency>
    <groupId>org.springframework.data</groupId>
    <artifactId>spring-data-commons</artifactId>
    <version>2.4.6</version>
  </dependency>
  <dependency>
    <groupId>org.springdoc</groupId>
    <artifactId>springdoc-openapi-ui</artifactId>
    <version>1.6.9</version>
  </dependency>
  <dependency>
    <groupId>com.alibaba</groupId>
    <artifactId>druid-spring-boot-starter</artifactId>
    <version>1.1.18</version>
  </dependency>

  <dependency>
    <groupId>org.mapstruct</groupId>
    <artifactId>mapstruct</artifactId>
    <version>${org.mapstruct.version}</version>
  </dependency>
  <dependency>
    <groupId>org.mapstruct</groupId>
    <artifactId>mapstruct-processor</artifactId>
    <version>${org.mapstruct.version}</version>
  </dependency>
</dependencies>

<build>
  <plugins>
    <plugin>
      <groupId>org.springframework.boot</groupId>
      <artifactId>spring-boot-maven-plugin</artifactId>
    </plugin>
  </plugins>
</build>
有些依赖不一定是最新版本,而且你看到这篇文章时,可能已经发布了新版本,到时候可以先模仿着将项目跑起来后,再根据自己的需求来升级各项依赖,有问题咱再解决问题。
日志请求切面
项目进入联调阶段,服务层的接口需要和协议层进行交互,协议层需要将入参[json字符串]组装成服务层所需的 json 字符串,组装的过程中很容易出错。入参出错导致接口调试失败问题在联调中出现很多次,因此就想写一个请求日志切面把入参信息打印一下,同时协议层调用服务层接口名称对不上也出现了几次,通过请求日志切面就可以知道上层是否有没有发起调用,方便前后端甩锅还能拿出证据。
首先定义一个请求日志类,记录一些关键信息。
@Data
@EqualsAndHashCode(callSuper = false)
public class RequestLog {

  // 请求ip
  private String ip;
  // 访问url
  private String url;
  // 请求类型
  private String httpMethod;
  // 请求方法名(绝对路径)
  private String classMethod;
  // 请求方法描述
  private String methodDesc;
  // 请求参数
  private Object requestParams;
  // 返回结果
  private Object result;
  // 操作时间
  private Long operateTime;
  // 消耗时间
  private Long timeCost;
  // 错误信息
  private JSONObject errorMessage;
}
然后根据 @Aspect 实现日志切面记录
@Component
@Aspect
@Slf4j
public class RequestLogAspect {

  @Pointcut("execution(* com.msdn.orm.hresh.controller..*(..))")
  public void requestServer() {
  }

  @Around("requestServer()")
  public Object doAround(ProceedingJoinPoint proceedingJoinPoint) throws Throwable {
    long start = System.currentTimeMillis();
    //获取当前请求对象
    RequestLog requestLog = getRequestLog();

    Object result = proceedingJoinPoint.proceed();
    Signature signature = proceedingJoinPoint.getSignature();
    // 请求方法名(绝对路径)
    requestLog.setClassMethod(String.format("%s.%s", signature.getDeclaringTypeName(),
        signature.getName()));
    // 请求参数
    requestLog.setRequestParams(getRequestParamsByProceedingJoinPoint(proceedingJoinPoint));
    // 返回结果
    requestLog.setResult(result);
    // 如果返回结果不为null,则从返回结果中剔除返回数据,查看条目数、返回状态和返回信息等
    if (!ObjectUtils.isEmpty(result)) {
      JSONObject jsonObject = JSONUtil.parseObj(result);
      Object data = jsonObject.get("data");
      if (!ObjectUtils.isEmpty(data) && data.toString().length() > 200) {
        // 减少日志记录量,比如大量查询结果,没必要记录
        jsonObject.remove("data");
        requestLog.setResult(jsonObject);
      }
    }

    // 获取请求方法的描述注解信息
    MethodSignature methodSignature = (MethodSignature) signature;
    Method method = methodSignature.getMethod();
    if (method.isAnnotationPresent(Operation.class)) {
      Operation methodAnnotation = method.getAnnotation(Operation.class);
      requestLog.setMethodDesc(methodAnnotation.description());
    }
    // 消耗时间
    requestLog.setTimeCost(System.currentTimeMillis() - start);

    log.info("Request Info      : {}", JSONUtil.toJsonStr(requestLog));
    return result;
  }

  @AfterThrowing(pointcut = "requestServer()", throwing = "e")
  public void doAfterThrow(JoinPoint joinPoint, RuntimeException e) {
    try {
      RequestLog requestLog = getRequestLog();

      Signature signature = joinPoint.getSignature();
      // 请求方法名(绝对路径)
      requestLog.setClassMethod(String.format("%s.%s", signature.getDeclaringTypeName(),
          signature.getName()));
      // 请求参数
      requestLog.setRequestParams(getRequestParamsByJoinPoint(joinPoint));
      StackTraceElement[] stackTrace = e.getStackTrace();
      // 将异常信息转换成json
      JSONObject jsonObject = new JSONObject();
      if (!ObjectUtils.isEmpty(stackTrace)) {
        StackTraceElement stackTraceElement = stackTrace[0];
        jsonObject = JSONUtil.parseObj(JSONUtil.toJsonStr(stackTraceElement));
        // 转换成json
        jsonObject.set("errorContent", e.getMessage());
        jsonObject.set("createTime", DateUtil.date());
        jsonObject.setDateFormat(DatePattern.NORM_DATETIME_PATTERN);
        jsonObject.set("messageId", IdUtil.fastSimpleUUID());
        // 获取IP地址
        jsonObject.set("serverIp", NetUtil.getLocalhostStr());
      }
      requestLog.setErrorMessage(jsonObject);
      log.error("Error Request Info      : {}", JSONUtil.toJsonStr(requestLog));
    } catch (Exception exception) {
      log.error(exception.getMessage());
    }
  }

  private RequestLog getRequestLog() {
    //获取当前请求对象
    ServletRequestAttributes attributes = (ServletRequestAttributes) RequestContextHolder
        .getRequestAttributes();
    // 记录请求信息(通过Logstash传入Elasticsearch)
    RequestLog requestLog = new RequestLog();
    if (!ObjectUtils.isEmpty(attributes) && !ObjectUtils.isEmpty(attributes.getRequest())) {
      HttpServletRequest request = attributes.getRequest();
      // 请求ip
      requestLog.setIp(request.getRemoteAddr());
      // 访问url
      requestLog.setUrl(request.getRequestURL().toString());
      // 请求类型
      requestLog.setHttpMethod(request.getMethod());
    }
    return requestLog;
  }

  /**
   * 根据方法和传入的参数获取请求参数
   *
   * @param proceedingJoinPoint 入参
   * @return 返回
   */
  private Map<String, Object> getRequestParamsByProceedingJoinPoint(
      ProceedingJoinPoint proceedingJoinPoint) {
    //参数名
    String[] paramNames = ((MethodSignature) proceedingJoinPoint.getSignature())
        .getParameterNames();
    //参数值
    Object[] paramValues = proceedingJoinPoint.getArgs();

    return buildRequestParam(paramNames, paramValues);
  }

  private Map<String, Object> getRequestParamsByJoinPoint(JoinPoint joinPoint) {
    try {
      //参数名
      String[] paramNames = ((MethodSignature) joinPoint.getSignature()).getParameterNames();
      //参数值
      Object[] paramValues = joinPoint.getArgs();

      return buildRequestParam(paramNames, paramValues);
    } catch (Exception e) {
      return new HashMap<>();
    }
  }

  private Map<String, Object> buildRequestParam(String[] paramNames, Object[] paramValues) {
    try {
      Map<String, Object> requestParams = new HashMap<>(paramNames.length);
      for (int i = 0; i < paramNames.length; i++) {
        Object value = paramValues[i];

        //如果是文件对象
        if (value instanceof MultipartFile) {
          MultipartFile file = (MultipartFile) value;
          //获取文件名
          value = file.getOriginalFilename();
        }

        requestParams.put(paramNames[i], value);
      }

      return requestParams;
    } catch (Exception e) {
      return new HashMap<>(1);
    }
  }
}
上述切面是在执行 Controller 方法时,打印出调用方IP、请求URL、HTTP 请求类型、调用的方法名、耗时等。
除了上述这种形式进行日志记录,还可以自定义注解,
@Target({ElementType.PARAMETER, ElementType.METHOD})//作用于参数或方法上
@Retention(RetentionPolicy.RUNTIME)
@Documented
public @interface SystemLog {

  /**
         * 日志描述
         * @return
         */
  String description() default "";

}
具体使用为:
@GetMapping(value = "/queryPage")
@Operation(description = "获取用户分页列表")
@SystemLog(description = "获取用户分页列表")
public Result<PageResult<UserVO>> queryPage(
  @RequestBody UserQueryPageDTO dto) {
  Page<UserVO> userVOPage = userService.queryPage(dto);
  return Result.ok(PageResult.ok(userVOPage));
}
我们只需要修改一下 RequestLogAspect 文件中的 requestServer()方法
  @Pointcut("@annotation(com.xxx.annotation.SystemLog)")
  public void requestServer() {
  }
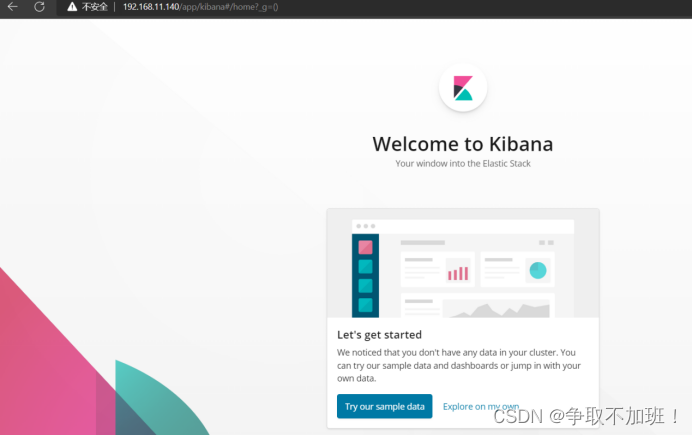
除了方便前后端排查问题,健壮的项目还会做日志分析,这里介绍一种我了解的日志分析系统——ELK(ELasticsearch+Logstash+Kibana),在 RequestLogAspect 文件中可以将日志信息输出到 ELK 上,本项目不做过多介绍。
除了日志分析,还有一种玩法,如果项目比较复杂,比如说分布式项目,微服务个数过多,一次请求往往需要涉及到多个服务,这样一来,调用链路就会很复杂,一旦出现故障,如何快速定位问题需要考虑。一种解决方案就是在日志记录时增加一个 traceId 字段,一条调用链路上的 traceId 是相同。
全局异常
在日常项目开发中,异常是常见的,虽然 SpringBoot 对于异常有自己的处理方案,但是对于开发人员不够友好。我们想要友好地抛出异常,针对运行时异常,想要一套全局异常捕获手段。因此如何处理好异常信息,对我们后续开发至关重要。
关于全局异常处理,可以参考这篇文章。
1、定义基础接口类
public interface IError {
    /**
     * 错误码
     */
    String getResultCode();

    /**
     * 错误描述
     */
    String getResultMsg();
}
2、异常枚举类
public enum ExceptionEnum implements IError {
    // 数据操作状态码和提示信息定义
    SUCCESS("200", "操作成功"),
    VALIDATE_FAILED("400", "参数检验失败"),
    NOT_FOUND("404", "参数检验失败"),
    UNAUTHORIZED("401", "暂未登录或token已经过期"),
    FORBIDDEN("403", "没有相关权限"),
    REQUEST_TIME_OUT("408", "请求时间超时"),
    INTERNAL_SERVER_ERROR("500", "服务器内部错误!"),
    SERVER_BUSY("503", "服务器正忙,请稍后再试!");
    /**
     * 错误码
     */
    private String resultCode;

    /**
     * 错误描述
     */
    private String resultMsg;

    private ExceptionEnum(String resultCode, String resultMsg) {
        this.resultCode = resultCode;
        this.resultMsg = resultMsg;
    }


    @Override
    public String getResultCode() {
        return resultCode;
    }

    @Override
    public String getResultMsg() {
        return resultMsg;
    }
}
3、自定义业务异常类
public class BusinessException extends RuntimeException {

  /**
   * 错误码
   */
  private String errorCode;

  /**
   * 错误描述
   */
  private String errorMsg;

  public BusinessException() {
    super();
  }

  public BusinessException(IError error) {
    super(error.getResultCode());
    this.errorCode = error.getResultCode();
    this.errorMsg = error.getResultMsg();
  }

  public BusinessException(IError error, Throwable cause) {
    super(error.getResultCode(), cause);
    this.errorCode = error.getResultCode();
    this.errorMsg = error.getResultMsg();
  }

  public BusinessException(String message) {
    super(message);
  }

  public BusinessException(String errorCode, String errorMsg) {
    super(errorCode);
    this.errorCode = errorCode;
    this.errorMsg = errorMsg;
  }

  public BusinessException(String errorCode, String errorMsg, Throwable cause) {
    super(errorCode, cause);
    this.errorCode = errorCode;
    this.errorMsg = errorMsg;
  }

  public BusinessException(Throwable cause) {
    super(cause);
  }

  public BusinessException(String message, Throwable cause) {
    super(message, cause);
  }

  public static void validateFailed(String message) {
    throw new BusinessException(ExceptionEnum.VALIDATE_FAILED.getResultCode(), message);
  }

  public static void fail(String message) {
    throw new BusinessException(message);
  }

  public static void fail(IError error) {
    throw new BusinessException(error);
  }

  public static void fail(String errorCode, String errorMsg) {
    throw new BusinessException(errorCode, errorMsg);
  }
}
4、全局异常处理类
@ControllerAdvice
@Slf4j
public class GlobalExceptionHandler {

  /**
   * 处理自定义的api异常
   *
   * @param e
   * @return
   */
  @ResponseBody
  @ExceptionHandler(value = BusinessException.class)
  public Result handle(BusinessException e) {
    if (Objects.nonNull(e.getErrorCode())) {
      log.error("发生业务异常!原因是:{}", e.getErrorMsg());
      return Result.failed(e.getErrorCode(), e.getErrorMsg());
    }
    return Result.failed(e.getMessage());
  }

  /**
   * 处理参数验证失败异常 基于json格式的数据传递,这种传递才会抛出MethodArgumentNotValidException异常
   *
   * @param e
   * @return
   */
  @ResponseBody
  @ExceptionHandler(value = MethodArgumentNotValidException.class)
  public Result handleValidException(MethodArgumentNotValidException e) {
    BindingResult bindingResult = e.getBindingResult();
    String message = null;
    if (bindingResult.hasErrors()) {
      FieldError fieldError = bindingResult.getFieldError();
      if (Objects.nonNull(fieldError)) {
        message = fieldError.getField() + fieldError.getDefaultMessage();
      }
    }
    return Result.validateFailed(message);
  }

  /**
   * 使用@Validated 来校验 JavaBean的参数,比如@NotNull、@NotBlank等等; post 请求数据传递有两种方式,一种是基于form-data格式的数据传递,这种传递才会抛出BindException异常
   *
   * @param e
   * @return
   */
  @ResponseBody
  @ExceptionHandler(value = BindException.class)
  public Result handleValidException(BindException e) {
    BindingResult bindingResult = e.getBindingResult();
    String message = null;
    if (bindingResult.hasErrors()) {
      FieldError fieldError = bindingResult.getFieldError();
      if (fieldError != null) {
        message = fieldError.getField() + fieldError.getDefaultMessage();
      }
    }
    return Result.validateFailed(message);
  }
}
统一返回格式
目前比较流行的是基于 json 格式的数据交互。但是 json 只是消息的格式,其中的内容还需要我们自行设计。不管是 HTTP 接口还是 RPC 接口保持返回值格式统一很重要,这将大大降低 client 的开发成本。
定义返回值四要素
-
boolean success ;是否成功。
-
T data ;成功时具体返回值,失败时为 null 。
-
String code ;成功时返回 200 ,失败时返回具体错误码。
-
String message ;成功时返回 null ,失败时返回具体错误消息。
返回对象中会处理分页结果,普通的查询结果,异常等信息。
@Data
@NoArgsConstructor
public class Result<T> implements Serializable {

  private T data;
  private String code;
  private String message;
  private boolean success;

  protected Result(String code, String message, T data) {
    this.code = code;
    this.message = message;
    this.data = data;
    this.success = true;
  }

  protected Result(String code, String message, T data, boolean success) {
    this(code, message, data);
    this.success = success;
  }

  public static <T> Result<T> ok() {
    return ok((T) null);
  }

  /**
   * 成功返回结果
   *
   * @param data 获取的数据
   * @return
   */
  public static <T> Result<T> ok(T data) {
    return new Result<>(ExceptionEnum.SUCCESS.getResultCode(),
        ExceptionEnum.SUCCESS.getResultMsg(), data);
  }

  /**
   * 成功返回list结果
   *
   * @param list 获取的数据
   * @return
   */
  public static <T> Result<List<T>> ok(List<T> list) {
    Result<List<T>> listResult = new Result<>(ExceptionEnum.SUCCESS.getResultCode(),
        ExceptionEnum.SUCCESS.getResultMsg(), list);
    return listResult;
  }

  /**
   * 成功返回结果
   *
   * @param data    获取的数据
   * @param message 提示信息
   */
  public static <T> Result<T> ok(T data, String message) {
    return new Result<>(ExceptionEnum.SUCCESS.getResultCode(), message, data);
  }

  /**
   * 失败返回结果
   *
   * @param error 错误码
   */
  public static <T> Result<T> failed(IError error) {
    return new Result<>(error.getResultCode(), error.getResultMsg(), null, false);
  }

  /**
   * 失败返回结果
   *
   * @param error   错误码
   * @param message 错误信息
   */
  public static <T> Result<T> failed(IError error, String message) {
    return new Result<>(error.getResultCode(), message, null, false);
  }

  /**
   * 失败返回结果
   *
   * @param errorCode 错误码
   * @param message   错误信息
   */
  public static <T> Result<T> failed(String errorCode, String message) {
    return new Result<>(errorCode, message, null, false);
  }

  /**
   * 失败返回结果
   *
   * @param message 提示信息
   */
  public static <T> Result<T> failed(String message) {
    return new Result<>(ExceptionEnum.INTERNAL_SERVER_ERROR.getResultCode(), message, null, false);
  }

  /**
   * 失败返回结果
   */
  public static <T> Result<T> failed() {
    return failed(ExceptionEnum.INTERNAL_SERVER_ERROR);
  }

  /**
   * 参数验证失败返回结果
   */
  public static <T> Result<T> validateFailed() {
    return failed(ExceptionEnum.VALIDATE_FAILED);
  }

  /**
   * 参数验证失败返回结果
   *
   * @param message 提示信息
   */
  public static <T> Result<T> validateFailed(String message) {
    return new Result<>(ExceptionEnum.VALIDATE_FAILED.getResultCode(), message, null, false);
  }

  /**
   * 未登录返回结果
   */
  public static <T> Result<T> unauthorized(T data) {
    return new Result<>(ExceptionEnum.UNAUTHORIZED.getResultCode(),
        ExceptionEnum.UNAUTHORIZED.getResultMsg(), data, false);
  }

  /**
   * 未授权返回结果
   */
  public static <T> Result<T> forbidden(T data) {
    return new Result<>(ExceptionEnum.FORBIDDEN.getResultCode(),
        ExceptionEnum.FORBIDDEN.getResultMsg(), data, false);
  }

  @Override
  public String toString() {
    return toJSONString(this);
  }
}
对象类型转换
在项目中,尤其是在服务层,经常要将服务中的 Dto 实体对象转换为 Entity 对象,以及将 Entity 对象转换为 VO 对象返回给前端展示。现在市面上有很多这样的工具包,比如 Spring 框架中就自带了 BeanUtils,使我们进行这样的数据操作十分简单快捷,但当数据量级特别大时,存在性能问题。因此我们要选择一款优秀的工具——Mapstruct。
关于 Mapstruct 的介绍以及其他对象转换工具,可以参考这两篇文章:Apache的BeanUtils、Spring的BeanUtils、Mapstruct、BeanCopier对象拷贝 和 MapStruct 才是王者
定义如下对象类型转换文件:
@Mapper(componentModel = "spring")
public interface UserStruct {

    @Mapping(target = "jobVOS",source = "jobs")
    UserVO modelToVO(User record);

    @Mapping(target = "jobVOS",source = "jobs")
    List<UserVO> modelToVO(List<User> records);

    User voToModel(UserVO record);

    List<User> voToModel(List<UserVO> records);

    UserDTO modelToDTO(User record);

    List<UserDTO> modelToDTO(List<User> records);

    User dtoToModel(UserDTO record);

    List<User> dtoToModel(List<UserDTO> records);
}
如果对象中的属性名不同,可以使用 @Mapping 注解进行声明,自动生成的 UserStructImpl.class 如下所示,这里只展示部分代码。
@Component
public class UserStructImpl implements UserStruct {

  @Override
  public UserVO modelToVO(User record) {
    if ( record == null ) {
      return null;
    }

    UserVO userVO = new UserVO();

    userVO.setJobVOS( jobListToJobVOList( record.getJobs() ) );
    userVO.setName( record.getName() );
    userVO.setAge( record.getAge() );
    userVO.setAddress( record.getAddress() );

    return userVO;
  }

  protected JobVO jobToJobVO(Job job) {
    if ( job == null ) {
      return null;
    }

    JobVO jobVO = new JobVO();

    jobVO.setName( job.getName() );
    jobVO.setAddress( job.getAddress() );

    return jobVO;
  }

  protected List<JobVO> jobListToJobVOList(List<Job> list) {
    if ( list == null ) {
      return null;
    }

    List<JobVO> list1 = new ArrayList<JobVO>( list.size() );
    for ( Job job : list ) {
      list1.add( jobToJobVO( job ) );
    }

    return list1;
  }

  //.......
}
分组校验和自定义校验
@Validation是一套帮助我们继续对传输的参数进行数据校验的注解,通过配置 Validation 可以很轻松的完成对数据的约束。
@Validated作用在类、方法和参数上
@Target({ElementType.TYPE, ElementType.METHOD, ElementType.PARAMETER})
@Retention(RetentionPolicy.RUNTIME)
@Documented
public @interface Validated {
    Class<?>[] value() default {};
}
在项目中我们可能会遇到这样的场景:新增数据时某些字段需要进行判空校验,而修改数据时又需要校验另外一些字段,而且都是用同一个对象来封装这些字段,为了便于管理及代码的优雅,我们决定引入分组校验。
创建分组,区分新增和编辑以及其它情况下的参数校验。
public interface ValidateGroup {

  /**
   * 新增
   */
  interface Add extends Default {

  }

  /**
   * 删除
   */
  interface Delete {

  }

  /**
   * 编辑
   */
  interface Edit extends Default {

  }
}
除了分组校验,validation 还允许我们自定义校验器。
@Documented
@Retention(RetentionPolicy.RUNTIME)
@Target({ElementType.FIELD, ElementType.PARAMETER})
@Constraint(validatedBy = EnumValidatorClass.class)
public @interface EnumValidator {

  String[] value() default {};

  boolean required() default true;

  // 校验枚举值不存在时的报错信息
  String message() default "enum is not found";

  //将validator进行分类,不同的类group中会执行不同的validator操作
  Class<?>[] groups() default {};

  //主要是针对bean,很少使用
  Class<? extends Payload>[] payload() default {};
}
其中 EnumValidatorClass 类主要是为了校验 EnumValidator 注解的,代码如下:
public class EnumValidatorClass implements ConstraintValidator<EnumValidator, Integer> {

  private String[] values;

  @Override
  public void initialize(EnumValidator enumValidator) {
    this.values = enumValidator.value();
  }

  @Override
  public boolean isValid(Integer value, ConstraintValidatorContext constraintValidatorContext) {
    boolean isValid = false;
    if (value == null) {
      //当状态为空时使用默认值
      return true;
    }
    for (int i = 0; i < values.length; i++) {
      if (values[i].equals(String.valueOf(value))) {
        isValid = true;
        break;
      }
    }
    return isValid;
  }
}
后续项目实践过程中会演示具体使用。
Liquibase
Liquibase 是一个用于跟踪、管理和应用数据库变化的开源的数据库重构工具。它将所有数据库的变化(包括结构和数据)都保存在 changelog 文件中,便于版本控制,它的目标是提供一种数据库类型无关的解决方案,通过执行 schema 类型的文件来达到迁移。
目标:
Liquibase 实施端到端CI / CD要求将所有代码(包括数据库代码)检入版本控制系统,并作为软件发布过程的一部分进行部署。
关于 Liquibase 的学习这里就不过多介绍了,推荐阅读这篇文章,我们直接进入应用环节。
1、引入依赖
<dependency>
  <groupId>org.liquibase</groupId>
  <artifactId>liquibase-core</artifactId>
  <version>4.16.1</version>
</dependency>
2、application.yml 配置
spring:
  liquibase:
    enabled: true
    change-log: classpath:liquibase/master.xml
    # 记录版本日志表
    database-change-log-table: databasechangelog
    # 记录版本改变lock表
    database-change-log-lock-table: databasechangeloglock
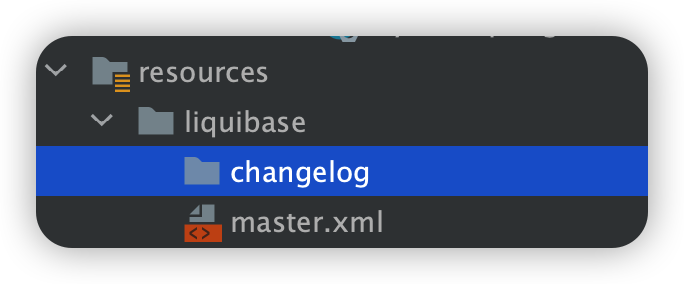
3、resource 目录下新建 master.xml 和 changelog 目录
<?xml version="1.0" encoding="UTF-8"?>
<databaseChangeLog xmlns="http://www.liquibase.org/xml/ns/dbchangelog"
                   xmlns:xsi="http://www.w3.org/2001/XMLSchema-instance"
                   xsi:schemaLocation="http://www.liquibase.org/xml/ns/dbchangelog http://www.liquibase.org/xml/ns/dbchangelog/dbchangelog-3.8.xsd">

  <includeAll path="src/main/resources/liquibase/changelog"/>

</databaseChangeLog>
4、运行项目,数据库中会生成如下两张表:
- DATABASECHANGELOG 表
- DATABASECHANGELOGLOCK表
因为 yaml 文件中的配置,实际生成的表名为小写格式。
接下来该研究如何使用 liquibase 了,如果项目所连接的数据库中目前没有一个表,那么你可以在网上找一下 changeset 的书写格式,然后模仿着来建表。如果数据库中有表,可以先执行 liquibase:generateChangeLog 命令,生成一份现有表的建表语句,文件输出路径既可以在 yaml 文件中添加,然后在 pom 文件中读取 yaml 文件;也可以直接在 pom 文件中添加。
#输出文件路径配置
outputChangeLogFile: src/main/resources/liquibase/out/out.xml
pom.xml
<plugin>
  <groupId>org.liquibase</groupId>
  <artifactId>liquibase-maven-plugin</artifactId>
  <version>4.16.1</version>
  <configuration>
    <!--properties文件路径,该文件记录了数据库连接信息等-->
    <propertyFile>src/main/resources/application.yml</propertyFile>
    <propertyFileWillOverride>true</propertyFileWillOverride>
    <!--生成文件的路径-->
    <!--          <outputChangeLogFile>src/main/resources/liquibase/out/out.xml</outputChangeLogFile>-
  </configuration>
</plugin>
如果之后想要添加新表,则只需要在 liquibase/changelog 目录下新建好对应的 xml 文件,比如这个:
<?xml version="1.1" encoding="UTF-8" standalone="no"?>
<databaseChangeLog xmlns="http://www.liquibase.org/xml/ns/dbchangelog"
  xmlns:ext="http://www.liquibase.org/xml/ns/dbchangelog-ext"
  xmlns:pro="http://www.liquibase.org/xml/ns/pro"
  xmlns:xsi="http://www.w3.org/2001/XMLSchema-instance"
  xsi:schemaLocation="http://www.liquibase.org/xml/ns/dbchangelog-ext http://www.liquibase.org/xml/ns/dbchangelog/dbchangelog-ext.xsd http://www.liquibase.org/xml/ns/pro http://www.liquibase.org/xml/ns/pro/liquibase-pro-latest.xsd http://www.liquibase.org/xml/ns/dbchangelog http://www.liquibase.org/xml/ns/dbchangelog/dbchangelog-latest.xsd">
  <changeSet author="hresh" id="1664204549485-7">
    <createTable remarks="用户" tableName="user">
      <column name="id" type="VARCHAR(36)">
        <constraints nullable="false" primaryKey="true"/>
      </column>
      <column name="name" type="VARCHAR(20)">
        <constraints unique="true"/>
      </column>
      <column name="age" type="INT"/>
      <column name="address" type="VARCHAR(100)"/>
      <column name="created_date" type="timestamp"/>
      <column name="last_modified_date" type="timestamp"/>
      <column defaultValueBoolean="false" name="del_flag" type="BIT(1)">
        <constraints nullable="false"/>
      </column>
      <column name="create_user_code" type="VARCHAR(36)"/>
      <column name="create_user_name" type="VARCHAR(50)"/>
      <column name="last_modified_code" type="VARCHAR(36)"/>
      <column name="last_modified_name" type="VARCHAR(50)"/>
      <column defaultValueNumeric="1" name="version" type="INT">
        <constraints nullable="false"/>
      </column>
    </createTable>
  </changeSet>
</databaseChangeLog>
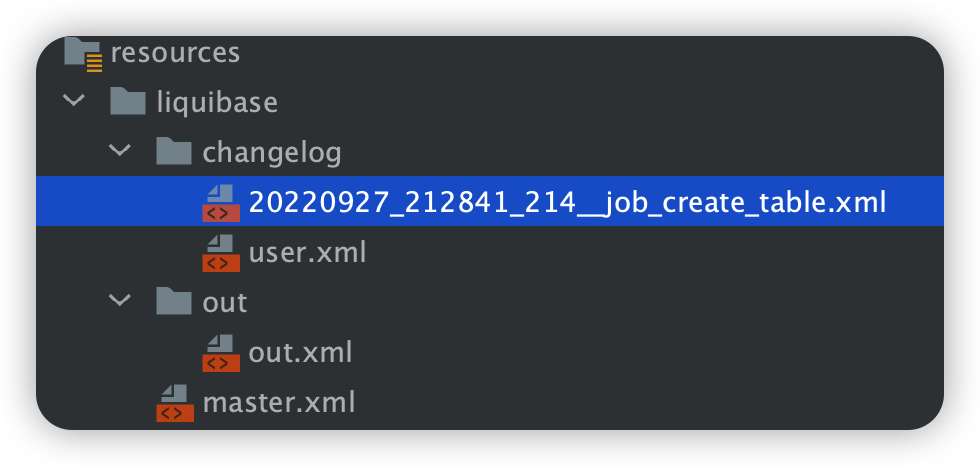
目前项目 resource 目录结构如下:
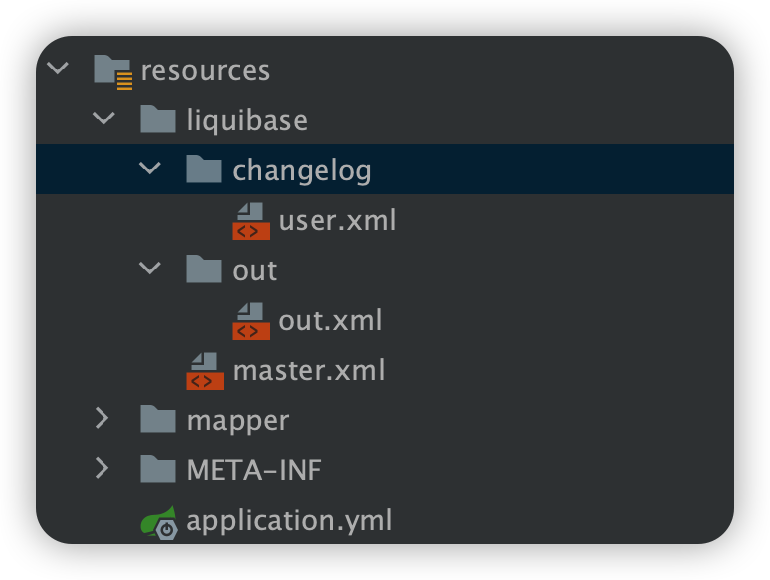
只需要运行该项目,就会处理 user.xml 中的 changeSet,并在数据库中生成 user 表,并且在 databasechangelog 中插入一条记录,重复运行项目时,会判断 changeSetId 避免重复插入。
为了更好的使用 liquibase,比如说通过命令行来生成一个 changelog 模版,最好能记录下创建时间,然后我们只需要修改里面的内容即可。
为了满足该需求,则需要自定义自定义 Maven 插件。
自定义Maven插件
创建一个 maven 项目 liquibase-changelog-generate,本项目具备生成 xml 和 yaml 两种格式的 changelog,个人觉得 yaml 格式的 changelog 可读性更高。
1、定义一个接口,提前准备好公用代码,主要是判断 changelog id 是否有非法字符,并且生成 changelog name。
public interface LiquibaseChangeLog {

  default String getChangeLogFileName(String sourceFolderPath) {
    System.out.println("> Please enter the id of this change:");
    Scanner scanner = new Scanner(System.in);
    String changeId = scanner.nextLine();
    if (StrUtil.isBlank(changeId)) {
      return null;
    }

    String changeIdPattern = "^[a-z][a-z0-9_]*$";
    Pattern pattern = Pattern.compile(changeIdPattern);
    Matcher matcher = pattern.matcher(changeId);
    if (!matcher.find()) {
      System.out.println("Change id should match " + changeIdPattern);
      return null;
    }

    if (isExistedChangeId(changeId, sourceFolderPath)) {
      System.out.println("Duplicate change id :" + changeId);
      return null;
    }

    Date now = new Date();
    String timestamp = DateUtil.format(now, "yyyyMMdd_HHmmss_SSS");
    return timestamp + "__" + changeId;
  }

  default boolean isExistedChangeId(String changeId, String sourceFolderPath) {
    File file = new File(sourceFolderPath);
    File[] files = file.listFiles();
    if (null == files) {
      return false;
    }

    for (File f : files) {
      if (f.isFile()) {
        if (f.getName().contains(changeId)) {
          return true;
        }
      }
    }
    return false;
  }
}
2、每个 changelog 文件中的 changeSet 都有一个 author 属性,用来标注是谁创建的 changelog,目前我的做法是执行终端命令来获取 git 的 userName,如果有更好的实现,望不吝赐教。
public class GitUtil {

  public static String getGitUserName() {
    try {
      String cmd = "git config user.name";
      Process p = Runtime.getRuntime().exec(cmd);
      InputStream is = p.getInputStream();
      BufferedReader reader = new BufferedReader(new InputStreamReader(is));
      String line = reader.readLine();
      p.waitFor();
      is.close();
      reader.close();
      p.destroy();
      return line;
    } catch (IOException | InterruptedException e) {
      e.printStackTrace();
    }
    return "hresh";
  }
}
3、生成 xml 格式的 changelog
@Mojo(name = "generateModelChangeXml", defaultPhase = LifecyclePhase.PACKAGE)
public class LiquibaseChangeLogXml extends AbstractMojo implements LiquibaseChangeLog {

  // 配置的是本maven插件的配置,在pom使用configration标签进行配置 property就是名字,
  // 在配置里面的标签名字。在调用该插件的时候会看到
  @Parameter(property = "sourceFolderPath")
  private String sourceFolderPath;

  @Override
  public void execute() throws MojoExecutionException, MojoFailureException {
    System.out.println("Create a new empty model changelog in liquibase yaml file.");
    String userName = GitUtil.getGitUserName();

    String changeLogFileName = getChangeLogFileName(sourceFolderPath);
    if (StrUtil.isNotBlank(changeLogFileName)) {
      generateXmlChangeLog(changeLogFileName, userName);
    }
  }

  private void generateXmlChangeLog(String changeLogFileName, String userName) {
    String changeLogFileFullName = changeLogFileName + ".xml";
    File file = new File(sourceFolderPath, changeLogFileFullName);
    String content = "<?xml version=\"1.1\" encoding=\"UTF-8\" standalone=\"no\"?>\n"
        + "<databaseChangeLog xmlns=\"http://www.liquibase.org/xml/ns/dbchangelog\"\n"
        + "  xmlns:ext=\"http://www.liquibase.org/xml/ns/dbchangelog-ext\"\n"
        + "  xmlns:pro=\"http://www.liquibase.org/xml/ns/pro\"\n"
        + "  xmlns:xsi=\"http://www.w3.org/2001/XMLSchema-instance\"\n"
        + "  xsi:schemaLocation=\"http://www.liquibase.org/xml/ns/dbchangelog-ext http://www.liquibase.org/xml/ns/dbchangelog/dbchangelog-ext.xsd http://www.liquibase.org/xml/ns/pro http://www.liquibase.org/xml/ns/pro/liquibase-pro-latest.xsd http://www.liquibase.org/xml/ns/dbchangelog http://www.liquibase.org/xml/ns/dbchangelog/dbchangelog-latest.xsd\">\n"
        + "  <changeSet author=\" " + userName + "\" id=\"" + changeLogFileName + "\">\n"
        + "  </changeSet>\n"
        + "</databaseChangeLog>";
    try {
      FileWriter fw = new FileWriter(file.getAbsoluteFile());
      BufferedWriter bw = new BufferedWriter(fw);
      bw.write(content);
      bw.close();
      fw.close();
    } catch (IOException e) {
      e.printStackTrace();
    }
  }

}
4、生成 yaml 格式的 changelog
@Mojo(name = "generateModelChangeYaml", defaultPhase = LifecyclePhase.PACKAGE)
public class LiquibaseChangeLogYaml extends AbstractMojo implements LiquibaseChangeLog {

  // 配置的是本maven插件的配置,在pom使用configration标签进行配置 property就是名字,
  // 在配置里面的标签名字。在调用该插件的时候会看到
  @Parameter(property = "sourceFolderPath")
  private String sourceFolderPath;

  @Override
  public void execute() throws MojoExecutionException, MojoFailureException {
    System.out.println("Create a new empty model changelog in liquibase yaml file.");
    String userName = GitUtil.getGitUserName();

    String changeLogFileName = getChangeLogFileName(sourceFolderPath);
    if (StrUtil.isNotBlank(changeLogFileName)) {
      generateYamlChangeLog(changeLogFileName, userName);
    }
  }

  private void generateYamlChangeLog(String changeLogFileName, String userName) {
    String changeLogFileFullName = changeLogFileName + ".yml";
    File file = new File(sourceFolderPath, changeLogFileFullName);
    String content = "databaseChangeLog:\n"
        + "  - changeSet:\n"
        + "      id: " + changeLogFileName + "\n"
        + "      author: " + userName + "\n"
        + "      changes:";
    try {
      FileWriter fw = new FileWriter(file.getAbsoluteFile());
      BufferedWriter bw = new BufferedWriter(fw);
      bw.write(content);
      bw.close();
      fw.close();
    } catch (IOException e) {
      e.printStackTrace();
    }
  }

}
5、执行 mvn install 命令,然后会在 maven 的 repository 文件中生成对应的 jar 包。
6、在 mybatis-springboot 引入 liquibase-changelog-generate
<plugin>
  <groupId>com.msdn.hresh</groupId>
  <artifactId>liquibase-changelog-generate</artifactId>
  <version>1.0-SNAPSHOT</version>
  <configuration>
    <sourceFolderPath>src/main/resources/liquibase/changelog/
    </sourceFolderPath><!-- 当前应用根目录 -->
  </configuration>
</plugin>
7、点击如下任意一个命令
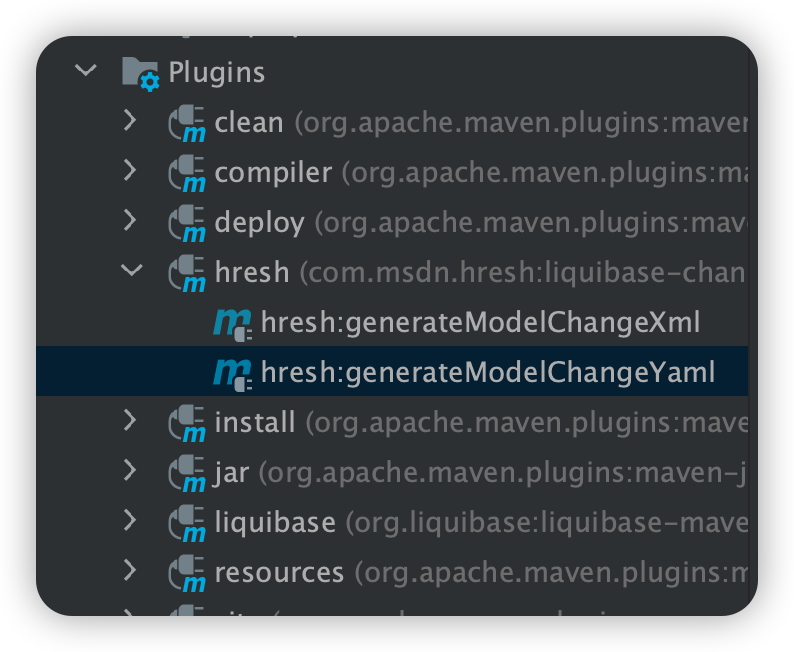
然后在控制台输入名称:job_create_table,效果为:
内容如下:
<?xml version="1.1" encoding="UTF-8" standalone="no"?>
<databaseChangeLog xmlns="http://www.liquibase.org/xml/ns/dbchangelog"
  xmlns:ext="http://www.liquibase.org/xml/ns/dbchangelog-ext"
  xmlns:pro="http://www.liquibase.org/xml/ns/pro"
  xmlns:xsi="http://www.w3.org/2001/XMLSchema-instance"
  xsi:schemaLocation="http://www.liquibase.org/xml/ns/dbchangelog-ext http://www.liquibase.org/xml/ns/dbchangelog/dbchangelog-ext.xsd http://www.liquibase.org/xml/ns/pro http://www.liquibase.org/xml/ns/pro/liquibase-pro-latest.xsd http://www.liquibase.org/xml/ns/dbchangelog http://www.liquibase.org/xml/ns/dbchangelog/dbchangelog-latest.xsd">
  <changeSet author="hresh" id="20220927_212841_214__job_create_table">
  </changeSet>
</databaseChangeLog>
plugin-生成数据库修改文档
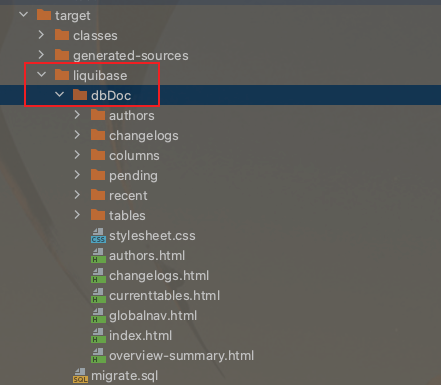
双击liquibase plugin面板中的liquibase:dbDoc选项,会生成数据库修改文档,默认会生成到target目录中,如下图所示
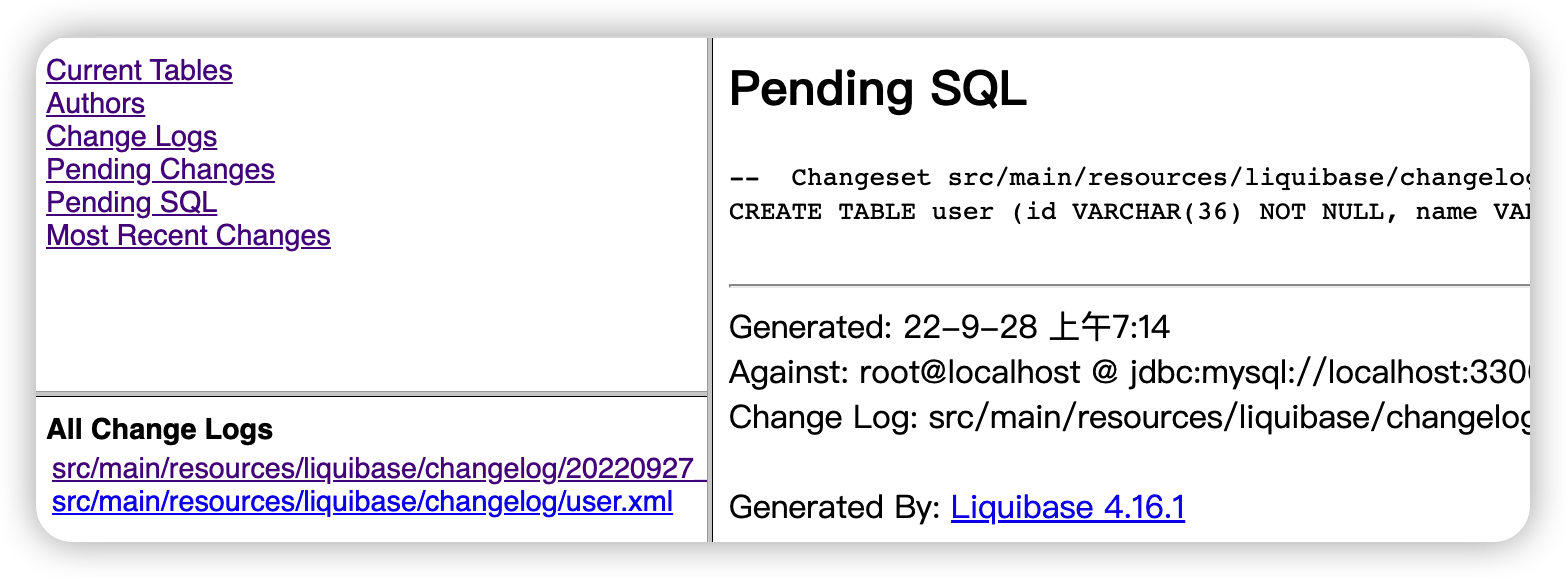
访问index.html会展示如下页面,简直应有尽有
关于 liquibase 的更多有意思的使用,可以花时间再去挖掘一下,这里就不过多介绍了。
一键式生成模版代码
基于 orm-generate 项目可以实现项目模板代码,集成了三种 ORM 方式:Mybatis、Mybatis-Plus 和 Spring JPA,JPA 是刚集成进来的,该项目去年就已经发布过一版,也成功实现了想要的功能,关于功能介绍可以参考我之前的这篇文章。
运行 orm-generate 项目,在 swagger 上调用 /build 接口,调用参数如下:
{
    "database": "mysql_db",
    "flat": true,
    "type": "mybatis",
    "group": "hresh",
    "host": "127.0.0.1",
    "module": "orm",
    "password": "root",
    "port": 3306,
    "table": [
        "user",
        "job"
    ],
    "username": "root",
    "tableStartIndex":"0"
}
先将代码下载下来,解压出来目录如下:
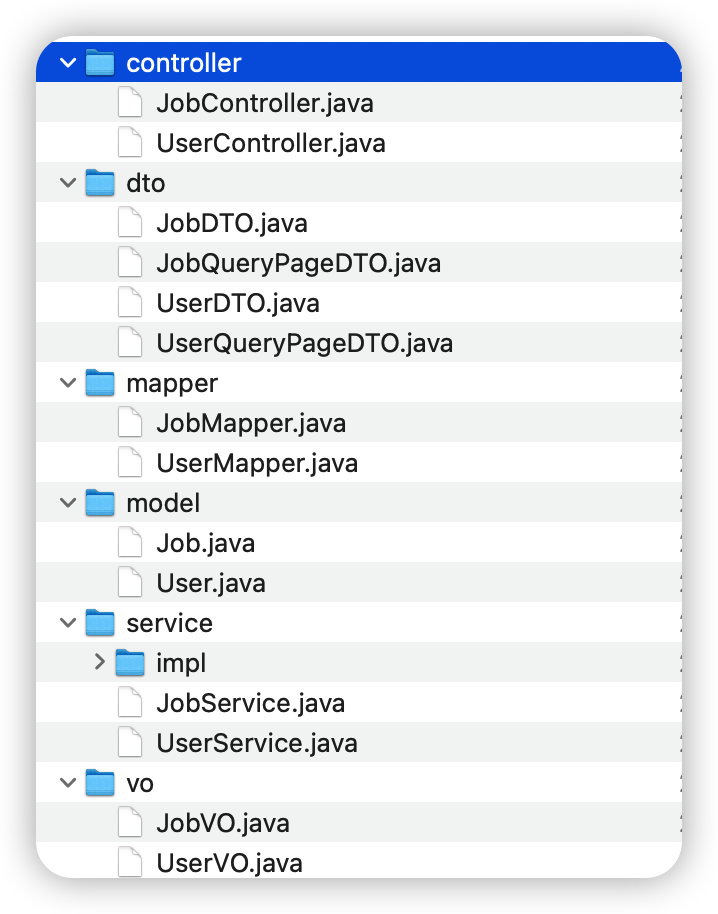
代码文件直接移到项目中就行了,稍微修改一下引用就好了。
总结
上述基础代码是根据个人经验总结出来的,可能不够完美,甚至还缺少一些更有价值的基础代码,望大家多多指教。
在实际项目开发中,SpringBoot 基础代码和模版生成代码完全可以作为两个独立的项目,供其他业务项目使用,以上代码仅供参考,应用时可以按需修改。