JAVA生成二维码QRcode
- 1 : 配置集成
- 1.1、配置maven
- 1.2、配置文件
- 1.3、logo文件
- 2 : 代码集成
- 2.1、加载配置文件
- 2.2、工具类
- 2.3、测试类
- 3 : 测试结果
- 3.1、生成二维码
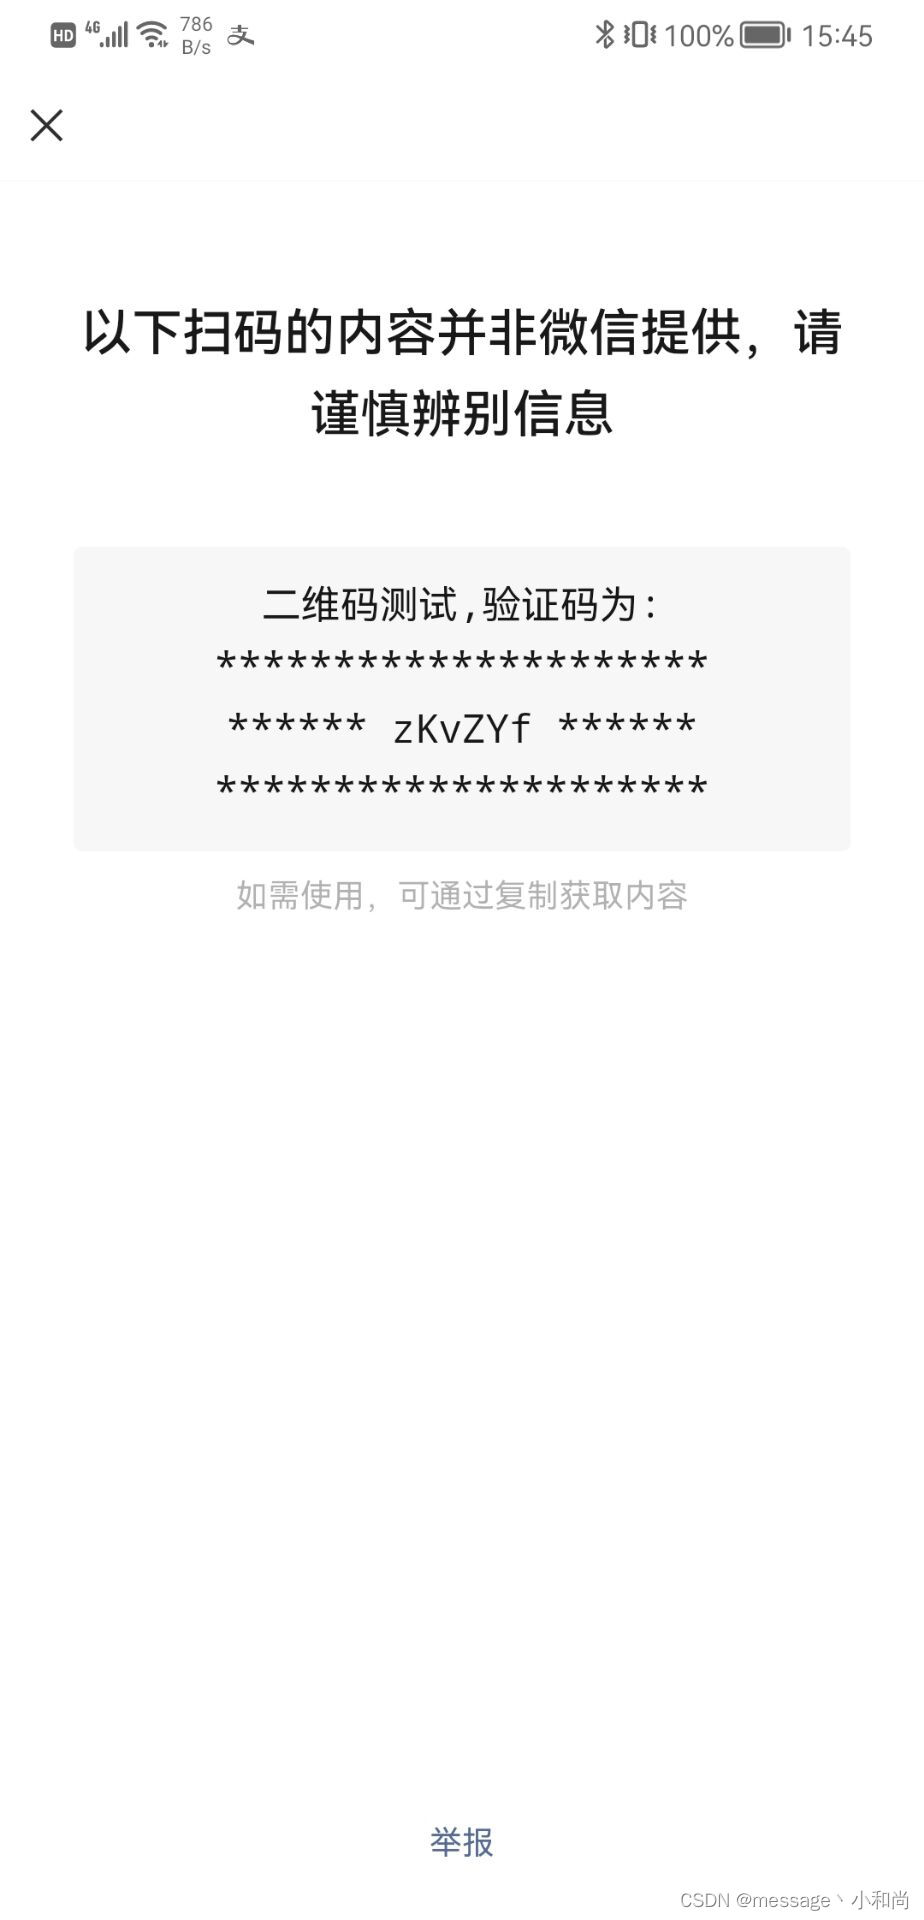
- 3.2、扫描结果
- 3.3、资源
1 : 配置集成
1.1、配置maven
pom文件中添加一下配置
<!-- QR code -->
<dependency>
    <groupId>com.google.zxing</groupId>
    <artifactId>core</artifactId>
    <version>3.3.0</version>
</dependency>
1.2、配置文件
新建配置文件 qr-image-config.properties
放置路径 /app/qrcode/config
#是否使用默认验证码:true:使用默认验证码;false:不使用默认验证码
useDefaultCode = false
#默认验证码
defaultCode = 123456
#二维码需要嵌入的图片地址,不设置则不嵌入
signImagePath = /app/qrcode/logo/logo.png
#二维码上传至服务器的地址
imageUploadPath = /app/qrcode/generate/
#二维码生成的随机数位数
codeDigit = 6
#二维码生成的随机数类型:1:数字;2:大写字母;3:小写字母;4:数字+大写字母;5:数字+小写字母;6:数字+大小写字母
codeType = 6
#二维码生成的图片类型
fileType = .jpg
#二维码有效期,单位秒
validityTime = 60
1.3、logo文件
可有可无,不需要也可以不用
logo图片 logo.png
放置路径 /app/qrcode/logo

2 : 代码集成
2.1、加载配置文件
新建 QrImagePathConfig.java
package com.qrcode;

import org.apache.commons.logging.Log;
import org.apache.commons.logging.LogFactory;
import org.springframework.core.io.ClassPathResource;
import org.springframework.core.io.support.EncodedResource;
import org.springframework.core.io.support.PropertiesLoaderUtils;
import java.io.File;
import java.io.FileReader;
import java.io.IOException;
import java.util.Properties;

/**
 * 获取二维码图片存取路径
 */
public class QrImagePathConfig {
    private Log log = LogFactory.getLog(this.getClass());
	private static final QrImagePathConfig QR_CONFIG = new QrImagePathConfig();
	private static final String CONFIG_FILE_NAME = "/app/qrcode/config/qr-image-config.properties";

    private String useDefaultCode ;//是否使用默认验证码:true:使用默认验证码;false:不使用默认验证码
    private String defaultCode ;//默认验证码
	private String signImagePath ;//二维码需要嵌入的图片地址
	private String imageUploadPath ;//二维码上传至服务器的地址
	private String codeDigit ;//二维码生成的随机数位数
    private String codeType ;//二维码生成的随机数类型:1:数字;2:大写字母;3:小写字母;4:数字+大写字母;5:数字+小写字母;6:数字+大小写字母
	private String fileType ;//二维码生成的图片类型
    private String validityTime ;//二维码有效期,单位秒

    public String getUseDefaultCode() {
        return useDefaultCode;
    }
    public void setUseDefaultCode(String useDefaultCode) {
        this.useDefaultCode = useDefaultCode;
    }
    public String getDefaultCode() {
        return defaultCode;
    }
    public void setDefaultCode(String defaultCode) {
        this.defaultCode = defaultCode;
    }
    public String getSignImagePath() {
        return signImagePath;
    }
    public void setSignImagePath(String signImagePath) {
        this.signImagePath = signImagePath;
    }
    public String getImageUploadPath() {
        return imageUploadPath;
    }
    public void setImageUploadPath(String imageUploadPath) {
        this.imageUploadPath = imageUploadPath;
    }
    public String getCodeDigit() {
        return codeDigit;
    }
    public void setCodeDigit(String codeDigit) {
        this.codeDigit = codeDigit;
    }
    public String getCodeType() {
        return codeType;
    }
    public void setCodeType(String codeType) {
        this.codeType = codeType;
    }
    public String getFileType() {
        return fileType;
    }
    public void setFileType(String fileType) {
        this.fileType = fileType;
    }
    public String getValidityTime() {
        return validityTime;
    }
    public void setValidityTime(String validityTime) {
        this.validityTime = validityTime;
    }

    public static QrImagePathConfig getQrConfig() {
		return QR_CONFIG;
	}
	static{
        QR_CONFIG.loadProperties();
	}
	private void loadProperties(){
		 try {
			 Properties properties = null;
			 if(CONFIG_FILE_NAME.startsWith("/")){
                 properties = new Properties();
                 properties.load(new FileReader(new File(CONFIG_FILE_NAME)));
			 } else {
                 properties = PropertiesLoaderUtils.loadProperties(new EncodedResource(new ClassPathResource(CONFIG_FILE_NAME),"UTF-8"));
			 }
			 log.info("加载文件" + CONFIG_FILE_NAME + "成功!");
             String useDefaultCode = properties.getProperty("useDefaultCode");
             String defaultCode = properties.getProperty("defaultCode");
			 String signImagePath = properties.getProperty("signImagePath");
			 String imageUploadPath = properties.getProperty("imageUploadPath");
			 String codeDigit = properties.getProperty("codeDigit");
             String codeType = properties.getProperty("codeType");
			 String fileType = properties.getProperty("fileType");
			 String validityTime = properties.getProperty("validityTime");
			 log.info("useDefaultCode:"+useDefaultCode+"defaultCode:"+defaultCode+"signImagePath:"+signImagePath+",imageUploadPath:"+imageUploadPath+",codeDigit:"+codeDigit+",codeType:"+codeType+",fileType:"+fileType+",validityTime:"+validityTime);
             QR_CONFIG.useDefaultCode = useDefaultCode;
             QR_CONFIG.defaultCode = defaultCode;
			 QR_CONFIG.signImagePath = signImagePath;
             QR_CONFIG.imageUploadPath = imageUploadPath;
             QR_CONFIG.codeDigit = codeDigit;
             QR_CONFIG.codeType = codeType;
             QR_CONFIG.fileType = fileType;
             QR_CONFIG.validityTime = validityTime;
		} catch (IOException e) {
			log.warn("加载配置文件:" + CONFIG_FILE_NAME + " 失败",e);
		}
	}
}
2.2、工具类
新建BufferedImageLuminanceSource.java
package com.qrcode;

import java.awt.Graphics2D;
import java.awt.geom.AffineTransform;
import java.awt.image.BufferedImage;
import com.google.zxing.LuminanceSource;

public class BufferedImageLuminanceSource extends LuminanceSource {
    private final BufferedImage image;
    private final int left;
    private final int top;

    public BufferedImageLuminanceSource(BufferedImage image) {
        this(image, 0, 0, image.getWidth(), image.getHeight());
    }

    public BufferedImageLuminanceSource(BufferedImage image, int left, int top, int width, int height) {
        super(width, height);

        int sourceWidth = image.getWidth();
        int sourceHeight = image.getHeight();
        if (left + width > sourceWidth || top + height > sourceHeight) {
            throw new IllegalArgumentException("Crop rectangle does not fit within image data.");
        }

        for (int y = top; y < top + height; y++) {
            for (int x = left; x < left + width; x++) {
                if ((image.getRGB(x, y) & 0xFF000000) == 0) {
                    image.setRGB(x, y, 0xFFFFFFFF); // = white
                }
            }
        }

        this.image = new BufferedImage(sourceWidth, sourceHeight, BufferedImage.TYPE_BYTE_GRAY);
        this.image.getGraphics().drawImage(image, 0, 0, null);
        this.left = left;
        this.top = top;
    }

    public byte[] getRow(int y, byte[] row) {
        if (y < 0 || y >= getHeight()) {
            throw new IllegalArgumentException("Requested row is outside the image: " + y);
        }
        int width = getWidth();
        if (row == null || row.length < width) {
            row = new byte[width];
        }
        image.getRaster().getDataElements(left, top + y, width, 1, row);
        return row;
    }

    public byte[] getMatrix() {
        int width = getWidth();
        int height = getHeight();
        int area = width * height;
        byte[] matrix = new byte[area];
        image.getRaster().getDataElements(left, top, width, height, matrix);
        return matrix;
    }

    public boolean isCropSupported() {
        return true;
    }

    public LuminanceSource crop(int left, int top, int width, int height) {
        return new BufferedImageLuminanceSource(image, this.left + left, this.top + top, width, height);
    }

    public boolean isRotateSupported() {
        return true;
    }

    public LuminanceSource rotateCounterClockwise() {
        int sourceWidth = image.getWidth();
        int sourceHeight = image.getHeight();
        AffineTransform transform = new AffineTransform(0.0, -1.0, 1.0, 0.0, 0.0, sourceWidth);
        BufferedImage rotatedImage = new BufferedImage(sourceHeight, sourceWidth, BufferedImage.TYPE_BYTE_GRAY);
        Graphics2D g = rotatedImage.createGraphics();
        g.drawImage(image, transform, null);
        g.dispose();
        int width = getWidth();
        return new BufferedImageLuminanceSource(rotatedImage, top, sourceWidth - (left + width), getHeight(), width);
    }
}
新建 QRCodeUtil.java
package com.qrcode;

import java.awt.*;
import java.awt.geom.RoundRectangle2D;
import java.awt.image.BufferedImage;
import java.io.File;
import java.io.OutputStream;
import java.util.Hashtable;
import javax.imageio.ImageIO;
import com.google.zxing.BarcodeFormat;
import com.google.zxing.BinaryBitmap;
import com.google.zxing.DecodeHintType;
import com.google.zxing.EncodeHintType;
import com.google.zxing.MultiFormatReader;
import com.google.zxing.MultiFormatWriter;
import com.google.zxing.Result;
import com.google.zxing.common.BitMatrix;
import com.google.zxing.common.HybridBinarizer;
import com.google.zxing.qrcode.decoder.ErrorCorrectionLevel;

public class QRCodeUtil {
    private static final String CHARSET = "utf-8";
    private static final String FORMAT_NAME = "JPG";
    // 二维码尺寸
    private static final int QR_CODE_SIZE = 300;
    // LOGO宽度
    private static final int WIDTH = 60;
    // LOGO高度
    private static final int HEIGHT = 60;

    private static BufferedImage createImage(String content, String imgPath, boolean needCompress) throws Exception {
        Hashtable hints = new Hashtable();
        hints.put(EncodeHintType.ERROR_CORRECTION, ErrorCorrectionLevel.H);
        //设置编码字符集
        hints.put(EncodeHintType.CHARACTER_SET, CHARSET);
        hints.put(EncodeHintType.MARGIN, 1);
        //1、生成二维码
        BitMatrix bitMatrix = new MultiFormatWriter().encode(content, BarcodeFormat.QR_CODE, QR_CODE_SIZE, QR_CODE_SIZE, hints);
        //2、获取二维码宽高
        int width = bitMatrix.getWidth();
        int height = bitMatrix.getHeight();
        //3、将二维码放入缓冲流
        BufferedImage image = new BufferedImage(width, height, BufferedImage.TYPE_INT_RGB);
        for (int x = 0; x < width; x++) {
            for (int y = 0; y < height; y++) {
                //4、循环将二维码内容定入图片
                image.setRGB(x, y, bitMatrix.get(x, y) ? 0xFF000000 : 0xFFFFFFFF);
            }
        }
        if (imgPath == null || "".equals(imgPath)) {
            return image;
        }
        // 插入图片
        QRCodeUtil.insertImage(image, imgPath, needCompress);
        return image;
    }

    private static void insertImage(BufferedImage source, String imgPath, boolean needCompress) throws Exception {
        File file = new File(imgPath);
        if (!file.exists()) {
            System.err.println("" + imgPath + "   该文件不存在!");
            return;
        }
        Image src = ImageIO.read(new File(imgPath));
        int width = src.getWidth(null);
        int height = src.getHeight(null);
        if (needCompress) { // 压缩LOGO
            if (width > WIDTH) {
                width = WIDTH;
            }
            if (height > HEIGHT) {
                height = HEIGHT;
            }
            Image image = src.getScaledInstance(width, height, Image.SCALE_SMOOTH);
            BufferedImage tag = new BufferedImage(width, height, BufferedImage.TYPE_INT_RGB);
            Graphics g = tag.getGraphics();
            g.drawImage(image, 0, 0, null); // 绘制缩小后的图
            g.dispose();
            src = image;
        }
        // 插入LOGO
        Graphics2D graph = source.createGraphics();
        int x = (QR_CODE_SIZE - width) / 2;
        int y = (QR_CODE_SIZE - height) / 2;
//        graph.setColor(Color.BLUE);//设定嵌入的图像边框颜色
        graph.drawImage(src, x, y, width, height, null);
        Shape shape = new RoundRectangle2D.Float(x, y, width, width, 6, 6);
        graph.setStroke(new BasicStroke(3f));
        graph.draw(shape);
        graph.dispose();
    }

    public static void encode(String content, String imgPath, String destPath, boolean needCompress) throws Exception {
        BufferedImage image = QRCodeUtil.createImage(content, imgPath, needCompress);
        mkdirs(destPath);
        // String file = new Random().nextInt(99999999)+".jpg";
        // ImageIO.write(image, FORMAT_NAME, new File(destPath+"/"+file));
        ImageIO.write(image, FORMAT_NAME, new File(destPath));
    }

    public static BufferedImage encode(String content, String imgPath, boolean needCompress) throws Exception {
        BufferedImage image = QRCodeUtil.createImage(content, imgPath, needCompress);
        return image;
    }

    public static void mkdirs(String destPath) {
        File file = new File(destPath);
        // 当文件夹不存在时,mkdirs会自动创建多层目录,区别于mkdir.(mkdir如果父目录不存在则会抛出异常)
        if (!file.exists() && !file.isDirectory()) {
            file.mkdirs();
        }
    }

    public static void encode(String content, String imgPath, String destPath) throws Exception {
        QRCodeUtil.encode(content, imgPath, destPath, false);
    }
    // 被注释的方法
	/*
	 * public static void encode(String content, String destPath, boolean
	 * needCompress) throws Exception { QRCodeUtil.encode(content, null, destPath,
	 * needCompress); }
	 */

    public static void encode(String content, String destPath) throws Exception {
        QRCodeUtil.encode(content, null, destPath, false);
    }

    public static void encode(String content, String imgPath, OutputStream output, boolean needCompress)
            throws Exception {
        BufferedImage image = QRCodeUtil.createImage(content, imgPath, needCompress);
        ImageIO.write(image, FORMAT_NAME, output);
    }

    public static void encode(String content, OutputStream output) throws Exception {
        QRCodeUtil.encode(content, null, output, false);
    }

    public static String decode(File file) throws Exception {
        BufferedImage image;
        image = ImageIO.read(file);
        if (image == null) {
            return null;
        }
        BufferedImageLuminanceSource source = new BufferedImageLuminanceSource(image);
        BinaryBitmap bitmap = new BinaryBitmap(new HybridBinarizer(source));
        Result result;
        Hashtable hints = new Hashtable();
        hints.put(DecodeHintType.CHARACTER_SET, CHARSET);
        result = new MultiFormatReader().decode(bitmap, hints);
        String resultStr = result.getText();
        return resultStr;
    }

    public static String decode(String path) throws Exception {
        return QRCodeUtil.decode(new File(path));
    }
}
2.3、测试类
新建 QrCodeTest.java
package com.qrcode;

import java.util.ArrayList;
import java.util.Collections;
import java.util.List;
import java.util.Random;
import java.util.UUID;

public class QrCodeTest {

    public static void main(String[] args) throws Exception {
        //text存放在二维码中的内容
        String num = "";
        if("true".equals(QrImagePathConfig.getQrConfig().getUseDefaultCode())){
            num = QrImagePathConfig.getQrConfig().getDefaultCode();
        } else {
            num = getRandomCodeByDigitAndType(Integer.valueOf(QrImagePathConfig.getQrConfig().getCodeDigit()),Integer.valueOf(QrImagePathConfig.getQrConfig().getCodeType()));
        }
        String text = "二维码测试,验证码为:\n" + "*********************\n" + "****** "+ num +" ******\n" + "*********************";
        //imgPath嵌入二维码的图片路径
//        String imgPath = "E:\\app\\qrcode\\config\\logo.png";
//        String imgPath = "/app/qrcode/config/logo.png";
        String imgPath = QrImagePathConfig.getQrConfig().getSignImagePath();
        //destPath生成的二维码的路径及名称
        String fileName = UUID.randomUUID().toString().replaceAll("-", "").substring(0,10);
        String destPath = QrImagePathConfig.getQrConfig().getImageUploadPath() + fileName + QrImagePathConfig.getQrConfig().getFileType();
        //生成二维码
        //text:编码到二维码中的内容;imgPath:要嵌入二维码的图片路径,如果不写或者为null则生成一个没有嵌入图片的纯净的二维码
        //destPath:生成的二维码的存放路径;true:表示将嵌入二维码的图片进行压缩,如果为“false”则表示不压缩.
        QRCodeUtil.encode(text, imgPath, destPath, true);
        //解析二维码
        //destPath:将要解析的二维码的存放路径;该方法返回值为String类型,即返回解析出的文字或者数字等.
        String str = QRCodeUtil.decode(destPath);
        //打印出解析出的内容
        System.out.println(str);
        //二维码存的信息越多,二维码图片也就越复杂,容错率也就越低,识别率也越低,并且二维码能存的内容大小也是有限的(大概500个汉字左右)
    }

    /**
     * 根据位数和类型获取验证码
     * @param codeDigit  随机数位数
     * @param codeType  随机数类型:1:数字;2:大写字母;3:小写字母;4:数字+大写字母;5:数字+小写字母;6:数字+大小写字母
     * @return
     */
    public static String getRandomCodeByDigitAndType(Integer codeDigit,Integer codeType) {
        String string = "";
        String numStr = "0123456789";
        String lowerCaseLetter = "abcdefghijklmnopqrstuvwxyz";
        String upperCaseLetter = "ABCDEFGHIJKLMNOPQRSTUVWXYZ";
        switch (codeType){
            case 1:
                string = numStr;
                break;
            case 2:
                string = upperCaseLetter;
                break;
            case 3:
                string = lowerCaseLetter;
                break;
            case 4:
                string = numStr + upperCaseLetter;
                break;
            case 5:
                string = numStr + lowerCaseLetter;
                break;
            case 6:
                string = numStr + lowerCaseLetter + upperCaseLetter;
                break;
        }
        string = getStringForDisorderSorting(string);//将字符串的顺序打乱
        StringBuilder stringBuilder = new StringBuilder();//声明一个StringBuffer对象保存验证码
        for (int i = 0; i < codeDigit; i++) {
            Random random = new Random();//创建随机数生成器
            int index = random.nextInt(string.length());//返回[0,string.length)范围的int值,保存下标
            char charAt = string.charAt(index);//charAt(),返回指定索引处的char值
            stringBuilder.append(charAt);//将charAt字符串追加到此序列
        }
        return stringBuilder.toString();//返回字符串
    }

    /**
     * 随机打乱一个字符串的排序方式
     * @param string
     * @return
     */
    private static String getStringForDisorderSorting(String string) {
        char[] chars = string.toCharArray();
        List<Character> characterList = new ArrayList<Character>();
        for(char ch:chars){
            characterList.add(ch);
        }
        Collections.shuffle(characterList);
        StringBuilder stringBuilder = new StringBuilder();
        for(Character character:characterList){
            stringBuilder.append(character);
        }
        return stringBuilder.toString();
    }

    /**
     * 根据位数获取数字验证码
     * @param codeDigit
     * @return
     */
    private static String getRandomNum(Integer codeDigit){
        StringBuilder stringBuilder=new StringBuilder();
        Random random = new Random();
        for (int i = 0; i < codeDigit; i++) {
            stringBuilder.append(random.nextInt(10));
        }
        return stringBuilder.toString();
    }
}
3 : 测试结果
3.1、生成二维码
在路径 /app/qrcode/generate

3.2、扫描结果
3.3、资源
CSDN下载链接:https://download.csdn.net/download/qq_38254635/87351537
百度云下载链接:https://pan.baidu.com/s/1zBaTmv2WgG8Ihx-HIEdoow?pwd=v7mc
提取码: v7mc
有什么不对的还望指正,书写不易,觉得有帮助就点个赞吧!


