本专栏内容为:C++学习专栏,分为初阶和进阶两部分。 通过本专栏的深入学习,你可以了解并掌握C++。
💓博主csdn个人主页:小小unicorn
⏩专栏分类:C++
🚚代码仓库:小小unicorn的代码仓库🚚
🌹🌹🌹关注我带你学习编程知识
STL详解(一)
- string类
- 成员函数(Member functions):
- 元素访问的三种访问形式与迭代器(Iterators)
- 方法一(运算符重载[]访问):
- 方法二(使用迭代器访问):
- 方法三:使用at
- 容量相关:
- 长度(size和length)
- 清理空间(clear)
- 最大长度(max_size)
- 容量(capacity)
- reserve
- resize
- 修改:
- operator+=与operator+ (string)
- 赋值(assgin)
- 修改(insert/erase/replace)
- swap
- 字符串操作:
- find系列
string类
今天要介绍的是STL中的string类,本文将从一下几个模块来讲string类的使用,借助文档C++plusepluse来学习。
首先看一下string的定义,其实string也是个摸版。
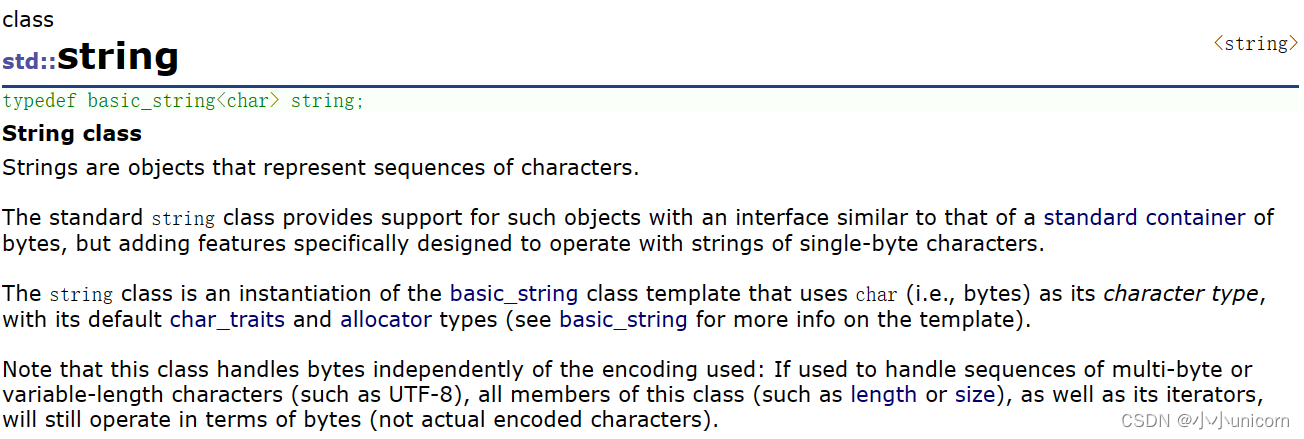
可以简单理解string是一个存储字符的一个顺序数组。
成员函数(Member functions):
在文档中,我们可以知道:
string类的默认成员函数有:构造函数,析构函数以及赋值重载函数。

我们先简单用一下:
void test_string1()
{
	string s1;
	string s2("hello world");

	cin >> s1;
	cout << s1 << endl;
	cout << s2 << endl;

    string ret1 = s1 + s1;
    cout << ret1 << endl;

    string ret2 = s1 + "我来了";
    cout << ret2 << endl;
}
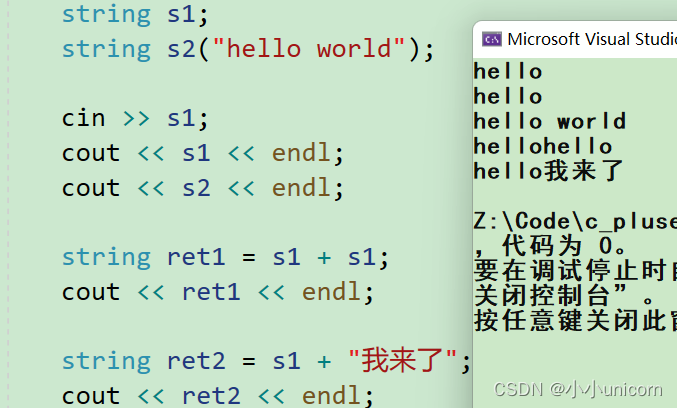
string类实现了多个构造函数的重载,常用的构造函数如下:
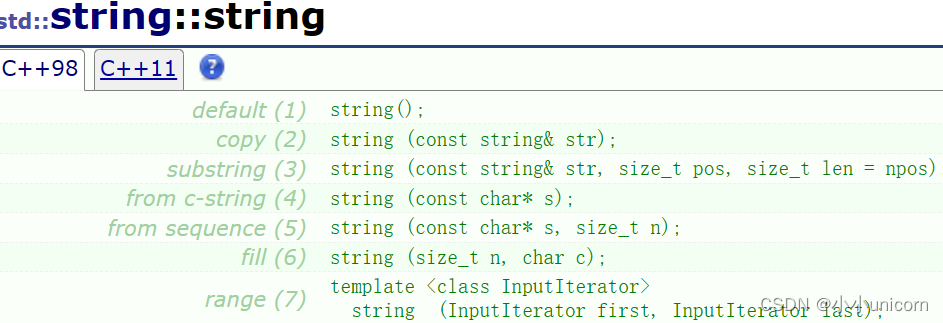
string();  //构造一个空字符串

string(const char* s);  //复制s所指的字符序列

string(const char* s, size_t n);  //复制s所指字符序列的前n个字符

string(size_t n, char c);  //生成n个c字符的字符串

string(const string& str);  //生成str的复制品

string(const string& str, size_t pos, size_t len = npos);  //复制str中从字符位置pos开始并跨越len个字符的部分
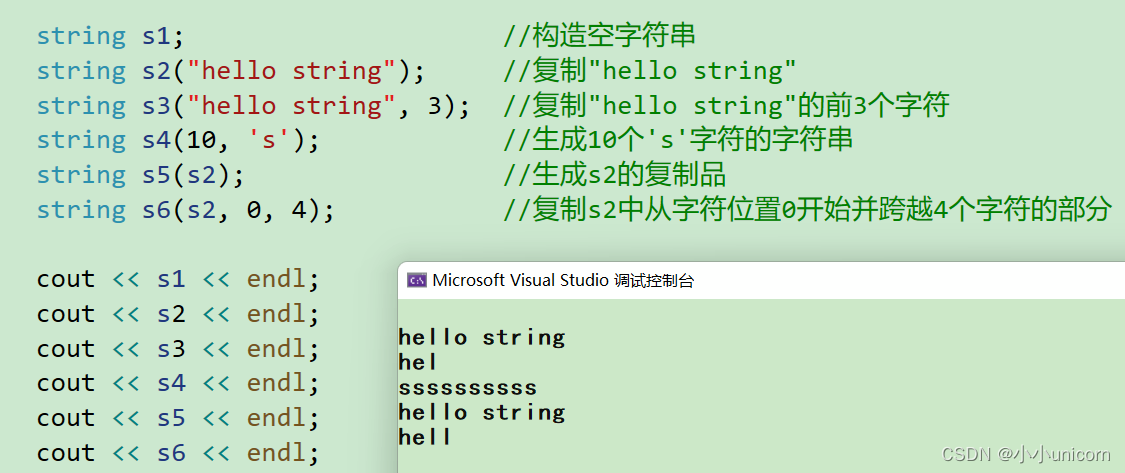
使用示例:
string s1;                     //构造空字符串
string s2("hello string");     //复制"hello string"
string s3("hello string", 3);  //复制"hello string"的前3个字符
string s4(10, 's');            //生成10个's'字符的字符串
string s5(s2);                 //生成s2的复制品
string s6(s2, 0, 4);           //复制s2中从字符位置0开始并跨越4个字符的部分
析构函数很简单:

这里就不做过多介绍了。
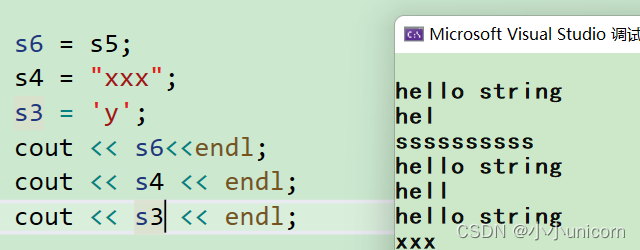
赋值重载函数:

void test_string5()
{

	string s1;                     //构造空字符串
	string s2("hello string");     //复制"hello string"
	string s3("hello string", 3);  //复制"hello string"的前3个字符
	string s4(10, 's');            //生成10个's'字符的字符串
	string s5(s2);                 //生成s2的复制品
	string s6(s2, 0, 4);           //复制s2中从字符位置0开始并跨越4个字符的部分

	cout << s1 << endl;
	cout << s2 << endl;
	cout << s3 << endl;
	cout << s4 << endl;
	cout << s5 << endl;
	cout << s6 << endl;
	s6 = s5;
	s4 = "xxx";
	s3 = 'y';
	cout << s6<<endl;
	cout << s4 << endl;
	cout << s3 << endl;
}
元素访问的三种访问形式与迭代器(Iterators)
首先我们思考一下,string元素如何访问元素?
这里有三种方法:
方法一(运算符重载[]访问):
在string中,有运算符重载[]来进行对元素的访问:

具体访问形式与数组访问下标一样。
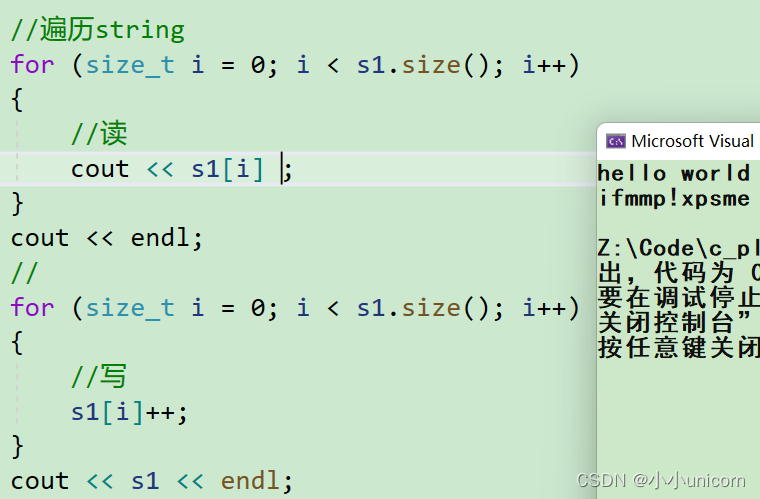
用[]遍历string,进行读写操作
void test_string2()
{
	string s1="hello world";
	string s2("hello world");

	//遍历string
	for (size_t i = 0; i < s1.size(); i++)
	{
		//读
		cout << s1[i] ;
	}
	cout << endl;
	//
	for (size_t i = 0; i < s1.size(); i++)
	{
		//写
	    s1[i]++;
	}
	cout << s1 << endl;
}
方法二(使用迭代器访问):
先看下面这组示例:
//迭代器
string::iterator it = s1.begin();
while (it != s1.end())
{
	//读
	cout << *it;
	++it;
}
cout << endl;
it = s1.begin();
while (it != s1.end())
{
	//写
	*it ='a';
	++it;
}
cout << endl;
cout << s1<<endl;
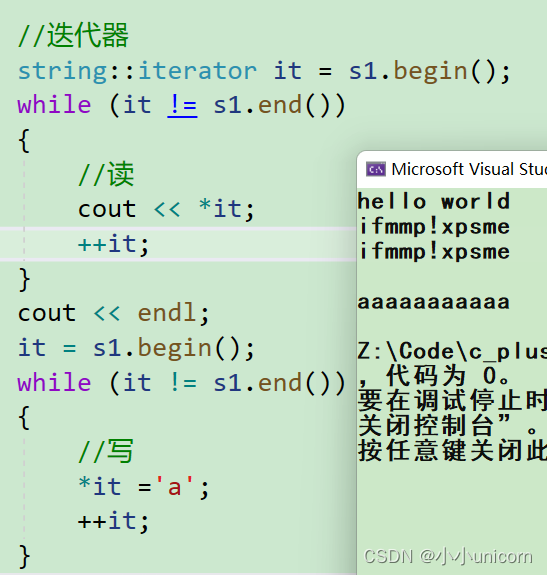
我们会发现:我们也能对string进行遍历和修改操作。
那么什么是迭代器呢?
先看看文档中与迭代器相关的函数:

在上面例子中,我们用到了begin和end.
回到正题,什么是迭代器?在这里,我们可以首先将迭代器理解成双指针。

begin指向起始位置,end指向末端位置。所以不难发现,这是一个左闭右开区间,因为end指向的是最后一个元素的下一位置。
那么有人就提出疑问了,为什么遍历的条件是it!=s1.end(),如果换成小于呢?答案是,讲条件换成小于其实也是对的,但是会有局限性。
这是因为,我们的string类存储其实本质也还是个数组,也就是按照顺序存储的,那如果换成链表呢?
我们知道,链表不是顺序存储,是按照节点跟节点相连。

如果此时用<就会出错。这就是我们用!=来作为我们的遍历条件。
其实不仅如此,我们后面介绍的二叉树,图的访问,都会用到迭代器。这也进一步体现了C++的封装。
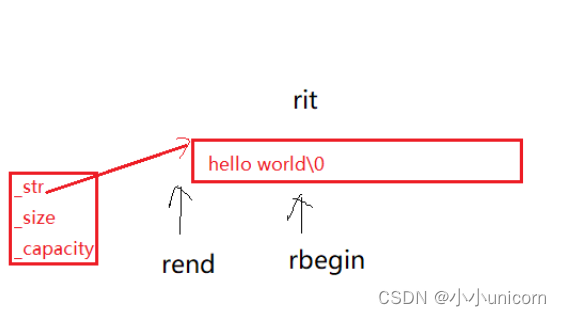
begin和end介绍完了,那rbegin和rend呢?
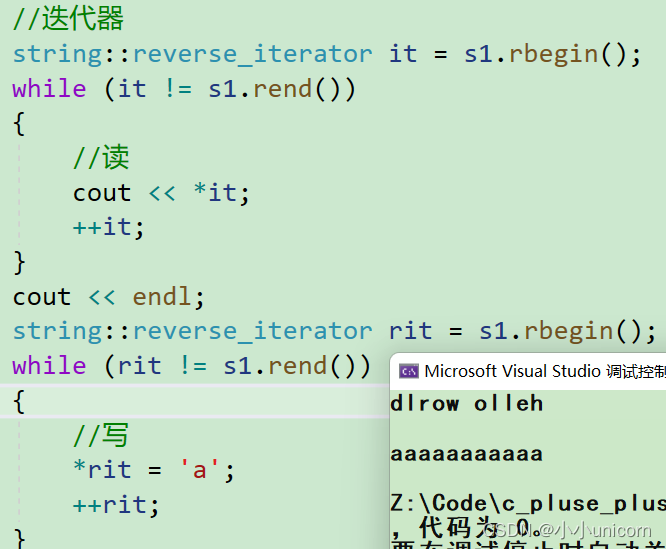
顾名思义,就是反着走。begin和end是正向迭代器,而rbegin和rend就是反向迭代器。
void test_string3()
{
	string s1 = "hello world";
	string s2("hello world");
	//迭代器
	string::reverse_iterator it = s1.rbegin();
	while (it != s1.rend())
	{
		//读
		cout << *it;
		++it;
	}
	cout << endl;
	string::reverse_iterator rit = s1.rbegin();
	while (rit != s1.rend())
	{
		//写
		*rit = 'a';
		++rit;
	}
	cout << endl;
	cout << s1 << endl;
}
但是呢,还有一个问题,这迭代器这么长,以防写错,我们还可以和auto进行搭配。不要忘了auto可以自动识别类型哦!
void test_string3()
{
	string s1 = "hello world";
	string s2("hello world");
	//迭代器
	//
	// string::reverse_iterator it = s1.rbegin();
	auto it = s1.rbegin();
	while (it != s1.rend())
	{
		//读
		cout << *it;
		++it;
	}
	cout << endl;
	//string::reverse_iterator rit = s1.rbegin();
	auto rit = s1.rbegin();
	while (rit != s1.rend())
	{
		//写
		*rit = 'a';
		++rit;
	}
	cout << endl;
	cout << s1 << endl;
}

其实不仅如此,遍历的时候我们还可以搭配范围for的用法:
void test_string3()
{
	string s1 = "hello world";
	string s2("hello world");


	//迭代器
	//
	// string::reverse_iterator it = s1.rbegin();
	auto it = s1.rbegin();
	//while (it != s1.rend())
	//{
	//	//读
	//	cout << *it;
	//	++it;
	//}
	for (auto ch : s1)
	{
		cout << ch;
	}

	cout << endl;
	//string::reverse_iterator rit = s1.rbegin();
	auto rit = s1.rbegin();
	//while (rit != s1.rend())
	//{
	//	//写
	//	*rit = 'a';
	//	++rit;
	//}
	for (auto& ch : s1)
	{
		ch++;
	}
	cout << endl;
	cout << s1 << endl;

}

现在感受到了auto的好用之处了吗?是不是感叹道,auto真香!
但要知道一点,其实范围for的本质其实就是迭代器!编译器编译时会自动替换成迭代器。
然后剩下的cbeg和cend又是什么呢?他们其实是一个const迭代器。
看下面这组示例:
void func(const string& s)
{
	//string::const_iterator it = s.begin();
	auto it = s.begin();
	while (it != s.end())
	{
		// 不支持写
		// *it = 'a';
		// 读
		cout << *it << " ";
		++it;
	}
	cout << endl;

	//string::const_reverse_iterator rit = s.rbegin();
	auto rit = s.rbegin();
	while (rit != s.rend())
	{
		cout << *rit << " ";
		++rit;
	}
	cout << endl;
}
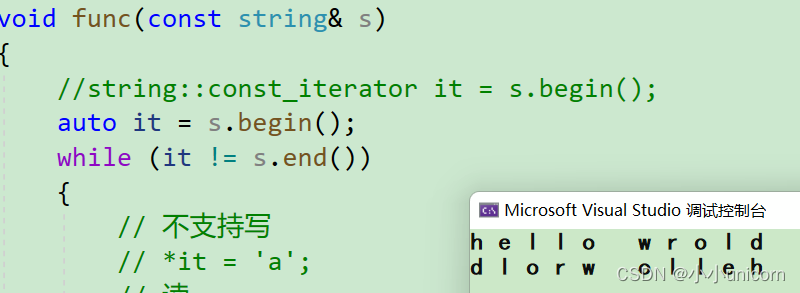
其实发现,我们并没有用到cbegin和cend,这是因为,其实begin和end中就已经包含了cont和const。

不过要注意一点:对于const迭代器来说,只能读不能写。
我们通过介绍元素访问,将迭代器基本上已经了解的差不多了。

总结一下:迭代器我们现在可以就先理解为底层实现其就是双指针,迭代器分了四种,const正向迭代器,非const正向迭代器,const反向迭代器,非const反向迭代器。在使用迭代器时,还可以搭配auto和范围for.还要注意对于const迭代器来说,只能读,不能写。
方法三:使用at

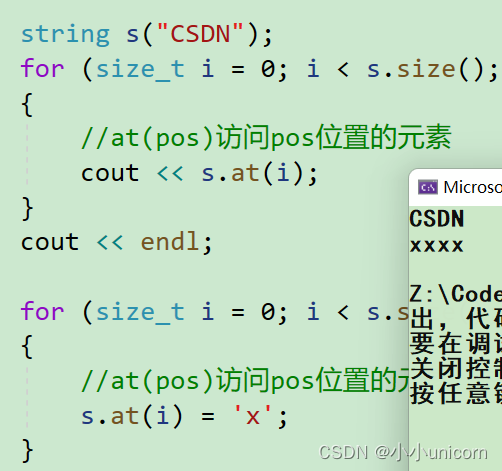
因为at函数也是使用的引用返回,所以我们也可以通过at函数修改对应位置的元素。
而用at访问和方法一中【】访问最大的区别就是:
【】+下标访问会严格检查越界问题,一旦检查到越界问题,就会直接奔溃,而用at访问不会出现奔溃,会抛异常。
void test_string4()
{

	string s("CSDN");
	for (size_t i = 0; i < s.size(); i++)
	{
		//at(pos)访问pos位置的元素
		cout << s.at(i);
	}
	cout << endl;

	for (size_t i = 0; i < s.size(); i++)
	{
		//at(pos)访问pos位置的元素,并对其进行修改
		s.at(i) = 'x';
	}
	cout << s << endl; //xxxx
}
容量相关:
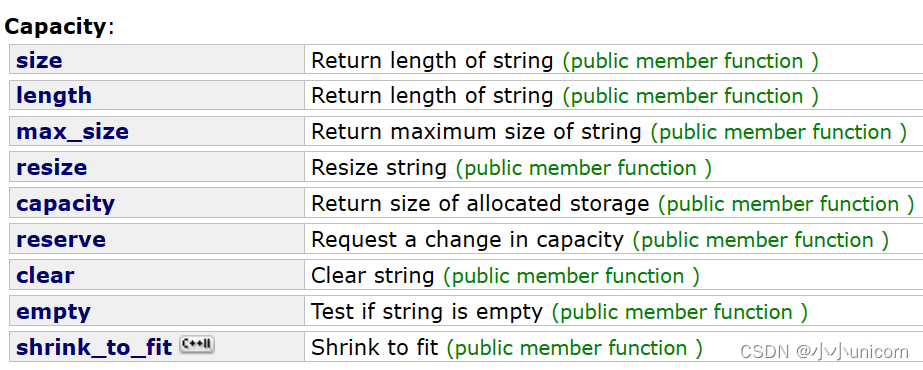
在string类中,与容量相关的有以下这些:
首先来看一下size和length.
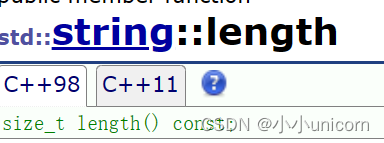
长度(size和length)
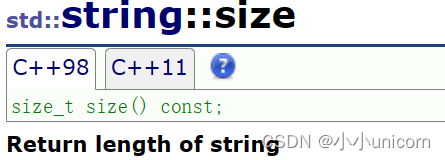
size和length顾名思义就是求string的长度。
void test_string6()
{

	string s1("hello world");

	cout << s1.size() << endl;
	cout << s1.length() << endl;

}
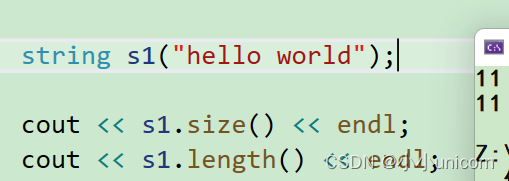
通过结果我们发现,怎么是一样的呢?是的,因为他们其实求的都是长度。也可以说,其实最原始求一个字符串的长度是只有length,但是既然出现了摸版这么好用的东西,与是也就出现了size,为了方便统一。
清理空间(clear)
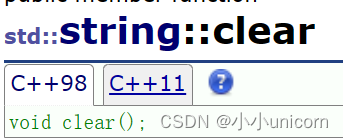
clear用来清理空间,但释不释放空间呢?我们可以进行测试一下:
void test_string6()
{

	string s1("hello world");

	cout << s1.size() << endl;
	cout << s1.length() << endl;

	cout << s1.capacity() << endl;
	s1.clear();
	cout << s1.capacity() << endl;
	s1 += "张三";
	cout << s1.size() << endl;
	cout << s1.capacity() << endl;
	//cout << s1.max_size() << endl;
}
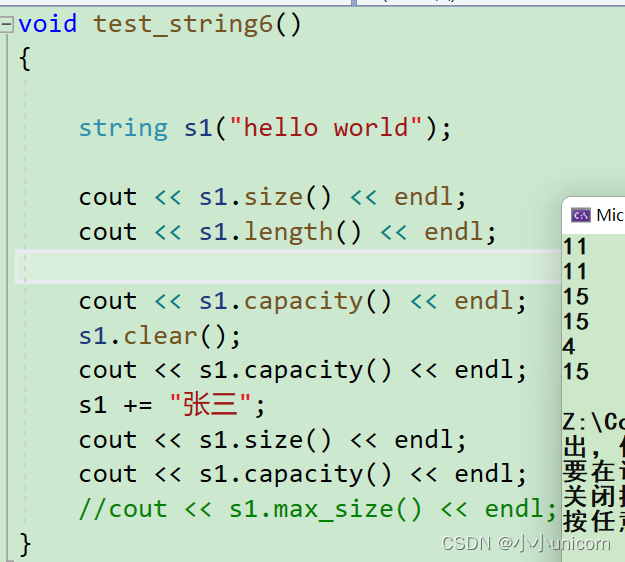
通过测试可以知道,clear只是清理空间,但并不会释放掉空间。因为没有必要需要释放空间,如果对其进行插入,又会开新的空间。我们要知道一点:空间是很廉价的,能合理利用就要合理利用。
最大长度(max_size)

求string的最大长度,这个很少用的到或者基本不用。
容量(capacity)

capacity就是求string的容量,我们可以看一下具体是怎么实现扩容的:
void test_string7()
{
	string s;
	//s.reserve(100);
	size_t old = s.capacity();
	cout << "初始" << s.capacity() << endl;

	for (size_t i = 0; i < 100; i++)
	{
		s.push_back('x');

		if (s.capacity() != old)
		{
			cout << "扩容:" << s.capacity() << endl;
			old = s.capacity();
		}
	}
	//s.reserve(10);
	//cout << s.capacity() << endl;
}
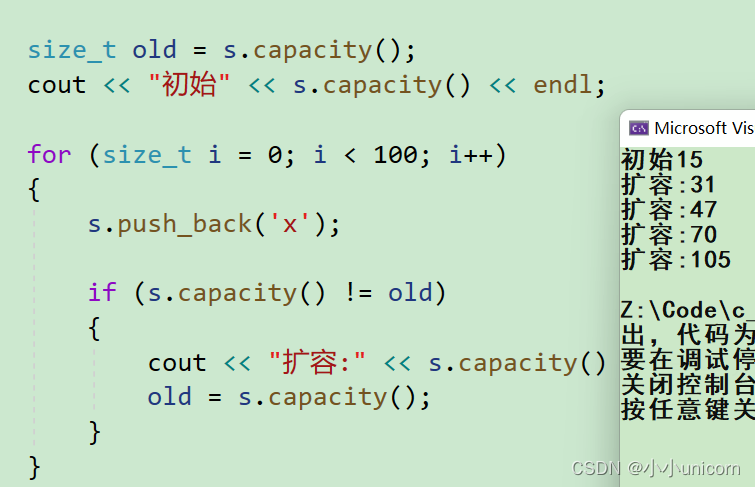
我们在Liunx系统下测试一下:
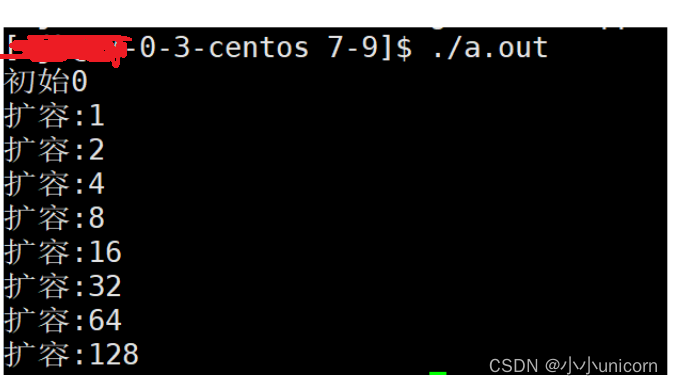
从结果可以发现,在vs中每次扩容1.5倍左右。而在liunx系统下,会每次扩容2倍。
reserve

要是提前知道空间的大小,我们就可以用reserve提前开好。
void test_string7()
{
	string s;
	s.reserve(100);

	size_t old = s.capacity();
	cout << "初始" << s.capacity() << endl;

	for (size_t i = 0; i < 100; i++)
	{
		s.push_back('x');

		if (s.capacity() != old)
		{
			cout << "扩容:" << s.capacity() << endl;
			old = s.capacity();
		}
	}

	/*s.reserve(10);
	cout << s.capacity() << endl;*/
}

这样的好处就是可以减少扩容,提高效率。
resize

在介绍resize前,先看下面这组示例:
void test_string8()
{
	string s1("hello world");
	cout << s1 << endl;
	cout << s1.size() << endl;
	cout << s1.capacity() << endl;

	//s1.resize(13);
	//s1.resize(13, 'x');
	//插入
	s1.resize(20, 'x');
	cout << s1 << endl;
	cout << s1.size() << endl;
	cout << s1.capacity() << endl;

	//删除
	s1.resize(5);
	cout << s1 << endl;
	cout << s1.size() << endl;
	cout << s1.capacity() << endl;

	//插入
	string s2;
	s2.resize(10, '#');
	cout << s2 << endl;
	cout << s2.size() << endl;
	cout << s2.capacity() << endl;
}
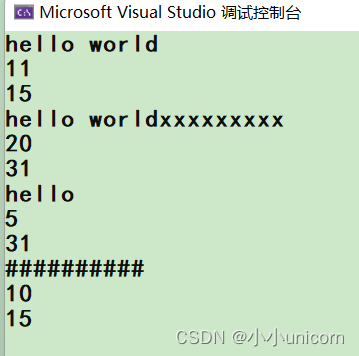
resize具体实现的功能因情况而定:

假设现在原有大小为7,如果传的大小大于了7,会实现自动扩容也就是插入的功能。要是比7小,就相当于删除,有多少删多少。
修改:
在string类中,与修改相关的有以下这些:
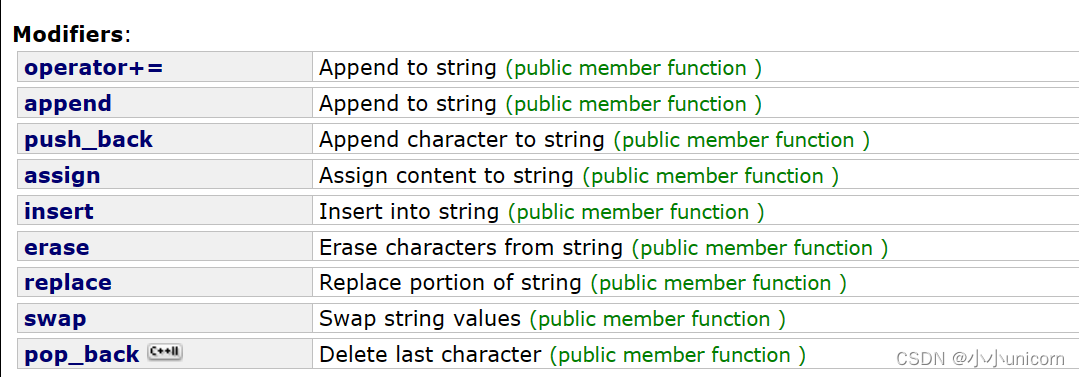
operator+=与operator+ (string)


void test_string9()
{
	string ss("world");
	string s;
	s.push_back('#');
	s.append("hello");
	cout << s << endl;
	s += '#';
	s += "hello";
	s += ss;
	cout << s << endl;
	string ret1 = ss + '#';
	string ret2 = ss + "hello";
	cout << ret1 << endl;
	cout << ret2 << endl;
}
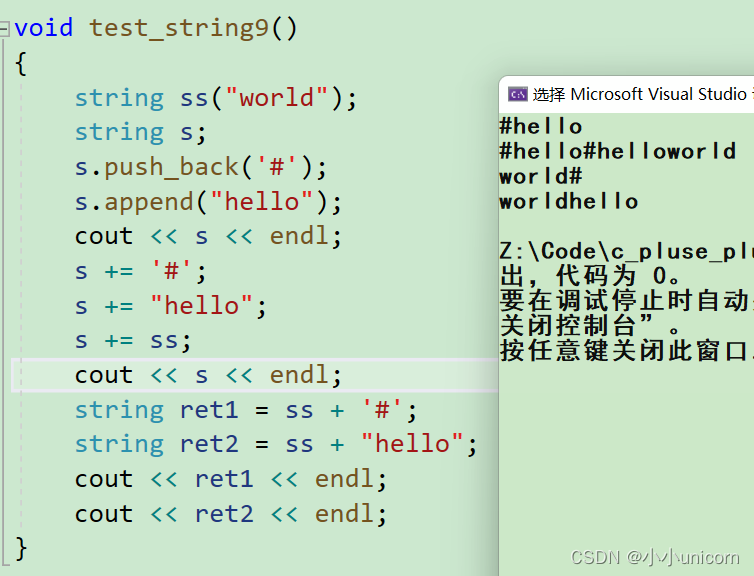
+=或+一个字符串很简单,这里不过多叙述。
注意:能用+的尽量要用+=,+用的是传值返回,拷贝构造花销会很大。

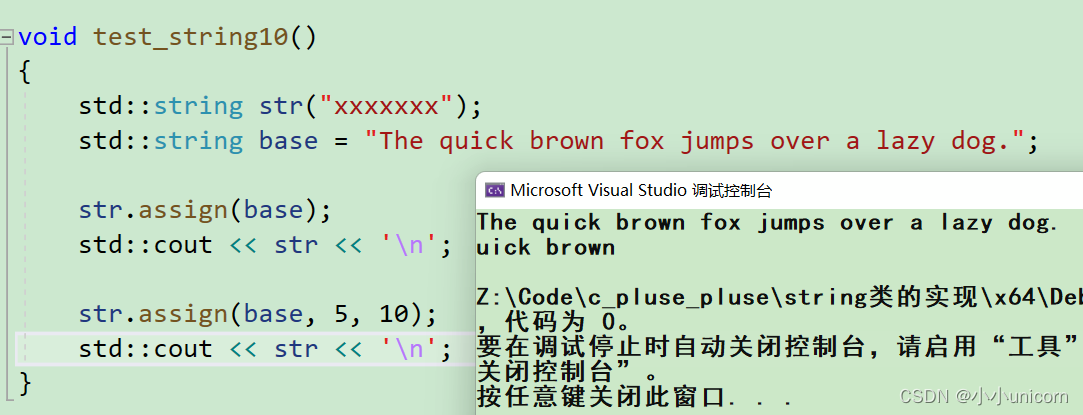
赋值(assgin)
assgin:变相的赋值,很少用到。

示例:
void test_string10()
{
	std::string str("xxxxxxx");
	std::string base = "The quick brown fox jumps over a lazy dog.";

	str.assign(base);
	std::cout << str << '\n';

	str.assign(base, 5, 10);
	std::cout << str << '\n';
}
修改(insert/erase/replace)

insert:在某个位置插入。

erase:删除某个位置
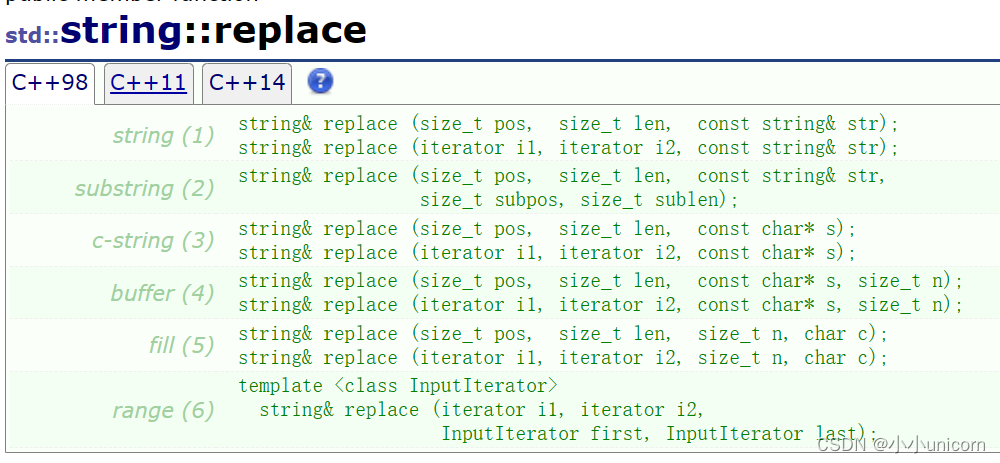
replace:将某个位置的值替换为…
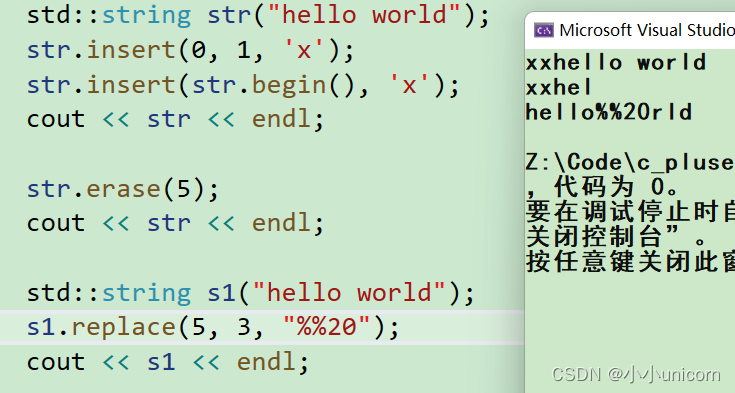
示例:
void test_string11()
{
	// insert/erase/repalce能不用就尽量不用,因为他们都涉及挪动数据,效率不高
	// 接口设计复杂繁多,需要时查一下文档即可
	std::string str("hello world");
	str.insert(0, 1, 'x');
	str.insert(str.begin(), 'x');
	cout << str << endl;

	str.erase(5);
	cout << str << endl;

	std::string s1("hello world");
	s1.replace(5, 3, "%%20");
	cout << s1 << endl;
}
虽然感觉实现了很多功能,但是还是要注意:
insert/erase/repalce能不用就尽量不用,因为他们都涉及挪动数据,效率不高
接口设计复杂繁多,需要时查一下文档即可。
接下来思考一下:
现在给定一个字符串,要将这个字符串中的空格全都换成%20,应该怎么处理呢?
"The quick brown fox jumps over a lazy dog."
我们可以用空间换时间的方法来解决这个问题:
void test_string12()
{
	// 空格替换为20%
	std::string s2("The quick brown fox jumps over a lazy dog.");
	string s3;
	for (auto ch : s2)
	{
		if (ch != ' ')
		{
			s3 += ch;
		}
		else
		{
			s3 += "20%";
		}
	}
	cout << s3 << endl;
}
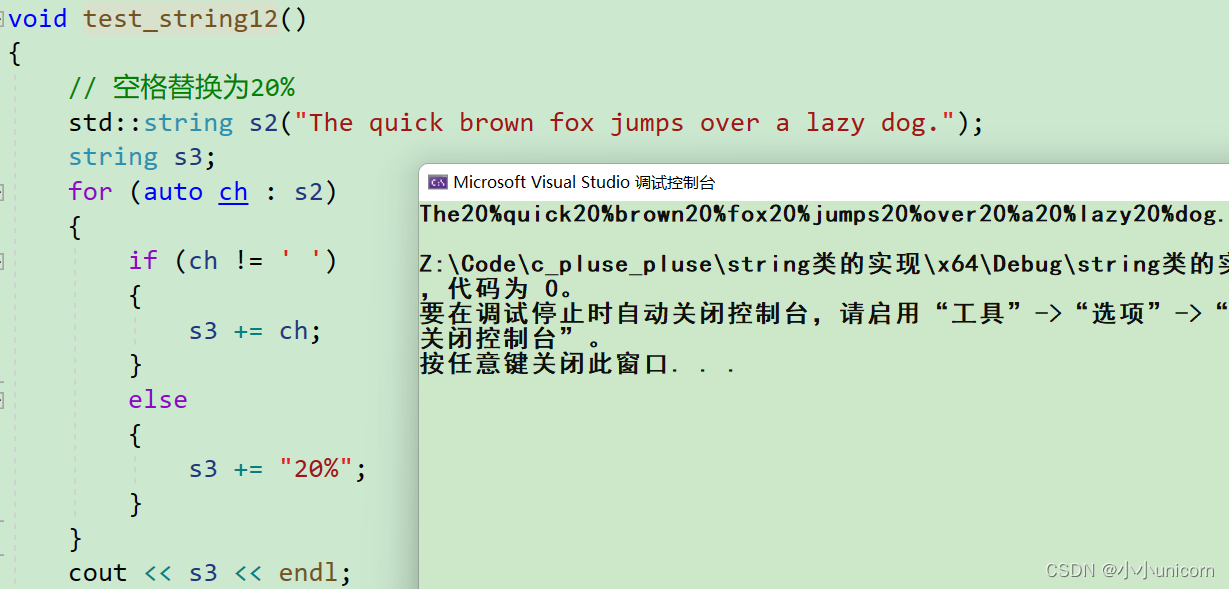
但我们输出的是s3,如果我就想让原字符串得到处理呢?
那么我们就可以用swqp函数,将s2与s3进行交换。
swap
我们将s2和s3进行交换:
swap(s2, s3);
但是我们这样直接交换,用的是算法库函数里面的swap交换函数。


但是用库里面的函数,代价开大了,会进行3次深拷贝。
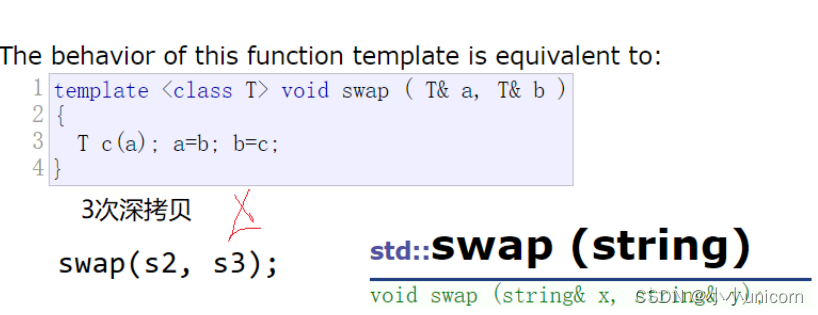
为了防止这个问题,string有一个专门的swap函数:

s2.swap(s3);
这里的swap就只是将s2和s3的地址进行了交换。

我们可以将地址打印出来,测试一下:
printf("s2:%p\n", s2.c_str());
printf("s3:%p\n", s3.c_str());
//swap(s2, s3);
s2.swap(s3);
printf("s2:%p\n", s2.c_str());
printf("s3:%p\n", s3.c_str());

确实只交换了地址。
那么库函数里的swap呢?
printf("s2:%p\n", s2.c_str());
printf("s3:%p\n", s3.c_str());
swap(s2, s3);
//s2.swap(s3);
printf("s2:%p\n", s2.c_str());
printf("s3:%p\n", s3.c_str());

结果发现:这里怎么也只是交换了地址,这又是为什么呢?

这是因为,在string的全员函数中,还有一个swap的全局函数:

而这个全局的swao函数就是为了防止调到算法库里面的swap函数,换句话说,string中基本上永远调不到算法库里面的swap函数。
现在反观STL,就会发现他的厉害之处。
字符串操作:
在string类中,与字符串操作相关的有以下这些:
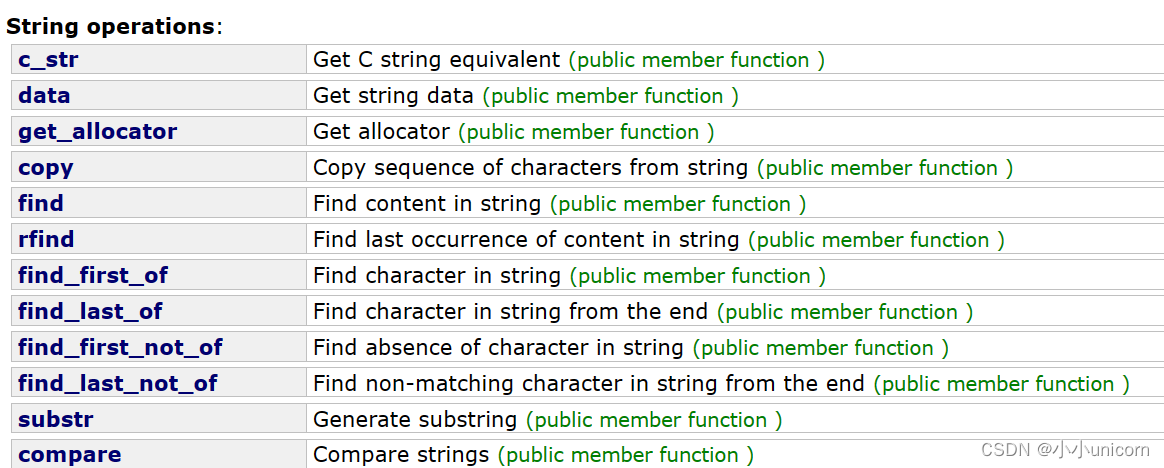
这里我们重点将find系列:
find系列
find系列有以下这些:

find:查找

rfind:从后往前找:

subster:获取子串操作

示例:
void test_string13()
{
	string s1("test.cpp.tar.zip");
	//size_t i = s1.find('.');
	size_t i = s1.rfind('.');

	string s2 = s1.substr(i);
	cout << s2 << endl;
}
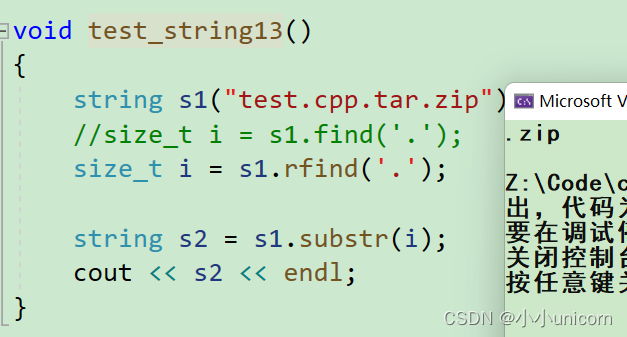
我们可以做一个小练习:
给定一个网址,将这个网址按照协议,域名,资源名分割开来:
void test_string13()
{
	string s1("test.cpp.tar.zip");
	//size_t i = s1.find('.');
	size_t i = s1.rfind('.');

	string s2 = s1.substr(i);
	cout << s2 << endl;

	string s3("https://legacy.cplusplus.com/reference/string/string/substr/");

	string sub1, sub2, sub3;
	// 协议
	size_t i1 = s3.find(':');
	if (i1 != string::npos)
	{
		sub1 = s3.substr(0, i1);
	}
	else
		cout << "没有找到协议" << endl;

	// 域名

	size_t i2 = s3.find('/', i1 + 3);
	if (i2 != string::npos)
	{
		sub2 = s3.substr(i1 + 3, i2 - (i1 + 3));
	}
	else
		cout << "没有找到域名" << endl;

	// 资源名
	sub3 = s3.substr(i2 + 1);

	cout << "协议为:" << endl;
	cout << sub1 << endl;
	cout << "域名为:" << endl;
	cout << sub2 << endl;
	cout << "资源名为:" << endl;
	cout << sub3 << endl;
}

难点就是如何控制下标的位置:
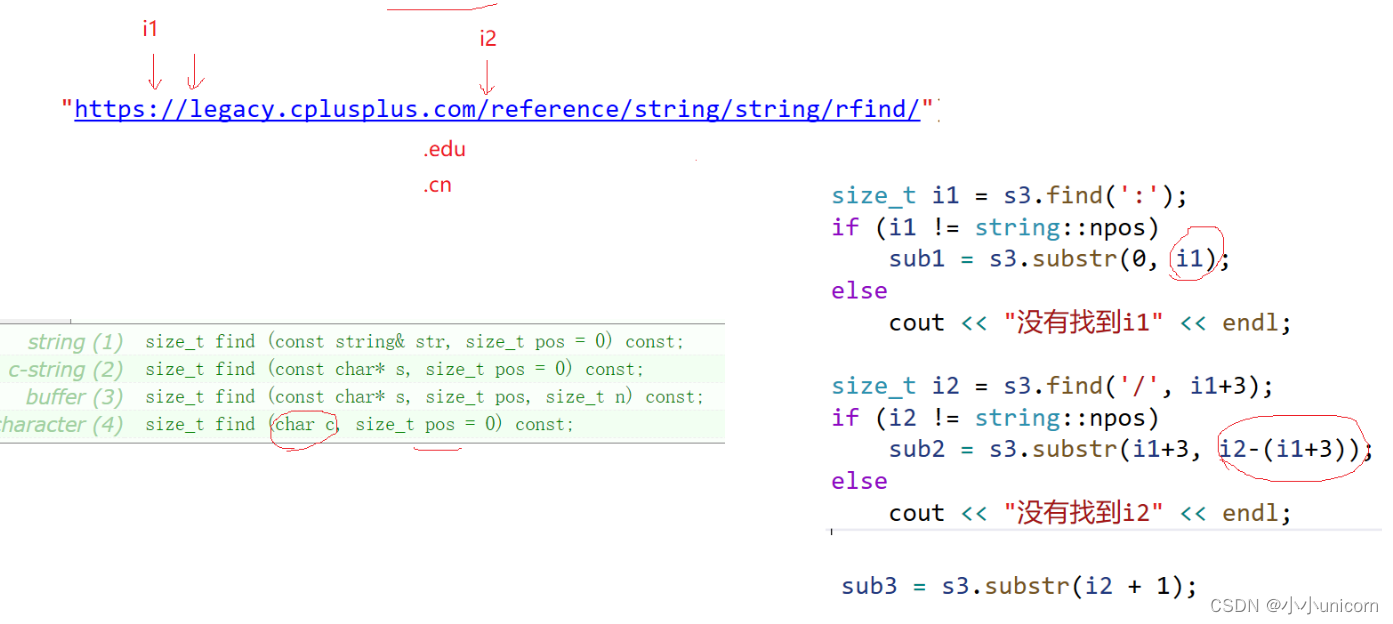
剩下的这些,用的很少:

先看一下示例:
void test_string14()
{
	/*std::string str("Please, replace the vowels in this sentence by asterisks.");
	std::size_t found = str.find_first_not_of("abc");
	while (found != std::string::npos)
	{
		str[found] = '*';
		found = str.find_first_not_of("abcdefg", found + 1);
	}

	std::cout << str << '\n';*/

	std::string str("Please, replace the vowels in this sentence by asterisks.");
	std::size_t found = str.find_first_of("abcd");
	while (found != std::string::npos)
	{
		str[found] = '*';
		found = str.find_first_of("abcd", found + 1);
	}

	std::cout << str << '\n';

}

find_first_of:可以看到,这里的用处是将满足条件的全部找出来。
void test_string14()
{
	std::string str("Please, replace the vowels in this sentence by asterisks.");
	std::size_t found = str.find_first_not_of("abc");
	while (found != std::string::npos)
	{
		str[found] = '*';
		found = str.find_first_not_of("abcdefg", found + 1);
	}

	std::cout << str << '\n';

	/*std::string str("Please, replace the vowels in this sentence by asterisks.");
	std::size_t found = str.find_first_of("abcd");
	while (found != std::string::npos)
	{
		str[found] = '*';
		found = str.find_first_of("abcd", found + 1);
	}

	std::cout << str << '\n';*/
}

find_first_not_of:而这就是取反操作,将满足条件之外的所有元素全部找出来。
