-
-
- 裁剪平面示例(二)
-
裁剪平面(osg::Scissor)示例(二)的代码如程序清单8-2所示
// 裁剪平面测试(2)
void scissor_8_2(const string strDataFolder)
{
osg::ref_ptr<osgViewer::Viewer> viewer = new osgViewer::Viewer();
osg::ref_ptr<osg::GraphicsContext::Traits> traits = new osg::GraphicsContext::Traits;
traits->x = 50;
traits->y = 50;
traits->width = 1000;
traits->height = 800;
traits->windowDecoration = true;
traits->doubleBuffer = true;
traits->sharedContext = 0;
osg::ref_ptr<osg::GraphicsContext> gc = osg::GraphicsContext::createGraphicsContext(traits.get());
osg::ref_ptr<osg::Camera> camera = new osg::Camera;
camera->setGraphicsContext(gc.get());
camera->setViewport(new osg::Viewport(0, 0, traits->width, traits->height));
GLenum buffer = traits->doubleBuffer ? GL_BACK : GL_FRONT;
camera->setDrawBuffer(buffer);
camera->setReadBuffer(buffer);
viewer->addSlave(camera.get());
// 创建一个裁剪面
osg::ref_ptr<osg::Scissor> scissor = new osg::Scissor;
// 设置裁剪面矩形(左下角坐标,长和宽)
scissor->setScissor(150, 150, 800, 600);
osg::ref_ptr<osg::Group> root = new osg::Group();
string strDataPath = strDataFolder + "cow.osg";
osg::ref_ptr<osg::Node> node = osgDB::readNodeFile(strDataPath);
if (node == nullptr)
{
cout << "读取cow.osg失败!" << endl;
return;
}
root->addChild(node.get());
osgUtil::Optimizer optimizer;
optimizer.optimize(root.get());
viewer->setSceneData(root.get());
viewer->realize();
viewer->run();
}
运行程序,截图如图 8-9 所示。
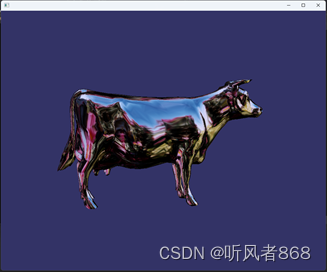
图8-9裁剪平面示例(二)截图
-
-
- 单视图与相机
-
在OSG中,单视图的管理是通过osgViewer.:Viewer来实现的。osgViewer.:Viewer 继承自多个类,负责OSG中单视图的管理,继承关系图如图8-10所示
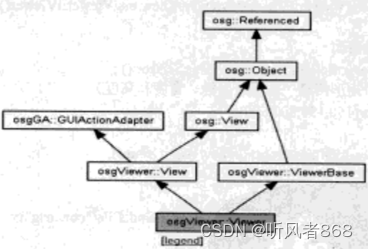
图8-10 osgViewer::Viewer 的继承关系图
从继承关系图中可以看出osgViewer:Viewer继承自osgVicwer:View类和osg:Viewer:ViewerBase,同样它也间接继承自osg::Referenced 类。因此,可以使用智能指针来管理
- osg::View:主要用来管理所有相机视图。它包含一个主相机(Master Camera)和N个从属相机(Slave)。如果 View 仅有一个主相机,则该主相机用来负责控制和染视图场景。如果包含从属相机,则主相机用来负责控制管理视图,从属相机用于渲染场景。
- osgViewer.:View:可以挂节事件、处理事件,并负责创建相机和创建图形环境窗口。
- osgViewer.:ViewerBase:具有管理染的线程、负责设置线程模式、启动相关线程等功能。
- osgGA::GUIActionAdapter类:GUI动作适配器用来向系统发送一些请求,以实现一些特定的操作。这也是后面说到的 GUI时间处理器的主要组成部分之一。
在osgViewer:Viewer中,只允许单视图,单视图可以同时包含多个相机渲染,也可以在多窗口中渲染。为了能够进行正常的渲染,还需要创建一个图形环境(默认的情况下已经创建了一个)。有时为了方便控制场景渲染,需要设置一个合适的图形环境窗口。
创建图形环境的主要步骤如下:
- 通过 WindowingSystemInterface 类得到系统窗口接口,该系统接口主要是为了关联窗口系统与图形环境。
- 下面是OSG中图形环境的主要特性,但在实际应用的过程中,没有必要设置每一个参数,只需根据实际需要来设置合理的参数即可。
x;y,width,height;// 窗口的坐标、高度及宽度,默认值都为0;windowDecration(false); // 是否支持窗口扩展的功能,Wi32中style
supportsResize(truc),// 是否支持窗口编放
red(8). //红色位数,默认8位
blue(8)//蓝色位数,默认8位
green(8)//绿色位数,默认8位
alpha(0)//alpha值位数,透明度,默认没有alpha通道,为RGB格式
depth(24)//颜色的深度(16,24,32),默认使用24位
stencil(0)//模板默认无
sampleBuffers(0)//采样缓存,默认无
samples(0).//采样倍数(抗锯齿的倍数),默认无
pbuffer(false)//pbuffer,默认不支持
quadBufferStereo(false)//立体四缓存,主要在高端显卡上有,如QUDRO显卡上
doubleBuffer(false) //是否支持双缓存,默认不支持
target(0),//目标
format(0)//格式
level(0)//嵌套的层数,默认无
face(0)./
mipMapGeneration(false),//是否支持生成Mipmap,默认不支持
vsync(true)//是否支持同步,默认同步模式
useMultiThreadedOpenGLEngine(false)/是否采用多线程,默认不支持
useCursor(true)//是否使用鼠标的指针,默认使用
sharedContext(0),//共享上下文
setInheritedWindowPixelFormat(false)//是否继承Window 中的位格式
- 通过图形环境特性创建图形环境。通过调用一个静态成员函数创建图形环境的代码如下:
osg::GraphicsContext:createGraphics(trait.get());
<4> 通过图形环境建窗口(hwnd)
有时仅用上面的方法创建一个图形环境是远远不够的,在OSG2.x系列以后,窗口的控制方式发生了变换,主要由宽度来控制场景的缩放。当窗口的宽度和高度不是 4:3 时,会出现一系列的问题,如变形等。这时调整宽度和高度肯定是可以的,还有一种方法就是设置投影矩阵。可以通过得到默认的对称透视投影,然后根据当前窗口的比例来确定一个合适的投影矩阵,代码可参看第 8.1.5节的示例。
-
-
- 宽屏变形示例
-
宽屏变形示例的代码如程序清单8-3所示
// 单视图+单相机 宽屏变形示例(3)
void wideScreen_8_3(const string strDataFolder)
{
// 创建Viewer对象,场景浏览器
osg::ref_ptr<osgViewer::Viewer> viewer = new osgViewer::Viewer();
// 创建场景组节点
osg::ref_ptr<osg::Group> root = new osg::Group();
// 读取模型
string strDataPath = strDataFolder + "cow.osg";
osg::ref_ptr<osg::Node> node = osgDB::readNodeFile(strDataPath);
root->addChild(node.get());
// 设置图像环境特性
osg::ref_ptr<osg::GraphicsContext::Traits> traits = new osg::GraphicsContext::Traits();
traits->x = 0;
traits->y = 0;
traits->width = 1000;
traits->height = 800;
traits->windowDecoration = true;
traits->doubleBuffer = true;
traits->sharedContext = 0;
// 创建图像环境特性
osg::ref_ptr<osg::GraphicsContext> gc = osg::GraphicsContext::createGraphicsContext(traits.get());
if (gc.valid())
{
osg::notify(osg::INFO) << " GraphicsWindow has been created successfully." << endl;
// 清除窗口颜色及清除颜色和深度缓冲
gc->setClearColor(osg::Vec4f(0.2f, 0.2f, 0.6f, 1.0f));
gc->setClearMask(GL_COLOR_BUFFER_BIT | GL_DEPTH_BUFFER_BIT);
}
else
{
osg::notify(osg::NOTICE) << " GraphicsWindow has not been created successfully" << endl;
}
// 根据分辨率确定合适的投影来保证显示的图形不变形
double fovy, aspectRatio, zNear, zFar;
viewer->getCamera()->getProjectionMatrixAsPerspective(fovy, aspectRatio, zNear, zFar);
double newAspectRatio = double(traits->width) / double(traits->height);
double aspectRatioChange = newAspectRatio / aspectRatio;
if (aspectRatioChange != 1.0)
{
// 设置投影矩阵
viewer->getCamera()->getProjectionMatrix() *= osg::Matrix::scale(1.0 / aspectRatioChange, 1.0, 1.0);
}
// 设置视口
viewer->getCamera()->setViewport(new osg::Viewport(0, 0, traits->width, traits->height));
// 设置图形环境
viewer->getCamera()->setGraphicsContext(gc.get());
// 优化场景数据
osgUtil::Optimizer optimizer;
optimizer.optimize(root.get());
viewer->setSceneData(root.get());
viewer->realize();
viewer->run();
}
运行程序,截图如图8-11所示

图8-11宽屏变形示例截图
-
-
- 单视图多相机渲染示例
-
单视图多相机渲染示例的代码如程序清单8-4所示
// 单视图多相机示例(4)
void singleWindowMultipleCameras(osg::ref_ptr<osgViewer::Viewer> viewer)
{
// 创建窗口系统接口
osg::ref_ptr<osg::GraphicsContext::WindowingSystemInterface> wsi = osg::GraphicsContext::getWindowingSystemInterface();
if (!wsi)
{
osg::notify(osg::NOTICE) << "Error, no WindowSystemInterface available cannot create windows." << endl;
return;
}
// 得到窗口分辨率
unsigned int width, height;
wsi->getScreenResolution(osg::GraphicsContext::ScreenIdentifier(0), width, height);
// 设置图形环境特性
osg::ref_ptr<osg::GraphicsContext::Traits> traits = new osg::GraphicsContext::Traits;
traits->x = 0;
traits->y = 0;
traits->width = width;
traits->height = height;
traits->windowDecoration = true;
traits->doubleBuffer = true;
traits->sharedContext = 0;
// 创建图形环境
osg::ref_ptr<osg::GraphicsContext> gc = osg::GraphicsContext::createGraphicsContext(traits.get());
if (gc->valid())
{
osg::notify(osg::INFO) << " GraphicsWindow has been created successfully." << endl;
// 确保窗口清除干净
gc->setClearColor(osg::Vec4f(0.2f, 0.2f, 0.6f, 1.0f));
gc->setClearMask(GL_COLOR_BUFFER_BIT | GL_DEPTH_BUFFER_BIT);
}
else
{
osg::notify(osg::NOTICE) << " GraphicsWindow has not been created successfully." << endl;
}
// 得到cameraMaster(主相机)
osg::ref_ptr<osg::Camera> cameraMaster = viewer->getCamera();
// 设置图形环境
cameraMaster->setGraphicsContext(gc.get());
// 根据分辨率确定合适的投影来保证显示的图形不变形
double fovy, aspectRatio, zNear, zFar;
cameraMaster->getProjectionMatrixAsPerspective(fovy, aspectRatio, zNear, zFar);
double newAspectRatio = double(traits->width) / double(traits->height);
double aspectRatioChange = newAspectRatio / aspectRatio;
if (aspectRatioChange != 1.0)
{
cameraMaster->getProjectionMatrix() *= osg::Matrix::scale(1.0 / aspectRatioChange, 1.0, 1.0);
}
// 设置视口
cameraMaster->setViewport(new osg::Viewport(0, 0, width, height));
GLenum bufferMaster = traits->doubleBuffer ? GL_BACK : GL_FRONT;
// 设置缓冲区
cameraMaster->setDrawBuffer(bufferMaster);
cameraMaster->setReadBuffer(bufferMaster);
// 创建从属相机
osg::ref_ptr<osg::Camera> cameraClient = new osg::Camera();
cameraClient->setGraphicsContext(gc.get());
cameraClient->setViewport(new osg::Viewport(9, 0, 400, 400));
GLenum bufferClient = traits->doubleBuffer ? GL_BACK : GL_FRONT;
cameraClient->setDrawBuffer(bufferClient);
cameraClient->setReadBuffer(bufferClient);
// 添加从属相机
viewer->addSlave(cameraClient, osg::Matrix::scale(aspectRatio, 1.0, 1.0), osg::Matrix());
}
void sinGraphMulCam_8_4(const string strDataFolder)
{
osg::ref_ptr<osgViewer::Viewer> viewer = new osgViewer::Viewer();
// 读取牛的模型
string strDataPath = strDataFolder + "cow.osg";
osg::ref_ptr<osg::Node> node = osgDB::readNodeFile(strDataPath);
// 启用单视图多相机渲染
singleWindowMultipleCameras(viewer.get());
// 优化场景数据
osgUtil::Optimizer optimizer;
optimizer.optimize(node.get());
viewer->setSceneData(node.get());
viewer->realize();
viewer->run();
}
运行程序,截图如图8-12所示
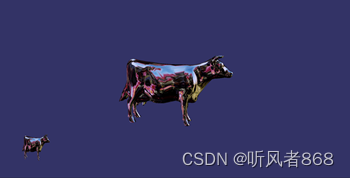
图8-12单视图多相机染示例截图


