目录
官方链接
编译安装
ubuntu版本
安装
examples
tools
hello_world.py demo
运行报错
网上目前的解决办法
错误分析过程
python版本检测
libbcc库检查
python3 bcc库检查
正常输出
监控进程切换
运行输出
监控CPU直方图
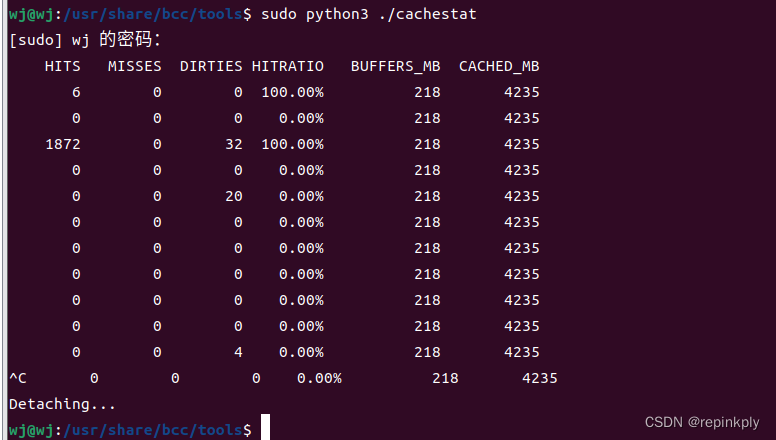
缓存命中率监控:cachestat
cachetop
BCC开发指南
官方链接
主页:https://github.com/iovisor/bcc
bcc开发:https://github.com/iovisor/bcc/blob/master/docs/tutorial_bcc_python_developer.md
编译安装
ubuntu版本
wj@wj:~$ lsb_release -a
No LSB modules are available.
Distributor ID:	Ubuntu
Description:	Ubuntu 22.04.2 LTS
Release:	22.04
Codename:	jammy
安装
git clone https://github.com/iovisor/bcc.git
mkdir bcc/build; cd bcc/build
cmake ..
make
sudo make install
cmake -DPYTHON_CMD=python3 .. # build python3 binding
pushd src/python/
make
sudo make install
popd

安装路径:
/usr/share/bcc/tools
可以看到 /usr/share/bcc 目录下,有4个文件夹,examples introspection man tools 。
在examples 文件下,有一些简单的demo。tools文件下有 bcc的各种工具。
examples

tools

hello_world.py demo
#!/usr/bin/python
# Copyright (c) PLUMgrid, Inc.
# Licensed under the Apache License, Version 2.0 (the "License")

# run in project examples directory with:
# sudo ./hello_world.py"
# see trace_fields.py for a longer example

from bcc import BPF

# This may not work for 4.17 on x64, you need replace kprobe__sys_clone with kprobe____x64_sys_clone
BPF(text='int kprobe__sys_clone(void *ctx) { bpf_trace_printk("Hello, World!\\n"); return 0; }').trace_print()
上述 hello_world.py程序中会监测 kprobe__sys_clone 事件,一旦内核监测到 kprobe__sys_clone 事件产生,就会打印 Hello, World! 出来。
运行报错
wj@wj:/usr/share/bcc/examples$ sudo python3 hello_world.py
Traceback (most recent call last):
  File "/usr/share/bcc/examples/hello_world.py", line 9, in <module>
    from bcc import BPF
  File "/usr/lib/python3/dist-packages/bcc/__init__.py", line 27, in <module>
    from .libbcc import lib, bcc_symbol, bcc_symbol_option, bcc_stacktrace_build_id, _SYM_CB_TYPE
  File "/usr/lib/python3/dist-packages/bcc/libbcc.py", line 20, in <module>
    lib.bpf_module_create_b.restype = ct.c_void_p
  File "/usr/lib/python3.10/ctypes/__init__.py", line 387, in __getattr__
    func = self.__getitem__(name)
  File "/usr/lib/python3.10/ctypes/__init__.py", line 392, in __getitem__
    func = self._FuncPtr((name_or_ordinal, self))
AttributeError: /lib/x86_64-linux-gnu/libbcc.so.0: undefined symbol: bpf_module_create_b
网上目前的解决办法
主要还是python版本问题,将python2切换为python3。而我这边显然不是这个问题,因为我的机子上只有python3
错误分析过程
根据报错信息,和报错相关的路径:
/lib/x86_64-linux-gnu/libbcc.so.0 :bcc库采用的libbcc.so.0
/usr/lib/python3/dist-packages/bcc :报错的bcc库
python版本检测
使用的均为python3,没有python2,所以不存在版本问题。
libbcc库检查
wj@wj:/usr/share/bcc/examples$ ls -lh /lib/x86_64-linux-gnu/ |grep libbcc
-rw-r--r--  1 root root  5.0M 11月  5 14:48 libbcc.a
-rw-r--r--  1 root root  1.5M 11月  5 14:46 libbcc_bpf.a
lrwxrwxrwx  1 root root    15  1月 19  2021 libbcc_bpf.so -> libbcc_bpf.so.0
lrwxrwxrwx  1 root root    20 11月  5 14:54 libbcc_bpf.so.0 -> libbcc_bpf.so.0.28.0
-rw-r--r--  1 root root   51K  1月 19  2021 libbcc_bpf.so.0.18.0
-rw-r--r--  1 root root  2.8M 11月  5 14:48 libbcc_bpf.so.0.28.0
-rw-r--r--  1 root root  243K 11月  5 14:47 libbcc-loader-static.a
lrwxrwxrwx  1 root root    11  1月 19  2021 libbcc.so -> libbcc.so.0
lrwxrwxrwx  1 root root    16 11月  5 14:54 libbcc.so.0 -> libbcc.so.0.28.0
-rw-r--r--  1 root root  3.3M  1月 19  2021 libbcc.so.0.18.0
-rw-r--r--  1 root root  105M 11月  5 14:47 libbcc.so.0.28.0
可以看到libbcc库的实际指向为: libbcc.so.0 -> libbcc.so.0.28.0
根据报错内容,python库需要bpf_module_create_b,而libbcc.so.0.28.0中没有
可以通过以下命令查看:
wj@wj:/usr/share/bcc/examples$ strings /lib/x86_64-linux-gnu/libbcc.so.0.28.0 |grep bpf_module_create_
bpf_module_create_c
bpf_module_create_c_from_string
bpf_module_create_c.cold
bpf_module_create_c_from_string.cold
bpf_module_create_c
bpf_module_create_c_from_string
此时注意到上一个步骤中的libbcc.so.0.18.0,同样进行bpf_module_create_b检查
wj@wj:/usr/share/bcc/examples$ strings /lib/x86_64-linux-gnu/libbcc.so.0.18.0 |grep bpf_module_create_
bpf_module_create_b
bpf_module_create_c
bpf_module_create_c_from_string
发现存在bpf_module_create_b,即便不进行时间对比,通过版本号0.18.0与0.28.0也知道,
python3的bcc库竟然请求的是老版(0.18.0)的bcc lib库
python3 bcc库检查
wj@wj:/usr/share/bcc/examples$ ll  /usr/lib/python3/dist-packages/bcc/
总计 212
drwxr-xr-x   3 root root  4096 10月  4 15:36 ./
drwxr-xr-x 155 root root 12288 11月  5 14:56 ../
-rw-r--r--   1 root root  2566  1月 19  2021 containers.py
-rw-r--r--   1 root root 20914  1月 19  2021 disassembler.py
-rw-r--r--   1 root root 58581  1月 19  2021 __init__.py
-rw-r--r--   1 root root 12951  1月 19  2021 libbcc.py
-rw-r--r--   1 root root  4693  1月 19  2021 perf.py
drwxr-xr-x   2 root root  4096 10月  4 15:36 __pycache__/
-rw-r--r--   1 root root  9656  1月 19  2021 syscall.py
-rw-r--r--   1 root root 40588  1月 19  2021 table.py
-rw-r--r--   1 root root  1604  1月 19  2021 tcp.py
-rw-r--r--   1 root root  9102  1月 19  2021 usdt.py
-rw-r--r--   1 root root  4904  1月 19  2021 utils.py
-rw-r--r--   1 root root    23  1月 19  2021 version.py
根据文件时间可以确定,确实都是21年的老库,遂进行替换,先查找bcc源码中的bcc python库:
wj@wj:/usr/share/bcc/examples$ find / -name libbcc.py -ls 2>/dev/null
   408370     16 -rw-rw-r--   1 wj       wj          14561 11月  5 14:44 /home/wj/bcc/build/src/python/bcc-python3/bcc/libbcc.py
   408643     16 -rw-r--r--   1 root     root        14561 11月  5 14:44 /home/wj/bcc/build/src/python/bcc-python3/build/lib/bcc/libbcc.py
   407310     16 -rw-rw-r--   1 wj       wj          14561 11月  5 14:43 /home/wj/bcc/src/python/bcc/libbcc.py
  4496431     16 -rw-r--r--   1 root     root        12951 1月 19  2021 /usr/lib/python3/dist-packages/bcc/libbcc.py
wj@wj:/usr/share/bcc/examples$ cp -r /home/wj/bcc/build/src/python/bcc-python3/bcc/* /usr/lib/python3/dist-packages/bcc/
cp: 无法创建普通文件 '/usr/lib/python3/dist-packages/bcc/containers.py': 权限不够
cp: 无法创建普通文件 '/usr/lib/python3/dist-packages/bcc/disassembler.py': 权限不够
cp: 无法创建普通文件 '/usr/lib/python3/dist-packages/bcc/__init__.py': 权限不够
cp: 无法创建普通文件 '/usr/lib/python3/dist-packages/bcc/libbcc.py': 权限不够
cp: 无法创建普通文件 '/usr/lib/python3/dist-packages/bcc/perf.py': 权限不够
cp: 无法创建普通文件 '/usr/lib/python3/dist-packages/bcc/syscall.py': 权限不够
cp: 无法创建普通文件 '/usr/lib/python3/dist-packages/bcc/table.py': 权限不够
cp: 无法创建普通文件 '/usr/lib/python3/dist-packages/bcc/tcp.py': 权限不够
cp: 无法创建普通文件 '/usr/lib/python3/dist-packages/bcc/usdt.py': 权限不够
cp: 无法创建普通文件 '/usr/lib/python3/dist-packages/bcc/utils.py': 权限不够
cp: 无法创建普通文件 '/usr/lib/python3/dist-packages/bcc/version.py': 权限不够
sudo cp -r /home/wj/bcc/build/src/python/bcc-python3/bcc/* /usr/lib/python3/dist-packages/bcc/参考:AttributeError: /lib/x86_64-linux-gnu/libbcc.so.0: undefined symbol: bpf_module_create_b-CSDN博客
正常输出

可以看到 内核捕获到了 kprobe__sys_clone 事件,并打印出 Hello, World! 出来。
监控进程切换
//task_switch.py
#!/usr/bin/python
# Copyright (c) PLUMgrid, Inc.
# Licensed under the Apache License, Version 2.0 (the "License")

from bcc import BPF
from time import sleep

b = BPF(src_file="task_switch.c")
b.attach_kprobe(event_re="^finish_task_switch$|^finish_task_switch\.isra\.\d$",
                fn_name="count_sched")

# generate many schedule events
for i in range(0, 100): sleep(0.01)

for k, v in b["stats"].items():
    print("task_switch[%5d->%5d]=%u" % (k.prev_pid, k.curr_pid, v.value))
k.prev_pid :表示上一个进程的 pid
k.curr_pid :表示切换到当前进程 pid
task_switch.c
#include <uapi/linux/ptrace.h>
#include <linux/sched.h>

struct key_t {
    u32 prev_pid;
    u32 curr_pid;
};

BPF_HASH(stats, struct key_t, u64, 1024);
int count_sched(struct pt_regs *ctx, struct task_struct *prev) {
    struct key_t key = {};
    u64 zero = 0, *val;

    key.curr_pid = bpf_get_current_pid_tgid();
    key.prev_pid = prev->pid;

    // could also use `stats.increment(key);`
    val = stats.lookup_or_try_init(&key, &zero);
    if (val) {
        (*val)++;
    }
    return 0;
}
运行输出
wj@wj:/usr/share/bcc/examples/tracing$ sudo python3 task_switch.py
[sudo] wj 的密码:
task_switch[  879->    0]=1
task_switch[    0->14938]=2
task_switch[14959->    0]=1
task_switch[    0->14964]=2
task_switch[    0->   71]=2
task_switch[    0->15021]=1
task_switch[14969->14939]=1
task_switch[11713->    0]=1
task_switch[   52->    0]=1
task_switch[    0->  809]=4
task_switch[ 2402->    0]=6
task_switch[  928->    0]=1
task_switch[ 5247->    0]=3
task_switch[    0->  437]=3
task_switch[    0-> 7458]=6
task_switch[    0->14986]=1
task_switch[11411->    0]=3
task_switch[ 2674->    0]=5
task_switch[15064->    0]=1
task_switch[ 8767->    0]=48
task_switch[14939->14969]=1
task_switch[14998->    0]=1
task_switch[    0->14921]=2
task_switch[14986->14959]=2
task_switch[    0->15194]=1
task_switch[    0->   16]=1
task_switch[    0->   15]=14
task_switch[  901->15194]=1
task_switch[   22->    0]=1
task_switch[ 1816->    0]=7
task_switch[    0->   40]=1
task_switch[14959->14986]=1
task_switch[    0->  901]=1
task_switch[14577->    0]=1
task_switch[    0-> 5247]=3
task_switch[   58->    0]=1
task_switch[14938->    0]=2
task_switch[    0->11411]=3
task_switch[   34->    0]=1
task_switch[15194->    0]=2
task_switch[    0->   58]=1
task_switch[    0->   28]=1
task_switch[ 7458->    0]=7
task_switch[    0->15010]=3
task_switch[  926->    0]=1
task_switch[14921->    0]=2
task_switch[   46->    0]=1
task_switch[14964->    0]=3
task_switch[15030->    0]=3
task_switch[   15->    0]=14
task_switch[   40->    0]=1
task_switch[    0->14374]=5
task_switch[    0->15064]=1
task_switch[15129->    0]=1
task_switch[    0-> 8767]=47
task_switch[    0->15129]=1
task_switch[  809->    0]=3
task_switch[14374->    0]=5
task_switch[    0-> 2674]=5
task_switch[    0->   34]=1
task_switch[    0->  926]=1
task_switch[    0->15211]=100
task_switch[14969->    0]=1
task_switch[    0->14969]=1
task_switch[    0->11713]=1
task_switch[  437->    0]=3
task_switch[  835->    0]=11
task_switch[ 2035->    0]=11
task_switch[ 8767->   29]=10
task_switch[    0->14577]=1
task_switch[    0-> 1816]=7
task_switch[    0->14998]=1
task_switch[    0->  928]=1
task_switch[15010->    0]=3
task_switch[    0-> 2402]=6
task_switch[    0->14981]=1
task_switch[    0-> 2142]=1
task_switch[  953->    0]=1
task_switch[   29-> 8767]=10
task_switch[  835-> 8767]=1
task_switch[    0->  835]=12
task_switch[   28->    0]=1
task_switch[    0->  953]=1
task_switch[    0-> 2035]=11
task_switch[14981->14964]=1
task_switch[  809-> 7458]=1
task_switch[ 1702->    0]=1
task_switch[    0->   52]=1
task_switch[   16->    0]=1
task_switch[    0->  879]=1
task_switch[    0->15030]=3
task_switch[15211->    0]=100
task_switch[    0->   22]=1
task_switch[   71->    0]=2
task_switch[15021->    0]=1
task_switch[    0->   46]=1
task_switch[ 2142->    0]=1
监控CPU直方图
tools/cpudist: Summarize on- and off-CPU time per task as a histogram.
tools/cpudist:将每个任务的 CPU 开启和关闭时间总结为直方图。
wj@wj:/usr/share/bcc/tools$ sudo python3 ./cpudist
Tracing on-CPU time... Hit Ctrl-C to end.
^C
     usecs               : count     distribution
         0 -> 1          : 5        |*                                       |
         2 -> 3          : 38       |********                                |
         4 -> 7          : 106      |***********************                 |
         8 -> 15         : 134      |******************************          |
        16 -> 31         : 156      |***********************************     |
        32 -> 63         : 177      |****************************************|
        64 -> 127        : 142      |********************************        |
       128 -> 255        : 63       |**************                          |
       256 -> 511        : 79       |*****************                       |
       512 -> 1023       : 21       |****                                    |
      1024 -> 2047       : 7        |*                                       |
      2048 -> 4095       : 1        |                                        |
      4096 -> 8191       : 1        |                                        |
wj@wj:/usr/share/bcc/tools$
缓存命中率监控:cachestat
- tools/cachestat: Trace page cache hit/miss ratio. Examples.
sudo python3 ./cachestat
cachetop
sudo python3 ./cachetop

以上都是自定义在 examples 和 tools 中的工具。如果需要自己开发 bcc 程序,那应该怎么样使用呢?可以参考如下链接。
BCC开发指南
https://github.com/iovisor/bcc/blob/master/docs/tutorial_bcc_python_developer.md

![[LeetCode]-160. 相交链表-141. 环形链表-142.环形链表II-138.随机链表的复制](https://img-blog.csdnimg.cn/eb7696b8f4e74a71a2e9ed3c27e0b7e9.png)







![[LeetCode] 2.两数相加](https://img-blog.csdnimg.cn/0b28e0acd1a74e1ca7a12d90a79a70bd.jpeg#pic_center)
