大家家好,我是一名网络怪咖,北漂五年。相信大家和我一样,都有一个大厂梦,作为一名资深Java选手,深知Spring重要性,现在普遍都使用SpringBoot来开发,面试的时候SpringBoot原理也是经常会问到,SpringBoot是为了简化Spring开发,但是底层仍然是Spring。如果不了解Spring源码,那就更别提SpringBoot源码了,接下来我准备用两个月时间,从基础到源码彻彻底底的学习一遍Spring。
学习框架一定要踏踏实实一步一个脚印的学,很多人都比较喜欢急功近利,选择跳着学,包括我有时候也是,最终会发现你不但节约不了时间,反而会更耗时,而且学着学着很容易放弃。
目录
- 1.用于创建对象的
- 2.用于扫描注解的
- 3.用于注入数据的
- 3.1.基于注解默认的自动注入
- 3.2.@Autowired详解
- 3.3.@Qualifier详解
- 3.4.@Resource详解
- 3.5.@Value详解
- 4.非自定义Bean注解开发
- 5.Bean配置类的注解开发
- 6.完全替换xml
- 7.自动注入集合
- 8.整合 junit测试
学习基于注解的 IoC 配置,大家脑海里首先得有一个认知,即注解配置和 xml 配置要实现的功能都是一样的,都是要降低程序间的耦合。只是配置的形式不一样。
Spring提供的注解有三个版本:
- 2.0时代,Spring开始出现注解
- 2.5时代,Spring的Bean配置可以使用注解完成
- 3.0时代,Spring其他配置也可以使用注解完成,我们进入全注解时代
1.用于创建对象的
@Component
- 作用:把资源让 spring 来管理。相当于xml当中的:
<bean id="" class=""> - 属性:value:指定 bean 的 id。如果不指定 value 属性,默认 bean 的 id 是当前类的类名,首字母小写。
- 使用方式:只能用在类上
// 获取方式:applicationContext.getBean("userDao");
@Component("userDao")
public class UserDaoImpl implements UserDao {

}
由于JavaEE开发是分层的,为了每层Bean标识的注解语义化更加明确,@Component又衍生出如下三个注解:

他们的都是由@Component衍生出来的,功能都是一样的!
@Repository("userDao")
public class UserDaoImpl implements UserDao{
}

@Service("userService")
public class UserServiceImpl implements UserService{
}

@Controller("userService")
public class UserController {
}
2.用于扫描注解的
使用注解对需要被Spring实例化的Bean进行标注,但是需要告诉Spring去哪找这些Bean,要配置组件扫描路径
<?xml version="1.0" encoding="UTF-8"?>
<beans xmlns="http://www.springframework.org/schema/beans"
       xmlns:context="http://www.springframework.org/schema/context"
       xmlns:xsi="http://www.w3.org/2001/XMLSchema-instance"
       xsi:schemaLocation="http://www.springframework.org/schema/beans
    http://www.springframework.org/schema/beans/spring-beans.xsd
    http://www.springframework.org/schema/context
    http://www.springframework.org/schema/context/spring-context.xsd">

    <!-- 告知Spring框架去com.gzl.cn包及其子包下去扫描使用了注解的类 -->
    <context:component-scan base-package="com.gzl.cn"></context:component-scan>
</beans>
3.用于注入数据的

注入数据分为自动注入和手动注入,手动注入通常有两种方式,一种是基于set方法的,一种是基于构造器的。
基于构造器的:
<bean id="testService" class="com.gzl.cn.service.TestService"/>

<bean id="testController" class="com.gzl.cn.controller.TestController">
    <property name="age" value="11"/>
    <property name="name" value="张三"/>
    <property name="testService" ref="testService"></property>
</bean>
基于set方法的:
<bean id="testController" class="com.gzl.cn.controller.TestController">
    <constructor-arg name="name" value="张三"></constructor-arg>
    <constructor-arg name="age" value="11"></constructor-arg>
    <constructor-arg name="testService" ref="testService"></constructor-arg>
</bean>
自动注入在xml当中就是指的bean标签的autowire,上一篇文章重点讲过,bean标签的autowire他有5个可选项:
- byName:按照名称进行注入
- byType:按类型进行注入
- constructor:按照构造方法进行注入
- default:默认注入方式
- no:不使用自动注入
<bean id="" class="" autowire="byType|byName|constructor|default" />
3.1.基于注解默认的自动注入
基于注解开发的时候,默认的自动注入
@Service
public class TestService {

    public TestService() {
        System.out.println("TestService初始化了");
    }
}
@Controller
public class TestController {

    private TestService testService;

    public TestController(){

    }

    public TestController(TestService testService) {
        System.out.println("testController初始化了");
        this.testService = testService;
    }

    public void setTestService(TestService testService) {
        System.out.println("testService的set方法执行了");
        this.testService = testService;
    }

    @Override
    public String toString() {
        return "TestController{" +
                "testService=" + testService +
                '}';
    }
}
<?xml version="1.0" encoding="UTF-8"?>
<beans xmlns="http://www.springframework.org/schema/beans"
       xmlns:context="http://www.springframework.org/schema/context"
       xmlns:xsi="http://www.w3.org/2001/XMLSchema-instance"
       xsi:schemaLocation="http://www.springframework.org/schema/beans
    http://www.springframework.org/schema/beans/spring-beans.xsd
    http://www.springframework.org/schema/context
    http://www.springframework.org/schema/context/spring-context.xsd">

    <!-- 告知 spring 创建容器时要扫描的包 -->
    <context:component-scan base-package="com.gzl.cn"></context:component-scan>

</beans>
public class Client {
    public static void main(String[] args) {
        ClassPathXmlApplicationContext classPathXmlApplicationContext = new ClassPathXmlApplicationContext("classpath:bean.xml");
        TestController testController = (TestController)classPathXmlApplicationContext.getBean("testController");
        System.out.println(testController);
    }
}
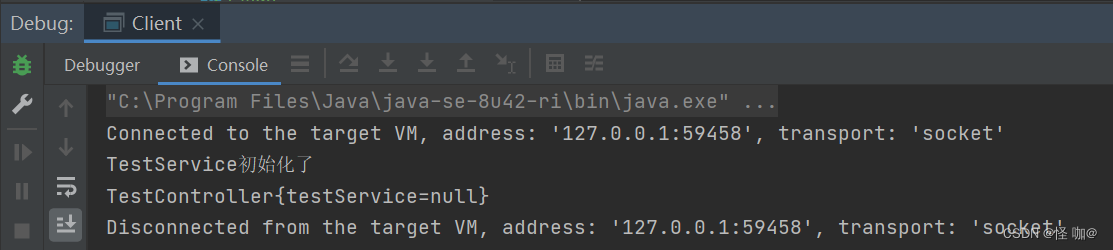
运行结果:很显然TestController当中成员变量testService并没有注入进去,证明他是用的无参构造
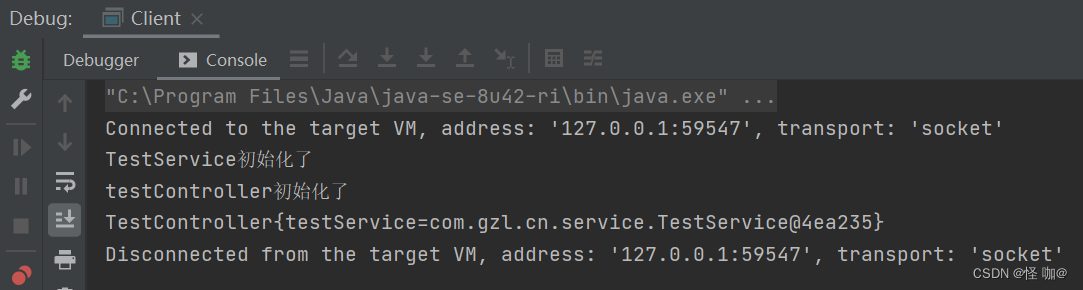
把testController的无参构造去掉之后,再次运行结果如下:
把TestService类当中的@Service注解去掉,运行结果如下:

得出结论:注意以上测试当中并没有使用@Autowired,假如类当中有成员变量,并且没有无参构造,只有有参构造的时候,他会去容器当中寻找该构造器参数的bean,如果找到直接使用该构造器创建对象,如果没找到直接报异常。有点类似于<bean id="" class="" autowire="constructor" />,如果有无参构造器的情况下,他会直接使用无参构造,也就是并不会通过有参构造器去帮我们注入,不使用@Autowired注解的情况下,他也不会通过set方法注入的。
有时候不知道spring当中存在这个机制,没有写无参构造,而只存在有参构造,指不定出什么问题!
3.2.@Autowired详解
作用:自动
按照类型注入。当一个类型有多个实例会通过变量名称当做bean的id去容器寻找,假如还是寻不到直接报错,如果不想要改变量名,还不想让他报错,可以通过@Qualifier来指定bean名称查找!使用@Autowired注入属性时,set 方法可以省略,本质上他也并不是通过set方法来赋值的,是通过反射赋值给成员变量的。
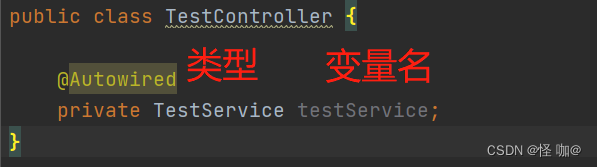
@Autowired作用和上一篇当中讲解的bean标签的autowire一样,都是负责自动注入,只不过@Autowired是注解,而之前的是依赖于xml当中的bean标签。@Autowired注解他也可以用在很多地方,例如:成员变量、set方法、构造器、方法参数。
@Autowired属性只有一个required,默认为true,为true代表着容器当中必须要有这个对象,假如没有启动项目会报could not be found异常。假如为false就算容器当中没有这个对象也不会启动报错。
@Target({ElementType.CONSTRUCTOR, ElementType.METHOD, ElementType.PARAMETER, ElementType.FIELD, ElementType.ANNOTATION_TYPE})
@Retention(RetentionPolicy.RUNTIME)
@Documented
public @interface Autowired {
    boolean required() default true;
}
用法:
// (1)使用在属性上直接注入
@Autowired
private TestService testService;

// (2)使用在set方法上直接注入
@Autowired
public void setTestService(TestService testService) {
    this.testService = testService;
}

// (3)使用在构造器上,假如没有无参构造的情况下,不添加@Autowired也会用这个构造器的,添加了@Autowired,意味着不管有没有无参构造都会使用该构造器注入
@Autowired
public TestController(TestService testService) {
    this.testService = testService;
}
放在方法参数上和构造器参数上是不可行的!!!
public void setTestService(@Autowired TestService testService) {
    this.testService = testService;
}
public TestController(@Autowired TestService testService) {
   this.testService = testService;
}
3.3.@Qualifier详解
当容器中同一类型的Bean实例有多个时,会尝试自动根据名字进行匹配:
@Repository("userDao")
public class UserDaoImpl implements UserDao{
}
@Repository("userDao2")
public class UserDaoImpl2 implements UserDao{
}
当容器中同一类型的Bean实例有多个时,且名字与被注入Bean名称不匹配时会报错
@Qualifier配合@Autowired可以完成根据名称注入Bean实例,使用@Qualifier指定名称
@Autowired
@Qualifier("userDao2")
private UserDao userDao;

@Autowired
@Qualifier("userDao2")
public void setUserDao(UserDao userDao){
	System.out.println(userDao);
}
3.4.@Resource详解
@Resource注解既可以根据类型注入,也可以根据名称注入,无参就是根据类型注入,有参数就是根据名称注入
@Resource
private UserDao userDao;

@Resource(name = "userDao2")
public void setUserDao(UserDao userDao){
	System.out.println(userDao);
}
@Resource注解存在与 javax.annotation 包中,Spring对其进行了解析
3.5.@Value详解
通过@Value 注入properties文件中的属性
@Value("${jdbc.username}")
private String username;

@Value("${jdbc.username}")
public void setUsername(String username){
	System.out.println(username);
}
加载properties文件
<context:property-placeholder location="classpath:jdbc.properties"/>
Springboot当中@Value用法,可以我的这一篇文章,写的非常全:https://blog.csdn.net/weixin_43888891/article/details/127833498
4.非自定义Bean注解开发
非自定义Bean不能像自定义Bean一样使用@Component进行管理,非自定义Bean要通过工厂的方式进行实例化,
使用@Bean标注方法即可,@Bean的属性为beanName,如不指定为当前工厂方法名称
// 将方法返回值Bean实例以@Bean注解指定的名称存储到Spring容器中
@Bean("dataSource")
public DataSource dataSource(){
	DruidDataSource dataSource = new DruidDataSource();
	dataSource.setDriverClassName("com.mysql.jdbc.Driver");
	dataSource.setUrl("jdbc:mysql://localhost:3306/mybatis");
	dataSource.setUsername("root");
	dataSource.setPassword("root");
	return dataSource;
}
PS:工厂方法所在类必须要被Spring管理
如果@Bean工厂方法需要参数的话,则有如下几种注入方式:
- 使用@Autowired 根据类型自动进行Bean的匹配,@Autowired可以省略 ;
- 使用@Qualifier 根据名称进行Bean的匹配;
- 使用@Value 根据名称进行普通数据类型匹配。
@Bean
@Autowired //根据类型匹配参数
public Object objectDemo01(UserDao userDao){
	System.out.println(userDao);
	return new Object();
}
@Bean
public Object objectDemo02(@Qualifier("userDao") UserDao userDao,
@Value("${jdbc.username}") String username){
	System.out.println(userDao);
	System.out.println(username);
	return new Object();
}
5.Bean配置类的注解开发
@Component等注解替代了标签,但是像、context:componentScan 等非 标签怎样去使用注解替代呢?
<!-- 加载properties文件 -->
<context:property-placeholder location="classpath:jdbc.properties"/>
<!-- 组件扫描 -->
<context:component-scan base-package="com.itheima"/>
<!-- 引入其他xml文件 -->
<import resource="classpath:beans.xml"/>
定义一个配置类替代原有的xml配置文件,<bean>标签以外的标签,一般都是在配置类上使用注解完成的
@Configuration注解标识的类为配置类,替代原有xml配置文件,本质是 和@Component具备一样的功能,只是他比@Component多了一个属性proxyBeanMethods,默认为true,这个属性可以控制代理的功能,所以更适合配置类上使用,当@Configuration修饰的对象是个单例并且proxyBeanMethods为true的时候,访问@Bean修饰的方法,获取到的对象总是同一个,假如proxyBeanMethods为false的时候,访问@Bean修饰的方法每次都不是一个对象,一般很少用,想了解详情的可以看我的这一篇文章:https://blog.csdn.net/weixin_43888891/article/details/127473290
@Configuration
public class ApplicationContextConfig {}
@ComponentScan 组件扫描配置,替代原有xml文件中的<context:component-scan base-package=""/>
@Configuration
@ComponentScan({"com.gzl.service","com.gzl.dao"})
public class ApplicationContextConfig {

}
base-package的配置方式:
- 指定一个或多个包名:扫描指定包及其子包下使用注解的类
- 不配置包名:扫描当前@componentScan注解配置类所在包及其子包下的类
@PropertySource 注解用于加载外部properties资源配置,替代原有xml中的 <context:property-placeholder location="classpath:jdbc.properties"/> 配置
@Configuration
@ComponentScan
@PropertySource({"classpath:jdbc.properties","classpath:xxx.properties"})
public class ApplicationContextConfig {

}
@Import 用于加载其他配置类,替代原有xml中的<import resource=“classpath:beans.xml”/>配置,除此之外@Import 也可用于导入非自定义Bean!@Import用法挺多的,想了解细节的可以看这一篇文章:https://blog.csdn.net/weixin_43888891/article/details/127462382
@Configuration
@ComponentScan
@PropertySource("classpath:jdbc.properties")
@Import(OtherConfig.class)
public class ApplicationContextConfig {

}
6.完全替换xml
通过以上我们学习了xml配置替换注解,问题来了,既然替换成了全注解开发,那么我们自然用不到ClassPathXmlApplicationContext加载容器了,我们需要改动如下:
(1)xml去掉
<?xml version="1.0" encoding="UTF-8"?>
<beans xmlns="http://www.springframework.org/schema/beans"
       xmlns:context="http://www.springframework.org/schema/context"
       xmlns:xsi="http://www.w3.org/2001/XMLSchema-instance"
       xsi:schemaLocation="http://www.springframework.org/schema/beans
    http://www.springframework.org/schema/beans/spring-beans.xsd
    http://www.springframework.org/schema/context
    http://www.springframework.org/schema/context/spring-context.xsd">

    <!-- 告知 spring 创建容器时要扫描的包 -->
	<context:component-scan base-package="com.gzl.cn"></context:component-scan>

</beans>
(2)添加自己的配置类
@Configuration
@ComponentScan("com.gzl.cn")
public class Myconfig {

}
(3)使用AnnotationConfigApplicationContext加载配置类
public class Client {
    public static void main(String[] args) {
        AnnotationConfigApplicationContext annotationConfigApplicationContext = new AnnotationConfigApplicationContext(Myconfig.class);
        TestController testController = (TestController)annotationConfigApplicationContext.getBean("testController");
        System.out.println(testController);
    }
}
7.自动注入集合
当容器当中存在多个同类型的bean的时候,@Resource和@Autowired是可以注入集合的。
(1)自定义配置类
@Configuration
@ComponentScan("com.gzl.cn")
public class Myconfig {
    @Bean
    public TestService testService1(){
        TestService testService = new TestService();
        System.out.println(testService);
        return testService;
    }

    @Bean
    public TestService testService2(){
        TestService testService = new TestService();
        System.out.println(testService);
        return testService;
    }
}
(2)使用自动注入集合
@Controller
public class TestController {

    @Resource
    private List<TestService> testService;

    @Override
    public String toString() {
        return "TestController{" +
                "testService=" + testService +
                '}';
    }
}
运行结果:

通过@Qualifier+@Autowired 用来限定注入的Bean的名称。这种用法也是很好的理解,接下来我们介绍通过@Qualifier来筛选限定注入对象。
@Configuration
@ComponentScan("com.gzl.cn")
public class Myconfig {
    @Bean
    @Qualifier
    public TestService testService1(){
        TestService testService = new TestService();
        System.out.println(testService);
        return testService;
    }

    @Bean
    public TestService testService2(){
        TestService testService = new TestService();
        System.out.println(testService);
        return testService;
    }
}
@Controller
public class TestController {

    @Autowired
    @Qualifier
    private List<TestService> testService;

    @Override
    public String toString() {
        return "TestController{" +
                "testService=" + testService +
                '}';
    }
}
运行结果:

通过以上证明@Qualifier+@Autowired注入集合的时候,只会注入带有@Qualifier+@Bean加载的对象,在Ribbon的自动配置类中就使用了该注入方式,@LoadBalanced内部就是用了@Qualifier注解!他在拿到这些使用@LoadBalanced修饰的RestTemplate之后,对其通过拦截器进行拦截,将服务名替换成真正的ip,假如有多个服务实例,并对其实施负载均衡!
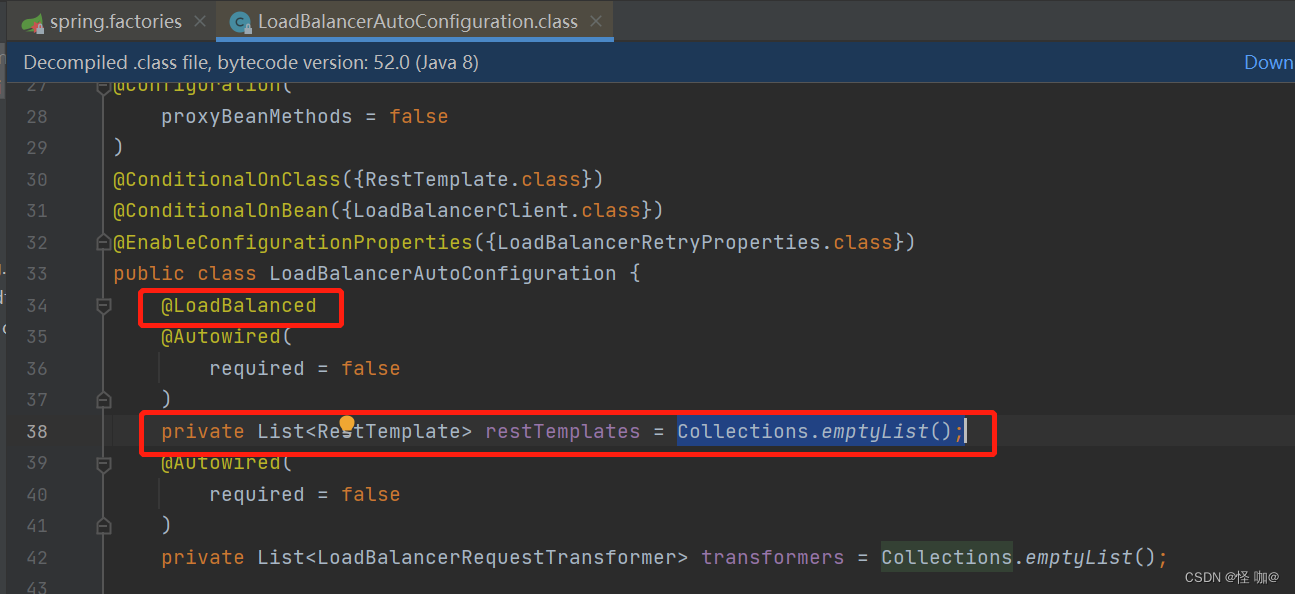
Collections.emptyList()的好处,他其实是由Collections当中static final修饰的一个空集合,假如我们要对list进行for循环,可以避免空指针,统一都使用static修饰的同时也可以减少内存开销;此List与常用的List不同,它是Collections类里的静态内部类,在继承AbstractList后并没有实现add()、remove()等方法,所以返回的List不能进行增加和删除元素操作。

8.整合 junit测试
上面我们想要测试容器对象情况,首先需要加载容器,常用的ClassPathXmlApplicationContext 和 AnnotationConfigApplicationContext ,除此外我们还可以基于junit来测试容器,使用如下:
(1)引入依赖
<dependency>
    <groupId>org.springframework</groupId>
    <artifactId>spring-test</artifactId>
    <version>5.3.23</version>
</dependency>
<dependency>
    <groupId>junit</groupId>
    <artifactId>junit</artifactId>
    <version>4.12</version>
    <scope>compile</scope>
</dependency>
(2)使用@RunWith 注解替换原有运行器,使用@ContextConfiguration 指定 spring 配置文件的位置,可以指定xml,也可以指定配置类!配置完之后直接可以使用@Autowired来注入对象,然后运行@Test修饰的方法即可测试!
@RunWith(SpringJUnit4ClassRunner.class)
//@ContextConfiguration(locations= {"classpath:bean.xml"})
@ContextConfiguration(classes = Myconfig.class)
public class ApplicationTest {

    @Autowired
    private TestController testController;

    @Test
    public void test1(){
        System.out.println(testController);
    }

}