十、CSRF 漏洞保护
简介
CSRF(Cross-Site Request Forgery 跨站请求伪造),也可称为一键式攻击(one-click-attack)通常缩写为 CSRF 或者 XSRF。CSRF 攻击是一种挟持用户在当前已登录的浏览器上,发送恶意请求的攻击方法。相对于 XSS 利用用户对指定网站的信任。CSRF则是利用网站对用户网页浏览器的信任。简单来说, CSRF 是致击者通过一些技术手段欺骗用户的浏览器,去访问一个用户曾经认证过的网站并执行恶意请求,例如发送邮件、发消息、甚至财产操作(如转账和购买商品)。由于客户端(浏览器)已经在该网站上认证过,所以该网站会认为是真正用户在操作而执行请求(实际上这个并非用户的本意)
- 举个简单的例子
假设 A 现在登录了某银行的网站准备完成一项转账操作,转账的链接如下:
https://bank.xxx.com/withdraw?account=A&amount=1000&for=B
可以看到。这个链接是想从 A 这个账户下转账1000元到 B 账户下。假设 A 没有注销登录该银行的网站,就在同一个浏览器新的选项卡中打开了一个危险网站,这个危险网站中有一幅图片,代码如下:
< img src=“https://bankxxx.com/withdraw?account=A&amount=1000&for=C”>
一旦用户打开了这个网站,这个图片链接中的请求就会自动发送出去。由于是同一个浏览器并且用户尚未注销登录,所以该请求会自动携带上对应的有效的Cookie信息,进而完成一次转账操作。这就是跨站请求伪造
10.1 CSRF 攻击演示
说明:模拟场景,用户A给用户B转账,在用户A未注销之前,有人通过用户A已经认证的信息,对其进行转账给用户C的操作
搭建:
- spring-security-11-csrf-bank 服务进行正常银行操作(8080端口)
- spring-security-11-csrf-attack 用于模拟 csrf 跨站请求(8081端口)
攻击演示
1) spring-security-11-csrf-bank 模块
- 创建模块 spring-security-11-csrf-bank,导入依赖
pom.xml
<dependencies>
    <!--web-->
    <dependency>
        <groupId>org.springframework.boot</groupId>
        <artifactId>spring-boot-starter-security</artifactId>
    </dependency>
    <!--security-->
    <dependency>
        <groupId>org.springframework.boot</groupId>
        <artifactId>spring-boot-starter-web</artifactId>
    </dependency>
</dependencies>
- 自定义 Security 配置
- WebSecurityConfigurerAdapter
package com.vinjcent.config;

import org.springframework.context.annotation.Bean;
import org.springframework.context.annotation.Configuration;
import org.springframework.security.config.annotation.authentication.builders.AuthenticationManagerBuilder;
import org.springframework.security.config.annotation.web.builders.HttpSecurity;
import org.springframework.security.config.annotation.web.configuration.WebSecurityConfigurerAdapter;
import org.springframework.security.core.userdetails.User;
import org.springframework.security.core.userdetails.UserDetailsService;
import org.springframework.security.provisioning.InMemoryUserDetailsManager;

@Configuration
public class WebSecurityConfiguration extends WebSecurityConfigurerAdapter {


    // 自定义用户认证数据源(内存方式)
    @Bean
    public UserDetailsService userDetailsService() {
        InMemoryUserDetailsManager inMemoryUserDetailsManager = new InMemoryUserDetailsManager();
        inMemoryUserDetailsManager.createUser(User.withUsername("root").password("{noop}123").roles("admin").build());
        return inMemoryUserDetailsManager;
    }

    // 自定义数据源需要对外暴露
    @Override
    protected void configure(AuthenticationManagerBuilder auth) throws Exception {
        auth.userDetailsService(userDetailsService());
    }

    // http 认证配置
    @Override
    protected void configure(HttpSecurity http) throws Exception {

        http.authorizeRequests()
                .anyRequest()
                .authenticated()
                .and()
                .formLogin()
                .and()
                .csrf()
                .disable();     // 关闭 CSRF 跨站请求保护
    }
}
- 定义测试controller接口
package com.vinjcent.controller;

import org.springframework.web.bind.annotation.GetMapping;
import org.springframework.web.bind.annotation.PostMapping;
import org.springframework.web.bind.annotation.RestController;

@RestController
public class HelloController {

    @GetMapping("/index")
    public String toIndex() {
        return "index ok";
    }

    @PostMapping("/withdraw")
    public String withdraw() {
        System.out.println("第一次转账操作");
        return "执行第一次转账操作";
    }
}
2) spring-security-11-csrf-attack 模块
- 创建模块 spring-security-11-csrf-attack,导入依赖
pom.xml
<dependencies>
    <!--web-->
    <dependency>
        <groupId>org.springframework.boot</groupId>
        <artifactId>spring-boot-starter-security</artifactId>
    </dependency>
</dependencies>
- 编写index.html
<!DOCTYPE html>
<html lang="en">
<head>
    <meta charset="UTF-8">
    <title>模拟 CSRF 跨站请求伪造</title>
</head>
<body>

<form action="http://localhost:8080/withdraw" method="post">
    <input type="hidden" name="name" value="A">
    <input type="hidden" name="money" value="B">
    <input type="submit" value="提交">
</form>

</body>
</html>
3)测试
- 先在 spring-security-11-csrf-bank 进行登录
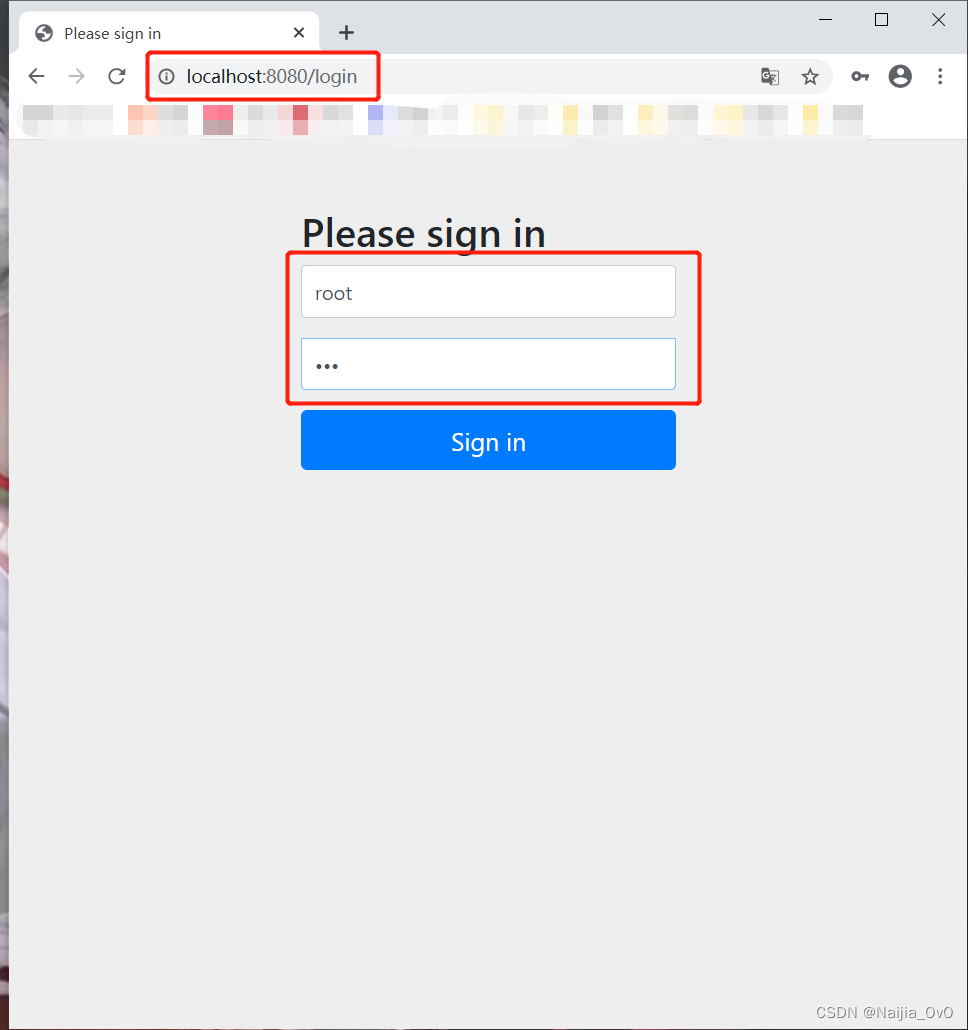
- 然后再访问 spring-security-11-csrf-attack 主页进行请求
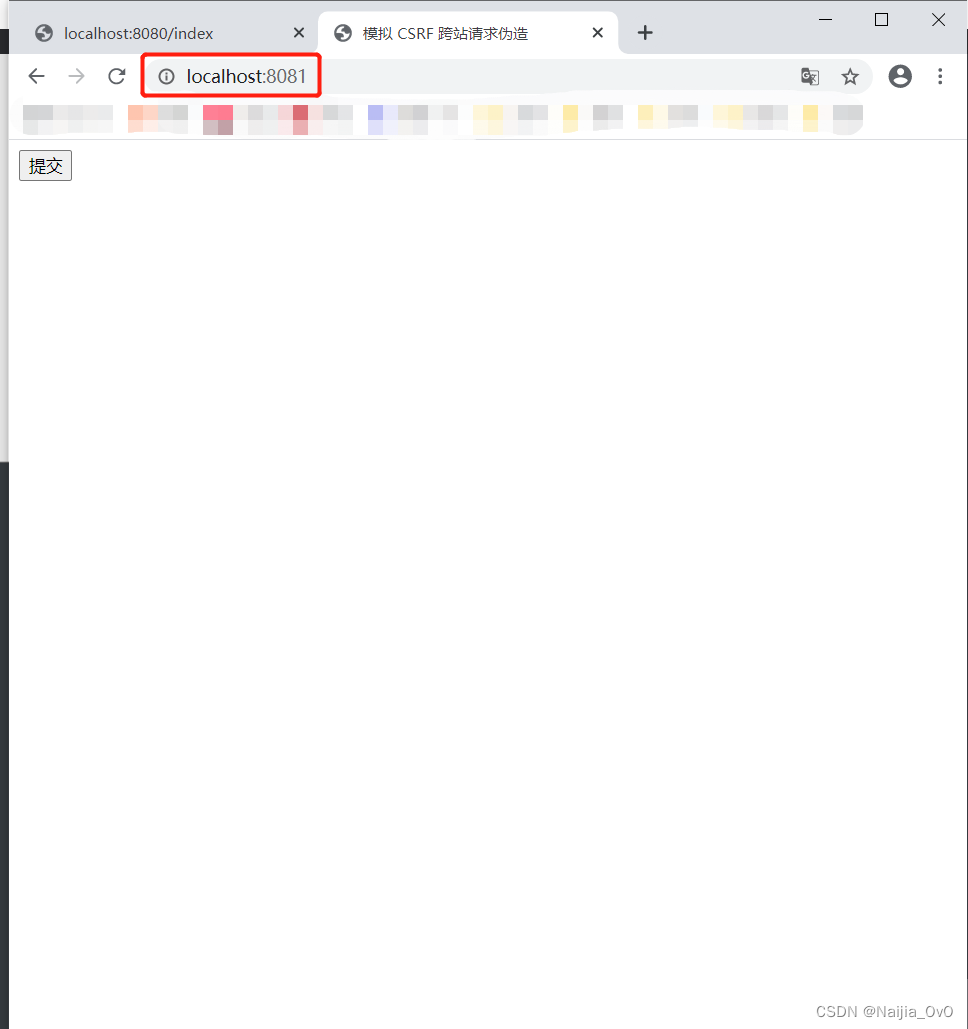
- 可以看到从8081进行了一次对8080的请求转账
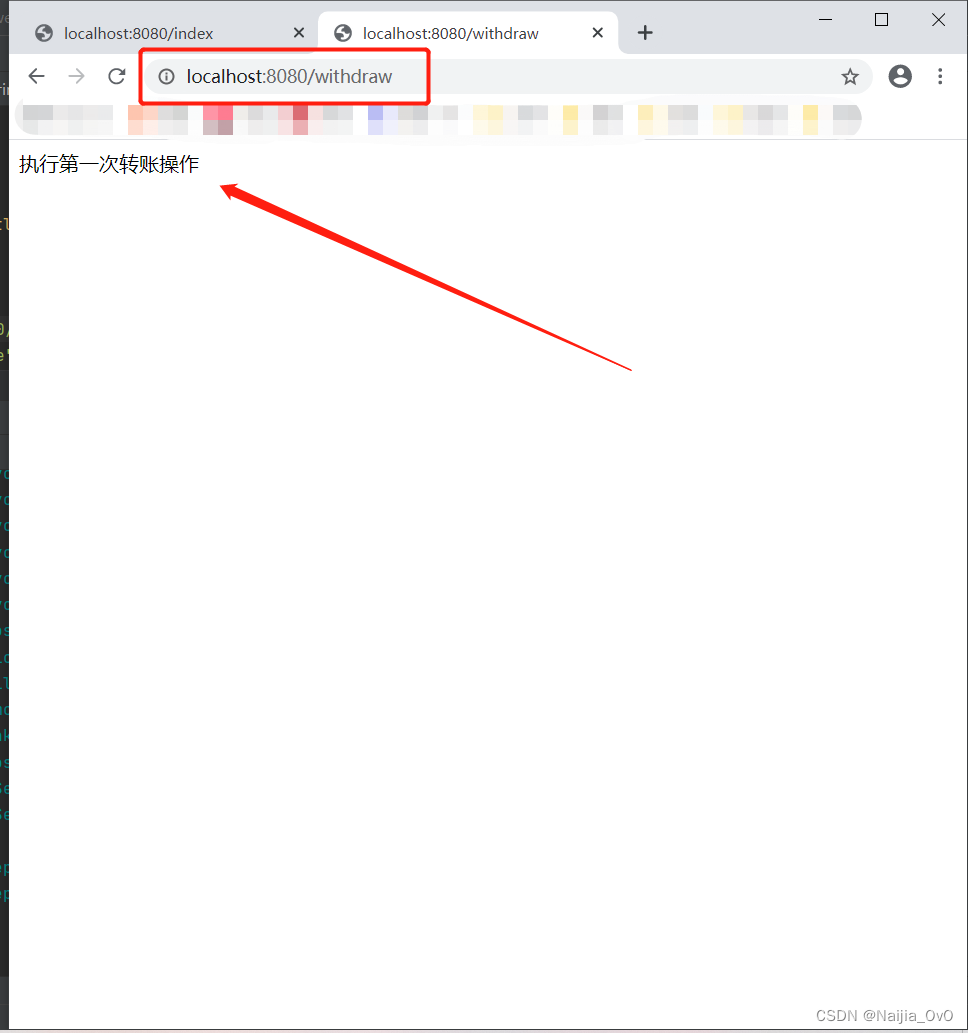

小结
可以发现,当用户在8080正常认证身份之后,假如另外一台服务知道8080服务的转账接口,那么就会根据这个接口去操作用户的信息,这回给我们用户带来数据泄露的问题,因为都是在当前网站的 Cookie 信息识别用户
10.2 CSRF 防御
CSRF 攻击的根源在于浏览器默认的身份验证机制(自动携带当前网站的Cookie信息)。这种机制虽然可以保证请求是来自用户的某个浏览器,但是无法确保这请求是用户授权发送。攻击者和用户发送的请求一模一样,这意味着我们没有办法去直接拒绝这里的某一个请求。如果能在合法清求中额外携带一个攻击者无法获取的参数,就可以成功区分出两种不同的请求,进而直接拒绝掉恶意请求。在 SpringSecurity 中就提供了这种机制来防御 CSRF 攻击,这种机制我们称之为令牌同步模式
令牌同步模式
这是目前主流的 CSRF 攻击防御方案。具体的操作方式就是在每一个 HTTP 请求中,除了默认自动携带的 Cookie 参数之外,再提供一个安全的、随机生成的字符串,我们称之为 CSRF 令牌。这个 CSRF 令牌由服务端生成,生成后在 HttpSession 中保存一份。当前端请求到达后,将请求携带的 CSRF 令牌信息和 服务端中保存的令牌进行对比,如果两者不相等,则拒绝掉该 HTTP 请求
【注】考虑到有一些外部站点链接到我们的网站,所以我们要求请求是幂等的,这样对于 HEAD、OPTIONS、TRACE等方法就没有必要使用 CSRF 令牌了,强行使用可能会导致令牌泄露
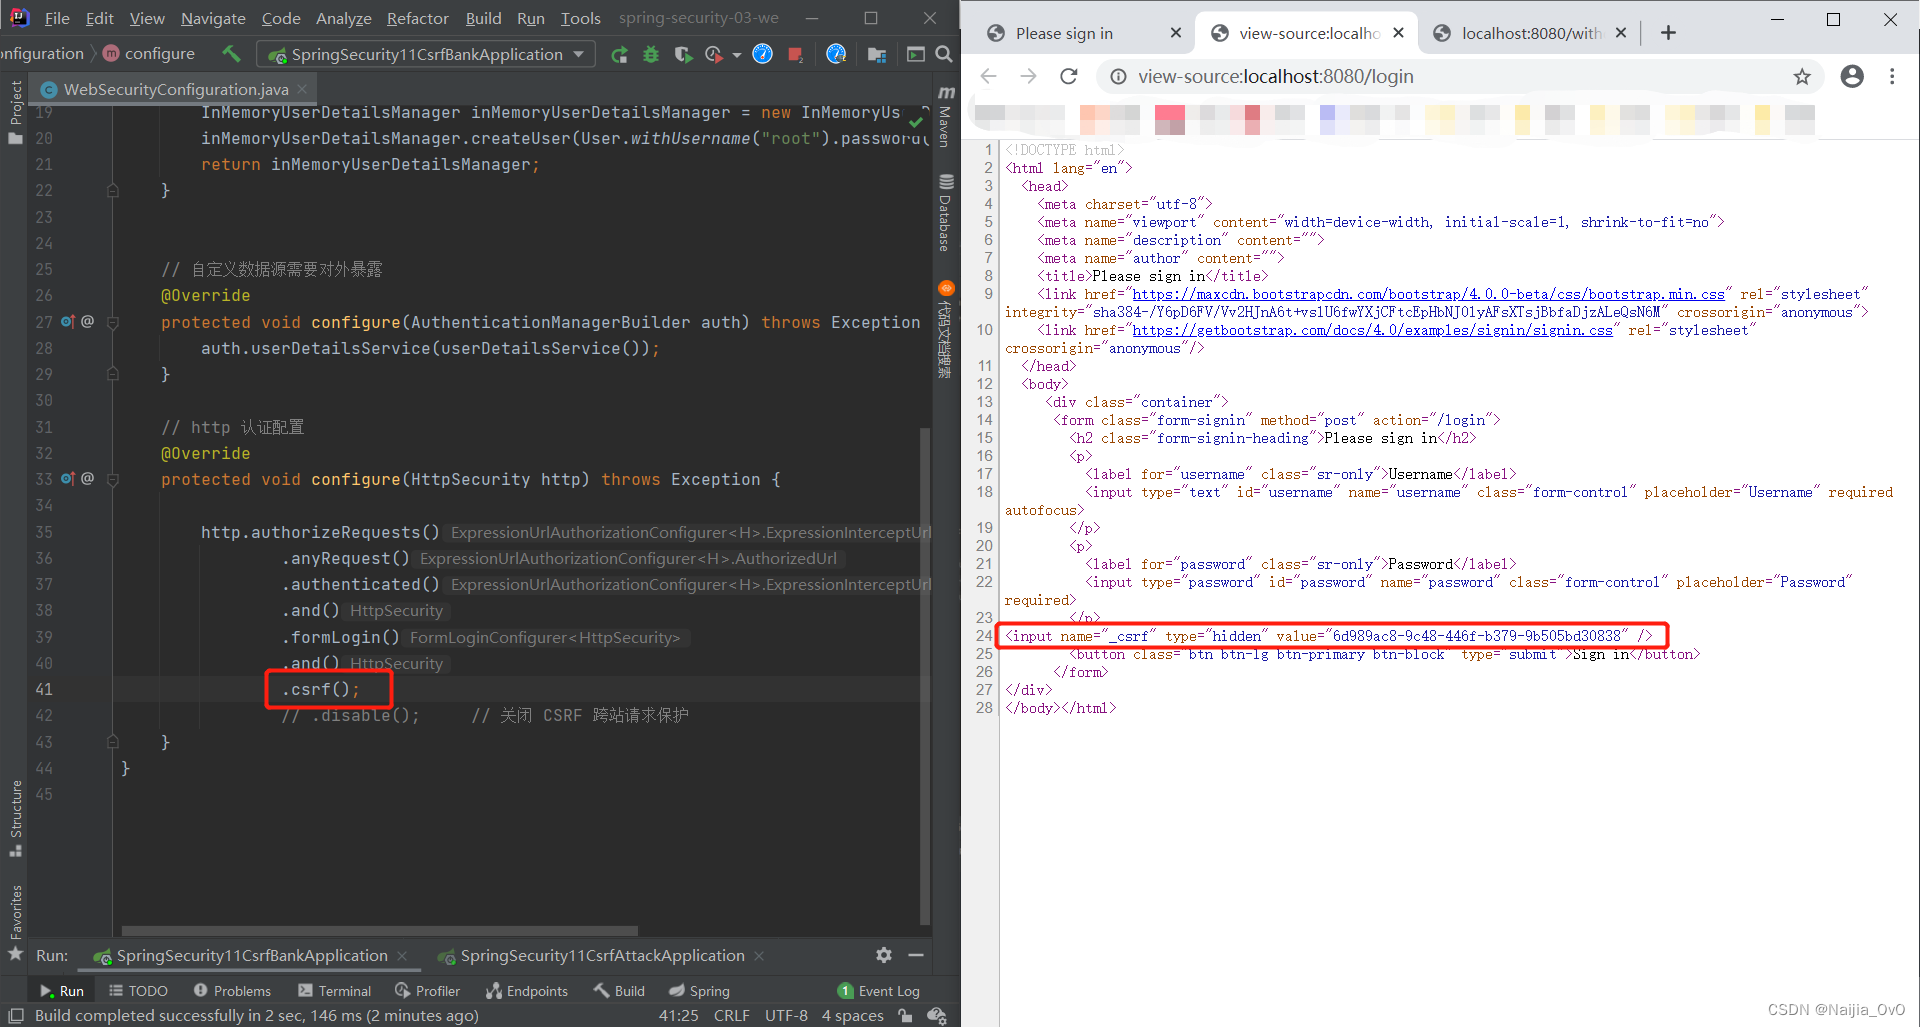
- 关闭 CSRF 请求保护的登录页面
在关闭 CSRF 请求保护之后,登陆页面是不会携带一个 csrf 的 token 令牌的

- 开启 CSRF 请求保护的登录页面
在开启 CSRF 请求保护之后,登陆页面携带了一个 csrf 的 token 令牌的,并且再次使用8081服务请求,会直接拦截

10.3 传统 web 开发使用 CSRF
开启 CSRF 防御后会自动在提交的表单加入如下代码,如果不能自动加入,需要开启之后手动加入如下代码,并随着请求提交。获取服务端令牌方式如下
<input th:name="${_csrf.parameterName}" type="hidden" th:value="{_csrf.token}" />
环境搭建
- 依赖
pom.xml
<!--web-->
<dependency>
    <groupId>org.springframework.boot</groupId>
    <artifactId>spring-boot-starter-web</artifactId>
</dependency>
<!--security-->
<dependency>
    <groupId>org.springframework.boot</groupId>
    <artifactId>spring-boot-starter-security</artifactId>
</dependency>
<!--thymeleaf-->
<dependency>
    <groupId>org.springframework.boot</groupId>
    <artifactId>spring-boot-starter-thymeleaf</artifactId>
</dependency>
<!--thymeleaf-security-->
<dependency>
    <groupId>org.thymeleaf.extras</groupId>
    <artifactId>thymeleaf-extras-springsecurity5</artifactId>
    <version>3.0.4.RELEASE</version>
</dependency>
application.yml配置文件
server:
  port: 8080

spring:
  thymeleaf:
    mode: HTML
    suffix: .html
    prefix: classpath:/templates/
    cache: false
- 开发测试 controller
package com.vinjcent.controller;

import org.springframework.stereotype.Controller;
import org.springframework.web.bind.annotation.PostMapping;
import org.springframework.web.bind.annotation.RequestMapping;
import org.springframework.web.bind.annotation.ResponseBody;

@Controller
public class HelloController {

    @PostMapping("/hello")
    @ResponseBody
    public String hello() {
        return "hello spring security!";
    }


    @RequestMapping("/toIndex")
    public String toIndex() {
        return "index";
    }
}
- 创建 index.html
<!DOCTYPE html>
<html lang="en" xmlns:th="http://www.thymeleaf.org"
      xmlns:sec="http://www.thymeleaf.org/extras/spring-security">
<head>
    <meta charset="UTF-8">
    <title>测试 CSRF 防御(传统web方式)</title>
</head>
<body>
<form th:action="@{/hello}" method="post">
    <input type="submit" value="提交">
</form>
</body>
</html>
- Security 配置
package com.vinjcent.config;

import org.springframework.context.annotation.Configuration;
import org.springframework.security.config.annotation.web.builders.HttpSecurity;
import org.springframework.security.config.annotation.web.configuration.WebSecurityConfigurerAdapter;

@Configuration
public class WebSecurityConfiguration extends WebSecurityConfigurerAdapter {

    @Override
    protected void configure(HttpSecurity http) throws Exception {
        http.authorizeRequests().anyRequest()
                .authenticated()
                .and().formLogin()
                .and().csrf();	// 开启 csrf 跨域请求保护
    }
}
- 测试
- 在没有任何配置情况下,security 配置开启了 csrf 请求保护,传统的 web 开发会自动在表单中添加一个表单项
_csrf,如图所示

10.4 前后端分离使用 CSRF
前后端分离时,只需要将生成 csrf 放入 Cookie 中,并在请求时获取 Cookie 中令牌信息进行提交即可
模拟前后端分离
在已有的前后端分离认证中,修改 Security 配置,核心代码如下
package com.vinjcent.config.security;

import com.vinjcent.filter.LoginFilter;
import com.vinjcent.handler.DivAuthenticationFailureHandler;
import com.vinjcent.handler.DivAuthenticationSuccessHandler;
import org.springframework.context.annotation.Bean;
import org.springframework.context.annotation.Configuration;
import org.springframework.security.authentication.AuthenticationManager;
import org.springframework.security.config.annotation.authentication.builders.AuthenticationManagerBuilder;
import org.springframework.security.config.annotation.web.builders.HttpSecurity;
import org.springframework.security.config.annotation.web.configuration.WebSecurityConfigurerAdapter;
import org.springframework.security.core.userdetails.User;
import org.springframework.security.core.userdetails.UserDetailsService;
import org.springframework.security.provisioning.InMemoryUserDetailsManager;
import org.springframework.security.web.authentication.UsernamePasswordAuthenticationFilter;
import org.springframework.security.web.csrf.CookieCsrfTokenRepository;

@Configuration
public class WebSecurityConfiguration extends WebSecurityConfigurerAdapter {

    // 使用内存数据源
    @Bean
    public UserDetailsService userDetailsService() {
        InMemoryUserDetailsManager inMemoryUserDetailsManager = new InMemoryUserDetailsManager();
        inMemoryUserDetailsManager.createUser(User.withUsername("root").password("{noop}123").roles("admin").build());
        return inMemoryUserDetailsManager;
    }

    // 配置认证管理者的认证数据源
    @Override
    protected void configure(AuthenticationManagerBuilder auth) throws Exception {
        auth.userDetailsService(userDetailsService());
    }

    // 暴露自定义认证数据源
    @Override
    @Bean
    public AuthenticationManager authenticationManagerBean() throws Exception {
        return super.authenticationManagerBean();
    }

    // 创建自定义的LoginFilter对象
    @Bean
    public LoginFilter loginFilter() throws Exception {

        LoginFilter loginFilter = new LoginFilter();
        loginFilter.setFilterProcessesUrl("/login");
        loginFilter.setUsernameParameter("uname");
        loginFilter.setPasswordParameter("passwd");
        loginFilter.setAuthenticationManager(authenticationManager());
        loginFilter.setAuthenticationSuccessHandler(new DivAuthenticationSuccessHandler());
        loginFilter.setAuthenticationFailureHandler(new DivAuthenticationFailureHandler());
        return loginFilter;
    }

    // 请求拦截配置
    @Override
    protected void configure(HttpSecurity http) throws Exception {
        http.authorizeRequests().anyRequest()
                .authenticated()
                .and()
                .formLogin()
                .and()
                .csrf()
                // .disable();
                .csrfTokenRepository(CookieCsrfTokenRepository.withHttpOnlyFalse());    // 将令牌保存到 cookie 中,允许 cookie 前端获取

        // 替换原始 UsernamePasswordAuthenticationFilter 过滤器
        http.addFilterAt(loginFilter(), UsernamePasswordAuthenticationFilter.class);
    }
}
测试
- 第一次登录,登陆失败,原因是需要一个 csrf 的 token 令牌
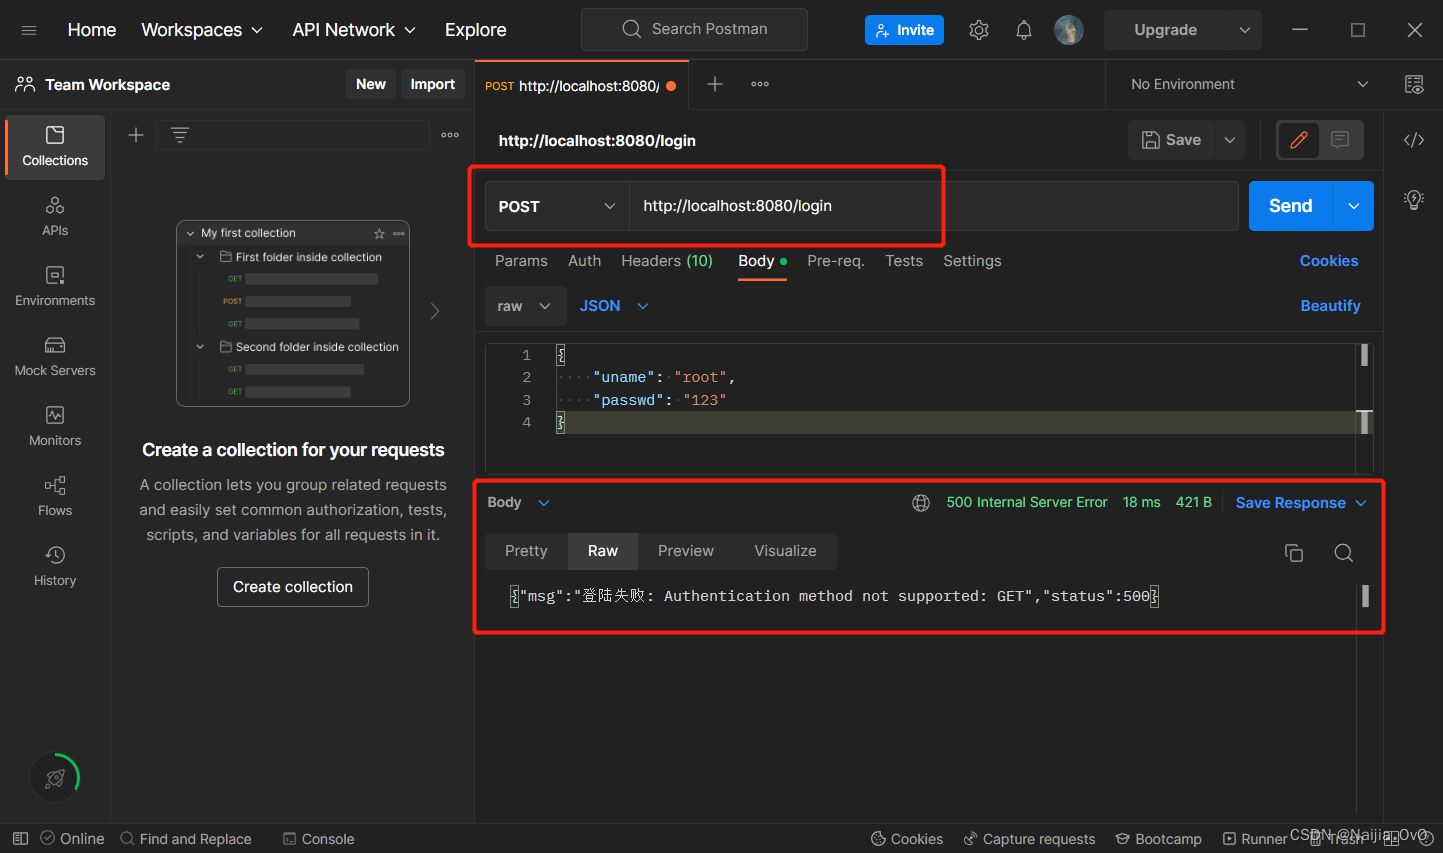
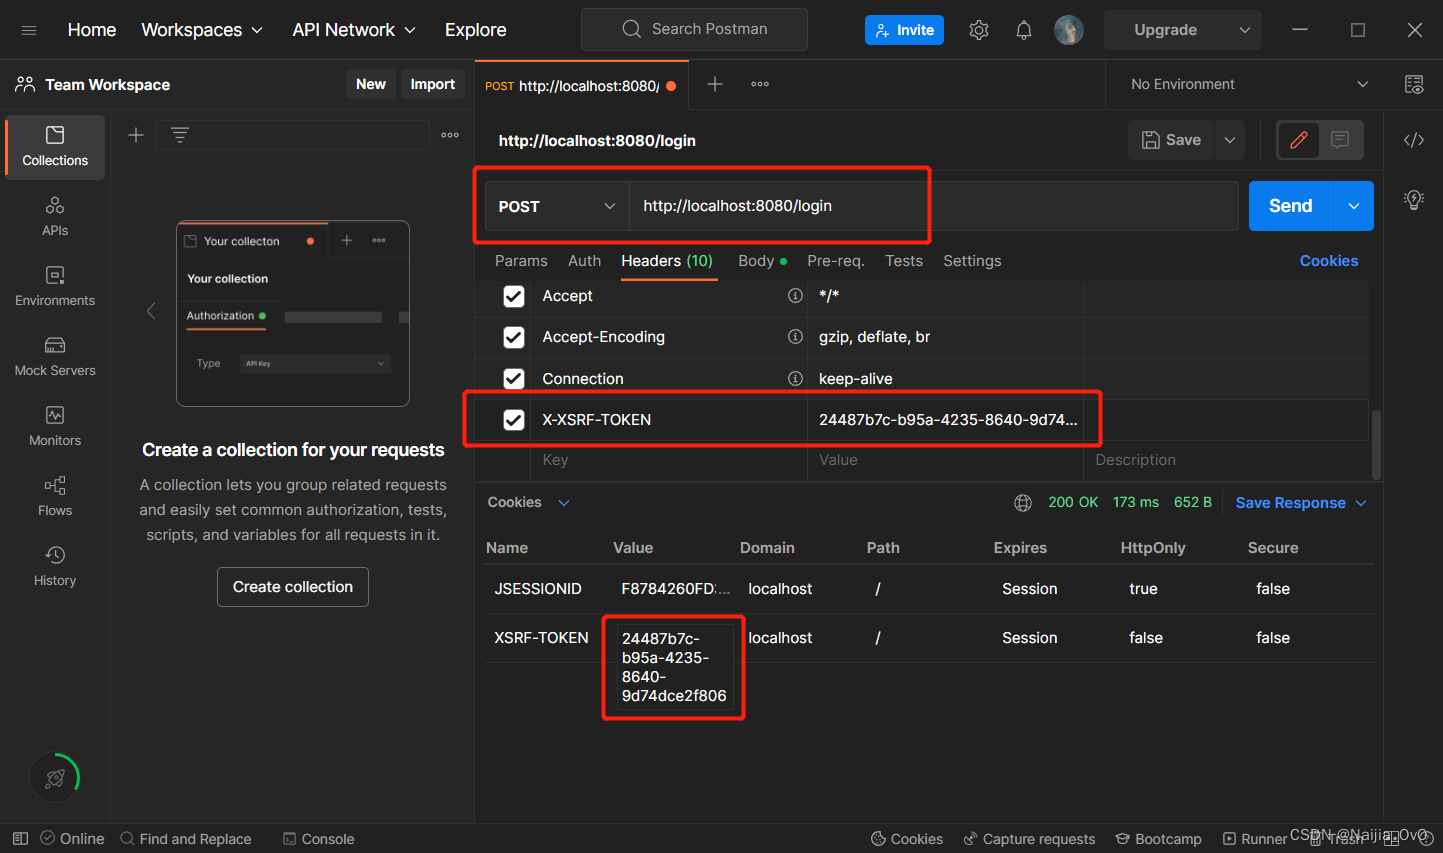
- 同时,在 Cookie 中生成了
XSRF-TOKEN的key-value,如下图所示
解析 csrf 认证流程
- 进行 Debug 调式
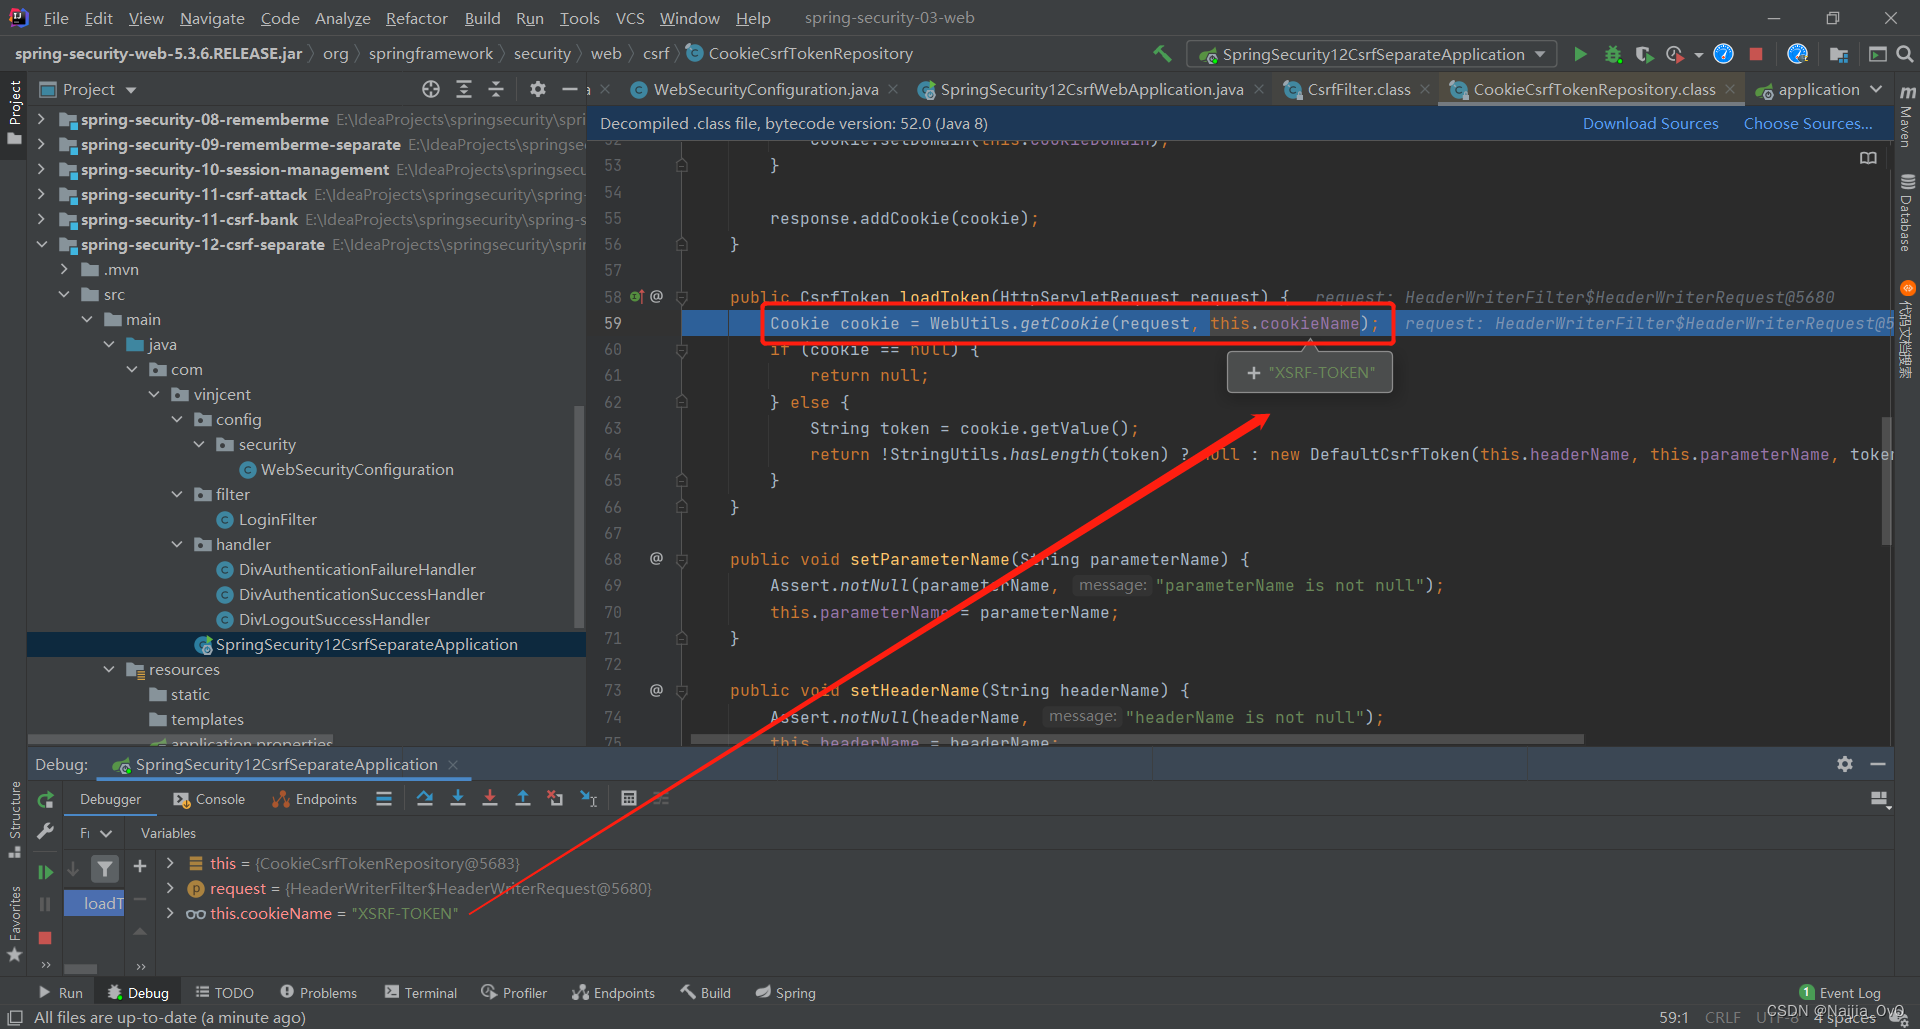
- 可以看到有些请求类型不需要 token
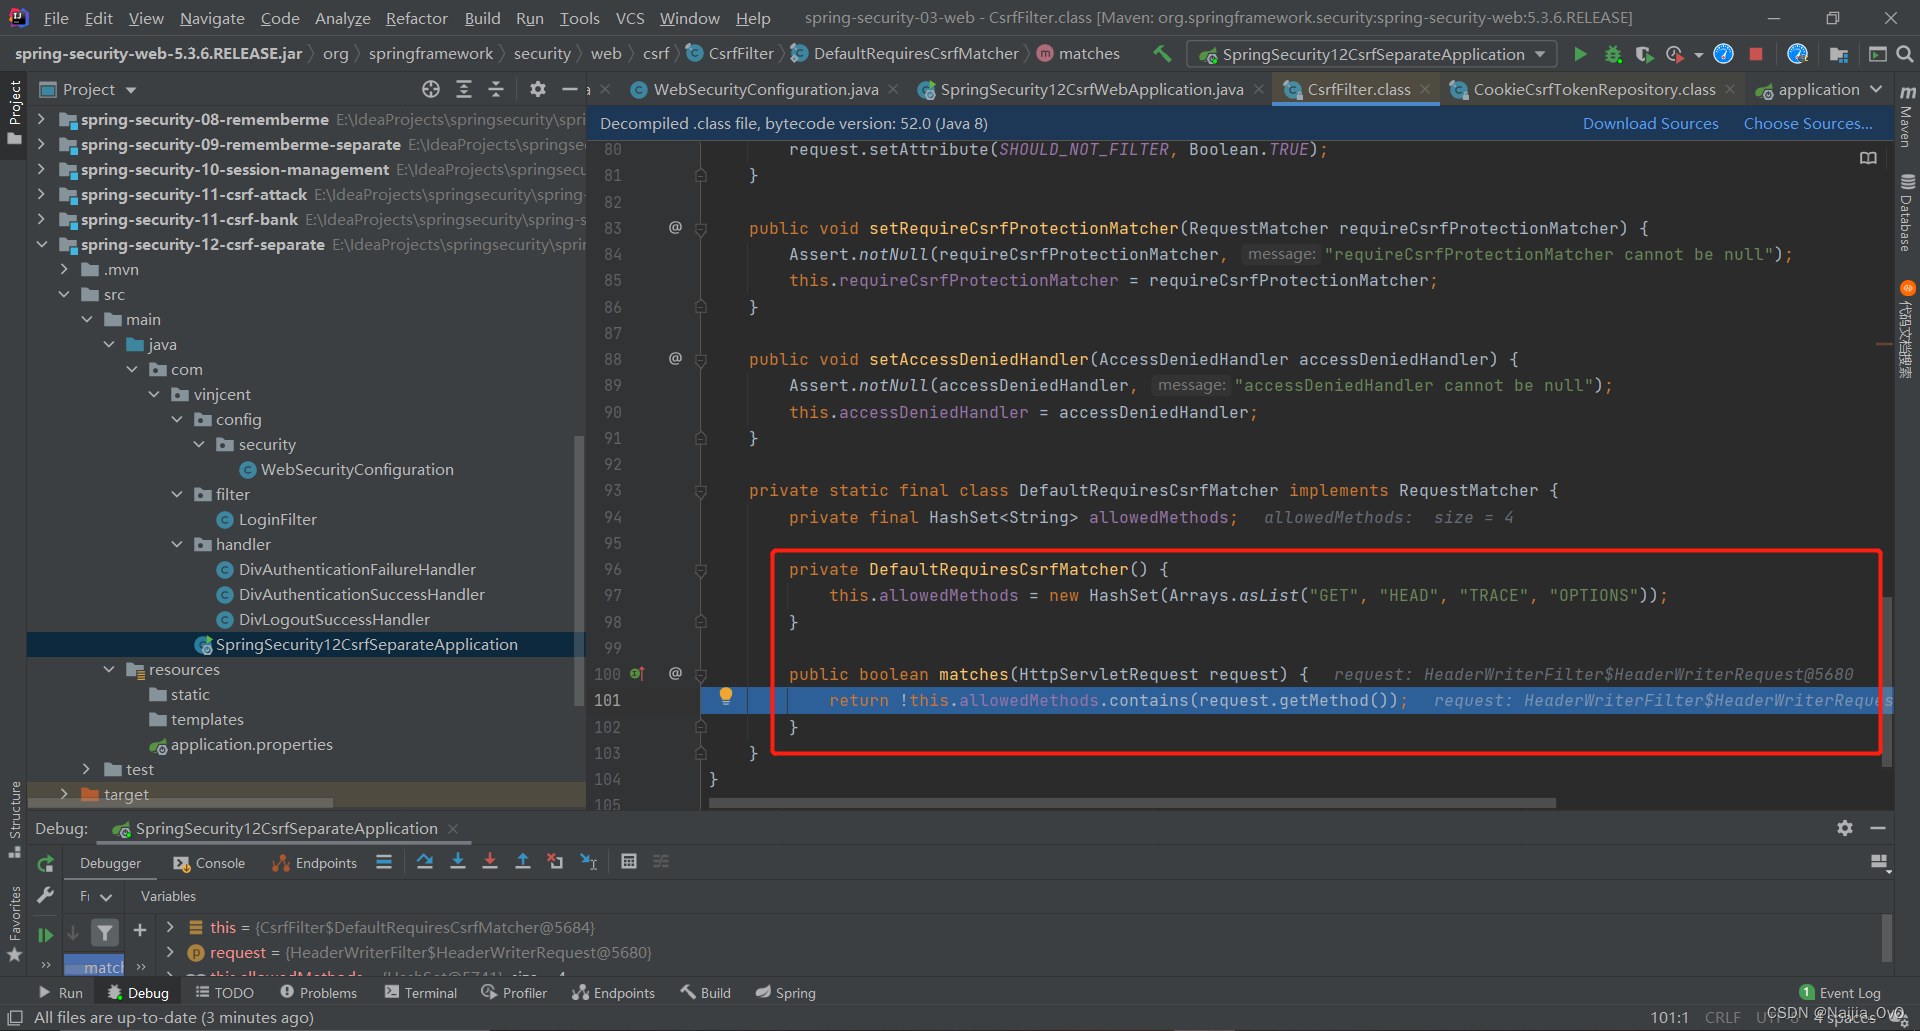
- 需要先获取请求头,默认值为
X-XSRF-TOKEN
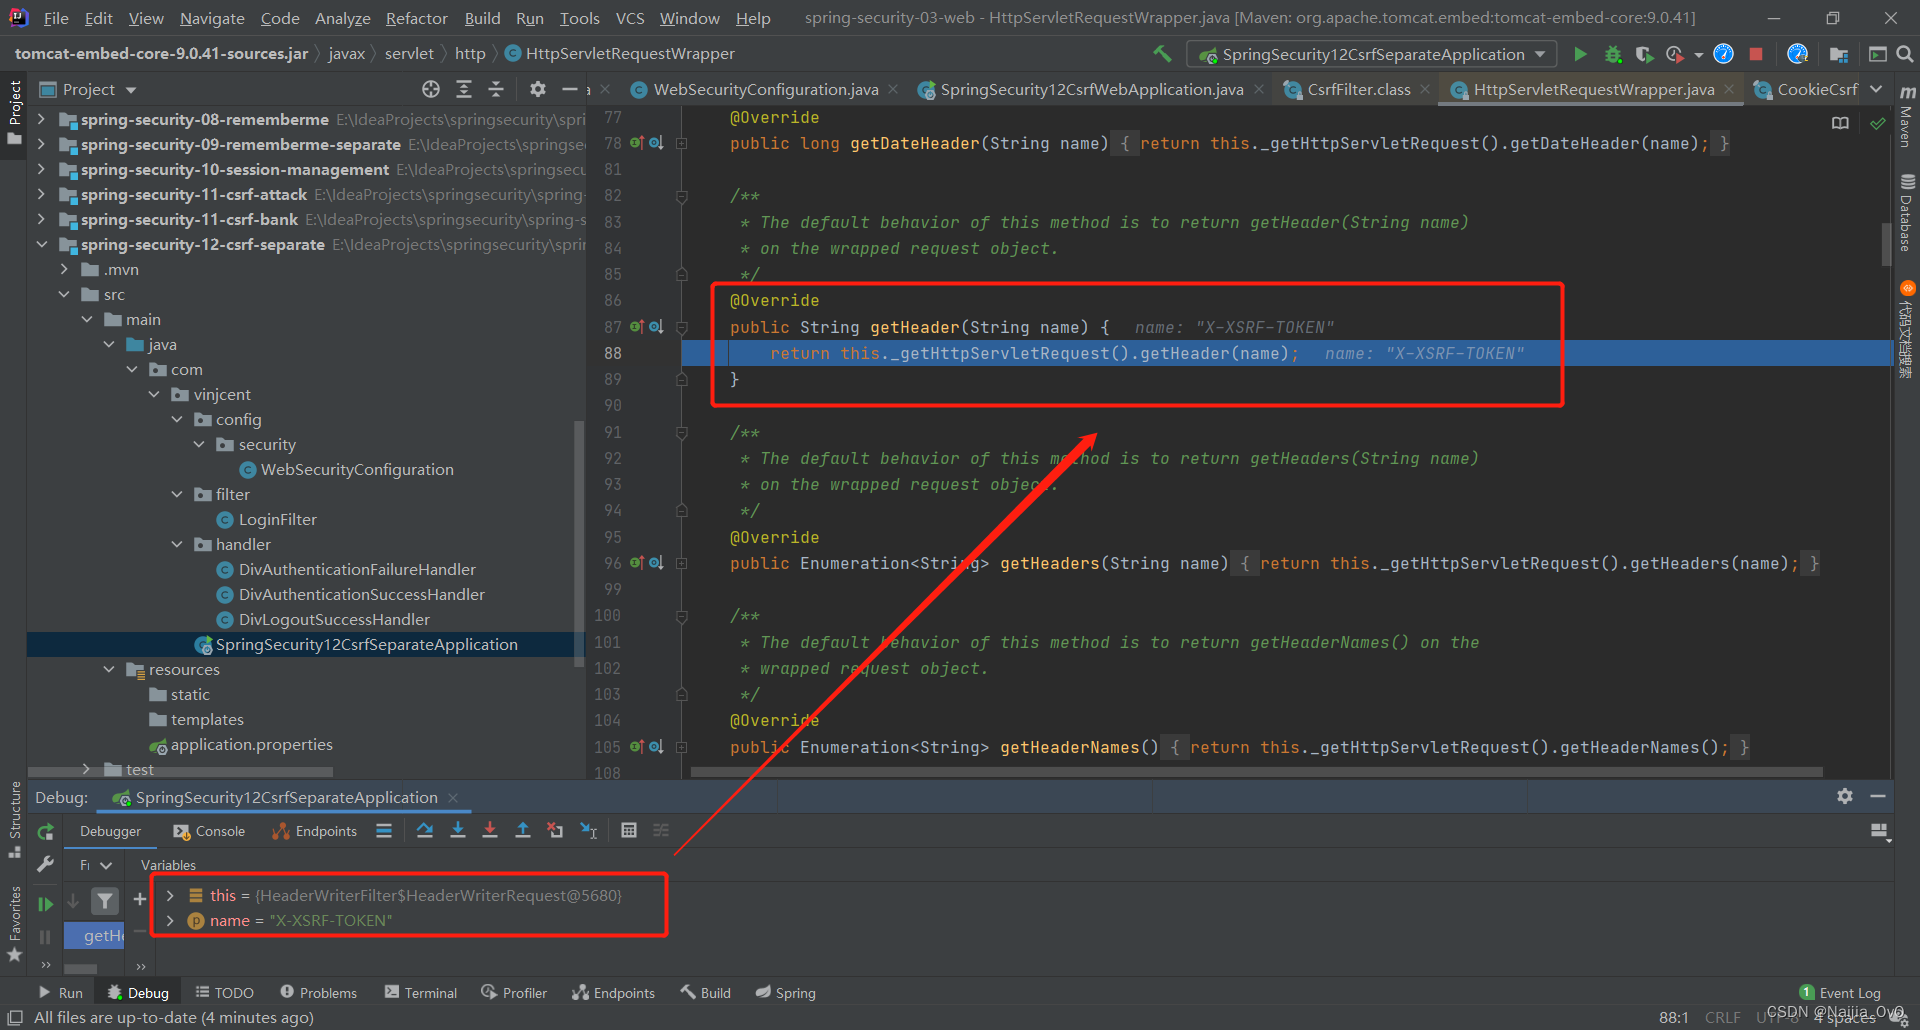
- 首先会去请求头
Header中获取,如果获取不到,就会去请求参数(_csrf)中获取
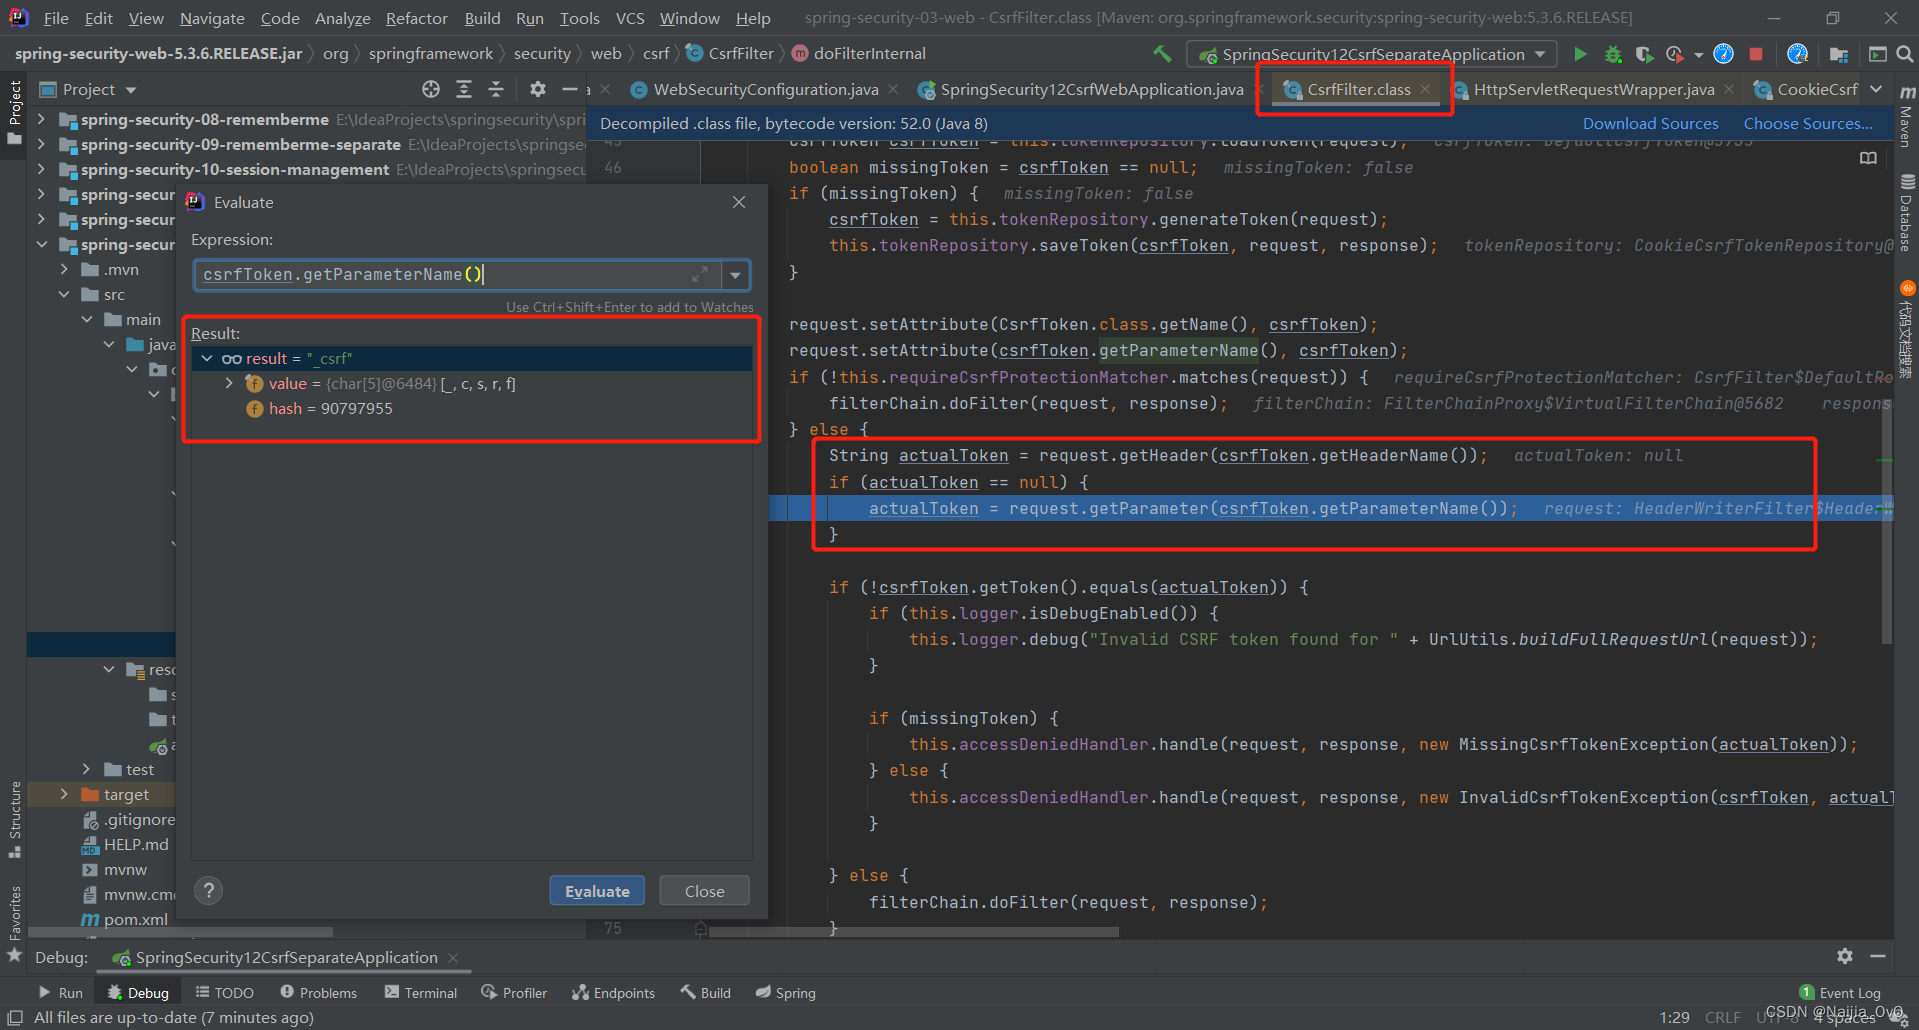
- 最后将实际的 token 与当前的 token 进行比对
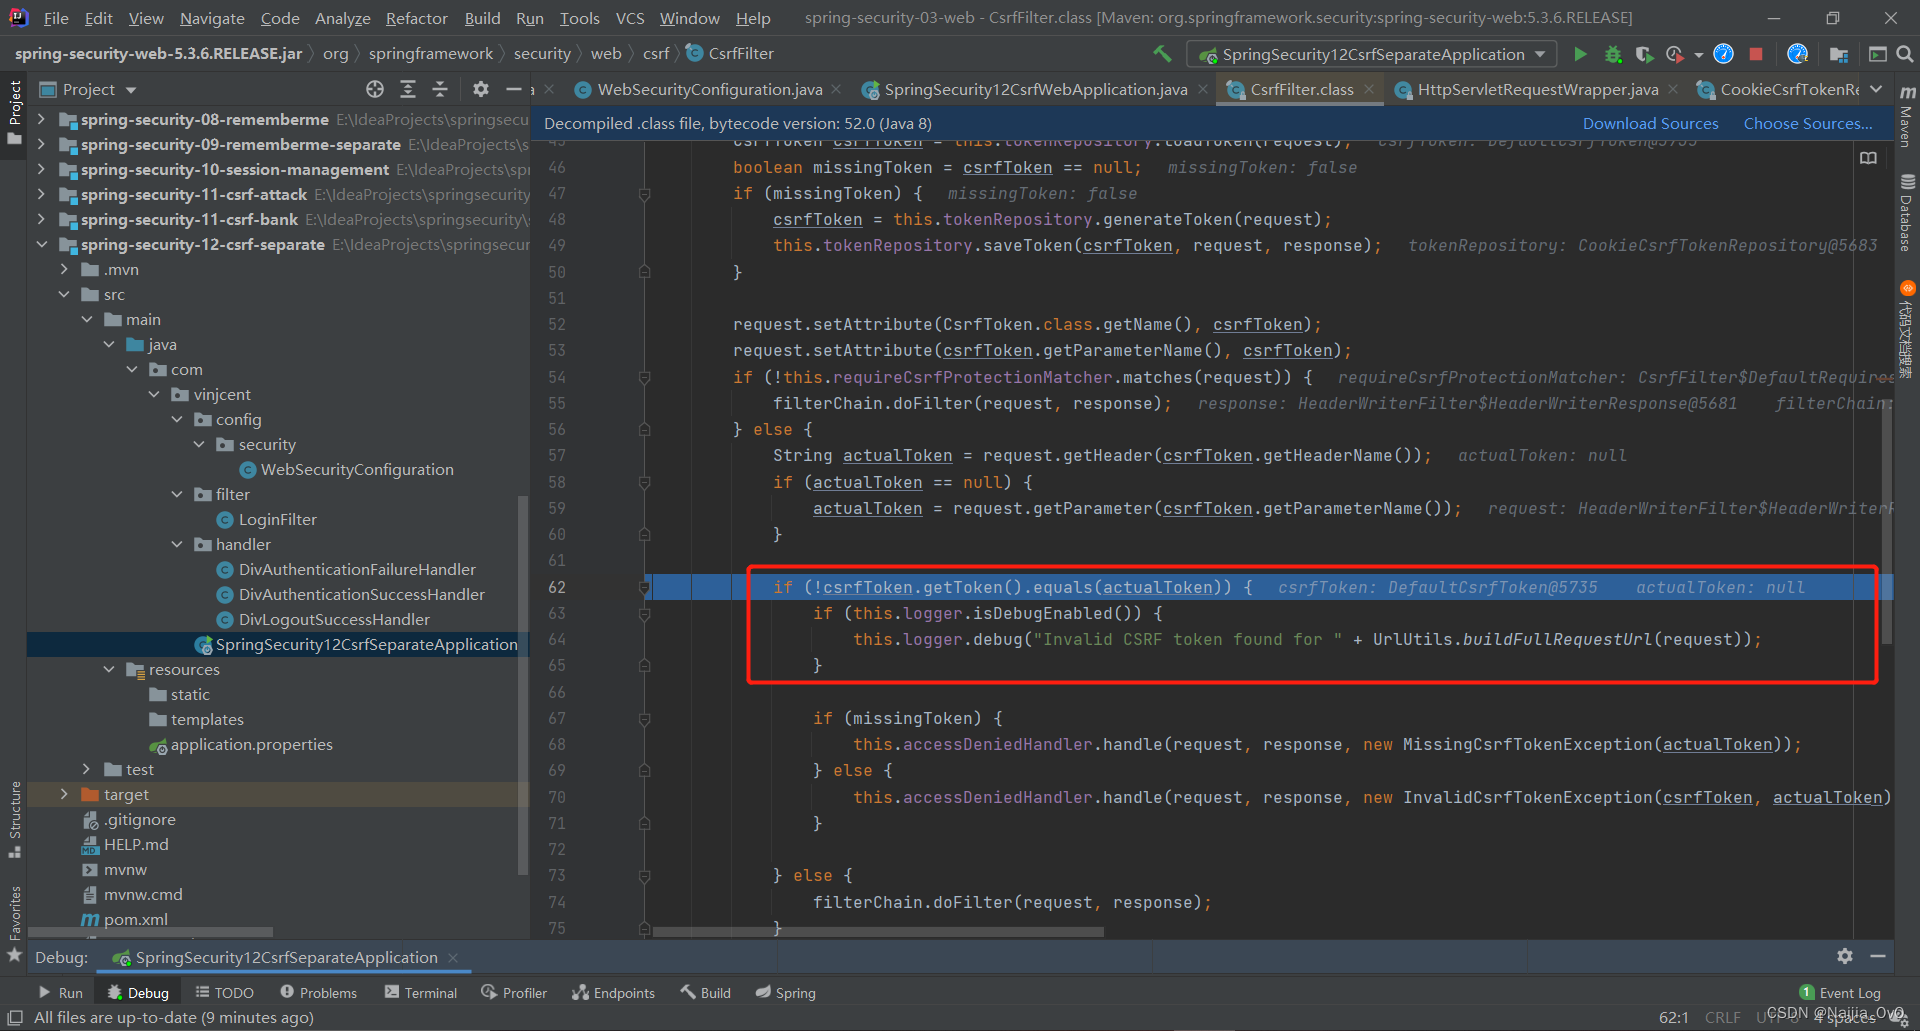
- 最后发现,如果需要实现前后端分离的 csrf 功能,要么在请求参数中添加一个名为
_csrf的参数或请求头 header 中携带一个X-XSRF-TOKEN键值对key-value
- 认证成功展示